1
SUGGESTED REPAIR TOOLS
The following tools must be available to properly repair
Viking RL pumps. These tools are in addition to standard
mechanics’ tools such as open end wrenches, pliers, screw
drivers, etc. Most items can be obtained from an industrial
supply house.
1.
2.
3.
4.
5.
6.
7.
8.
Soft headed hammer
Allen wrenches
Depth micrometer (0-1” Range)
Bearing Locknut Spanner Wrench (Source: #472
J.H. Williams & Co. or equal)
Brass bar or wood block
Arbor Press
3/4” NC X 6” capscrews (2)
Bearing Puller PUMP DISASSEMBLY
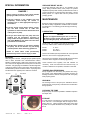
DANGER !
Before opening any Viking pump liquid chamber
(pumping chamber, reservoir, etc.) be sure:
1.
That any pressure in the chamber has been
completely vented through the suction or
discharge lines or other appropriate openings or
connections.
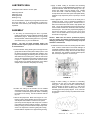
figure 3
4.Straighten out the bearing lockwasher tab on both shafts
(See figure 4). Place a wooden block or brass bar in
between the lobes to block rotation of the top shaft.
Use the spanner wrench (Suggested Repair Tools # 5)
to loosen the locknut. Remove the wooden block and
insert on the opposite side to restrict movement of the
other shaft. Remove the second locknut. Remove both
of the lockwashers.
Bearing Lockwasher Tabs
2.That the driving means (motor, turbine, engine,
etc.) has been “locked out” or made nonoperational so that it cannot be started while work
is being done on pump.
3.That you know what liquid the pump has been
handling and the precautions necessary to
safely handle the liquid. Obtain a material safety
data sheet (MSDS) for the liquid to be sure these
precautions are understood.
4.That the timing gearbox to cool before handling
the pump. The oil will become very hot during
normal operation. Allow the timing gearbox oil.
Failure to follow above listed precautionary
measures may result in serious injury or death.
1.Turn the centering tabs on the seals 90° (See Figure 8).
2.Remove the (18) nuts holding the head with a 15/16”
wrench. Carefully slide head off of studs. If head does
not slide freely, insert a dowel pin approx. 1” long into the
¾” tapped holes (one at the top and bottom) then thread
in the ¾” X 6” capscrews (suggested repair tools #2).
CAUTION: The head weighs 125 pounds and will require
two people to handle. See Figure 3.
3/8” Jackscrew Holes
figure 4
5.Slide the timing gears off the shafts. If the timing gears
do not come off easily, use (3) 1/2“ capscrews as
jackscrews or a bearing puller (See Figure 4).
6.Remove the keys under the gears. (These are special
size keys – do not lose them - standard 5/8” key stock
should not be used)
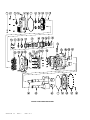
7.Remove the (4) 1/8”allen head pipe plugs (items #29) on
the sides of the bracket. Loosen the (4) 5/16” set screws
(items #28) that lock the bearing housings in place by 3
full turns.
8.Use the assembly tool shown in Figure 5 to rotate and
remove the bearing housing. The bearing housing
should come out as an assembly. If it does not, remove
the (6) allen head capscrews (Item #13) then the end
cap (Item #17). Slide the outer spacer off the shaft.
3.Drain oil in the gear case by removing the pipe plug (item
#1). Remove (6) ½ “ capscrews then carefully slide gear
case off driver shaft. There is one dowel pin that might
restrict removal.
SECTION TSM
270
ISSUE
F
PAGE 5 OF 10