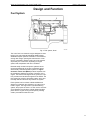
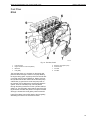
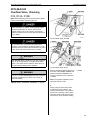
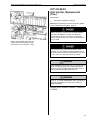
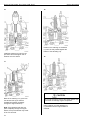
1
Service Manual
Trucks
Group
230–600
Fuel System
D12, D12A, D12B, D12C
PV776-TSP142867
Foreword
The descriptions and service procedures contained in this manual are based on designs and methods studies carried out up to August 2000.
The products are under continuous development. Vehicles and components produced
after the above date may therefore have different specifications and repair methods.
When this is believed to have a significant bearing on this manual, supplementary service bulletins will be issued to cover the changes.
The new edition of this manual will update the changes.
In service procedures where the title incorporates an operation number, this is a reference to an S.R.T. (Standard Repair Time).
Service procedures which do not include an operation number in the title are for general information and no reference is made to an S.R.T.
The following levels of observations, cautions and warnings are used in this Service
Documentation:
Note: Indicates a procedure, practice, or condition that must be followed in order to
have the vehicle or component function in the manner intended.
Caution: Indicates an unsafe practice where damage to the product could occur.
Warning: Indicates an unsafe practice where personal injury or severe damage to the
product could occur.
Danger: Indicates an unsafe practice where serious personal injury or death could occur.
Volvo Trucks North America, Inc.
Greensboro, NC USA
Order number: PV776-TSP142867
© 2000 Volvo Trucks North America, Inc., Greensboro, NC USA
All rights reserved. No part of this publication may be reproduced, stored in
retrieval system, or transmitted in any forms by any means, electronic, mechanical, photocopying, recording or otherwise, without the prior written
permission of Volvo Trucks North America, Inc..
Contents
General .................................................................................................... 3
Specifications .........................................................................................
Fuel System ...........................................................................................
Fuel Supply Pump and Overflow Valve ...............................................
Fuel Supply Pressure ........................................................................
Overflow Valve ...................................................................................
Identifying 450 kPa (65 psi) Fuel System Components ...................
5
5
5
5
5
6
Tools ........................................................................................................ 7
Special Tools ......................................................................................... 7
Special Equipment ................................................................................. 9
Design and Function ...........................................................................
Fuel System .........................................................................................
Fuel Line O-Rings .............................................................................
Unit Injectors .....................................................................................
Injector Operational Phases ............................................................
D12A ...............................................................................................
D12B ...............................................................................................
D12C ...............................................................................................
Fuel Flow ...........................................................................................
D12A ...............................................................................................
D12B ...............................................................................................
D12C ...............................................................................................
Fuel Filter ..........................................................................................
D12C ...............................................................................................
Overflow Valve ...................................................................................
D12C ...............................................................................................
Fuel Feed Pump ................................................................................
Fuel Feed Pump Replacement .......................................................
Hand Primer ....................................................................................
Engine Electronic Control Unit (EECU) ...............................................
11
11
12
13
14
18
18
18
19
19
20
21
22
22
23
23
24
25
26
26
Troubleshooting ...................................................................................
Fuel System, Fault Tracing ..................................................................
Fault Codes .......................................................................................
Unit Injector Troubleshooting ...............................................................
Read and Document Fault Codes .....................................................
Troubleshooting Flow Path ................................................................
Active fault codes ............................................................................
Inactive fault codes with high counts ..............................................
Unit Injector Mechanical Faults .........................................................
1. Active code or misfiring occur immediately after start-up ..........
2. Active code at normal operating temperature and high idle ......
3. Active code and misfiring at BASE IDLE ONLY .........................
Locating Air in the Fuel System ..........................................................
Determining Whether There is Air in the Fuel ..................................
Determining which Cylinder is Introducing Air into the Fuel .............
27
27
27
27
27
29
29
29
32
32
32
33
34
35
41
Service Procedures .............................................................................
General Work Practices ......................................................................
Clamping the Fuel Lines ...................................................................
Turning the Engine Over with the Starter Motor ...............................
Fuel System Pressure, Checking ........................................................
Fuel System, Draining .........................................................................
43
43
44
44
45
47
1
Fuel System, Bleeding ........................................................................
Fuel Feed Pump, Replacement ...........................................................
D12, D12A, D12B ..............................................................................
Fuel Feed Pump, Replacement ...........................................................
D12C .................................................................................................
Types ...............................................................................................
Removal ..........................................................................................
Installation .......................................................................................
Hand-Primer Pump, Replacement ......................................................
Fuel Filter, Replacement .....................................................................
Overflow Valve, Checking ....................................................................
D12, D12A, D12B ..............................................................................
Overflow Valve, Replacement ..............................................................
D12, D12A, D12B ..............................................................................
Overflow Valve, Replacement ..............................................................
D12C .................................................................................................
Unit Injector, Replacement (One) ........................................................
Unit Injector, Adjustment .....................................................................
Unit Injector Copper Sleeve, Replacement .........................................
50
52
52
53
53
54
54
55
56
57
59
59
60
60
62
62
63
67
69
Feedback
Operation Numbers
2
Group 23 Fuel System, D12, D12A, D12B, D12C
General
General
W2003244
This information covers the fuel system of the Volvo D12 engine and includes engine
versions D12, D12A, D12B, and D12C.
3
4
Group 23 Fuel System, D12, D12A, D12B, D12C
Specifications
Specifications
Fuel System
Component
Nm
ft-lb
Retainer bolt
unit injector w/ NEW COPPER SLEEVE
First tightening
Step 1
20 ± 5
15 ± 4
First tightening
Step 2
Turn an additional 180 ± 5
Loosen the retainer bolt for the unit injector prior to the second tightening.
Second tightening
Step 1
20 ± 5
Second tightening
Step 2
Turn an additional 60 ± 5
Component
15 ± 4
Nm
ft-lb
Retainer bolt
unit injector w/ OLD COPPER SLEEVE
Step 1
Step 2
20 ± 5
Turn an additional 60 ± 5
15 ± 4
Fuel Supply Pump and Overflow Valve
Fuel Supply Pressure
Engine number ....................................................................................
up to 98799
from 98800
Minimum supply pressure at full load .................................................
250 kPa
(36 psi)
350 kPa
(51 psi)
Engine number ....................................................................................
up to 98799
from 98800
Opening pressure ...............................................................................
300-350 kPa
(44-51 psi)
340-450 kPa
(50-65 psi)
Overflow Valve
5
Group 23 Fuel System, D12, D12A, D12B, D12C
Specifications
Identifying 450 kPa (65 psi) Fuel System Components
W2003117
Fig. 1: Fuel System Components
1
2
350 kPa (51 psi) overflow valve*
New 450 kPa (65 psi) overflow valve can be identified by the groove cut into the hex portion of the valve as
shown above.*
3 350 kPa (51 psi) fuel pump.
4 New 450 kPa (65 psi) fuel pump can be identified by the additional web in the casting as shown above.
(*D12A/B location shown.)
Important: When changing an overflow valve to the new
450 kPa (65 psi) bar version, the fuel pump must also be
changed to the 450 kPa (65 psi) version. However, when
changing a fuel supply pump to the 450 kPa (65 psi) version, you are not required to change the overflow valve.
W2003394
Fig. 2: Overflow valve location, D12C
6
Group 23 Fuel System, D12, D12A, D12B, D12C
Tools
Tools
Special Tools
The following special tools are used to replace or repair components. The tools can be
ordered from Volvo Parts North America; please use the specified part number when
ordering. Tools with part numbers beginning with ”J” are available directly from KentMoore (telephone: 1–800–328–6657).
W0000404
9996390
Drift indicator extension for setting electronic unit injector
9996534
Gauge for checking fuel feed pressure
9996662
Pressure gauge
9996666
Union for checking fuel feed pressure
9996671
Fuel filter removal tool
9996956
Cranking tool for flywheel
9998249
Protective sleeve for electronic unit injector
9998250
Sealing rings for the fuel gallery (2)
9998251
Sealing plug for cylinder head
9998277
Union for draining fuel system
9812546
Cleaning brush
J-41603
Socket
J-41196
Dial indicator
7
Group 23 Fuel System, D12, D12A, D12B, D12C
Tools
W0001802
9998511
Lever tool
W2003530
9998599
Cleaning kit
1
2
3
4
5
6
7
W0001837
J-44515
Fuel vacuum tool
J-42885–25
Injector bore protecting sleeve
W2003529
8
9808614 — brush
9808615 — holder
9808613 — holder
9808616 — handle
J-42885–25 — protecting
sleeve
9808617 — brush
9808618 — brush
Group 23 Fuel System, D12, D12A, D12B, D12C
Tools
Special Equipment
Like the special tools, the following equipment will aid in servicing the D12 engine.
When ordering equipment, specify the appropriate number.
W0001840
1159794
Torque wrench, 10 – 100 Nm (7 –
70 ft-lb)
W0000399
MT302A
SNAP-ON Remote Starter Cable
Switch
9
10
Group 23 Fuel System, D12, D12A, D12B, D12C
Design and Function
Design and Function
Fuel System
W2003243
Fig. 3: Fuel system, D12C
The Volvo D12 is an electronic engine designed to meet
today’s high environmental standards. Meeting these
standards requires optimum combustion. This demands,
among other things, injecting the exact amount of fuel
into the combustion chamber under very high pressure,
at precisely the correct time, depending on engine
speed, load, temperature and other conditions.
Because totally mechanical injection systems cannot
meet these demands, the engine is equipped with an
electronically controlled injection system. An engine
electronic control unit (EECU) receives impulses from
the accelerator pedal and a number of sensors on the
engine. The sensors read signals which govern the injection procedure and send these signals to the EECU. The
fuel system has a built-in diagnostic system, which electronically detects and traces any faults in the system.
Each cylinder has four valves. Individual differences
always occur between the cylinders in an internal combustion engine. The engine has a cylinder balancing
system, the purpose of which is to even out the amounts
of fuel between the cylinders. Cylinder balancing takes
place with the engine running at idle speed, providing
certain preconditions have been met.
11
Group 23 Fuel System, D12, D12A, D12B, D12C
Design and Function
Fuel Line O-Rings
W2002168
Fig. 4: Removing fuel lines
Always replace the fuel line O-rings when:
•
•
troubleshooting for fuel aeration and/or
performing any Service Procedure that requires the
removal of VE D12 engine fuel lines.
W2002169
Fig. 5: Fuel line O-ring locations
1
2
12
976020
955984
Group 23 Fuel System, D12, D12A, D12B, D12C
Design and Function
Unit Injectors
The fuel injection system of the D12 engine uses
electronically-governed unit injectors that are electrically
activated and mechanically driven via roller rocker arms
from the camshaft lobe. They are vertically located in the
center between the four valves in the cylinder head for
each cylinder.
The electronic unit injector (EUI) combines an injection
pump and an injector. An EUI can operate at considerably higher injection pressure than a conventional
injector. The EUI consists of three main components:
•
Pump containing a cylinder and piston; this corresponds to the pump assembly in an injection pump.
•
•
Injector with nozzle body, nozzle needle and spring.
Valve housing with an electro-magnetically controlled fuel valve.
The upper part of the electronic unit injector, which includes the compression spring and valve housing, lies
above the cylinder head.
The center part of the electronic unit injector, where the
intake and outlet holes for the fuel are located, lies in the
cylinder head fuel gallery. The electronic unit injector
takes in fuel directly from the fuel gallery.
The lower part of the EUI is located in a copper sleeve
against the bottom of the cylinder head, similar to a
standard injector.
The EECU calculates injection timing and the amount of
fuel to inject into the cylinder and transmits signals to the
electromagnetically controlled fuel valve in the valve
housing. The length of the injection time determines the
amount of fuel injected into the cylinder.
T2006848
Fig. 6: Electronic unit injector (EUI)
1
2
3
Pump part
Injector part
Valve housing
13
Group 23 Fuel System, D12, D12A, D12B, D12C
Design and Function
Injector Operational Phases
Fill Phase
During the filling phase, the pump plunger (2) is on its
way up, the camshaft lobe is passing its highest point,
and the rocker arm is on its way toward the camshaft basic circle.
The fuel valve (1) is open, allowing fuel to flow into the
EUI from the lower fuel gallery (4). It flows into the cylinder head and the EUI pump cylinder. Filling continues
until the pump plunger reaches its upper position.
T2006813
Fig. 7: Filling phase
1
2
3
4
14
Fuel valve
Pump plunger
Fuel outlet (overflow)
Fuel gallery (inlet and outlet)
Group 23 Fuel System, D12, D12A, D12B, D12C
Design and Function
Spill Phase
The spill phase begins when the camshaft turns to the
position at which the camshaft lobe forces the rocker
arm to push the pump plunger (2) down.
The fuel can now flow through the fuel valve (1), through
the holes in the EUI and out through the fuel gallery (4).
The spill phase continues as long as the fuel valve (1) is
open.
T2006814
Fig. 8: Spill phase
1
2
3
4
Fuel valve
Pump plunger
Fuel outlet (overflow)
Fuel gallery (inlet and outlet)
15
Group 23 Fuel System, D12, D12A, D12B, D12C
Design and Function
Injection Phase
The injection phase begins when the fuel valve (1)
closes. The camshaft lobe and rocker arm continue to
press down the pump plunger (2) and injection occurs as
the route through the fuel valve closes. The injection
phase continues as long as the fuel valve (1) is closed.
T2006815
Fig. 9: Injection phase
1
2
3
4
16
Fuel valve
Pump plunger
Fuel outlet (overflow)
Fuel gallery (inlet and outlet)
Group 23 Fuel System, D12, D12A, D12B, D12C
Design and Function
Pressure Drop Phase
The injection phase ends when the fuel valve (1) opens
and pressure in the EUI drops below the nozzle opening
pressure. The fuel flows through the open fuel valve (1),
through the electronic unit injector holes and out through
the fuel gallery (4). Note that the fuel valve position
(closed or open) determines when the injection phase
begins and ends. The time during which the fuel valve is
closed determines the amount of fuel injected at each
pump stroke.
T2006816
Fig. 10: Pressure drop phase
1
2
3
4
Fuel valve
Pump plunger
Fuel outlet (overflow)
Fuel gallery (inlet and outlet)
17
Group 23 Fuel System, D12, D12A, D12B, D12C
Design and Function
D12A
One unit injector is used for the 345, 385, and 425
horsepower variants. The spray angle has been modified. These injectors are NOT interchangeable with the
D12 injectors.
D12B
The unit injectors on the D12B have a longer pump
stroke length than earlier injectors on the D12A. They
are not interchangeable with other engine versions.
The engine electronic control unit (EECU) receives signals both from the engine’s own sensors and from the
vehicle control unit. The EECU then controls the unit injectors and determines the timing of the injection as well
as the amount of fuel to be injected into the cylinders.
With the adaptation to the new vehicle electronics, the
throttle position sensor signal on the D12B is now linked
to the engine control unit via the vehicle control unit.
CAUTION
Using incorrect injectors (i.e. D12A injectors in a
D12B engine) can cause engine damage and/or poor
performance. Injector identification can only be made
using the injector part number located on the injector
solenoid valve.
D12C
The D12C has new unit injectors, with 17 mm pump
stroke and higher injection pressure. The injector nozzles are new, and have a different orifice pattern.
Unlike the D12A and D12B engines, the D12C cylinder
head only has one fuel galley for the unit injectors. This
means that only two sealing rings are needed for each
unit injector (the D12A and D12B use three rings).
Fuel enters at the rear of the cylinder head and exits out
the front.
T2012782
Fig. 11: Unit Injector, D12C
18
Group 23 Fuel System, D12, D12A, D12B, D12C
Design and Function
Fuel Flow
D12A
W2000680
Fig. 12: Fuel flow, D12A
1
2
3
4
Fuel feed pump
Engine electronic control unit (EECU)
Bleed line
Fuel gallery
5
6
7
8
Electronic unit injector (EUI)
Overflow valve
Fuel tank
Fuel filter
The fuel feed pump (1) is mounted on the timing gear
plate and driven through a recess in the pump shaft by
the engine timing gears. It picks up fuel from the fuel tank
(7) through the fuel system EECU (2). Return fuel from
the cylinder head is also routed into the fuel feed pump.
A bleed line (3) goes from the fuel feed pump back to
the fuel tank, and is designed to continuously bleed the
system. From the fuel feed pump, fuel first passes
through the filter (8) and then into the cylinder head fuel
gallery (4). The fuel gallery surrounds the part of the EUI
(5) where the fuel holes are placed. The system overflow
valve (6) is located in the fuel gallery outlet connection.
Leak-off fuel flows from the EUI back to the fuel gallery,
eliminating the need for an external fuel return.
19
Group 23 Fuel System, D12, D12A, D12B, D12C
Design and Function
D12B
Unlike the D12A, the EECU on the D12B is fitted with
an external fuel cooling coil.
W2002628
Fig. 13: D12B, Fuel flow
1
2
3
Supply pump
EECU
Bleed line
4
5
Fuel gallery
Unit injector
The fuel system’s supply pump (1) is attached to the timing gear plate and is driven via a groove in the pump
shaft from the engine’s timing gears.
The supply pump pulls fuel from the tank (7) through the
EECU’s cooling coil, which cools the EECU. The return
fuel from the cylinder head is then blended with this fuel
and enters the supply pump. From the supply pump (1),
a bleed line (3) leads back to the fuel tank to provide
continuous venting for the system.
With the bleed line (3) as the only return line to the tank,
the only fuel passing through the EECU’s cooling coil is
the amount consumed by the engine.
From the supply pump (1), the fuel is forced through the
fuel filter (8) and then into the cylinder head fuel gallery
(4). The fuel gallery is designed so that it surrounds that
part of the unit injectors (5) where the fuel holes are located.
The system’s overflow valve (6) is located in the fuel
gallery’s outlet connection. The overflow valve regulates
the fuel system’s supply pressure. All fuel that exits the
overflow valve (leak-off fuel) is then blended with the fuel
entering the supply pump.
20
6
7
8
Overflow valve
Fuel tank
Fuel filter
Group 23 Fuel System, D12, D12A, D12B, D12C
Design and Function
D12C
W2003243
Fig. 14: External fuel line installation and fuel flow, D12C.
1
Bypass valve
2
Fuel passage in cylinder head
The D12C uses a fuel line through the cylinder head.
The bypass valve is also located toward the front of the
cylinder head.
21
Group 23 Fuel System, D12, D12A, D12B, D12C
Design and Function
Fuel Filter
The system is equipped with a large fuel filter located on
the left-hand side of the engine. The filter insert consists
of a special corrugated filter paper with a high resistance
to water and very good filtering properties. In addition, a
fine-gauge net filter on the fuel suction line in the fuel
tank separates any possible solid impurities before the
fuel is pumped up into the system.
T2006726
Fig. 15: Fuel filter
1
2
Drain nipple
Bleed nipple
D12C
The D12C uses a new fuel filter base, with hand pump
mounted directly on the base.
The base has a port for a fuel pressure sensor.
T2012783
Fig. 16: Fuel Filter, D12C
22
Group 23 Fuel System, D12, D12A, D12B, D12C
Design and Function
Overflow Valve
The overflow valve, located in the outlet from the cylinder
head fuel gallery, regulates the fuel system feed pressure. Opening pressure is about 345 kPa (50 psi). The
high feed pressure ensures that the injectors are filled
with fuel.
W2000681
Fig. 17: Overflow Valve Location, D12A/B
D12C
The D12C has a new overflow valve. The valve is integrated with the hollow screw in the fuel outlet at the front
of the cylinder head.
T2012784
Fig. 18: Overflow Valve, D12C
W2003527
Fig. 19: Overflow Valve location, D12C
23
Group 23 Fuel System, D12, D12A, D12B, D12C
Design and Function
Fuel Feed Pump
The capacity of the pump has been adapted to give the
correct pressure and flow to the EUI. Filling the EUIs requires relatively high pressure. The flow must be large
enough to even out any fuel temperature differences in
the cylinder head fuel gallery.
T2006725
Fig. 20: Fuel Feed Pump
24
Group 23 Fuel System, D12, D12A, D12B, D12C
Design and Function
Fuel Feed Pump Replacement
W2002891
Fig. 21: A = Radial Play
When replacing a D12 fuel supply pump for any reason,
the accessory drive must also be inspected. There
should be no radial or axial play in the accessory drive
shaft. Radial play is movement parallel (side to side) to
the face of the pulley. Do not confuse with backlash
which is measured by turning the pulley. Axial play is
movement perpendicular (in and out) to the face of the
pulley. Release the tension on the alternator and fan
belts before checking. This test is done by simply attempting to move the accessory drive pulley by hand.
CAUTION
Radial or axial play in the accessory drive shaft may
cause premature failure of the fuel feed pump.
25
Group 23 Fuel System, D12, D12A, D12B, D12C
Design and Function
Hand Primer
The hand primer is situated on the fuel filter bracket. It is
used to pump the fuel and bleed the system when the
engine is not running.
T2006729
Fig. 22: Hand primer
Engine Electronic Control Unit (EECU)
The electronic control module is the central part of the
injection system. It is located on the left-hand side of the
engine. The EECU receives continuous information from
the accelerator pedal and from several sensors on the
engine. It calculates the amount and the time to inject
fuel into the cylinders. Electrical wiring to the EUI fuel
valves transmits control signals to the injectors.
The EECU uses the flywheel sensor to monitor engine
rotation and engine speed variations during a revolution.
This allows the EECU to ensure that each EUI receives
exactly the correct amount of fuel. The EECU stores information when a fault occurs or if something in the
system is abnormal. Occassional faults are also stored
and can be traced at a later stage.
For information about the EECU, EECU sensors, and
their functions, refer to:
Service
Information
280–600
Control Systems, D12
IMPACT
Function Group: 284
Information Type: Design and Function
”Sensors”
26
Group 23 Fuel System, D12, D12A, D12B, D12C
Troubleshooting
Troubleshooting
Fuel System, Fault Tracing
Correct fault diagnosis is essential to accurate engine repair. The complex design of the engine (that is, with a
cylinder head that covers all the cylinders, overhead
gear wheel-driven camshaft, and EUI) makes the cylinder head removal on the D12 a comprehensive work
operation. Fault tracing in the fuel system requires thorough knowledge on how the system functions, as one
does not have the opportunity as with a conventional fuel
system of seeing and checking directly on the engine.
As the EECU receives all the information electronically
from the different sensors, the EECU must gather all the
information when the engine is started and then check
that the information is correct. This means the D12 engine does not start on the first crankshaft revolution, but
requires two revolutions in order for the control unit to set
the correct values. It is important that the starter motor
revolutions are not too slow, as slow starter motor speed
is interpreted by the control unit that the crankshaft does
not rotate and, as a result, the injector fuel valves do not
receive the appropriate signals to release fuel.
The crankshaft must rotate at a minimum of 75 rpm to
ensure that the engine starts. To facilitate fault tracing in
the fuel system, D12 is equipped with a diagnostic system which makes it possible to localize faults in the fuel
system without having to perform extensive dismantling
work.
With the fault codes stored in the control unit, it is possible, through the diagnostic system, to quickly establish
which fault or faults have occurred.
Fault Codes
It is important to delete a fault code from the diagnostic
system after the fault code has been corrected and before the truck leaves the workshop. Fault codes
remain in the system until they are removed. They
do not automatically clear when the fault has been
corrected.
Unit Injector Troubleshooting
The following information will aid in troubleshooting of
Electronic Unit Injector (EUI) fault codes.
Read and Document Fault Codes
Connect the MPSI tool to the vehicle’s diagnostic connector to determine whether any active or inactive fault
codes are set. Document all set fault codes below:
27
Group 23 Fuel System, D12, D12A, D12B, D12C
Code #
Occurred counts
Active/Inactive
Troubleshooting
PID
SID
FMI
Description ........................................................................................................................................................................
Code #
Occurred counts
Active/Inactive
PID
SID
FMI
Description ........................................................................................................................................................................
Code #
Occurred counts
Active/Inactive
PID
SID
FMI
Description ........................................................................................................................................................................
Code #
Occurred counts
Active/Inactive
PID
SID
FMI
Description ........................................................................................................................................................................
28
Group 23 Fuel System, D12, D12A, D12B, D12C
Troubleshooting
Troubleshooting Flow Path
Active fault codes
Troubleshoot the active fault codes first.
Inactive fault codes with high counts
If inactive fault codes are recorded, follow the troubleshooting path for that same active code. This should
be done; however, only when there is a driver complaint
in conjunction with the inactive fault code.
Fault code 31, 32, 33, 34, 35 or 36
Active
Electronic
code
Refer to TSI Service Manual, Electronic Control System, D12: "Fault codes 31-36:
Electronic unit injectors." This will help you
determine the supply and/or return pin for
each code.
Remove the EA harness from the ECU,
remove the white shield and inspect the terminals for damage (push back, tension,
and/or corrosion). Use tool 9998482 to check
tension, check ECU for pin damage.
Is there damage?
Inactive
Mechanical
code
See “Unit Injector Mechanical
Faults” page 32.
If inactive fault codes have been reported
along with a driver complaint, follow the troubleshooting path for the active code. If the
inactive code was not reported with a
complaint, no further troubleshooting is necessary. Be sure to clear inactive codes.
NO
YES
Connect the J41132, 36-pin breakout box to the EA harness
only. Check the EA harness and the injector solenoid for the
correct resistance. To determine the correct resistance value,
subtract the resistance of the Digital Multimeter (DMM) from
the total resistance of the injector solenoid circuit. Measure
the resistance of the DMM by touching the leads together and
noting the resistance.
Replace or repair the damaged terminals in EA harness.
Use tool 9998482 to check
tension. If the terminals are
damaged in the EECU, other
than slightly straightening, the
EECU must be replaced.
Continued (see table page 30).
29
Group 23 Fuel System, D12, D12A, D12B, D12C
Troubleshooting
Continued from table page 29
Measure the circuit resistance between the injector supply and return pins into the EA harness and
note the reading. Subtract the DMM lead resistance from the injector circuit resistance. This will give
you the true circuit resistance. Compare to the specifications below.
Note: The ECU must NOT be connected to the breakout harness during these checks.
Specifications:
* Solenoid circuit to ground ....................................................................
OL (open circuit)
* Solenoid circuit resistance ...................................................................
1.3-3.5
* Return circuit to block ..........................................................................
OL (open circuit)
* Supply circuit to block ..........................................................................
OL (open circuit)
Record the values.
Remove the valve cover, check the harness to solenoid
connection.
Is connection tight?
YES
Remove the supply and return wiring from the injector solenoid
and test the solenoid for open or short circuit to ground.
Does the solenoid check within specifications?
Tighten the connection, reassemble and check for
active code.
YES
NO
The injector is good. Do not replace the
injector.
Replace the injector.
Continued (see table page 31)
30
NO
Group 23 Fuel System, D12, D12A, D12B, D12C
Troubleshooting
Continued from table page 30
Continue to test the EA harness for open circuits, wiring shorted to ground, or shorted wire to wire in
EA harness. Perform pull test during testing.
Is the harness within specifications?
YES
Possible EECU failure. Contact Volvo with
documented information before replacing
the EECU.
For VN, call 1-800-52-VOLVO.
For VHD, call 1-887-97-VOLVO.
NO
Repair or replace the EA harness.
Start the engine and check to be sure that
the codes are inactive.
Clear the inactive fault codes.
31
Group 23 Fuel System, D12, D12A, D12B, D12C
Troubleshooting
Unit Injector Mechanical Faults
Note: A mechanical fault indicates low performance of
that cylinder, not just the injector.
Determine the correct troubleshooting flow path.
Fault codes: 31, 32, 33, 34, 35, 36.
1. Active code or misfiring occur immediately after start-up
Cause
Corrective action
•
Incorrect valve or injector adjustment
•
Check the valve and injector adjustment as required.
•
Injector problem
•
Perform cylinder balancing or manual compression test
before replacing the injector; refer to appropriate service literature or diagnostics checklists for information.
•
Base engine problem
•
Visual inspection of the camshaft and high crankcase
pressure. Perform cylinder balancing or manual compression test before replacing the injector for piston
and valve condition. Repair as required.
2. Active code at normal operating temperature and high idle
Cause
Corrective action
•
Incorrect valve or injector adjustment
•
Check the valve and injector adjustment as required.
•
Poor quality fuel or excessive fuel additives
•
Test with auxiliary fuel and retest.
•
Aeration
•
Check for fuel restriction, air or compression introduced into the fuel system and repair as required.
•
Injector problem
•
Perform cylinder balancing test or manual compression test. If within specifications, replace injector.
•
Base engine problem
•
Visual inspection of camshaft and high crankcase
pressure. Perform cylinder balancing or manual compression test before replacing injector for piston and
valve condition. Repair as required.
32
Group 23 Fuel System, D12, D12A, D12B, D12C
Troubleshooting
3. Active code and misfiring at BASE IDLE ONLY
Cause
•
Incorrect camshaft to crankshaft static timing
Corrective action
•
Refer to Camshaft Timing procedure, Group 21.
If the answer to any of the following is yes, static timing may be the cause of the fault.
•
Have previous repairs been made to the engine that required removing the camshaft?
•
Can you clear the fault code, unplug the camshaft sensor, start the engine, and the fault code does not return?
•
Can you clear the fault code, start the engine, set the idle above the base idle, and the fault code does not return?
33
Group 23 Fuel System, D12, D12A, D12B, D12C
Locating Air in the Fuel System
Air in the fuel being supplied to the engine can cause a
number of problems including hard starting, poor performance, and excessive smoke. Air can enter the fuel
system at several points:
•
•
•
•
•
•
suction side fuel supply lines
pick-up in the fuel tank
primary fuel filter
copper sleeve to injector seat
injector tip
fuel supply pump seals
Locating the point of entry can be troublesome and time
consuming. A kit has been developed to aid in this
process. The kit (J–42753) consists of:
•
•
•
•
•
•
•
34
two fuel line sight glass assemblies
two transparent hose assemblies
a clamp
a washer
a hollow screw
copper gaskets
O-rings
Troubleshooting
Group 23 Fuel System, D12, D12A, D12B, D12C
Troubleshooting
Determining Whether There is Air
in the Fuel
Before working on a vehicle, set the parking brakes,
place the transmission in neutral, and block the
wheels. Failure to do so can result in unexpected
vehicle movement and can cause serious personal injury or death.
Do not service any part of the fuel system while
smoking or in the presence of flames, sparks, or hot
surfaces. Failure to follow these precautions can result
in fire, which can cause serious injury or death.
WARNING
HOT ENGINE! Keep yourself and your test equipment
clear of all moving parts or hot engine parts and/or
fluids. A hot engine and/or fluids can cause burns or
can permanently damage test equipment.
CAUTION
After using the fuel aeration test kit, thoroughly drain
all remaining fuel from the test hoses, then install
plugs, end caps and washers. This will prevent
accidental spillage which could result in fuel contamination.
35
Group 23 Fuel System, D12, D12A, D12B, D12C
Troubleshooting
W2003008
Fig. 23: D12, D12A Fuel System Diagram with Fuel Line Kit Installed
1
2
3
4
5
36
3/8 in. I.D. Transparent Suction Hose/Alternate Fuel Supply
Sight Glass Hose Assembly (S)
3/16 in. I.D. Transparent Hose
Sight Glass Hose Assembly (R)
Vent Line Port Washer (949873)
Group 23 Fuel System, D12, D12A, D12B, D12C
Troubleshooting
W2003009
Fig. 24: D12B Fuel System Diagram with Fuel Line Kit Installed
1
2
3
4
3/8 in. I.D. Transparent Suction Hose/Alternate Fuel Supply
Sight Glass Hose Assembly (S)
3/16 in. I.D. Transparent Hose
Sight Glass Hose Assembly (R)
37
Group 23 Fuel System, D12, D12A, D12B, D12C
Troubleshooting
W2003500
Fig. 25: D12C Fuel System Diagram with Fuel Line Kit Installed
1
2
3
4
38
3/8 in. I.D. Transparent Suction Hose/Alternate Fuel Supply
Sight Glass Hose Assembly (S)
3/16 in. I.D. Transparent Hose
Sight Glass Hose Assembly (R)
Group 23 Fuel System, D12, D12A, D12B, D12C
Note: The numbers within parentheses in the following
steps correspond to the accompanying figures:
D12, D12A
See Fig. 23: D12, D12A Fuel System
Diagram with Fuel Line Kit Installed,
page 37
D12B
See Fig. 24: D12B Fuel System Diagram with Fuel Line Kit Installed, page
38
D12C
See Fig. 25: D12C Fuel System Diagram with Fuel Line Kit Installed, page
39
1
Connect the 3/16 in. I.D. transparent
hose (3) to the bleed nipple located at
the rear of the cylinder head and secure onto the bleed nipple with the
clamp provided in the fuel line kit.
Route the line back to the fuel tank
and secure to prevent it from moving
out of the tank. Open the bleed nipple
1 1/2 turns and pump the hand primer
pump until the transparent hose is free
of air. If the fuel system can be bled
free of air continue to step 3.
2
If air continues to exist in the fuel,
check the following:
•
•
•
•
•
that there is ample fuel in both
tanks.
connections from the fuel tank to
the fuel supply pump for suction
leaks.
fuel/water separator for restrictions, suction side leaks or an
incorrect micron element.
that the hand primer pump is capable of pumping fuel.
the fuel supply pump seal for failure.
3
Close the fuel bleed nipple and start
the engine.
Note: It may be necessary to continue
to pump the hand primer during cranking to start the engine. If the engine
does not start then the fuel system is
most likely filling with air during cranking; skip to step 5.
Troubleshooting
4
Once the engine starts, open the fuel
bleed nipple, located at the rear of the
cylinder head, 1 1/2 turns with the
transparent hose connected. Monitor
for air in the fuel for 3 to 5 minutes. If
air is present continue to step 5, if not
then there is a possibility that air is entering the fuel system only under
loaded conditions. If it is suspected
that air is entering under loaded conditions continue to step 5. If not, stop
here, no further testing is required.
5
If the engine would not start in step 3,
continues aeration during cranking, or
if air is noted in the transparent hose
while the engine is running then install
the following hoses and sight glasses
to determine where the air is entering
the fuel system.
6
Install sight glass hose assembly (2)
between the outlet port of the fuel supply pump and the fuel filter.
7
Remove the fuel supply (suction) line
from the fuel supply pump and install
the alternate transparent fuel supply
line (1) and route back to the fuel tank.
8
Remove the two fuel lines at the overflow valve and install sight glass
assembly (4) onto the overflow valve
using hollow screw (941686) from the
kit, and route the line to the fuel tank.
9
Remove the transparent hose (3) from
the bleed nipple at the rear of the
cylinder head to the fuel tank and
close the bleed nipple. Secure all
three lines to prevent them from moving out of the fuel inside the tank.
Note: For engines equipped with the
small line located between the fuel
supply pump and the top of the engine
electronic control unit (EECU), this line
must be disconnected from the fuel
supply pump and the port from which
the line was removed (5) must be
plugged using two copper gaskets and
washer (949873) supplied in the fuel
line kit.
39
Group 23 Fuel System, D12, D12A, D12B, D12C
10
Using the hand primer pump attempt
to purge all air from the fuel system
and start the engine.
Note: Purging time may vary.
11
Repeat the conditions in which aeration was previously noted or test under
loaded conditions, i.e. dyno test.
12
Monitor the two sight glasses and
transparent hose for aeration allowing
3 to 5 minutes for the sight glasses to
clear.
Note: Shining a flashlight into the
backside of the sight glass will improve visibility.
13
If no air is noted in either sight glass
and air was noted in previous steps,
the air entry is most likely in the suction lines between the fuel supply
pump and the fuel tank including the
primary fuel filter, copper washers, Orings and pick-up inside of the fuel
tanks.
14
If air is noted in sight glass (2) between the fuel supply pump and fuel
filter, and the alternate fuel supply is
supplying the fuel supply pump with a
good flow of air free fuel, the problem
is most likely in the fuel pump seals.
Note: The fuel in sight glass (2) is under pressure. This compresses the air
bubbles and they will appear to be
small.
40
Troubleshooting
15
If air is noted in the sight glass (4), at
the rear of the cylinder head, but not
in sight glass (2) at the outlet of the
fuel supply pump (with no engine
load), the problem is most likely within
the cylinder head, i.e. copper sleeve to
injector seat or injector tip leakage.
See “Determining which Cylinder is
Introducing Air into the Fuel” page 41.
Note: Sight glass (4) will show small
bubbles due to the turbulence created
by the opening and closing of the
overflow valve. To determine whether
normal or abnormal aeration is occurring, use the transparent hose (3) at
the bleed nipple at the rear of the
cylinder head. Open the bleed nipple 1
1/2 turns and monitor for air. If the line
is clear then the aeration in the sight
glass (4) is normal. If the transparent
hose indicates aeration then the aeration in sight glass (4) is abnormal.
16
If air is noted only under loaded conditions, remove all six injectors and
inspect the copper sleeve to the injector seat for signs of leakage.
Group 23 Fuel System, D12, D12A, D12B, D12C
Determining which Cylinder is Introducing Air into the Fuel
Before working on a vehicle, set the parking brakes,
place the transmission in neutral, and block the
wheels. Failure to do so can result in unexpected
vehicle movement and can cause serious personal injury or death.
Do not service any part of the fuel system while
smoking or in the presence of flames, sparks, or hot
surfaces. Failure to follow these precautions can result
in fire, which can cause serious injury or death.
WARNING
HOT ENGINE! Keep yourself and your test equipment
clear of all moving parts or hot engine parts and/or
fluids. A hot engine and/or fluids can cause burns or
can permanently damage test equipment.
CAUTION
After using the fuel aeration test kit, thoroughly drain
all remaining fuel from the test hoses, then install
plugs, end caps and washers. This will prevent
accidental spillage which could result in fuel contamination.
Troubleshooting
Note: The numbers within parentheses in the following
steps correspond to the accompanying figures:
D12, D12A
See Fig. 23: D12, D12A Fuel System
Diagram with Fuel Line Kit Installed,
page 37
D12B
See Fig. 24: D12B Fuel System Diagram with Fuel Line Kit Installed, page
38
D12C
See Fig. 25: D12C Fuel System Diagram with Fuel Line Kit Installed, page
39
1
Disconnect the two fuel lines from the
overflow valve at the rear of the cylinder head and install the sight glass (4)
and line assembly onto the overflow
valve using hollow screw (941686),
from the kit, and route into the fuel
tank. Tie down the line to prevent it
from moving out of the tank.
2
Remove the fuel supply line from the
fuel supply pump and install the alternate fuel supply line onto the feed
pump. Route the line back to the fuel
tank. Tie down the line to prevent it
from moving out of the fuel level inside
the tank.
Note: For engines equipped with the
small line located between the fuel
supply pump and the top of the engine
electronic control unit (EECU), this line
must be disconnected from the fuel
supply pump. The port from which the
line was removed (5) must be plugged
using two copper gaskets and washer
(949873) supplied in the fuel line kit.
3
Start the engine and allow 3 minutes
for the sight glass to clear. Take note
of the air present in the fuel sight
glass (4).
4
Stop the engine and remove the valve
cover.
41
Group 23 Fuel System, D12, D12A, D12B, D12C
5
Troubleshooting
7
Restart the engine and monitor the
sight glass (4) in the rear of the cylinder head. If the air that was noted in
step 3 is gone then the problem is
most likely in the number 1 cylinder
(injector tip or injector to copper sleeve
seat). Remove the number 1 injector
and inspect the injector to the copper
sleeve seat. If the seat appears to be
OK, replace the injector and perform
the test again.
W2003027
Fig. 26: 1 base circle of camshaft
Rotate the engine by hand until the
rocker arm for the intake valve for number 1 cylinder is on the base circle of
the cam, (in other words, in position to
be adjusted). Turn the adjusting screw
down (clockwise) until all clearance
has been removed then turn it down
an additional 1/4 turn (90 ). Install the
valve cover and secure with 4 nuts.
CAUTION
Do not turn the adjusting screw down more than 1/4
turn (90 ) after all clearance has been removed. Engine damage will result.
6
Using the hand primer pump, purge all
air from the fuel system.
8
If the air that was noted in step 3 is
not gone, stop the engine, remove the
valve cover, back out (counterclockwise) the adjusting screw for the
intake valve at the number 1 cylinder
1/2 round (180 ), and repeat the procedure (starting with step 5) on the
number 2 cylinder.
9
Continue the procedure until the cylinder that is introducing air into the fuel
system has been determined.
10
When the cylinder that is introducing
air into the fuel system has been located, remove that injector and inspect
the injector to copper sleeve seat. If
the seat appears to be O.K., replace
the injector and perform the test again.
If the seat and injector O-rings show
signs of combustion leakage, clean
the injector and replace the injector
copper sleeve. Reinstall the injector
with new O-rings and adjust all valves
and injectors.
CAUTION
Run the engine only at idle speed with no load for this
test. High engine speed or load could cause engine
damage.
42
11
Start the engine and monitor the sight
glass for air. If no air is present then
stop. If air is present then test again
as required.
Group 23 Fuel System, D12, D12A, D12B, D12C
Service Procedures
Service Procedures
General Work Practices
Before working on a vehicle, set the parking brakes,
place the transmission in neutral, and block the
wheels. Failure to do so can result in unexpected
vehicle movement and can cause serious personal injury or death.
The D12 engine uses high voltage (up to 90 V) to the
electronic unit injectors. Do not come in contact with
the injector terminals while the engine is running as
there could be as much as 90V going to the electronic
injectors. Contact may result in electrical shock. Personal injury or death can occur.
CAUTION
Extreme cleanliness must be observed when working
on the fuel system and the Volvo Engine Brake
(VEB). Always clean the engine before beginning repairs. To prevent dirt from entering the fuel system,
install protective plugs whenever connections are removed. Store components in sealed plastic bags
(when feasible) until they are to be reinstalled. The
same procedures apply for VEB components. The oil
channels for the VEB control system should also be
plugged. Dirt in the fuel system and in the VEB system can affect engine operation.
Note: After removing or replacing any EUI, or after adjusting preload, start the engine and allow it to reach
normal operation temperature. Then let the engine idle
for an additional five minutes. This will enable the ECM
(through the cylinder-balancing system) to set the
correct amount of fuel for delivery to the EUI. No powerconsuming components, for example, a PTO should be
engaged. The exhaust pressure governor must not be
activated. (Remove wire 636K from the solenoid valve
and apply the parking brake to ensure that the truck cannot move.) When the engine runs evenly at idle speed,
the cylinder-balancing function has been carried out.
•
Never remove the EECU connectors or any other
electrical wires from the sensors while the engine is
running. The ignition key must be in the OFF position and the engine stopped.
•
Never turn the battery master switch OFF or disconnect the battery cables while the engine is running.
•
When performing electric welding work on the truck,
the EECU connectors must be disconnected from
the EECU.
Note: Before disconnecting the connectors, the key
switch must be turned to the OFF position.
•
When oven-drying spray-paint work, any ECUs must
be removed from the truck. The maximum allowable
drying temperature, with the control unit in the vehi
cle, is 80 C (176 F).
•
Use only batteries for auxiliary starting. Using a
starting unit can induce peak voltages that can damage the electronic components.
•
When charging batteries with a rapid charger, battery cables must be disconnected. (Normal trickle
charging does not require this procedure.)
•
If a connector is removed, make sure it is reinstalled
correctly and is not covered with oil or other fluids
which can result in a poor connection.
•
For maintenance intervals, refer to:
Service
Bulletin
175-001
Oil and Filter Change Intervals
IMPACT
Function Group 175
Information Type: Maintenance
Engine Maintenance
Note: If the engine is turned over with the starter motor
(for example, when adjusting the valves) the fuse for the
engine control system (B6) must first be removed and
the ignition key must be in the OFF position in order to
eliminate any risk of the engine starting unintentionally.
Also check that the gear lever is in neutral and the parking brake is applied.
43
Group 23 Fuel System, D12, D12A, D12B, D12C
Clamping the Fuel Lines
Service Procedures
Turning the Engine Over with the
Starter Motor
1
Before working on a vehicle, set the parking brakes,
place the transmission in neutral, and block the
wheels. Failure to do so can result in unexpected
vehicle movement and can cause serious personal injury or death.
Apply the parking brake, block the
wheels, and place the gear lever in
neutral. Make sure that the ignition key
is in the OFF position.
W2000684
Fig. 27: Fuel line routing and securing
2
To avoid damage and operational disturbances in the
fuel system, the fuel lines should be rerouted and secured with plastic cable ties.
Note: Always check the fuel lines for cuts, abrasions,
chafing or leakage. Diesel fuel that comes in contact
with a hot surface can start a fire.
Note: Refer to Service Bulletin, Group 23, for oil-cooler
thermostat plate leak repair.
Note: Refer to Service Bulletin, Group 23, for accessory
drive pulley information.
Note: Refer to Service Bulletin, Group 23, for fuel line
information.
W3000459
Fig. 28: EECU power supply relay, D12A/B
W5001141
Fig. 29: R3 relay location (TEC Panel), D12C
For D12/A/B only, disconnect the
EECU power supply relay (1); for
D12C (and later versions of D12B),
disconnect the R3 relay (located in the
TEC panel).
44
Group 23 Fuel System, D12, D12A, D12B, D12C
Service Procedures
2309-06-02-03
Fuel System Pressure, Checking
3
Note: Before beginning this service procedure, please
review “General Work Practices” page 43.
Before working on a vehicle, set the parking brakes,
place the transmission in neutral, and block the
wheels. Failure to do so can result in unexpected
vehicle movement and can cause serious personal injury or death.
W3000458
Fig. 30: Remote starter switch and wiring
Connect a switch between the battery
positive (+) and the positive (+) connection on the starter solenoid.
Do not service any part of the fuel system while
smoking or in the presence of flames, sparks, or hot
surfaces. Failure to follow these precautions can result
in fire, which can cause serious injury or death.
WARNING
4
Do not run the starter for more than
15 seconds at any one time. However,
if the starter is run for 15 seconds or
longer, wait at least one minute before
reusing the starter motor.
HOT ENGINE! Keep yourself and your test equipment
clear of all moving parts or hot engine parts and/or
fluids. A hot engine and/or fluids can cause burns or
can permanently damage test equipment.
WARNING
Fuel, oil, or coolant leaked/spilled onto hot surfaces or
electrical components can cause a fire. Clean up
spills immediately.
WARNING
Do not work near the fan with the engine running or
the ignition in the ON position. The engine fan can engage at any time without warning. Anyone near the
fan when it turns on could be seriously injured.
Special tools: 9996666, 9998496, J–39200
45
Group 23 Fuel System, D12, D12A, D12B, D12C
1
Service Procedures
2
When operating a vehicle on streets and highways,
during a data collection procedure, it is mandatory to
have a second person drive while a technician collects the data.
Monitor fuel pressure under full load,
i.e, Dyno test or road test with load.
W2002209
Fig. 31: Bleed nipple, D12A/B
3
Compare measurements with specifications found in “Fuel Supply Pump
and Overflow Valve” page 5.
Note: If measurements are found to
be within specifications, no further
testing is required. However, if measurements do not meet specifications,
refer to the Diagnostics Checklist B,
“Fuel System.”
.
W2003513
Fig. 32: Bleed nipple, D12C
Remove the bleed nipple at the rear of
the head on the D12A/B, or at the
front of the head on the D12C; install
adapter 9996666 and pressure transducer 9998496.
Connect the transducer to multimeter
J–39200.
Note: The pressure transducer measurement scale is in kPa.
46
9996666
9998496
J–39200
Group 23 Fuel System, D12, D12A, D12B, D12C
2309-11-03-01
Fuel System, Draining
Service Procedures
1
Note: Before beginning this service procedure, please
review “General Work Practices” page 43.
Before working on a vehicle, set the parking brakes,
place the transmission in neutral, and block the
wheels. Failure to do so can result in unexpected
vehicle movement and can cause serious personal injury or death.
Do not service any part of the fuel system while
smoking or in the presence of flames, sparks, or hot
surfaces. Failure to follow these precautions can result
in fire, which can cause serious injury or death.
WARNING
HOT ENGINE! Keep yourself and your test equipment
clear of all moving parts or hot engine parts and/or
fluids. A hot engine and/or fluids can cause burns or
can permanently damage test equipment.
T2006719
Fig. 33: Draining the fuel system (D12A/B bleed nipple
location shown)
Carefully clean around the cylinder
head bleed nipple and the fuel filter
bracket drain union located on the
right side of the filter housing.
WARNING
Fuel, oil, or coolant leaked/spilled onto hot surfaces or
electrical components can cause a fire. Clean up
spills immediately.
2
Connect a 7.9 mm (5/16 in.) drain
hose and open the fuel filter bracket
drain union. Remove the bleed nipple
from the cylinder head.
WARNING
Make sure that gauge pressure never exceeds 50 kPa
(7.25 psi). Excessive pressure may cause personal injury.
Note: Before using, check the function of pressure
gauge 6662 by attaching it to an air supply and setting
the pressure to 50 kPa (7.25 psi) with the regulator valve.
Special tools: 9996662, 9998277
47
Group 23 Fuel System, D12, D12A, D12B, D12C
3
Service Procedures
4
T2006715
Fig. 34: Tool installation, D12A/B
T2006716
Check the pressure gauge assembly
1
Reduction valve
2
Air supply shut-off
Make sure the reduction valve knob is
completely open (rotate counterclockwise). Open the shut-off tap. Connect
pressure gauge 9996662 assembly to
the shop air supply.
W2003511
Fig. 35: Tool installation, D12C
When the fuel has completely drained
out of the cylinder head, install union
9998277 into the bleed nipple hole.
48
9998277
9996662
Group 23 Fuel System, D12, D12A, D12B, D12C
5
Service Procedures
6
T2006717
Fig. 36: Pressure gauge assembly connected to union,
D12A/B
T2006718
Fig. 38: Draining the remainder of the fuel, D12A/B
Fig. 37: Pressure gauge assembly connected to union,
D12C
Blow the remaining fuel out of the
cylinder head by carefully increasing
the pressure with the knob on the
pressure gauge reduction valve. DO
NOT EXCEED 50 kPa (7.25 psi).
Check that the pressure gauge indicator is at “0” (zero) and connect the
gauge to union 9998277.
7
When all fuel has been drained:
W2003512
9998277
•
Remove the pressure gauge assembly, union and the drain hose.
•
Reinstall the bleed nipple and the
protective cap onto the cylinder
head. Do not replace the nipple,
as the original nipple is fitted to
the seating in the cylinder head. A
new nipple can result in leakage.
•
Tighten the drain union on the
fuel filter bracket and install the
protective cap.
49
Group 23 Fuel System, D12, D12A, D12B, D12C
2309-05-03-01
Fuel System, Bleeding
Service Procedures
1
Note: Before beginning this service procedure, please
review “General Work Practices” page 43.
Before working on a vehicle, set the parking brakes,
place the transmission in neutral, and block the
wheels. Failure to do so can result in unexpected
vehicle movement and can cause serious personal injury or death.
T2006713
Do not service any part of the fuel system while
smoking or in the presence of flames, sparks, or hot
surfaces. Failure to follow these precautions can result
in fire, which can cause serious injury or death.
Fig. 39: Cylinder head bleed nipple, D12A/B location
WARNING
HOT ENGINE! Keep yourself and your test equipment
clear of all moving parts or hot engine parts and/or
fluids. A hot engine and/or fluids can cause burns or
can permanently damage test equipment.
W2003394
Fig. 40: Cylinder head bleed nipple, D12C location
WARNING
Fuel, oil, or coolant leaked/spilled onto hot surfaces or
electrical components can cause a fire. Clean up
spills immediately.
T2006712
Fig. 41: Fuel filter bleed nipple
Clean around the bleed nipples on the
fuel filter housing and cylinder head.
50
Group 23 Fuel System, D12, D12A, D12B, D12C
2
Service Procedures
4
T2006728
Fig. 42: Installing bleed line
T2006711
Fig. 43: Bleeding the cylinder head, D12A/B
Connect a transparent plastic hose to
the fuel filter housing bleed nipple.
Open the bleed nipple and pump the
hand primer until clean fuel runs out of
the hose. Tighten the bleed nipple
while fuel is still running out.
3
Remove the hose and install the protection plug on the bleed nipple.
W2003510
Fig. 44: Bleeding the cylinder head, D12C
Move the hose over to the cylinderhead bleed nipple and bleed the
system in the same way as with the
fuel filter housing.
5
Apply parking brake and place gear
lever into neutral.
6
Start the engine and allow it to run at
fast idle, or with the PTO engaged, for
about five minutes to remove air from
the system. Check for leaks.
51
Group 23 Fuel System, D12, D12A, D12B, D12C
2331-03-02-01
Fuel Feed Pump, Replacement
Service Procedures
2
D12, D12A, D12B
Note: Before beginning this service procedure, please
review “General Work Practices” page 43.
Before working on a vehicle, set the parking brakes,
place the transmission in neutral, and block the
wheels. Failure to do so can result in unexpected
vehicle movement and can cause serious personal injury or death.
Do not service any part of the fuel system while
smoking or in the presence of flames, sparks, or hot
surfaces. Failure to follow these precautions can result
in fire, which can cause serious injury or death.
WARNING
HOT ENGINE! Keep yourself and your test equipment
clear of all moving parts or hot engine parts and/or
fluids. A hot engine and/or fluids can cause burns or
can permanently damage test equipment.
T2006724
Fig. 45: Removing fuel line
Remove the plastic straps securing
the fuel line on the ECM and cylinder
block. Remove the lines at the unions
from the fuel feed pump, as indicated
by arrows in figure Fig. 46: Removing
fuel pump, page 52.
3
WARNING
Do not work near the fan with the engine running or
the ignition in the ON position. The engine fan can engage at any time without warning. Anyone near the
fan when it turns on could be seriously injured.
WARNING
Fuel, oil, or coolant leaked/spilled onto hot surfaces or
electrical components can cause a fire. Clean up
spills immediately.
T2006723
Fig. 46: Removing fuel pump
1
Clean the area around the fuel feed
pump area and remove the bleed line.
Remove the bolts indicated by arrows
in figure Fig. 46: Removing fuel
pump, page 52 and lift out the fuelfeed pump.
4
Clean the contact surface on the timing gear plate.
52
Group 23 Fuel System, D12, D12A, D12B, D12C
5
Service Procedures
9
Start the engine. Allow it to run at fast
idle, or with the PTO engaged, for
about five minutes to remove air from
the system. Check for leaks.
2331-03-02-01
Fuel Feed Pump, Replacement
D12C
Note: Before beginning this service procedure, please
review “General Work Practices” page 43.
T2006722
Fig. 47: Install fuel-feed pump
Before working on a vehicle, set the parking brakes,
place the transmission in neutral, and block the
wheels. Failure to do so can result in unexpected
vehicle movement and can cause serious personal injury or death.
Check to make sure that the fuel-feed
pump drive engages in the drive slot.
Install a new gasket and tighten the
fuel-feed pump mounting bolts.
6
Connect the fuel lines and the bleed
line. Use new sealing washers. Secure
the fuel lines with plastic tie straps.
Do not service any part of the fuel system while
smoking or in the presence of flames, sparks, or hot
surfaces. Failure to follow these precautions can result
in fire, which can cause serious injury or death.
7
WARNING
HOT ENGINE! Keep yourself and your test equipment
clear of all moving parts or hot engine parts and/or
fluids. A hot engine and/or fluids can cause burns or
can permanently damage test equipment.
WARNING
T2006728
Fig. 48: Bleeding fuel system
Bleed the fuel system at the fuel filter
as shown in illustration, Fig. 48:
Bleeding fuel system, page 53. See
also “Fuel System, Bleeding” page 50.
8
Apply parking brake and place gear
lever into neutral.
Fuel, oil, or coolant leaked/spilled onto hot surfaces or
electrical components can cause a fire. Clean up
spills immediately.
WARNING
Do not work near the fan with the engine running or
the ignition in the ON position. The engine fan can engage at any time without warning. Anyone near the
fan when it turns on could be seriously injured.
53
Group 23 Fuel System, D12, D12A, D12B, D12C
Service Procedures
Types
CAUTION
There are two types of feed pump on the D12C engine:
1
When replacing feed pump Type 1, great care must
be taken with the long drive shaft. Any damage to the
drive shaft can damage the feed pump; if it is installed
on the engine, serious engine damage can result.
Removal
1
W2003386
Fig. 49: Feed pump, type 1 (older version, with long
drive shaft).
1
2
Seal
Shaft journal
2
W2003384
Cut the plastic clamps for the cabling
and remove the bracket under the alternator.
2
Carefully clean round the feed pump
and the fuel connections.
W2003385
Fig. 50: Feed pump, type 2 (newer version, available
with one or two drive heads; available on newer and replacement engines).
Feed pumps as spare parts are available in both versions.
Note: Both types of feed pumps are interchangeable, i.e.
feed pump type 1 can be replaced with feed pump type
2 and vice versa.
3
Remove all fuel pipes from the feed
pump.
4
Remove the hold-down bolts for the
feed pump. Carefully pull the drive
shaft from the drive exhaust and remove the pump from the engine.
5
Clean the sealing surface on timing
gears plate. Check that the gasket for
the feed pump is in good condition. If
necessary, replace with new gasket.
54
Group 23 Fuel System, D12, D12A, D12B, D12C
Service Procedures
Installation
3
1
W2003386
Fig. 51: Feed Pump Type 1
1
2
Seal
Shaft journal
T2014660
Fig. 53: M8–bolt with sealant
(Feed Pump Type 1 only:) Check that
the seal (1) is in good condition and
correctly positioned. Also check that
the shaft journal (2) is lubricated with
graphite grease.
Install the seal on the feed pump and
install the feed pump on the engine.
CAUTION
2
(Feed Pump Type 2:) Observe great care with the
feed pump’s drive shaft. Damage to the feed pump’s
drive shaft can permanently damage the engine.
Note. The M8–bolt should be reinstalled with sealant to seal any oil
leakage. Do not install the old bolt
without sealant or leakage can occur.
4
Check the seals on the fuel lines. The
sealing washers for the return line
should always be replaced. Replace
other seals if necessary.
Install the fuel lines on the feed pump.
W2003387
Fig. 52: Feed pump drive shaft groove
Check that the feed pump’s drive installs in the groove on the feed pump’s
drive shaft.
The groove in the shaft shows which
position the feed pump’s shaft journal
should have when installing ( applies
to both type 1 and 2).
55
Group 23 Fuel System, D12, D12A, D12B, D12C
Service Procedures
2331-03-02-02
Hand-Primer Pump, Replacement
5
Note: Before beginning this service procedure, please
review “General Work Practices” page 43.
Before working on a vehicle, set the parking brakes,
place the transmission in neutral, and block the
wheels. Failure to do so can result in unexpected
vehicle movement and can cause serious personal injury or death.
W2003388
Vent the fuel system.
6
Start the engine and run it at high revs
(approx. 800 – 1000 rpm) for approx.
10 min. to evacuate any remaining air
in the fuel system.
7
Conduct leakage check.
8
Check that no fault codes exist.
800 – 1000
rpm
approx. 10
min
Do not service any part of the fuel system while
smoking or in the presence of flames, sparks, or hot
surfaces. Failure to follow these precautions can result
in fire, which can cause serious injury or death.
WARNING
HOT ENGINE! Keep yourself and your test equipment
clear of all moving parts or hot engine parts and/or
fluids. A hot engine and/or fluids can cause burns or
can permanently damage test equipment.
WARNING
Fuel, oil, or coolant leaked/spilled onto hot surfaces or
electrical components can cause a fire. Clean up
spills immediately.
1
Open the fuel tank cap to release any
pressure in the fuel tank.
2
Clean around the hand-primer fuel fittings.
56
Group 23 Fuel System, D12, D12A, D12B, D12C
Service Procedures
2334-03-02-01
Fuel Filter, Replacement
3
Prerequisite:
•
Container for fuel under filter.
Note: Before beginning this service procedure, please
review “General Work Practices” page 43.
Before working on a vehicle, set the parking brakes,
place the transmission in neutral, and block the
wheels. Failure to do so can result in unexpected
vehicle movement and can cause serious personal injury or death.
T2006720
Fig. 54: Removing hand-primer pump
Remove the hand-primer pump fuel
lines at the unions.
4
Remove the hand-primer pump mounting bolts.
5
Install the new hand-primer pump using new sealing washers.
6
Reconnect the mounting bolts and fuel
lines.
7
Bleed the fuel system (see “Fuel System, Bleeding” page 50).
8
Apply parking brake and place the
gear lever into neutral.
9
Start the engine. Allow it to run at fast
idle, or with the PTO engaged, for
about five minutes to remove air from
the system and check for leaks.
Do not service any part of the fuel system while
smoking or in the presence of flames, sparks, or hot
surfaces. Failure to follow these precautions can result
in fire, which can cause serious injury or death.
WARNING
HOT ENGINE! Keep yourself and your test equipment
clear of all moving parts or hot engine parts and/or
fluids. A hot engine and/or fluids can cause burns or
can permanently damage test equipment.
WARNING
Fuel, oil, or coolant leaked/spilled onto hot surfaces or
electrical components can cause a fire. Clean up
spills immediately.
Special tools: 9996671
1
Clean the area around the fuel filter
area.
57
Group 23 Fuel System, D12, D12A, D12B, D12C
Service Procedures
2
5
W2003389
Remove the fuel filter.
3
Clean the sealing surface, making
sure that there is no residual gasket.
4
Install the new fuel filter, following the
instructions on the filter.
CAUTION
Do not fill the new fuel filter with fuel before installing.
Doing so may allow foreign objects to get into the fuel,
and can cause the injectors to malfuction.
W2003388
Bleed (vent) the fuel system at the fuel
filter. Connect a transparent plastic
hose to the bleed nipple. Open the
bleed nipple and pump the hand
primer until clean fuel runs out of the
hose. Tighten the bleed nipple while
fuel is still running out (see “Fuel System, Bleeding” page 50).
6
Remove the hose and reinstall the
protection plug on the bleed nipple.
7
Apply parking brake and shift lever
into neutral.
8
Start the engine. Allow it to run at fast
idle, or with the PTO engaged, for
about 10 minutes to evacuate any
residual air in the fuel system.
58
Group 23 Fuel System, D12, D12A, D12B, D12C
2339-06-02-02
Overflow Valve, Checking
Service Procedures
1
D12, D12A, D12B
Note: Before beginning this service procedure, please
review “General Work Practices” page 43.
Before working on a vehicle, set the parking brakes,
place the transmission in neutral, and block the
wheels. Failure to do so can result in unexpected
vehicle movement and can cause serious personal injury or death.
W2002209
Fig. 55: Bleed nipple, D12A/B
Do not service any part of the fuel system while
smoking or in the presence of flames, sparks, or hot
surfaces. Failure to follow these precautions can result
in fire, which can cause serious injury or death.
WARNING
HOT ENGINE! Keep yourself and your test equipment
clear of all moving parts or hot engine parts and/or
fluids. A hot engine and/or fluids can cause burns or
can permanently damage test equipment.
W2003513
Fig. 56: Bleed nipple, D12C
WARNING
Fuel, oil, or coolant leaked/spilled onto hot surfaces or
electrical components can cause a fire. Clean up
spills immediately.
Special tools: 9996666, 9998496, J–39200
Remove the bleed nipple at the rear of
the head, install adapter 9996666 and
pressure transducer 9998496. Connect the transducer to the multimeter
J–39200.
J–39200
Note: The pressure transducer measurement scale is in kPa.
2
Slowly pump the hand pump while
monitoring the fuel pressure. The
pressure should rise to a point determined by the opening of the overflow
valve then drop quickly. Recheck several times to get an accurate reading.
59
Group 23 Fuel System, D12, D12A, D12B, D12C
Service Procedures
3
The opening pressure should correspond to specifications found in “Fuel
Supply Pump and Overflow Valve”
page 5.
2339-03-02-02
Overflow Valve, Replacement
Note: If the overflow valve opens at a
pressure that is less than that given in
the specification, low fuel pressure will
result. The valve must be replaced.
Note: Before beginning this service procedure, please
review “General Work Practices” page 43.
4
Replace the valve if necessary.
D12, D12A, D12B
Before working on a vehicle, set the parking brakes,
place the transmission in neutral, and block the
wheels. Failure to do so can result in unexpected
vehicle movement and can cause serious personal injury or death.
Do not service any part of the fuel system while
smoking or in the presence of flames, sparks, or hot
surfaces. Failure to follow these precautions can result
in fire, which can cause serious injury or death.
WARNING
HOT ENGINE! Keep yourself and your test equipment
clear of all moving parts or hot engine parts and/or
fluids. A hot engine and/or fluids can cause burns or
can permanently damage test equipment.
WARNING
Fuel, oil, or coolant leaked/spilled onto hot surfaces or
electrical components can cause a fire. Clean up
spills immediately.
60
Group 23 Fuel System, D12, D12A, D12B, D12C
1
Service Procedures
2
T2006730
Overflow valve
Carefully clean the area around the
overflow valve area.
T2006710
Draining fuel
Drain the fuel by connecting a hose to
the fuel filter housing drain nipple. Remove the protection plug and open the
bleed nipple on the cylinder head.
Route the fuel from the fuel filter housing into a suitable container.
3
T2006714
Removing fuel lines
Remove the fuel line from the overflow
valve.
61
Group 23 Fuel System, D12, D12A, D12B, D12C
Service Procedures
4
Remove the overflow valve.
2339-03-02-02
Overflow Valve, Replacement
5
Clean the contact surface on the cylinder head and install a new overflow
valve. Use a new sealing washer.
D12C
6
Reconnect the fuel line. Use new sealing washer.
7
Bleed the fuel system.
Note: Before beginning this service procedure, please
review “General Work Practices” page 43.
Before working on a vehicle, set the parking brakes,
place the transmission in neutral, and block the
wheels. Failure to do so can result in unexpected
vehicle movement and can cause serious personal injury or death.
8
Apply parking brake and place the
gear lever into neutral.
9
Start the engine and allow it to run at
fast idle, or with the PTO engaged, for
about ten minutes to remove air from
the system.
10
Perform leak and operation checks.
Do not service any part of the fuel system while
smoking or in the presence of flames, sparks, or hot
surfaces. Failure to follow these precautions can result
in fire, which can cause serious injury or death.
WARNING
HOT ENGINE! Keep yourself and your test equipment
clear of all moving parts or hot engine parts and/or
fluids. A hot engine and/or fluids can cause burns or
can permanently damage test equipment.
WARNING
Fuel, oil, or coolant leaked/spilled onto hot surfaces or
electrical components can cause a fire. Clean up
spills immediately.
1
Remove the overflow valve from the
intake pipe.
2
Clean the sealing surfaces.
62
Group 23 Fuel System, D12, D12A, D12B, D12C
Service Procedures
2371-03-02-02
Unit Injector, Replacement
(One)
3
Not Included:
•
“Unit Injector, Adjustment” page 67
Note: Before beginning this service procedure, please
review “General Work Practices” page 43.
W2003390
Before working on a vehicle, set the parking brakes,
place the transmission in neutral, and block the
wheels. Failure to do so can result in unexpected
vehicle movement and can cause serious personal injury or death.
Install a new overflow valve with new
copper washers and tighten the overflow valve to 55 ± 5 Nm (40 ± 4 ft-lb).
Do not service any part of the fuel system while
smoking or in the presence of flames, sparks, or hot
surfaces. Failure to follow these precautions can result
in fire, which can cause serious injury or death.
WARNING
HOT ENGINE! Keep yourself and your test equipment
clear of all moving parts or hot engine parts and/or
fluids. A hot engine and/or fluids can cause burns or
can permanently damage test equipment.
WARNING
Fuel, oil, or coolant leaked/spilled onto hot surfaces or
electrical components can cause a fire. Clean up
spills immediately.
Special tools: 9998249, 9998511, 9998599,
J–44515
63
Group 23 Fuel System, D12, D12A, D12B, D12C
Service Procedures
1
3
W2003391
Drain the fuel out of the system to prevent fuel running down into the cylinder
when a unit injector is dismantled.
T2009070
Prerequisites:
•
•
•
4
Valve cover removed.
Control valve removed.
Pipe removed between control
valve and rocker arm shaft.
2
T2008956
Remove the injector hold-down bolt.
5
Clean very carefully round the unit injector to be changed.
T2008812
Release the rocker arm bridge as per
the specifications.
64
Group 23 Fuel System, D12, D12A, D12B, D12C
Service Procedures
9
6
W2003392
Remove the electrical cables from the
unit injector and the bolt for the unit injector’s attachment yoke.
Remove the unit injector with tool
9998511.
9998511
W2003393
Fig. 58: Cleaning the copper sleeve
Install cleaning sleeve 9998580 in the
injector well and carefully clean the
copper sleeve.
9998580
9998251
Leave cleaning sleeve 9998580 on the
cylinder head until the dirt is removed
from the injector well.
7
Note: If the unit injector is not installed
immediately, install the protective plug
9998251 in the cylinder head.
10
Check the sealing rings on the unit injector. Install the unit injector and
centre it between the valve springs.
Tighten with a torque as per the specifications.
W0001837
Fig. 57: Vacuum pump J-44515
Remove fuel from the top of the piston
using vacuum pump J-44515.
8
Install protective sleeve J–42885–25
on the unit injector.
J-44515
J–42885–25
65
Group 23 Fuel System, D12, D12A, D12B, D12C
11
Connect the electric cables to the injector.
Note: Tighten the nuts with a torque of
1.4 ± 0.1 Nm (3.5 ± 0.88 in-lb).
Service Procedures
14
1.4 ± 0.1 Nm
(3.5 ± 0.88 inlb)
CAUTION
Do not overtorque. This will break the stud.
12
Install the rocker arm bridge and
tighten with a torque as per the specifications.
13
T2008812
Install the control valve.
15
Connect the cables on the solenoid
valve.
Note: Tighten the nuts with a torque of
1.4 ± 0.1 Nm (3.5 ± 0.88 in-lb).
1.4 ± 0.1 Nm
(3.5 ± 0.88 inlb)
CAUTION
Do not overtorque. This will break the stud.
16
Adjust the valves.
T2009070
Install the pipe between the rocker
arm shaft and control valve.
66
17
Install the valve cover and tighten according to the tightening schedule in
the specifications.
Group 23 Fuel System, D12, D12A, D12B, D12C
Service Procedures
2371-05-02-01
Unit Injector, Adjustment
18
(Adjusting pre-load)
Note: Before beginning this service procedure, please
review “General Work Practices” page 43.
Before working on a vehicle, set the parking brakes,
place the transmission in neutral, and block the
wheels. Failure to do so can result in unexpected
vehicle movement and can cause serious personal injury or death.
W2003388
Vent the fuel system at the fuel filter.
19
Do not service any part of the fuel system while
smoking or in the presence of flames, sparks, or hot
surfaces. Failure to follow these precautions can result
in fire, which can cause serious injury or death.
WARNING
HOT ENGINE! Keep yourself and your test equipment
clear of all moving parts or hot engine parts and/or
fluids. A hot engine and/or fluids can cause burns or
can permanently damage test equipment.
W2003394
Vent the fuel system on the cylinder
head.
20
Start the engine and run for approx.
10 minutes to evacuate any residual
air in the fuel system.
21
Check that the engine has reached
normal working temperature and then
run for another 5 minutes.
22
Check to make sure the fuel system is
operating properly. Check for leaks.
67
Group 23 Fuel System, D12, D12A, D12B, D12C
WARNING
Fuel, oil, or coolant leaked/spilled onto hot surfaces or
electrical components can cause a fire. Clean up
spills immediately.
Service Procedures
2
Loosen the adjustment screw and adjust the unit injector rocker arm to zero
clearance against the camshaft.
Tighten the adjustment screw one full
turn and then loosen again. Then return the rocker arm to zero clearance.
3
WARNING
Do not work near the fan with the engine running or
the ignition in the ON position. The engine fan can engage at any time without warning. Anyone near the
fan when it turns on could be seriously injured.
CAUTION
Observe the greatest possible cleanliness when working on the cylinder head. Dirt particles in the fuel and
oil channels can cause the unit injectors to malfunction, and can cause the VEB (if equipped) to fail.
Special tools: 9996956
T2008845
Preload the unit injector by screwing
down the adjustment screw 3–4 flats,
(180 - 240 ). Torque-tighten the lock
nut according to the specifications.
Unit Injector, Adjusting Pre-load
1
T2006935
Check that the camshaft line marking
for adjusting the intake valves and unit
injector are opposite the marking on
the bearing cap, tolerance ± 2 mm (alternatively between the marks).
Check, via the number marking on the
camshaft on which cylinder unit injector pre-loading is to be adjusted.
Important: If tool 6956 is used to
crank the flywheel, make sure that the
tool is removed if the engine is to be
turned over with the starter motor.
68
3–4 flats
(180 - 240 )
Group 23 Fuel System, D12, D12A, D12B, D12C
2379-03-02-02
Unit Injector Copper Sleeve,
Replacement
Service Procedures
2
Note: Before beginning this service procedure, please
review “General Work Practices” page 43.
T2006777
Before working on a vehicle, set the parking brakes,
place the transmission in neutral, and block the
wheels. Failure to do so can result in unexpected
vehicle movement and can cause serious personal injury or death.
Remove the rocker arm bridge bolts.
Note: Loosen the bolts in three equal
stages to avoid bending the rocker
arm shaft.
3
CAUTION
Do not service any part of the fuel system while
smoking or in the presence of flames, sparks, or hot
surfaces. Failure to follow these precautions can result
in fire, which can cause serious injury or death.
WARNING
HOT ENGINE! Keep yourself and your test equipment
clear of all moving parts or hot engine parts and/or
fluids. A hot engine and/or fluids can cause burns or
can permanently damage test equipment.
WARNING
Fuel, oil, or coolant leaked/spilled onto hot surfaces or
electrical components can cause a fire. Clean up
spills immediately.
Failure to remove the control valve before removing
the rocker arm bridge may result in damage to the
control valve and/or the pipe.
If the engine is equipped with a VEB
(Volvo Engine Brake), remove the control valve and the pipe. Plug the ports
and place the valve in a plastic bag to
prevent it from being subjected to dirt
and contamination. To facilitate removal, remove the valve cover stud
bolt.
Note: On engines equipped with a
VEB (Volvo Engine Brake), secure the
rocker arm plungers with rubber bands
so that the plungers do not fall out of
the rocker arms.
4
WARNING
Do not work near the fan with the engine running or
the ignition in the ON position. The engine fan can engage at any time without warning. Anyone near the
fan when it turns on could be seriously injured.
Removal
1
Connect a drain hose 9996049 to the
engine coolant drain nipple and drain
the coolant into a suitable container.
9996049
T2006776
Lift the rocker arm bridge using lifting
tool 9998255.
9998255
69
Group 23 Fuel System, D12, D12A, D12B, D12C
5
Drain the fuel from the cylinder head.
Refer to the procedure,“Fuel System
Draining,” the service manual 210–
600, Basic Engine D12.
Service Procedures
8
6
Carefully clean around the electronic
unit injector (EUI) to be removed.
7
T2006708
Remove the EUI and check that no dirt
enters the injector well in the cylinder
head. Install a dust cover on the EUI,
and install protective plug 9998249 in
the injector well in the cylinder head.
9998249
9
T2006709
Disconnect the electrical wires from
the EUI.
CAUTION
Pay close attention to the wire terminals. If one
breaks, remove the broken pieces. Failure to do so
may result in pieces falling into the cylinder, which can
cause component damage.
T2007050
Remove the valve bridges at the copper sleeve that is to be changed, and
make note of location for reassembly.
10
Make sure that the piston corresponding to the copper sleeve being
removed is in the down position.
70
Group 23 Fuel System, D12, D12A, D12B, D12C
11
Service Procedures
13
W2003433
Using the Allen wrench, loosen the
Allen set-screw on the extractor tool
9992853.
9998253
T2007157
(This step is for D12C only) Check
whether the copper sleeve has an 8
mm or 9 mm hole in the tip. Install the
8 mm tap in tool 9998252 and try
threading the copper sleeve. If it turns
too easily, replace the 8 mm tap with
the 9 mm tap and continue with the
procedure.
12
Using tool 9998252 turn tap approximately 1/4 of a turn, then back off at
least a full turn to remove shavings.
Turn forward again until you feel tension, then repeat this step. Continue
until the tap has passed through the
bottom of the copper sleeve.
9998252
14
Adjust the bolt in the end of the tool
until the bolt extends approximately 22
mm (0.875 in.) beyond the end of the
tool(A).
9998252
15
Tighten the Allen set-screw and make
sure that the screw is seated against
the flat part of the extractor bolt.
Note: Apply grease to the tap to prevent shavings from falling down into
the cylinder.
71
Group 23 Fuel System, D12, D12A, D12B, D12C
16
Service Procedures
18
W2003436
W2003434
Install the extractor tool into the copper sleeve and hand tighten until it
bottoms out in the sleeve.
Hand turn the retaining nut clockwise
(1) until it is firmly seated against the
bottom of the extracting cup.
19
17
W2003437
CAUTION
W2003435
Back off the retaining nut (1) and turn
the extractor bolt (2) so that the
threaded end passes completely
through the copper sleeve tip.
Note: If the threaded end does not
pass completely through the copper
sleeve, the tip of the sleeve may break
off as it is removed.
72
Do not use air tools to remove the copper sleeve. Use
of air tools can damage engine components.
Using a wrench, turn the retaining nut
(1) clockwise until the copper sleeve is
removed.
Group 23 Fuel System, D12, D12A, D12B, D12C
20
Service Procedures
22
W2003438
CAUTION
Pieces of the copper sleeve that fall into the cylinder
can seriously damage the piston and/or turbocharger.
T2006821
Install the 2 sealing clamps 9998250
in the cylinder head fuel gallery.
When the sleeve is removed, the
extractor tool should be extended beyond the cooper sleeve at least 3 mm
(0.125 in); see (1). If it is not, check to
make sure that a piece of the cooper
sleeve has not broken off and fallen
into the cylinder.
9998250
23
Cleaning the Copper Sleeve Bore
21
W2003148
WARNING
Wear safety glasses while using cleaning brushes or
compressed air. Failure to do so could cause eye injury from flying debris.
W2003537
Fig. 59: Cleaning kit J-42885
When replacing the injector copper
sleeves in the cylinder head, it is important that the sleeve bore in the
head is free from any carbon deposits
and any other residue (i.e. pieces of
the O-ring, etc.) before installing the
new sleeve. Use the cleaning kit J42885 in the following steps.
J-42885
Use the “7/16 in. diameter” brush inside bore (C). Move the brush up and
down while turning it at the same time.
J-42885
73
Group 23 Fuel System, D12, D12A, D12B, D12C
Service Procedures
Installation
24
1
W2003528
Place the injector bore sleeve protector into injector bore. Assemble the
Roloc® brush (2), the holder (3), and
the extension (4). Install the assembly
into a drill and clean the sleeve seal
(B); see illustration page 73.
25
Install the 1.5 in. diameter brush into
the drill and clean bore (A); see illustration page 73.
26
Use the chip vacuum PT-2900 to remove all debris from the copper sleeve
bore.
J-42885
T2007088
J-42885
PT-2900
2
27
Inspect the copper sleeve bore for any
remaining debris. Pay close attention
to the O-ring area of the bore for any
remaining pieces of the O-ring that
may require scraping with a pocket
knife to remove. Reclean if needed.
28
Remove the 2 sealing clamps
9998250 from the cylinder head fuel
gallery, and remove any remaining debris using chip vacuum PT-2900.
Lubricate the new sealing ring with engine oil and install it on the new
copper sleeve.
Lubricate the sealing ring again with
engine oil.
W2003176
9998250
PT-2900
Install the copper sleeve on the flaring
tool 9998254, and lubricate the flaring
pin 9808000 with engine oil. Thread
the flaring tool 9998000 to the flaring
tool 9998254 until it bottoms. Then,
loosen the flaring pin approximately
180 .
Note: Failure to loosen the flaring tool
180 can result in the pin being twisted
or broken.
3
Check that the piston is not at T.D.C.
(if the piston is at T.D.C., the flywheel
must be turned). Carefully tap down
the copper sleeve until it bottoms out
against the sleeve seal in the cylinder
head.
4
Install and tighten the retainer for the
electronic unit injector.
74
9998254
9808000
Group 23 Fuel System, D12, D12A, D12B, D12C
5
Service Procedures
7
T2006707
T2007089
Flare the copper sleeve. Do this by
turning the nut while counterholding
the spindle until the flaring pin,
9998254 has been completely pulled
through the copper sleeve.
9998254
8
Note: Failure to counterhold the spindle will result in a twisted or broken
flaring pin.
6
Remove the flaring tool 9998254 and
pin 9808000.
Install the new sealing rings on the
electronic unit injector (EUI). Lubricate
the sealing rings with grease and install the electronic unit injector.
CAUTION
9998254
9808000
Remove all oil from the injector retainer bolt holes to
prevent a hydraulic lock that may result in damage to
the cylinder head.
Tighten the electronic unit injector.
New Copper Sleeve:
9
Tighten retainer bolt to a torque of 20
± 5 Nm (15 ± 4 ft-lb).
20 ± 5 Nm
(15 ± 4 ft-lb)
75
Group 23 Fuel System, D12, D12A, D12B, D12C
Service Procedures
10
16
W2003181
Turn the retainer bolt an additional 180
±5.
180 ± 5
T2006709
11
Loosen the retainer bolt for the unit injector prior to the second tightening.
12
Tighten bolt to a torque of 20 ± 5 Nm
(15 ± 4 ft-lb).
13
Turn the retainer bolt an additional
60 ± 5 .
20 ± 5 Nm
(15 ± 4 ft-lb)
60 ± 5
Note: Be careful not to pinch the EUI
wiring cable harness when installing
the valve cover.
Old Copper Sleeve:
14
Tighten the retainer bolt to a torque of
20 ± 5 Nm (15 ± 4 ft-lb).
20 ± 5 Nm
(15 ± 4 ft-lb)
Note: If the injector is not to be installed at once, install a protective plug
in the cylinder head.
15
Turn the retainer bolt an additional
60 ± 5 .
76
Connect the electronic unit injector
(EUI) electrical wires and tighten the
nut to a torque of 1.4 Nm (1 ft-lb).
The EUI electrical wires should be
routed to the outside of the valve
cover bolts.
Pay close attention to the cable holders. If one breaks, remove the broken
pieces to prevent clogging or damage
to any components.
60 ± 5
Note: Hold the wires while tightening.
If the screw gets damaged, the complete electronic unit injector must be
replaced.
Note: Applies to engines equipped
with VEB (Volvo Engine Brake).
The VEB control valve should be reinstalled at this time. Reconnect sliding
valve and pipe into the rocker arm
shaft as a unit. Apply Loctite® 242 to
threads and tighten the bolts to a
torque of 33 ± 4 Nm (24 ± 3 ft-lb).
1.4 Nm
(1 ft-lb)
33 ± 4 Nm
(24 ± 3 ft-lb)
Group 23 Fuel System, D12, D12A, D12B, D12C
Service Procedures
17
19
T2006777
Install all rocker arm shaft bolts, making sure they are hand tight before
continuing.
T2006820
Coat the valve bridges and camshaft
lobes with engine oil.
Note: When reinstalling a rocker arm
shaft which has been removed or loosened, only the bolts which hold the
rocker arm shaft should be tightened.
18
T2006776
CAUTION
Remove all oil from the rocker arm bridge bolt holes
to prevent a hydraulic lock that may result in damage
to the cylinder head.
Install the rocker arm bridge, using lifting tool 9998255.
9998255
77
Group 23 Fuel System, D12, D12A, D12B, D12C
20
W2003520
Fig. 60: Bearing caps and camshaft/rocker shaft,
tightening sequence
D12C:
1
2
3
4
5
15 ± 5 Nm (11
60 ± 5 Nm (44
15 ± 5 Nm (11
60 ± 5 Nm (44
0 Nm (0 ft-lb)
15 ± 5 Nm (11
±
±
±
±
4
4
4
4
ft-lb); +90 ± 5
ft-lb)
ft-lb); +120 ± 5
ft-lb); loosen to
± 4 ft-lb); +120 ± 5
D12, D12A, D12B:
1
2
3
4
5
Gradually tighten the bolts so that the
rocker arm shaft does not bend or
warp. Tighten the shaft until it lies
against the camshaft lobes, then
torque tighten using the 5-step torque
sequence shown.
21
Adjust the valves and the electronic
unit injector (EUI).
78
15 ± 5 Nm (11 ± 4 ft-lb); +90 ± 5
45 Nm (33 ft-lb)
15 ± 5 Nm (11 ± 4 ft-lb); +90 ± 5
45 Nm (33 ft-lb); loosen to
0 Nm (0 ft-lb)
15 ± 5 Nm (11 ± 4 ft-lb); +90 ± 5
Service Procedures
Feedback
One of our objectives is that workshop personnel should have access to correct and
appropriate service manuals where it concerns fault tracing, repairs and maintenance
of Volvo trucks.
In order to maintain the high standards of our literature, your opinions and experience
when using this manual would be greatly appreciated.
If you have any comments or suggestions, make a copy of this page, write down your
comments and send them to us, either via telefax or mailing directly to the address
listed below.
To
From
Volvo Trucks North America, Inc.
..........................................................................
Dept. 516 Service Publications
..........................................................................
7825 National Service Road
..........................................................................
P.O. Box 26115
..........................................................................
Greensboro, NC 27402-6115
..........................................................................
USA
..........................................................................
Fax (336) 393-3170
..........................................................................
Comments/proposals
................................................................................................................................................................................
................................................................................................................................................................................
................................................................................................................................................................................
................................................................................................................................................................................
................................................................................................................................................................................
................................................................................................................................................................................
................................................................................................................................................................................
................................................................................................................................................................................
................................................................................................................................................................................
................................................................................................................................................................................
................................................................................................................................................................................
................................................................................................................................................................................
................................................................................................................................................................................
Concerns Service Manual: ...............................................................................................................................
Operation Numbers
2309-05-03-01
2309-06-02-03
2309-11-03-01
2331-03-02-01
2331-03-02-02
2334-03-02-01
2339-03-02-02
2339-06-02-02
2371-03-02-02
2371-05-02-01
2379-03-02-02
Fuel System, Bleeding . . . . . . . . .
Fuel System Pressure, Checking . . . .
Fuel System, Draining . . . . . . . . . .
Fuel Feed Pump, Replacement . . . . .
Hand-Primer Pump, Replacement . . . .
Fuel Filter, Replacement . . . . . . . .
Overflow Valve, Replacement . . . . . .
Overflow Valve, Checking . . . . . . . .
Unit Injector, Replacement (One) . . . .
Unit Injector, Adjustment . . . . . . . .
Unit Injector Copper Sleeve, Replacement
.
.
.
.
.
.
.
.
.
.
.
.
.
.
.
.
.
.
.
.
.
.
.
.
.
.
.
.
.
.
.
.
.
.
.
.
.
.
.
.
.
.
.
.
.
.
.
.
.
.
.
.
.
.
.
.
.
.
.
.
.
.
.
.
.
.
.
.
.
.
.
.
.
.
.
.
.
.
.
.
.
.
.
.
.
.
.
.
.
.
.
.
.
.
.
.
.
.
.
.
.
.
.
.
.
.
.
.
.
.
.
.
.
.
.
.
.
.
.
.
.
.
.
.
.
.
.
.
.
.
.
.
.
.
.
.
.
.
.
.
.
.
.
.
.
.
.
.
.
.
.
.
.
.
.
.
.
.
.
.
.
.
.
.
.
.
.
.
.
.
.
.
.
.
.
.
.
.
.
.
.
.
.
.
.
.
.
.
.
.
.
.
.
.
.
.
.
.
. .
. .
. .
52,
. .
. .
60,
. .
. .
. .
. .
50
45
47
53
56
57
62
59
63
67
69
Volvo Trucks North America, Inc.
P.O. Box 26115, Greensboro, NC 27402-6115
Volvo Trucks Canada, Ltd.
6490 Vipond Drive, Mississauga, Ontario L5T 1W8
http://www.volvotrucks.volvo.com
PV776-TSP142867 (1000) 08.200 © Volvo Trucks North America, Inc., 2000