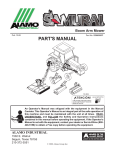
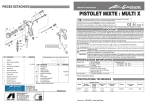
1
BRAHMA
Assembly Manual
Published 09-05
Part No. 02983272
Caterpillar Challenger
MT465B Cab/4wd
BRAHMA
Tractors equipped with additional options, special equipment, tractor manufacturer modifications,
new tractor models, or Customer alterations may prevent this Mount Kit from being properly
mounted to the tractor. Alamo Group is not responsible for modifications to the Mount Kit to
accommodate these differences.
ALAMO INDUSTRIAL
1502 E. Walnut
Seguin, Texas 78155
210-379-1480
© 2005 Alamo Group Inc.
TO THE OWNER/OPERATOR/DEALER
All implements with moving parts are potentially hazardous. There is no substitute for a cautious,
safe-minded operator who recognizes the potential hazards and follows reasonable safety
practices. The manufacturer has designed this implement to be used with all its safety equipment
properly attached to minimize the chance of accidents.
BEFORE YOU START!!
Read the safety messages on the implement and shown in your
manual. Observe the rules of safety and common sense!
INTRODUCTION
ABOUT THIS MANUAL:
The intent of this publication to provide the competent technician with the information necessary
to perform the CORRECT Assembly to the Alamo Industrial Product. This will, in turn provide for
complete customer satisfaction
It is hoped that the information contained in this and other Manuals will provide enough detail to
eliminate the need for contact of the Alamo Industrial Technical Service Dept. However, it should be
understood that many instances may arrive where correspondence with the Manufacturer is necessary.
CONTACTING MANUFACTURER: (Please help us Help You! Before You Call! )
Alamo Industrial Service Staff Members are dedicated to helping you solve your problem, or
your customer’s service problem as quickly and efficiently as possible. Unfortunately, we receive
entirely to many calls with only a minimum amount of information. In some cases, the correspondent
has never gone out to look at the equipment and merely calls inquiring of the problems described to him
by the operator or customer.
Most calls received by Alamo Industrial Service can be classified into approx. 6 general categories.
1.
Hydraulic or Mechanical Trouble Shooting.
2.
Request for Technical Information or Specifications.
3.
Mounting or Fitting Problem.
4.
Special Service Problem.
5.
Equipment Application Problems.
6.
Tractor Problem Inquiries.
HOW YOU CAN HELP:
Make sure the call is necessary! Most of the calls received may not be necessary if the Dealer
Service Technician would do the following.
1.
Check the Service Information at your Dealership provided by Alamo Industrial, This
would include, Service Bulletins, Information Bulletins, Parts Manuals, Operators Manuals, Assembly
Manual or Service Manual, many of these are available via the Alamo Industrial Internet site (www.AlamoIndustrial.Com). Attempt to diagnose or repair problem before calling.
2.
If a call to Alamo Industrial is needed, Certain Information should be available and ready
for the Alamo Industrial Service Staff. Such information as, Machine Model, Serial Number, Your Dealer
Name, Your Account Number and Any other information that will be useful. This information is vital for
the development of a prompt and correct solution to the problem. This will also help to develop a
database of problems and related solutions, which will expedite a solution to future problems of a similar
nature.
3.
The technician may be asked to provide detailed information about the problem
including the results of any required trouble shooting techniques. If the information is not available, The
technician may be asked to get the information and call back. Most recommendations for repairs will
be based on the procedures listed in the Service Manual / Trouble Shooting Guide and Information
provided by customer.
CONTACT ALAMO INDUSTRIAL:
Alamo Industrial, 1502 E. Walnut St. Seguin TX. 78155, Technical Service Dept. PH: 830-379-1480
Brahma (Caterpiller Challenger MT465B Asy. Manual) 09/05
© 2005 Alamo Group Inc.
Index -1
INDEX - ASSEMBLY INSTRUCTION
Index
Page
Introduction..................................................................................... Index 1
General Index................................................................................. Index 2 & 3
User / Assmbly Notes..................................................................... Index 4
Section 1
Safety Section.................................................................................... 1-1 to 1-6
Section 2
Pre-Dilivery Check List...................................................................... 2-1 to 2-4
Section 3
General Information............................................................................3-1 to 3-3
Tools Required.................................................................................. 3-2
Bolt Torque Chart.............................................................................. 3-2
General Statement............................................................................ 3-3
Section 4
Frame Mounting................................................................................. 4-1 to 4-4
RH Frame Rail Installation................................................................ 4-2 to 4-3
Pins & Teflon Bearing Information / Warning.................................... 4-3
Mounting Arm & Under Beam........................................................... 4-4
Section 5
Pump - Driveshaft - Hyd. Tank.......................................................... 5-1 to 5-9
Prepare Tractor................................................................................. 5-2
Install Crankshaft Pulley Adapter ..................................................... 5-2 to 5-3
Install Driveshaft ................................................................................5-3
Install Pump Mount Plate................................................................... 5-3
Install Driveshaft ................................................................................5-4
Pump & Pump Drive Schematic....................................................... 5-5 to 5-6
Install Tank & Bumper....................................................................... 5-7 to 5-8
Section 6
Cylinder Control Valve Installation......................................................6-1 to 6-7
Mount Cylinders ................................................................................ 6-2
Modify Control Valve End Cap.......................................................... 6-2 to 6-3
Connect Remote Cables to Valve.................................................... 6-4
Mounting Control Valve to Frame..................................................... 6-5 to 6-7
Brahma (Caterpiller Challenger MT465B Asy. Manual) 09/05
© 2005 Alamo Group Inc.
Index -2
INDEX - ASSEMBLY INSTRUCTION
Section 7
Page
Joystick & Electrical Controld Mounting............................................ 7-1 to 7-6
Install Joystick Mounting Stand....................................................... 7-2
Joystick Control Instruction Decal.................................................... 7-2 to 8-3
Install Cbles & Wire Harnnes through Cab Floor............................. 7-2
Connect Cables to Joystick.............................................................. 7-3
Connecting Wire Harness................................................................. 7-4 to to 7-6
Section 8
Pump Hose c Connections & Head Installation.................................8-1 to 8-8
General Information about Hose connections.................................. 8-2 to 8-3
Pump to Frame Hose connections................................................... 8-4
Hose Retaining Ring......................................................................... 8-4
Hose to Pump Connections.............................................................. 8-4
Head Installation................................................................................. 8-5 to 8-7
Section 9
Tractor Start Up Procedure............................................................... 9-1 to 9-4
Hydraulic Tank Filling......................................................................... 9-2 to 9-3
Tank Shield Installation...................................................................... 9-3
Stratup Procedure..............................................................................9-4
Section 10
Mounting Specifications..................................................................... 10-1 to 10-3
Mounting Kit Bills of Materials List..................................................... 10-4 to 10-9
Component ID................................................................................... 10-10 to 10-18
Brahma (Caterpiller Challenger MT465B Asy. Manual) 09/05
© 2005 Alamo Group Inc.
Index -3
NOTES
Brahma (Caterpiller Challenger MT465B Asy. Manual) 09/05
© 2005 Alamo Group Inc.
Index -4
Section 1
A-BOOM
Caterpiller Challenger
MT465B
Cab / 4 WD Tractor
SAFETY
SECTION
Brahma (Caterpiller Challenger MT465B Asy. Manual) 09/05
© 2005Alamo Group Inc.
Section 1 - 1
Read these assembly instructions through completely and understand them
before proceeding with the assembly of the equipement.
A safe and careful operator is the best operator. Safety is of primary importance to the
manufacturer and should be to the owner/operator. Most accidents can be avoided by
being aware of your equipment, your surroundings, and observing certain precautions. The
first section of this manual includes a list of Safety Messages that, if followed, will help
protect the operator and bystanders from injury or death. Read and understand these
Safety Messages before assembling, operating or servicing this Implement. This equipment should only be operated by those persons who have read the Manual, who are responsible and trained, and who know how to do so safely and responsibly.
The Safety Alert Symbol combined with a Signal Word, as seen below, is used throughout
this manual and on decals which are attached to the equipment. The Safety Alert Symbol
means: “ATTENTION! BECOME ALERT! YOUR SAFETY IS INVOLVED!” The Symbol
and Signal Word are intended to warn the owner/operator of impending hazards and the
degree of possible injury faced when operating this equipment..
Practice all usual and customary safe working precautions and
above all---remember safety is up to YOU. Only YOU can prevent
serious injury or death from unsafe practices.
CAUTION!
The lowest level of Safety Message; warns of possible injury. Decals
located on the Equipment with this Signal Word are Black and Yellow.
WARNING!
Serious injury or possible death! Decals are Black and Orange.
DANGER!
Imminent death/critical injury. Decals are Red and White. (SG-1)
Brahma (Caterpiller Challenger MT465B Asy. Manual) 09/05
© 2005 Alamo Group Inc.
Section 1 - 2
PELIGRO!
Si no lee Ingles, pida ayuda a alguien que si lo lea para que le
traduzca las medidas de seguridad. (SG-3)
!LEA EL INSTRUCTIVO!
READ, UNDERSTAND, and FOLLOW the following Safety
Messages. Serious injury or death may occur unless care is
taken to follow the warnings and instructions stated in the Safety
Messages. Always use good common sense to avoid hazards.
(SG-2)
!
PELIGRO!Si no lee Ingles, pida ayuda a alguien que
si lo lea para que le traduzca las medidas
de seguridad. (SG-3)
LEA EL
INSTRUCTIVO!
WARNING!
Perform service, repairs and lubrication according to the maintenance section. Ensure the unit
is properly lubricated as specified in the lubrication schedule and all bolts and nuts are properly
torqued. Failure to properly service, repair and maintain this Implement in good operating
condition could cause component failure and possible serious injury or even death. (SG-35)
WARNING!
Operate this Equipment only with a Tractor equipped with an
approved roll-over-protective system (ROPS). Always wear seat
belts. Serious injury or even death could result from falling off the
tractor--particularly during a turnover when the operator could be
pinned under the ROPS. (SG-7)
DANGER!
Never work under the Implement, the framework, or any lifted component unless the Implement is securely supported or blocked up to
prevent sudden or inadvertent falling which could cause serious injury
or even death. (SG-14)
WARNING!
Use caution and wear protective gloves when handling sharp objects such as blades, knives,
and other cutting edges. Be alert to worn component surfaces which have sharp edges. Sharp
surfaces can inflict severe laceration injuries if proper hand protection is not worn. (SG-37)
Brahma (Caterpiller Challenger MT465B Asy. Manual) 09/05
© 2005Alamo Group Inc.
Section 1 - 3
WARNING! Many of the parts are heavy and require lifting assistance. Do not try to
lift the heavy parts by yourself. Get help from another employee or from
an overhead crane.
WARNING!
The operator and all support personnel should wear hard hats,
safety shoes, safety glasses, and proper hearing protection at all
times for protection from injury including injury from items thrown by
the equipment. (SG-16)
WARNING!
Always wear safety shoes with steel toes when working on this equipment.
It is recommended that the safety shoes have metatarsal guards.
WARNING!
When welding use Welding hood with the appropriate OSHA required
protective lens, welding apron, and welding gloves.
DANGER!
Always disconnect the wire leads from the mower valve solenoid before
performing service on the Tractor or Mower. Use caution when working
on the Tractor or Mower. Tractor engine must be stopped before
working on Mower or Tractor. The Mower Blades could inadvertently be
turned on without warning and cause immediate dismemberment, injury
or death. (SBM-12)
DANGER!
Never run the tractor engine in a closed building or without adequate
ventilation. The exhaust fumes can be hazardous to your health.
(SG-23)
Brahma (Caterpiller Challenger MT465B Asy. Manual) 09/05
© 2005 Alamo Group Inc.
Section 1 - 4
DANGER!
WARNING!
Before starting the mower make sure the area is clear and the floor has
been swept. The mower blade can throw objects several hundred feet.
Thrown objects could damge property or cause severe bodily injuries even
death.
Make certain that the “Slow Moving Vehicle” (SMV) sign is installed in
such a way as to be clearly visible and legible. When transporting the
Equipment use the Tractor flashing warning lights and follow all local traffic
regulations. (SG-6)
DANGER!
Start tractor only when properly seated in the Tractor seat. Starting a
tractor in gear can result in injury or death. Read the Tractor operators
manual for proper starting instructions. (SG-13)
DANGER!
Do not operate this Equipment with hydraulic oil leaking. Oil is
expensive and its presence could present a hazard. Do not check for
leaks with your hand! Use a piece of heavy paper or cardboard. Highpressure oil streams from breaks in the line could penetrate the skin
and cause tissue damage including gangrene. If oil does penetrate the
skin, have the injury treated immediately by a physician knowledgeable and skilled in this procedure. (SG-15)
WARNING! Always read carefully and comply fully with the manufacturers instructions when handling oil, solvents, cleansers, and any other chemical
agent. (SG-22)
DANGER!
All Safety Shields, Guards and Safety devices including
(but not limited to) - the Deflectors, Chain Guards, Steel
Guards, Gearbox Shields, PTO integral shields , and
Retractable Door Shields should be used and maintained in good working condition. All safety devices
should be inspected carefully at least daily for missing
or broken components. Missing, broken, or worn items
must be replaced at once to reduce the possibility of
injury or death from thrown objects, entanglement, or
blade contact. (SGM-3)
Brahma (Caterpiller Challenger MT465B Asy. Manual) 09/05
© 2005Alamo Group Inc.
Section 1 - 5
DANGER! NEVER use drugs or alcohol immediately before or while operating the
Tractor and Implement. Drugs and alcohol will affect an operator’s
alertness and coordination and therefore affect the operator’s ability to
operate the equipment safely. Before operating the Tractor or Implement, an operator on prescription or over-the-counter medication must
consult a medical professional regarding any side effects of the medication that would hinder their ability to operate the Equipment safely.
NEVER knowingly allow anyone to operate this equipment when their
alertness or coordination is impaired. Serious injury or death to the
operator or others could result if the operator is under the influence of
drugs or alcohol. (SG-27)
DANGER!
WARNING!
WARNING!
Operate the Tractor and/or Implement controls only while properly seated
in the Tractor seat with the seat belt securely fastened around you.
Inadvertent movement of the Tractor or Implement may cause serious
injury or death. (SG-29)
Engine Exhaust, some of its constituents, and certain vehicle
components contain or emit chemicals known to the state of
California to cause cancer and birth defects or other
reproductive harm. (SG-30)
Battery posts, terminals and related accessories contain lead
and lead compounds, chemicals known to the state of California to cause cancer and birth defects or other reproductive
harm. Wash Hands after handling. (SG-31)
WARNING!
Use extreme caution when getting onto the Implement to perform repairs, maintenance and
when removing accumulated material. Only stand on solid flat surfaces to ensure good
footing. Use a ladder or raised stand to access high spots which cannot be reached from
gound level. Slipping and falling can cause serious injury or death. (SG-33)
WARNING!
Avoid contact with hot surfaces including hydraulic oil tanks, pumps, motors, valves and
hose connections. Relieve hydraulic pressure before performing maintenance or repairs.
Use gloves and eye protection when servicing hot components. Contact with a hot surface
or fluid can cause serious injury from burns or scalding. (SG-34)
WARNING!
Avoid contact with hot surfaces of the engine or muffler. Use gloves and eye protection
when servicing hot components. Contact with a hot surface or fluid can cause serious injury
from burns or scalding. (SG-38)
Brahma (Caterpiller Challenger MT465B Asy. Manual) 09/05
© 2005 Alamo Group Inc.
Section 1 - 6
Section 2
BRAHMA
Caterpiller Challenger
MT465B
Cab / 4 WD Tractor
PRE-DELIVERY INSPECTION
CHECKLIST
Brahma (Caterpiller Challenger MT465B Asy. Man.) 09/05
© 2005 Alamo Group Inc.
Section2 - 1
BRAHMA PRE-DELIVERY INSPECTION CHECKLIST
Pre-Operation Inspection: Check the following items before operating the unit to
assure that they are properly assembled.
Saftey Equipment:
-------------------------
Operators Manual is with Unit.
The Safety Decals are installed as listed in the Assembly Manual.
Valve operation plate is installed.
Operators cage or Tractor Cab is in place. (Item 1 page 1-4)
Deflectors are installed on the Mower Head. (Item 2 page 1-4)
Tractor Rops or Cab with seatbels installed properly.
Frame:
-------------
Front Support Bolts are torqued.
Hydraulic Tank mounting Pins / Bolts in place correctly.
All Welds inspected toinsure proper welds and locations.
Hydraulic System:
-----------------------------
Oil Level in Hydraulic Tank is within the sight gauge.
Hose connections are tight.
Hoses do not have any kinks or twist in them.
Front Pump Shaft adapter bolts are tight.
Front Pump Shaft Coupler / Drive Shaft is lubricated and has an anti-seize compound
on the Splines of Pump and Shafts.
The Pump Drive Shaft has correct alignment.
Suction Hose has no leaks or kinks.
Rotary Mower Head:
-----------------------------
Skid Shoe Bolts are torqued to 120 ft. lbs.
Spindle Housing Bolts are torqued to 400 ft. lbs.
The Spindle Housing is properly lubricated.
Motor Bolts are torqued to 120 ft. lbs.
Blade Carrier (Bar) Bolts torque to 400 ft. lbs.
Blade Bolts are torqued and the retainings Pins are in place.
Blades Swing freely.
Brahma (Caterpiller Challenger MT465B Asy. Man.) 09/05
© 2005 Alamo Group Inc.
Section 2 - 2
BRAHMA PRE-DELIVERY INSPECTION CHECKLIST
Pre-Operation Inspection: Check the following items before operating the unit to assure
that they are properly assembled. (See following page 1-4 for component location)
Flail Mower Head:
___
___
___
___
___
___
Skid Shoe Bolts are torqued to 120 ft-lbs
Motor Bolts are torqued to 120 ft-lbs
Belt Alignment& tension adjustment is correct
Cutter shaft bearings are properly lubricated
Roller bearings are properly lubricated
Blades swing freely
Tractor Mower Operation Inspection:
Using all Safety precautions, operate the Tractor and Mower unit for 30 minutes and
while the unit is running check the following items: Note! Only make adjustments after
the mower has been turned off and all motion has stopped and all hydraulic pressure
has been relieved.
___ Check for Hydraulic oil leaks at the hose connections
___ Operate the mower head throughout its full range of motion and check for hose's
rubbing, pinching, or kinking.
___ Make sure the Return Filter Gauge is reading in the Green after Oil is warm.
___ Check the function of the Mower Head On-Off Valve and switch for proper function
___ Make sure that the tractor will not start with the mower on-off switch in the on
position.
___ Check the Blade Rotation for the Rotary Mower Head to make sure it is turning
Clockwise looking from the top of the mower deck and facing forward.
___ Make sure the control valve boom movements agree with the valve operation decal.
___ Make Sure Boom Movement operates as expected and is smooth and under control
(no air in the control system)
___ Look for any unusual or excessive noise or vibrations.
Post-Operation Inspection:
___ Check that the oil in the hydraulic tank has not turned milky in color or has foam on top.
___ Check that there are no loose fasteners or hardware.
Brahma (Caterpiller Challenger MT465B Asy. Man.) 09/05
© 2005 Alamo Group Inc.
Section 2 - 3
NOTES
Brahma (Caterpiller Challenger MT465B Asy. Man.) 09/05
© 2005 Alamo Group Inc.
Section 2 - 4
Section 3
BRAHMA
Caterpiller Challenger
MT465B
Cab / 4 WD Tractor
General Information
Brahma (Caterpiller Challenger MT465B Asy. Man.) 09/05
© 2005 Alamo Group Inc.
Section 3 - 1
GENERAL INFORMATION:
The tools you will need at the assembly site are as follows:
1.
2.
3.
4.
5.
6.
7.
8.
9.
Impact wrench or socket and ratchet set.
Rubber mallet.
Box-end, Allen, and adjustable wrenches.
Alignment pins.
Forklift or hydraulic floor jacks with rolling back boards.
Small chain hoist or block-and-tackle.
Multidirectional Levels.
Hydraulic Filter Buggy or Cart.
Safety shoes, safety glasses, and gloves.
A hard hat should be worn by anyone working under any raised component.
Remember to follow each step closely and cautiously. Be aware of all support personnel at all times.
Keep the assembly area as clean as possible; clean up all spills when they occur. An uncluttered
assembly area and a crew that is sensitive to the hazards involved in putting this implement together
will help prevent accidents. Keep all unauthorized personnel from the area. Do not allow children near
the assembly site nor allow them on or near the tractor after assembly. There is no safe place for
anyone except the operator on the tractor and those assisting with the assembly.
RECOMMENDED TORQUE VALUES CHART:
RECOMMENDED TORQUE IN FT.-LBS. (Nm)
COARSE AND FINE THREADS
5 (D)
2 (B)
8 (F)
Bolt
Dia.
Plain
Head
Three
Dashes
Six
Dashes
1/4"
5/16"
3/8"
7/16"
1/2"
9/16"
5/8"
3/4"
7/8"
1"
1-1/8"
1-1/4"
Not used
Not used
Not used
35 (47)
55 (75)
75 (102)
105 (142)
185 (251)
160 (217)
250 (339)
330 (447)
480 (651)
10 (14)
20 (27)
35 (47)
55 (75)
85 (115)
130 (176)
170 (230)
300 (407)
445 (603)
670 (908)
910 (1234)
1250 (1695)
14 (19)
30 (41)
50 (68)
80 (108)
120 (163)
175 (237)
240 (325)
425 (576)
685 (929)
1030 (1396)
1460 (1979)
2060 (2793)
Brahma (Caterpiller Challenger MT465B Asy. Man.) 09/05
© 2005 Alamo Group Inc.
Section 3 - 2
To help you assemble your new Brahma and mount it to your tractor, we provide you with
drawings, instructions, and general information. When needed, you can get information or
clarification from Your Dealer or Alamo Group Customer Service.
This publication provides general information not specifically for your case or tractor, but, in
connection with the drawings and Parts Section, this publication offers you some valuable
assistance - please read it thoroughly.
The mount kits are made for selected tractors with standard configurations. Only the noted
options and tire sizes listed in the model specifications will work with these mount kits. Other
options, front axles, or different tire sizes may prevent the mount kit from fitting your nonstandard
tractor. Alamo Group cannot take responsibility for these problems or any modifications made to
the unit.
Throughout these instructions, In the Parts Mnaual, Operators Manual and decals on unit you will
see the following symbles, pay close attenion to them. References are made to right or left
directions. Right and left are determined by sitting on the tractor seat and facing the direction of
travel.
This is the Safety-Alert symbol. When you see this symbol on your machine
or in these instructions, be alert to the potential for personal injury. Follow
recommended precautions and safe operating practices.
DANGER!
A signal word - DANGER, WARNING, or CAUTION - is used with the Safety Alert
symbol. DANGER identifies the most serious hazards.
WARNING!
Safety signs with signal word
more serious hazards.
CAUTION!
General precautions are listed on CAUTION safety sign. CAUTION also
calls attention to safety messages in these instructions.
WARNING are typically used to point out
Brahma (Caterpiller Challenger MT465B Asy. Man.) 09/05
© 2005 Alamo Group Inc.
Section 3 - 3
NOTES
Brahma (Caterpiller Challenger MT465B Asy. Man.) 09/05
© 2005 Alamo Group Inc.
Section 3 - 4
Section 4
BRAHMA
Caterpiller Challenger
MT465B
Cab / 4 WD Tractor
Frame Mounting
Brahma (Caterpiller Challenger MT465B Asy. Man.) 09/05
© 2005 Alamo Group Inc.
Section 4 - 1
Mounting Main Frame Asy. To Tractor
MOUNTING RH FRAME WELDMENT:
1.
The RH Frame weldment will bolt to the rear axle and the front right hand side of the front
of the tractor. use bolts, flatwashers & lockwashers furnished (See Figure 1) in bolt bag.
Secure Tractor so that it cannot be started unless you want it started. DO NOT Mount any
Brackets or components until instructed to do so. There are some components that will interfere
with mounting others if mounted to soon. The RH frame and LH frame support must be mounted
under the tank rails as they are retained with the same bolts. The front 4 bolts of frame rail should
be left loose until the frail rails are installed later. Back from the front 4 bolts there are two bolts
that can be snugged for now, remember these must be tighten later.
Front of
Tractor
2
P/N 02975669 Bolt, M20 X 60MM
P/N 02971158 Lockwasher M20
P/N 5312316 Hardened Flatwasher 3/4"
4
RH Side of
Tractor
P/N 02975738 Bolt, M20 X 70MM
P/N 02971158 Lockwasher M20
P/N 5312316 Hardened Flatwasher 3/4"
Rear of
Tractor
P/N 02983114
Main frame Weldment
Figure 1
Figure 2
P/N 02976113 Bolt, M20 X 80MM
P/N 02971158 Lockwasher M20
P/N 5312316 Hardened Flatwasher 3/4"
4
Figure 3
2.
The rear of the frame weldment will bolt up under the RH rear axle. The stabilizer bracket
for the RH side will need to be taken loose (See Figure 2) and reinstalled over the frame
weldment (See Figure 3). The frame weldment will need to be supported while the bolts are being
installed, this can be done with floor jacks or by using an overhead hoist. When lifting the frame
weldsment use caution not to damage the cab or other components of the tractor. Do not tighten
any of the mounting bolts for the frame weldment until all the bolts have been install. When
tightening the frame weldment do not use the bolts to force the frame up, it should go up straight.
Brahma (Caterpiller Challenger MT465B Asy. Man.) 09/05
© 2005 Alamo Group Inc.
Section 4 - 2
Mounting Main Frame Asy. To Tractor
3.
The LH Frame Support will bolt to the LH side of the tractor with the angle end pointing
inward toward RH side (See Figure 4, 5 & 8). Use 4 bolts (P/N 02975738) 4 Lockwashers (P/N
02971158) and 4 Hardened Flatwashers (P/N 5312316). The LH Tank Rail will bolt on with these
same bolts front 4 bolts, these bolts should be left loose until tank rails are installed. There are 2
bolts (P/N 02975669) 2 Flatwashers (P/N 5312316) and 2 Lockwashers (P/N 02971158) that will
be used in the LH frame rail that can be installed and snugged (See Figure 5).
PINS AND TEFLON BEARINGS:
1.
Teflon Bearings and Pins should last a reasonable time on Brahma, but only if properly
installed.
2.
Before assembling any points that have
teflon bearings, check for any damage to the bearings, or any burrs on the pins. Replace the bearing if there is any damage to it, and remove any
burrs on the pins.
P/N 02983115
LH Frame Support
Toward RH side of
Tractor
3.
DO NOT USE EXCESSIVE FORCE - Pins
should slide into the bearing with just hand force.
If they do not check each bearing and thru hole to
make certain that the pin will go into them. It they
do, realign and try again. Teflon bearings are not
to be Force Fitted. The Holes for the pins are align
bored, DO NOT use force to spread any components as you will misaligned the holes.
Figure 4
4.
If the Teflon sheathing is pushed out by a
pin, the bearing must be replaced immediately.
5.
DO NOT USE ANY KIND OF LUBRICANT - If problems continue, do not use any kind
of lubricant to aid the installation of the pin (it will
only attract dirt, becoming liquid sandpaper, and
definitely destroy the bearing) Contact your dealer,
or Alamo Industrial Technical Services.
P/N 02983115
LH Frame Support
Figure 5
Under Beam Weldment
Lift Arm Assembly
Figure 6
Figure 7
Brahma (Caterpiller Challenger MT465B Asy. Man.) 09/05
© 2005 Alamo Group Inc.
Section 4 - 3
Mounting Main Frame Asy. To Tractor
6.
Assembled Components. The Under Beam and the Lift Assembly will be shipped assembled. The pins and bolts will have to be removed in order to mount them together and to the
tractor, use caution not to damage pin bearings.
MOUNTING ARM & UNDER BEAM INSTALLATION:
1.
The Under Bear & Lift arm can be assembled off the tractor and then installed as an
assembly to the tractor, or they can be installed as components one piece at a time. If installing
under beam and Lift Arm assembled it is best that you use an overhead hoist and an assistant to
help control the components movement. The LH Under beam Support Mount WILL be assembled
to the tractor be fore the under beam is installed. The Clamp plate to mount the under beam to the
LH Under beam Support Mount will be installed after the arm, bracket and under beam asy are
installed (See Figure 8).
2.
Locate Components. Locate Lift Arm Assembly (See Figure 7). Locate the underbeam
weldment (See Figure 6 & 8). These component can be assembled together then mounted on to
the tractor. These are heavy components you will need an overhead hoist to lift them into position.
3.
Align components. The same pin will connect all three components. It works well to have
the Mounting Arm Assembly up off the floor a few inches (See Figure 8). Align the under beam up
with the lift arm, using a hoist lower the under beam down and into the frame rail. Caution: read
the section on the previous page about the bearings for these pin, this is important that
these bearings are not damaged.
LH Under Beam
LH Under Beam
Support Mount
RH Frame
Clamp Plate
Weldment
Lift Arm Asy
Under Beam
Weldment
Pin Lock Nut
Arm Pivot
Figure 8
Pin
NOTE: Shown in Figure 8 as disassembled as reference only, these components can be connected to tractor as an assembly, it is the person mounting the unit to decide which method
works best for them.
Pin Retaining
Bolt
Brahma (Caterpiller Challenger MT465B Asy. Man.) 09/05
© 2005 Alamo Group Inc.
Section 4 - 4
Section 5
MACHETE
Caterpiller Challenger
MT465B
Cab / 4 WD Tractor
Front Pump, Driveshaft &
Hydraulic Tank
Installation
Brahma (Caterpiller Challenger MT465B Asy. Man.) 09/05
© 2005 Alamo Group Inc.
Section 5 - 1
Pump / Driveshaft Assembly Instructions
Installing Pump, Pump Drive Components and Hydraulic Tank:
This Section covers the installation of Pump Drive Components, Pump Assembly and the Hydraulic
Tank. Some precautions must be followed during the Assembly Process and before unit is ever started
for the first time.
1. Tractor must be disabled to prevent accidental engine start and prevent damage to components.
2. All Fittings, Hose, Cylinders, Tank must be kept plugged at all times, No part of the Hydraulic
System can be left open at any time during mounting process, this will keep system clean.
3. All Tools, Work Area, Components and Workers Hands must remain Clean when working on
any part of the Hydraulic System.
4. All components should be rechecked for tightness at least twice, Hose routing also double
checked.
Prepare Tractor Front Plate (Bolster) to Slide Driveline in F/ Engine Side:
1.
Preparing Tractor, On the Left and Right side of Tractor the hood sides will need to be removed,
also if there are engine protective shields they will have to be removed to install pulley adapter and driveshaft
half. The shaft half of driveline will have to be slid down and through the bolster from the engine side of
radiator. The driveshaft has to slide in from the engine side because the hole (holes) in bolster may be
to small for driveline flange yoke to slide through. There is a plate that is bolted to the front of tractor that
will have to be removed. Check hoses for the Oil Cooler and/or Air Conditioning condenser, these hoses
need to be tied up in such away that they will not rub on driveshaft after it has been installed.
Installing Pump Drive Components:
1.
With Front Bolster cover removed Remove any plastic plugs that are located in the threaded holes
in the front and discard them, they will not be needed. The Casting should already have a hole in it for the
driveshaft to slide through.
Installing Crankshaft Pulley Adapter:
1.
Install Pulley Adapter. The Pulley adapter (P/N 02979238) is a round plate with 4 threaded holes
and four non-threaded holes in it. Notice this pulley adapter will not have a center hole in it (See Figure 1).
The four non-threaded holes are used to mount the Adapter to the Crankshaft Pulley using 4 bolts and 4
lockwashers that are supplied in mount kit. The four threaded holes are used to install the flange yoke of
driveline to pulley adapter Do not use longer bolts to mount Pulley Adapter to Pulley or Flange yoke to
adapter than are supplied with mounting kit, if longer bolts are used they could go through adapter and pulley
causing damage. Tighten the four bolts that retain the pulley adapter to the pulley now, it will be easier than
trying to tighten them later.
2.
Install Shaft Half of Driveline with Flange Yoke. Note the driveline universal joints should be timed
(See Figure 2). Slide the two driveline half assemblies apart and lay the tube half aside for now. Make
certain that the four retaining bolts for the Pulley adapter to the crankshaft pulley have been tightened.
From the side of the tractor (LH or RH side) slide the Shaft Half of driveline shaft end first down into
the opening below the radiator from engine side, insert it through the existing hole until the shaft is pointed
toward the front of the tractor, and the flange yoke is over far enough to align with the four threaded pulley
adapter holes. Special Note. Some technicians do not connect driveshaft to crank shaft pulley at this time,
they leave the driveshaft pushed up under radiator. This allows them to be able to start and move tractor
if needed without damaging the pump due to no oil. If you do this use extreme caution that driveshaft is out
of way of crankshaft pulley and will not move and hit them.
Align the four holes in the flange yoke of driveline with the four threaded holes in the pulley adapter.
Install the four retaining bolts and lockwasher into flange yoke into adapter, tighten them at this time. These
four bolts can be tightened by using a long socket extension run through along side the driveline shaft.
Set the tube end of driveshaft aside for now as it will be installed later. But always remember the
driveline universal joint must be aligned (timed) when assembling the driveline halves.
Brahma (Caterpiller Challenger MT465B Asy. Man.) 09/05
Section 5 - 2
© 2005 Alamo Group Inc.
Pump / Driveshaft Assembly Instructions
Four Non-Threaded Holes
Figure 1
Four Threaded
Holes
Splined Clamp Yoke
/ Tube End
Flange Yoke
/ Shaft End
Drive Shaft
Assembly
Pulley Adapter
P/N 02979238
Figure 2
Installing Pump Mounting Weldment :
1.
Install Pump Mounting Weldment. The Pump Mount Weldment (P/N 02977074) bolts to
the front of the tractor, there are four spacers that are used (P/N 02982085) used to space pump
mount plated (See Figure 3) .
P/N 002528 Bolt, M20 X 70MM
P/N 02971158 Lockwasher M20
P/N 5312316 Hardened Flatwasher 3/4"
P/N 20982085 Spacers (4)
4
123456789012345678901
123456789012345678901
123456789012345678901
Tractor Bolster
12345678901234567890
12345678901234567890
12345678901234567890
12345678901234567890
Figure 3
P/N 02977074 Pump
Mount Weldment
Installing Driveline Half to Pump :
1.
Install Driveline Half to Pump. Coat the Splined Pump Shaft with anti-sieze compound
before installing driveline. Grease the driveshafts universal joints before assembly. Install the
clamp yoke of the tube half of driveline onto the pump, slide the clamp yoke on pump shaft until
you have about 1/8" to 1/4" gap between yoke and pump. Do not install yoke so far on pump shaft
that yoke will rub against pump in anyway. Tighten the two bolts and nuts on clamp yoke at this
time. (See Figure 4)
Brahma (Caterpiller Challenger MT465B Asy. Man.) 09/05
© 2005 Alamo Group Inc.
Section 5 - 3
Pump / Driveshaft Assembly Instructions
Driveline Tube Half with
Clamp Yoke
12
12
12
12
12
12
12
12
12
12
123456
123456
123456
123456
1
1
12
12
12
12
12
12
12
Figure 4
Installing Pump to Pump Mount Weldment :
1.
Install Pump to Pump Mount Weldment. The Pump has the tube half of driveline attached
and clamp yoke tightened. To install the pump and driveline half it is best to use an assistant or
overhead hoist to help you align the drivelines halves as they are slid together, the Driveline must
be timed (universal joints aligned the same) as shown in the pump & driveline schematic on (See
Figure 4 thru 12). Slide Driveline half and pump together until the shoulder on the pump slide in
the hole on the pump mount weldment. The Driveshaft halves will have to slide together while the
two halves must align to keep the universal jionts in time.
When installing the pump always keep ports sealed to keep them clean and free of
contamination. The pump MUST be turned correctly. This can be done by making certain that the
pressure filter that is mounted on top of the pump is up.
Install the two 1/2" X 1-1/2" long pump mount bolts (P/N 02892000) and two 1/2"
lockwashers (P/N 00001300). Tighten the two pump mounting bolts.
Bolts To
Tractor Bolster
Mounting Bolts
Pump Mount Plate
12
12
123
123
123
12
12
12
12
12
12
12
12
12
12
12345678901
12345678901
12345678901
11
11
11
11
Spacers
12345678901
12345678901
12345678901
Figure 5
Brahma (Caterpiller Challenger MT465B Asy. Man.) 09/05
Section 5 - 4
© 2005 Alamo Group Inc.
Pump / Driveshaft Assembly Instructions
Driveshaft & Pump
Mount Weldment
installed
Figure 6
Align Splines on Pump Shaft
with Driveshaft clamp yoke.
Figure 8
Pump Shipped w/ Hyd. Tank &
Pump Cover
Figure 7
Tighten Clamp Yoke, leave
1/8" to 1/4" gap btween
yoke & pump
Figure 9
Push Pump into Pump
Mount until flush
Figure 10
Install Pump
Mounting Bolts
Figure 11
Brahma (Caterpiller Challenger MT465B Asy. Man.) 09/05
© 2005 Alamo Group Inc.
Section 5 - 5
Pump / Driveshaft Assembly Instructions
Pump & Driveshaft Components
Tractor Engine Pulley
Time Universal Joints
Pump End
Clamp Yoke
Pulley Adpater P/N 02979238
w/ Mounting Bolts & Washers
(4 bolts)
Driveline Asy P/N
02975257A
12
12
12
12
12
12
12
1234
1234
1234
12
12
12
12
12
12
12
12345
12345
Driveshaft Mounting Bolts (4)
Mounting Bolts
123456789012
123456789012
123456789012
1
1234
1234
1
Pump Mount
P/N 02977074
Pump (Reference)
123456789
123456789
123456789
123456789
12345678901
12345678901
12345678901
12345678901
Mounting Bolts
Figure 12
Spacers
P/N 02982085
Bolts To
Tractor Bolster
Pump Mounting Bolts
Install Tank Rail Weldments:
1.
Install Tank Rail Welments. P/N 02983116 LH and P/N 02983118 RH. These will bolt on using
the holes to the front of the tractor bolster on each side.. This will need to be done so the hydraulic tank
can be mounted (See Figure 13 & 14).
Do Not tighten the bolts at this time, leave them a bit loose it will help in instaling hydraulic tank and
bumper weldment later. NOTE: There is a left hand and a right hand weldment, the best way to
determine which is LH and RH is the welded on mount for the rubber hold down. These rubber hold
downs will always be to the outside (See Figure 13)
Brahma (Caterpiller Challenger MT465B Asy. Man.) 09/05
Section 5 - 6
© 2005 Alamo Group Inc.
Pump / Driveshaft Assembly Instructions
Cover Hold
down on outside
Cover Hold
down on outside
P/N 02983118
P/N 02983116
Figure 13
Installing Hydraulic Tank:
Tank Mounting
Rails
Special Note, the photos in this section may not be of the same type tractor as
you are mounting, but the procedure will
be the same. These photos are illusrtration
only and not for model identification.
1.
Hydraulic Tank. The Hydraulic tank is sent
with the Tank Filler cap attached to it and the return
Filter Assembly mounted on it. The Openings (For
Hoses) are plugged and should remain Plugged
untill Hoses are connected. Never leave a Hose or
Fitting unplugged during Assembly (See Figure
16 & 17).
Figure 14
2.
Tank Mounting Brackets & Bumper. Inspect the Tank Mounting Brackets. Notice the
Bends in the Brackets, they should be bent to
where they are wider at the Bumper end than at the
Tractor Frame Rail Mounting End. The tank rails
are installed using the RH frmae rail and LH
support frames front 4 bolts. Remove the front 4
bolts of frame rail and install the tank rails over the
frame. these four bolts can be tighten now. Test fit
Bumper, this will make sure that the Tank Mounting
Brackets are correct and the Bumper will fit Ok.
Remove Bumper as the Hydraulic Tank cannot be
installed with the Bumper installed (See Figure
28).
Tighten Suction
Hose Fitting
Figure 15
Brahma (Caterpiller Challenger MT465B Asy. Man.) 09/05
© 2005 Alamo Group Inc.
Section 5 - 7
Pump / Hydraulic Tank Assembly Instructions
Installing Hydraulic Tank:
(continued)
Outlet / Pressure
Hose / Fitting
3.
Hydraulic Tank Installation. Using a hoist
to lift the Hydraulic Tank into position (See Figure
19), The Hydraulic Tank will slide in under Pump.
Align the rear two mounting holes of Hydraulic
Tank with the holes in the Tank Mounting Brackets
(See Figure 20). These are the two closest to the
tractor, Snug these two bolts at this time do not
tighten them, as tank will have to move to align
front Bolts. Note, the front Bolts that mount tank
also mount Bumper. Leave the Tank supported by
the Hoist.
Figure 16
4.
Mounting Bumper. When installing the
front bumper, Tank mount Brackets and the Bumper
must all line up together as they share the same
bolts. Start with one side or the other, in Figures
below we started with the LH side (See Figure 21
& 22). There are three bolts on each side (total 6
for both sides). Insert the Bolts, Washers and
Nuts, but do not tighten untill all 6 are installed.
Tighten the 2 rear mounting bolts and the 6 front
mounting bolts (See Figure 20).
5.
Tightening Tank. Makes sure all the Mounting Bolts for the Tank and Bumper are tightened.
Make sure that all Fittings and Hoses are plugged
to prevent contamination from getting into system.
Figure 17
Bumper
Weldment
Tank Mounting
Bracket
Figure 18
Figure 19
Brahma (Caterpiller Challenger MT465B Asy. Man.) 09/05
Section 5 - 8
© 2005 Alamo Group Inc.
Suction Hose / Fitting points
to Rear of Tractor at approx
15 to 20 deg. to RH Side
Hydraulic Tank Assembly Instructions
Figure 20
Figure 21
Figure 22
Brahma (Caterpiller Challenger MT465B Asy. Man.) 09/05
© 2005 Alamo Group Inc.
Section 5 - 9
NOTES
Brahma (Caterpiller Challenger MT465B Asy. Man.) 09/05
Section 5 - 10
© 2005 Alamo Group Inc.
Section 6
BRAHMA
Caterpiller Challenger
MT465B
Cab / 4 WD Tractor
Control Valve Installation
Brahma (Caterpiller Challenger MT465B Asy. Man.) 09/05
© 2005 Alamo Group Inc.
Section 6 - 1
Mounting Cylinders & Control Valve
Mounting Cylinders and Control Valve:
1.
Connect Cylinders to Mounting Bracket.
If the cylinders are not already connected, Connect the cylinders to the under beam. (See Figure 9). It is easiest to connect the bottom cylinder first, the pin can be removed or inserted
through the holes in the mounting bracket. A
hoist can be used to lift the mount arm, this will
help to align the cylinder pin holes. After the
lower (Tilt) cylinder is connected the upper (Lift)
cylinder can be connected, this cylinder is connected to a lift arm on the other end and should
allow it to reach the under arm without extending the cylinder. IF YOU NEED to extend any
cylinders, unplug the hoses. Place the hoses in
a clean container as some oil may have been
left in the cylinders at the time of testing and /or
assembling them at the factory. Once the cylinders are extended re-plug the hoses to keep
contamination out, NEVER leave hoses, valves,
pumps, motors or any hydraulic component open
during assembly. ONLY unplug them when ready
to assemble them.
Figure 9
2.
Remove End Cap From Valve Asy.
IMPORTANT INFORMATION! The Control valve will have to be modified from the way it
is received. The end cap will need to be
changed.
Turn the valve on its side to where the
standard end cap (cap with no outlets is showing (See Figure 10). There are three tie rods
connecting the valve segments together. These
valve sections should be left together when tie
rods are unbolted, remove the nuts off tie rods,
do not pull tie rods out. If the valve sections are
separated the O-Rings could be moved or fall
out from between the sections.
Figure 10
3.
When the end cap is removed you will
notice that there are several O-Rings (See Figure 11), sometimes they will stay on the end
cap and sometimes on the valve section. Always check where these O-rings are. There is
a grooved circle around the holes on the cap or
the valve segments. The O-rings need to be in
these grooves. If the O-Rings need to be held in
place use light coating of petroleum jelly
(Vaseline) to hold them in place. The old end
cap will not be used again.
Figure 11
Brahma (Caterpiller Challenger MT465B Asy. Man.) 09/05
© 2005 Alamo Group Inc.
Section 6 - 2
Mounting Cylinders & Control Valve
4.
Locate New Power Beyond End Cap. The
new power beyond cap (P/N 02975061 See Figure 12 & 13) is shipped as a part in the Brahma
Mount Kit (Kit P/N 02983164) and will need to be
installed onto the valve to modify the valve to
function correctly in this application (See Figure
12).
5.
Locate the Hydraulic Elbow Adapter. The
end cap will need an adapter installed into it.
Adapter, Hyd Elbow P/N 02161300 (8MJ - 10MB90)
as shown (See Figure 12). Install the adapter as
shown in figure 12, the angle can be changed
later if desired, or this elbow could be installed
later if desired.
6.
Install Power beyond End Cap. Make certain all the O-Rings are in the proper location, if
you need to hold an o-ring in place use petroleum
jelly (vaseline) to coat the o-ring. A light coat of
petroleum jelly will hold o-ring in place and will not
contaminate hydraulic oil (See Figure 13). Lower
end cap down over the tie rod bolts carefully
(See Figure 14), the end cap will only fit one way.
IMPORTANT INFORMATION! Start the nuts onto
the tie rod bolts and tighten them until they touch
the valve end cap only, DO NOT tighten beyond
that point as damage to the valve could occur.
SEE STEP 7 for proper valve tightening sequence.
7.
Proper End Cap Tightening Procedure. It
is very important that this step be followed when
tightening the valve end cap. 1 st. Tighten the
three tie rod nuts 7 to 10 ft. lbs torque, do this
alternating from one nut to the other a little at a
time till all three are torqued. 2 nd. Lay the valve
on a flat surface with the ports facing up. make
certain the components of the valve are sitting
flat on the bench, if one or more of the feet of the
valve are sticking up use a mallet and lightly tap
the corners until all four are level and touching
the bench. This will allow the center segments to
hang straight on the center tie rod bolt. 3 rd.
Torque the three nuts to 20 ft. lbs. alternating
from one to the other in 4 to 5 ft. lbs increments.
IMPORTANT STEP! If the above procedure is not
followed the valve segments could be installed
crooked and warp the surfaces and/or make the
valve leak.
P/N 02161300
Figure 12
P/N 02975061
Power Beyond
End Cap
Figure 13
Figure 14
Brahma (Caterpiller Challenger MT465B Asy. Man.) 09/05
Section 6 - 3
© 2005 Alamo Group Inc.
P/N 02975061
Power Beyond
End Cap
Mounting Cylinders & Control Valve
8.
Attach the Control Cables to Valve. Cable are included in the mount kit to the valve, with
the Cable Connecting Kit in the Common Box. There should be an instruction sheet included in
the cable package.
A.
B.
C.
D.
E.
F.
G.
H.
I.
J.
Remove the two screws that are around the spool on the valve.
Screw the large jam nut onto the cable past the threads until the jam nut slides
down the cable (See Figure 15).
Slide the retaining ring (2 screw retaining ring) on over the threaded cable housing
(See Figure 15).
Screw the cable mounting tube onto the cable housing until the tube unscrews
off the threads and slides onto the cable outer housing.
Screw the Jam Nut onto the threaded cable end followed by the clevis, tighten the
jam nut down against the clevis to keep the clevis from turning
Insert the clevis over the valve spool post and insert retaining pin into clevis and
through the valve post.
Screw the cable mounting tube back onto the threaded portion of the cable housing
until the tube touches the valve body.
Slide the two screw retaining ring over the mounting tube and down against the
valve body, install the two screws into valve body but only snug them down for
now. The retaining screw to be tighten after the cables have been adjusted later.
Thread the large jam nut onto the cable housing and screw it down against the
cable mounting tube. Do not tighten it only snug for now (See Figure 16).
DO NOT remove any caps
Figure 15
Valve
Clevis
Valve control cable
Hex Head Bolt
Valve Post
Nut
Pin
Cable Mounting Tube
Two screw retaining ring
Jam Nut
Brahma (Caterpiller Challenger MT465B Asy. Man.) 09/05
© 2005 Alamo Group Inc.
Section 6 - 4
Mounting Cylinders & Control Valve
9.
Mount Valve w/ Cables to frame. The valve will mount on the frame above the cylinders, the
mounting holes are already in the frame (See Figure 17). Insert the four bolts (1 in each corner of
the valve) and bolt it to the frame.
10.
Locate tractor factory Hydraulic Supply
hose to Tractor remotes. The tractor has a factory hydraulic supply hose that connects on the
lower LH side down beside the transmission
(See Figure 18). The other end connects to the
LH side of the tractor remotes, this is called the
power beyond port. Insert a drain pan under the
bottom of the hose to catch the oil that will run
out. Remove this factory hose at both ends and
discard the hose, it will not be used again.
11.
Locate the three # 8 hoses. There are
three number # 8 hoses that will connect the
add on control vale to the tractor hydraulic system (See Figure 20 & 21).
Figure 16
Hose
P/N 02972267 #8 - 8FJX - 8FJX90 - 112" long
P/N 02960004 #8 - 8FJX - 8FJX90 - 92" long
P/N 02961853 #8 - 8FJX - 8FJX90 - 84" long
Adapters
P/N 0692300 8MJ 0 22 MM w/ Seal (Qty 1)
P/N 02861100 8MJ - 8FJX90 (Qty 2)
P/N 02961851 8MJ - 10 FJ (Qty 2)
CAUTION: DO NOT leave any fittings, hoses,
ports or any other opening in hydraulic system
during assembly, always use compressed air
and clean out all new hoses before installing
them. This will make certain there is nothing in
hoses to contaminate hydraulic system.
Figure 17
Tractor Pressure
hose to remotes is
connected here.
Figure 18
Tractor Pressure
hose to remotes is
connected here.
Figure 19
Brahma (Caterpiller Challenger MT465B Asy. Man.) 09/05
Section 6 - 5
© 2005 Alamo Group Inc.
Corner Valve
mounting bolts
Mounting Cylinders & Control Valve
Hydraulic lines LH Side of
Tractor down beside
Transmission
Existing Line
New Hose
P/N 02960004
(92" long)
(T) Tank Return - Orange Tie
Lift Cylinder, Base End 123
123
123
Blue Tie
123
123
Install Adapter Here
P/N 02761100
(8MJ - 8FJX90)
123
123
123
123
Existing Line
Install Adapter Here
P/N 02961851
8MJ - 10FJ
○
○
○
PB
○
○
○
P
New Hose
P/N 02972267
(112" Long)
○
○
○
○
○
○
Existing Hose that will
need to be removed
and not used, Hose is
to be rerouted using
new hoses to route
hydraulics through add
on cylinder control valve
T
○
○
○
○
○
○
○
○
○
○
○
○
○
○
○
New Hose
P/N 02961853
(84" long)
○
○
○
○
○
○
○
○
○
Tilt Cylinder, Base End - Green Tie
○
○
○
○
○
○
○
○
○
○
○
Install Adapter Here
P/N 02961851
8MJ - 10FJ
Install Adapter Here
P/N 0692300
8MJ - 22 MM w/ Seal
Figure 20
Brahma (Caterpiller Challenger MT465B Asy. Man.) 09/05
© 2005 Alamo Group Inc.
Section 6 - 6
Tilt Cylinder, Rod End - Green / White Tie
○
○
Lift Cylinder, Rod End - Blue / White Tie
○
○
Mounting Cylinders & Control Valve
Blue Tie (Solid Color) Lift Cyl Base End
Green Tie (Solid Color) Tilt Cyl. Base End
Green Tie (w/ White Stripe)
Tilt Cyl. Rod End
Lif
tC
yl.
Blue Tie ( w/ White Stripe)
Lift Cyl. Rod End
yl.
C
t
l
Ti
Figure 21
12.
Connect the Cylinder Hoses to Control
Valve. The cylinder hoses connect to the control
valve as shown in hydraulic diagraham (See
Figure 20 & 21). After the hoses have been
connected to the valve check all the hoses to
make certain they are not kinked, rubbing somewhere or to close to the exhaust sytem. If hoses
need to be moved, tied up to clear then it should
be done before unit is run (See Figure 22).
Figure 22
Brahma (Caterpiller Challenger MT465B Asy. Man.) 09/05
Section 6 - 7
© 2005 Alamo Group Inc.
NOTES
Brahma (Caterpiller Challenger MT465B Asy. Man.) 09/05
© 2005 Alamo Group Inc.
Section 6 - 8
Section 7
BRAHMA
Caterpillar Challenger
MT465B
Cab / 4 WD Tractor
Joystick & Electrical
Connections
Brahma (Caterpiller Challenger MT465B Asy. Man.) 09/05
© 2005 Alamo Group Inc.
Section 7 - 1
Joystick & Electrical Controls Mounting
Joystick Mount Installation:
1.
Fitting Joy Stick Mount Stand to Tractor
Cab. The joystick stand is a weldment that will bolt
to the floor of the cab (See Figure 1 & 2). Sit the
stand inside cab of tractor and position it for the
best reach by the operator, sometimes it is best to
consult the operator to see what is needed by them.
once the location is determined use a marker pencil
to mark the holes in the stand to the floor mat of
cab.
2.
Bolt in the Joystick stand. Once the location
has been determined and marked check under the
cab to make certain that the other components will
not be in the way of the drill or the bolts when
installed. Drill the four mounting bolt holes and the
hole in the center to run the electrical wiring through
(See figure 3)
P/N 02982176
Control Stand
Weldment
Figure 1
Joystick & Motor Control Decal:
1.
The Joystick and Motor Control operation
Decal will need to be installed in the cab of the
tractor. This is a transparent decal that shows the
direction of movement of joystick in relation to the
function that is activated. Install this decal where it
is easily in view by the operator but where it will
not interfere with his line of sight of his environment (See Figure 4)
Figure 2
Control Cables & Wire Harness installation:
1.
Control Cable & Wire Harness Route
through Cab Floor. The wire harness and the
control cables will be inserted through the cab floor
in the same hole (See Figure 3). It is best to mark
the cables as to which is which (Lift or Tilt), see
Figure 5 for which cable connects to where on
joystick and control valve section for which cable
is connected to where at the valve. These cables
must be connected correctly so the joystick will
operate as the decal shows (See Figure 4)
Figure 3
Brahma (Caterpiller Challenger MT465B Asy. Man.) 09/05
Section 7 - 2
© 2005 Alamo Group Inc.
Joystick & Electrical Controls Mounting
CONTROL CABLE TO JOYSTICK
CONNECTION: (See Figure 5, 6 & 7))
JOYSTICK CONTROL
(When using Alamo Industrial Valve Only)
1.
2.
3.
4.
5.
6.
Lift Down
Remove the Cable retaining bolt for one of
the directions (Lift shown).
Position the Joystick so that the Lift Plunger
is accessible. Check the Joystick, for the
proper direction for each cylinder.
Connect the cable leading from the left (inside) valve section to the left cable port on
the joystick, this controls the Lift Cylinders
motion.
Repeat the procedure for the Tilt Cylinder.
Route both cables up to the Control Valve so
they do not interfere with the operation of the
tractor or the mower
Install the top cover of joystick using the
rubber boot on top (See Figure 7 & 8).
Tilt Up
Tilt Down
Float
Lift Up
PULL UP TO START
PUSH TO STOP
02970202
Figure 4
Position Joystick to connect
cables as necessary
Push Pull
Switch
Joystick mounting bracket
Joystick
mounting
bolt
Joystick
Cable ( Tilt Valve
Function )
Cable retainong bolt
Cable ( Lift Valve
Function )
Note: Routing of wire
harness & control cables,
this hole will most likely
require cutting.
General Illustration
Tilt
Shown for General
Lift
information
Figure 5
Brahma (Caterpiller Challenger MT465B Asy. Man.) 09/05
© 2005 Alamo Group Inc.
Section 7 - 3
Joystick & Electrical Controls Mounting
CONTROL WIRING:
1. Disconnect the Battery negative lead
(ground) from the battery terminal to prevent
any damage to the electrical system.
2. Running the Wiring Harness section with
the plug on it from the inside of the cab to the
Hydraulic tank mounted on front of the tractor.
The second leg of the wire harness with the
wires sticking out of will stay in the cab and
connect to the tractor electrical system. Make
certain that the Wiring Harness is free and
clear of any moving parts from the Mower or
the Tractor, or any condition that may sever,
bind, or entangle the cable. The wiring harness
will run through a protective boot in the floor of
the cab. If there is not a hole under floor mat to
run wiring through the cab floor one will need to
be cut with a hole saw.
Figure 6
3. Install Push / Pull Switch & Switch Mounting Bracket. The push pull switch bracket will
bolt to the side panel in the cab. The exact
location can vary as long as it is mounted in a
convenient location for operator. Alamo industrial recommends mounting bracket as shown.
The Switch will mount to bracket. Plug the wire
harness plug to switch (See Figure 5 & 6).
Figure 7
4. Install Wire Harness Through Tractor Floor.
The wire harness will have two leads, one
stays in the cab to connect to the tractors
system the second goes through the floor to
connect to the pump solenoid. Both will run
through the cable boot to where they split up
under the floor mat, the outside lead will go
through the floor and the inside lead will go
under floor mat to the tractor control panel
(See Figure 9, 10 & 11).
Figure 8
Brahma (Caterpiller Challenger MT465B Asy. Man.) 09/05
Section 7 - 4
© 2005 Alamo Group Inc.
Joystick & Electrical Controls Mounting
P/N 02970204 Wire Harness
# 16 Red
1
Fuse Holder
with Fuse
(10 Amp Fuse)
# 16 Red
2
4
3
2
1
3
4
(10 Amp Fuse)
Push-Pull Switch
shown turned around
for illustration of
terminals only
2
1
3
4
ON / Off
Switch Plug
# 12 Brn
Starter Solenoid Wire
Starter Solenoid Wire
Switched Power Supply
Ground
48” long
#16 Black
Pump Solenoid Connector
Ring Connector
to Ground
Connecters Shipped Loose in
Separate Plastic Bag
108” long
#16 Black
(-)
36” long
#16 Black
#16 Red (+) to
Ignition Switch
(Power Supply) # 16 Red
Figure 9
# 12 Brown Line
Connector to
Starter Solenoid
Brahma (Caterpiller Challenger MT465B Asy. Man.) 09/05
© 2005 Alamo Group Inc.
Section 7 - 5
Solenoid Connector
at front pump
Joystick & Electrical Controls Mounting
5. Connect Positive power Sup-
6. Find the “Ignition-Start” wire
Br
ow
nW
Re
dW
ire
of
ire
Ha
of
Br
rne
H
ow
arn
ss
nW
es
s
i
re
Bl
ac
of
kW
Ha
rne
ire
ss
Gr
ou
nd
Battery
Shown here is typical Ignition
ply Wire from wire harness.
connection, Your Ignition may
Remove ignition switch access ACC Wire
vary but the function will not.
panel or ignition switch if panels
Ignition
are not provided in dash. Identify
the “Ignition "ON" / "OFF" Positive” wire. This wire must be
Tra
connected to a wire that is only
cto
r
te
r Ig
Star
charged when ignition switch is
nit
ion
on and dead when ignition is off.
Wi
re
Connect power supply wire as
Tractor
close to the switch as possible.
Ignition Switch
Do not connect wire into wire
that will be overloaded because
something else is connected to
Cut Tractor Starter
it. If power supply wire is conWire to Starter Solenected to a wire that is positive
noid and reroute
when switch is off and operator
through Joystick
leaves the push pull switch on it
Harness Brown
will drain the tractor battery (See
wires.
Figure 10).
leading from ignition switch to Joystick Wiring
starter solenoid of the tractor,
Harness
cut the wire in two as close to
ignition switch as is reasonable and still have
room to work. Strip off 1/4" to 3/8" of insulation
from each wire. Connect the two brown wires of
harness to this wire. Solder the connection and
insulate with a good heat shrink tubing (See
Figure 10)
FIGURE 10
Pump Solenoid
7. Connect Wire Harness to the Pump Solenoid. The wire harness has a plug that will connect to the pump solenoid at the pump on front
of the tractor (See Figure 11). after wire harness
has been connected use plastic ties to tie the
wire harness to the hoses wunning along side
the right side of tractor. Tie wires so they will not
be pinched or pulled.
Figure 11
8. Installation of the wiring harness in now completed. Recheck all wires according to color and
instructions for that color (See Figure 10 & 11).
9. Reconnect the negative lead (ground) to the battery terminal . DO NOT START TRACTOR
until the assembly is complete and unit has been inspected as well as filled with oil.
Brahma (Caterpiller Challenger MT465B Asy. Man.) 09/05
Section 7 - 6
© 2005 Alamo Group Inc.
Section 8
BRAHMA
Caterpillar Challenger
MT465B
Cab / 4 WD Tractor
Pump Hose Connections
& Head Installation
Brahma (Caterpiller Challenger MT465B Asy. Man.) 09/05
© 2005 Alamo Group Inc.
Section 8 - 1
Connecting Hoses To Pump & Frame
GENERAL INFORMATION AND WARNINGS - HYDRAULICS:
(See Figure 1 )
Inspect and clean all hydraulic hoses and fittings prior to installing them onto the tractor or
Mower. If dirt or material is seen in any of the parts, they should be washed and cleaned thoroughly
with an oil-compatible solution. Do not blow the material further into a hose since this sometimes does
not remove the foreign material and can cause damage to hydraulic components down stream.
It is important that pipe thread sealant be used only on solid connections of pipe thread; never
on connections between swivel fittings and external pipe threads or on straight thread "O" ring fittings.
Use pipe thread sealant suitable for hydraulic service. Do not substitute some other type of sealant,
i.e., teflon tape, paint, shellac, etc.
Hoses supplied have two types of Fittings; solid or rigid. Some Hoses have rigid Fittings on
both ends; others have a rigid fitting and a swivel fitting. Hoses with two rigid fittings will fit into either an
internal rigid thread, or a swivel adapter union. When installing either type hose, rigid fittings must be
installed first. Then install the swivel end of the hose.
The Brahma hydraulic system incorporates three basic types of hydraulic fittings:
A.
Standard pipe (NPT or NPTF) thread fittings. This type requires a small amount of evenlyapplied sealant.
B.
JIC Swivel fittings. This type does not require any sealant on the swivel end because it seals
against an internal
flare.
C.
"O" Ring fittings. This type does not require any sealant on the "O" Ring end of the fitting.
It is extremely important to avoid getting pipe thread sealant inside the fittings or hoses. KEEP
THE INTERIOR OF ALL HYDRAULIC COMPONENTS ABSOLUTELY CLEAN. Inspect the inside
diameter of each hose before assembly. Ensure that no obstruction is present. Dirt, sand, dust, etc.,
are abrasive and, once in the system, can cause immediate or early failure.
CAUTION
When assembling the fittings and hoses, be careful not to introduce any dust or
contaminants into the system. Keep all fittings, hoses, and hydraulic components sealed until installed. Do not allow any components to lie open and
exposed to dust or contamination. Do not lay parts down on the dirt or sand and
then assemble them as this will introduce contamination into the system. (See
Figure 1,2 & 3).
Figure 1
Brahma (Caterpiller Challenger MT465B Asy. Man.) 09/05
© 2005 Alamo Group Inc.
Section 8 - 2
Connecting Hoses To Pump & Frame
Refer to your Operator's Manual and Parts Listing for part numbers and Hydraulic Schematic.
Tighten any leaking Hydraulic Fittings. If pipe fittings leak, loosen the fitting, apply a pipe thread
compound to pipe threads and tighten. Care must be taken when tightening Hydraulic Fittings.
Too much tightening can cause the fittings to crack and require replacement. Please use
recommended hose end torque values.
WARNING
Once Pumps are installed, DO NOT start the tractor (which will turn the pump)
unless the hydraulic circuit is filled with AW ISO VG100 hydraulic fluid. Running
pump without oil will cause nonwarrantable, and immediate damage
HYDRAULIC HOSE CONNECTIONS: (FRONT MOUNTED TANK HYDRAULICS)
On all Hoses, and Major Connections, colored ties are used to identify the proper flow of
hydraulic fluid. There are two hydraulic systems; The Motor Hydraulics and the Cylinder
Hydraulics.
1.
The Motor Hydraulics consists of the Front Mounted Pump and Tank, and the larger
hoses, and the Motor on the Mowing Head (which can vary). There are three types of
hoses in this system, marked with the colored ties.
Color(s)
Abbreviation
Hydraulic Direction
Red Tie
Orange Tie
Blue Tie
R
Or
B
Pressure Flow
Return Flow
Case Drain
Note: The colored ties do repeat, but the motor hoses can be identified by their large size,
compared to all the other hoses.
2.
The Hoses for the Brahma are included in the Mount Kit and with the Head, each may vary
in length.
3.
Connect the Mount Kit hoses to the marked Tank Ports, and route the hoses to the tractor
so that they do not interfere with the tractor, mowers operation, Be especially aware of
any pinch points on the tractor or any position where the hoses may become entangled in
brush.
4.
Connect the Mount Kit hoses to the Right Side of the Fittings located on the Middle Rear of
the Arm, first- Red, second - Orange, then Blue.
5.
Connect the Hoses from the Head to the Left Side of the Arm Fittings in the same order,
Note the Motor is marked with the same color codes.
6.
Check each connection by following one hose and checking the color connections.
Brahma (Caterpiller Challenger MT465B Asy. Man.) 09/05
© 2005 Alamo Group Inc.
Section 8 - 3
Connecting Hoses To Pump & Frame
Pump To Frame Hose Connections:
1.
Connect Hoses to the Mounting Arm Bulkhead. The Mounting Arm has a bulkhead fitting
lug welded on to on the rear side. These lugs are
color coded with a plastic tie on the bulkhead
fitting (See Figure 2).
Mounting Arm Assembly
Orange Tie
Orange Tie = the top fitting
Red Tie = the middle fitting
Blue Tie = the bottom fitting
Red Tie
Orange Tied Hose Returns Flow back to
Front Pump Hydraulic Reservoir.
Red Tied Hose Supplies Pressure Flow
From Front Pump.
Blue Tied Hose is Case drain from Motor
back to Hydraulic Tank in front of tractor.
Blue Tie
Figure 2
Bolt On Hose
Ring
2.
Run Hoses Along Side RH Frame Rail.
The hoses rub up and over under beam and back
along the RH side of Tractor Frame. Install
hoses through the sleeving material furnished
(See Figure 3). Hoses will be run through a bolt
hose ring (See Figure 4). Hoses will then be
connected to the tank and pump as shown (See
Figure 5)
Caution: DO NOT try to start tractor as
there is no hydraulic in tank and all hoses are
NOT connected.
Figure 3
Orange Tie
(Tank Return)
Red Tie
(Pressure
Supply)
Figure 4
Bolt On Hose
Ring
Blue Tie
(Case Drain)
Figure 5
Brahma (Caterpiller Challenger MT465B Asy. Man.) 09/05
© 2005 Alamo Group Inc.
Section 8 - 4
Connecting Head To Frame
Install Cutting Head:
1.
Prepare to Install Cutting Head. There is a
Flail Head and a Rotary Head option. Shown here
is the Flail Option. The Mounting frame will be
shipped already bolted to the Flail Head. The
Rotary Head the Mounting Frame is part of the
head (See Figure 6). There are lift lugs bolted to
each end of the flail deck for lifting (See Figure 6
& 7)
There are two pins that will need to be
removed from the mounting frame before attempting to install the Cutting head. The Tilt cyl.
Arm Pin and/or the Head Pivot Pin. The head
pivot pin can be in Head Frame or it can be in
Mounting Arm depending which one you used to
install mounting arm. (See Figure 7)
2.
Align Cutting head with Mounting arm. The
Cutting Head will have to aligned with the mounting arm and the tilt lug weldment at the same
time. This is recommended that two person work
on this together. When the Head Mounting frame
is aligned with the mounting arm install a temporary under size pin into the front side to help hold
the head in position (See Figure 8). From the
back side start the pivot pin into the hole, make
certain to try to keep the retaining bolt hole of pin
a closely aligned with the frame as possible. DO
NOT use excess force to install this pin. With the
Head suspended by a hoist have your helper
move the head to keep it from binding on pin
while you install the pin with a minimum amount
of force. If the Teflon Bushing are damage during
this installation you will know it because as pin is
installed it will push out pieces of the bushing. If
this happens the bushing must be replaced.
Use a Rubber Hammer or a soft piece of
metal such as brass or aluminum to protect the
pivot pin if it is hammered on. Installing the pivot
pin will push the under sized pin out that you have
installed into the front. Go slowly as you will need
to align the lift lug as the pin starts through and
then the outer part of the mount arm. Sometimes
it is best to put a floor jack under the mounting
arm to help align the mounting arm and head.
Figure 6
Tilt Cyl Arm Pin
Head Pivot Pins
Figure 7
Under Sized Short
Pin in front side to
help align the three
components.
Figure 8
Brahma (Caterpiller Challenger MT465B Asy. Man.) 09/05
© 2005 Alamo Group Inc.
Section 8 - 5
Connecting Head To Frame
Install Cutting Head:
3.
Secure The Head Pivot Pin. The head
pivot pin uses a bolt and nut to retain the pin. You
may have to realign the hole in the pin with the
hole in mounting frame. If you can not see the
hole at all you can push the pin back out a short
distance till the pin hole is visible, not to much or
you will lose the alignment of pin and components. Using a small punch or bolt insert it into
the pin retaining hole, using a hammer tap on
punch or bolt to rotate pin. NEVER USE a tool
that will scratch or cut pin. It will help if you have
you helper rock the head a bit as you align the
pin.
4.
Install the Lift Lug Pin for the Tilt Cyl. Start
the Lift Pin into the front side of the frame. Push
pin through while holding the lifting lug into alignment, the other end of this lug is connected to the
same pivot bracket as the cylinder is connected
to. Sometimes it will be required to extent or
retract the cylinder to align this lug. If you need to
extend or retract the cylinder you can usually do it
with a pry bar, but you may have to loosen the
hoses to let pressure escape. The lift lug uses a
retaining bolt and nut, if you need to align the
retaining bolt hole in pin with hole in the mounting
frame. The pin has a head welded on to it in the
front side that can turned by using a large pair of
pliers or a pipe wrench. Align pin and install retaining nut and bolt. (See Figure 10, 11 & 12)
NOTE: The two holes where cylinder can be connected, which hole determines what degrees the
head will fold into transport.
Figure 11
Figure 9
Figure 10
Figure 12
Brahma (Caterpiller Challenger MT465B Asy. Man.) 09/05
© 2005 Alamo Group Inc.
Section 8 - 6
Connecting Head To Frame
Install Cutting Head:
5.
Check Head mount Frame To Head Connections. The head mounting frame for the flail
head is a bolt on clamp type. Always check these
bolts to make certain they have been tightened
(See Figure 13).
Head Frame Mounting
Clamp
6.
Connect Hoses from Head to Mounting
Arm. The hoses are already assembled on to the
head and will have the sleeving installed. It may
be required to loosen some of the fittings at the
Motor to allow hose / Fitting clearance or for the
hoses to run in the direction you need them to.
These hose will have color coded plastic ties on
them.
Orange Tie = the top fitting
Red Tie = the middle fitting
Blue Tie = the bottom fitting
Figure 13
Orange Tie Hose Returns Flow back to
Front Pump Hydraulic Reservoir.
Red Tie Hose Supplies Pressure Flow From
Front Pump.
Blue Tie Hose is Case drain from Motor
back to Hydraulic Tank in front of tractor.
Make certain that the hoses are connected
where they will not rub or get pinched when Head
is folded up (See Figure 14).
7.
Connecting Rotary Head. The rotary head
will connect the same as the Flail Head with the
exception of the bolt on mounting frame like the
Flail has. The rotary Head mount is built on the
the rotary head. The hoses will have the same
color coded plastic ties on them as the flail has
and will connect in the same order (See Figure
15).
Figure 14
Figure 15
Brahma (Caterpiller Challenger MT465B Asy. Man.) 09/05
© 2005 Alamo Group Inc.
Section 8 - 7
NOTES
Brahma (Caterpiller Challenger MT465B Asy. Man.) 09/05
© 2005 Alamo Group Inc.
Section 8 - 8
Section 9
BRAHMA
Caterpillar Challenger
MT465B
Cab/ 4 WD Tractor
Tractor Start Up Procedures
Brahma (Caterpiller Challenger MT465B Asy. Man.) 09/05
© 2005 Alamo Group Inc.
Section 9 - 1
Tractor Start Up Procedure
HYDRAULIC TANK FILLING:
1. Remove the Filler Cap and fill the Hydraulic Tank completely full of AW ISO VG100 Fluid,
however do not over flow, or spill over.
2. Replace Filler Cap and clear area to start the Tractor and the Hydraulic Pump as outlined in
the Operation Section. Make certain that the Mower Head is in a clear safe mowing position
(i.e.. Blades down and the area is clear.).
3. Check that all the hydraulic connections are complete on the Motor Hydraulic System and
the Cylinder Hydraulic System.
4. Start the Tractor and Engage the Mower (see the START UP PROCEDURE IN THIS
SECTION, SAFETY SECTION, AND OPERATION SECTION for details) Run the Mower Head
for 5 minutes. While the tractor is running, wearing protective clothing and eye protection,
CAREFULLY check for leaking hydraulic fittings, hoses and ports at this point with a piece of
cardboard, DO NOT USE YOUR HAND!
5. Shut down completely the Mower and Tractor. And correct any leaking connections.
6. The Pump, Hydraulic Lines, Hoses, and Motor should now be filled with the Hydraulic Fluid.
Check the Sight Gauge and add more AW ISO VG100 Hydraulic Fluid to bring the level up to
Half to Three Quarters up on the Gauge.
Figure 1
IMPORTANT:
Change the return filter in tank and suction filters after the first 200 hours of operation. Change
the filters again at 800 hours; then, change the oil and filters at 1600 hours. After that, continue to
change the filter every 800 hours and the oil every 1600 hours. Hydraulic oil to be used, AW ISO
VG100 (Alamo P/N 00751758). Use the above procedures as part of a good filter maintenance
program.
Brahma (Caterpiller Challenger MT465B Asy. Man.) 09/05
© 2005 Alamo Group Inc.
Section 9 - 2
Tractor Start Up Procedure
7.
Avoid hydraulic contamination by filtering the hydraulic oil while filling the hydraulic
tank. Filter buggies or carts are commercially
available for hydraulic system cleanup.
These consist of a high-efficiency, high-capacity filter, a circulating pump, a drive motor,
and hoses for connecting to the overhauled
machine's hydraulic system. (See Figure 2
& 3)
When adding hydraulic oil, use only
new oil from a sealed barrel. Used oil or oil
from an open barrel may contain high levels of
contamination. Transfer the new oil into the
hydraulic tank by using a hydraulic filter pump
unit equipped with a properly operating 10 micron filter. This will insure that the oil being
added is clean. Do not just pour the oil directly
into the hydraulic tank since most oils (even
from a sealed barrel) have contaminants that
should be removed, before operating the hydraulic system.
Figure 2
Figure 3
TANK SHIELD ATTACHMENT:
Attach the Tank Shield to the Bumper and the Straps to the Tank with the Hardware
supplied in the Common Box.
1.
2.
3.
Attach the Tank Straps to the tank with the pin and Cotter pin.
Place the Special Washer upon the Hinge posts.
Lower and Slide the Shield in place, secure the straps to the rear of the shield.
Brahma (Caterpiller Challenger MT465B Asy. Man.) 09/05
© 2005 Alamo Group Inc.
Section 9 - 3
Tractor Start Up Procedure
START UP PROCEDURE:
1. Read all safety instructions. Decals on the Brahma Mower warn you of particular and multiple
hazards. Many decals are attached close to part of the Brahma Mower where there is a possible
hazard. Read and make sure you understand the safety messages before you operate the Brahma
Mower. Keep all decals clean and readable. Replace lost or damaged decals.
2. Before operating, read all the safety and operating instructions in the Operator's Manuals for both
the tractor and mower.
3. When the hydraulic tank has been filled and the mower unit properly assembled, the unit should be
started up. NOTE: Make sure that no materials, tools, or jacks have been left under the mower head.
Make sure the front and rear of the mower are properly guarded to prevent any foreign objects from
being thrown by the mower. All other workers should be kept a safe distance from the unit before the
mower is started.
4. Start the tractor and idle at a slow engine speed until oil is being pumped.
5. Engage the Cutter Control Valve at low engine rpm and run the mower slowly for a short period until
all air is removed from the hoses. Keep all persons WELL CLEAR of mower since Blades can
THROW OBJECTS with great velocity for a considerable distance! KEEP CLEAR!
6. With the area clear of any ground and overhead obstructions, work each cylinder on the boom one
at a time, several times, to expel any air in the Hoses and Cylinders
7. Run the Mower Head for 5 minutes. While the tractor is idling, its tires are blocked, and you
wearing protective clothing and eye protection, CAREFULLY check for leaking hydraulic fittings,
hoses and ports at this point with a piece of cardboard, DO NOT USE YOUR HAND! If any are
found stop the tractor immediately and correct any leaky connections.
8. Check the fluid level in the Hydraulic Tank on the Tractor, and add oil if required. As the air has been
forced out of the Cylinders and Hoses, it goes into the Hydraulic Tank and reduces the oil level. Check
you Tractors operators manual for the proper level and type of oil to be used.
9. Basic trouble shooting guide for first start up.
A.
B.
C.
D.
E.
Electrical solenoid valve does not work - check wiring, possible faulty switch,
possible faulty solenoid. (see the Maintenance Section for proper adjustment of the
Motor Solenoid)
Pump is making noise - check for obstruction in suction hose and tank suction
assembly, check alignment of pump driveshaft.
Cylinders will not raise - hoses from cylinder incorrectly connected to valve bank,
pump not suppling oil.
Cylinder raise slowly - hoses from cylinder incorrectly connected to valve bank, work
port reliefs on valve bank set too low - replace as required.
The mower head slows down or stops completely - the filter may be clogged, replace.
Brahma (Caterpiller Challenger MT465B Asy. Man.) 09/05
© 2005 Alamo Group Inc.
Section 9 - 4
Section 10
Brahma
Caterpillar Challenger
MT465B
Cab/4wd Tractor
Mounting Specifications
&
Component ID
Brahma (Cat Challenger MT465B Asy. Man.) 09/05
Section 10 - 1
© 2005 Alamo Group Inc.
Mounting Specifications
Caterpillar Challenger MT465B Cab/4wd
As Of: 08-19-05
Tires & Wheels:
14.9-24 (R-1W) Max Front Tire
18.4-34 (R-1W) Max Rear Tire
Valve Type:
Open Center Valve
Mount Kit:
Brahma Mount Kit ………………...…..……………………...... 02983164
Restrictions:
1. For proper rotary head pitch, we recommend using the maximum tire sizes listed
above for 4 wd tractors. Other tire combinations may tilt the head in a manner that
creates an undesirable cut. However, flail heads should cut smoothly at any pitch.
2. For additional stability, a 500# wheel weight or calcium chloride may be added to the
left rear wheel at the dealer/customer’s expense.
3.
This mount kit includes the Neapco style driveline with double U-joints.
4. Adjustment of the steering stop may be necessary on 4wd models.
First Cut From Tractor Centerline:
Rotary: ~72-1/2"
Flail: ~79-1/2"
Brahma (Cat Challenger MT465B Asy. Man.) 09/05
© 2005 Alamo Group Inc.
Section 10 - 2
Mounting Specifications
Brahma (Cat Challenger MT465B Asy. Man.) 09/05
Section 10 - 3
© 2005 Alamo Group Inc.
Mounting Kit - Bill of Material
Caterpillar Challenger MT465B Cab/4wd
IMPORTANT NOTICE:
The following Part / Assembly Numbers are for reference and
should not be ordered as replacement parts, unless all the components in that assembly are
wanted. These will break down to bills of material of the components. Some of numbers listed are
NOT individual Parts but complete assemblies and/or box of assemblies. Check before ordering.
02983164 Brahma Mount Kit - Caterpillar Challenger MT465B Cab/4wd
Consist of the Following Items
Item
1
2
3
4
5
6
7
8
9
10
11
12
13
14
15
16
17
18
19
20
21
22
23
24
25
26
27
28
29
30
31
Part No.
02753400
02775500
02960004
02966874
02966873
02969130
02969813
02969814
02969815
02969850
02975257A
02959770
02983114
02983115
02983116
02983118
02983119
02961853
02972267
02975061
02161300
00724357
02761100
02961851
0692300
02982176
02983165
02977074
02979238
02982085
02983272
Qty
3
10
1
1
1
2
1
1
1
1
1
2
1
1
1
1
1
1
1
1
1
2
2
2
1
1
1
1
1
4
1
Description
PLASTIC TIE, 15” LG
PLASTIC TIE, 21” LG.
HOSE, #8 - 8FJX - 8FJX90 - 92” LG
BOOT, CABLE
DRAWING INSTRUCTION, BOOT
CABLE REMOTE CONTROL 72" LG
HOSE, #16,-16FJX - 16FJX - 108LG
HOSE, #16,-16FJX - 16FJX - 108LG
HOSE, #16,-16FJX - 16FJX - 108LG
CORDURA SLEEVING 100
DRIVELINE ASY, 1” X15 SPLINE
HOSE SUPPORT RING
MAINFRAME WELDMENT BRAHMA
SUPPORT MOUNT, LH
TANK RAIL WELDMENT, LH
TANK RAIL WELDMENT, RH
BATTERY MOUNT BRACKET
HOSE, #8 - 8FJX - 8FJX90 - 84” LG
HOSE, #8 - 8FJX - 8FJX90 -112” LG
END CAP, POWER BEYOND
ADAPTER, HYD ELBOW 8MJ - 10MB90
HYDRAULIC FITTING, 12MB PLUG
ADAPTER, HYD 8MJ - 8FJX90
ADAPTER, HYD STRAIGHT 8MJ - 10FJ
ADAPTER, HYD 8MJ - 22MM W/SEAL
CONTROL STAND WELDMENT
BOLT BAG, CAT MT465B C/4 BRAHMA
PUMP MOUNT PLATE, MACHINED
SPACER PLATE, MACHINED
SPACER, PUMP PLATE
ASSEMBLY MANUAL CAT MT465B
Brahma (Cat Challenger MT465B Asy. Man.) 09/05
© 2005 Alamo Group Inc.
Section 10 - 4
Mounting Kit - Bill of Material
02983165 Bolt Bag - Caterpillar Challenger MT465B Cab/4wd
Consist of the Following Items
Item
Part No.
Qty
Description
1
2
3
4
5
6
7
8
9
10
11
12
13
14
15
16
17
18
00015800
00022200
02892000
02971158
02976344
02975738
02976113
00759635
5312316
02970595
02957042
00001300
02975781
002528
00753642
00013900
00011100
02975669
9
8
2
20
4
8
4
2
16
2
1
2
4
4
2
4
4
4
LOCKNUT, TOPLOCK 3/8”
LOCKWASHER, 7/16” PL
BOLT, HEX HEAD 1/2"-13NC X 1-1/2" PL GR8
LOCKWASHER, 20MM
BOLT, HEX HEAD 7/16”-NC X 1-1/4” PL GR8
BOLT, HEX HEAD M20-P2.5 X 70MM PL GR10.9
BOLT, HEX HEAD M20-P2.5 X 80MM PL GR10.9
FLATWASHER, 1/2” HARDENED NON-PLTD
WASHER, 3/4" HARDENED
BOLT, HEX HEAD 3/8”-NC X 2-3/4” PL GR8
BOLT, HEX HEAD 3/8”-NC X 1-3/4” PL GR8
LOCKWASHER, 1/2”
BOLT, HEX HEAD 7/16”-NF X 1-3/4” PL GR8
BOLT, HEX HEAD M20-P2.5 X 110MM PL GR10.9
BOLT, HEX HEAD 3/8”-NC X 1-1/4” PL GR5
BOLT, HEX HEAD 3/8”-NC X 2-1/2” PL GR5
FLATWASHER, 3/8” STD
BOLT, HEX HEAD M20-P2.5 X 60MM PL GR10.9
Bolt Bag Asy P/N 02983165 is included in Mount Kit P/N 02983134
Brahma (Cat Challenger MT465B Asy. Man.) 09/05
Section 10 - 5
© 2005 Alamo Group Inc.
Common Box - Component List - Aux. Hyd. Valve
IMPORTANT NOTICE;
These are parts that are used as Base Unit with each unit that
will use Auxillary Cylinder Control Valve. These parts will remain the same no matter which
model tractor or head is used. DO NOT ORDER any of these parts unless you are certain that
that is what you want, most of theses are complete assemblies and may contain more prts than
are wanted to perform repairs. If ordering parts that are listed here it is recommended that you
look up the parts in a regular parts manual under the specific assembly number.
04001000 Base Unit Consist of the Following Items:
04001000 is NOT a Replacement Part Number, listed here as a reference only !
Used on Caterpillar Challenger MT465B Cab/4wd w/Aux Valve.
ITEM
PART NO.
QTY.
DESCRITION
1.
2.
3.
04001000
02969093
02979630
02979631
-1
1
1
BRAHMA SIDE MOWER BASE UNIT (ITEMS 1 THRU 3)
COMMON BOX, BRAHMA
UNDERBEAM ASY, BRAHMA
MOUNTING ARM, BRAHMA
Base Unit Includes Valve & Joystick for Hydraulic Cylinder Control
02969093 Common box Consist of the Following Items:
ITEM
PART NO.
QTY.
DESCRITION
1
2
3
4
5
6
7
8
9
10
11
12
13
14
15
16
17
18
19
00001300
00001800
00002700
00015800
00023500
002369
00725336
00725337
00725746
00726119
00748823
00750940
02027400
02733700
02776600
02959010
02964028
02965093
02965262
2
8
8
3
6
1
2
2
1
2
2
3
6
3
2
1
1
1
1
LOCKWASHER, 1/2”
LOCKNUT, TOPLOCK, 1/2”-NC PLB
FLATWASHER, 1/2” PL STD
LOCKNUT, TOPLOCK, 3/8”
FLATWASHER, 5/16” PL
DECAL, DANGER MULTI-HAZARD
STRAP
PIN
DECAL, PELIGRO
WASHER, BRASS SPECIAL F/ HINGE
BOLT, HEX HEAD 1/2”-13UNC X 1-1/2” PL GR5
LOCKNUT, TOPLOCK 5/16”-NC PLB
BOLT, HEX HEAD 1/2”-NC X 2-1/4” PL GR5
BOLT, HEX HEAD 5/16”-NC X 4-1/2” PL GR5
BOLT, HEX HEAD 1/2”-13NC X 1-1/4" PL GR8
PAMPHLET, SAFETY MOUNTING
SWITCH, PUSH-PULL SPDT 10A@12V
DECAL, PROPER ENGINE OPERATING
DECAL, WARNING HOSE BURST
(Continued Next Page)
Brahma (Cat Challenger MT465B Asy. Man.) 09/05
© 2005 Alamo Group Inc.
Section 10 - 6
Common Box - Component List - Aux. Hyd. Valve
02969093 Common box Consist of the Following Items:
(Continued From Previous Page)
ITEM
PART NO.
QTY.
DESCRITION
20
21
22
23
24
25
26
27
28
29
30
31
32
33
34
35
36
37
38
02966634
02967827
02981212
02968822A
02968822CA
02969128
02969129
02969613
02969646
02970202
02970204
02971123
02971191
02978099
00059900
00010600
02958206
02958488
02982828
1
1
1
1
1
1
2
1
1
1
1
1
1
1
2
1
1
2
1
BUMPER WELDMENT
DECAL, MULTI HAZ
OIL TANK & PUMP ASY
ASY, BRAHMA OPERATORS & PARTS
ASY, BRAHMA CANISTER MANUAL
JOYSTICK, DUAL AXIS REMOTE CONTROL
KIT, CABLE CONNECTION F/ VALVE
VALVE ASY, CONTROL
DECAL, NAME -BRAHMA 20(YELLOW)
DECAL, INST-JOYSTICK & PUMP
WIRE HARNESS, PUMP CONTROL
DECAL, WARNING PRESSURIZED TANK
WELDMENT, SWITCH MOUNT
TANK COVER ASY
BOLT, HEX HEAD 3/8”-NC X 3” PL GR5
BOLT, HEX HEAD 3/8”-NC X 2 “ PL GR5
QUICK-SPLICE, 18-14 TO 18-14GA
COTTER PIN, 1/16” X 1/2”
DECAL, OIL HYD TEMP RANGE
Common Box P/N 02969093 is included in Base Unit P/N 04001000
Brahma (Cat Challenger MT465B Asy. Man.) 09/05
Section 10 - 7
© 2005 Alamo Group Inc.
Common Box - Component List - Tractor Hyd. Valve
IMPORTANT NOTICE;
These are parts that are used as Base Unit with each unit that
will use tractor hydraulics for Cylinder Control Valve. These parts will remain the same no matter
which model tractor or head is used. DO NOT ORDER any of these parts unless you are certain
that that is what you want, most of theses are complete assemblies and may contain more prts
than are wanted to perform repairs. If ordering parts that are listed here it is recommended that
you look up the parts in a regular parts manual under the specific assembly number.
04101000 Base Unit Consist of the Following Items:
04101000 is NOT a Replacement Part Number, listed here as a reference only !
Used on Caterpillar Challenger MT465B Cab/4wd
Base Unit when Tractor Hydraulic used for Hydraulic Cylinder
Control.
ITEM
PART NO.
QTY.
DESCRITION
1.
2.
3.
04101000
02982163
02979630
02979631
-1
1
1
BRAHMA SIDE MOWER BASE UNIT (ITEMS 1 THRU 3)
COMMON BOX, BRAHMA
UNDERBEAM ASY, BRAHMA
MOUNTING ARM, BRAHMA
Base Unit WILL NOT Include Valve or Joystick for Hydraulic
Cylinder Control. Use Tractor Huydraulic controls.
02982163 Common box Consist of the Following Items:
ITEM
PART NO.
QTY.
DESCRITION
1
2
3
4
5
6
7
8
9
10
11
12
13
14
15
16
00001300
00001800
00002700
002369
00725336
00725337
00725746
00726119
00748823
02027400
02776600
02959010
02964028
02965093
02965262
02966634
2
8
8
1
2
2
1
2
2
6
2
1
1
1
1
1
LOCKWASHER, 1/2”
LOCKNUT, TOPLOCK, 1/2”-NC PLB
FLATWASHER, 1/2” PL STD
DECAL, DANGER MULTI-HAZARD
STRAP
PIN
DECAL, PELIGRO
WASHER, BRASS SPECIAL F/ HINGE
BOLT, HEX HEAD 1/2”-13UNC X 1-1/2” PL GR5
BOLT, HEX HEAD 1/2”-NC X 2-1/4” PL GR5
BOLT, HEX HEAD 1/2”-13NC X 1-1/4" PL GR8
PAMPHLET, SAFETY MOUNTING
SWITCH, PUSH-PULL SPDT 10A@12V
DECAL, PROPER ENGINE OPERATING
DECAL, WARNING HOSE BURST
BUMPER WELDMENT
(Continued Next Page)
Brahma (Cat Challenger MT465B Asy. Man.) 09/05
© 2005 Alamo Group Inc.
Section 10 - 8
Common Box - Component List - Tractor Hyd. Valve
02982163 Common box Consist of the Following Items:
(Continued From Previous Page)
ITEM
PART NO.
QTY.
DESCRITION
17
18
19
20
21
22
23
24
25
26
27
02967827
02968822A
02968822CA
02969646
02970204
02971123
02978099
02958206
02958488
02981212
02982828
1
1
1
1
1
1
1
1
2
1
1
DECAL, MULTI HAZ
ASY, BRAHMA OPERATORS & PARTS
ASY, BRAHMA CANISTER MANUAL
DECAL, NAME -BRAHMA 20(YELLOW)
WIRE HARNESS, PUMP CONTROL
DECAL, WARNING PRESSURIZED TANK
TANK COVER ASY
QUICK-SPLICE, 18-14 TO 18-14GA
COTTER PIN, 1/16” X 1/2”
OIL TANK & PUMP ASY
DECAL, OIL HYD TEMP RANGE
Common Box P/N 02982163 is included in Base Unit P/N 04101000
Brahma (Cat Challenger MT465B Asy. Man.) 09/05
Section 10 - 9
© 2005 Alamo Group Inc.
Mount Kit - Component ID
P/N 02979238
Pulley Adapter/ Spacer
(has 4 thread holes & 4
non-threaded holes)
P/N 02977074
Pump Mount Plate, Machined
1-1/4” OD
2.38”
13/16” ID
P/N 02982085
Pump Plate Spacer
P/N 02982176
Control Stand Weldment
Cover Hold
down on
outside
Cover Hold
down on
outside
P/N 02983116
Tamk Rail Mount LH
Brahma (Cat Challenger MT465B Asy. Man.) 09/05
© 2005 Alamo Group Inc.
Section 10 - 10
P/N 02983118
Tamk Rail Mount RH
Mount Kit - Component ID
P/N 02983114
Main frame Weldment
1” f/ center hole
to this edge
5/8” f/ center
hole to this
edge
6-3/8” square
1/4” thick
P/N 02983115
Support Weldment
P/N 02983119
Battery Mount Bracket
1” X 15 Spline Clamp Yoke
4 Bolt Flange Yoke
C
C
C
C
C
C
C
C
C
C
C
C
C
C
C
C
C
C
O
O
O
O
O
CCCCCCCCCCCCCCCCCCOOOOO
P/N 02979770
Hose Support Ring
(Weld On)
P/N 02975257A
Driveshaft Asy.
(Inner & Outer Half W/Yokes)
Brahma (Cat Challenger MT465B Asy. Man.) 09/05
Section 10 - 11
© 2005 Alamo Group Inc.
Mount Kit - Component ID
Pump & Driveshaft Components
Tractor Engine Pulley
Time Universal Joints
Pump End
Clamp Yoke
Pulley Adpater P/N 02979238
w/ Mounting Bolts & Washers
(4 bolts)
Driveline Asy P/N
02975257A
1
1
1
1
1
1
1
1
11
1
11
11
1
1234
1234
123456
123456
Driveshaft Mounting Bolts (4)
Mounting Bolts
123456789012
123456789012
123456789012
123456789012
1
1234
1234
1234
1
1
Spacers
P/N 02982085
Pump (Reference)
123456789
123456789
123456789
123456789
12345678901
12345678901
12345678901
Mounting Bolts
Bolts To
Tractor Bolster
Pump Mounting Bolts
Pump Mount
P/N 02977074
Brahma (Cat Challenger MT465B Asy. Man.) 09/05
© 2005 Alamo Group Inc.
Section 10 - 12
Base Unit - Component ID
2
P/N 02979630
Under Beam Asy w/ Hardware
(Shipped Assembled)
4
1
7
2
5
6
3
1
6
Item
Part No
Qty
Description
1
2
3
4
5
6
7
02979630
00015800
00059900
00695100
00059100
02967987
02979629
02979613
-2
2
4
4
1
2
1
Under Beam Asy. (Item 1 thru 7)
Locknut, Toplock 3/8”-NC PLC
Bolt, Hex head 3/8”-NC X 3” PL
Locknut, Toplock 5/8”-NC PLB
Bolt, Hex Head 5/8”-NC X 6 PL
Clamp Plate
Pin, Cylinder Base
Under Beam, Machined
Asy P/N 02979630
Under Beam Asy w/ Harware
Under Beam assembly will be shipped with pins, bolts, nuts and clamp plate. Under
beam assembly is shipped as part of the base unit.
Brahma (Cat Challenger MT465B Asy. Man.) 09/05
Section 10 - 13
© 2005 Alamo Group Inc.
Base Unit - Component ID
Blue
Blue / White
Green / White
Green
Green
Green / White
Orange
Red
Blue
Asy P/N 02979631
Mounting Arm Assembly
This is shipped assembled with the above shown components. For parts number
and parts description for the components in this assembly see the Brahma Parts
Manual. The Hydraulic Hoses have Color Coded Plastic ties on them, these must
be connected to matching location for the proper functions to operate as designed.
Some ties have solid colors and some have white stripes on them.
Brahma (Cat Challenger MT465B Asy. Man.) 09/05
© 2005 Alamo Group Inc.
Section 10 - 14
Base Unit - Component ID
Orange
Red
Blue
Old style weld on Filter
mount shown, latter tanks
this will be a bolt on bracket
Asy P/N 02981212
Tank & Pump Asy
This is shipped assembled with the above shown components. For parts number and parts description for the components in this assembly see the Brahma Parts Manual. The Hydraulic Hoses have
Color Coded Plastic ties on them, these must be connected to matching location for the proper
functions to operate as designed. Some ties have solid colors and some have white stripes on them.
Brahma (Cat Challenger MT465B Asy. Man.) 09/05
Section 10 - 15
© 2005 Alamo Group Inc.
Base Unit - Component ID
P/N 02970204 Wire Harness
# 16 Red
Fuse Holder
with Fuse
(10 Amp Fuse)
1
# 16 Red
2
4
3
2
1
3
4
(10 Amp Fuse)
Push-Pull Switch
shown turned around
for illustration of
terminals only
2
1
3
4
ON / Off
Switch Plug
# 12 Brn
Starter Solenoid Wire
Starter Solenoid Wire
Switched Power Supply
Ground
48” long
#16 Black
Pump Solenoid Connector
Ring Connector
to Ground
Connecters Shipped Loose in
Separate Plastic Bag
108” long
#16 Black
(-)
36” long
#16 Black
#16 Red (+) to
Ignition Switch
(Power Supply) # 16 Red
# 12 Brown Line
Connector to
Starter Solenoid
Brahma (Cat Challenger MT465B Asy. Man.) 09/05
© 2005 Alamo Group Inc.
Section 10 - 16
Solenoid Connector
at front pump
Base Unit - Component ID
Orange Tie
Blue Tie
9
1
2
3
11
5
Red Tie
11
7
Note orientation of orfice
plate notch points away
from valve as shown
4
Green Tie
Valve
10
1
12
12
13
13
Green / White Tie
8
1
6
Blue / White Tie
Item
Part No
Qty
Description
1
2
3
4
5
6
7
8
9
10
11
12
13
02969613
02963349
02967150
02967151
02968828
02968830
02968831
02968832
02968833
02968834
02969131
63042700
02969399
02972159
-3
1
1
1
1
1
1
1
1
1
2
1
1
Valve Asy, (1 thru 13)
Adapter, Hyd Elbow 8MJ - 4MJ
Adapter, Hyd Tee 8MJ - 8MJ - 8FJX
Adapter, Hyd Straight 8FJ - 4 MJ
Plastic Tie, 4” LG Red
Plastic Tie, 4” LG Blue
Plastic Tie, 4” LG Blue & White
Plastic Tie, 4” LG Green
Plastic Tie, 4” LG Green & White
Plastic Tie, 4” LG Orange
Valve Only
Adapter, Hyd. Straight 12MB - 8MJ
Orfice, One Way Restrictor
Adapter, Hyd Elbow 8FB - 8MB
Brahma (Cat Challenger MT465B Asy. Man.) 09/05
Section 10 - 17
© 2005 Alamo Group Inc.
Base Unit - Component ID
P/N 02966634
Bumper Weldment
P/N 02978099
Tank Cover & Manual
Cannister Asy.
Brahma (Cat Challenger MT465B Asy. Man.) 09/05
© 2005 Alamo Group Inc.
Section 10 - 18
P/N 02971191
Switch Mount Weldment
Brahma Asy. Manual
Caterpillar Challenger
MT465B Cab / 4 wd
2005 Edition
P/N 02983272
Brahma (Caterpiller Challenger MT465B Asy. Man.) 09/05
© 2005 Alamo Group Inc.