1
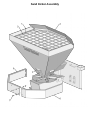
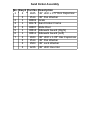
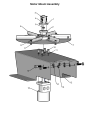
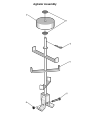
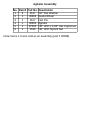
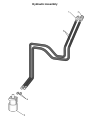
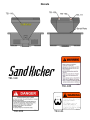
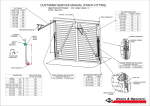
Talet Equipment International Ltd.
Sand Kicker
Parts & Operators Manual
P.O. Box 2351
Strathmore AB
Canada
T1P 1K3
www.taletattachments.com
[email protected]
Toll Free 1-888-317-5878
Fax 1-403-934-3042
This page intentionally left blank
To The Owner
General Comments
Congratulations on the purchase of your new Sand Kicker sand
spreader. Your unit was carefully designed and manufactured to give
you many years of dependable service. Your sand kicker will require
some minor maintenance to keep it in top working condition. Be sure
to observe all maintenance procedures and safety precautions in this
manual and the safety decals located on the attachment and on any
equipment on which it is mounted.
About This Manual
Read this manual before using your Sand Kicker. This manual has
been written to help you do a more efficient and safer job. Read this
manual carefully and become familiar with the operating procedures
before attempting to operate your Sand Kicker. Remember, never let
anyone operate this unit without them having read and completely
understanding the instructions in this manual, or having them be fully
trained by an experienced, qualified person.
Service
When servicing your Sand Kicker remember to use only original
manufacturer replacement parts. Substitute parts may not meet the
standards required for safe, dependable operation.
To facilitate parts ordering, record the model and serial number in the
space provided on the page. This information may be obtained from
the identification plate located above the mounting plate.
Model___________________Serial No._____________________
Our parts department needs this information to ensure that you
receive the correct parts for your specific model.
Safety Precautions
Safety Alert Symbol
This is the “Safety Alert Symbol” used by this
industry. This symbol is used to warn of possible
injury. Be sure to read all warnings carefully. They
are included for your safety and for the safety of
others working around you.
Signal Words
Note the use of signal words Danger, Warning, and Caution with the
safety messages. The appropriate signal word for reach has been
selected using the following guidelines:
●
●
●
DANGER: Indicates an immediate hazardous situation in which, if
not avoided, will result in death or serious injury. This signal word is
to be limited to the most extreme situations; typically for machine
components which, for functional purposes, cannot be guarded.
WARNING: Indicates a potentially hazardous situation in which, if
not avoided, can result in death or serious injury and indicated
hazards that exposed when guards are removed. It may also be
used to alert against unsafe practices.
CAUTION: Indicates a potentially hazardous situation which, if not
avoided, may result in minor or moderate injury. It may also be used
to alert against unsafe practices.
Safety Rules
To ensure skid steer stability, and to prevent tipping, always observe
the following safety rules:
●
●
Keep clear of spinner while in operation
Before operating the skid steer, read the operating and safety
instructions provided by the manufacturer. Observe all warnings and
cautions, particularly those which describe the use of seat belts and
other operator restraints and those which describe the proper way of
carrying loads as close to the ground as possible.
Safety Precautions
●
●
●
●
●
●
●
●
When using the Sand Kicker, be sure that the proper weight of the
load is not too heavy. A light load sticking out too far can have the
same tipping effect on the loader as a heavy load carried too close.
Do not attempt to dig with the Sand Kicker. The scraper blade is
made to scoop from loose piles only.
Do not obstruct your vision when traveling or working. Carry the
Sand Kicker low for maximum stability and visibility when traveling.
Operate at speeds slow enough so that you have complete control
at all times. Travel slowly over rough or slippery ground and on
hillsides.
Avoid steep slopes or unstable surfaces. If you must drive on a
slope, keep the load low and proceed with extreme caution. Do not
drive across a steep slope under any circumstances. Drive straight
up and down the slope.
Avoid turning on an incline, if at all possible. If it is necessary, use
extreme caution and make the turn wide and slow with the bucket
carried low.
Never operate the spinner when people are standing by the hopper
and could be injured by the sand or agitator inside the hopper.
Never heap load heavy material where the combined weight of the
bucket and the material could exceed the rated capacity of the skidsteer loader.
If you can't see where you are going then stop.
Skid-steer Loader Safety
1. Read the entire skid-steer loader operators manual before ever
attempting to use the skid steer loader. This knowledge is necessary
for safe operation.
2. Follow all safety decals on the skid-steer loader. Keep them clean
and replace them if they become worn and hard to read.
Safety Precautions
3. Know the limitation of your equipment. Do not use equipment for
anything other than what it was originally designed for.
4. Pay attention to the job at hand. Do not let your mind lose
concentration on what you are doing.
5. Use your seat belt and R.O.P.S. (Roll Over Protective Structure)
when operating the skid-steer loader. Keep belt and R.O.P.S. in
good repair. Do not modify R.O.P.S. or seat belt. Do not remove
R.O.P.S. or seat belt. Overturning the skid-steer loader without
proper R.O.P.S. and seat belt can result in death.
6. Fasten your seat belt before and during skid steer loader operation.
Remain seated at all times.
7. Do not take passengers on the skid steer loader or attachment.
There is no safe place for a passenger.
8. Use hand hold when getting on and off the skid-steer loader. Failure
to do so could cause a fall.
9. Inspect the skid steer loader before you try to operate the unit.
Check for needed maintenance or repairs and have them done
before using the equipment.
10.Never leave the skid steer loader running unattended. Always lower
lift arms, set parking brake, turn off engine, and remove key.
11.Wear appropriate clothing such as safety glasses, ear plugs, etc.
Do not wear loose fitting clothing; it may catch on the equipment.
Always wear a hardhat when operating the skid-steer loader to
prevent head injury.
12.When driving on public roads use safety light, reflectors, slow
moving vehicle sign, etc., to prevent accidents. Check with local
governments for regulations that may affect you.
13.Turn off the skid-steer loader before performing maintenance. If the
lift arms must be left raised for any reason, use a positive lift arm
lock to secure arms in place. Serious damage or personal injury
could result from lift arms accidentally lowering.
Safety Precautions
Escaping fluid under pressure can have efficient force to
penetrate the skin causing serious personal injury. Fluid
escaping from a very small hole can be almost invisible.
Use a piece of cardboard or wood, rather than your hands,
to search for suspected leaks.
14.Reduce speed when driving on rough terrain, slopes, or turning, to
avoid overturning the skid-steer loader.
15.Do not smoke when refueling the skid-steer loader. Allow room in
the gas tank for expansion. Wipe up any spilled liquid. Secure cap
tightly when done.
Keep unprotected body parts, such as face, eyes, and arms, as far
away as possible from a suspected leak. Flesh injected with hydraulic
fluid may develop gangrene or other permanent disabilities. If injured
by injected fluid, see a doctor at once. If you doctor is not familiar with
this type of injury, ask him to research immediately to determine
proper treatment.
Pre-Operation
General Information
The purpose of this manual is to assist in setting up, operating, and
maintaining your sand kicker. Parts lists and diagrams along with
optional equipment available are located at the back of this manual.
The illustration and data used in this manual were current at the time
of printing, however, we reserve the right to redesign and change the
sand kicker as may be necessary without notification.
Preparing the Vehicle
Your skid-steer must be equipped with a universal quick-tach hitch and
auxiliary hydraulics. read your skid-steer loader operator's manual and
know the limitations of your skid-steer loader, it may require the
addition of a counterweight kit to ensure that the combined weight of
the bucket and the material does not exceed the rated capacity of your
loader.
Note: An easy formula for calculating weight:
Bucket and material = empty bucket weight + 1000 lbs.
Do not use the hopper for mixing. Doing this will result in
extreme premature wear.
Mounting Instructions
Installation Instructions
After determining the rated capacity of your loader and adding any
counterweight kits that are needed you are ready to install your sand
kicker.
1. Install the bucket by following your skid-steer operators manual for
installing an attachment. Be sure to lock the attachment to the skidsteer.
2. Connect the hydraulic hoses to the skid-steer auxiliary hydraulics
using the quick couplers.
Mounting Instructions
3. Turn the auxiliary hydraulics to the forward or locking position and
the spinner should rotate so that the material in the hopper is
discharged through the sliding doors a the bottom of the hopper. If the
spinner is discharging sand in the wrong direction, reverse the
couplers.
Sand Kicker Assembly
Sand Kicker Assembly
No. Req'd Part No.
1
2
1045
2
1514
2
1
90002
3
1
90178
4
3
30007
5
1
30010
6
1
30011
7
2
1043
2
1514
2
1503
2
1226
Description
.38” UNC x 1.5” Hex Capscrew
.38” Flat Washer
Grate
Sand Kicker Frame
Slide Door
Sidewalk Guard (Right)
Sidewalk Guard (Left)
.38” UNC x 1.00” Hex Capscrew
.38” Flat Washer
.38” Lock Washer
.38” UNC Hex Nut
Motor Mount Assembly
Motor Mount Assembly
No. Req'd Part No.
1
1
30004
2
1
30003
3
3
1006
4
3
1513
5
1
1227
6
6
30008
7
1
30002
8
12
30009
9
12
87601
10
4
87561
11
4
1503
12
1
30001
13
4
89148
14
4
10005
15
4
1228
16
1
87484
1
87551
Description
Linkage
Bushing
.25” UNC x 1.50” Hex Capscrew
.25” Lock Washer
.44” Nut – Used As Spacer Only
Spinner Blades
Spinner Plate
.31” UNC x .75” Carriage Bolt
.31” UNC K-Nut
.38” UNC x .75” Hex Capscrew
.38” Lock Washer
Spinner Mount
.50” UNC x 1.5” Hex Capscrew
.50” Lock Washer
.50” UNC Hex Nut
Hydraulic Motor
Replacement Key
Note: Items 6-9 also sold as an assembly (part # 90372).
Note: Items 6,8,9 also sold as an assembly (part # 90077).
Agitator Assembly
Agitator Assembly
No. Req'd Part No.
1
2
1517
2
1
30006
3
1
1617
4
1
30005
5
1
87562
6
1
1536
Description
.62” Flat Washer
Guide Wheel
Hair Pin
Agitator
.38” UNC x 2.00” Hex Capscrew
.38” UNC Nylock Nut
Note: Items 1-6 also sold as an assembly (part # 90068).
Hydraulic Assembly
Hydraulic Assembly
No. Req'd Part No.
1
1
80133
2
1
80132
3
2
3072
4
2
3071
5
1
87484
1
87551
Description
Flat Face Male Coupler (10FB)
Flat Face Female Coupler (10FB)
Hose Assembly .50” x 108” 10FJ – 10MB
Straight Adapter 10MB – 10MJ
Hydraulic Motor
Replacement Key
Decals
Sand Kicker
TEI-118
TEI-105
TEI-102
TEI-111
Warranty
All new Talet products are warranted to be free from defects
in materials or workmanship which may cause failure under
normal usage and service when used for the purpose
intended.
In the event of failure within twelve (12) months from initial
retail sale, lease or rental date (excluding cable, ground
engaging parts such as sprockets, digging chain, bearings,
teeth, tamping and demolition heads, blade cutting edges,
pilot bits, auger teeth, auger heads & broom bristles), if after
examination, Talet determines failure was due to defective
material and/or workmanship, parts will be repaired or
replaced. Talet may request defective part or parts be
returned prepaid to them for inspection at their place of
business at Strathmore, Alberta or to a location specified by
Talet.
Any claims under this warranty must be made within fifteen
(15) days after the Buyer learns of the facts upon which such
claim is based. All claims not made in writing and received by
talet within the time period specified above shall be deemed
waived.
This warranty is in lieu of all other warranties expressed or
implied and there are no warranties of merchantability or of
fitness for a particular purpose. In no event shall Talet be
liable for consequential or special damage.
Talet's liability for any and all losses and damages to buyer,
resulting from any cause whatsoever, including Talet's
negligence, irrespective of whether such defects are
discoverable or latent, shall in no event exceed the purchase
price of the particular products with respect to which losses
or damages are claimed, or, at the election of Talet, the repair
or replacement of defective or damaged products.