1
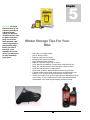
TOO COOL MOTORCYCLE SCHOOL Basic Maintenance Course Too Cool Motorcycle School Phone 403-202-0099 Table of Contents CHAPTER 1 Changing Your Oil Chapter 2 Checking Your Drive System Chains, Belts and Drive Shafts CHAPTER 3 Checking Your Brakes CHAPTER 4 Checking Your Tires CHAPTER 5 Winterizing your Motorcycle B A S I C M A I N T E N A N C E 1 Chapter C O U R S E Changing Your Oil This a step-by-step method of changing oil on most motorcycles. Please refer to your owner’s manual it is a great resource for you to have. When to change your oil is simple as 3,4,5. City riding every 3,000k.m City and Highway riding 4,000km. Highway only 5,000km. Don says: Regular motorcycle oil should be used for the first 3 oil changes then time to treat your engine with a semi-synthetic like Motul 5100 Semi-Synthetic oil. (You will feel the difference) Plus oil is cheap compared to a new engine. B efore you get started with your oil change, lets make sure we have what we need to begin. Owners Manual (Always nice to have) Latex gloves, Drop Cloth, Magnetic dish, Drain pan Strap Wrench or a Filter wrench, Screw driver (longer one) Plastic Bag, Oil Filter, O-rings, Rag Crush washers, Piece of Cardboard Trev says: Before you change your oil, ride around for a bit to warm things up. A hot oil change is the best way to remove contaminants. Caution! Oil and engine parts are very hot Small Funnel, Oil, Flashlight Time to put those latex gloves on… 1. Run engine 3-5 minutes to warm the oil so it flows out easier. (Just make sure you do this in a well ventilated area, outdoors would be the best place.) Have a look at your owner’s manual. 2. You may have to remove part of the fairing. Your manual will show you how to do it. Trust me, slow down and follow those instructions. (Not a bad idea to put the drop cloth down and put all your parts on the cloth and use the little magnetic dish for all you screws, etc.) 1 3. Place Drain pan under your engines drain plugs, undo fill cap, then remove drains plugs. Allow time for the oil to drain. 4. Undo bolts for oil filter or use a strap wrench or filter wrench to remove a spin on oil filter. (These can be very snug; I have had to punch through the filter with a screw driver to get them off because the strap wrench could not fit). Now place old filter in plastic bag. Don says: Try putting a little oil or grease on the o-ring for spin on filters. For paper filters put some grease on the o-ring to keep them in place when installing. Careful not to pinch the o-ring when doing up the bolts Trev says: Need a service manual go to your local bike shop. Can’t find one; try the internet or eBay you just never know what you can find. Even a photocopy of the manual can help out a lot. Check out what bad oil versus good oil looks like. 5. Before you install a spin on oil filter, pre fill the filter with oil. If it is a paper filter inspect the o-ring and give it a little wipe down or replace if you wish. I always like to clean every thing with a rag before it all goes back together. Careful not to over tighten (hand tight and just a little bit more) 6. Let’s put our drain plugs back in and install a new crush washer. If you do not have one, you can flip the one that is on there. (Just a one time deal, next time try to have a new one. By using a new crush washer you have a better chance of preventing leakage). Remember to snug up the drain plugs but do not over tighten (manual may provide you with torque info). Remove drain pan and place a piece of Cardboard under the bike, in case of leaks. (Good idea to leave it under your bike when parked for a few days.) 7. Now use the small funnel to pour the oil into the fill hole just as far as the top level indicator when the bike is level.. Have a rag in the other hand to wipe any excess oil that spills. Make sure to put your oil fill cap back on before the next step. 8. Start the bike and let it idle for one minute. Rev your engine a few times then turn it off. Allow the bike to sit for two minutes then check for leaks and check oil level. Chances are that you will need to put a little more oil in as some goes to fill the oil filter area. Always fill to what your manual recommends. If you have an oil window, this is where your flashlight can come in handy to check the levels. If you have a dip stick, take out and wipe it off, drop it back in and then remove the dip stick to ensure you have the proper oil level. Please refer to your manual to see if you have to screw it in before you check levels. Always ensure that the motorcycle is in an upright position when checking levels. 9. Time to re-install the body work if need be. (Remember be gentle, do not force anything together.) 10. Now re-check all the bolts. Remember to check them all again in about a week. Keep the cardboard under as well. 2 2 Chapter Don Says: I have used lots of different chain lubes. Try Maxima Chain Wax. It does not fling off and because it is not super tacky It will not pick up so much debris. Plus it uses paraffin. So it makes it easier to clean when it comes time. Trev says: Try Pit Bull Stands for both front and rear tires. They are well worth the investment. Lubing Your Chain Chains are ours to look after. Just a few minutes a week can pay off with many many kilometers of fun! Here are few steps to help. Remember o-ring chain have lube on the inside but you have to lube them where they meet the sprocket. Every two tanks of gas you should lube your chain. L ubing a chain is easy, let’s get a few things ready before we begin. Latex Gloves Rear Stand (if you have one) Piece of Cardboard Chain Lube Pledge, Plexus, Rag Time to put those latex gloves on again… 1. Lubing the chain is best done after the chain is a little warm, time to go for a short 10-minute ride. It will allow the lube to penetrate much more effectively. 2. Place bike on side stand or if you have a rear stand (they make maintenance so much easier). 3. Place a piece of cardboard under where you are going to be spraying. 3 4. If you only have a side stand you need a friend to pull the bike over to the left so the back tire can spin while you spray on the chain lube. If you have a rear stand you can spin the wheel yourself as you spray on the lube onto the chain. Also you can buy a Rollastand to set and roll the wheel on for lubing and cleaning. 5. Make sure that you coat all sides of the chain. While rotating the tire, spray the inside diameter of the chain where it meets the rear sprocket. Next, spray the outside diameter of the chain. Remember you are lubing where the metal sprocket meets the chain. Don Says: The best thing you can use to clean your chain is diesel fuel, kerosene or paraffin. Diesel is the most readily available. Do not ever use gasoline, varsol or turpentine never. When you decide to clean your chain remember to get a small paint brush and make yourself a little trough from a plastic dish, you will save a ton of rags. Trust us use Mechanics gloves, they will save your knuckles! Trev says: If you own a bike that has a belt drive. Try to stay out of alleyway and gravel. They do tremendous amount of damage to the sprockets and could puncture a very expensive belt. 6. After you are done spraying, use the Pledge or Plexus with the rag to clean the rear rim. 7. Let the bike sit for around ten minutes so the lube can penetrate and set into the chain. 8. Inspect the side of the tire after your first ride to make sure that no chain lube has flung off onto the side wall. If there is lube on the tire, wipe your tire clean (a cloth with dish soap works great). Adjusting Your Chain We have seen chains dangerously too loose and too tight. This is another part of the routine Maintenance that you need to do for not only the heath of the bike, but also yours. It is so easy to do. A djusting your chain will need a few things before we get going. If you have a belt it is the same steps, but you need to purchase a belt tensioner gauge from a local bike shop. Wrenches for Axel and for each side of swing arm. (Some bikes have a special tool for this, usually found in your bikes tool kit), Small Hammer. Let’s put on some Mechanics Gloves… 1. In your manual and sometimes on the swing arm. You will find about how tight you chain is allowed to be. There should be a range of movement that 4 Trev says: If there is a lot of difference between the tight and loose point, you made need a new chain. If you ever replace your chain you usually have to replace both sprockets. If the sprockets look likes a saw blade, replace them. they are ok with. There is always a tight spot, as the chain moves there is always at tight point. Use this point to adjust your chain. 2. This is a good time to inspect your sprockets both at the wheel (Bigger sprocket on the rear wheel) and the countershaft sprocket (Smaller one by the foot pegs). Check them for missing teeth and for wear. Sprockets that look like a V and the tips are very small are just asking for trouble. 3. Use a wrench to loosen axel nut (you do not have to take it right off). Just have it loose enough that you can move it with your fingers. 4. Loosen the lock nut and remember to hold the other nut with a second wrench (most of the time they are different sizes). 5. When tightening move each side equally. There is usually some sort of line that you can refer to on both sides of the swing arm. This is to make sure that the rear wheel is tracking straight. 6. If you have to loosen instead of tighten you may need to bump with a small hammer on the little nut so it will loosen the chain. It seems easier to tighten than loosen a chain. 7. After the chain has been adjusted re-tighten the lock nuts (Remember to hold the adjuster nut with the other wrench at the same time). 8. Re-tighten the main axel bolt. At this point it is a great idea to check all the nuts that hold the sprocket, and the chain as well (sometimes they go loose). Reinstall a “NEW” Cotter pin if required. 9. This is a great time to clean the chain and give it a good lube as well. Shaft driven motorcycles require little maintenance throughout the year. This is where your manual is very important. It will show you where and how to check its fluid levels. Remember to ride for a while to warm up oil to ensure a better drain. 5 3 Chapter Trev says: Checking your brakes every 1500k’s to 3000k’s is very important. Do not check the brakes right after a ride. Because they will be VERY HOT. Don Says: If you do not know which brake fluid to use. Just check the top of the brake fluid reservoir. It will say something like DOT 3, 4 or 5. Or you can always refer to your manual. Never mix DOT 5 with any other number. Trev says: When the brake fluid is low in the reservoirs. Excessive wear to the brake pads is usually the cause. If it is just have a professional change them. A lot depends on your brakes. Remember to change the fluid every two years. Checking Your Brakes!! Checking and cleaning your brakes are also quite easy but kind of dirty tasks. C hecking your brakes only needs a few things. Mechanics Gloves Screw Driver (Phillips?) Brake Clean Still have those Mechanics Gloves handy… 1. Checking your brakes is a very basic task. It takes but a moment to find the best place to look at the thickness of your pads if you have hydraulic brake. Take a look at a new pad and compare it to the old one on the bike. If you have drum brakes (usually this would be your rear brake on some models). They are easy because as you depress the pedal there is an arrow showing you the usable range. Replace if needed 2. If you have hydraulic brakes check the fluid lines for any leaks and or crack. Check fluid levels in the brake reservoirs both front and back (these are only for hydraulic braking systems) they should have some sort of window to check the levels, If not take a screw driver and open to check. If they are cable operated drum brakes (usually front brakes) check for any fraying or rusting. Replace cable if necessary (these cables will require lubing and adjusting on a regular basis). 3. Check also for build up of brake dust. You can use the brake clean to remedy that problem. 6 4 Chapter Checking Your Tires Don Says: Check your tires bi-weekly. If you are on a trip check them every day. If you notice a big drop in pressure, time to check for a nail. Also time to get a new tire. Tires are where the rubber meets the road. Many people neglect or do not pay much attention. When the tire fails. It is almost always the rider’s fault. Checking your tires is as easy as bending over. C hecking your tires. You will need… A good tire pressure gauge Hey remember those Mechanics gloves, don’t need them this time… Trev says: After replacing any tire, it is going to take you about 100K to get used to the handling of the new tire. Just take it easy until that slippery mold release wears off of that new pair of shoes. Your motorcycle was designed around its tires. Significant departures from the manufacturer’s tire specifications will nearly always affect handling - for the worse. Older machines (pre-1980) had ‘100 % aspect ratio’ tires with characteristically ‘tall’ profiles. Some bikes (cruisers/customs) still use them. Since then, however, manufacturers have moved to increasingly low profile, wider tires. Installing a modern, low-profile tire on an older machine not designed for it can be dangerous. Chassis geometry will be affected, and cornering clearance greatly reduced. Michelin introduced radials for motorcycles in the early ‘80s, and they are now in widespread use. Radials should not be combined with bias ply tires, with a small handful of exceptions. Modern low- profile radial tires are responsible for much of the improvement in motorcycle handling since the ‘80s. The subjects of tires, traction and control are inseparable. We’ve touched on such things as inflation and tread depth, but naturally there’s more. Every nice new tire is heat-cured to provide specific traction properties at certain temperatures. DOT race tires (tires that are legal for the street but meant for the track) are designed to 7 Don Says: Wider tires are not wider they are taller. If the factory could of made the bike handle better with a wider tire. Don’t you think they would have put one on? Just remember Rim size dictates Tire size. Trev says: Always have the tires balanced after the installation onto the rim. produce extreme grip for just a small number of extreme heat cycles (sometimes one is all it’ll take). After that, they lose much of their adhesion. They’re also designed to dissipate heat in order to avoid overheating during sustained track thrashings. At street speeds, they may take a long time to warm up, or fail to warm up altogether. Street tires are designed to warm up quickly and survive a large number of relatively mild heat cycles. With normal use, the compound will continue to provide reasonable grip until the tread is worn out. Many riders would like a wider rear tire than the OEM tire fitted to their bike. A wider tire may look cool, but unless you’re running the banking at Daytona, that fatter tire is only going to make your bike harder to turn and cost more to replace. You may notice differences in handling after switching to a different manufacturer’s tire even if it has the same dimensions, but these differences will be rather subtle and not dangerous in themselves. The differences (in steering response or ease of leaningin, cornering and straight-line stability) come down to carcass construction, shape, and slight differences in circumference. Two tires may have the same 70% aspect ratio, but some are more rounded, others more triangular. A triangular profile generally turns in quickly and gives a relatively larger contact patch when leaned over. Rounded profiles take slightly more effort to roll over, leaning more slowly and evenly. Tires with slightly larger or smaller outer diameter will affect the geometry and steering response of the bike (this can be corrected by raising/lowering the forks). As tires wear (more in the center of the tread in typical street use), the profile will be changed. Even before tread depth runs out, some degradation of handling characteristics and cornering grip may be detected. These won’t prove dangerous in normal riding conditions. If departing from OEM-spec tires or carrying heavy loads ensure your tire choice has the correct weight rating (‘A’: lightest load; ‘C’: heaviest). No matter what the bike is doing wrong, whether it’s sluggish, high-effort steering, poor grip, front wheel wanting to ‘tuck’ in a turn, the first thing you should think of is inflation. Chronic improper inflation causes 2 obvious types of uneven wear. Over inflation rapidly wears the tread over a narrow central area. Under inflation wears the tread on either side of the center. It can also produce a distinctive ‘cupping’ or ‘puckering’ of the tread blocks. Blowouts, Tread Separations Of the small percentage of accidents caused by mechanical failures, tire failure (blowouts, tread separations) make up the majority. And the majority of deflating punctures and blowouts happen to tires late in their lifespan. This is a good reason to think again before trying to get another 1000 km out of that marginal tire. Smart 8 money is not saved on tires. Check frequently for embedded objects. Total tread separation or ‘chunking’ generally affects tires subjected to vicious highspeed abuse, but partial tread separations which can affect handling / steering can escape casual inspection. They can be detected with a stationary index pointer. If ignored, total tread separation could occur. This will be felt as a violently out-ofbalance vibration, which could develop into a ‘tankslapper’. Keep a firm grip on the bars to prevent oscillations getting out of control, and respond as you would to a blowout. Old, badly cracked tires are the most likely to ‘chunk’ on the street, along with chronically under inflated (overheating) tires. In the event of a front tire blowout, keep a firm grip on the bars and gradually slow down by throttling off, rear braking and downshifting. Avoid the front brake. Pull the bike carefully over to a safe parking spot. If the rear tire deflates, gradually slow down by throttling off, applying the front brake, then pulling in the clutch and tapping down, before pulling over to a safe stopping point. Any time you detect a problem with either tire, keep the bike as upright as possible and do nothing that will require a large amount of traction. Another rule of thumb when it comes to when to replace that tire is simple. If you are on the Tread wear indicators anywhere on the tire , time to replace it! Don Says: Never reuse a tire that has been in an accident or impacted. You might never see the damage that had occurred. Repairs Some shops will refuse to plug punctured tires, on the grounds that repaired tires are unsafe. If a puncture occurs in one of the tread grooves, where the compound is thinner, a plug may not be a good idea. If the puncture is close the edge of the tire or at an angle, repairing may not be an option. If the tire is more than half-through its useful life you’re better off replacing it. A repaired tire drops at least one speed rating (from Z to V, for e.g.). For long trips, you may wish to carry a repair kit and know how to use it: tubeless tire plug kits are compact and fairly simple to use. Practice on an old discarded tire before you have to use it in earnest. The best type of repair is a plug / patch from the inside. If you are riding on a plug do not ride faster than 130km. That should not be an issue because the speed limit in North America is 110km. When there is less than 30% tread left time to replace. Using tire repair liquids of any kind have never been endorsed by tire manufacturers. If they were good do you think they would have had it in there already. These should be only used in case of an emergency. 9 5 Chapter Trev says: You might feel the need to go out and start your baby up and listen to that engine purr. But trust me please do not. I had to replace a full set of plugs, not once but twice. Because it did not run long enough it just fouled the plugs. Even if you want to take it for a spin remember if it is mid season you will have to do some winterizing steps again. Winter Storage Tips For Your Bike • • • • • • • • • Drain dirty oil, Change oil filter (Hot oil change is best) Drain the carburetor fuel bowls Disconnect and remove the battery (Store inside & charge monthly) Make sure gas tank is either full or empty (If full add gas line stabilizer, If empty spray inside with WD-40) Wash, Dry, and wax (polish) before storage to inhibit corrosion Cover bike with bike cover or soft blanket Store inside if possible, Otherwise protect it from the elements If stored outside remove spark plugs and pour a small amount (one teaspoon) of 2 cycle oil into the cylinders then reinstall plugs. Unless your intention is to go for a good ride avoid starting the bike up just to hear it. It has a good chance of fouling the plugs and leaves condensation in the exhaust pipes causing premature rusting. 10 $10 Off Tire Purchase 50% off Mounting and Balancing Bay 1 3924 3A Street N.E. Calgary Alberta T2E-‐6R4 403-‐277-‐0152 The Official Motorcycle Mechanics of Too Cool Motorcycle would like to thank our Sponsors for all their support. 11