1
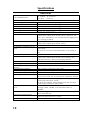
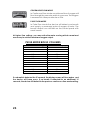
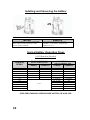
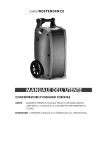
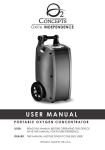
Oxlife INDEPENDENCE USER MANUAL PO RTABL E O XYG EN CO NCENTRATO R USER: READ THIS MANUAL BEFORE OPERATING THIS DEVICE. SAVE THIS MANUAL FOR FUTURE REFERENCE. DEALER: THIS MANUAL MUST BE GIVEN TO THE END USER. PROUDLY MADE IN THE U.S.A. PLEASE READ THIS OPERATION MANUAL CAREFULLY BEFORE USING THIS DEVICE. BE AWARE OF ALL WARNINGS AND SAFETY INFORMATION. ONLY USE ACCESSORIES APPROVED BY O2 CONCEPTS AND REFERENCED WITHIN THIS MANUAL. IF YOU DO NOT FULLY UNDERSTAND ALL THE WARNINGS, SAFETY PRECAUTIONS, AND OPERATING INSTRUCTIONS CONTACT YOUR AUTHORIZED DEALER OR PROVIDER FOR TECHNICAL SUPPORT. CAUTION: U.S. FEDERAL LAW RESTRICTS THESE DEVICES TO SALE BY OR ON THE ORDER OF A PHYSICIAN. Table of Contents Table of Contents Section 1: Introduction ............................................................ 7 Symbols Reference ......................................................... 7 How to Contact O2 Concepts ..................................... 9 Specifications ................................................................. 10 Indications for Use ......................................................... 12 Section 2: Safety Guidelines................................................ 13 Device Safety Guidelines............................................ 13 Battery and Power Supply Safety Guidelines ........ 15 Section 3: Product Description ........................................... 16 Device and Accessories: ............................................ 16 Feature Identification ................................................... 17 Understanding the Control Panel.............................. 18 Applied Parts................................................................... 19 Section 4: Operating Instructions ....................................... 20 Before Operating ........................................................... 20 Locating Your Device................................................... 21 Device Settings............................................................... 22 PULSE MODE BOLUS VOLUMES .................................... 23 Installing and Removing the Battery ........................ 24 Typical Battery Operation Times ............................... 24 Battery Time Management......................................... 25 AC Power Supply Home .............................................. 26 5 DC Power Supply Auto ................................................. 27 DC Power Supply Information Guide for Use ......... 28 DC Power Supply Troubleshooting Guide for Use 29 Handling ........................................................................... 31 Accessory Bag ............................................................... 32 Cannula Use.................................................................... 33 Humidifier Kit ................................................................... 34 FiresafeTM Cannula Valve............................................ 35 Section 5: User Alerts and Alarms...................................... 37 Alarm and Alert Screens ............................................. 37 How to Simulate Alarms and Alerts (Providers Only).................................................................................. 38 How to Respond to Alarms ......................................... 40 Section 6: Maintenance and Cleaning................... 42 Maintenance .................................................................. 42 User Care and Cleaning.............................................. 42 Air Inlet Filter Cleaning ................................................. 42 Battery Disposal ............................................................. 44 Device Disposal ............................................................. 44 Section 7: Standards Compliance..................................... 45 NOTES ................................................................................ 46 6 Section 1: Introduction Symbols Reference ICON MEANING 7 ICON MEANING On/Off Button Use no grease or oils Mode Button Type BF Equipment Continuous Mode Do not dispose of in household waste Pulse Mode Keep dry in transport and storage Breath Detect Icon Not suitable for use in the presence of a flammable anesthetic mixture Increase Flow Setting No smoking while using or near dev ice Decrease Flow Setting No open flames Battery Life Indication Date of Manufacture AC/DC Power Caution (as seen in manual) AC/DC Charging Indicator Warning (as seen in manual) Do not disassemble Auto (as seen in manual Home (as seen in manual) The Oxlife Independence protects again solid objects ov er 12mm and direct sprays of water up to 15° of v ertical (IEC 60529) Refer to instructions The dev ice conforms to Directiv e 93/42/EEC concerning medical dev ices Class II Equipment The Oxlife Independence complies with IEC 60601-1 3rd Edition; Medical Electrical Equipment; Part 1: General Requirements for Basic Safety and Essential Performance. 8 How to Contact O2 Concepts Please contact your homecare prov ider if your Oxlife Independence requires serv ice. Please call O2 Concepts Technical Support, at 1-(877)-867-4008, for support with your Oxlife Independence. Please call Customer Serv ice to report any unexpected operation and ev ents associated with the dev ice. Information about the Oxlife Independence and O2 Concepts can also be found on our website at www.o2-concepts.com. 9 Specifications DIMENSIONS H: 20.29 in H: 51.5 cm W : 10.85 in W : 27.55 cm D: 9.45 in D: 24 cm Dev ice Dimensions w it h Handle/W heels WEIGHTS Dev ice W eight Cart Kit (W heels & Pull Handle) Bat t ery AC Charger DC Charger 16.7 lbs. (7.57 kg) 2.17 lbs. (0.98 kg) 1.4 lbs. (0.63 kg) 1.9 lbs. (0.86 kg) .37 lbs. (0.16 kg) MODES OF OPERATION Cont inuous Flow 0.5 t o 3 LPM in 0.5 LPM increment s; Measured flow v alues are w it hin ± 2% of act ual v alues . Max flow 3.0 LPM. Flow maint ained w it h out let pressure ranging from 0 t o 5.0 psig (0-34kPa) Pulse Dose 0.5 t o 6.0 (8mL-96mL) set t ing increment s; Measured flow v alues are w it hin ± 2% of act ual v alues 14.4V Lit hium I on Bat t ery Bat t ery Specificat ion Ex t ernal Pow er Supply Pow er I nput Alt it ude Ox y gen Purit y Operat ing Temperat ure Operat ing Humidit y Operat ing At mospheric Pressure Operat ing Env ironment Transport / St orage Temperat ure Transport / St orage Humidit y Operat ing Time Cannula Specificat ion A-W eight ed Sound Pressure Lev el Alarm Sound Lev el Max imum Out let Pressure Serv ice Life 10 AC pow er: 100 - 240 VAC, 50/60 Hz @ 2.5 amps DC pow er: 12-15 VDC; Recommended: 15A out let at 12V 0-13,123ft or (0-4000m) 91% ± 4% (87 - 95%) from 0.5 t o 3.0 LPM ; Measured purit y v alues are w it hin ± 2% of act ual v alues ; There is no v ariat ion in purit y w ithin t he operat ing alt it ude. 50°F (10°) t o 104°F (40°C) 10% - 95% @ 82.4°F (28°C) 101kPa t o 63kPa Free of smoke, pollut ant s, and fumes. -4°F (-20°C) t o 140°F (60°C) 0 -95% non-condensing 24 hours per day w hen connect ed t o an ex t ernal AC or DC pow er source. This is a cont inuous operat ion dev ice. DO NOT use cannula t ubing longer t han 7ft (2.13m) w hen using Pulse Flow Mode Do NOT use cannula t ubing longer t han 50ft (15.25m) w hen using Cont inuous Flow Mode. The v olume t hat t he dev ice w ill reach at max imum set t ings w ill be ~ 56dBA w it h max imum peaks of 58.8dBA. All alarms t riggered by t he dev ice w ill be 85dBA at 10cm from t he unit . Dev ice w ill maint ain flow up t o 5psi back pressure. Max imum back pressure is 7.0psi. Dev ice: 5y rs, Accessories: 1y r Contraindications Under certain circumstances, the use of non-prescribed oxygen therapy can be hazardous. This dev ice should only be used when prescribed by a physician. Not for use in the presence of aerosol sprays or flammable anesthetics. Additional monitoring may be required for patients using this dev ice who are unable to hear or see alarms or communicate discomfort. The Oxlife Independence is not appropriate for any patient who would experience adv erse health consequences as a result of a temporary interruption in oxygen therapy. The av ailability of an alternate source of supplemental oxygen is strongly recommended in the case of power interruption or a mechanical failure of the dev ice. This dev ice is for adult use only. It is not qualified for use by pediatric patients. 11 Indications for Use PRESCRIBED MODE AND FLOW SETTINGS SHOULD ONLY BE ADJUSTED UNDER THE ADVICE OF A PHYSICIAN The O2 Concepts Oxlife Independence is indicated on a prescription basis for the administration of supplemental oxygen. It is not intended for life support, nor does it prov ide any patient monitoring capabilities. Federal law restricts this dev ice to sale by or on the order of a physician. No modification of this equipment is allowed. There is no know interference posed by ME equipment during specific inv estigations or treatments. There are no known devices that will cause interference issues. 12 Section 2: Safety Guidelines Device Safety Guidelines Avoid exposure to open flames or creation of any spark near your Oxlife Independence. This includes sparks from static electricity created by any type of friction. Protect electrical power cords from sharp edges to avoid electrical shock and serious physical injury. Locate the Oxlife Independence in a well v entilated area to allow for adequate air intake. Av oid the intake of airborne pollutants, smoke, or fumes. Use only approved accessories as specified in this User Manual. Use of non-approved accessories may cause serious damage to the device and will v oid the warranty. Locate oxygen tubing and power cords away from hot surfaces and in a manner to prev ent tripping hazards. DO NOT Operate the device in an enclosed space, such as a closet. DO NOT block the air inlet or the exhaust vents located on the side of the dev ice. DO NOT cov er the device with a towel, blanket, etc. DO NOT drop or insert any objects or liquid into any opening. DO NOT leav e your Oxlife Independence or batteries in your v ehicle or trunk. Extreme hot or cold may damage your dev ice and or batteries. DO NOT ship the Oxlife Independence with the batteries installed. Batteries must be shipped separately and packaged appropriately. 13 Device Safety Guidelines DO NOT SMOKE WHILE USING THIS DEVICE. KEEP ALL MATCHES, LIT CIGARETTES, CANDLES, OR OTHER SOURCES OF IGNITION AT LEAST 10 FEET FROM THE DEVICE. THIS DEVICE PRODUCES ENRICHED OXYGEN GAS WHICH ACCELERATES COMBUSTION. Outdoor use must be conducted using battery power. Keep unit away from children, pets, and potential house hold pests. Use caution when operating with long power cords or cannulas due to possibility of strangulation from excess length. Use caution as small parts may pose a choking hazard Do not remov e any parts or fasteners from unit. Small parts can cause injury if inhaled or swallowed. DO NOT use the dev ice with a damaged power cord or plug. DO NOT operate the device on wet surfaces or in standing water, and do not submerge or expose to water. If the Oxlife Independence has been dropped, damaged or exposed to water please contact your authorized dealer for inspection and possible repair of the dev ice. DO NOT come in contact with the device when wet. DO NOT use oil, grease, or petroleum based products on or near the dev ice. DO NOT use the dev ice with an extension cord. 14 Battery and Power Supply Safety Guidelines Use of non-approv ed battery or power supply may cause serious damage to the dev ice and will v oid the warranty. Store the battery in a cool dry place when not in use. Remov e the battery from the dev ice if it will not be used for an extended period of time. Locate the external power supply in the open air to prev ent ov erheating when in use. U.S. Department of Transportation (DOT) and United Nations (UN) regulations require that batteries be remov ed from the dev ice when checked as luggage on international flights. The battery may explode if exposed to or disposed of in a fire. Use only the supplied battery; AC and/or DC power supplies that were prov ided with the dev ice. Keep the battery away from children. Use of a damaged battery or power supply may cause personal inju ry. DO NOT attempt to disassemble the battery or power supply. DO NOT short circuit the battery's metal contacts with metallic objects such as keys or coins. It may cause sparks or excessiv e heat. DO NOT use the battery or power supply for anything other t han its intended purpose. DO NOT drop the battery or expose it to mechanical shock. DO NOT expose the battery to water or other liquids. DO NOT expose the battery to excessiv e heat or cold. 15 Section 3: Product Description Device and Accessories: Information regarding how to operate the Oxlife Independence and its accessories can be found in the following sections: Product Description and Operating Instructions. The use of certain humidifiers and administration accessories not specified for use with this oxygen concentrator may impair performance Accessories for the Oxlife Independence: 16 Battery Battery Shell/Blank Desktop Charger (Single Bay) Desktop Charger (6 Bay) AC Power Supply DC Power Cord Accessory Bag Humidifier Kit 7ft Cannula 50ft Cannula Firesafe TM Cannula Valv e Feature Identification 1. CONTROL PANEL 2. LCD DISPLAY 3. OXYGEN OUTLET PORT 4. EXHAUST PORT 5. WHEELS 6. RECHARGEABLE BATTERY SLOTS 7. FAA APPROVAL IDENTIFICATION 8. PULL HANDLE 9. AIR INTAKE PORT FILTER 10. EXTERNAL POWER INPUT 11. HANDLE LOCK/RELEASE BUTTON 12. CARRY HANDLE 17 Understanding the Control Panel 13. POWER BUTTON 14. BATTERY STATUS 15. EXTERNAL POWER SOURCE / INDICATOR 16. INCREASE/UP BUTTON 17. DECREASE/DOWN BUTTON 18. SYSTEM STATUS 19. BREATH DETECT (PULSE MODE ONLY) 20. MODE SETTING 21. MODE BUTTON 18 BATTERY CHARGING Applied Parts The applied parts, or components that a patient will come in contact with during normal operation of the device, are listed below: 1. 2. 3. 19 Handle Display Oxygen Port Section 4: Operating Instructions Before Operating Your authorized dealer will and or should demonstrate proper operation of your Oxlife Independence. This manual should be saved for future reference to help you safely operate your dev ice. If you have any further questions please contact your authorized dealer. This equipment needs to be installed and put into service in accordance with the information prov ided in the accompanying documents. DO NOT operate the Oxlife Independence without first reading the Safety Guidelines included in SECTION 2 of this manual. Please follow all operating instructions. If you are relocating your Oxlife Independence from an extreme environment, allow the dev ice to return to the specified operating temperature and humidity ranges before use. Operating your device outside of specified ranges may dama ge your device, impact device performance and may void your warranty. See Operating Temperature and Humidity Ranges listed in the Specification Table. Fully charge batteries before first use. 20 Locating Your Device Place the Oxlife Independence in a well v entilated area free of smoke, fumes, pollutants, and away from direct sun light. Av oid high humidity environments. Ensure that air intake and exhaust ports are not obstructed. The Oxlife Independence MUST be located so that alarms can be heard. Position the oxygen supply tubing and power cords in a manner that prevents kinking, air flow obstructions, and tripping hazards. To protect dev ice finish, it is recommended to use the Oxlife Independence in either an upright position or lying on its back. DO NOT operate the dev ice in an enclosed space, such as a closet. DO NOT locate the Oxlife Independence near any flammable materials or cleaning product or in the direct path of any heat source such as a stov e, heat register or a car heater. Keep the Oxlife Independence at least 5 feet (1.6m) from hot sparking objects or open flame. 21 Device Settings Turn the dev ice on by pressing the Power Button Press the Mode Button Press the Increase . to select Continuous or Pulse Flow Mode or Decrease buttons to select the correct flow rate. Turn the dev ice off by pressing and holding the Power Button . THE PROPER FLOW MODE AND FLOW RATE ARE PRESCRIBED BY YOUR PHYSICIAN. DO NOT CHANGE THESE SETTINGS WITHOUT CONSULTING WITH YOUR PHYSICIAN. PULSE FLOW MODE SHOULD ONLY BE USED UNDER THE DIRECTION OF YOUR PHYSICIAN. APPROPRIATE AND SAFE PULSE MODE SETTINGS MUST ACCOMMODATE THE INDIVIDUAL PATIENT'S LIFESTYLE INCLUDING REST, TRAVEL AND EXERCISE. The device may take up to 3 minutes in order to warm up and reach desired performance. 22 CONTINUOUS FLOW MODE In Continuous Flow Mode a continuous flow of oxygen will flow through the cannula and into your nose. The oxygen is measured in Liters per Minute or LPM. PULSE FLOW MODE In Pulse Flow Mode the dev ice will detect your breath and supply a measured pulse of oxygen or bolus. The breath detect icon will flash on the control panel with each breath. At higher flow settings, you may notice the motor revving which normal and necessary to achieve maximum oxygen output. PULSE MODE BOLUS VOLUMES Pulse Mode Setting 0.5 1.0 1.5 2.0 2.5 3.0 3.5 4.0 4.5 5.0 5.5 6.0 Bolus Volume (mL) 8 16 24 32 40 48 56 64 72 80 88 96 If no breath is detected for 45 seconds, the display screen will turn amber, and the device will beep once. If no breath is detected for an additional 15 seconds, the device will default to the previous continuous flow mode setting. 23 Installing and Removing the Battery INSTALL REMOVE SLI DE I NTO BACK OF DEVI CE; BATTERY W I LL DROP DOW N SLI GHTLY AND CLI CK I NTO POSI TI ON PU LL TAB AW AY FROM U NI T; LI FT BATTERY U P SLI GHTLY; THEN SLI DE STRAI GHT OU T Typical Battery Operation Times (@ 20 Breaths/Minute) FLOW RATE SETTING 0.5 1.0 1.5 2.0 2.5 3.0 3.5 4.0 4.5 5.0 5.5 6.0 CONTINUOUS FLOW (Hours of Battery Life) 1 Battery 2hr 2hr 1hr 1hr 53 min 38 min 45 min 15 min 1hr 45 min N/A PULSE FLOW (Hours of Battery Life) 2 Batteries 1 Battery 2 Batteries 5hr 45min 5hr 15 min 3hr 30 min 2hr 30 min 2hr 1hr 30min 3hr 8 min 3hr 3hr 2hr 53min 2hr 23min 2hr 1hr 45min 1hr 30 min 1hr 15min 1hr 8min 1hr 53min 6hr 15min 6hr 6hr 5hr 45min 4hr 45min 4hr 3hr 30min 3hr 2hr 30min 2hr 15min 2hr 1hr 45min OPERATING TIME WILL DEGRADE WITH BATTERY USE AND AGE. 24 Battery Time Management With the combined use of the battery, AC power cord, and DC power cord your time away from home is v irtually limitless. Using the AC and DC power cords whenever possible will giv e you optimal battery life. The battery will charge in the dev ice, when plugged into an external power source. The Oxlife Independence comes equipped with a rechargeable lithium battery that is NOT user serv iceable. Battery Charge Status is also displayed on the control panel. Each bar represents approximately 25% of the total battery charge. When the battery is fully charged (ov er 90%) the battery icon will appear solid. The Oxlife Independence battery includes a battery charge status indicator located on the front of the battery. Simply press the "PUSH" button on battery to display the remaining battery life in 25% increments. Indicates that there is 75% charge remaining The typical time to recharge a fully discharged battery is approximately 1.5 hours if charging a single battery and 2.5 hours if charging two with the device plugged into AC power and powered off. Battery Charge times with the dev ice running will v ary depending on setting used. There is no routine maintenance or serv ice to the O2 Concepts rechargeable batteries. 25 AC Power Supply Home Use only the power supplies provided with this device. The AC power supply charges the battery using a 100-240 volt 50/60 Hertz outlet (a typical wall outlet in your home). Using the AC power supply allows you to use your Oxlife Independence while simultaneously recharging the battery. To use the AC power supply, connect the power supply to a wall outlet and the Oxlife Independence. The external power source icon will be displayed on the control panel. Recommendation for Use: Use no electrical outlets controlled by a switch. When changing power sources wait for the control panel to display the new power source icon and unit to beep before remov ing the original source. The detachable power supply cord to the power supply is the means of isolating the unit from the supply mains. If AC power is remov ed from the dev ice, wait 10 seconds before re-applying power. When traveling internationally a standard international power plug adapter is all that is required. EXTERNAL POWER INPUT 26 DC Power Supply Auto Use only the power supplies prov ided with this dev ice. The DC power supply allows you to power your Oxlife Independence from your v ehicle's (car, boat, RV) 12/15 v olt DC outlet, (cigarette lighter) in all settings. Use the DC outlet closest to the battery. Use no other DC outlets in the v ehicle. If your v ehicles DC power drops below 11.5 v olts, the dev ice will rev ert to battery power. A 15 amp outlet at 12 v olts is recommended for use with the dev ice. The external power supply icon will be displayed on the control panel. Recommendations for Use: ALWAYS have the vehicle's engine running before plugging in your Oxlife Independence. With the engine running, plug in and turn on your device. When operating the Oxlife Independence in your vehicle, ensure that the dev ice is securely stowed and will not get damaged during transport. Ensure that air inlet and exhaust ports are not blocked. Batteries will not charge at any setting if the engine is not running. DC power is not sufficient to charge the batteries at all settings. Charging will NOT occur at settings higher than Continuous 2.0 or Pulse 4.0. The dev ice may “rev” more while operating on DC power. This is normal operation while connected to DC power and not cause for any concern. DO NOT leav e the dev ice plugged into the v ehicle when the engine is not running. DO NOT use the Oxlife Independence with any power splitting devices. 27 DC Power Supply Information Guide for Use Starting the Device on DC Power 1. Be sure that the v ehicle’s engine is running PRIOR to plugging in your Oxlife Independence. 2. Plug DC power cord into the dev ice before plugging into the v ehicle’s DC outlet. 3. Plug DC power cord into the v ehicle’s DC outlet. 4. Remov e the DC power cord from the v ehicle’s DC outlet when the engine is not running. Stopping the device on DC power 1. Without batteries installed, keep the v ehicle’s engine running and power the dev ice Off by pressing and holding the power button. 2. W hen the dev ice is Off, disconnect the DC power cord from the v ehicle’s DC outlet. 3. With batteries installed, disconnect the DC power cord from dev ice. The dev ice will beep once and switch to internal battery power. To Reset / Reboot 1. With batteries installed, remov e DC power from the dev ice and wait 15 seconds. 28 2. Remov e the batteries from the dev ice. 3. Re-insert the DC power cord into the dev ice. 4. Turn dev ice On using the power button. DC Power Supply Troubleshooting Guide for Use Event Solution Batteries Not Charging Low Battery Alarm Dev ice Alerting / Beeping Intermittently Unit Not Running Low External Power Alarm Perform a Reset/Reboot There may be too much of a power draw on the v ehicles electrical system (ie: air conditioning, radio, or GPS). Try eliminating these power draws. Check your v ehicle’s user manual or consult an auto technician to determine your v ehicle’s DC power amperage and wattage. The dev ice requires 150 watts (15 amps) to run at all settings. You may require an Inv erter with at least a 450 watt capacity. This can be purchased through any Auto Serv ice Provider. 29 If there is no charging icon (lightning bolt symbol), reduce the dev ice setting to 0.5LPM Continuous and wait for charging icon to appear. Next, increase the flow rate by 0.5 increments until desired flow rate is reached. (Batteries will not charge on settings higher than 2.0 Continuous or 4.0 Pulse) If batteries are fully depleted to 0%, they may not charge until the dev ice is powered off. Batteries may require being charged to 10% in order for the lightning bolt to appear on the display. To prev ent accidental discharge of fully charged batteries, batteries can be remov ed from the dev ice while running on DC power. If the DC power drops below 11.5 v olts, the dev ice will beep. If batteries are installed, the dev ice will switch to battery power. The dev ice will automatically return to DC power once the v ehicle supplies the proper v oltage. The dev ice will default to the most reliable source of power to supply oxygen. Handle Operation OPEN/CLOSE Press button to unlock handle. Begin rotating and release button. Handle will re-lock in open/close position automatically. 30 Handling 31 Accessory Bag The Accessory Bag is designed to carry your Oxlife Independence accessories including batteries, AC charger and cable, and DC charger. 32 Cannula Use Your physician or dealer will recommend the proper cannula for your use Use of a cannula not specified for use with oxygen may impair the performance of your dev ice. DO NOT use cannula tubing longer than 7 feet when using Pulse Flow Mode. DO NOT use cannula tubing longer than 50 feet when using Continuous Flow Mode. Your physician will prescribe the appropriate cannula for your use. Connect the cannula to the oxygen outlet port as shown on adjacent page. The cannula fitting may be tight. DO NOT use grease or oils to lubricate the oxygen outlet port. Read and follow the instructions included with the cannula, and follow the instructions giv en by your authorized dealer. Place the cannula over your ears and position the cannula prongs in your nose. Clean and replace your cannula regularly as instructed by your authorized dealer. O2 Concepts recommends M125310 from Salter Labs, or equiv alent, as a 7ft cannula and 1650HF-50-10 from Salter Labs, or equivalent, as a 50ft cannula. Oxygen Port 33 Humidifier Kit The O2 Concepts Oxlife Independence portable oxygen concentrator is designed to be used with a humidifier bottle in continuous flow mode only. Use of this Dev ice with a humidifier in pulse mode may impair performance and/or damage your dev ice. DO NOT ov erfill humidifier. Fill the humidifier with distilled water only to the lev el shown by the manufacturer of the humi difier bottle. DO NOT rev erse the oxygen input and output connections. W ater from the humidifier will trav el through the cannula and back to the patient. DO NOT operate your O2 Concepts Oxlife Independence and ambulate while a humidifier is attached. Always remov e the humidifier before walking. DO NOT lay your dev ice down horizontally while attached to a humidifier. Using the Humidifier: O2 Concepts recommends using the 800-1015 Humidifier Bottle Strap to attach your humidifier to your oxygen concentrator. 1. 2. 3. 4. 5. Raise the Oxlife Independence handle, slide the humidifier strap on unit, pull it down until tight, and buckle the bottom strap. Place the humidifier bottle into the front pocket. Install the tubing to the top of the humidifier bottle. Connect the other end of the tubing to the oxygen output connector on the Oxlife Independence. Install the cannula to the output port on the humidifier bottle. Refer to the 800-1015 Humidifier Bottle Adapter Assembly Instructions for additional direction descriptions and troubleshooting help. 34 Cleaning the Humidifier: Note: To clean the humidifier, follow the instructions provided by the manufacturer. If none are prov ided, follow these steps: 1. 2. 3. Clean the humidifier daily. W ash it in soapy water and rinse it with a solution of ten parts water to one part v inegar. Rinse thoroughly with hot water. Replace the humidifier monthly or as recommended by the manufacturer or your authorized dealer. Purchase of humidifier bottle and cannula equipment should be purchased through your oxygen prov ider. O2 Concepts recommends the use of the 7100-0-50 humidifier from Salter Labs or equiv alent. Firesafe TM Cannula Valve Intended Use: The Firesafe TM Cannula Valv e is a thermal fuse designed to extinguish an oxygen deliv ery tube fire and stop the flow of oxygen if the tube is accidently ignited. Read Firesafe TM Cannula Valv e Instructions before installing. As with all medical equipment, attempting to use or install this dev ice without a thorough understanding of its operations and limitations may result in patient or user injury. The dev ice is intended for a life of 4 years from the manufacturing date stated on the dev ice label. The Firesafe TM Cannula Valve must be used in order to comply with IEC 60601-1 and ISO 8359. 35 Refer to Instructions for Use for Part Number: 1109-2017 CE from Applied Home Healthcare Equipment. This includes intended use, warnings, installation instructions, cleaning, maintenance, disposal, and device specifications. 36 Section 5: User Alerts and Alarms The functionality of the alarm system is v erified automatically by the unit upon start up by the unit flashing the various visual display colors and audible indicators. There are delays that are greater than 10 seconds inherent to specific alarms, and these delays are explained in detail for each alarm in the tables below. Alarm and Alert Screens Red Screens 37 Amber Screens How to Simulate Alarms and Alerts (Providers Only) Alarm Name, Priority and Type No Breath Alarm (Low Priority) (Physiological) Low Battery Alert (Low Priority) (Technical) Low Battery Alarm (High Priority) (Technical) Low Purity Alert (Low Priority) (Technical) Low Purity Alarm (High Priority) When in PULSE mode, if a breath is not detected for 45 seconds the screen will turn amber, sound one beep and the text “ALERT No Breath” will flash in the system status window. If no breath is detected for an additional 15 seconds, the unit will switch to the previous CONTINUOUS mode setting selected. When calculated battery run time reaches 6 minutes remaining the screen will turn amber, sound one beep per 30 seconds and the text “ALERT Low Battery” will flash in the system status window. Pushing POWER button once silences the beeping. When battery power is depleted, the pump shuts off the screen will flash red at 2Hz, sound a 10 beep sequence repeated after 2.5 seconds of silence and the text “Low Battery” will flash in the system status window The unit will continue to sound until; the power button is pressed to silence the audio, the power button is held to power off the unit, or 15 seconds has expired. When oxygen levels drop below 85%, the screen will turn amber, sound one beep per 30 seconds and the text “ALERT Low Purity” will flash in the system status window. Pushing POWER button once silences the beeping. When oxygen levels drop below 72%, the screen will flash red at 2Hz, sound a 10 beep sequence repeated after 2.5 seconds of silence and the text “Low Purity” will flash in the system status window (Technical) The unit will continue to sound until; the power button is pressed to silence the audio, the power button is held to power off the unit, or 15 seconds has expired. No Flow Alarm When the flow of oxygen is stopped for 45 seconds , the screen will flash red at 2Hz, sound a 10 beep sequence repeated after 2.5 seconds of silence and the text “No Flow” will flash in the system status window (High Priority) (Technical) Over Temperature Alarm (High Priority) (Technical) Invalid Motor Temperature (High Priority) (Technical) 38 Alarm Description The unit will continue to sound until; the power button is pressed to silence the audio, the power button is held to power off the unit, or 15 seconds has expired. The maximum operating temperature of the enclosure and pump is 70C and 90C respectively. When either of these temperatures are reached the screen will flash red at 2Hz, sound a 10 beep sequence repeated after 2.5 seconds of silence and the text “Over Temperature” will flash in the system status window The unit will continue to sound until; the power button is pressed to silence the audio, the power button is held to power off the unit, or 15 seconds has expired. When the motor temperature sensor is out of a valid range , the screen will flash red at 2Hz, sound a 10 beep sequence repeated after 2.5 seconds of silence and the text “Invalid Motor Temperature” will flash in the system status window The unit will continue to sound until; the power button is pressed to silence the audio, the power button is held to power off the unit, or 15 seconds has expired. How to Simulate Alarm Run unit in PULSE mode with no cannula connected. Unit will automatically trigger alarm and revert to CONTINUOUS mode. Run unit in CONTINUOUS mode 2.0 with one low charge battery. Unit will alarm with 6 minutes of run time remaining. Run unit in CONTINUOUS mode 2.0 with a low charge battery. Allow unit to enter battery alert mode, then alarm mode. Introduce a nitrogen rich stream of gas to the inlet port of the enclosure. Oxygen purity should fall when unit is deprived of “clean” air. Introduce a nitrogen rich stream of gas to the inlet port of the enclosure. Oxygen purity should fall when unit is deprived of “clean” air. Run the unit in 2.0 Continuous and allow it to warm up. Place a cap over the outlet of the unit and wait the appropriate amount of time. Remove display circuit board and associated sheet metal. Apply heat from a heat gun gradually to thermistor located on board until unit alarms. Sensor output can be monitored in “engineering mode” of device in real time. Disconnect the temp wires on the motor hall sensor cable (2 purple wires) Invalid Box Temperature (High Priority) (Technical) Unauthorized Battery Alert (Medium Priority) (Technical) When the internal box temperature sensor is out of a valid range, the screen will flash red at 2Hz, sound a 10 beep sequence repeated after 2.5 seconds of silence and the text “Invalid Box Temperature” will flash in the system status window The unit will continue to sound until; the power button is pressed to silence the audio, the power button is held to power off the unit, or 15 seconds has expired. If the unit detects that a battery other than one from O2 Concepts has been installed in the unit the battery icon will show an exclamation point within the battery outline. The unit will continue to run if on AC, DC or a second valid battery is present. The screen will turn amber, sound a 3 beep sequence repeated after 15 seconds of silence and the text “Unauthorized Battery” will flash in the system status window. Chill the unit to 34 deg F while off then turn on while still cold Install a battery from a manufacturer other than O2 Concepts while another power source is present. Pushing POWER button once silences the beeping. Unauthorized Battery Alarm (High Priority) (Technical) Low External Power Alert (Medium Priority) (Technical) Low External Power Alarm (High Priority) (Technical) High External Power Alarm (High Priority) (Technical) No External Power Alarm (High Priority) (Technical) If the unit detects that a battery other than one from O2 Concepts has been installed in the unit the battery icon will show an exclamation point within the battery outline. If no other power source is present the screen will flash red at 2Hz, sound a 10 beep sequence repeated after 2.5 seconds of silence and the text “Unauthorized Battery” will flash in the system status window Install a battery from a manufacturer other than O2 Concepts with no other power source present. The unit will continue to sound until; the power button is pressed to silence the audio, the power button is held to power off the unit, or 15 seconds has expired. When the voltage from an external power source falls to 11.6 volts or less (as measured by the unit internally) the screen will turn amber, sound a 3 beep sequence separated by 15 seconds of silence and the text “ALERT Low Ext Power” will flash in the system status window. Pushing POWER button once silences the beeping. When the voltage from an external power source falls below 10.6 volts (as measured by the unit internally) the screen will flash red at 2Hz, sound a 10 beep sequence repeated after 2.5 seconds of silence and the text “Low External Power” will flash in the system status window The unit will continue to sound until; the power button is pressed to silence the audio, the power button is held to power off the unit, or 15 seconds has expired. When the voltage from an external power source is above 26 volts (as measured by the unit internally) the screen will flash red at 2Hz, sound a 10 beep sequence repeated after 2.5 seconds of silence and the text “High External Power” will flash in the system status window The unit will continue to sound until; the power button is pressed to silence the audio, the power button is held to power off the unit, or 15 seconds has expired. If power is removed while the unit is running the unit will sound a 10 beep sequence repeated after 4 seconds of silence. Since the power is remove the display is blank and no backlight color is available. Connect to an external DC power supply capable of delivering 20amps. Run unit on 2.0 continuous. Starting at 14 volts steadily reduce input voltage until unit alerts. Connect to an external DC power supply capable of delivering 20amps. Run unit on 2.0 continuous. Starting at 14 volts steadily reduce input voltage until unit alarms. Connect to an external DC power supply capable of delivering 20amps. Run unit on 2.0 continuous. Starting at 14 volts steadily increase input voltage until unit alarms. Run unit on 2.0 continuous using AC power supply. Remove all batteries. Remove AC power supply. DO NOT IGNORE ALARMS 39 How to Respond to Alarms Alarm Name, Priority and Type Alarm Description No Breath Alarm When in PULSE mode, if a breath is not detected for 45 seconds the screen will turn amber, sound one beep and the text “ALERT No Breath” will flash in the system status window. (Low Priority) (Physiological) Low Battery Alert (Low Priority) (Technical) Low Battery Alarm (High Priority) (Technical) Low Purity Alert (Low Priority) (Technical) Low Purity Alarm (High Priority) When calculated battery run time reaches 6 minutes the screen will turn amber, sound one beep per 30 seconds and the text “ALERT Low Battery” will flash in the system status window. Pushing POWER button once silences the beeping. When battery power is depleted, the pump shuts off, the screen will flash red at 2Hz, sound a 10 beep sequence repeated after 2.5 seconds of silence and the text “Low Battery” will flash in the system status window The unit will continue to sound until; the power button is pressed to silence the audio, the power button is held to power off the unit, or 15 seconds has expired. When oxygen levels drop below 85% the screen will turn amber, sound one beep per 30 seconds and the text “ALERT Low Purity” will flash in the system status window. When oxygen levels drop below 72% the screen will flash red at 2Hz, sound a 10 beep sequence repeated after 2.5 seconds of silence and the text “Low Purity” will flash in the system status window The unit will continue to sound until; the power button is pressed to silence the audio, the power button is held to power off the unit, or 15 seconds has expired. No Flow Alarm When the flow of oxygen is stopped for 45 seconds the screen will flash red at 2Hz, sound a 10 beep sequence repeated after 2.5 seconds of silence and the text “No Flow” will flash in the system status window (Technical) The unit will continue to sound until; the power button is pressed to silence the audio, the power button is held to power off the unit, or 15 seconds has expired. Over Temperature Alarm The maximum operating temperature of the enclosure and pump is 70C and 90C respectively. When either of these temperatures are reached the screen will flash red at 2Hz, sound a 10 beep sequence repeated after 2.5 seconds of silence and the text “Over Temperature” will flash in the system status window (High Priority) (Technical) The unit will continue to sound until; the power button is pressed to silence the audio, the power button is held to power off the unit, or 15 seconds has expired. Invalid Motor Temperature When the motor temperature sensor is out of a valid range the screen will flash red at 2Hz, sound a 10 beep sequence repeated after 2.5 seconds of silence and the text “Invalid Motor Temperature” will flash in the system status window (High Priority) Ensure cannula tubing does not exceed 7 feet (2.1m).Ensure user breathing through nose and not mouth. Note: No Breath Detected is used when in Pulse Flow Mode ONLY. Plug into an external power source. OR Replace depleted battery (batteries) with a charged battery. Plug into an external power source. Replace depleted battery (batteries) with a charged battery. Clean or replace air inlet filter. Contact your authorized dealer. Pushing POWER button once silences the beeping. (Technical) (High Priority) 40 If no breath is detected for an additional 15 seconds, the unit will switch to the previous CONTINUOUS mode setting selected. Solution (Technical) The unit will continue to sound until; the power button is pressed to silence the audio, the power button is held to power off the unit, or 15 seconds has expired. Invalid Box When the internal box temperature sensor is out of a Repair or replace tubing or humidifier. Clean or replace air inlet filter. Contact your authorized dealer. Check cannula connection. Repair or replace tubing or humidifier. Clean or replace air inlet filter. Move device to ensure adequate air flow. Contact your authorized dealer. Allow the device to reach operating temperature. Utilize an alternate source of oxygen if necessary. Allow the device to reach operating temperature. Utilize an alternate source of oxygen if necessary. Allow the device to reach operating temperature. Temperature (High Priority) (Technical) Unauthorized Battery Alert (Medium Priority) (Technical) valid range the screen will flash red at 2Hz, sound a 10 beep sequence repeated after 2.5 seconds of silence and the text “Invalid Box Temperature” will flash in the system status window Utilize an alternate source of oxygen if necessary. The unit will continue to sound until; the power button is pressed to silence the audio, the power button is held to power off the unit, or 15 seconds has expired. If the unit detects that a battery other than one from O2 Concepts has been installed in the unit the battery icon will show an exclamation point within the battery outline. The unit will continue to run if on AC, DC or a second valid battery is present. The screen will turn amber, sound a 3 beep sequence repeated after 15 seconds of silence and the text “Unauthorized Battery” will flash in the system status window. Remove unauthorized battery and replace with an authorized O2 Concepts battery. Pushing POWER button once silences the beeping. Unauthorized Battery Alarm (High Priority) (Technical) Low External Power Alert (Medium Priority) (Technical) Low External Power Alarm (High Priority) (Technical) High External Power Alarm (High Priority) (Technical) No External Power Alarm (High Priority) (Technical) 41 If the unit detects that a battery other than one from O2 Concepts has been installed in the unit the battery icon will show an exclamation point within the battery outline. If no other power source is present, the screen will flash red at 2Hz, sound a 10 beep sequence repeated after 2.5 seconds of silence and the text “Battery Alarm” will flash in the system status window Remove unauthorized battery and replace with an authorized O2 Concepts battery. The unit will continue to sound until; the power button is pressed to silence the audio, the power button is held to power off the unit, or 15 seconds has expired. When the voltage from an external power source falls to 11.6 volts or less (as measured by the unit internally) the screen will turn amber, sound a 3 beep sequence separated by 15 seconds of silence and the text “ALERT Low Ext Power” will flash in the system status window. Ensure all charging connections are intact. Refer to the DC user guide section of this manual. Pushing POWER button once silences the beeping. When the voltage from an external power source falls below 10.6 volts (as measured by the unit internally) the screen will flash red at 2Hz, sound a 10 beep sequence repeated after 2.5 seconds of silence and the text “Low External Power” will flash in the system status window Ensure all charging connections are intact. Refer to the DC user guide section of this manual. The unit will continue to sound until; the power button is pressed to silence the audio, the power button is held to power off the unit, or 15 seconds has expired. When the voltage from an external power source is above 26 volts (as measured by the unit internally) the screen will flash red at 2Hz, sound a 10 beep sequence repeated after 2.5 seconds of silence and the text “High External Power” will flash in the system status window The unit will continue to sound until; the power button is pressed to silence the audio, the power button is held to power off the unit, or 15 seconds has expired. If power is removed while the unit is running the unit will sound a 10 beep sequence repeated after 4 seconds of silence. Since the power is removed, the display is blank and no backlight color is available. Disconnect the external power source from the Oxlife Independence and use an alternative power source that is within the operating limits. Ensure all charging connections are intact. In the case of an extended power outage, utilize an alternate, nonpowered, source of oxygen. Section 6: Maintenance and Cleaning Maintenance All maintenance MUST be conducted by a qualified Oxlife Independence serv ice technician. DO NOT attempt to disassemble or perform any maintenance on your device. Any such attempt will void the warranty. Routine cleaning of the air inlet filter, as described below, is the only routine maintenance. The Oxlife Independence and its parts requires maintenance at the end of the 5 year serv ice life or as required, determined by your care prov ider. There is no routine maintenance or serv ice to the O2 Concepts rechargeable batteries. User Care and Cleaning Unplug your Oxlife Independence and or power supplies before cleaning. DO NOT use alcohol, ethylene chloride or petroleum based cleaners on the case or power supplies. Clean the outside case of your dev ice using a soft cloth dampened with a mild detergent and water. DO NOT spray or soak the case or front panel. Air Inlet Filter Cleaning Regular cleaning of the Air Inlet Filter is the only maintenance you will perform on your dev ice. To keep your Oxlife Independence working properly, it is recommended you clean the Air Inlet Filter weekly. If the Oxlife Independence is used in a dusty env ironment, more frequent cleaning of the Air Inlet Filter may be required. Nev er use your Oxlife Independence without an Air Inlet Filter. 42 Air Inlet Filter Cleaning (Continued) Follow these simple directions to clean the Air Inlet Filter: 1. Remov e the Air Inlet Filter 2. Wash the filter by running under warm tap water using a mild detergent. 3. Rinse thoroughly under warm, running water. 4. Squeeze out excess water. 5. It is important to allow the filter to dry completely before reinserting into the dev ice. Moisture from a wet or damp Air Inlet Filter may damage your dev ice. You may want to keep an extra Air Inlet Filter to use as a replacement while one is drying. AI R I NLET FI LTER Contact your authorized dealer for extra Air Inlet Filters. 43 Battery Disposal Your battery is rechargeable and can be recycled. Always return to your authorized dealer for proper disposal. You can also contact your local city or town offices for proper disposal instructions for a lithium ion battery. Device Disposal This product may contain substances that could be harmful to the environment if disposed of in landfills that are inappropriate. Follow local governing ordinances and recycling plans regarding disposal of the dev ice. 44 Section 7: Standards Compliance This dev ice is designed to comply with the following standards: IEC 60601-1 3rd Edition; Medical Electrical Equipment; Part 1: General Requirements for Basic Safety and Essential Performance IEC 60601-1-2 2nd Edition; Medical Electrical Equipment, Part 1-2: General Requirement for Safety – Collateral Standard: Electromagnetic (EMC) Compatibility ISO 8359 2nd Edition; Oxygen Concentrators for Medical Use – Safety Requirements RTCA, DO 160, Section 21, Category M; Emission of Radio Frequency Energy ISO 13485:2003 Medical Dev ices; Quality Management Systems; Requirements for Regulatory Purposes 45 NOTES 46 Oxlife INDEPENDENCE O2 Concepts LLC 15 Commerce Road, Newtown, CT 06470 (877) 867-4008 www.o2-concepts.com Represented in Europe by: MT Promedt Consulting GmbH Altenhofstrasse 80 66386 St. Ingbert Germany 0086 PN: 800-1008 Rev : C April 15, 2015 47 48