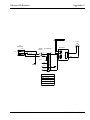
1
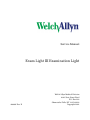
Service Manual
Exam Light III Examination Light
488061 Rev. B
Welch Allyn Medical Division
4341 State Street Road
P.O. Box 220
Skaneateles Falls, NY 13153-0220
Copyright 2002
Part#
488061
488061
Revision
A
B
Description
New service manual
Page 24, Bubble 81, 488119
changed to new 714160
ECN#
5-45435
D*
Date
01/20/03
08/12/09
Approved
DK
D*
D*: See SAP DIR for change number, approver name, and date of approval.
Drawings and/or illustrations and/or part numbers contained in this document are for reference purposes only. For current revisions call the Welch Allyn Customer Service phone
number listed in Section 1 page 3.
Service Manual 488061 Rev. B
Welch Allyn Exam Light III i
Table Of Contents
Section 1: General Information
About the Exam Light....................................................................................................... 1
Features ............................................................................................................................ 1
Agency Approvals ............................................................................................................ 1
Cautions and Warnings..................................................................................................... 2
Help Information .............................................................................................................. 3
Section 2: Incoming Inspection
Incoming Inspection ......................................................................................................... 1
Required Tools .................................................................................................................. 1
Section 3: Troubleshooting
Initial Screening................................................................................................................ 1
Light Pipe .......................................................................................................................... 1
Focusing Sleeve ................................................................................................................ 1
Electrical Troubleshooting ............................................................................................... 1
Section 4: Disassembly and Repair
Cover Removal .................................................................................................................. 1
EMI Shield Removal ......................................................................................................... 1
Lamp Clip Removal .......................................................................................................... 1
Lamp Removal .................................................................................................................. 2
Lamp Holder Removal...................................................................................................... 2
Lamp Baffle Removal........................................................................................................ 2
Light Pipe Connector Assembly Removal ....................................................................... 3
Transformer Removal ....................................................................................................... 3
Illuminated On/Off Switch Removal ............................................................................... 4
Fan Removal ..................................................................................................................... 4
Rectifier Board Removal................................................................................................... 5
Light Pipe Connector Assembly Dissassembly................................................................ 6
Focusing Sleeve Assembly ............................................................................................... 8
Appendix A: Repair Part Numbers
Appendix B: Expoded View Drawings/Photos
Appendix C: Electrical Schematic
ii
Welch Allyn Exam Light III
Service Manual 488061 Rev. B
Service Manual 488061 Rev. B
Welch Allyn Exam Light III iii
iv
Welch Allyn Exam Light III
Service Manual 488061 Rev. B
General Information
Section 1
About the Exam Light III
Welch Allyn’s Exam Light IIITM takes flexible illumination to a new level. It mounts easily
to fit on a wall, stand, or on an examination table. The Exam Light III delivers bright, white,
fiber optic illumination for better visibility and more accurate diagnosis.
Features
• Durable fiber optic pipe provides cool illumination and is bendable to almost any position.
• Easy to position, small, non-obstrusive head does not block view for task areas.
• Light weight focusing sleeve optics are sealed for less dust.
• Provides homogenous spot and variable spot size.
• Easy to maintain dichronic halogen lamp provides brighter, whiter light (3,200°F).
• Multiple mounting options for greater flexibility.
• Special UV filters provide safe trans illumination of neonates to detect pneumothorax
conditions and intacranial hemorrhaging, perform infant venipuncture, and locate blood
vessels (Model 48760 only).
Agency Approvals
The CE mark on this product indicates that it
has been tested to and conforms with the
provisions noted within the 89/336/ECC
Electromagnetic Compatibility Directive.
Australia EMC Framework Compliance
N344
Service Manual 488061 Rev. B
Welch Allyn Exam Light III 1
Section 1
General Information
Cautions and Warnings
Intense Light: Lamp is extremely bright. Do not stare at the lamp when in
use. May be harmful to eyes.
Caution: Remove power cord from electrical outlet and allow lamp to cool
10 minutes before replacing with a Welch Allyn lamp.
Danger: Electrical shock hazard. Refer servicing to qualified service personnel.
Caution: Risk of explosion if used in the presence of flammable anesthetics.
Hot Surface: Lamp is hot. May be harmful to skin if touched.
NOTE: This product complies with the current required standards for electromagnetic interference and should not interfere with other equipment or be affected by other compliant
devices. As a precaution, avoid using this device in close proximity to other equipment.
2
Welch Allyn Exam Light III
Service Manual 488061 Rev. B
General Information
Section 1
Help Information
To assure correct operation and performance all service and repairs must be performed by
fully trained and properly equipped personnel, using genuine replacement parts and correct
procedures. Failure to do so will also invalidate the product warranty.
Welch Allyn Inc.
State Street Plant /Corporate Headquarters
4341 State Street Road
Skaneateles Falls, NY 13153-0220, USA
tel:
1-800-535-6663
315-685-4100
fax:
315-685-3361
www.welchallyn.com/medical/support/tech
Welch Allyn GMBH
Zollerstrasse 2-4
72417 Jungingen, Germany
tel:
fax:
(011) 49-7477-927186
(011) 49-7477-927193
Welch Allyn UK Ltd
St. Georges House
Vernon Gate, Derby
England DE1 1UQ
tel:
fax:
mob:
(011) 44-01332-206208
(011) 44-01332-206209
(011) 44-0467-301814
MD International
11300 N.W. 41st Street
Miami, FL 33178 USA
tel:
fax:
Welch Allyn France SARL
814 rue Charles de Gaulle
77100 Mareuil les Meaux
France
tel:
Fax:
300 Beach Road, #25-08
The Concourse
Singapore 199589, Singapore
tel:
fax:
(011) 65-291-0882
(011) 65-291-5780
( 011) 33 1.6009.3366
(011) 33 1 .6009.6797
Welch Allyn Australia Pty
The Metro Centre Unit 5
38-46 South Street
Rydalmere NSW 2116, Australia
Postal address:
PO Box 132
Rydalmere NSW 1701, Australia
tel:
fax:
Welch Allyn Singapore Ltd
305-669-9003
305-669-1971
(011) 612 9638-3000
(011) 612 9638-3500
China Service Center
Room 708 Central Plaza
No. 277 Huang Pi Bei Rd.
Huang Pi District
Shanghai 200003
China
tel:
fax:
(011) 86-21-63279631
(011) 86-21-63279632
Welch Allyn Japan K.K.
Bon Marusan 8F, 3-5-1 Kanda
Jinbo-Cho, Chiyoda-Ku
Tokyo 101-0051
Japan
tel:
fax:
(011) 813-5212-7391
(011) 813-3261-7372
Service Manual 488061 Rev. B
Welch Allyn Exam Light III 3
Blank Page
Service
Section 2
Incoming Inspection
NOTE: Use the following guidelines when unpacking the Exam Light III from its shipping
carton.
1. Before opening the Exam Light shipping carton, check for damage.
2. If damage is apparent, stop unpacking the carton and contact the shipping company for
further instructions. If the carton is intact, unpack the Exam Light.
3. With the Exam Light out of its carton, check to see that all the items listed on the
packing slip are in the shipping carton.
4. If an item is missing, first check the carton, then check with your receiving
department. If necessary contact Welch Allyn at the Address and phone number
shown in Section 1.
5. Clean and disinfect by following the instructions printed in the Operator Manual.
NOTE: Perform all functional tests before and after servicing.
6. Operate the Exam Light to verify the customer complaint before making any changes to
the unit. Call the customer if the complaint is unclear.
7. If the unit has caused or is suspected of having caused an injury of any type:
DO NOT DISASSEMBLE OR REPAIR THE UNIT IN ANY WAY.
Contact Welch Allyn Customer Service immediately.
Required Tools
Phillips Screw Driver
Flat Head Screw Driver
Standard Needle Nose Pliers
11/32 Nut Driver
5/64 Nut Driver
3/8 Nut Driver
5/64 Hex wrench
Digital MultiMeter
Service Manual 488061 Rev. B
Welch Allyn Exam Light III 1
Blank Page
Troublshooting
Section 3
Initial Screening
1. Inspect the Exam Light for physical damage - cracked cover, etc.
2. Attempt to confirm reason for return.
3. If reason can not be determined, contact the sender.
Light Pipe
1. Flex the light pipe at each bend and replace any that:
A. Have noisy monocoils.
B. Show signs of not holding position.
C. Have excessive springback when positioned in a “U” position.
NOTE: When the light pipe is placed in the “U” shape, at the center bend, the pipe
should not spring back by more than 8 to 9 inches. When the light pipe is bent in a “U”
shape at the light source bend, the spring back should not be more than 4 to 5 inches.
Focusing Sleeve
1. Check for cracks or damage.
2. Check for smooth operation of the lens when the sleeve is turned.
3. Replace any lens that have scratches.
Electrical Troubleshooting
WARNING: Turn off and unplug unit between each of the next steps.
1. Lamp does not light and the green rocker switch does not light.
A. Pull fuses out and check fuses with ohm meter.
B. Attach a known good power cord.
C. Replace the green rocker switch.
D. Check the AC connector for damage and cracks.
Service Manual 488061 Rev. B
Welch Allyn Exam Light III 1
Section 3
Troubleshooting
2. Green rocker switch light is illuminated but the lamp does not light.
A. Check for proper lamp. It should be 12 volt 35 watt, Welch Allyn #04200.
NOTE: If the lamp is replaced, burn the unit in for at least one hour to confirm there are not
other issues.
B. Check transformer output. It should measure 12vac.
C. Lift lamp out of bracket and check filter and gasket.
NOTE: The gasket should not be blocking the light. The filter should not be cracked,
chipped or dirty.
2
Welch Allyn Exam Light III
Service Manual 488061 Rev. B
Disassembly and Repair
Section 4
Observe All ESD
Precautions!
Turn unit off. Unplug the
power cord from the outlet
and from the light box!
1. Cover Removal
Unscrew the captured screw at the bottom of
the main housing. Push the cover up and forward.
NOTE: Take extreme care when removing the
cover. The tabs on the cover may break if you
do not push the cover all the way up before
removal.
2. EMI Shield Removal
Remove the 5 phillips head screws.
NOTE: Notice manufactured date stamp on
the EMI shield.
3. Lamp Clip Removal
For first time lamp removal, grasp the wire
clip at the top of the lamp. Rotate the clip
toward the base of the unit it pops out.
NOTE: Discard the clip. It is used only for
shipping.
Service Manual 488061 Rev. B
Welch Allyn Exam Light III 1
Section 4
Disassembly and Repair
4. Lamp Removal
Grasp the lamp connector and pull the lamp
straight out of its holder.
5. Lamp Holder Removal
Remove the two nuts.
6. Lamp Baffle Removal
Remove the one phillips head screw.
2 Welch Allyn Exam Light III
Service Manual 488061 Rev. B
Disassembly and Repair
Section 4
7. Light Pipe Connector Assembly Removal
With a 5/64 hex wrench, slightly back the hex
nut off the pipe connector assembly. Slide the
pipe connector assembly out. The pipe connector assembly can only be removed from
the inside of the main housing
8. Transformer Removal
Remove the 4 phillips head screws.
NOTE: Note the wire orientation and wire
color on the illuminated off/on switch. The
wires must be removed from the illuminated
switch before the illuminated switch can be
removed.
Light
Blue
Blue
The photo shows the wiring as wired for
domestic 120V. See the wiring diagram in
Appendix C for the wiring in your local area.
Black
Service Manual 488061 Rev. B
Brown
Welch Allyn Exam Light III 3
Section 4
Disassembly and Repair
9. Illuminated Switch Removal
Squeeze the outer tabs on the switch and
push outward.
NOTE: Notice the orientation of the switch
when properly installed.
10. Fan Removal
Use a 3/16 driver on the hex nut and a flat bed
screw driver on the screw and remove all four
fasteners. Disconnect the fan connector from
the PCB.
4 Welch Allyn Exam Light III
Service Manual 488061 Rev. B
Disassembly and Repair
Section 4
NOTE:
C
A. Notice how the wires are secured
to the chassis.
B. Notice how wires are routed
through the channel with rubber
grommets.
A
C. Notice wire ties on brown wires.
B
Note: Notice the wiring orientation to
the IEC connector and wire colors
Green
Blue
Brown
11. Rectifier board removal
Remove all four phillips head screws.
Service Manual 488061 Rev. B
Welch Allyn Exam Light III 5
Section 4
Disassembly and Repair
12. Light Pipe Connector Assembly Disassembly.
A. Remove the retaining ring.
B. Remove the square heat filter.
C. Remove the heat filter gasket.
6 Welch Allyn Exam Light III
Service Manual 488061 Rev. B
Disassembly and Repair
Section 4
D. Remove the two hex set screws that
secure the insulator to the retaining collar.
E. Pull the retaining collar from the insulator.
F. Remove the brake from the inside of the
insulator.
Service Manual 488061 Rev. B
Welch Allyn Exam Light III 7
Section 4
Disassembly and Repair
13. Focusing Sleeve Assembly
A. Insert the rear lens inside the main body.
NOTE: The rear lens is the lens with the
smaller diameter convex shape in the middle
of the lens. The convex shape should be facing outward.
B. Insert the front lens into the main body.
NOTE: The front lens is the lens with the
larger convex shape. The convex shape
should be facing outward.
C. Insert the end window into the main body.
NOTE: There are three very small tabs on the
lip of the end window. Line those three tabs
with the three long slots of the main body.
8 Welch Allyn Exam Light III
Service Manual 488061 Rev. B
Disassembly and Repair
Section 4
D. Attach the three cam sleeves to the main
body. Align the cam slots of the cam sleeve
with the front and rear lens tabs.
NOTE: Align one sleeve with the front and the
rear lens and the other two sleeves with go on
easier.
NOTE: Observe how the front and the rear
lens tabs, on the front and rear lens, fit in the
cam sleeve.
Front
Lens
Tab
Note: Observe that each cam sleeve has a slot
at the rear of the cam sleeve. The slot must
face toward the rear of the assembly.
Service Manual 488061 Rev. B
Rear Lens
Tab
Note the slot
Welch Allyn Exam Light III 9
Section 4
Disassembly and Repair
E. Slide the rear body over the main body
assembly.
NOTE: There are three tabs in the rear of the
rear body. The rear body tabs will need to fit
into the slots of the cam sleeves. You may
have to rotate the rear body to get the rear
body tabs to fit in the cam sleeve slots.
F. Slide the front body over the assembly. You
may have to rotate the front body. The front
body will snap in place.
10 Welch Allyn Exam Light III
Service Manual 488061 Rev. B
Repair Parts
Bubble #
Appendix A
Part #
Description
1
236732
IEC CONNECTOR
2
488042
WIRE HARNESS,PWR MOD/GROUND S
3
488074-502
WIRE HARNESS, POWER MOD/SWITCH
4
488074-501
WIRE HARNESS,POWER MOD/SWITCH
5
236707-2
ILLUMINATED SWITCH-EXPORT 250VAC
6
488053
MOLEX HOUSING
7
106140-19
#6-32 X 1.375 PH,PN,ST,ZN
8
236733
FUSE DRAWER
9
236706-3114
FUSE 500MA USA
10
443071-1
TRANSFORMER, 35W
11
443093
SPARE WIRE CAPS
12
236706-3112
FUSE- 315 MA EUROPE, UK, Aus.
13
488307-4
FUSE-630 MA, JAPAN
14
761076-0
POWER CORD, DETACH.(DOM/JAPAN)
15
761076-2
POWER CORD-DETACH (EUROPEAN)
16
761076-4
POWER CORD-DETCHBL(U.K)
17
761076-6
POWER CORD DETACH. (AUSTRALIA)
18
106130-2
QUICK CONNECT RECEPTACLE
19
488082
MOLEX CONNECTOR
20
48200
FIBER OPTIC LITE PIPE ASSY
21
48605
FOCUSING SLEEVE ASSEMBLY
22
488106
INNER SLEEVE
23
488401-2
BODY-MAIN,MACHINED
24
488406
CAM SLEEVE
25
488403
REAR LEANS
26
488405
END WINDOW
27
488408
FRONT OUTER BODY
28
488404
FRONT LENS
29
488407
REAR BODY
30
488035
RETAINING COLLAR
31
488034
INSULATOR
32
488311
FILTER-HEAT
33
106101-2
RETAINING RING
34
488432
BRAKE
35
488312
GASKET-HEAT FILTER
36
106113-22
SET SCREW, 6-32 X .125 CUP
37
488001-502
PIPE CONNECTOR ASSEMBLY
38
236707-1
ILLUMINATED SWITCH-DOMESTIC 125VAC
39
488118-501
REAR HOUSING, ASSY COMPLETE
40
747187
#8-32 HEX NUT-CAD PLTD
41
483412
#8 EXTERNAL LOCKWASHER
42
106137-2
NUT,8-32 EXTLOCK
Service Manual 488061 Rev. B
Welch Allyn Exam Light III 1
Appendix A
Bubble #
Repair Parts
Part #
Description
43
488110
KEYHOLE STANDOFF
44
488112
CAPTIVE PANEL SCREW
45
106140-3
4-40 X.25 W/EXT WASHER
46
488070
487 MODEL LABEL JAPAN
47
488069
487 MODEL LABEL (DOM)
48
488083
LAMP CHANGE LABEL
49
488071
487 MODEL LABEL EUROPE
50
488072
487 MODEL LABEL (AUST/UK)
51
455508
LABEL, PROTECTIVE EARTH GROUND
52
488089
CLIP REMOVAL LABEL
53
488116
WIRE TIE
54
443083
WIRE TIE W/MOUNTING HOLE
55
106100-4
PHPS 4-40 X .38 LG
56
488066
EMI SHIELD, 35W
57
488076-501
TRANSFORMER/WIRE HARNESS (DOM)
58
488043-503
FAN WITH WIRE HARNESS
59
488073-501
WIRE HARNESS LAMP/REC.BOARD
60
488058
LAMP HARNESS CONNECTOR
61
495073
LAMP HARNESS CONNECTOR
62
488077
LAMP CONNECTOR
63
106102-35
FHCS 4-40 X .75,NYLON BLACK
64
106109-13
NUT 4-40 SM,SM.HEX, STEEL ZINC
65
106140-18
3-48 X .250 PHP,ST.ZN W/WAS
66
488067-501
RECTIFIER BOARD
67
488063
MR16 LAMP HOLER
68
488084
35W BAFFLE
69
106137-1
NUT,4-40X.250 HEX,KEPS EXTLOCK
70
106102-40
FHPS #8-32 X .500
71
488023
BRACKET, WALL MOUNT
72
488206
MOUNTING PLATE 48780 ONLY
73
482205
RECEIVER BRACKET 48780 ONLY
74
488111
INSULATOR, TRANSFORMER
75
042000
HALOGEN LAMP-2 PIN
76
488011-2
FRONT COVER W/LOGO
77
488420-502
MOUNTING HARDWARE KIT
78
482200-501
FLEXIBLE FIBER OPTIC CABLE ASSY
79
106113-25
CUT PT.SET SCR,8-32X.25 STEEL
80
488082
Molex Connector
81
714160
Operation Instruction
82
488061
Service Manual
2 Welch Allyn Exam Light III
Service Manual 488061 Rev. B
Exploded View Drawings/Photos
Service Manual 488061 Rev. B
Appendix B
Welch Allyn Exam Light III 1
Appendix B
Transformer
Insulator
Exploded View Drawings/Photos
74
57
2 Welch Allyn Exam Light III
Service Manual 488061 Rev. B
Exploded View Drawings/Photos
59
Appendix B
61
60
62
58
63
66
65
64
Service Manual 488061 Rev. B
Welch Allyn Exam Light III 3
Appendix B
Exploded View Drawings/Photos
39
40
41
4 Welch Allyn Exam Light III
42
43
44
Service Manual 488061 Rev. B
Exploded View Drawings/Photos
Appendix B
68
45
67
69
Service Manual 488061 Rev. B
Welch Allyn Exam Light III 5
Appendix B
6 Welch Allyn Exam Light III
Exploded View Drawings/Photos
Service Manual 488061 Rev. B
Exploded View Drawings/Photos
Appendix B
75
21
24
22
23
26
25
28
29
27
24
24
Service Manual 488061 Rev. B
Welch Allyn Exam Light III 7
Appendix B
Exploded View Drawings/Photos
76
83
Neonate
Lite
Pipe
78
For the 48780
77
8 Welch Allyn Exam Light III
Service Manual 488061 Rev. B
Exploded View Drawings/Photos
Appendix B
56
45
Service Manual 488061 Rev. B
Welch Allyn Exam Light III 9
Appendix B
Exploded View Drawings/Photos
31
30
32
36
35
34
33
37
79
Set Screw
10 Welch Allyn Exam Light III
Service Manual 488061 Rev. B
Exploded View Drawings/Photos
46
Appendix B
48
47
54
52
49
Service Manual 488061 Rev. B
50
51
53
55
Welch Allyn Exam Light III 11
Appendix B
Exploded View Drawings/Photos
72
70
73
71
12 Welch Allyn Exam Light III
Service Manual 488061 Rev. B
Electrical Schematic
Appendix C
FAN
RED
BLACK
LAMP
IEC
CONNECTOR
POWER
SWITCH
FUSE
AC LINE
LINE
F1
GND
NEUTRAL F2
RECTIFIER BD.
TRANSFORMER
BRN
BLU
RED
WHT
12VAC
GRN/YEL
BLU
- 2
+ 1
J5
1
2
1
J1
J4
4
BRN
BRN
DPST
BLK
CHASSIS
BRN
YEL
GRAY
WHT
TRANSFORMER PRIMARY
BLU - COMMON
WHT - 100V TAP
BLK - 120V TAP
BRN - 230V TAP
GRAY - 240V TAP
Service Manual 488061 Rev. B
Welch Allyn Exam Light III 1
Blank Page