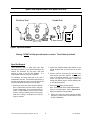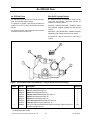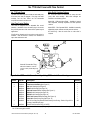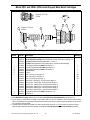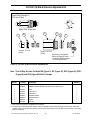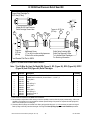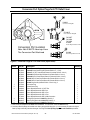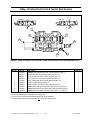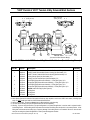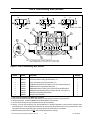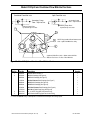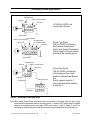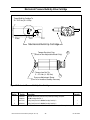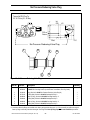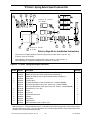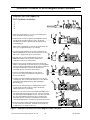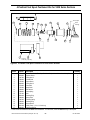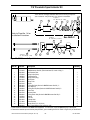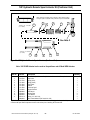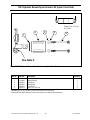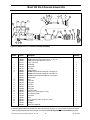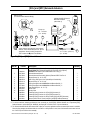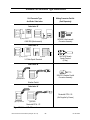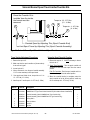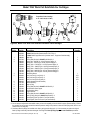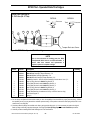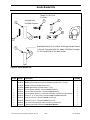
1
GRESEN R Hydraulics Model V20 Sectional Body Directional Control Valve Service and Parts Manual Maximum Operating Pressure: Minimum Filtration Required: 3500 PSI (242 bar) 10 Micron The information in this Service Manual was current at the time of publication. This information is subject to change at any time without notice. Model V20 Service and Parts Manual No. Revision: 08-01-2002 (Replaces: SC-1102 ~ Revision 2/92) Table of Contents Section Seal Replacement and Section Seal Kits ................................................................................ Page 3 Spool Seal Replacement and Spool Seal Kits ..................................................................................... Page 4 Model V20 Manual Work Section ......................................................................................................... Page 5 Model V20 [SOL] and [EPC] Solenoid Work Sections .......................................................................... Page 6 Model V20 [SOL] and [EPC] Solenoid Work Section with Handle ........................................................ Page 7 K-6125 Spring-Return Spool Positioner Kit .......................................................................................... Page 8 CK-6012 ‘D’ Detented Spool Positioner Kit .......................................................................................... Page 9 ‘R’ Detent - Spring Return Spool Positioner Kits ................................................................................ Page 10 CK-6173 ‘PA’ Pneumatic Spool Actuator Kit ...................................................................................... Page 11 Installation Instructions for CK-6173 Pneumatic Actuators ................................................................ Page 12 K-6128 Hydraulic Remote ‘HR’ Spool Actuator Kit ............................................................................. Page 13 K-6129 Hydraulic Remote ‘HR’ Spool Actuator Kit ............................................................................. Page 14 K-6130 Hydraulic Remote ‘HRO’ Spool Actuator Kit .......................................................................... Page 15 K-6131 Hydraulic Remote ‘HRO’ Spool Actuator Kit .......................................................................... Page 16 On/Off [SOL] Solenoid Actuator Assembly ......................................................................................... Page 17 Proportional [EPC] Solenoid Actuator Assembly ................................................................................ Page 18 On/Off [SOL-IH] Solenoid Actuator Assembly .................................................................................... Page 19 Proportional [EPC-IH] Solenoid Actuator Assembly ........................................................................... Page 20 Solenoid Actuator (with Handle) Removal & Installation .................................................................... Page 21 On/Off Solenoid Cartridge Kits (K-CRT-SXXX) .................................................................................. Page 22 Proportional Solenoid Cartridge Kits (K-CRT-EXXX) ......................................................................... Page 23 2-Way, 2-Position (Plugged) Solenoid Bonnet Conversion ................................................................ Page 24 Solenoid Bonnet Spool Travel Limiter/Override Kits .......................................................................... Page 25 Solenoid Bonnet (with Handle) Spool Travel Limiter Kit ..................................................................... Page 26 K-6215 Compensator Plug Kit ............................................................................................................ Page 27 Model ‘RCPC’ Work Port Relief Cartridge .......................................................................................... Page 28 Standard & Heavy Duty Seal Retainer Kits ........................................................................................ Page 29 Handle Bracket and Spool Boot Kits .................................................................................................. Page 30 Vertical and Horizontal Handle Kits .................................................................................................... Page 31 Service Product Warranty, April 1996 ................................................................................................ Page 32 The information in this Service Manual was current at the time of publication. This information is subject to change at any time without notice. Model V20 Service and Parts Manual (Catalog No. SC-1102) 2 Rev: 08-26-2002 V20 Work Section Housing Identification Warning There is a visual similarity between Gresen’s Model V20 Directional Control Valve closed center and open center work sections. Work sections for these two valve assemblies should NEVER be intermixed or interchanged without prior consultation with the factory. Intermixing a V20C, V20LS or V20PC closed center section with a V20P, V20T or V20S work section will convert the complete valve bank to closed center operation and in some cases, could render the valve assembly inoperable and cause damage to components in the hydraulic circuit. Inlet Cover Casting No. Location 7736 (Flow Control Inlet) 8398 (Standard Inlet) Work Section Casting No. Location 8072 (V20P 'Parallel') 8112 (V20T 'Tandem') 10954 (V20RP 'Parallel') 10762 (V20RT 'Tandem) 11483 (V20S 'Series') 11571 (V20LO 'Lockout' 8364 (V20C 'Closed Center') 8364 (V20LS 'Load Sense) 8364 (V20PC 'Pressure Comp') Mid-Inlet Casting No. Location Outlet Cover Casting No. Location 6825 (Split or Combined Flow) 8644 (Top Outlet) PB OUT 6770 (End Outlet) Unloader Section Casting No. Location Utility Section Casting No. Location 22952 (With or Without Pilot) 7820 (Internal or External Pilot) Figure 1. Casting Identification Numbers Model V20 Service and Parts Manual (Catalog No. SC-1102) 3 Rev: 08-26-2002 K-61XX Assembly Stud Kits K-6121 or K-6156 Section Seal Kits (See Figure 3) 09310006 Nut Assembly Stud (3 Nuts per Kit) (3 Studs per Kit) Torque to 25 - 28 Ft Lbs [34 - 38 Nm] (This is a dry torque spec - Reduce torque by 8 Ft Lbs [11 Nm] for oiled tie bolts) Figure 2. K-61XX Stud Kit Components Kit No. and Description Part Number 12807001 12808001 12809001 12810001 12811001 12812001 12813001 12814001 12815001 12697001 12816001 Kit No. K-6104 K-6105 K-6106 K-6107 K-6108 K-6109 K-6110 K-6111 K-6112 K-6113 K-6114 Number of Mid Sections Using: No. 6770 Outlet One Section Two Sections Three Sections Four Sections Five Sections Six Sections Seven Sections Eight Sections Nine Sections Ten Sections Eleven Sections No. 8644 Outlet ----One Section Two Sections Three Sections Four Sections Five Sections Six Sections Seven Sections Eight Sections Nine Sections Ten Sections Tie Bolts and Nut Part Numbers Bolt No. (3) per Kit 09120124 09120129 09120301 08100004 08100005 08100006 08100007 08100008 08100009 08100010 08100011 Nut No. (3) per Kit 09310106 09310106 09310106 09310106 09310106 09310106 09310106 09310106 09310106 09310106 09310106 Notes: When using the 8644 Right End Cover, add one section to assure proper stud length. Torque Specifications CAUTION Replace the stud nuts and torque evenly to 25 - 28 Ft Lbs [34 - 38 Nm]. This is a dry stud torque spec. Reduce torque spec to 18 - 20 Ft Lbs [25 - 27 Nm] for oily studs. Model V20 Service and Parts Manual (Catalog No. SC-1102) If the stud nuts are not tightened to the proper torque, valve spools may bind or stick, or cause ORing seals to extrude. 4 Rev: 08-26-2002 Section Seal Identificaton and Section Seal Kits Section Seal Changes WARNING As of April 1, 1991, the section seals for the V20 changed. The new versions have larger cross section (the old was .070, the new is .103) and different configurations for open center and closed center sections. It is important to note that the seal kits include all O-Rings (new and old), therefore there will be some left unused. Do not pre-lube the O-Ring section seals prior to installation. Make sure that the O-Rings and valve counterbores are dry. Compression of lubricants can distort the valve body causing spool bind. (Prior To April 1, 1991) (After April 1, 1991) (After April 1, 1991) All Work Sections, Mid-Inlets, Utility Sections and Outlet Covers Open Center Work Sections Closed Center Work Sections, Mid-Inlets, Utility Sections and Outlet Covers 1 2 4 1 3 3 2 5 3 6 5 4 5 5 6 6 4 5 6 6 Refer To The Warning Prior To Installing Section Seals Figure 3. Section Seal Identification Section Seal Kits Ref No. Part No. Description Quantity 08340001 K-6121 Open Center Section Seal Kit (Includes all Seals Listed Below) 10749001 K-6156 Load Sense Section Seal Kit (Includes all Seals Listed Below) 1 06814002 O-Ring Section Seal (Serviced in K-6121 & K-6156 Seal Kits) 2 2 06815002 O-Ring Section Seal (Serviced in K-6121 & K-6156 Seal Kits) 2 3 08316001 O-Ring Section Seal (Serviced in K-6121 & K-6156 Seal Kits) 3 4 21857001 O-Ring Section Seal (Serviced in K-6121 & K-6156 Seal Kits) 3 5 21733001 O-Ring Section Seal (Serviced in K-6121 & K-6156 Seal Kits) 3 6 21866001 O-Ring Section Seal (Serviced in K-6121 & K-6156 Seal Kits) 3 K-6121 and K-6156 Section Seal Kits include the same seal part numbers. The quantities of seals in each kit are different. Model V20 Service and Parts Manual (Catalog No. SC-1102) 5 Rev: 08-26-2002 Spool Seal Replacement and Spool Seal Kits Positioner End Handle End 5 10954 1 4 2 3 Spool Chamfer Figure 4. Spool Seal Removal Warning: DO NOT hold the spool with a pliers or wrench. This will destroy the finish. Spool Seal Removal 2. Remove the complete handle, handle bracket or seal retainer hardware (Item 2) from the front of the work section. These instructions apply to valves which have been removed from machines. If room permits rebuilding on the machine, first disconnect any lines which could hold pressure or supply oil into the valve assembly. It is recommended to drain the valve prior to rebuilding. 3. Push the spool into the housing from the front of the valve until the front seal is exposed. Since the spool seals can be replaced externally, it is not necessary to remove the spool from the housing. Remove the retainer plate washers (Item 3), back-up washers (Item 4), and spool seals (Item 5). For clarification, the control handle side of the valve is considered the front side. The seal retainer plate (Item 3) is the larger round plate with a hole in the center and two half round notches opposite each other on the outer edge. 4. Remove the back seal in the same manner. 1. Remove the bonnet and spool positioner hardware (Item 1) from the back of the work section. Keep parts in order of disassembly. If the work section does not include a handle assembly, prevent the spool from turning or moving by inserting a screw driver through clevis slot, or running a rod through the pin hole and using it as a handle. Model V20 Service and Parts Manual (Catalog No. SC-1102) Note: The back spool seal is located inside the detent sleeve in V20 Float sections. Refer to Figures 60 & 61 for parts illustration for float positioner. 5. 6 Remove the bonnet and spool positioner assembly parts (Item 1) from the back of the work section. Keep in order of disassembly. Rev: 08-26-2002 Spool Seal Replacement and Spool Seal Kits Positioner End Handle End 10954 1 5 4 3 2 Spool Chamfer Figure 5. Spool Seal Installation Spool Seal Kits Ref No. Part No. Description 1 2 3 4 5 07385001 12741001 12786001 06752001 03265001 07700001 K-6035 Standard Buna-N Spool Seal Kit (Includes Items 4 and 5 Only) K-6125 Spool Positioner Assembly (See Figures 52 thru 62 for Positioner Options) K-6033 Seal Retainer Assembly (See Figures 96 thru 99 for Handle End Options) Seal Retainer Plate Back-Up Washer Buna-N Spool Seal (Serviced in K-6035 Spool Seal Kit) Quantity 1 1 2 2 2 Spool Seal Installation 6. Install O-Ring spool seal and backup washer into the seal gland in the same manner as in the front side. 7. Reassemble (in reverse order) all hardware disassembled in Steps 1 & 2, Spool Seal Removal. Front Spool Seal Installation (O-Ring Spool Seal) 1. Push the spool into the housing from the front side of the valve until the chamfer on the spool is flush with the bottom of the seal gland. Install O-Ring spool seal into the seal gland. 2. Place the new back-up washer (Item 4) over the spool and up against the spool seal . 3. Place the seal retainer plate (Item 3) over the spool and up against the back-up washer. Push firmly into place. 4. Hold the seal retainer plate against the valve body and push the spool from the back side thru the seal approximately ¼ inch. Back Seal Installation (Float Work Sections Only) (Refer to Figures 60 & 61 for Float Positioner illustration) 5. With the float positioner disassembled from the spool, slip the retainer sleeve over the spool into the counterbore in the valve housing. Slide the spool seal onto the spool and against the retainer sleeve. 6. Install the face seal O-Ring into the spotface in the end of the detent sleeve. Slip the detent sleeve onto the spool, over the spool seal, and up against the valve housing. 7. Reassemble (in reverse order) all hardware disassembled in Steps 1 & 2, Spool Seal Removal. Back Seal Installation (Standard 3- and 4-Way Sections) 5. Push the spool into the housing from the back side until the end of the spool is flush with the valve back face, not the bottom of the seal gland. If the spool is pushed in too far, the metering notches and/or spool land may be moved into the seal area on the front end of the valve. If this happens, DO NOT push the spool back into the valve. Disassemble the seal assembly and carefully remove the seal from the spool. Reassemble per Steps 1 thru 4. Model V20 Service and Parts Manual (Catalog No. SC-1102) 7 Rev: 08-26-2002 Model V20 Directional Control Valve – Typical Main Assembly 7 6 9 5 2 10 1 1 11 4 3 8 Figure 6. Model V20 Directional Control Valve – Typical Main Assembly Ref No. 1 2 3 4 5 6 7 8 9 10 11 Description Refer To Page(s): Assembly Bolts and Nuts Inlet Cover Housing Main Relief Cartridge Port Plugs Section Seals Mid Sections/Mid-Inlets/Utility Sections Spool Positioners Handles Work Port Relief Cartridge Outlet Cover Housing Outlet Cover Conversion Options Model V20 Service and Parts Manual (Catalog No. SC-1102) 8 Rev: 08-26-2002 Special Note Regarding Back-Up Rings Back-Up Rings in Used Seal Kits (Continuous) Back-Up Rings Many of the plugs and cartridges used in the Gresen product line utilize back-up rings. Therefore, many of the seal kits in this Service Manual include back-up rings, some of which are continuous back-up rings. Since the continuous back-up rings are installed at the factory using a special sizing tool, only replace this back-up ring if it has been damaged. Preparing the Back-Up Ring for Installation If the continuous back-up ring should need replacing, follow these simple procedures. Carefully make one cut thru Back-Up Ring at approximately 30 degree angle as shown here. 1. Using a single edge razor blade, carefully cut through the back-up ring in an angle as shown in the drawing. Caution: Make only one diagonal cut thru the back-up ring. Do not separate the ring into two pieces. 2. Slip the back-up ring over the cartridge and into place. Model V20 Service and Parts Manual (Catalog No. SC-1102) 9 Rev: 08-26-2002 No. 8398 Inlet Cover No. 8398 Inlet Cover Main Relief Cartridge Options No. 8398 Inlet Covers offers top and end inlet and outlet ports. All unused ports must be plugged. No. 8398 Inlet Covers are machined to accept the inlet (main) relief valve cartridge. Main relief cartridges are available in the following options: If a gauge port is required, a port plug may be drilled and tapped for a 1/4" NPTF or SAE 4 and installed in the unused inlet port. Model WH – Differential Area Relief – Available in internal shim adjustable, externally adjustable, and dual pressure versions. Port Plugs and the main relief cartridge are the serviceable components located in the inlet cover. Model RP51 – Pilot Operated Relief - Available in externally adjustable, tamper resistant and dual pressure versions. No Relief Plug – Must be used when no main relief is required. 3 3 3 1 2 Figure 7. No. 08120xxx Inlet Cover Assembly – Using 08398xxx Inlet Cover Housing Ref No. Part No. 1 2 08398xxx 06532xxx 08853xxx 11387xxx 08950xxx 08950xxx 27005xxx 12797001 06089001 Description Quantity Inlet Cover Housing 1 WH Relief Cartridge (See Figure 9) 1 WHA Relief Cartridge (See Figure 10) 1 WH Dual Pressure Relief Cartridge (See Figure 11) 1 RP51A Relief Cartridge (See Figure 12) 1 RP51N Relief Cartridge (See Figure 12) 1 RP51 Dual Pressure Relief Cartridge (See Figure 13) 1 CK-6132 No Relief Cavity Plug (See Figure 14) 1 3 SAE 12 Port Plug (Plug Selection Determined by Inlet Porting – Refer to Page 105 for A/R a listing of available port plugs. No. 08398 Inlet Cover Housing are available in many porting configurations. Contact the Gresen factory for help in identifying No. 08398 housing part numbers. Model V20 Service and Parts Manual (Catalog No. SC-1102) 10 Rev: 08-26-2002 No. 7736 Inlet Cover with Flow Control No. 7736 Inlet Cover Main Relief Cartridge Options This inlet cover offers top and end inlet and end outlet ports. All unused ports must be plugged. Port plugs, inlet relief cartridge, and the flow control are the serviceable components located in the inlet cover. No. 7736 inlet covers are machined to accept the inlet (main) relief valve cartridge. Main relief cartridges are available in the following options: Model WH – Differential Area Relief – Available in internal shim adjustable, externally adjustable, and dual pressure versions. Inlet Flow Control Option This cover is equipped with an adjustable flow control assembly. Installation of the conversion plug in the excess flow port will permit use of the excess flow for power beyond applications. Model RP51 – Pilot Operated Relief - Available in externally adjustable, tamper resistant and dual pressure versions. No Relief Plug – Must be used when no main relief is required. Oil will only be directed out this port when a work section is actuated. With all sections in neutral, oil is directed thru open center and back to tank. 4 2 1 3 Internal Conversion Plug Must be installed to use the Excess Flow (Power Beyond) option 5 Figure 8. No. 07737xxx Inlet Cover Assembly – Using 07736xxx Inlet Cover Housing Ref No. Part No. 1 2 3 07736xxx 07400xxx 06532xxx 08853xxx 11387xxx 08950xxx 08950xxx 27005xxx 12797001 06089001 Description Quantity Inlet Cover Housing 1 Flow Control Assembly (See Figure 15) 1 WH Relief Cartridge (See Figure 9) 1 WHA Relief Cartridge (See Figure 10) 1 WH-Dual Pressure Relief Cartridge (See Figure 11) 1 RP51A Relief Cartridge (See Figure 12) 1 RP51N Relief Cartridge (See Figure 12) 1 1 RP51 Dual Pressure Relief Cartridge (See Figure 13) 1 CK-6132 No Relief Cavity Plug (See Figure 14) 4 A/R SAE 12 Port Plug (Plug Selection Determined by Inlet Porting – Refer to Page 105 for a listing of available port plugs. 5 00947001 1 Excess Flow Conversion Plug (1/2” NPTF) No. 07736 Inlet Cover Housing are available in many porting configurations. Contact the Gresen factory for help in identifying No. 07736 housing part numbers. Model V20 Service and Parts Manual (Catalog No. SC-1102) 11 Rev: 08-26-2002 Model ‘WH’ and ‘WHA’ (Differential Poppet) Main Relief Cartridges Torque to: 20 Ft Lbs (27 Nm) 4 9 Torque to: 14 Ft Lbs (19 Nm) 3 2 1 6 7 5 8 Figure 9. Model ‘WH’ and ‘WHA’ (Differential Poppet) Main Relief Cartridges (Model WH Shown) Ref No. Part No. Description Quantity 06532xxx Model WH Relief Cartridge, Complete (Specify Pressure Setting When Ordering) 08853xxx Model WHA Relief Cartridge, Complete (Specify Pressure Setting When Ordering) 07523001 K-19003 WH Relief Seal Kit (Includes Items 1, 2, 3 & 8 ) 12727001 K-19002 Relief Poppet Service Kit (Contains Item 5 - Poppet and Seal Assembly) 1 01718001 O-Ring Seal (Serviced in K-19003 Relief Seal Kit) 1 1 2 09020022 Back-Up Ring (Serviced in K-19003 Relief Seal Kit) 1 01615001 O-Ring Seal (Serviced in K-19003 Relief Seal Kit) 3 1 06533001 WH Relief Body 4 1 03936001 Poppet 5 A/R 00458001 Shim (.040 inch [1,0 mm] thick) 6 A/R 00459001 Shim (.020 inch [0,5 mm] thick) A/R 00462001 Shim (.010 inch [0,25 mm] thick) 1 01869001 Spring (500 - 1249 PSI [35 - 87 bar] Pressure Range) 7 1 07638001 Spring (1250 - 1749 PSI [88 - 122 bar] Pressure Range) 1 07078001 Spring (1750 - 1999 PSI [123 - 140 bar] Pressure Range) 1 01870001 Spring (2000 - 2599 PSI [141 - 183 bar] Pressure Range) 1 07497001 Spring (2600 - 2999 PSI [184 - 209 bar] Pressure Range) 1 11912001 Spring (3000 - 3500 PSI [210 - 245 bar] Pressure Range) 1 8 02707001 O-Ring Seal (Serviced in K-19003 Relief Seal Kit) 1 01880001 Relief Cap 9 Buna-N seals are standard for all Gresen valve assemblies. For Viton seals, contact the Gresen factory in Minneapolis. Model WHA Relief Cartridge replaces Items 8 & 9 with the CK-19001 External Adjustment Kit shown in Figure 10. Do not attempt to change shims or springs in these reliefs unless you have the capability to test for proper pressure setting. Without the capability to test you may exceed the maximum pressure rating of the product or draw the relief spring solid, which in turn means there is no relief (NR). Continuous Back-Up Rings are installed at the factory using special sizing tools. It is Not necessary to replace the original Back-Up Rings unless they have been damaged. See Page 9 for Back-Up Ring Preparation and Installation procedures. Model V20 Service and Parts Manual (Catalog No. SC-1102) 12 Rev: 08-26-2002 CK-19001 (K-WH-A) External Adjustment Kit Torque Relief Cartridge To: 20 Ft Lbs [27 Nm] Model 'WHA' Shown Here 7 4 6 5 Torque to: 15 Ft Lbs (20 Nm) Torque to: 20 Ft Lbs (27 Nm) 3 2 1 Relief Valve Cartridge With Relief Cap Removed - Refer To Individual Relief Cartridges For Servicing Information. Figure 10. CK-19001 (K-WH-A) External Adjustment Kit Note: This Kit May Be Used On Model WH (Figure 9), RC (Figure 85), RCS (Figure 86), RCPC (Figure 90) and CRA (Figure 88) Relief Cartridges Ref No. 1 2 3 4 5 6 7 Part No. 06489001 06489002 11481001 01818001 02707001 03498001 03496001 03500001 03497001 Description Quantity CK-19001 External Adjustment Kit (Contains All Items listed here) K-19015 Adjustment Kit Seal Kit (Contains Items 2 and 3 Only) Piston O-Ring Seal O-Ring Seal Adjustment Adapter Adjustment Stem Jam Nut Acorn Nut 1 1 1 1 1 1 1 Buna-N seals are standard for all Gresen valve assemblies. Do not attempt to adjust these reliefs unless you have the capability to test the reliefs for proper pressure setting. Without the capability to test you may exceed the maximum pressure rating of the product or draw the relief spring solid, which in turn means there is no relief (NR). Model V20 Service and Parts Manual (Catalog No. SC-1102) 13 Rev: 08-26-2002 K-19006 Dual Pressure Relief Head Kit Torque Relief Cartridge To: 20 Ft Lbs [27 Nm] Model WH-2S Dual Pressure Relief Cartridge Shown Here 9 8 Torque to: 15 Ft Lbs (20 Nm) 7 6 5 4 Torque to: 20 Ft Lbs (27 Nm) 2 3 Adjustment Screw 1. Turn full in to shim-set high pressure. 2. Back off to set low pressure. Remote Pilot Port is SAE 4 1 Relief Valve Cartridge With Relief Cap Removed - Refer To Individual Relief Cartridges For Servicing Information. Figure 11. K-19006 Dual Pressure Relief Head Kit Note: This Kit May Be Used On Model WH (Figure 9), RC (Figure 85), RCS (Figure 86), RCPC (Figure 90) and CRA (Figure 88 ) Relief Cartridges Ref No. Part No. Description Quantity 12731001 K-19006 Dual Pressure Relief Head Kit (Contains All Items listed here) 12194002 K-19016 Relief Head Seal Kit (Contains Items 1, 3, 4, 6 & 7) 1 02707001 O-Ring Seal 1 2 08931001 Body 1 3 09021113 Back Up Ring 1 4 09000113 O-Ring Seal 1 5 08932001 Piston 1 6 06839001 O-Ring Seal 1 7 09021016 Back Up Ring 1 8 08933001 Adjustment Screw 1 9 09302014 Hex Jam Nut 1 Buna-N seals are standard for all Gresen valve assemblies. Do not attempt to adjust these reliefs unless you have the capability to test the reliefs for proper pressure setting. Without the capability to read pressure, you may exceed the maximum pressure rating of the product or compress the relief spring solid, which in turn means there is no relief (NR). Continuous Back-Up Rings are installed at the factory using special sizing tools. It is Not necessary to replace the original Back-Up Rings unless they have been damaged. See Page 9 for Back-Up Ring Preparation and Installation procedures. Model V20 Service and Parts Manual (Catalog No. SC-1102) 14 Rev: 08-26-2002 Model ‘RP51’ Main Relief Cartridges Torque Relief Cartridge To: 20 Ft Lbs [27 Nm] RP51-A 1 2 RP51-N 3 4 Figure 12. Model ‘RP51’ (Pilot-Operated) Main Relief Cartridges NOTE Due to close tolerances on working parts, the RP51 Pilot-Operated Relief Valve is not field serviceable. If service other than external seal replacement is required, replace the complete cartridge. Ref No. Part No. Description 1 2 3 4 08950005 08950014 08950006 08950011 08427001 01718001 09020022 01615001 10034001 RP51-A Cartridge, Adjustable from 1000 - 3500 PSI [69 – 240 bar] RP51-A-LP Cartridge, Adjustable from 500 - 999 PSI [35 – 239 bar] RP51-N Cartridge, Tamper Resistant, Preset 1000 – 3500 PSI [69 – 240 bar] RP51-N-LP Cartridge, Tamper Resistant, Preset 500 – 999 PSI [35 – 239 bar] K-28062 Plug Seal Kit (Contains Items 1 thru 3 Only) See Note Below O-Ring Seal Back Up Ring O-Ring Seal Tamper Resistant Cap (Installed at the factory on RP51-N Versions Only) Quantity 1 1 1 1 Buna-N seals are standard for all Gresen valve assemblies. Specify relief valve pressure setting when ordering. Do NOT attempt to adjust these relief valves unless you have the capability to test the reliefs for proper pressure setting. Without the capability to test you may exceed the maximum pressure rating of the product or draw the relief spring solid, which in turn means there is no relief (NR). RP51-N and RP51-N-LP Cartridges are preset at the factory and then the Tamper Resistant Cap is installed. Continuous Back-Up Rings are installed at the factory using special sizing tools. It is Not necessary to replace the original Back-Up Rings unless they have been damaged. See Page 9 for Back-Up Ring Preparation and Installation procedures. Model V20 Service and Parts Manual (Catalog No. SC-1102) 15 Rev: 08-26-2002 Model ‘RP51 - Dual Pressure’ Main Relief Cartridges Torque Relief Cartridge To: 20 Ft Lbs [27 Nm] RP51-A Dual Pressure Relief T 1 2 P Remote Pilot Source 3 SAE 4 Pilot Port For Remote Pilot Source (Minimum of 700 PSI [48 bar] Required) High Pressure Adjustment Locknut Low Pressure Adjustment Locknut Figure 13. Model ‘RP51 – Dual Pressure’ Main Relief Cartridges NOTE Due to close tolerances on working parts, the RP51 Dual Pressure Pilot-Operated Relief Valve is not field serviceable. If service other than external seal replacement is required, replace the complete cartridge. Ref No. 1 2 3 4 Part No. Description 27005001 RP51-A-DP Cartridge, Dual Pressures, Adjustable from 1000 - 3500 PSI [69 – 240 bar] K-28062 Plug Seal Kit (Contains Items 1 thru 3 Only) See Note Below O-Ring Seal Back Up Ring O-Ring Seal Tamper Resistant Cap (Installed at the factory on RP51-N Versions Only) 08427001 01718001 09020022 01615001 10034001 Quantity 1 1 1 1 Buna-N seals are standard for all Gresen valve assemblies. Specify relief valve pressure setting when ordering. Do NOT attempt to adjust these relief valves unless you have the capability to test the reliefs for proper pressure setting. Without the capability to test you may exceed the maximum pressure rating of the product or draw the relief spring solid, which in turn means there is no relief (NR). Continuous Back-Up Rings are installed at the factory using special sizing tools. It is Not necessary to replace the original Back-Up Rings unless they have been damaged. See Page 9 for Back-Up Ring Preparation and Installation procedures. Model V20 Service and Parts Manual (Catalog No. SC-1102) 16 Rev: 08-26-2002 CK-6132 Main Relief ‘NR’ Cavity Plug Torque Relief Cavity Plug To: 20 Ft Lbs [27 Nm] Inlet 1 2 3 Tank 4 Figure 14. CK-6132 Main Relief ‘NR’ Cavity Plug Ref No. Part No. Description 1 2 3 4 12797001 08427001 01718001 09020022 01615001 06760001 CK-6132 No Relief ‘NR’ Plug Kit (Contains All Items Listed Below) K-28062 Plug Seal Kit (Contains Items 1 thru 3 Only) O-Ring Seal (Serviced in K-28062 Plug Seal Kit) Back-Up Ring (Serviced in K-28062 Plug Seal Kit) O-Ring Seal (Serviced in K-28062 Plug Seal Kit) Relief Cavity Plug Quantity 1 1 1 1 Buna-N seals are standard for all Gresen valve assemblies. For Viton seals, contact the Gresen factory in Minneapolis. Continuous Back-Up Rings are installed at the factory using special sizing tools. It is Not necessary to replace the original Back-Up Rings unless they have been damaged. See Page 9 for Back-Up Ring Preparation and Installation procedures. Model V20 Service and Parts Manual (Catalog No. SC-1102) 17 Rev: 08-26-2002 Inlet Cover Flow Control – Used In 07737xxx Inlet Assemblies Torque to: 12 Ft Lbs (16 Nm) 1 2 3 4 5 7 6 8 9 10 11 12 Figure 15. Inlet Cover Flow Control Ref No. Part No. Description Quantity 12833001 K-6067 (3 to 16 GPM - 11 to 60 lpm) Flow Control Kit (Contains Item 10 thru 12 Only) 12832001 K-6068 (8 to 25 GPM - 30 to 95 lpm) Flow Control Kit (Contains Item 10 thru 12 Only) 13110001 K-6193 (4 to 25 GPM - 15 to 95 lpm) Flow Control Kit (Contains Item 10 thru 12 Only) 07990001 K-6065 Flow Control Seal Kit (Contains Items 5, 7, 8, 11 & 12 Only) 12834001 K-6066 Flow Control Adjustment Kit (Contains Items 1 thru 8 Only) 1 03236001 Knob 1 2 03731101 Hex Head Screw 1 3 00563001 Lock Washer 4 4 03906001 Cap 4 5 03911001 O-Ring Seal (Serviced in K-6065 Seal Kit) 1 6 06309001 Flow Adjuster (Standard) 1 03902001 Flow Adjuster (Optional - 3 inch [76 mm] stem) 1 7 03908001 Back-Up Ring (Serviced in K-6065 Seal Kit) 1 8 09001012 O-Ring Seal (Serviced in K-6065 Seal Kit) 1 9 03882001 Spring 1 10 07400006 Flow Control Assembly (3 to 16 GPM [11 to 60 lpm]) (Serviced in K-6067 F/C Kit) 1 07400007 Flow Control Assembly (4 - 25 GPM [15 - 95 lpm]) (Serviced in K-6193 F/C Kit) 1 07400005 Flow Control Assembly (8 to 25 GPM [30 to 95 lpm]) (Serviced in K-6068 F/C Kit) 1 11 01819001 O-Ring Seal (Serviced in K-6065 Seal Kit) 1 12 01821001 Back-Up Ring (Serviced in K-6065 Seal Kit) 1 Buna-N seals are standard for all Gresen valve assemblies. For Viton seals, contact the Gresen factory in Minneapolis. Continuous Back-Up Rings are installed at the factory using special sizing tools. It is Not necessary to replace the original Back-Up Rings unless they have been damaged. See Page 9 for Back-Up Ring Preparation and Installation procedures. Model V20 Service and Parts Manual (Catalog No. SC-1102) 18 Rev: 08-26-2002 No. 8644 Outlet Cover No. 8644 Outlet Cover Caution: No. 8644 Outlet Cover may only be used in open center and closed center (high pressure standby) systems. They may not be used with V20LS Work Sections. This cover offers top, end or bottom outlet ports in addition to a top power beyond port. All unused outlet ports must be plugged. An internal plug (09435108) is available for conversion to closed center or power beyond. 3 Port Plug Installed in PB port will convert the valve to Closed Center when the Internal Conversion Plug is installed. PB 4 OUT 1 5 2 Internal Conversion Plug (Must be installed for conversion to Power Beyond or Closed Center) 5 4 Figure 16. No. 8644 Outlet Cover Ref No. Part No. Description 1 2 3 08340001 08644xxx 09435108 06089001 4 5 21857001 21733001 K-6121 Section Seal Kit (Includes Ref No’s. 3 & 4) Outlet Cover Housing Internal Conversion Plug (SAE 8 Socket Head) SAE 12 Port Plug (Plug Selection Determined by Inlet Porting – Refer to Page for a listing of available port plugs. O-Ring Seal (Serviced in K-6121 Section Seal Kit) O-Ring Seal (Serviced in K-6121 Section Seal Kit) Quantity 1 1 A/R 2 2 Buna-N seals are standard for all Gresen valve assemblies. For Viton seals, contact the Gresen factory. No. 08644 Outlet Cover Housing are available in many porting configurations. Contact the Gresen factory for help in identifying No. 08644 housing part numbers. Model V20 Service and Parts Manual (Catalog No. SC-1102) 19 Rev: 08-26-2002 No. 6770 Outlet Cover With Conversion Port – Non Load Sense No. 6770 Outlet Cover Power Beyond Conversion This outlet cover offers an end outlet port (port on left). A second (conversion) port is located in the center of the outlet cover. This port accepts the closed center or power beyond conversion plugs. Provides for proper hook-up of an additional valve “downstream”. The Power Beyond Sleeve prevents subjecting the exhaust core to back pressure. A power beyond sleeve is installed in the option port in the outlet cover to convert to power beyond. Closed Center Conversion Caution: Never attempt to plug the power beyond sleeve, as this will convert the valve to “Closed Center”. Provides a “Closed Center” system by plugging the open center flow passage. This is normally used with a variable displacement pump. A closed center plug is installed in the option port in the outlet cover. 3 1 Conversion Port 2 4 3 4 (Accepts Power Beyond Sleeves and Closed Center Conversion Plugs) Figure 17. No. 6770 (Open Center) Outlet Cover Assembly Ref No. Part No. Description Quantity 08340001 K-6121 Section Seal Kit (Includes Ref No’s. 3 & 4 Only) 06770xxx Outlet Cover Housing 1 06395001 K-6016 Conversion Plug (See Figure 15) 1 12735001 CK-6015 (Optional) Closed Center Plug (See Figure 15) 1 12745001 CK-6017 (Optional) 1/2” NPT Power Beyond Sleeve (See Figure 15) 1 12746001 CK-6018 (Optional) SAE 8 Power Beyond Sleeve (See Figure 15) 1 12747001 CK-6019 (Optional) SAE 10 Power Beyond Sleeve (See Figure 15) 1 12748001 K-6168 (Optional) SAE 12 Power Beyond Sleeve (See Figure 15) 1 12749001 K-6060 (Optional) SAE 16 Male Power Beyond Sleeve (See Figure 15) 1 3 21857001 O-Ring Seal (Order K-6121 Section Seal Kit) 2 4 21733001 O-Ring Seal (Order K-6121 Section Seal Kit) 2 Buna-N seals are standard for all Gresen valve assemblies. For Viton seals, contact the Gresen factory. No. 06770 Outlet Cover Housing are available in many porting configurations. Contact the Gresen factory for help in identifying No. 06770 housing part numbers. 1 2 Model V20 Service and Parts Manual (Catalog No. SC-1102) 20 Rev: 08-26-2002 No. 6770 Outlet Cover With Solenoid Cartridge – Non Load Sense No. 6770 Outlet Cover Power Beyond Conversion This outlet cover offers an end outlet port (port on left). A second (conversion) port is located in the center of the outlet cover. This port accepts the closed center or power beyond conversion plugs. A power beyond sleeve is installed in the option port in the outlet cover to convert to power beyond. 2 3 1 12 V .D .C . 4 3 4 Figure 18. No. 6770 Outlet Cover With Solenoid Cartridge Ref No. Part No. Description Quantity 08340001 K-6121 Section Seal Kit (Includes Ref No’s. 3 & 4 Only) 06770xxx Outlet Cover Housing 1 12968001 CK-6177 12VDC Build Up Cartridge - See Figure xx 1 12969001 CK-6178 24VDC Build Up Cartridge - See Figure xx 1 12970001 CK-6179 Mechanical Build Up Cartridge Kit – See Figure xx 1 3 21857001 O-Ring Seal (Order K-6121 Section Seal Kit) 2 4 21733001 O-Ring Seal (Order K-6121 Section Seal Kit) 2 Buna-N seals are standard for all Gresen valve assemblies. For Viton seals, contact the Gresen factory. No. 06770 Outlet Cover Housing are available in many porting configurations. Contact the Gresen factory for help in identifying No. 06770 housing part numbers. 1 2 Model V20 Service and Parts Manual (Catalog No. SC-1102) 21 Rev: 08-26-2002 No. 6770 V20LS Outlet Cover (No Load Sense Bleed-Down Plug) No. 6770 Outlet Cover The outlet cover offers top and end outlet ports. unused outlet port must be plugged. 1 The 3 2 4 5 5 3 5 4 Solenoid Pilot Seal Counterbores Figure 19. No. 6770 V20LS Outlet Cover Assembly Ref No. Part No. Description Quantity 10749001 K-6156 Section Seal Kit (Includes Ref No’s. 3 thru 5) 1 06770xxx Outlet Cover Housing 1 2 00073001 3/8” - 18 NPTF Port Plug 1 3 21857001 O-Ring Seal (Serviced in K-6156 Section Seal Kit) 2 4 21733001 O-Ring Seal (Serviced in K-6156 Section Seal Kit) 2 5 21866001 O-Ring Seal (Serviced in K-6156 Section Seal Kit) A/R Buna-N seals are standard for all Gresen valve assemblies. For Viton seals, contact the Gresen factory. No. 06770 Outlet Cover Housing are available in many porting configurations. Contact the Gresen factory for help in identifying No. 06770 housing part numbers. Model V20 Service and Parts Manual (Catalog No. SC-1102) 22 Rev: 08-26-2002 No. 6770LS Outlet Cover (With Load Sense Bleed-Down Plug) No. 6770LS Outlet Cover Optional Outlet Plugs The outlet cover offers top and end outlet ports. unused outlet port must be plugged. Bleed-Down Plug The Port plugs and bleed-down cartridges are field serviceable components located in the outlet cover. 3 1 2 4 5 5 3 4 5 Solenoid Pilot Seal Counterbores Figure 20. No. 6770LS Outlet Cover Assembly Ref No. 1 2 3 4 5 Part No. 10749001 06770xxx 16012001 21857001 21733001 21866001 Description Quantity K-6156 Section Seal Kit (Includes Ref No’s. 3 thru 5) Outlet Cover Housing K-6255 Bleed-Down Cartridge Kit (See Figure 16) O-Ring Seal (Serviced in K-6156 Section Seal Kit) O-Ring Seal (Serviced in K-6156 Section Seal Kit) O-Ring Seal (Serviced in K-6156 Section Seal Kit) 1 1 2 2 1 Buna-N seals are standard for all Gresen valve assemblies. For Viton seals, contact the Gresen factory. No. 06770 Outlet Cover Housing are available in many porting configurations. Contact the Gresen factory for help in identifying No. 06770 housing part numbers. Model V20 Service and Parts Manual (Catalog No. SC-1102) 23 Rev: 08-26-2002 Conversion Port Option Plugs for 6770 Outlet Cover K-6016 Conversion Plug Kit CK-6015 Closed Center Plug Kit CK-6017 CK-6018 CK-6019 K-6168 Power Beyond Sleeve Kits Conversion Port Location Note: Not All 06770 Housings Have The Conversion Port Machined K-6060 Power Beyond Sleeve Kit Figure 21. Conversion Plugs for 6770 Outlet Cover (Open Center) Ref No. Part No. Description Quantity 06395001 K-6016 Conversion Plug Kit - Supplied as Standard (Includes Ref No’s. 1 & 2) 12735001 CK-6015 Closed Center Plug Kit (Includes Ref No’s. 2, 4, 5 & 6) 12745001 CK-6017 1/2” NPT Power Beyond Sleeve Kit (Includes Ref No’s. 3 thru 6) 12746001 CK-6018 SAE 8 Power Beyond Sleeve Kit (Includes Ref No’s. 3 thru 6) 12747001 CK-6019 SAE 10 Power Beyond Sleeve Kit (Includes Ref No’s. 3 thru 6) 12748001 K-6168 SAE 12 Power Beyond Sleeve Kit (Includes Ref No’s. 3 thru 6) 12749001 K-6060 SAE 16 Power Beyond Sleeve Kit (Includes Ref No’s. 3 thru 6) 06418001 K-6025 Plug Seal Kit (Includes Ref No’s. 4 thru 6 Only) 1 01727001 Conversion Plug 1 2 01830001 Closed Center Plug 1 3 01833001 Power Beyond Sleeve with 1/2” NPT Port 1 01835001 Power Beyond Sleeve with SAE 8 Port 1 01836001 Power Beyond Sleeve with SAE 10 Port 1 01913001 Power Beyond Sleeve with SAE 12 Port 1 07716001 Power Beyond Sleeve with SAE 16 Male Connection 1 4 02709001 O-Ring Seal (Serviced in K-6025 Plug Seal Kit) 1 5 09020017 Back-Up Ring (Serviced in K-6025 Plug Seal Kit) 1 6 01721001 O-Ring Seal (Serviced in K-6025 Plug Seal Kit) 1 Buna-N seals are standard for all Gresen valve assemblies. For Viton seals, contact the Gresen factory. Continuous Back-Up Rings are installed at the factory using special sizing tools. It is Not necessary to replace the original Back-Up Rings unless they have been damaged. See Page 9 for Back-Up Ring Preparation and Installation procedures. Model V20 Service and Parts Manual (Catalog No. SC-1102) 24 Rev: 08-26-2002 Load Sense Bleed-Down Plug for 6770LS Outlet Cover K-6255 Bleed Down Cartridge Kit Cleaning Instructions????? 1 Required per LS System 3 Load Sense Bleed-Down Plug 1 4 6 7 Clean Threads and Apply Loctite Ref. No. 242 Thread Locking Compound to Ref No. 7 prior to installation 5 2 Figure 22. Load Sense Bleed-Down Plug for 6770LS Outlet Cover Ref No. 1 2 3 4 5 6 7 Part No. Description Quantity 16012002 16088001 22249001 02708001 22489001 09001115 11839001 12293001 11056001 K-6240 Bleed-Down Cartridge Kit (Includes All Ref No’s Listed Below) K-6269 Cartridge Seal Kit (Includes Ref No’s. 2 and 4 Only) Bleed-Down Plug O-Ring Seal (Serviced in K-6269 Cartridge Seal Kit) .018 Orifice Screw (Standard) O-Ring Seal (Serviced in K-6269 Cartridge Seal Kit) Filter Screen Back-Up Washer Locking Screw 1 1 1 1 1 2 1 Buna-N seals are standard for all Gresen valve assemblies. For Viton seals, contact the Gresen factory. Optional Orifice Screws are available from the Gresen factory. Available bleed hole diameters sizes are: .020, .030 & .040. The Load Sense Bleed-Down Plug can be converted to a no-bleed assembly in the field by replacing the Orifice Screw with a solid screw – Gresen Part Number 09275304. Install plug flush or slightly below surface. Model V20 Service and Parts Manual (Catalog No. SC-1102) 25 Rev: 08-26-2002 3-Way, 3-Position Parallel & Tandem Work Sections Tandem B B Parallel 8 T P T 4 1 OC OC P 5 5 3 2 6 7 Figure 23. 3-Way, 3-Position Parallel & Tandem Work Sections (Parallel Housing Shown Here) Ref No. Part No. Description Quantity 07018001 K-6027 Work Section Service Kit - Standard Buna-N O-Rings 1 08072xxx V20P Parallel Work Section Housing (Not Serviceable) 1 10954xxx V20RP Parallel Work Section Housing (Not Serviceable) 1 08112xxx V20T Tandem Work Section Housing (Not Serviceable) 1 10762xxx V20RT Tandem Work Section Housing (Not Serviceable) 1 2 08083001 3-Way Spool (Not Serviceable) 1 3 12741001 K-6125 (V20P and V20T) Spring-Return Spool Positioner Kit (See Figure 6) 1 12933001 K-6207 (V20RP and V20RT) Spring-Return Spool Positioner Kit (See Figure 6) 1 4 06754001 3-Way Conversion Plug 1 5 12742001 K-6030 Load Check Plug Assembly (See Figures 24 thru 25 for Options) 2 6 12786001 K-6033 Seal Retainer Kit (See Figures 26 thru 29 for Handle End Options) 1 7 07385001 K-6035 Spool Seal Assembly (Serviced in Spool Seal Kits - See Figure 2) 2 8 07054001 SAE 10 Port Plug (Plug Selection Determined By Port Size) 1 00947001 ½” - 14 NPT Port Plug 1 Work Section Service Kits include all the seals and back-up rings required to service one V20 work section. Contact the Gresen factory in Minneapolis for porting options. The work section housing and spool are matched and are not sold separately. Warning: If you are using the free flow (F4) spool configuration in a cylinder lift application, it must be used in conjunction with a load holding device. A load holding device will prevent the load from free falling when the spool is in the neutral position. A free falling load could cause serious bodily injury or property damage if the holding device is not installed. Manual Positioners and Actuators will NOT work on Solenoid Work Section housings. Do not install the load check poppet and spring on the same side that the conversion plug (Item 4) is installed. Model V20 Service and Parts Manual (Catalog No. SC-1102) 26 Rev: 08-26-2002 4-Way, 3-Position Parallel & Tandem Work Sections B B A P T A Parallel Tandem T OC OC 1 P 4 4 3 2 5 6 Figure 24. 4-Way, 3-Position Parallel & Tandem Work Sections (Tandem Housing Shown Here) Ref No. Part No. Description Quantity 07018001 K-6027 Work Section Service Kit - Standard Buna-N O-Rings 1 08072xxx V20P Parallel Work Section Housing (Not Serviceable) 1 10954xxx V20RP Parallel Work Section Housing (Not Serviceable) 1 08112xxx V20T Tandem Work Section Housing (Not Serviceable) 1 10762xxx V20RT Tandem Work Section Housing (Not Serviceable) 1 2 08084001 4-Way Spool (Not Serviceable) 1 08108001 4-Way Free Flow Spool (Not Serviceable) 1 3 12741001 K-6125 (V20P and V20T) Spring-Return Spool Positioner Kit (See Figure 6) 1 12933001 K-6207 (V20RP and V20RT) Spring-Return Spool Positioner Kit (See Figure 6) 1 4 12742001 K-6030 Load Check Plug Assembly (See Figures 24 thru 25 for Options) 2 5 12786001 K-6033 Seal Retainer Kit (See Figures 26 thru 29 for Handle End Options) 1 6 07385001 K-6035 Spool Seal Assembly (Serviced in Spool Seal Kits - See Figure 2) 2 Work Section Service Kits include all the seals and back-up rings required to service one V20 work section. Contact the Gresen factory in Minneapolis for porting options. The work section housing and spool are matched and are not sold separately. Warning: If you are using the free flow (F4) spool configuration in a cylinder lift application, it must be used in conjunction with a load holding device. A load holding device will prevent the load from free falling when the spool is in the neutral position. A free falling load could cause serious bodily injury or property damage if the holding device is not installed. Manual Positioners and Actuators will NOT work on Solenoid Work Section housings. Model V20 Service and Parts Manual (Catalog No. SC-1102) 27 Rev: 08-26-2002 4-Way, 4-Position Float Parallel & Tandem Work Sections B Tandem B A A Parallel T P OC T 1 OC P 4 4 3 2 6 5 Figure 25. 4-Way, 4-Position Float Parallel & Tandem Work Sections (Parallel Housing Shown Here) Ref No. Part No. Description Quantity K-6028 Float Work Section Service Kit - Standard Buna-N O-Rings 07019001 1 V20P Parallel Work Section Housing (Not Serviceable) 08072xxx V20RP Parallel Work Section Housing (Not Serviceable) 10954xxx V20T Tandem Work Section Housing (Not Serviceable) 08112xxx V20RT Tandem Work Section Housing (Not Serviceable) 10762xxx 2 4-Way Float Spool (Not Serviceable) 08085001 3 K-6127 4-Position Float Spool Positioner Kit (See Figure 6) 12888001 4 K-6030 Load Check Plug Assembly (See Figures 24 thru 25 for Options) 12742001 5 K-6033 Seal Retainer Kit (See Figures 26 thru 29 for Handle End Options) 12786001 6 K-6035 Spool Seal Assembly (Serviced in Spool Seal Kits - See Figure 2) 07385001 Work Section Service Kits include all the seals and back-up rings required to service one V20 work section. Contact the Gresen factory in Minneapolis for porting options. The work section housing and spool are matched and are not sold separately. 3-Position Spool Positioners and Actuators will NOT work on Float Work Sections. Model V20 Service and Parts Manual (Catalog No. SC-1102) 28 1 1 1 1 1 1 2 1 1 Rev: 08-26-2002 4-Way, 3-Position ‘V20LO’ Lockout Work Section B A 5 1 4 4 T P OC 3 2 7 6 Figure 26. 4-Way, 3-Position ‘V20LO’ Lockout Work Section Ref No. Part No. Description Quantity 07018001 K-6027 Work Section Service Kit - Standard Buna-N O-Rings 1 11571xxx V20LO Lockout Work Section Housing (Not Serviceable) 2 08397001 4-Way Lockout Spool (Not Serviceable) 3 12741001 K-6125 (V20P and V20T) Spring-Return Spool Positioner Kit (See Figure 6) 12933001 K-6207 (V20RP and V20RT) Spring-Return Spool Positioner Kit (See Figure 6) 4 06638001 K-6024 Lockout Check Plug Assembly (See Figure 24) 5 11572001 Unlocking Piston 6 12786001 K-6033 Seal Retainer Kit (See Figures 26 thru 29 for Handle End Options) 7 07385001 K-6035 Spool Seal Assembly (Serviced in Spool Seal Kits - See Figure 2) Work Section Service Kits include all the seals and back-up rings required to service one V20 work section. Contact the Gresen factory in Minneapolis for porting options. The work section housing and spool are matched and are not sold separately. Model V20 Service and Parts Manual (Catalog No. SC-1102) 29 1 1 1 1 2 1 1 1 Rev: 08-26-2002 4-Way, 3-Position Parallel & Tandem Work Sections with ‘KO’ B T A B A Parallel Tandem 1 P P T OC OC 4 4 3 2 6 5 Figure 27. 4-Way, 3-Position Parallel & Tandem Work Sections with ‘KO’ (Tandem Housing Shown Here) Ref No. Part No. Description Quantity 07018001 K-6027 Work Section Service Kit - Standard Buna-N O-Rings 08072xxx V20P Parallel Work Section Housing (Not Serviceable) 10954xxx V20RP Parallel Work Section Housing (Not Serviceable) 08112xxx V20T Tandem Work Section Housing (Not Serviceable) 10762xxx V20RT Tandem Work Section Housing (Not Serviceable) 2 08534001 4-Way ‘KO’ (Knockout) Spool (Not Serviceable) 3 08542002 3-Position ‘KO’ Spool Positioner Kit (See Figure 6) 4 12742001 K-6030 Load Check Plug Assembly (See Figures 24 thru 25 for Options) 5 12786001 K-6033 Seal Retainer Kit (See Figures 26 thru 29 for Handle End Options) 6 07385001 K-6035 Spool Seal Assembly (Serviced in Spool Seal Kits - See Figure 2) Work Section Service Kits include all the seals and back-up rings required to service one V20 work section. Contact the Gresen factory in Minneapolis for porting options. The work section housing and spool are matched and are not sold separately. ‘KO’ Knockout Spool Positioners will NOT work with standard spools. 1 Model V20 Service and Parts Manual (Catalog No. SC-1102) 30 1 1 1 1 1 1 2 1 1 Rev: 08-26-2002 Model V20 Externally Piloted Solenoid Work Sections B T 1 3 4 A OC P 4 2 7 6 5 8 Figure 28. Model V20 Externally Piloted Solenoid Work Sections (Parallel 4-Way Section Shown) Ref No. Part No. Description Quantity 07018001 K-6027 Work Section Service Kit - Standard Buna-N O-Rings 1 08072xxx V20P Parallel Work Section Housing (Not Serviceable) 1 10954xxx V20RP Parallel Work Section Housing (Not Serviceable) 1 08112xxx V20T Tandem Work Section Housing (Not Serviceable) 1 10762xxx V20RT Tandem Work Section Housing (Not Serviceable) 1 2 08084001 4-Way Spool (Not Serviceable) 1 08108001 4-Way Free Flow Spool (Not Serviceable) 1 3 10490001 K-6167 12VDC Solenoid Actuator Kit (See Figure 6) 1 4 12742001 K-6030 Load Check Plug Assembly (See Figures 24 thru 25 for Options) 2 5 07385001 K-6035 Spool Seal Assembly (Serviced in Spool Seal Kits - See Figure 2) 1 6 07700001 O-Ring Seal (Serviced in Spool Seal Kits – Figure 2) 1 7 03265001 Back-Up Ring (Serviced in Spool Seal Kits – Figure 2) 1 8 12786001 K-6033 Seal Retainer Kit (See Figures 26 thru 29 for Handle End Options) 1 Buna-N seals are standard for all Gresen valve assemblies. Work Section Service Kits include all the seals and back-up rings required to service one V26PC work section, including spool seals. Do NOT install spool seals into V26PC Solenoid Work Sections. SAE porting standard. Contact the Gresen factory in Minneapolis for optional porting. The work section housing and spool are matched and are not sold separately. Warning: If you are using the free flow (F4) spool configuration in a cylinder lift application, it must be used in conjunction with a load holding device. A load holding device will prevent the load from free falling when the spool is in the neutral position. A free falling load could cause serious bodily injury or property damage if the holding device is not installed. Be sure to clear the work area prior to testing the cylinder lift application to avoid a potential dangerous situation. Continuous Back-Up Rings are installed at the factory using special sizing tools. It is Not necessary to replace the original Back-Up Rings unless they have been damaged. See Page 9 for Back-Up Ring Preparation and Installation procedures. Model V20 Service and Parts Manual (Catalog No. SC-1102) 31 Rev: 08-26-2002 ‘V20P’ Parallel & ‘V20T’ Tandem 4-Way Solenoid Work Sections B T A OC [SOL] Schematic (4-Way Shown) [EPC] Schematic (4-Way Shown) B T P 5 A OC P 5 3 4 7 1 6 2 Bonnet Seals 8 (Located in Work Section Body) Figure 29. ‘V20P’ Parallel & ‘V20T’ Tandem 4-Way Solenoid Work Sections (Parallel Housing Shown) Ref No. Part No. Description Quantity K-6 V20 Solenoid Work Section Service Kit - Buna-N O-Rings 1 10954xxx V20RP ‘Parallel’ Solenoid Work Section Housing (Not Serviceable) 1 10762xxx V20RT ‘Tandem’ Solenoid Work Section Housing (Not Serviceable) 1 2 21500001 4-Way Solenoid Spool (Not Serviceable) 1 21504001 4-Way Free Flow Solenoid Spool (Not Serviceable) 1 3 21477xxx On/Off [SOL] Solenoid Actuator Assembly - ‘A’ End (See Figure 14) 1 21475xxx Proportional [EPC] Solenoid Actuator Assembly - ‘A’ End (See Figure 14) 1 4 21478xxx On/Off [SOL] Solenoid Actuator Assembly - ‘B’ End (See Figure 14) 1 21476xxx Proportional [EPC] Solenoid Actuator Assembly - ‘B’ End (See Figure 14) 1 5 12742001 K-6030 Load Check Plug Kit (See Figure 24) 2 6 21866001 O-Ring Seal 2 7 21801001 O-Ring Seal 2 8 07773001 O-Ring Seal 4 Buna-N seals are standard for all Gresen valve assemblies. Work Section Service Kits include all the seals and back-up rings required to service one V26PC work section, including spool seals. Do NOT install spool seals into V26PC Solenoid Work Sections. SAE porting standard. Contact the Gresen factory in Minneapolis for optional porting. The work section housing and spool are matched and are not sold separately. Warning: If you are using the free flow (F4) spool configuration in a cylinder lift application, it must be used in conjunction with a load holding device. A load holding device will prevent the load from free falling when the spool is in the neutral position. A free falling load could cause serious bodily injury or property damage if the holding device is not installed. Be sure to clear the work area prior to testing the cylinder lift application to avoid a potential dangerous situation. Model V20 Service and Parts Manual (Catalog No. SC-1102) 32 Rev: 08-26-2002 Manual Positioner and Actuators will NOT work on Solenoid Type Work Section housings. ‘V20P’ & ‘V20T’ Solenoid Work Sections with Handle B A B A [SOL-IH] Schematic (4-Way Shown) T [EPC-IH] Schematic (4-Way Shown) T P OC 5 OC P 5 4 3 1 6 2 7 Bonnet Seals (Located in Work Section Body) 8 Figure 30. ‘V20P’ & ‘V20T’ Solenoid Work Sections with Handle Ref No. Part No. Description Quantity K-6 V20 Solenoid Work Section Service Kit - Buna-N O-Rings 10954xxx V20RP ‘Parallel’ Solenoid Work Section Housing (Not Serviceable) 1 10762xxx V20RT ‘Tandem’ Solenoid Work Section Housing (Not Serviceable) 1 2 21500001 4-Way Solenoid Spool (Not Serviceable) 1 21504001 4-Way Free Flow Solenoid Spool (Not Serviceable) 1 3 21561xxx On/Off [SOL] Solenoid Actuator with Handle - ‘A’ End (See Figure 14) 1 21475xxx Proportional [EPC] Solenoid Actuator with Handle - ‘A’ End (See Figure 14) 1 21478xxx On/Off [SOL] Solenoid Actuator Assembly - ‘B’ End (See Figure 14) 1 21476xxx Proportional [EPC] Solenoid Actuator Assembly - ‘B’ End (See Figure 14) 1 4 12742001 K-6030 Load Check Plug Kit (See Figure 24) 1 5 21801001 O-Ring Seal 2 6 21866001 O-Ring Seal 2 7 07773001 O-Ring Seal 4 Buna-N seals are standard for all Gresen valve assemblies. Work Section Service Kits include all the seals and back-up rings required to service one V26PC work section, including spool seals. Do NOT install spool seals into V26PC Solenoid Work Sections. SAE porting standard. Contact the Gresen factory in Minneapolis for optional porting. The work section housing and spool are matched and are not sold separately. Warning: If you are using the free flow (F4) spool configuration in a cylinder lift application, it must be used in conjunction with a load holding device. A load holding device will prevent the load from free falling when the spool is in the neutral position. A free falling load could cause serious bodily injury or property damage if the holding device is not installed. Be sure to clear the work area prior to testing the cylinder lift application to avoid a potential dangerous situation. Manual Positioner and Actuators will NOT work on Solenoid Type Work Section housings. 1 Model V20 Service and Parts Manual (Catalog No. SC-1102) 33 Rev: 08-26-2002 4-Way, 3-Position ‘Series’ Work Sections 4-Way Free Flow B B A T A 4-Way T P P OC OC 1 4 4 3 2 5 6 Figure 31. 4-Way, 3-Position ‘Series’ Work Section Ref No. Part No. Description Quantity 11499001 K-6209 V20S Series Work Section Service Kit - Standard Buna-N O-Rings V20S ‘Series’ Work Section Housing (Not Serviceable) 1 11483xxx 11245001 4-Way ‘Series’ Spool (Not Serviceable) 1 4-Way ‘Series’ Free Flow Spool (Not Serviceable) 1 12653001 12933001 K-6207 Spring-Return Spool Positioner Kit (See Figure 6) 1 3 12953001 K-6203 ‘Series’ Load Check Plug Assembly (See Figures 24 thru 25 for Options) 2 4 1 5 12786001 K-6033 Seal Retainer Kit (See Figures 26 thru 29 for Handle End Options) K-6035 Spool Seal Assembly (Serviced in Spool Seal Kits - See Figure 2) 2 6 07385001 Work Section Service Kits include all the seals and back-up rings required to service one V20S ‘Series’ work section. Contact the Gresen factory in Minneapolis for porting options. The work section housing and spool are matched and are not sold separately. Warning: If you are using the free flow (F4) spool configuration in a cylinder lift application, it must be used in conjunction with a load holding device. A load holding device will prevent the load from free falling when the spool is in the neutral position. A free falling load could cause serious bodily injury or property damage if the holding device is not installed. Manual Positioners and Actuators will NOT work on Solenoid Work Section housings. 1 2 Model V20 Service and Parts Manual (Catalog No. SC-1102) 34 Rev: 08-26-2002 4-Way, 4-Position Float ‘Series’ Work Sections 4-Position Float B 1 A T 4 4 3 P OC 2 6 5 Figure 32. 4-Way, 3-Position ‘Series’ Float Work Section Ref No. Part No. Description Quantity 11500001 K-6210 V20S Series Work Section Service Kit - Standard Buna-N O-Rings 11483xxx V20S ‘Series’ Work Section Housing (Not Serviceable) 1 4-Way ‘Series’ Float Spool (Not Serviceable) 2 11377001 12701001 K-6208 ‘Series’ Float Spool Positioner Kit (See Figure 6) 3 K-6203 ‘Series’ Load Check Plug Assembly (See Figures 24 thru 25 for Options) 4 12953001 5 12786001 K-6033 Seal Retainer Kit (See Figures 26 thru 29 for Handle End Options) 6 07385001 K-6035 Spool Seal Assembly (Serviced in Spool Seal Kits - See Figure 2) Work Section Service Kits include all the seals and back-up rings required to service one V20S ‘Series’ work section. Contact the Gresen factory in Minneapolis for porting options. The work section housing and spool are matched and are not sold separately. 3-Position Spool Positioners and Actuators will NOT work on Float Work Sections. Model V20 Service and Parts Manual (Catalog No. SC-1102) 35 1 1 1 2 1 1 Rev: 08-26-2002 V20LS ‘Load Sensing’ Work Sections T T P LS A B B P LS 3-Way B 4-Way 1 A T P LS 4-Way Free Flow 5 6 4 3 2 7 9 8 Note: The Spring Pin and Load Sense Ball Are Not Serviceable Items. Do NOT Remove Them From The Valve Housing Figure 33. V20LS ‘Load Sensing’ Work Sections Ref No. 1 2 3 4 5 6 7 8 Part No. Description 08364xxx 08388001 12741001 12742001 12786001 07385001 07397001 08392001 KV20 Work Section Service Kit - Standard Buna-N O-Rings V20LS Work Section Housing (Not Serviceable) 4-Way Load Sensing Spool (Not Serviceable) K-6125 Spool Positioner Kit (See Figures 6 thru 13 for Positioner Options) K-6030 Load Check Plug Assembly (See Figure ) K-6033 Seal Retainer Kit (See Figures 26 thru 29 for Handle End Options) K-6035 Spool Seal Assembly (Serviced in Spool Seal Kits - See Figure 2) Load Sense Check Ball (Not Serviceable) Spring Pin (Not Serviceable) Quantity 1 1 1 2 1 2 1 1 Buna-N seals are standard for all Gresen valve assemblies. Work Section Service Kits include all the seals and back-up rings required to service one V20 work section. SAE porting standard. Contact the Gresen factory in Minneapolis for optional porting. The work section housing and spool are matched and are not sold separately. Warning: If you are using the free flow (F4) spool configuration in a cylinder lift application, it must be used in conjunction with a load holding device. A load holding device will prevent the load from free falling when the spool is in the neutral position. A free falling load could cause serious bodily injury or property damage if the holding device is not installed. Manual Positioners and Actuators will NOT work on Solenoid Work Section housings. Model V20 Service and Parts Manual (Catalog No. SC-1102) 36 Rev: 08-26-2002 V20LS ‘Load Sensing’ Work Section With Flow Control B A 6 T 7 8 Do Not Remove - Stop Is Installed With Loctite and Threads Staked. P LS 1 5 9 4 3 2 10 11 12 Note: The Spring Pin And Load Sense Ball Are Not Serviceable Items. Do NOT Remove Them From The Valve Housing Figure 34. V20LS ‘Load Sensing’ Work Section With Flow Control Ref No. Part No. Description Quantity 1 2 3 4 5 6 7 8 9 10 11 12 08364xxx 08388001 12741001 12742001 10981001 10983001 10982001 10984001 07397001 08392001 07385001 12786001 KV20 Work Section Service Kit - Standard Buna-N O-Rings V20LS-W/FC Work Section Housing (Not Serviceable) 4-Way Load Sensing Spool (Not Serviceable) K-6125 Spool Positioner Kit (See Figures 6 thru 13 for Positioner Options) K-6030 Load Check Plug Assembly (See Figure ) Flow Control Cartridge (See Figure ) Flow Control Spring (See Figure ) 5-25 GPM Flow Control Piston (See Figure ) Flow Control Stop (Not Serviceable – Do NOT Remove) Load Sense Check Ball (Not Serviceable – Do NOT Remove) Spring Pin (Not Serviceable – Do NOT Remove) K-6035 Spool Seal Assembly (Serviced in Spool Seal Kits - See Figure 2) K-6033 Seal Retainer Kit (See Figures 26 thru 29 for Handle End Options) 1 1 1 1 1 1 1 1 1 1 2 1 Buna-N seals are standard for all Gresen valve assemblies. Work Section Service Kits include all the seals and back-up rings required to service one V20 work section. SAE porting standard. Contact the Gresen factory in Minneapolis for optional porting. The work section housing and spool are matched and are not sold separately. Warning: If you are using the free flow (F4) spool configuration in a cylinder lift application, it must be used in conjunction with a load holding device. A load holding device will prevent the load from free falling when the spool is in the neutral position. A free falling load could cause serious bodily injury or property damage if the holding device is not installed. Manual Positioners and Actuators will NOT work on Solenoid Work Section housings. Model V20 Service and Parts Manual (Catalog No. SC-1102) 37 Rev: 08-26-2002 V20PC ‘Pressure Compensated’ Manual Work Sections B A 4-Way Free Flow 5 T B A 4-Way 6 7 P T LS 4 8 P LS 4 3 2 10 9 1 11 Note: The Spring Pin And Load Sense Ball Are Not Serviceable Items. Do NOT Remove Them From The Valve Housing Figure 35. V20PC ‘Pressure Compensated’ Manual Work Sections Ref No. Part No. Description Quantity 16102001 K-6272 V20 Work Section Service Kit - Standard Buna-N O-Rings 1 08364XXX V20PC Work Section Housing (Not Serviceable) 1 2 21430001 3-Way ‘V20PC’ 15 GPM Spool (Not Serviceable) 1 21427001 4-Way ‘V20PC’ 15 GPM Spool (Not Serviceable) 1 21568001 4-Way Free Flow ‘V20PC’ 15 GPM Spool (Not Serviceable) 1 3 12741001 K-6125 Spool Positioner Kit (See Figures 6 thru 13 for Positioner Options) 1 4 16092001 K-6215 Compensator Plug Assembly (See Figures 24 thru 25 for Options) 2 5 20972003 Compensator Piston (Not Serviceable) 1 6 22092002 Compensator Spring 1 7 00458001 Shim (.040 inch [1,0 mm] thick) A/R 00459001 Shim (.020 inch [0,5 mm] thick) A/R 00462001 Shim (.010 inch [0,25 mm] thick) A/R 8 12786001 K-6033 Seal Retainer Kit (See Figures 26 thru 29 for Handle End Options) 1 9 07385001 K-6035 Spool Seal Assembly (Serviced in Spool Seal Kits - See Figure 2) 2 10 07397001 Load Sense Check Ball (Not Serviceable) 1 11 08392001 Spring Pin (Not Serviceable) 1 Buna-N seals are standard for all Gresen valve assemblies. Work Section Service Kits include all the seals and back-up rings required to service one V20 work section. SAE porting standard. Contact the Gresen factory in Minneapolis for optional porting. The work section housing and spool are matched and are not sold separately. Contact the Gresen factory in Minneapolis for spool flow sizes. Warning: If you are using the free flow (F4) spool configuration in a cylinder lift application, it must be used in conjunction with a load holding device. A load holding device will prevent the load from free falling when the spool is in the neutral position. A free falling load could cause serious bodily injury or property damage if the holding device is not installed. Manual Positioners and Actuators will NOT work on Solenoid Work Section housings. The amount of ‘preload’ on the compensator piston is preset at the factory. Do NOT change the shim quantity without first contacting the factory. Model V20 Service and Parts Manual (Catalog No. SC-1102) 38 Rev: 08-26-2002 V20PC ‘Pressure Compensated’ Solenoid Work Sections B A B A [SOL] Schematic T 4 LS [EPC] Schematic T P 5 P LS 6 3 3 9 9 DANA / GRESEN DANA / GRESEN MODEL HT20108-02 MODEL HT20108-02 VOLT 12 AMP 1.6 OHM 7.5 VOLT 12 AMP 1. 6 OHM 7.5 DATE 9624 DUTY 100% DATE 9624 DUTY 100% 7 8 1 2 The Spring Pin And Load Sense Ball Are Not Serviceable Items. Do NOT Remove Them From The Valve Housing. Figure 36. Model V20 [SOL] and [EPC] Solenoid Work Sections Ref No. Part No. Description Quantity 16102001 K-6272 V20 Work Section Service Kit - Standard Buna-N O-Rings 1 08364XXX V20PC Solenoid Work Section Housing (Not Serviceable) 1 2 21433001 3-Way ‘V20PC’ 15 GPM Spool (Not Serviceable) 1 21295001 4-Way ‘V20PC’ 15 GPM Spool (Not Serviceable) 1 21484001 4-Way Free Flow ‘V20PC’ 15 GPM Spool (Not Serviceable) 1 3 21477XXX On/Off [SOL] Solenoid Actuator Assembly - ‘A’ End (See Figure 14) 1 21475XXX Proportional [EPC] Solenoid Actuator Assembly - ‘A’ End (See Figure 15) 1 4 21478XXX On/Off [SOL] Solenoid Actuator Assembly - ‘B’ End (See Figure 14) 2 21476XXX Proportional [EPC] Solenoid Actuator Assembly - ‘B’ End (See Figure 15) 1 5 21345002 Compensator Plug Assembly (See Figures 24 thru 25 for Options) 1 6 20972003 Compensator Piston (Not Serviceable) A/R 7 22092002 Compensator Spring A/R 8 00458001 Shim (.040 inch [1,0 mm] thick) A/R 00459001 Shim (.020 inch [0,5 mm] thick) 1 00462001 Shim (.010 inch [0,25 mm] thick) 1 Buna-N seals are standard for all Gresen valve assemblies. Work Section Service Kits include all the seals and back-up rings required to service one V20 work section. Do NOT install spool seals into V20 Solenoid Work Sections. SAE porting standard. Contact the Gresen factory in Minneapolis for optional porting. The work section housing and spool are matched and are not sold separately. Contact the Gresen factory in Minneapolis for spool flow sizes. Warning: If you are using the free flow (F4) spool configuration in a cylinder lift application, it must be used in conjunction with a load holding device. A load holding device will prevent the load from free falling when the spool is in the neutral position. A free falling load could cause serious bodily injury or property damage if the holding device is not installed. Solenoid Actuators will NOT work on Manual Work Section housings. The amount of ‘preload’ on the compensator piston is preset at the factory. Do NOT change the shim quantity without first contacting the factory. Model V20 Service and Parts Manual (Catalog No. SC-1102) 39 Rev: 08-26-2002 Model V20 Split and Combined Flow Mid-Inlet Sections Split Flow Mid- Inlet Combined Flow Mid- Inlet Secondary Pump Flow - Top Inlet Port 1 Secondary Pump Flow - Top Inlet Port Primary Pump Flow Up Stream Open Center Primary Pump Flow Up Stream Open Center 2 NPTF Plug Installed From Downstream Side - Split Flow Mid-Inlets Only 3 4 (Optional) Pilot Thru Holes - Allows Solenoid Pilot And/Or Load Sense To Pass Thru Mid-Inlet Figure 37. Model V20 Split and Combined Flow Mid-Inlet Sections Ref No. Part No. Description Quantity 1 06825xxx Mid-Inlet Section Housing 1 2 06532xxx WH Relief Cartridge (See Figure 6) 1 08853xxx WHA Relief Cartridge (See Figure 7) 1 11387xxx WH Dual Pressure Relief Cartridge (See Figure 7) 1 08950xxx RP51A Relief Cartridge (See Figure 8) 1 08950xxx RP51N Relief Cartridge (See Figure 8) 1 27005xxx RP51 Dual Pressure Relief Cartridge (See Figure 8) 1 12797001 CK-6132 No Relief Cavity Plug (See Figure 9) 1 3 00017001 1/4 - 18 NPTF Plug (Split Flow Versions Only) 1 4 09435105 SAE 5 Socket Head Plug (Split Flow Versions Only) 1 Contact the Gresen factory in Minneapolis for Combined Flow and Split Flow housing options. Model V20 Service and Parts Manual (Catalog No. SC-1102) 40 Rev: 08-26-2002 Open Center Utility Sections T Mechanical Utility Section Electric Utility Sections T 300 PSI Pilot 300 PSI P/C O/C Pilot Torque to: 3 - 4 Ft Lbs (4 - 6 Nm) Torque to: 16 - 18 Ft Lbs 4 (21 - 24 Nm) 1 2 P/C O/C Torque to: 29 - 33 Ft Lbs (38 - 44 Nm) 5 Torque to: 16 - 18 Ft Lbs (21 - 24 Nm) 6 3 8 7 Figure 38. Open Center Utility Section with Solenoid-Operated Build Up Valve Cartridge (V20T) tandem work sections must not be used in solenoid valve applications where a Utility Section is required because the blocked power core in the tandem work section interrupts oil flow to the solenoid actuators. Tandem sections may only be used with the Unloading Utility Section (Page 19) or where an external pilot source is available. Ref No. Part No. Description Quantity 1 2 07820XXX Utility Section Housing (Not Serviceable) 1 12968001 CK-6177 12 Volt Build-Up Cartridge (See Figure 20) 1 12969001 CK-6178 24 Volt Build-Up Cartridge (See Figure 20) 1 12970001 CK-6179 Mechanical (Continuous On) Build-Up Cartridge (See Figure 21) 1 12880001 CK-6097 SAE 12 Power Beyond Sleeve (See Figure 22) 1 12879001 CK-6098 ¾” NPT Power Beyond Sleeve (See Figure 22) 1 3 06879001 SAE 8 Plug 1 4 08103001 SAE 4 Plug 1 5 12956001 CK-28096 Pressure Reducing Valve Cartridge (See Figure 24) 2 6 21733001 O-Ring Seal (Exhaust) (Serviced in K-6156 Section Seal Kit) 2 7 21866001 O-Ring Seal (Pilot) (Serviced in K-6156 Section Seal Kit) 2 8 21857001 O-Ring Seal (Open Center and Power Core) (Serviced in K-6156 Section Seal Kit) Buna-N seals are standard for all Gresen valve assemblies. Contact the Gresen factory in Minneapolis for optional seals. Model V20 Service and Parts Manual (Catalog No. SC-1102) 41 Rev: 08-26-2002 Closed Center (Load Sensing) Utility Section Load Sensing Utility Section T LS 300 PSI P/C Pilot Torque to: 3 - 4 Ft Lbs (4 - 6 Nm) 1 5 Torque to: 16 - 18 Ft Lbs (21 - 24 Nm) Torque to: 29 - 33 Ft Lbs (38 - 44 Nm) 6 2 Torque to: 16 - 18 Ft Lbs (21 - 24 Nm) 3 7 4 8 Internal NPTF Plug 9 Figure 39. Closed Center (Load Sensing) Utility Section Ref No. Part No. Description Quantity 1 07820XXX Utility Section Housing (Not Serviceable) 1 2 11543001 CK-6103 Closed Center Plug (See Figure 23) 1 3 06879001 SAE 8 Plug 1 4 00017001 1/4 - 18 NPTF Plug 1 5 08103001 SAE 4 Plug 1 6 12956001 CK-28096 Pressure Reducing Valve Cartridge (See Figure 24) 1 7 21733001 O-Ring Seal (Exhaust) (Serviced in K-6156 Section Seal Kit) 2 8 21866001 O-Ring Seal (Solenoid Pilot and Load Sense) (Serviced in K-6156 Section Seal Kit) 3 9 21857001 O-Ring Seal (Open Center and Power Core) (Serviced in K-6156 Section Seal Kit) 2 Buna-N seals are standard for all Gresen valve assemblies. Contact the Gresen factory in Minneapolis for optional seals. Model V20 Service and Parts Manual (Catalog No. SC-1102) 42 Rev: 08-26-2002 Unloading Utility Section Torque To: 30 - 35 Ft Lbs (40 - 47 Nm) Power Beyond Or Outlet Port 3 Torque To: 15 - 20 Ft Lbs (20 - 27 Nm) External Pilot Port Torque To: 20 - 25 Ft Lbs (27 - 33 Nm) Internal Power Beyond Conversion Plug (See Note 1) 4 2 Torque To: 30 - 35 Ft Lbs (40 - 47 Nm) 1 7 5 6 Torque To: 25 - 30 Ft Lbs (33 - 40 Nm) Torque To: 15 - 20 Ft Lbs (20 - 27 Nm) Solenoid Pilot Passage (See Note 2) 8 Expansion Plugs (See Notes 2 and 3) Solenoid Pilot Passage (See Note 2) Load Sense Signal Passage (See Note 3) Figure 40. Unloading Utility Section IMPORTANT O-Ring Seals and Plugs furnished with these sections makes it easily adapted to many valve applications. Refer to Page 20 for circuit applications using the V20 Unloading Section. Refer to Pages 21 and 22 for procedures on how to select power beyond or outlet options. Ref No. Part No. 1 2 3 4 5 6 7 22952XXX 09435106 06089001 00017001 16134001 16133001 12956001 22273001 22962002 8 Description Quantity Unloading Section Housing (Not Serviceable) SAE 6 Plug SAE 12 Plug 1/4 - 18 NPTF Plug K-6237 Unloading Valve Cartridge (See Figure 51) K-6236 Bleed-Down Plug (See Figure 50) CK-28096 Pressure Reducing Valve Cartridge - For Solenoid Valves (See Figure 24) No Pressure Reducing Valve Plug - For Manual Valves (See Figure 25) 6mm Expansion Plug (Not Serviceable) Model V20 Service and Parts Manual (Catalog No. SC-1102) 43 1 1 1 1 1 1 1 1 3 Rev: 08-26-2002 Unloading Section Applications Unloading Section V20PC or LS Work Sections Inlet Cover Outlet Cover All V20LS or V20PC Load Sensing Work Sections Optional Outlet Unloading Section V20PC or LS Work Sections V20T Work Section V20P Work Sections Outlet Cover Inlet Cover (Priority Type Circuit) V20LS or V20PC Load Sensing Work Sections Upstream and Open Center Sections Downstream Priority is given to the work sections upstream of the unloading section. Optional Outlet Unloading Section Inlet Cover V20PC or LS Work Sections Outlet Cover Valve No. 1 Open Center Valve Power Beyond (Priority Type Circuit) V20LS or V20PC Load Sensing Valve feeding an Open Center Valve thru External Power Beyond Port. Priority is given to valve No. 1. Only excess flow will be available to valve No. 2. Valve No. 2 Figure 41. Unloading Section Applications Note: When mixing Closed Center and Open Center work sections in the same stack, the open center sections must be downstream from the unloading section. A tandem (V20T) section must be installed between the unloading section and parallel (V20P) work sections. Refer to Pages 21 and 22 for information on when and where to install the conversion plugs supplied with the unloading section. Model V20 Service and Parts Manual (Catalog No. SC-1102) 44 Rev: 08-26-2002 Standard Unloading Utility Section - No Power Beyond Option Aux. Pilot Int. P/B T LS 300 PSI P/B or Return External return oil port. Install SAE Plug to return oil thru right end cover. Torque Plug To: 30 - 35 Ft Lbs (40 - 47 Nm) Solenoid Pilot Passage (See Note 2) Expansion Plugs (See Notes 2 and 3) P/C Pilot Internal conversion plug must be removed to select standard return option. Solenoid Pilot Passage (See Note 2) Load Sense Signal Passage (See Note 3) Figure 42. Unloading Utility Section (Selecting the Standard Return Option) Procedures for Selecting the Standard Return Option The internal (1/4” NPTF) conversion plug must be removed to select the standard return option. Return oil will exit thru the top SAE 12 port or may be directed thru the outlet port located in the inlet or outlet cover. Install expansion plugs in the outer solenoid pilot passages on the downstream side of the unloading section when downstream work section(s) do not have pilot holes (i.e. manual work sections). Refer to Note 3 for information on when to install the expansion plug in the center load sense signal passage. Install expansion plug in the center load sensing passage on the downstream side of the unloading section when the downstream section(s) are not load sensing work sections. Refer to Note 2 for information on when to install the expansion plugs in the outer solenoid pilot passages. Model V20 Service and Parts Manual (Catalog No. SC-1102) 45 Rev: 08-26-2002 Unloading Utility Section with Power Beyond Option Aux. Pilot Int. P/B T LS 300 PSI Ext. P/B External power beyond port. Install SAE Plug to select the internal power beyond option. Torque Plug To: 30 - 35 Ft Lbs (40 - 47 Nm) Solenoid Pilot Passage (See Note 2) Expansion Plugs (See Notes 2 and 3) Pilot P/C Internal conversion plug must be installed to select both the internal and external power beyond options. Solenoid Pilot Passage (See Note 2) Load Sense Signal Passage (See Note 3) Figure 43. Unloading Utility Section (Selecting the Power Beyond Option) Procedures for Selecting the Internal or External Power Beyond Option The internal (1/4” NPTF) power beyond conversion plug must be installed to select the power beyond option. Power beyond oil will exit thru the top SAE 12 port or may be directed internally to downstream work sections. IMPORTANT: If selecting the internal power beyond option, a V20 Tandem work section must be installed immediately downstream from the unloading section. Install expansion plugs in the outer solenoid pilot passages on the downstream side of the unloading section when downstream work section(s) do not have pilot holes (i.e. manual work sections). Refer to Note 3 for information on when to install the expansion plug in the center load sense signal passage. Install expansion plug in the center load sensing passage on the downstream side of the unloading section when the downstream section(s) are not load sensing work sections. Refer to Note 2 for information on when to install the expansion plugs in the outer solenoid pilot passages. Model V20 Service and Parts Manual (Catalog No. SC-1102) 46 Rev: 08-26-2002 Solenoid-Operated Pressure Build-Up Valve Cartridges Torque Build-Up Cartridge To: 29 - 33 Ft Lbs (38 - 44 Nm) T 300 PSI Pilot P/C O/C Electric Pressure Build-Up Valve Torque To: 3 - 4 Ft Lbs (4 - 5,5 Nm) 3 2 1 Figure 44. Solenoid-Operated Pressure Build-Up Valve Cartridges Ref No. Part No. Description Quantity 12968001 CK-6177 12 VDC Build-Up Cartridge, Complete 12969001 CK-6178 24 VDC Build-Up Cartridge, Complete 12052001 K-6184 Cartridge Seal Kit 08512001 12 VDC Replacement Coil 1 08511001 24 VDC Replacement Coil 1 2 09002018 O-Ring Seal (Serviced in K-6184 Cartridge Seal Kit) 1 3 06277001 O-Ring Seal (Serviced in K-6184 Cartridge Seal Kit) 1 1 Buna-N seals are standard for all Gresen valve assemblies. Contact the Gresen factory in Minneapolis for optional seals. Model V20 Service and Parts Manual (Catalog No. SC-1102) 47 Rev: 08-26-2002 Mechanical Pressure Build-Up Valve Cartridge Torque Build-Up Cartridge To: 29 - 33 Ft Lbs (38 - 44 Nm) T 300 PSI Pilot P/C O/C Mechanical Build-Up Cartridge Tamper Resistant Cap (Used on Non-Adjustable Model Only) Torque Jam Nut To: 3 - 4 Ft Lbs (4 - 5,5 Nm) 2 1 Pressure Adjustment Screw (Turn 'In' to Increase Standby Pressure) Figure 45. Mechanical Pressure Build-Up Valve Cartridge Ref No. Part No. Description Quantity 12970001 CK-6179 Mechanical (Continuous On) Build-Up Cartridge, Complete 12690001 K-6188 Cartridge Seal Kit 1 06277001 O-Ring Seal (Serviced in K-6184 Cartridge Seal Kit) 1 2 09002018 O-Ring Seal (Serviced in K-6184 Cartridge Seal Kit) 1 Buna-N seals are standard for all Gresen valve assemblies. Contact the Gresen factory in Minneapolis for optional seals. Model V20 Service and Parts Manual (Catalog No. SC-1102) 48 Rev: 08-26-2002 Power Beyond Sleeves for use in Utility Sections Torque Power Beyond Sleeve To: 29 - 33 Ft Lbs (38 - 44 Nm) T PB 300 PSI Pilot O/C P/C Power Beyond Sleeve 3 1 2 Figure 46. Power Beyond Sleeve for use in Utility Sections In V20 Solenoid Valves, the power beyond conversion is made in the utility section. Since the power beyond sleeve is installed where the pressure build-up valve is normally located, there will be no pressure build-up valve in the valve assembly. The pressure build-up valve must be located in the downstream valve circuit. Ref No. Part No. Description Quantity 12880001 CK-6097 SAE 12 Power Beyond Sleeve Kit, Complete 12879001 CK-6098 3/4” NPT Power Beyond Sleeve Kit, Complete 16097001 K-6234 Plug Seal Kit 1 08193001 3/4” NPT Power Beyond Sleeve (Serviced in CK-6098 Power Beyond Sleeve Kit) 1 2 08194001 SAE 12 Sleeve (Serviced in CK-6097 Power Beyond Sleeve Kit) 1 3 02709001 O-Ring Seal (Serviced in K-6234 Cartridge Seal Kit) 1 01910001 O-Ring Seal (Serviced in K-6234 Cartridge Seal Kit) 1 Buna-N seals are standard for all Gresen valve assemblies. Contact the Gresen factory in Minneapolis for optional seals. Model V20 Service and Parts Manual (Catalog No. SC-1102) 49 Rev: 08-26-2002 Closed Center Plug for use in Utility Sections Torque Closed Center Plug To: 29 - 33 Ft Lbs (38 - 44 Nm) T CC 300 PSI O/C Pilot P/C Closed Center Plug 3 1 2 Figure 47. Closed Center Plug for use in Utility Sections Ref No. Part No. Description Quantity 11543001 CK-6103 Closed Center Plug Kit, Complete 16097001 K-6234 Plug Seal Kit 1 08195001 Plug (Serviced in CK-6103 Closed Center Plug Kit) 1 2 02709001 O-Ring Seal (Serviced in K-6234 Plug Seal Kit) 1 3 01910001 O-Ring Seal (Serviced in K-6234 Plug Seal Kit) 1 Buna-N seals are standard for all Gresen valve assemblies. Contact the Gresen factory in Minneapolis for optional seals. Model V20 Service and Parts Manual (Catalog No. SC-1102) 50 Rev: 08-26-2002 Pressure Reducing Valve Cartridge Torque PRV Cartridge To: 25 - 30 Ft Lbs ([33 - 40 Nm) T CC 300 PSI Pilot P/C O/C Pressure Reducing Valve 1 2 3 4 5 Figure 48. Pressure Reducing Valve Cartridge Ref No. Part No. Description Quantity 12956001 CK-28096 Pressure Reducing Valve Cartridge Kit (300 PSI Cartridge), Complete 08569001 K-28078 PRV Cartridge Seal Kit (Includes Items Listed Below, Plus Plug Seals) 1 02707001 O-Ring Seal (Serviced in K-28078 Cartridge Seal Kit) 1 2 03092001 Back-Up Ring (Serviced in K-28078 Cartridge Seal Kit) 1 3 07829001 O-Ring Seal (Serviced in K-28078 Cartridge Seal Kit) 1 4 00682001 Back-Up Ring (Serviced in K-28078 Cartridge Seal Kit) 1 5 01091001 O-Ring Seal (Serviced in K-28078 Cartridge Seal Kit) 1 Buna-N seals are standard for all Gresen valve assemblies. Contact the Gresen factory in Minneapolis for optional seals. Continuous Back-Up Rings are installed at the factory using special sizing tools. It is Not necessary to replace the original Back-Up Rings unless they have been damaged. See Page 9 for Back-Up Ring Preparation and Installation procedures. Model V20 Service and Parts Manual (Catalog No. SC-1102) 51 Rev: 08-26-2002 No Pressure Reducing Valve Plug Torque No PRV Plug To: 25 - 30 Ft Lbs (33 - 40 Nm) Int. P/B T LS P/B or Return P/C Pilot No Pressure Reducing Valve Plug 1 2 4 6 5 3 Figure 49. No Pressure Reducing Valve Plug Ref No. Part No. Description Quantity 16123001 K-6297 No Pressure Reducing Valve Plug, Complete 08569001 K-28078 PRV Cartridge Seal Kit (Includes Items Listed Below, Plus Plug Seals) 1 21204001 Plug (Serviced in K-6297 No Pressure Reducing Valve Plug Kit) 1 2 02707001 O-Ring Seal (Serviced in K-28078 Cartridge Seal Kit) 1 3 03092001 Back-Up Ring (Serviced in K-28078 Cartridge Seal Kit) 1 4 07829001 O-Ring Seal (Serviced in K-28078 Cartridge Seal Kit) 1 5 00682001 Back-Up Ring (Serviced in K-28078 Cartridge Seal Kit) 1 6 01091001 O-Ring Seal (Serviced in K-28078 Cartridge Seal Kit) 1 Buna-N seals are standard for all Gresen valve assemblies. Contact the Gresen factory in Minneapolis for optional seals. Continuous Back-Up Rings are installed at the factory using special sizing tools. It is Not necessary to replace the original Back-Up Rings unless they have been damaged. See Page 9 for Back-Up Ring Preparation and Installation procedures. Model V20 Service and Parts Manual (Catalog No. SC-1102) 52 Rev: 08-26-2002 Bleed-Down Plug for use in Unloading Utility Sections Torque Bleed-Down Plug To: 15 - 20 Ft Lbs (20 - 27 Nm) Aux. Pilot Int. P/B T LS 300 PSI P/B or Return P/C Pilot Bleed-Down Plug 4 3 2 1 5 6 Figure 50. Bleed-Down Plug for use in Unloading Utility Sections Ref No. Part No. Description Quantity 16133001 K-6236 Bleed-Down Plug, Complete 16082001 K-6268 Bleed-Down Plug Seal Kit 1 23336001 Bleed Plug (Serviced in K-6236 Bleed-Down Plug Kit) 1 2 02705001 O-Ring Seal (Serviced in K-6268 Plug Seal Kit) 1 3 23445001 O-Ring Seal, Urethane (Serviced in K-6268 Plug Seal Kit) 1 4 23444001 O-Ring Seal, Urethane (Serviced in K-6268 Plug Seal Kit) 1 5 11840001 Retaining Ring (Serviced in K-6236 Bleed-Down Plug Kit) 1 6 11839001 Filter Screen (Serviced in K-6236 Bleed-Down Plug Kit) 1 Buna-N seals are standard for all Gresen valve assemblies. Contact the Gresen factory in Minneapolis for optional seals. Model V20 Service and Parts Manual (Catalog No. SC-1102) 53 Rev: 08-26-2002 Unloading Valve Cartridge for use in Unloading Utility Sections Torque Unloading Valve Cartridge To: 30 - 35 Ft Lbs [40 - 47 Nm] Aux. Pilot Int. P/B T LS 300 PSI P/B or Return Pilot P/C Unloading Valve Cartridge 1 3 5 2 4 Figure 51. Unloading Valve Cartridge for use in Unloading Utility Sections Ref No. Part No. Description Quantity 16134001 K-6237 Unloading Valve Cartridge, Complete 16094001 K-6267 Unloading Cartridge Seal Kit 1 02708001 O-Ring Seal (Serviced in K-6267 Plug Seal Kit) 2 2 01910001 O-Ring Seal (Serviced in K-6267 Plug Seal Kit) 1 3 09021018 Back-Up Ring (Serviced in K-6267 Plug Seal Kit) 2 4 09000017 O-Ring Seal (Serviced in K-6267 Plug Seal Kit) 1 5 09021017 Back-Up Ring (Serviced in K-6267 Plug Seal Kit) 1 Buna-N seals are standard for all Gresen valve assemblies. Contact the Gresen factory in Minneapolis for optional seals. Continuous Back-Up Rings are installed at the factory using special sizing tools. It is Not necessary to replace the original Back-Up Rings unless they have been damaged. See Page 9 for Back-Up Ring Preparation and Installation procedures. Model V20 Service and Parts Manual (Catalog No. SC-1102) 54 Rev: 08-26-2002 Spring-Return and Manual Spool Positioner Kits Spring Return Positioner Manual Spool Positioner Clean Threads and Apply 08006001 Blue Thread Locking Compound to Ref No. 3 prior to installation 1 4 5 Torque to: 4 - 6 Ft Lbs (6 - 8 Nm) 3 2 1 Torque to: 10 - 12 Ft Lbs (13 - 16 Nm) Figure 52. Spring-Return and Manual Spool Positioners Ref No. Part No. Description Quantity 12741001 K-6125 Spring-Return Positioner Kit (For use in V20P, V20C, V20LS & V20PC) 12933001 K-6207 Spring-Return Positioner Kit (For use in V20S, V20RP and V20RT Sections) 12740001 K-6020 Heavy Duty Spring-Return Kit (May be used in all V20 Sections) 1 01809001 Spring Collar 2 2 07433001 Standard (Red) Centering Spring (Serviced in K-6125 Kit) 1 10956001 Standard (Silver) Centering Spring (Serviced in K-6207 Kit) 1 22633001 Heavy Duty (Blue) Centering Spring (Serviced in K-6020 Kit ) 1 3 10892001 Spool Screw 1 4 01811003 Bonnet 1 5 09161407 Bonnet Screw (1/4 - 20 X .875) 2 08006001 Blue Thread Adhesive (Ref. Loctite No. 242) 1 07433001 Centering Spring is standard. An Optional Heavy Duty Centering Spring (22633001) is available. Refer to the Table below for spool force comparisons. Note: These measurements are taken at the spool clevis. Remove the Centering Spring from the above Spring-Return Assembly to make a Manual Spool Positioner. Manual spool positioners are typically used with external linkage devices having their own spring-centering mechanisms. Part No. 07433001 10956001 22633001 Spring Color Red Silver Blue Force Required to Begin Spool Movement 30 Lbs. (13,6 Kg) 45 Lbs. (20,4 Kg) 55 Lbs. (24,9 Kg) Model V20 Service and Parts Manual (Catalog No. SC-1102) 55 Force Required for Full Spool Shift 70 Lbs. (31,7 Kg) 130 Lbs. ( 58,9 Kg) Rev: 08-26-2002 ‘D’ Detented Spool Positioner Kits 2-Position 'D' Detent Neutral and Spool In 2-Position 'D' Detent Neutral and Spool Out 3-Position 'D' Detent Clean Threads and Apply 08006001 Blue Thread Locking Compound to Ref No. 3 prior to installation 4 5 6 8 1 Torque to: 4 - 6 Ft Lbs (6 - 8 Nm) 2 3 Torque to: 10 - 12 Ft Lbs (13 - 16 Nm) Locate Detent Stop (Item No. 8) Here For 2-Position Detent Neutral and Spool Out 8 7 Locate Detent Stop (Item No. 8) Here For 2-Position Detent Neutral and Spool In. Figure 53. ‘D’ Detented Spool Positioner Kits Ref No. Part No. Description 1 2 3 4 5 6 7 8 12739001 09161407 01811003 01840001 00023001 01838001 01837001 06812001 01889001 CK-6012 ‘D’ Detent Spool Positioner Kit (Kit Includes all Items Listed Below) Bonnet Screw (1/4 - 20 X .875) Bonnet Detent Ball Holder .250 Diameter Detent Ball Detent Spring Lock Washer 3-Position Detent Sleeve 2-Position Detent Stop (Optional - Not Included in Kit – Refer to the above drawing to insert the Detent Stop in the correct location to block out the desired spool position. Blue Thread Adhesive (Ref. Loctite No. 242) 08006001 Model V20 Service and Parts Manual (Catalog No. SC-1102) Quantity 56 2 1 1 2 1 1 1 1 1 Rev: 08-26-2002 ‘R’ Detent - Spring Return Spool Positioner Kits 9 10 8 7 6 'RO' Torque to: 10 - 12 Ft Lbs (13 - 16 Nm) 'RI' 'RIO' 'RO' 3 'RI' 'RIO' 1 5 4 2 1 Torque to: 4 - 6 Ft Lbs (6 - 8 Nm) Refer to Page 58 for Installation Instructions Clean threads and Apply 08006001 Thread Locking Compound (Ref. 'Blue' Loctite No. 242) to Ref No. 3 prior to installation. Apply 08006001 Thread Locking Compound (Ref. 'Blue' Loctite No. 242) to Ref No. 10 after completing the Installation and Adjustment Procedures on Page 58. Figure 54. ‘R’ Detent - Spring Return Spool Positioners Ref No. 1 2 3 4 5 6 7 8 9 10 Part No. Description 12904001 12903001 12905001 01809001 03250001 08573001 08572001 08574001 03731099 08325004 20722001 01700001 21990002 03252001 20723001 08006001 CK-6152 ‘RI’ Detent ‘In’ Kit (Kit Includes all Items Listed Below) K-6151 ‘RO’ Detent ‘Out’ Kit (Kit Includes all Items Listed Below) K-6153 ‘RIO’ Detent ‘In’ and ‘Out’ Kit (Kit Includes all Items Listed Below) Spring Collar Centering Spring ‘RI’ Detent Spud (Detent in Spool ‘IN’ Position Only – Included in CK-6152) ‘RO’ Detent Spud (Detent in Spool ‘OUT’ Position Only – Included in K-6151) ‘RIO’ Detent Spud (Detents in both Spool ‘IN’ and ‘OUT’ Positions – Included in K-6153) Bonnet Screw (1/4 - 20 X .625) Bonnet Thrust Plate .219 Diameter Detent Ball Ball Race Detent Spring Adjusting Cap Blue Thread Adhesive (Ref. Loctite No. 242) Quantity 2 1 1 1 1 2 1 1 12 1 1 1 1 The amount of force required to release the spool from the detented position(s) is adjustable by the tension applied by the detent spring (No. 9). Turning the Adjusting Cap (No. 10) Clockwise will increase the spring tension, while turning it CounterClockwise will reduce the tension. Once the desired detent force is obtained, apply 08006001 Locking Compound (Ref. ‘Blue’ Loctite No. 242) to the threads of the Adjusting Cap. Model V20 Service and Parts Manual (Catalog No. SC-1102) 57 Rev: 08-26-2002 Installation and Adjustment Procedures for ‘R’ Detent Positioners The Reference Numbers referred to in the following procedures may be found in the ‘R’ Detent - Spring Return Spool Positioner Drawing on Page 57 . ‘R’ Detent Installation and Adjustment Procedures 1. Remove the existing positioner from the control valve. Do not remove the spool seal, back-up washer or seal retainer plate. Remove any oil film from the internal threads of the valve spool. 2. Insert the detent spud (No. 3) thru the outer spring collar (No. 1), centering spring (No. 2), and inner spring collar (No. 1). 3. Remove any oil film from the threads of the detent spud (No. 3) and apply 08006001 thread locking adhesive (Loctite 242, supplied in the kit). Install in the detent spud into the valve spool and tighten to 10 - 12 Ft Lbs (13 - 16 Nm) torque. 4. Mount the bonnet (No. 5) using the provided screws (No. 4). Tighten to 4 - 6 Ft Lbs (6 - 8 Nm) torque. 5. Insert the thrust plate (No. 6) into the bonnet and into place over the detent spud. 6. Insert the 12 detent balls (No. 7) around the detent spud next to the thrust plate. Applying a small amount of grease to the thrust plate surface may help hold the detent balls in place. 7. Position the ball race (No. 8) over the detent balls with the beveled side facing in. 8. Slide the detent spring (No. 9) inside the bonnet. 9. Thread the adjusting cap (No. 10) into the bonnet. The amount of force required to release the spool from the detented position(s) is set by the tension applied to the detent spring (No. 9). Turning the adjusting cap clockwise will increase the spring tension, while turning it counter-clockwise will reduce the tension. 10. Test the detent force by shifting the valve spool into and out of the detented position(s). 11. Once the desired detent force is obtained, apply 08006001 Thread Locking Compound (Ref. ‘Blue’ Loctite No. 242) to the thread surface of the adjusting cap. Model V20 Service and Parts Manual (Catalog No. SC-1102) 58 Rev: 08-26-2002 Spring Extended (Spool Out) Positioner Kits B A Schematic Shown With 4-Way Spool T OC P Clean Threads and Apply 08006001 Blue Thread Locking Compound to Ref No. 3 prior to installation 6 7 Torque to: 4 - 6 Ft Lbs (6 - 8 Nm) 4 5 3 2 1 Torque to: 6 - 8 Ft Lbs (8 - 10 Nm) Figure 55. Spring Exended (Spool Out) Positioner Kits Ref No. Part No. Description 1 2 3 4 5 6 7 08667001 06756001 01860001 01813001 01812001 08666001 01824001 09161407 K-6150 Spring Extended Spool Positioner Kit (Kit Includes all Items Listed Below) Bonnet Sleeve Stop Collar Lock Washer Cap Screw Spring Bonnet Screw Model V20 Service and Parts Manual (Catalog No. SC-1102) Quantity 59 1 1 1 1 1 1 2 Rev: 08-26-2002 Electro-Magnetic Detent Positioner Kits A B C 9 10 Torque to: 22 - 30 In Lbs (2,5 - 3,4 Nm) 12 16 11 4 12 14 A C B 2 3 1 2 15 17 13 Torque to: 10 - 12 Ft Lbs (13 - 16 Nm) 8 Torque to: 10 - 12 Ft Lbs (13 - 16 Nm) 7 Torque to: 10 - 12 Ft Lbs (13 - 16 Nm) 6 5 Figure 56. Electro-Magnetic Detent Positioner Kits Installation Procedures for Electro-Magnetic Detent Positioners Are Found On Next Page Ref No. Part No. Description 1 2 3 4 5 6 7 8 9 10 11 12 13 14 15 16 17 12877001 07989001 07572001 07573001 03250001 07589001 00563001 03731103 07954001 07583004 07955001 07593001 07956001 22993001 07958001 08555001 07755001 07756001 07957001 CK-6140 Electro-Magnetic Detent Positioner Kit (Kit Includes all Items Listed Below) K-6064 Electro-Mag Positioner Rebuild Kit (Kit Includes 7, 12, 14, 15 & 16) Spool Seal Retainer Spring Collar Centering Spring Seal Cap Lock Washer Housing Screw Positioner Spud Electric Detent Bonnet Electrical Connector Thread Cutting Screw Thread Cutting Screw Electro-Magnet Spacer Armature Alignment Washer Shoulder Screw Bonnet Plug Model V20 Service and Parts Manual (Catalog No. SC-1102) Quantity 60 1 2 1 1 2 2 1 1 1 4 1 2 1 1 1 1 1 Rev: 08-26-2002 Installation Procedures for Electro-Magnetic Detent Positioners Required Tools and Supplies for EMD Positioner Installation 4 1. 2. 3. 4. 2 3 5 6 2 1 7 1. Slide Spool Seal Retainer (1) over spool end and into place in into counterbore in valve housing. 8 2. Clean threads of Positioner Spud (4) and apply Blue Thread Locking Compound (Ref Loctite No. 242) to the threads. Carefully insert Positioner Spud thru the two Spring Collars (2) and Spring (3). While compressing Spring, screw the Positioner Spud into the valve spool. Tighten and torque to specification. 3. Locate the two Mounting Screws (5) and Lock Washers (6). Slide the EMD Bonnet (7) into position and fasten to housing with screws. Tighten and torque to specifications. 10 9 11 4. Carefully slide one of the Detent Magnets (8) into the EMD Bonnet with the wires to the top. Run the wires up thru the hole in the top of the Bonnet. 5. Slide the Spacer (9) into the Bonnet and next to the Detent Magnet. Clean threads of Shoulder Screw (11) and apply Blue Thread Locking Compound (Ref Loctite No. 242) to the threads. Carefully insert Shoulder Screw thru the Armature (10) and install onto rod end of the Positioner Spud. 8 6. Take the remaining Detent Magnet (8) and slide into place next to spacer and run the wires out the hole in the top of the Bonnet. 7. Install the long Thread Cutting Screw into the hole in the top of the Bonnet. This screw should enter the bore of the Bonnet and hold the Detent Magnet in place while installing the Bonnet Plug (13). 12 13 8. Clean threads of Bonnet Plug (13) and apply Blue Thread Locking Compound (Ref Loctite No. 242) to the threads. Tighten and Torque to specification. 9. Solder one of the wire leads from the innet Detent Magnet to the 'B' terminal of the Electrical Connector (14). Take the remaining wire lead from this Detent Magnet and one of the wire leads from the outer Detent Magnet and Solder to the 'C' terminal of the Electical Connector. Solder the remaining wire lead from the outer Detent Magnet to the 'A' terminal of the Electrical Connector. 15 A C B 14 10 Push wire leads back down into Bonnet and position Electrical Connector into place in Bonnet. Install the four short Thread Cutting Screws (15) into the Connector. Figure 57. Installation Procedures for Electro-Magnetic Detent Positioners Model V20 Service and Parts Manual (Catalog No. SC-1102) 61 Rev: 08-26-2002 Pressure Detent Release (KO) Positioner Kits 5 6 2 9 11 Parallel 16 14 15 17 20 21 T OC P 1 18 19 22 7 8 10 Torque to: 32 in. lbs. (3,6 Nm Work Section Housing 12 3 4 'KO' Spool 'KO' Pressure Sensing Hole 13 Torque to: 10 - 12 Ft Lbs (13 - 16 Nm) Apply Purple Thread Locking Compound (Ref. Loctite 222) Ref No.s 6 & 19 and Torque to 5 Ft Lbs (7 Nm) Figure 58. Pressure Detent Release (KO) Positioner Kits Ref No. Part No. Description Quantity 08542001 ‘KO’ Positioner , Complete, (1200 – 1600 PSI [83 – 110 bar]) 08542002 ‘KO’ Positioner , Complete, (1601 – 2400 PSI [111 – 165 bar]) 08542003 ‘KO’ Positioner , Complete, (2401 – 3000 PSI [166 – 207 bar]) 07934001 K-6061 Pressure Detent Release Positioner Seal Kit (Kit Includes 16, 17, 20 & 21) 1 07902001 Flush Head Button Plug 1 2 01824002 Bonnet 1 3 09161407 Screw 2 4 07904001 Bearing Plate 2 5 08536001 Spring Collar 2 6 08535001 Spool Collar 1 7 08014001 Screw 1 8 06229001 Locknut 1 9 07433001 Centering Spring 1 10 07899001 Spring Guide 1 11 07898001 Spring 1 12 07897001 Ball Follower 1 13 08007001 Detent Sleeve (Standard 2-Position Detent) 1 08341001 Detent Sleeve (Optional 1-Position Detent - Spool In Only – Must be ordered separately) 1 14 01700001 Steel Ball 4 15 08047001 Spring, 1200 – 1600 PSI [83-110 bar] - Used in 08542001 ‘KO’ Positioner 1 08010001 Spring, 1601 – 2400 PSI [111-165 bar] - Used in 08542002 ‘KO’ Positioner 1 08538001 Spring, 2401 – 3000 PSI [166-207 bar] - Used in 08542003 ‘KO’ Positioner 1 16 03265001 Back-Up Ring 2 17 07700001 O-Ring Seal 1 18 07896001 Knockout Plunger 1 19 07906001 Piston Guide 1 20 03328001 O-Ring Seal 1 21 07907001 Back-Up Ring 1 22 07908001 Needle Roller 1 Buna-N seals are standard for all Gresen valve assemblies. For Viton seals, contact the Gresen factory in Minneapolis. Continuous Back-Up Rings are installed at the factory using special sizing tools. It is Not necessary to replace the original Back-Up Rings unless they have been damaged. See Page 9 for Back-Up Ring Preparation and Installation procedures. Model V20 Service and Parts Manual (Catalog No. SC-1102) 62 Rev: 08-26-2002 Pressure Detent Release (KO) Adjustment Procedures The Reference Numbers referred to in the following procedures may be found in the ‘KO’ Spool Positioner Drawing on Page 62 . Pressure Detent Release (KO) Adjustment Procedures 1. Figure 59. Pressure Detent Release (KO) Adjustment Procedures Model V20 Service and Parts Manual (Catalog No. SC-1102) 63 Rev: 08-26-2002 Rotary ‘W’ Spool Positioner Kits 10 Clean Threads and Apply Type II, Grade N, Blue Thread Locking Compound (Ref. Loctite No. 242) to Ref No. 3 prior to installation 9 Torque to: 10 - 12 Ft Lbs (13 - 16 Nm) 8 5 3 7 6 Torque to: 4 - 6 Ft Lbs (6 - 8 Nm) 2 1 4 View Of Dowel Pin Holes In Rotary Cam Body View Of Dowel Pin Hole In Back Of Spool Figure 60. Rotary ‘W’ Spool Positioners Note: Apply heavy duty general purpose grease to the helical groove of Cam Body (Item 2) and Pin (Item 8). For Standard assembly, dowel pin hole in spool clevis must be horizontal with valve spool in neutral. Ref No. Part No. Description 1 2 3 4 5 6 7 8 9 10 12913001 00888001 08746001 03731150 06552001 01824006 09161407 08743001 02676001 08808001 08744004 K-6141 Rotary Spool Positioner Kit (Includes all items listed below) Dowel Pin Rotary Cam Body HSHC Screw 5/16-18 by 1 inch long Seal Retainer Plate Rotary Bonnet HSHC Screw 1/4-20 by 7/8 inch long Detent Cap Washer Detent Pin Detent Spring Rotary Detent Cap Model V20 Service and Parts Manual (Catalog No. SC-1102) Quantity 64 1 1 1 1 1 2 1 1 1 1 Rev: 08-26-2002 4-Position Float Spool Positioner Kits For Non-Series Sections Torque to 10 Ft Lbs. [13,6 Nm] 13 Float Spool 12 8 3 8 Valve Housing 5 9 10 11 7 4 2 6 1 Figure 61. 4-Position Float Spool Positioners For Non-Series Sections Ref No. Part No. Description Quantity 12888001 K-6127 Float Positioner Kit (Includes all items listed below) 1 08079001 Retainer Sleeve 1 2 01853001 O-Ring Seal (Spool Seal) 1 3 01700001 Detent Ball 4 4 08098001 Detent Spring 1 5 01828001 Detent Ball Follower 1 6 21047001 O-Ring Seal 1 7 08077001 Detent Sleeve 1 8 01826001 Stop Collar 2 9 08099001 Centering Spring 1 10 01852001 Retaining Ring 1 11 08082001 Float Bonnet 1 12 00563001 Lock Washer 1 13 03731101 HSHC Screw ¼-20 x 7/8 inch long 2 08099001 Centering Spring and 08098001 Detent Springs are standard. Optional Heavy Duty Centering Spring (03091001) and Detent Spring (01829001) are available. Refer to the Table below for spool force comparisons. Note: These measurements are taken at the spool clevis. Buna-N seals are standard for all Gresen valve assemblies. For Viton seals, contact the Gresen factory in Minneapolis. Part No. 08099001 03091001 Spring Color Force Required to Begin Spool Movement Force Required for Full Spool Shift Gray 64 Lbs. (29,0 Kg) 90 Lbs. (40,7 Kg) Model V20 Service and Parts Manual (Catalog No. SC-1102) 65 Rev: 08-26-2002 4-Position Float Spool Positioner Kits For V20S Series Sections Float Spool 14 13 12 12 6 11 9 10 17 16 4 7 5 Valve Housing 2 8 3 1 15 Torque to 10 Ft Lbs. [13,6 Nm] Figure 62. 4-Position Float Spool Positioners For V20S Series Sections Ref No. Part No. Description Quantity 12701001 K-6208 V20S Series Float Spool Positioner Kit (Includes all items listed below) 1 08079001 Retainer Sleeve 2 21047001 O-Ring Seal 3 01853001 4-Lobed Seal 4 11372001 Detent Sleeve 5 00449001 O-Ring Seal 6 01700001 Detent Ball 7 11373001 Spool Collar 8 01828001 Ball Follower 9 01829001 Detent Spring 10 11371001 Shim 11 09320016 Retaining Ring 12 01826001 Spring Collar 13 01807001 Centering Spring 14 01852001 Retaining Ring 15 07905001 Bonnet Spacer 16 09161412 HSHC Screw ¼ - 20 x 1-1/2 inch long 17 08282001 V20S Float Bonnet Buna-N seals are standard for all Gresen valve assemblies. For Viton seals, contact the Gresen factory in Minneapolis. Model V20 Service and Parts Manual (Catalog No. SC-1102) 66 1 1 1 1 1 4 1 1 1 1 1 2 1 1 1 2 1 Rev: 08-26-2002 ‘PA’ Pneumatic Spool Actuator Kit Clean threads and Apply 08006001 Blue Thread Locking Compound (Ref. Loctite No. 242) to Ref No's. 5 & 15 prior to installation. 6 7 Torque to: 38 - 46 In Lbs (4 - 5 Nm) 3 4 5 1 2 Refer to Page No. 14 for Installation Instructions Torque to: 38 - 46 In Lbs (4 - 5 Nm) 15 12 14 16 17 8 11 14 18 Torque to: 50 - 60 In Lbs (6 - 7 Nm) See Note 2 13 10 9 Figure 63. ‘PA’ Pneumatic Spool Actuator Ref No. Part No. Description Quantity 11732001 CK-6173 ‘PA’ Pneumatic Spool Actuator Kit (Kit Includes all items listed below) 11734001 K-6174 Actuator Seal Kit (Kit Includes Items 8, 10 and 13 Only) 1 24143001 Seal Retainer Plate 1 2 11724001 Spring Collar (Short) 1 3 10956001 Centering Spring 1 4 11725001 Spring Collar (Long) 1 5 24144001 Spool Collar 1 6 24145001 Spring Tube 1 7 24151001 Spacer 1 8 08316001 O-Ring Rod Seal (Serviced in K-6174 Actuator Seal Kit) 1 9 24159001 Inner End Cap 1 10 12196001 O-Ring End Cap Seal (Serviced in K-6174 Actuator Seal Kit) 2 11 24146001 Piston Rod 1 12 24147001 Actuator Piston 1 13 00006001 O-Ring Piston Seal (Serviced in K-6174 Actuator Seal Kit) 1 14 11652001 Washer 5 15 11651001 Lock Nut 1 16 24016001 Cylinder Shell 1 17 11719001 Outer End Cap 1 18 03731120 Bonnet Screw (1/4 - 20 X 6.00) 4 08006001 Blue Thread Adhesive (Ref. Loctite No. 242) 1 Buna-N seals are standard for all Gresen valve assemblies. For Viton seals, contact the Gresen factory in Minneapolis. Remove the standard spool seal retainer plate (06752001) prior to installing the ‘PA’ kits. Refer to Figure 2 for part identification. Model V20 Service and Parts Manual (Catalog No. SC-1102) 67 Rev: 08-26-2002 Installation Instructions for ‘PA’ Pneumatic Actuators The pneumatic actuator is installed on one end of the valve spool in place of the standard positioner. A manual lever can be used on the opposite end as an override to the actuator if required. The pneumatic actuator must be controlled by a four-way, three-position pneumatic directional control valve. The Reference Numbers referred to in the following procedures may be found in the ‘PA’ Pneumatic Spool Actuator Assembly Drawing on Page 13 . Actuator Installation 1. Remove the existing positioner and seal retainer plate from the control valve. Do not remove the spool seal or back-up washer. Remove any oil film from the internal threads of the valve spool. 2. Insert the seal retainer plate (No. 1) over the end of the spool ensuring that it locates in the counter bore correctly. 3. Insert the spool collar (No. 5) thru the outer spring collar (No. 4), centering spring (No. 3), and inner spring collar (No. 2). Note: The shorter of the two spring collars goes next to the spool. 4. Remove any oil film from the threads of the spool collar (No. 5) and apply 08006001 thread locking adhesive (Loctite 242, supplied in the kit). Install in the spool and tighten to 38 - 46 in lb (4 - 5 Nm) torque. Caution: Over tightening the spool collar may cause spool binding. 5. Slide the spring tube (No. 6) into place over the spring assembly. 6. Insert spacer (No. 7) into spring tube (No. 6). 7. Lubricate the piston rod (No. 11) with the supplied grease (high temperature silicon based bearing grease with a NLGI #2 consistency). Avoid getting lubricant on the threads. 8. Carefully insert the threaded end of the piston rod thru the inner end cap assembly (No. 9). 9. Install the piston assembly (No. 12) and washer (No. 14) on the piston rod (No. 11) as shown. 10. Remove any oil film from the threads of the piston rod and apply 08006001 thread locking adhesive (Loctite 242 supplied in the kit). Install lock nut (No. 15) and tighten to 38 - 46 in lb (4 - 5 Nm) torque. 11. Insert the end of the piston rod (No. 11) into the spool collar (No. 5). Also position the inner end cap assembly (No. 9) onto the spring tube (No. 6). 12. Using the above mention grease, lubricate the inner surface of the cylinder shell (No. 16) and install over the piston assembly (No. 12). 13. Mount the outer end cap assembly (No. 17) using the provided screws (No. 18) and washers (No. 14) and tighten to 50 60 in lb (6 - 7 Nm) torque. Lubrication The pneumatic actuator comes pre-lubed. In the event the lubrication is wiped off, liberally apply a high temperature siliconbased bearing grease with a NLGI #2 consistency to the piston seal (No. 13), rod seal (No. 8), and all seal travel surfaces. Testing the CK-6173 Pneumatic Actuator after Installation 1. Apply a soap solution to all of the actuator joints, ports, and connectors. Actuate the control device to move the spool in one direction. Allowable leakage would be defined as enough to cause a one inch bubble in 3 seconds. 2. Reapply soap solution and repeat test while spool is being moved in the other direction. 3. If leakage is excessive, ensure that the joints are tight and that the installation is correct. 4. Verify that the spool moves easily thru its entire travel range and that there is no evidence of sticking or binding. If binding is detected, the installation should be checked immediately. Failure to do so could result in improper actuation in the future and should be corrected. Model V20 Service and Parts Manual (Catalog No. SC-1102) 68 Rev: 08-26-2002 ‘HR’ Hydraulic Remote Spool Actuator Kit (Positioner End) Clean Threads and Apply Type II, Grade 0, Red Thread Locking Compound (Ref. Loctite No. 262) to Ref No. 6 prior to installation Torque to: 10 - 12 Ft Lbs (13 - 16 Nm) 5 6 3 4 2 1 See Note 2 Torque to: 4 - 6 Ft Lbs (6 - 8 Nm) 11 10 8 9 7 Figure 64. ‘HR’ Hydraulic Remote Spool Actuator (Positioner End) Note: K-6128 HR Actuator is also used on the positioner end of Model HRH Actuator. Ref No. Part No. Description Quantity 12940001 K-6128 ‘HR’ Spool Actuator Kit (Kit Includes all Items Listed Below) 1 11127001 Stop Collar 2 11117001 Spring (Inner) 3 11116001 Spring (Outer) 4 11113001 Stop Sleeve 5 11114001 Washer 6 11115001 Positioner Spud 7 11126001 Square-Cut Seal 8 08338001 ‘HR’ Bonnet 9 07904001 Bearing Plate 10 00563001 Lock Washer 11 03731110 Screw (1/4 - 20 X 3.00) 08006001 Blue Thread Adhesive (Ref. Loctite No. 242) K-6128 Actuator Kit is for installation on the positioner end of the work section (opposite the spool clevis). Remove all Spool Seal Components from the work section prior to installing ‘HR’ Actuator Kits. Model V20 Service and Parts Manual (Catalog No. SC-1102) 69 1 1 1 1 1 1 1 1 4 4 4 1 Rev: 08-26-2002 ‘HR’ Hydraulic Remote Spool Actuator Kit (Spool Clevis End) Torque to: 4 - 6 Ft Lbs (6 - 8 Nm) 2 3 1 4 5 See Note 2 Figure 65. ‘HR’ Hydraulic Remote Spool Actuator (Spool Clevis End) Ref No. Part No. Description Quantity 12942001 K-6129 ‘HR’ Spool Actuator Kit (Kit Includes all Items Listed Below) 1 11126001 Square-Cut Seal 2 08338001 ‘HR’ Bonnet 3 07904001 Bearing Plate 4 00563001 Lock Washer 5 03731110 Screw (1/4 - 20 X 3.00) K-6129 Actuator Kit is for installation on the spool clevis end of the work section. Remove all Spool Seal Components from the work section prior to installing ‘HR’ Actuator Kits. Model V20 Service and Parts Manual (Catalog No. SC-1102) 70 1 1 4 4 4 Rev: 08-26-2002 ‘HRO’ Hydraulic Remote Spool Actuator Kit (Positioner End) Clean Threads and Apply Type II, Grade 0, Red Thread Locking Compound (Ref. Loctite No. 262) to Ref No's. 6 and 8 prior to installation Torque to: 10 - 12 Ft Lbs (13 - 16 Nm) 5 6 4 3 1 2 Torque to: 4 - 6 Ft Lbs (6 - 8 Nm) See Note 2 17 14 13 16 12 11 10 15 Figure 66. ‘HRO’ Hydraulic Remote Spool Actuator Ref No. Part No. Description 9 8 7 Torque to: 22 - 30 In Lbs (2,5 - 3,4 Nm) (Positioner End) Quantity 12944001 K-6130 ‘HRO’ Spool Actuator Kit (Kit Includes all Items Listed Below) 1 11127001 Stop Collar 1 2 11117001 Spring (Inner) 1 3 11116001 Spring (Outer) 1 4 11113001 Stop Sleeve 1 5 11114001 Washer 1 6 11115001 Positioner Spud 1 7 11126001 Square-Cut Seal 1 8 08319001 Screw (Countersunk Head) 1 9 08318001 Travel Stop 1 10 08320001 ‘HRO’ Bonnet 1 11 08317001 Spool Override Screw 1 12 08316001 O-Ring Seal 1 13 08315001 Back-Up Ring 1 14 07826001 Boot 1 15 07904001 Bearing Plate 4 16 00563001 Lock Washer 4 17 03731110 Bonnet Screw (1/4 - 20 X 3.00) 4 08006001 Blue Thread Adhesive (Ref. Loctite No. 242) 1 K-6130 Actuator Kit is for installation on the positioner end of the work section (opposite the spool clevis). Remove all Spool Seal Components from the work section prior to installing ‘HRO’ Actuator Kits. Turning the Spool Override Screw (No. 11) Clockwise will move the Travel Stop (No. 9) in, making contact with the valve spool. Continued Clockwise rotation will force the spool from the center position. The Override may also be used as a Spool Travel Limiter. The farther in the Spool Override Screw is adjusted (without actually making contact with the valve spool), the less distance from center the valve spool can travel. Continuous Back-Up Rings are installed at the factory using special sizing tools. It is Not necessary to replace the original Back-Up Rings unless they have been damaged. See Page 9 for Back-Up Ring Preparation and Installation procedures. Model V20 Service and Parts Manual (Catalog No. SC-1102) 71 Rev: 08-26-2002 ‘HRO’ Hydraulic Remote Spool Actuator Kit (Spool Clevis End) Clean Threads and Apply 08006001 Blue Thread Locking Compound to Ref No. 2 prior to installation. 4 1 10 3 2 8 6 Torque to: 22 - 30 In Lbs (2,5 - 3,4 Nm) 5 Torque to: 4 - 6 Ft Lbs (6 - 8 Nm) 7 9 See Note 2 Figure 67. ‘HRO’ Hydraulic Remote Spool Actuator Ref No. Part No. Description 11 (Spool Clevis End) Quantity 12945001 K-6131 ‘HRO’ Spool Actuator Kit (Kit Includes all Items Listed Below) 1 11126001 Square-Cut Seal 1 2 08319001 Screw (Countersunk Head) 1 3 08318001 Travel Stop 1 4 08320001 ‘HRO’ Bonnet 1 5 08317001 Spool Override Screw 1 6 08316001 O-Ring Seal 1 7 08315001 Back-Up Ring 1 8 07826001 Boot 1 9 07904001 Bearing Plate 4 10 00563001 Lock Washer 4 11 03731110 Bonnet Screw (1/4 - 20 X 3.00) 4 08006001 Blue Thread Adhesive (Ref. Loctite No. 242) 1 K-6131 Actuator Kit is for installation on the spool clevis end of the work section. Remove all Spool Seal Components from the work section prior to installing ‘HRO’ Actuator Kits. Turning the Spool Override Screw (No. 5) Clockwise will move the Travel Stop (No. 3) in, making contact with the valve spool. Continued Clockwise rotation will force the spool from the center position. The Override may also be used as a Spool Travel Limiter. The farther in the Spool Override Screw is adjusted (without actually making contact with the valve spool), the less distance from center the valve spool can travel. Continuous Back-Up Rings are installed at the factory using special sizing tools. It is Not necessary to replace the original Back-Up Rings unless they have been damaged. See Page 9 for Back-Up Ring Preparation and Installation procedures. Model V20 Service and Parts Manual (Catalog No. SC-1102) 72 Rev: 08-26-2002 ‘HRH’ Hydraulic Remote Spool Actuator Kits Vertical Handle 17 10 16 11 9 Torque (4) Screws to: 15 - 20 In Lbs 12 (2 - 3 Nm) 18 15 8 13 7 Torque (4) Screws to: 4 - 6 Ft Lbs (5,4 - 8,2 Nm) 6 Horizontal Handle 3 9 4 2 1 14 10 9 11 5 Model HRH Actuators require a special spool with a longer clevis and cannot be field installed on sections with standard spools. Figure 68. ‘HRH’ Hydraulic Remote Spool Actuators Ref No. Part No. Description Quantity 12900001 K-6142 Vertical Handle HRH Actuator Kit (Includes all Items Listed Below) 10357001 K-6149 Horizontal Handle HRH Actuator Kit (Includes all Items Listed Below) 12347001 K-6187 Actuator Seal Kit (Includes Items 1, 15, 17 & 18 Only) 1 11126001 O-Ring Seal (Serviced in K-6187 Actuator Seal Kit) 1 2 11685001 Bonnet Guide 1 3 00563001 Lock Washer 4 4 03731100 Screw 4 5 10073003 HRH Bonnet 1 6 09350310 Dowel Pin 1 7 08587001 Boot Retainer 1 8 07622001 Boot 1 9 09302106 Jam Nut A/R 10 08815001 Knob 1 11 08962002 Vertical Handle Rod (Included in K-6142 Vertical Handle HRH Kit) 1 08962001 Horizontal Handle Rod (Included in K-6149 Horizontal Handle HRH Kit) 1 12 03731003 Screw 4 13 09285002 Lock Washer 4 14 08589001 Vertical Adapter (Included in K-6142 Vertical Handle HRH Kit) 1 08961001 Horizontal Adapter (Included in K-6149 Horizontal Handle HRH Kit) 1 15 09000027 O-Ring Seal (Serviced in K-6187 Actuator Seal Kit) 1 16 08963001 Seal Retainer 1 17 07028002 O-Ring Seal (Serviced in K-6187 Actuator Seal Kit) 1 18 08959001 Special Seal (Serviced in K-6187 Actuator Seal Kit) 1 Buna-N seals are standard for all Gresen valve assemblies. For Viton seals, contact the Gresen factory in Minneapolis. Horizontal Handle requires 2 jam nuts. Model V20 Service and Parts Manual (Catalog No. SC-1102) 73 Rev: 08-26-2002 Model V20 SOL-E Solenoid Actuator Kits 9 10 8 7 11 12 13 14 7 6 5 15 16 17 18 19 21 20 4 1 2 3 Figure 69. Model V20 SOL-E Solenoid Actuator Assembly Ref No. Part No. Description Quantity 07978001 CK-6080 Actuator Kit (Contains Items 1 thru 5, plus 7 thru 22) 07983001 K-6074 Actuator Seal Kit (Contains Items 9, 10, 12 & 13) 07979001 K-6079 Piston Kit (Contains Items 7 thru 11) 1 03731111 Screw, ¼-20 x 3.25” 4 2 00563001 Lock Washer 4 3 07904001 Bearing Plate 4 4 03637001 SAE 6 Plug 1 5 07850001 Actuator Housing 1 6 12893001 CK-6083 12VDC Solenoid Cartridge Kit – See Figure 73 2 12895001 CK-6093 24VDC Solenoid Cartridge Kit – See Figure 73 2 12518001 CK-6169 120VAC Solenoid Cartridge Kit – See Figure 73 2 7 07855001 Retaining Ring 2 8 07856001 Piston 1 9 07700001 O-Ring Seal 1 10 03191001 O-Ring Seal 1 11 07857001 Piston Rod 1 12 07854001 O-Ring Seal 1 13 07028002 O-Ring Seal 1 14 07858001 Piston Rod Guide 1 15 07851001 Sleeve, 1.43 x 1.49 inches [36,3 x 37,8] 1 16 10815001 Spool Centering Collar 1 17 11640001 Spool Screw 1 18 11639001 Spacer 1 19 07853001 Spring, Centering 1.250 x .156 [31,8 x 4,0 mm] 1 20 10816001 Stop Collar 1 21 07572001 Seal Plate 1 08006001 Loctite Tube, Grade 262 1 Buna-N seals are standard for all Gresen valve assemblies. For Viton seals, contact the Gresen factory in Minneapolis. Continuous Back-Up Rings are installed at the factory using special sizing tools. It is Not necessary to replace the original Back-Up Rings unless they have been damaged. See Page 9 for Back-Up Ring Preparation and Installation procedures. Model V20 Service and Parts Manual (Catalog No. SC-1102) 74 Rev: 08-26-2002 Model V20 SOL-E Solenoid Actuator Installation Procedures 11640001 Spool Adapter Required Tools and Supplies for Actuator Installation 1. 2. 3. 4. 5. 11639001 Small Spacer 10815001 Outer Spring Collar 7853001 Centering Spring 10816001 Inner Spring Collar 9/16" Flat Wrench Model V20 Handle Kit 5/16" Allen Wrench Medium Grade Loctite Oil Lubricant 1. Install Model V20 Handle Kit. 7572001 Seal Plate 2. Clean threads and apply a small amount of medium grade thread 4189005 Piston & Rod Assembly locking compound to the threads of the Spool Adapter. Insert Spool Adapter thru Spacer, Spring Collars, Centering Spring and Seal 7851001 Large (Sleeve) Spacer Plate in order shown here. 3. While compressing the spring, screw the Spool Adapter into the valve spool approximately two or three turns. Do not tighten at this time. 4. Slide the large (sleeve) Spacer over the assembled spring componets. 5. Slide the rod of the Piston & Rod Assembly thru the into the slot in the Spool Adapter. 6. The Spool Adapter may now be tightened using a 9/16" open end Rod End Slides into slot in Spool Adapter. wrench. Verify that the small Spacer is positioned properly between the two Spring Collars. 7. Apply a film of oil on the inside surface of the Actuator 7850001 Actuator Housing Housing and the O-Ring seals on the Piston & Rod Assembly. 8. Carefully slide the Actuator Housing over the Piston & Rod Assembly and into position next to the valve housing. 9. Slide the Bonnet Screws thru the Lock Washer and Bearing Plate and attach 7904001 Bearing Plate 563001 Lock Washer 3731111 Bonnet Screw the Actuator Housing to the valve housing. 10. Using the valve Handle Kit, shift the valve spool back and forth to verify that the valve spool moves freely inside the Actuator Housing. If it does not, remove actuator assembly and repeat assembly procedures 11. Install SAE 6 Plug, Solenoid Cartridges, Fittings and Tubing Kits. Figure 70. Model V20 SOL-E Solenoid Actuator Installation Procedures Model V20 Service and Parts Manual (Catalog No. SC-1102) 75 Rev: 08-26-2002 Model V20 SOL-E Solenoid Actuator Installation Procedures Pilot Return Fitting - With Adjustable or Non-Adjustable Speed Control Pilot Exhaust Port - This port may also be used to exhaust an external pilot supply. Pilot Supply Tube Pilot Supply Fitting Pilot Supply Inlet Port - This port may also be used to bring in an external pilot supply. Pilot Return Check Valve Pilot Return Tube Figure 71. Model V20 SOL-E Solenoid Actuator Plumbing Diagram Adjustable Speed Control Turn Adjustment Screw 'In' to slow spool shift or 'Out' to increase spool shift speed. Figure 72. Actuator Pilot Return Fitting with Adjustable Speed Control Model V20 Service and Parts Manual (Catalog No. SC-1102) 76 Rev: 08-26-2002 SOL-E Solenoid Cartridges Top View 4 Matched Set Parts, Internal Cartridge Components Are Not Sold Separately Torque To: 3 - 4 Ft Lbs (4,5 - 5 Nm) 8 7 6 5 Torque To: 15 - 20 Ft Lbs (20 - 27 Nm) 2 1 3 Figure 73. SOL-E Solenoid Cartridges Ref No. Part No. Description Quantity 12893001 CK-6083 12VDC Solenoid Cartridge Kit, Complete 12895001 CK-6093 24VDC Solenoid Cartridge Kit, Complete 11518001 CK-6169 120VAC Solenoid Cartridge Kit, Complete 07980001 K-6077 Cartridge Seal Kit (Contains Items 5 thru 8) 08607001 K-6143 Replacement Coil Kit, 12 VDC (Contains Items 1 thru 3 Only) 08607002 K-6144 Replacement Coil Kit, 24 VDC (Contains Items 1 thru 3 Only) 08607003 K-6241 Replacement Coil Kit, 120 VAC (Contains Items 1 thru 3 Only) 1 07836001 Pan Head Screw, No. 10-24 x .31” 2 07837001 Lock Washer 3 08512001 12 VDC Solenoid Coil with Spade Terminals – Serviced in K-6143 Coil Kit 08512002 12 VDC Solenoid Coil with Flying Leads – Sold as Piece Part Only 08511001 24 VDC Solenoid Coil with Spade Terminals - Serviced in K-6144 Coil Kit 08511002 24 VDC Solenoid Coil with Flying Leads - Sold as Piece Part Only 11430001 120 VAC Solenoid Coil with Spade Terminals - Serviced in K-6241 Coil Kit 4 21007001 Cartridge Tube Assembly – Matched Components –Not Sold Separately 5 02708001 O-Ring Seal – Serviced in K-6077 Cartridge Tube Seal Kit 6 06839001 O-Ring Seal – Serviced in K-6077 Cartridge Tube Seal Kit 7 01910001 O-Ring Seal – Serviced in K-6077 Cartridge Tube Seal Kit 8 07829001 O-Ring Seal – Serviced in K-6077 Cartridge Tube Seal Kit Buna-N seals are standard for all Gresen valve assemblies. Contact the Gresen factory in Minneapolis for optional seals. These Cartridges and Replacement Coil Kits are NOT for use in the newer internal piloted solenoid versions. Cartridge Tube Assembly 21007001 includes O-Ring Seals 5 thru 8. Model V20 Service and Parts Manual (Catalog No. SC-1102) 77 Rev: 08-26-2002 [SOL] and [EPC] Solenoid Actuators Bonnet Seals (Located in Work Section Body) (Optional) SAE 4 External Pilot Port Location (See Note 3) 6 1 7 10 12 10 11 Torque to: 10 - 12 Ft Lbs (14 - 16 Nm) 9 2 3 8 4 Clean internal spool threads and external threads of Hex Head Bolt (Ref. No. 8) and apply Blue Thread Locking Compound (Ref. Loctite 242 ) prior to installation. Torque to: 9 - 11 Ft Lbs (3 Places) (12 - 15 Nm) R 5 Figure 74. [SOL] and [EPC] Solenoid Actuators Ref No. Part No. Description Quantity 1 K-CRT-SXXX [SOL] Solenoid Cartridge Kits (See Page 11 for Options) K-CRT-EXXX [EPC] Solenoid Cartridge Kits (See Page 12 for Options) K-6266 Bonnet Seal Kit (Kit Includes Items 6 and 7 Only) 16081001 21472002 Solenoid Actuator Bonnet 1 2 1 21472004 Solenoid Actuator Bonnet with (Optional) External SAE 4 Pilot Port 2 3 03731101 Bonnet Screw (1/4 - 20 X .875) SAE 6 Plug (See Figure 12 for Optional Spool Override Kits) 1 4 09435106 5 03731110 Bonnet Screw (1/4 - 20 X 3.00) 1 1 6 21801001 O-Ring Seal (Serviced in K-6266 Solenoid Bonnet Seal Kit) 07773001 O-Ring Seal (Serviced in K-6266 Solenoid Bonnet Seal Kit) 2 7 Hex Head Bolt (5/16 - 18 X 1.75) 1 8 09140062 9 21451001 Spool Collar 1 2 10 21453001 Spring Collar 06855001 Centering Spring (Used on the ‘A’ Port [SOL] Actuators) 1 11 10742001 Centering Spring (Used on the ‘A’ Port [EPC] Actuators) 1 21558001 Centering Spring (Used on the ‘B’ Port of both [SOL] and [EPC] Actuators) 1 21452001 Spacer (Used in the ‘A’ Port of both [SOL] and [EPC] Solenoid Actuators) 1 12 Buna-N seals are standard for all Gresen valve assemblies. Contact the Gresen factory in Minneapolis for optional seals. To achieve maximum metering performance when converting an On/Off [SOL] Solenoid Actuator to a Proportional [EPC] Solenoid Actuator, replace Spring No. 06855001 with Spring No. 10742001 on the ‘A’ port end actuators. The Solenoid Actuator Bonnet with external SAE 4 pilot port is used in applications where an external pilot source is available. Since the pilot passages are isolated within the valve when no Utility Section is used, one of the bonnets must be used on both the ‘A’ and ‘B’ port end of the valve assembly. 1 Model V20 Service and Parts Manual (Catalog No. SC-1102) 78 Rev: 08-26-2002 [SOL-IH] and [EPC-IH] Solenoid Actuators (with Handle) 6 1 5 4 2 3 Torque To: 9 - 11 Ft lbs. (12 - 15 Nm) 3 Places Figure 75. [SOL-IH] and [EPC-IH] Solenoid Actuators (with Handle) Ref No. Part No. 1 Description Quantity K-CRT-SXXX [SOL] Solenoid Cartridge Kits (See Page 11 for Options) 1 K-CRT-EXXX [EPC] Solenoid Cartridge Kits (See Page 12 for Options) 2 21560002 Solenoid Bonnet 1 3 03731101 Bonnet Screw (1/4 - 20 X .875) 3 4 16103003 K-6276 Spool Travel Limiter Kit - (See Figure 13) 1 5 04220004 Handle Actuator Assembly (See Figure 6) 1 6 04220002 Handle Rod Assembly (See Figure 6) 1 Buna-N seals are standard for all Gresen valve assemblies. Contact the Gresen factory in Minneapolis for optional seals. Model V20 Service and Parts Manual (Catalog No. SC-1102) 79 Rev: 08-26-2002 [SOL-IH] and [EPC-IH] Handle Assembly Apply Blue Thread Locking Compound (Ref Loctite No. 242) to knob and hand tighten only. 1 2 Torque Jam Nut to: 15 - 20 Ft Lbs (20 - 27 Nm) 3 Torque (4) Screws to: 15 - 20 In Lbs (2 - 3 Nm) 4 6 Position Handle Adapter into Handle Pilot Retainer so that the holes line up. Insert the Dowel Pin. 5 9 7 10 8 13 Position Handle Adapter fork into Spool Clevis when inserting Handle Assembly into bonnet. 12 11 Handle Adapter Fork Spool Clevis Clevis Pin Figure 75. [SOL-IH] and [EPC-IH] Handle Assembly Ref No. Part No. Description Quantity 16104001 K-6277 Actuator Service Kit (Items 6, 7, 9 thru 12, plus K-6266 Seals) 04220002 Handle Rod Assembly (Assembly Includes Items 1 thru 3 Only) 04220004 Handle Actuator Assembly (Assembly Includes Items 4 thru 13 Only) 1 08815001 Handle Knob 1 2 08962002 Handle Rod 1 3 09302106 Jam Nut 1 4 03731003 Screw (#8 - 32 X .625) 4 5 09285002 Lock Washer 4 6 07622001 Protective Boot (Serviced in K-6277 Actuator Service Kit) 1 7 08587001 Boot Retainer (Serviced in K-6277 Actuator Service Kit) 1 8 09350310 Dowel Pin 1 9 07028002 O-Ring Seal (Serviced in K-6277 Actuator Service Kit) 1 10 08963001 Handle Pivot Retainer (Serviced in K-6277 Actuator Service Kit) 1 11 09000027 O-Ring Seal (Serviced in K-6277 Actuator Service Kit) 1 12 08959001 Seal (Serviced in K-6277 Actuator Service Kit) 1 13 08589001 Handle Adapter 1 Buna-N seals are standard for all Gresen valve assemblies. Contact the Gresen factory in Minneapolis for optional seals. Model V20 Service and Parts Manual (Catalog No. SC-1102) 80 Rev: 08-26-2002 [SOL-IH] and [EPC-IH] Solenoid Bonnet Assembly Bonnet Seals (Located in Work Section Body) Clean internal spool threads and external threads of Clevis Bolt (Ref. No. 2) and apply Blue Thread Locking Compound (Ref. Loctite 242 R ) prior to installation. 7 8 4 6 4 5 3 1 2 Torque to: 10 - 12 Ft Lbs (14 - 16 Nm) Figure 76. [SOL-IH] and [EPC-IH] Solenoid Bonnet Assembly Ref No. Part No. Description Quantity 16081001 K-6266 Solenoid Bonnet Seal Kit (Includes Items 8 and 9 Only) 1 09350405 Dowel Pin 1 2 21544001 (Extended) Spool Clevis 1 3 21451001 Spool Collar 1 4 21453001 Spring Collar 2 5 06855001 Centering Spring (Used in On/Off [SOL-IH] Actuators) 1 10742001 Centering Spring (Used in Proportional [EPC-IH] Actuators) 1 6 21452001 Spacer 1 7 21801001 O-Ring Seal (Serviced in K-6277 Actuator Service Kit) 1 8 07773001 O-Ring Seal (Serviced in K-6277 Actuator Service Kit) 2 Buna-N seals are standard for all Gresen valve assemblies. Contact the Gresen factory in Minneapolis for optional seals. To achieve maximum metering performance when converting an On/Off [SOL-IH] Solenoid Actuator to a Proportional [EPC-IH] Solenoid Actuator, replace Spring No. 06855001 with Spring No. 10742001. Model V20 Service and Parts Manual (Catalog No. SC-1102) 81 Rev: 08-26-2002 Solenoid Coil Connector Type Identification Coil Connector Type Mating Connector Part No. And Order Code Letter (Sold Separately) Code Letter ‘D’ GRESEN A MODEL HT20108-02 VOLT 12 DATE 9624 AMP 1.6 DUTY 100% OHM 7.5 [S] On/Off [E] Proportional 43650 DIN (Hirschmann) 24790001 Hirschmann Connector Assembly Code Letter ‘S’ GRESEN MODEL HT20108-02 VOLT 12 DATE 9624 AMP 1.6 DUTY 100% OHM 7.5 24473002 Female Spade Terminal (2 Req.) [S] On/Off [E] Proportional 1/4” Male Spade Terminals Code Letter ‘W’ GRESEN MODEL HT20108-02 VOLT 12 DATE 9624 AMP 1.6 DUTY 100% OHM 7.5 [E] Proportional 22247001 Weather Pack Connector Assembly [S] On/Off Weather Pack Code Letter ‘H’ DEUTSCH IPD U S A D T 04 - 2 P GRESEN Deutsch DT06 - 2S MODEL HT20108-02 VOLT 12 DATE 9624 AMP 1.6 DUTY 100% OHM 7.5 [E] Proportional (Not Supplied by Gresen) [S] On/Off Deutsch DT04 - 2P Figure 77. Solenoid Coil Connectors Model V20 Service and Parts Manual (Catalog No. SC-1102) 82 Rev: 08-26-2002 On/Off [SOL] Solenoid Cartridge and Replacement Coil Kits Installation Instructions for [SOL] Cartridges Torque to: 15 - 30 In Lbs (2 - 4 Nm) Step 1. Cartridge cavities MUST be clean prior to installing the Solenoid Cartridge. Flush cavity if necessary. Step 2. Install O-Rings (No’s. 3, 4, and 5) on Solenoid Tube Assembly (Ref No. 2). Step 3. Remove the Coil from the Solenoid Tube Assembly (No. 1). Lightly oil and screw the Solenoid Tube Assembly into the cavity. Torque to 15 - 20 Ft Lbs (20 - 27 Nm). 2 1 (Excluding Coil) Step 4. Slide Solenoid Coil into place on the Solenoid Cartridge Tube and Torque to Coil Nut to 15 - 30 In Lbs (2 - 4 Nm). TorqueCartridge to: 15 - 20 Ft Lbs (20 - 27 Nm) 4 3 5 Figure 78. On/Off [SOL] Solenoid Cartridge Ref No. Part No. Description Quantity 16044007 16059001 K-6263 Cartridge Tube Kit (Includes Ref No’s. 2 thru 5 Only - Coil NOT included) K-6265 Cartridge Seal Kit (Includes Ref No’s. 3 thru 5 Only) 1 Complete Solenoid Cartridge Kit or Replacement Coil Kit – Refer to the Table Below 1 2 24097001 Solenoid Cartridge Tube (Serviced in K-6263 Cartridge Tube Kit) 1 3 02706001 O-Ring Seal (Serviced in K-6265 Cartridge Seal Kit) 1 4 01091001 O-Ring Seal (Serviced in K-6265 Cartridge Seal Kit) 1 5 07828001 O-Ring Seal (Serviced in K-6265 Cartridge Seal Kit) 1 Buna-N seals are standard for all Gresen valve assemblies. Contact the Gresen factory in Minneapolis for optional seals. K-6263 Cartridge Tube Kit includes the Cartridge Tube, Washer, Coil Nut and O-Ring Seals. These parts not sold separately. All Coil Kits and Cartridge Kits include the connector type indicated. Refer to Figure 77 for coil connector identification. On/Off [SOL] Complete Solenoid Cartridge Kits and Replacement Coil Kits Complete K-CRT-S Cartridge Kits Cartridge Kit Part Number Replacement Coil Kit Coil Kit Part Number Coil Voltage [12] [24] Flying Leads [F] K-CRT-S12F K-CRT-S24F K-CRT-S12D K-CRT-S24D K-CRT-S12W K-CRT-S24W K-CRT-S12S K-CRT-S24S K-CRT-S12H K-CRT-S24H 21246001 21246002 23535001 23535002 22969001 22969002 24102001 24102002 25479001 25479002 K-6260 K-6261 K-6230 K-6231 K-6278 K-6279 K-6280 K-6264 K-6292 K-6293 16044004 16044005 16089001 16089002 16108001 16108002 16108003 16050001 16044008 16044009 12 24 12 24 12 24 12 24 12 24 • • Model V20 Service and Parts Manual (Catalog No. SC-1102) 83 43650 DIN [D] ¼” Male Spade [S] Weather Pack [W] Deutsch DT04-2P [H] • • • • • • • • Rev: 08-26-2002 Proportional [EPC] Solenoid Cartridge and Replacement Coil Kits Installation Instructions for [EPC] Cartridges Torque to: 15 - 30 In Lbs (2 - 4 Nm) Step 1. Cartridge cavities MUST be clean prior to installing the Solenoid Cartridge. Flush Cavity if necessary. Torque Cartridge to: 15 - 20 Ft Lbs (20 - 27 Nm) Step 2. Install O-Rings (No’s. 4 and 5) on Sleeve (No. 2). Carefully insert Spring and Spool into Sleeve as shown. Verify that the spool moves freely inside the sleeve. If not, remove and inspect spool and sleeve for burrs or contamination. Once problem is located, fix and return the spool and spring to the sleeve and repeat. DANA / GRESEN MODEL HT20108-02 1 VOLT 12 DATE 9624 AMP 1.6 DUTY 100% OHM 7.5 Step 3. Lightly oil Sleeve Assembly (No. 2) and insert into cavity. Carefully push into place. 2 Step 4. Remove the Solenoid Coil from the Solenoid Tube (Ref No. 1). Install O-Ring (No. 3) on the Solenoid Tube and screw into the bonnet cavity. Torque the Solenoid Tube to 15 - 20 Ft Lbs (20 - 27 Nm). 3 Step 5. Slide Solenoid Coil and Bumper Seals into place on 4 Solenoid Tube and Torque to Coil Nut to 15 - 30 In Lbs (2 - 4 Nm). 5 Figure 79. Proportional [EPC] Solenoid Cartridge Ref No. Part No. Description Quantity 16044007 16059001 CK-6198 PRV Cartridge Kit (Includes Ref No’s. 2 thru 5 Only - Coil NOT included) K-6265 Cartridge Seal Kit (Includes Ref No’s. 3 thru 5 Only) 1 Complete Solenoid Cartridge Kit or Replacement Coil Kit – Refer to the Table Below 1 2 21226000 PRV Cartridge (Serviced in CK-6198 PRV Cartridge Kit – Parts Not Sold Separately) 1 3 02706001 O-Ring Seal (Serviced in K-6265 Cartridge Seal Kit) 1 4 01091001 O-Ring Seal (Serviced in K-6265 Cartridge Seal Kit) 1 5 07828001 O-Ring Seal (Serviced in K-6265 Cartridge Seal Kit) 1 Buna-N seals are standard for all Gresen valve assemblies. Contact the Gresen factory in Minneapolis for optional seals. CK-6198 PRV Valve Kit includes the Insert Sleeve, Spool, Spring, and O-Ring Seals. These parts are not sold separately. All Coil Kits and Cartridge Kits include the connector type indicated. Refer to Figure 77 for coil connector identification. Proportional [EPC] Solenoid Cartridge and Coil Kits Complete K-CRT-E Cartridge Kits Cartridge Kit Part Number Replacement Coil Kit Coil Kit Part Number Coil Voltage [12] [24] Flying Leads [F] K-CRT-E12F K-CRT-E24F K-CRT-E12D K-CRT-E24D K-CRT-E12S K-CRT-E24S K-CRT-E12W K-CRT-E24W K-CRT-E12H K-CRT-E24H 21226001 21226002 21226006 21226007 21226004 21226005 21226008 21226009 21226015 21226016 K-6270 K-6271 K-6232 K-6233 K-6283 K-6284 K-6252 K-6253 K-6294 K-6295 16096001 16096002 16091001 16091002 16109001 16109002 16011003 16011004 16108008 16108009 12 24 12 24 12 24 12 24 12 24 • • Model V20 Service and Parts Manual (Catalog No. SC-1102) 84 43650 DIN [D] ¼” Male Spade [S] Weather Pack [W] Deutsch DT04-2P [H] • • • • • • • • Rev: 08-26-2002 Bonnet Conversion for 2-Way, 2-Position Operation 2-Way, 2-Position Schematic Torque SAE Plug to: 15 - 20 Ft Lbs (20 - 27 Nm) 1 5 2 4 Install Hex Set Screw Here - Apply Blue Thread Adhesive (Loctite No. 242) and Insert Below Surface Exhaust Port Torque (3) Screws to: 9 - 11 Ft Lbs (12 - 15 Nm) Pilot Port 3 Figure 80. Solenoid Bonnet Conversion Solenoid Bonnet Conversion Procedures 1. Remove the solenoid and cartridge insert from the solenoid bonnet. 4. Re-attach the solenoid bonnet to the work section. 5. Install an SAE 8 Plug into the solenoid cartridge cavity. 2. Remove the solenoid bonnet from the work section. Flush and dry. 3. Apply Blue thread adhesive (Ref. Loctite No. 242) and install hex set screw into the pilot port in the solenoid bonnet as shown in the above illustration. Ref No. Part No. 21473002 1 2 3 4 21472002 09276408 06879001 Description Quantity 2-Way Bonnet Assembly (Item No. 2 with installed Item No. 3) K-CRT-XXXX Solenoid Cartridge Solenoid Bonnet Hex Set Screw (1/4 - 20 X .500) SAE 8 Plug (with O-Ring Seal) 1 1 1 1 The Hex Set Screw MUST be installed in the pilot port (not the exhaust port), and inserted below the surface, for proper operation. Refer to the above illustration for pilot port identification. Model V20 Service and Parts Manual (Catalog No. SC-1102) 85 Rev: 08-26-2002 Solenoid Bonnet Spool Travel Limiter/Override Kits Since the Override Kit is installed from the inside, the bonnet must be removed. 2 1 3 Torque to: 10 - 12 Ft Lbs (12 - 14 Nm) 4 Torque to: 4 - 6 Ft Lbs (6 - 8 Nm) 5 Override Spool by Adjusting This (Spool Override Rod) Limit Spool Travel by Adjusting This (Spool Override Assembly) Figure 81. Solenoid Bonnet Spool Travel Limiter and Spool Overrides Travel Limiter Adjustment Procedures Using the Spool Override Function 1. Remove the cap nut . 1. Remove the cap nut . It is NOT necessary to loosen the lock nut . 2. Make sure that the spool override rod (shown above) is out as far as it goes. 2. Screw Type Overrides - Turn the spool override rod clockwise to force the valve spool from the neutral position. 3. Loosen lock nut . 4. Using a flat wrench, turn the spool override assembly in or out as necessary to limit spool travel. Push Pin Overrides - Push the spool override rod in to force the valve spool from the neutral position. 5. Once spool travel limiter is set, torque lock nut to 10 - 12 Ft Lbs (12 - 14 Nm). 3. When the override function is complete, return the spool override rod to the full out position, install cap nut and torque to 4 - 6 Ft Lbs (6 - 8 Nm). 6. Install cap nut and torque to 4 - 6 Ft Lbs (6 - 8 Nm). Ref No. Part No. Description 16103001 K-6274 Screw Type Travel Limiter/Override Kit (Kit Includes all Items Listed Below) 16103002 K-6275 Push Pin Type Travel Limiter/Override Kit (Kit Includes all Items Listed Below) 04295001 Override Assembly (Used in K-6274 Screw Type Override Only) 1 04295003 Override Assembly (Used in K-6275 Push Pin Type Override Only) 1 2 02705001 O-Ring Seal 1 3 21361001 Back-Up Washer 1 4 21359001 Lock Nut 1 5 21523001 Cap Nut 1 1 Quantity Buna-N seals are standard for all Gresen valve assemblies. Contact the Gresen factory in Minneapolis for optional seals. Model V20 Service and Parts Manual (Catalog No. SC-1102) 86 Rev: 08-26-2002 Solenoid Bonnet (with Handle) Spool Travel Limiter Kit Since the Override Kit is installed from the inside, the handle assembly and bonnet must be removed. Torque to: 10 - 12 Ft Lbs (12 - 14 Nm) 2 1 3 Limit Spool Travel by Adjusting This (Travel Limiter Rod) Figure 82. Solenoid Bonnet (with Handle) Spool Travel Limiter Spool Travel Limiter Adjustment Procedures 1. Loosen lock nut (No. 3). 3. Once travel limiter is set, torque lock nut (No. 3) to 10 12 Ft Lbs (12 - 14 Nm). 2. Using a flat wrench, turn the travel limiter rod (No. 1) in or out as necessary to limit spool travel. Ref No. Part No. Description Quantity 16103003 K-6276 Screw Type Travel Limiter Kit (Kit Includes all Items Listed Below) 1 21628001 Travel Limiter Rod 1 2 03119001 O-Ring Seal 1 3 21627001 Lock Nut 1 Buna-N seals are standard for all Gresen valve assemblies. Contact the Gresen factory in Minneapolis for optional seals. Model V20 Service and Parts Manual (Catalog No. SC-1102) 87 Rev: 08-26-2002 K-6030 and K-6203 Load Check Plug Kits Torque Load Check Plug to: 15 - 20 Ft Lbs (20 - 27 Nm) 3 1 5 6 7 4 3 2 8 8 9 K-6030 Load Check Plug Kit - For Use In V20P, V20RP, V20T, V20RT, V20C & V20LS Sections 5 10 4 K-6203 Load Check Plug Kit - For Use In V20S 'Series' Sections Figure 83. K-6030 and K-6203 Load Check Plug Kits Ref No. Part No. Description Quantity 12742001 K-6030 Load Check Plug Kit For All Non-V20S Sections (Contains all Items Listed Here) 12953001 K-6203 Load Check Plug Kit For All V20S Sections (Contains all Items Listed Here) 07382001 K-6032 Plug Seal Kit For K-6030 Load Check Plugs (Contains Items 3 thru 7 Only) 11497001 K-6204 Plug Seal Kit For K-6203 Load Check Plugs (Contains Items 3 thru 5 Only) 1 03411001 Load Check Plug (Serviced in K-6030 Load Check Plug Kit) 1 2 11241001 Load Check Plug – V20S (Serviced in K-6203 Load Check Plug Kit) 1 3 02707001 O-Ring Seal (Serviced in both K-6032 and K-6203 Plug Seal Kits) 1 4 01821001 Back-Up Ring (Serviced in both K-6032 and K-6203 Plug Seal Kits) 1 5 01819001 O-Ring Seal (Serviced in both K-6032 and K-6203 Plug Seal Kits) 1 6 01818001 O-Ring Seal (Serviced in K-6032 and Plug Seal Kit Only) 1 7 01820001 Back-Up Ring (Serviced in K-6032 and Plug Seal Kit Only) 2 8 01868001 Spring (Serviced in K-6030 and K-6203 Load Check Plug Kits) 1 9 02781001 Check Poppet (Serviced in K-6030 Load Check Plug Kit) 1 10 07791001 Check Poppet – V20S (Serviced in K-6203 Load Check Plug Kit) 1 Buna-N seals are standard for all Gresen valve assemblies. For Viton seals, contact the Gresen factory in Minneapolis. Continuous Back-Up Rings are installed at the factory using special sizing tools. It is Not necessary to replace the original Back-Up Rings unless they have been damaged. See Page 9 for Back-Up Ring Preparation and Installation procedures. Model V20 Service and Parts Manual (Catalog No. SC-1102) 88 Rev: 08-26-2002 3-Way Conversion Check Plug Torque Load Check Plug to: 15 - 20 Ft Lbs (20 - 27 Nm) 2 1 4 5 7 6 3 06140006 Three-Way Conversion Plug Assy For Use In The Non-Active Work Port Of V20P, V20RP, V20T, V20RT 3-Way Sections Figure 84. 3-Way Conversion Check Plug Ref No. Part No. Description Quantity 06140006 3-Way Conversion Plug Assy (Contains all Items Listed Here) 07382001 K-6032 Plug Seal Kit For K-6030 Load Check Plugs (Contains Items 2 thru 6 Only) 1 03411001 Load Check Plug (Serviced in 06140006 Conversion 3-Way Check Plug Assy) 1 2 02707001 O-Ring Seal (Serviced in K-6032 Plug Seal Kits) 2 3 01821001 Back-Up Ring (Serviced in both K-6032 Plug Seal Kit) 1 4 01819001 O-Ring Seal (Serviced in both K-6032 Plug Seal Kit) 1 5 01818001 O-Ring Seal (Serviced in K-6032 Plug Seal Kit) 1 6 01820001 Back-Up Ring (Serviced in K-6032 Plug Seal Kit) 1 7 06754001 3-Way Conversion Plug (Included in 06140006 Conversion Plug Assy) 1 Buna-N seals are standard for all Gresen valve assemblies. For Viton seals, contact the Gresen factory in Minneapolis. Continuous Back-Up Rings are installed at the factory using special sizing tools. It is Not necessary to replace the original Back-Up Rings unless they have been damaged. See Page 9 for Back-Up Ring Preparation and Installation procedures. Model V20 Service and Parts Manual (Catalog No. SC-1102) 89 Rev: 08-26-2002 K-6215 Compensator Plug Kit Torque Compensator Plug to: 15 - 20 Ft Lbs (20 - 27 Nm) 6 5 4 3 2 1 Figure 85. K-6215 Compensator Plug Kit – For Use In V20PC Work Sections Ref No. Part No. 16092001 Description Quantity K-6215 Compensator Plug Kit (Contains all Items Listed Here) 16095001 K-6216 Compensator Plug Seal Kit (Contains Items 1 thru 5 Only) 1 02707001 O-Ring Seal (Serviced in K-6216 Plug Seal Kit) 1 2 09023017 Back-Up Ring (Serviced in K-6216 Plug Seal Kit) 1 3 01721001 O-Ring Seal (Serviced in K-6216 Plug Seal Kit) 1 4 01821001 Back-Up Ring (Serviced in K-6216 Plug Seal Kit) 2 5 01819001 O-Ring Seal (Serviced in K-6216 Plug Seal Kit) 1 6 20971002 Compensator Plug (Serviced in K-6215 Compensator Plug Kit) 1 Buna-N seals are standard for all Gresen valve assemblies. For Viton seals, contact the Gresen factory in Minneapolis. Continuous Back-Up Rings are installed at the factory using special sizing tools. It is Not necessary to replace the original Back-Up Rings unless they have been damaged. See Page 9 for Back-Up Ring Preparation and Installation procedures. Model V20 Service and Parts Manual (Catalog No. SC-1102) 90 Rev: 08-26-2002 Model ‘RC’ Work Port Relief Cartridges Torque Relief Valve Cartridge to: 15 - 20 Ft Lbs (20 - 27 Nm) 1 2 7 3 5 2 6 4 8 9 10 12 13 11 Figure 86. Model ‘RC’ Work Port Relief Cartridges Ref No. Part No. Description Quantity 03838xxx RC Relief Cartridge - With Check (Specify Pressure Setting When Ordering) 06419001 K-6005 Relief Seal Kit (Contains Items 2 thru 6 Only 12727001 K-19002 Relief Poppet Service Kit (Contains Item 5 - Poppet and Seal Assembly) 1 01880001 Relief Cap 1 2 02707001 O-Ring Seal (Serviced in K-6005 Relief Seal Kit) 2 3 20949001 Spring (200 - 499 PSI [13 - 33 bar] Pressure Range) 1 01869001 Spring (500 - 1249 PSI [34 - 86 bar] Pressure Range) 1 07638001 Spring (1250 - 1749 PSI [87 - 121 bar] Pressure Range) 1 07078001 Spring (1750 – 1999 PSI [122 - 138 bar] Pressure Range) 1 01870001 Spring (2000 – 2599 PSI [139 - 179 bar] Pressure Range) 1 07497001 Spring (2600 - 2999 PSI [180 - 207 bar] Pressure Range) 1 11912001 Spring (3000 - 3500 PSI [208 - 242 bar] Pressure Range) 1 4 07874001 Dampening Sleeve 1 5 00458001 Shim (.040 inch [1,0 mm] thick) A/R 00459001 Shim (.020 inch [0,5 mm] thick) A/R 00462001 Shim (.010 inch [0,25 mm] thick) A/R 6 03936001 Poppet Assembly (Not Serviceable) 1 7 01884001 RC Relief Body 1 8 01821001 Back-Up Ring (Serviced in K-6005 Relief Seal Kit) 1 9 01819001 O-Ring Seal (Serviced in K-6005 Relief Seal Kit) 1 10 01818001 O-Ring Seal (Serviced in K-6005 Relief Seal Kit) 1 11 01820001 Back-Up Ring (Serviced in K-6005 Relief Seal Kit) 2 12 01868001 Check Spring (Omit This Part In Free Flow Sections) 1 13 02781001 Check Poppet (Omit This Part In Free Flow Sections) 1 Buna-N seals are standard for all Gresen valve assemblies. For Viton seals, contact the Gresen factory in Minneapolis. Do not attempt to adjust/shim these reliefs unless you have the capability to test the reliefs for proper pressure setting. Without the capability to test you may exceed the maximum pressure rating of the product or draw the relief spring solid, which in turn means there is no relief (NR). Continuous Back-Up Rings are installed at the factory using special sizing tools. It is Not necessary to replace the original Back-Up Rings unless they have been damaged. See Page 9 for Back-Up Ring Preparation and Installation procedures. Model V20 Service and Parts Manual (Catalog No. SC-1102) 91 Rev: 08-26-2002 Model ‘RCS’ Work Port Relief Cartridge Torque Relief Valve Cartridge to: 15 - 20 Ft Lbs (20 - 27 Nm) 1 2 6 3 4 5 2 7 8 9 Figure 87. Model ‘RCS’ Work Port Relief Cartridge For V20S ‘Series’ Work Sections Ref No. Part No. Description Quantity 11472xxx Model RCS Relief Cartridge - With Check (Specify Pressure When Ordering) 11498001 K-6206 Relief Seal Kit (Contains Items 2 and 7 Only 12727001 K-19002 Relief Poppet Service Kit (Contains Item 5 - Poppet and Seal Assembly) 1 01880001 Relief Cap 1 2 02707001 O-Ring Seal (Serviced in K-6206 Relief Seal Kit) 2 3 20949001 Spring (200 - 499 PSI [13 - 33 bar] Pressure Range) 1 01869001 Spring (500 - 1249 PSI [34 - 86 bar] Pressure Range) 1 07638001 Spring (1250 - 1749 PSI [87 - 121 bar] Pressure Range) 1 07078001 Spring (1750 – 1999 PSI [122 - 138 bar] Pressure Range) 1 01870001 Spring (2000 – 2599 PSI [139 - 179 bar] Pressure Range) 1 07497001 Spring (2600 - 2999 PSI [180 - 207 bar] Pressure Range) 1 11912001 Spring (3000 - 3500 PSI [208 - 242 bar] Pressure Range) 1 4 00458001 Shim (.040 inch [1,0 mm] thick) A/R 00459001 Shim (.020 inch [0,5 mm] thick) A/R 00462001 Shim (.010 inch [0,25 mm] thick) A/R 5 03936001 Poppet Assembly (Not Serviceable) 1 6 11471001 RCS Relief Body 1 7 01819001 O-Ring Seal (Serviced in K-6206 Relief Seal Kit) 1 8 11470001 Check Spring (Omit This Part In Free Flow Sections) 1 9 11469001 Check Poppet (Omit This Part In Free Flow Sections) 1 Buna-N seals are standard for all Gresen valve assemblies. For Viton seals, contact the Gresen factory in Minneapolis. Do not attempt to adjust/shim these reliefs unless you have the capability to test the reliefs for proper pressure setting. Without the capability to test you may exceed the maximum pressure rating of the product or draw the relief spring solid, which in turn means there is no relief (NR). Model V20 Service and Parts Manual (Catalog No. SC-1102) 92 Rev: 08-26-2002 Anti-Cavitation Check Cartridges Torque Anti-Cavitation Check Cartridge to: 15 - 20 Ft Lbs (20 - 27 Nm) Work Port Exhaust Core 3 1 6 2 9 7 3 13 6 12 11 10 4 5 5 8 CK-6021 Anti-Cavitation Check Plug Kit - For Use In V20P, V20RP, V20T, V20RT, V20C & V20LS Sections K-6205 Anti-Cavitation Check Plug Kit - For Use In V20S 'Series' Sections Figure 88. Anti-Cavitation Check Cartridges Ref No. Part No. Description Quantity 12751001 CK-6021 Anti-Cav Check Plug Kit, Excluding V20S (Contains All Items Listed Below) 12955001 K-6205 Anti-Cav Check Plug Kit For V20S ‘Series’ (Contains All Items Listed Below) 07382001 K-6032 Plug Seal Kit – Services CK-6021 Cartridge (Contains Items 3, 4, 5, 8 & 9) 11498001 K-6206 Plug Seal Kit – Services K-6205 Cartridge (Contains Items 3 thru 5 Only 1 01822001 Anti-Cavitation Check Body – (Serviced In CK-6021 A/C Check Plug Kit) 1 2 11340001 Anti-Cavitation Check Body – (Serviced In K-6205 Series A/C Check Plug Kit) 1 3 02707001 O-Ring Seal (Serviced in both K-6032 and K-6026 Plug Seal Kits) 1 4 01820001 Back-Up Ring (Serviced in K-6032 Plug Seal Kit) 1 5 01819001 O-Ring Seal (Serviced in both K-6032 and K-6026 Plug Seal Kits) 1 6 00071001 7/16” Steel Ball 1 7 01823001 Check Ball Retainer – (Serviced In CK-6021 A/C Check Plug Kit) 1 8 01820001 Back-Up Ring (Serviced in K-6032 Plug Seal Kit) 2 9 01818001 O-Ring Seal (Serviced in K-6032 Plug Seal Kit) 1 10 01868001 Check Spring (Serviced In CK-6021 A/C Check Plug Kit) 1 11 11343001 Check Spring (Serviced In K-6205 Series A/C Check Plug Kit) 1 12 02781001 Check Poppet (Serviced In CK-6021 A/C Check Plug Kit) 1 13 07791002 Check Poppet (Serviced In K-6205 Series A/C Check Plug Kit) Buna-N seals are standard for all Gresen valve assemblies. For Viton seals, contact the Gresen factory in Minneapolis. Continuous Back-Up Rings are installed at the factory using special sizing tools. It is Not necessary to replace the original Back-Up Rings unless they have been damaged. See Page 9 for Back-Up Ring Preparation and Installation procedures. Omit This Part In Free Flow Sections Model V20 Service and Parts Manual (Catalog No. SC-1102) 93 Rev: 08-26-2002 Model ‘CRA’ Work Port Relief/Anti-Cav Cartridges Torque Relief Valve Cartridge to: 15 - 20 Ft Lbs (20 - 27 Nm) 1 2 7 3 2 5 4 9 12 13 15 6 8 10 16 11 14 Figure 89. Model ‘CRA’ Work Port Relief/Anti-Cavitation Check Cartridges Ref No. Part No. Description Quantity 07745xxx CRA Relief/Anti-Cav Check Cartridge (Specify Pressure Setting When Ordering) 06419001 K-6005 Relief Seal Kit (Contains Items 2 and 7 Only 12727001 K-19002 Relief Poppet Service Kit (Contains Item 5 - Poppet and Seal Assembly) 1 01880001 Relief Cap 1 2 02707001 O-Ring Seal (Serviced in K-6005 Relief Seal Kit) 2 3 20949001 Spring (200 - 499 PSI [13 - 33 bar] Pressure Range) 1 01869001 Spring (500 - 1249 PSI [34 - 86 bar] Pressure Range) 07638001 Spring (1250 - 1749 PSI [87 - 121 bar] Pressure Range) 07078001 Spring (1750 – 1999 PSI [122 - 138 bar] Pressure Range) 01870001 Spring (2000 – 2599 PSI [139 - 179 bar] Pressure Range) 07497001 Spring (2600 - 2999 PSI [180 - 207 bar] Pressure Range) 11912001 Spring (3000 - 3500 PSI [208 - 242 bar] Pressure Range) 4 07874001 Dampening Sleeve 1 5 00458001 Shim (.040 inch [1,0 mm] thick) A/R 00459001 Shim (.020 inch [0,5 mm] thick) A/R 00462001 Shim (.010 inch [0,25 mm] thick) A/R 6 03936001 Poppet Assembly (Not Serviceable) 1 7 07741001 CRA Relief Body 1 8 01821001 Back-Up Ring 1 9 01819001 O-Ring Seal (Serviced in K-6005 Relief Seal Kit) 1 10 07743001 Anti-Cavitation Check Poppet 1 11 07744001 Anti-Cavitation Spring 1 12 07742001 Poppet Retainer 1 13 01818001 O-Ring Seal (Serviced in K-6005 Relief Seal Kit) 1 14 01820001 Back-Up Ring (Serviced in K-6005 Relief Seal Kit) 1 15 06016001 Check Spring (Omit This Part In Free Flow Sections) 1 16 06015001 Check Poppet (Omit This Part In Free Flow Sections) 1 Buna-N seals are standard for all Gresen valve assemblies. For Viton seals, contact the Gresen factory in Minneapolis. Do not attempt to adjust/shim these reliefs unless you have the capability to test the reliefs for proper pressure setting. Without the capability to test you may exceed the maximum pressure rating of the product or draw the relief spring solid, which in turn means there is no relief (NR). Continuous Back-Up Rings are installed at the factory using special sizing tools. It is Not necessary to replace the original Back-Up Rings unless they have been damaged. See Page 9 for Back-Up Ring Preparation and Installation procedures. Model V20 Service and Parts Manual (Catalog No. SC-1102) 94 Rev: 08-26-2002 Model ‘CRA’ Work Port Relief Installation Procedures Installation Tools Required Needle Nose Pliers General Purpose Grease 5 4 1 3 2 1. Apply a liberal amount of grease to the I.D.'s on both ends of the Poppet Retainer assembly (1). Insert the Load Check Spring (2) and Load Check Poppet (3) into the larger greased I.D. end of the Poppet Retainer (1). 5 4 2. Using a suitable tool with a hollow end, install the assembly created in Step 1, into work port option cavity and push until poppet retainer seats into the bore as shown. 3. Using a needle nose pliers, insert the Anti-Cavitation Spring (4) into the Poppet Retainer as shown. 5 4. Apply a liberal amount of grease to the open end of the Relief Cartridge. Insert the Anti-Cavitation Check Poppet (5) into the greased end of the cartridge with the open end of the poppet facing out as shown. 5. Carefully insert the CRA Relief Cartridge into the cavity so that the bore end of the Anti-Cavitatin Poppet slides over the spring protruding out of the Poppet Retainer. If the hex head of the CRA Relief Cartridge will not screw into the seat the O-Ring, the Anti-Cavitation Poppet did not slide over the spring ant the stem of the Poppet Retainer. Realign the Anti-Cavitation Check Poppet and re-install. Once alignment is obtained, the CRA Relief Cartridge can be torqued to specifications. Figure 90. Model ‘CRA’ Work Port Relief Installation Procedures Model V20 Service and Parts Manual (Catalog No. SC-1102) 95 Rev: 08-26-2002 Model ‘RCPC’ Work Port Relief Cartridges Torque Relief Valve Cartridge to: 15 - 20 Ft Lbs (20 - 27 Nm) 1 2 6 3 4 2 5 7 8 9 10 Figure 91. Model ‘RCPC’ Work Port Relief Cartridges – For Use In V20PC Work Sections Ref No. Part No. Description Quantity 22252xxx RCPC Relief Cartridge (Specify Pressure Setting When Ordering) 06419001 K-6214 RCPC Relief Seal Kit (Contains Items 2 thru 6 Only 12727001 K-19002 Relief Poppet Service Kit (Contains Item 5 - Poppet and Seal Assembly) 1 01880001 Relief Cap 1 2 02707001 O-Ring Seal (Serviced in K-6214 Relief Seal Kit) 2 3 20949001 Spring (200 - 499 PSI [13 - 33 bar] Pressure Range) 1 01869001 Spring (500 - 1249 PSI [34 - 86 bar] Pressure Range) 1 07638001 Spring (1250 - 1749 PSI [87 - 121 bar] Pressure Range) 1 07078001 Spring (1750 – 1999 PSI [122 - 138 bar] Pressure Range) 1 01870001 Spring (2000 – 2599 PSI [139 - 179 bar] Pressure Range) 1 07497001 Spring (2600 - 2999 PSI [180 - 207 bar] Pressure Range) 1 11912001 Spring (3000 - 3500 PSI [208 - 242 bar] Pressure Range) 1 4 00458001 Shim (.040 inch [1,0 mm] thick) A/R 00459001 Shim (.020 inch [0,5 mm] thick) A/R 00462001 Shim (.010 inch [0,25 mm] thick) A/R 5 03936001 Poppet Assembly (Not Serviceable) 1 6 22002001 RCPC Relief Body 1 7 09023017 Back-Up Ring (Serviced in K-6214 Relief Seal Kit) 1 8 01721001 O-Ring Seal (Serviced in K-6214 Relief Seal Kit) 1 9 01819001 O-Ring Seal (Serviced in K-6214 Relief Seal Kit) 1 10 01821001 Back-Up Ring (Serviced in K-6214 Relief Seal Kit) 2 Buna-N seals are standard for all Gresen valve assemblies. For Viton seals, contact the Gresen factory in Minneapolis. Do not attempt to adjust/shim these reliefs unless you have the capability to test the reliefs for proper pressure setting. Without the capability to test you may exceed the maximum pressure rating of the product or draw the relief spring solid, which in turn means there is no relief (NR). Continuous Back-Up Rings are installed at the factory using special sizing tools. It is Not necessary to replace the original Back-Up Rings unless they have been damaged. See Page 9 for Back-Up Ring Preparation and Installation procedures. Model V20 Service and Parts Manual (Catalog No. SC-1102) 96 Rev: 08-26-2002 Anti-Drift Cartridges For V20LS and V20PC Sections Torque Anti-Drift Cartridge to: 15 - 20 Ft Lbs (20 - 27 Nm) Work Port Exhaust Core 1 12 3 5 4 13 8 6 10 7 9 3 11 15 8 2 K-6164 Anti-Drift Cartridge Kit - For Use In The 'A' Port End Of V20C and V20LS Sections 2 14 4 K-6239 Anti-Drift Cartridge Kit - For Use In Either Port Of V20PC Sections Figure 92. Anti-Drift Cartridges For V20LS and V20PC Sections Ref No. Part No. Description Quantity 12935001 K-6164 Anti-Drift Cartridge Kit, Complete - for V20C and C20LS Sections 12935002 K-6239 Anti-Drift Cartridge Kit, Complete - for V20PC Sections 07382001 K-6032 Plug Seal Kit – Services K-6164 Cartridge (Contains Items 3, 4, 5, 8 & 9) 16095001 K-6216 Plug Seal Kit – Services K-6239 Cartridge (Contains Items 3 thru 5 Only 1 11052001 Bleed Plug Body – (Serviced In K-6164 Bleed Plug Kit) 1 2 02707001 O-Ring Seal (Serviced in both K-6032 and K-6216 Plug Seal Kits) 1 3 01821001 Back-Up Ring (Serviced in K-6032 and K-6216 Plug Seal Kit) 1 4 01819001 O-Ring Seal (Serviced in both K-6032 and K-6216 Plug Seal Kits) 1 5 01820001 Back-Up Ring (Serviced in K-6032 Plug Seal Kit) 2 6 01818001 O-Ring Seal (Serviced in K-6032 Plug Seal Kit) 1 7 11053001 Bleed Washer 1 8 12293001 Spacer 2 9 11055001 Spacer 1 10 11012001 Spring 1 11 11056001 Locking Screw 1 12 20971009 Bleed Plug Body – (Serviced In K-6239 A/C Check Plug Kit) 1 13 09023017 Back-Up Ring (Serviced in K-6216 Plug Seal Kit) 1 14 01721001 O-Ring Seal (Serviced in K-6216 Plug Seal Kit) 1 15 22174018 .018 Orifice Plug 1 Buna-N seals are standard for all Gresen valve assemblies. For Viton seals, contact the Gresen factory in Minneapolis. Continuous Back-Up Rings are installed at the factory using special sizing tools. It is Not necessary to replace the original Back-Up Rings unless they have been damaged. See Page 9 for Back-Up Ring Preparation and Installation procedures. Model V20 Service and Parts Manual (Catalog No. SC-1102) 97 Rev: 08-26-2002 K-6024 Lockout Cartridges For V20LO Sections Torque Lockout Cartridge to: 15 - 20 Ft Lbs (20 - 27 Nm) Pilot Work Port 5 1 2 3 4 6 7 8 Figure 93. K-6024 Lockout Cartridges For V20LO Sections Ref No. Part No. Description 1 2 3 4 5 6 7 8 06638001 07474001 00216001 00449001 01571001 00071001 11466001 02707001 01818001 03092001 K-6024 Lockout Cartridge Kit, Complete - for V20LO Sections K-6039 Plug Seal Kit – Services K-6164 Cartridge (Contains Items 3, 4, 5, 8 & 9) Check Plug Cap – (Serviced In K-6024 Lockout Check Plug Kit) O-Ring Seal (Serviced in both K-6039 Plug Seal Kit) Spring (Serviced In K-6024 Lockout Check Plug Kit) Steel Ball (Serviced In K-6024 Lockout Check Plug Kit) Lockout Check Body (Serviced In K-6024 Lockout Check Plug Kit) O-Ring Seal (Serviced in both K-6039 Plug Seal Kit) O-Ring Seal (Serviced in K-6039 Plug Seal Kit) Back-Up Ring (Serviced in K-6039 Plug Seal Kit) Quantity 1 1 1 1 1 1 1 1 Buna-N seals are standard for all Gresen valve assemblies. For Viton seals, contact the Gresen factory in Minneapolis. Continuous Back-Up Rings are installed at the factory using special sizing tools. It is Not necessary to replace the original Back-Up Rings unless they have been damaged. See Page 9 for Back-Up Ring Preparation and Installation procedures. Model V20 Service and Parts Manual (Catalog No. SC-1102) 98 Rev: 08-26-2002 RP20 Pilot - Operated Relief Cartridges Torque Relief Cartridge to: 15 - 20 Ft Lbs (20 - 27 Nm) RP20-A Tank 7 8 1 2 3 4 5 RP20-N Pressure Tank Pressure 6 Tamper Resistant Cover Figure 94. RP20 Pilot - Operated Relief Cartridges NOTE Due to close tolerances on working parts, the RP20 Pilot-Operated Relief Valve is not field serviceable. If service other than external seal replacement is required, replace the complete cartridge. Ref No. Part No. Description Quantity 20498xxx RP20-A Relief Cartridge (Adjustable) 20498xxx RP20-N Relief Cartridge (Tamper Resistant) 20498xxx RP20-A-LP Relief Cartridge (Adjustable) 20498xxx RP20-N-LP Relief Cartridge (Tamper Resistant) 07474001 K-6032 Plug Seal Kit – Services K-6164 Cartridge (Contains Items 1 thru 5) 1 01820001 Back-Up Ring (Serviced in K-6032 Plug Seal Kit) 2 2 01818001 O-Ring Seal (Serviced in both K-6032 Plug Seal Kit) 1 3 01819001 O-Ring Seal (Serviced in both K-6032 Plug Seal Kit) 1 4 01821001 Back-Up Ring (Serviced in K-6032 Plug Seal Kit) 1 5 02707001 O-Ring Seal (Serviced in both K-6032 Plug Seal Kit) 1 6 10034001 Tamper Resistant Cap (Installed at the factory on RP20-N Versions Only) 1 7 02781001 Load Check Poppet 1 8 01868001 Spring 1 Buna-N seals are standard for all Gresen valve assemblies. For Viton seals, contact the Gresen factory in Minneapolis. Do not attempt to adjust/shim these reliefs unless you have the capability to test the reliefs for proper pressure setting. Without the capability to test you may exceed the maximum pressure rating of the product or draw the relief spring solid, which in turn means there is no relief (NR). Continuous Back-Up Rings are installed at the factory using special sizing tools. It is Not necessary to replace the original Back-Up Rings unless they have been damaged. See Page 9 for Back-Up Ring Preparation and Installation procedures. Omit this part when installing RP20 Relief Cartridge into Free Flow Sections. Model V20 Service and Parts Manual (Catalog No. SC-1102) 99 Rev: 08-26-2002 Work Port Flow Controls For V20C and V20LS Sections Torque Flow Control Cartridge to: 15 - 20 Ft Lbs (20 - 27 Nm) Feeder Core 17 2 3 5 1 4 19 18 12 10 11 6 7 8 Power Core 13 14 15 16 9 Figure 95. Work Port Flow Controls For V20C and V20LS Sections Ref No. Part No. Description Quantity 10981001 Flow Control Assembly for V20LO Sections (Contains Items 1 thru 16) 10981002 Flow Control W/Short Stem Assembly for V20LO Sections (Contains Items 1 thru 16) 11565001 K-6171 Flow Control Seal Kit (Contains Items 3, 5, 6, 7, 13, 14, 15 & 16) 1 10973001 Retaining Ring 1 2 10974001 Flow Control Plug 1 3 26294001 O-Ring Seal (Serviced in both K-6171 Flow Control Seal Kit) 1 4 10972001 Flow Control Adjustment Drive Stem (Standard) 1 10972002 Flow Control Adjustment Drive Stem (Short) 1 5 07773001 O-Ring Seal (Serviced in both K-6171 Flow Control Seal Kit) 1 6 09020010 Back-Up Ring (Serviced in K-6171 Flow Control Seal Kit) 3 7 09020110 Back-Up Ring (Serviced in K-6171 Flow Control Kit) 1 8 10980001 Thrust Washer 1 9 10975001 Spring 1 10 10979001 Adjustment Collar 1 11 10977001 Spring Retainer 1 12 10976001 Flow Control Body 1 13 02707001 O-Ring Seal (Serviced in K-6171 Flow Control Seal Kit) 1 14 10978001 Back-Up Ring (Serviced in K-6171 Flow Control Seal Kit) 1 15 03158001 O-Ring Seal (Serviced in K-6171 Flow Control Seal Kit) 1 16 01819001 O-Ring Seal (Serviced in K-6171 Flow Control Seal Kit) 1 17 10983001 Flow Control Spring (Not Included In FC Assembly – Purchase Separately) 1 18 10982001 5-25 GPM Flow Control Piston (Not Included In FC Assembly – Purchase Separately) 1 11006001 1-5 GPM Flow Control Piston (Not Included In FC Assembly – Purchase Separately) 1 11006003 3-15 GPM Flow Control Piston (Not Included In FC Assembly – Purchase Separately) 1 19 10984001 Flow Control Stop (Not a Serviceable Item – Refer To Work Section View) 1 Buna-N seals are standard for all Gresen valve assemblies. For Viton seals, contact the Gresen factory in Minneapolis. Continuous Back-Up Rings are installed at the factory using special sizing tools. It is Not necessary to replace the original Back-Up Rings unless they have been damaged. See Page 9 for Back-Up Ring Preparation and Installation procedures. Additional flow range piston are available from the Gresen factory in Minneapolis Model V20 Service and Parts Manual (Catalog No. SC-1102) 100 Rev: 08-26-2002 Work Port Dump Valve Cartridges Torque Dump Valve Cartridge to: 15 - 20 Ft Lbs (20 - 27 Nm) Tank 13 1 4 3 2 6 5 External Pilot Source 12 7 8 9 Work Port 10 8 9 11 SAE 4 Pilot Port For External Pilot Source Figure 96. Work Port Dump Valve Cartridges Ref No. Part No. Description Quantity 27158001 Work Port Dump Valve Cartridge, Complete 12194003 K-19017 Dump Valve Seal Kit (Contains Items 1 thru 5, 8 & 9) 1 01818001 O-Ring Seal (Serviced in K-19017 Dump Valve Seal Kit) 1 2 01820001 Back-Up Ring (Serviced in K-19017 Dump Valve Seal Kit) 2 3 01819001 O-Ring Seal (Serviced in K-19017 Dump Valve Seal Kit) 1 4 01821001 Back-Up Ring (Serviced in K-19017 Dump Valve Seal Kit) 1 5 02707001 O-Ring Seal (Serviced in K-19017 Dump Valve Seal Kit) 1 6 27139001 Unloading Valve Body 1 7 26932001 Poppet 1 8 00682001 Back-Up Ring (Serviced in K-19017 Dump Valve Seal Kit) 2 9 01091001 O-Ring Seal (Serviced in K-19017 Dump Valve Seal Kit) 2 10 27187001 Spring 1 11 27140001 Pilot Head Sub Assembly (Internal Components Not Sold Separately) 1 12 01868001 Spring 1 13 02781001 Load Check Poppet 1 Buna-N seals are standard for all Gresen valve assemblies. For Viton seals, contact the Gresen factory in Minneapolis. Continuous Back-Up Rings are installed at the factory using special sizing tools. It is Not necessary to replace the original Back-Up Rings unless they have been damaged. See Page 9 for Back-Up Ring Preparation and Installation procedures. Do Not install the Load Check Poppet and Spring into F4 (Free Flow) work sections. Model V20 Service and Parts Manual (Catalog No. SC-1102) 101 Rev: 08-26-2002 Seal Retainer and Spool Wiper Kits K-6033 (Standard) Seal Retainer Kit CK-6029 (Optional)Heavy Duty Seal Retainer Kit 4 1 3 2 1 2 Torque To: 10 Ft Lbs (13,6 Nm) Torque To: 10 Ft Lbs (13,6 Nm) K-6057 (Optional) Extra Heavy Duty Seal Retainer Kit 5 6 7 2 1 1 Torque To: 10 Ft Lbs (13,6 Nm) Figure 97. Seal Retainer and Spool Wiper Kits Ref No. Part No. Description Quantity 12786001 K-6033 Standard Seal Retainer Kit (Includes Items 1 and 2 Only) 12806001 CK-6029 Heavy Duty Seal Retainer With Wiper Kit (Includes Items 1 thru 4 Only) 12860001 K-6057 Extra Heavy Duty Seal Retainer Kit (Includes Items 1, 2, 5, 6 & 7) 16105001 K-6223 Spool Wiper Kit (Includes Item No. 4 Only) 1 06552001 Seal Retainer Plate (Serviced in all three Retainer Kits) A/R 2 03731098 Screw (1/4 - 20 by 1/2” Long - Serviced in all three Retainer Kits) 2 3 06802001 Spool Wiper Retainer Plate (Serviced in CK-6029 Retainer Kit) 1 4 01800001 Wiper (Serviced in CK-6029 Seal Retainer Kit and K-6223 Spool Wiper Kit) 1 5 01857001 Clevis Pin (Serviced in K-6057 Seal Retainer Kit) 1 6 00018001 Cotter Pin (Serviced in K-6057 Seal Retainer Kit) 1 7 07565001 Spacer Washer (Serviced in K-6057 Seal Retainer Kit) 1 Used when handle bracket is not furnished and return line pressures are below 200 PSI [14 bar]. Used when handle bracket is not furnished and return line pressures are below 1000 PSI [69 bar], and when wiper seal is desired. Used when handle bracket is not furnished and return line pressures are subject to occasional peak pressures exceeding 1000 PSI [69 bar]. Model V20 Service and Parts Manual (Catalog No. SC-1102) 102 Rev: 08-26-2002 Handle Bracket Kits Torque To: 10 Ft Lbs (13,6 Nm) 3 01801001 and 1 4 07355001 Brackets 5 6 7 01801002 Bracket For Use When 180 Degree Handle Bracket 2 Is Used In Conjunction With The Model CRA Relief Cartridges On The Handle End Of The Work Section. Figure 98. Handle Bracket Kits Ref No. 1 2 3 4 5 6 7 Part No. Description 12753001 08764001 12732001 16105001 01801001 07355001 01801002 09161407 01857001 00086001 00928001 01800001 K-6031 Standard Bracket and Pin Kit (Contains Items 1, 3, 4 & 5 Only) K-6037 (Optional) Heavy Duty Cast Iron Bracket Kit (Contains Items 1 & 3 Only) K-6158 Link & Pin Kit (Includes Items 4 thru 6) K-6223 Spool Wiper Kit (Contains Item No. 7 Only) Die Cast Bracket (Standard - Serviced in K-6031 Bracket Kit) Cast Iron Bracket (Heavy Duty - Serviced in K-6037 Bracket Kit) Die Cast Bracket (Optional – For Use when CRA Relief is used with 180 Degree Handle) Screw (1/4 - 20 X 7/8 Inch long - Serviced in K-6031 & K-6037 Bracket Kits) Clevis Pin (.250 X .91 - Serviced in K-6158 Link & Pin Kit) Cotter Pin (.078 X .5 - Serviced in K-6158 Link & Pin Kit) Link and Pin Sub Assembly (Includes Link, Plate and 2 Cotter Pins) (Optional) Spool Wiper (Serviced in K-6223 Spool Wiper Kit) Model V20 Service and Parts Manual (Catalog No. SC-1102) Quantity 103 1 1 1 1 1 2 1 1 1 1 Rev: 08-26-2002 Protective Spool Boot Kits Note: Spool Boots will not work with Handle Kits or Spool Wipers Torque To: 10 Ft Lbs (13,6 Nm) 3 2 1 Figure 99. K-6056 Spool Boot Kit Ref No. 1 2 3 Part No. 12859001 07623001 07622001 03731098 Description K-6056 Spool Boot Kit (Contains all Items Listed Here) Boot Retainer Spool Protective Boot Screw (1/4 - 20 by 1/2” Long) Model V20 Service and Parts Manual (Catalog No. SC-1102) 104 Quantity 1 1 2 Rev: 08-26-2002 Vertical and Horizontal Handle Kits 4 3 3 Torque To: 10 Ft Lbs (13,6 Nm) 5 1 2 3 Figure 100. Vertical and Horizontal Handle Kits Ref No. 1 2 3 4 5 Part No. Description Quantity 12752001 12755001 16106001 16106002 08377001 13001001 16106003 16106004 12732001 09161407 01801001 04238001 01802001 01802003 03249001 03249003 K-6004 Complete Vertical Handle & Bracket Kit (Black Plastic Coated Handle) K-6137 Complete Vertical Handle & Bracket Kit (Optional Plain Handle) K-6219 Vertical Handle & Linkage Kit (Black Plastic Coated Handle - No Bracket) K-6220 Vertical Handle & Linkage Kit (Optional Plain Handle - No Bracket) K-6007 Complete Horizontal Handle & Bracket Kit (Black Plastic Coated Handle) K-6139 Complete Horizontal Handle & Bracket Kit (Optional Plain Handle) K-6221 Horizontal Handle & Linkage Kit (Black Plastic Coated Handle - No Bracket) K-6222 Horizontal Handle & Linkage Kit (Optional Plain Handle - No Bracket) K-6158 Link and Pin Kit (Contains Item No. 3 Only) Screw (1/4 - 20 by 7/8 Inch long) Handle Bracket Link, Plate and Cotter Pin Assembly Standard Vertical Handle (Black Plastic Coated Handle) Optional Vertical Handle (Plain Handle) Standard Horizontal Handle (Black Plastic Coated Handle) Optional Horizontal Handle (Plain Handle) 2 1 1 1 1 1 1 All of the Handle and Bracket Kits listed above include the Standard Die Cast Handle Bracket (No. 01801001). The Optional Heavy Duty Cast Iron Handle Bracket (No. 07355001) is supplied in K-6037 Bracket Kit. Model V20 Service and Parts Manual (Catalog No. SC-1102) 105 Rev: 08-26-2002 Work Port Restrictors V20 Work Port Restrictor Installation Meter 'OUT' Meter 'IN' 2 Oil Flow Metered 1 Oil Flow Metered With the restrictor Spring and Orifice plate installed as shown, oil flow is restricted into the work port (Meter 'IN'). With the restrictor Spring and Orifice plate installed as shown, oil flow is restricted out of the work port (Meter 'OUT'). Figure 101. Work Port Restrictors Ref No. 1 2 Part No. Description 11031xxx SAE 8 Port Restrictor Assembly (Contains Items 1 and 2) Quantity 10098xxx SAE 10 Port Restrictor Assembly (Contains Items 1 and 2) 10821001 Conical Spring (For Use In SAE 8 Restrictor Assembly) 1 10064001 Conical Spring (For Use In SAE 10 Restrictor Assembly) 1 10817xxx SAE 8 Orifice Plate (Choose Orifice Hole Size From Table Below) 1 10063xxx SAE 10 Orifice Plate (Choose Orifice Hole Size From Table Below) 1 The last three digits of the Restrictor Assembly and Orifice Plate are the same as the orifice hole size. Example: An SAE 8 Restrictor Plate with a .062 hole diameter is Restrictor Assembly part number 11031062. The table below indentifies the available hole sizes for both SAE 8 and SAE 10 Orifice Plates. Orifice Holes Sizes Available 10817xxx SAE 8 Orifice Plates 10063xxx SAE 10 Orifice Plates 015, 032, 040, 046, 055, 062, 074, 082, 095, 109, 125, 141, 156, 172, 189, 220 Model V20 Service and Parts Manual (Catalog No. SC-1102) 015, 032, 037, 042, 047, 053, 062, 070, 076, 082, 086, 095, 109, 125, 141, 156, 189, 203, 220, 281 106 Rev: 08-26-2002 Port Plugs Hex Head Port Plug With Gauge Port Plug Socket Head Port Plug Hex Head Port Plug Figure 102. Port Plugs Port Plug Identification Chart Plug Part Number 00017001 00073001 00947001 01282001 20527001 09435104 08103001 08103002 09435106 03637001 09435108 06879001 06879002 09435110 07054001 07054002 09435112 06089001 06089002 06089003 06089004 06089005 06089006 06089007 06089008 Viton Seal NA NA NA NA NA SAE 4 SAE 6 SAE 8 SAE 10 SAE 12 ¼” NPT 3/8” NPT ½” NPT ¾” NPT S.H. Yes With ¼” Gauge Port Yes Notes H.H. Yes Yes With ¼” Port Plug W/SAE 4 Port Plug With ¼” Port Plug W/SAE 6 Port Plug Open SAE 4 Port Open ¼” NPT Port S.H. (Socket Head) Port Plug H.H. (Hex Head) Port Plug Plug is drilled and tapped for gauge port size indicated. Model V20 Service and Parts Manual (Catalog No. SC-1102) 107 Rev: 08-26-2002 Buna-N and Viton O-Ring Cross Reference Viton seals are recommeded for most applications that use phosphate-ester type fluids. Viton seals are also recommeded for applications that have a continuous operating temperature of +200°F [+93°C] or more. All standard Gresen products utilize Buna-N seals which are compatible with petroleum base, water-in-oil emulsions, and water-glycol fluids. Phosphate ester type fire-resistant fluids will cause Buna-N seals to swell. This swelling is not normally detrimental to static seals, but will be a problem for dynamic seals such as valve spool seals. Swelling of these seals can result in binding. The temperature range of BunaN seals is -40°F to +200°F [-40°C to +93°C]. Cross Reference For O-Ring Seals, Buna-N to Viton Buna-N Part Number 00006001 00449001 01091001 01615001 01718001 01721001 01818001 01819001 01853001 01910001 02705001 02706001 02707001 02708001 02709001 03119001 03158001 03328001 03911001 Viton Part Number 09002214 07611001 09002014 07447001 07446001 07612001 07444001 07445001 07613001 09002018 07951001 09003908 07448001 07452001 06277001 09002903 09002018 07952001 09002028 Common Application Pneumatic Actuator Lockout Cartridge + Others Solenoid Cartridge + Others Main Relief Cartridge, NR Main Relief Cartridge, NR P/B Sleeve + Others Load Check Plug + Others Load Check Plug + Others Quad Seal – Float P/B Sleeve + Others Bleed Down Plug + Others Solenoid Cartridge + Others Load Check Plug + Others Bleed Plug + Others P/B Sleeve + Others EPC-IH Bonnet PC Flow Control KO Positioner PC Flow Control Model V20 Service and Parts Manual (Catalog No. SC-1102) Buna-N Part Number 06814002 06815002 06839001 07028002 07700001 07773001 07828001 07829001 08316001 09000017 09000027 09000113 09001012 12196001 21047001 21733001 21801001 21857001 21866001 108 Viton Part Number 07450001 07451001 09002016 09002022 07449001 09002010 09002013 09002015 09002011 07612001 09002027 09002113 07877001 09002024 09002023 09002119 09002121 09003117 09002108 Common Application Section Seal, Old Section Seal, Old Dual Pressure Relief Head HRH, EPC-IH Actuators Spool Seal Solenoid Bonnet + Others EPC Cartridge PRV Cartridge LS Section Seal, Old Unloading Valve Cartridge HRH Actuator Dual Pressure Relief Head PC Flow Control Pneumatic Actuator Float Positioners Section Seal, New EPC Bonnet + Others Section Seal, New LS Section Seal, New Rev: 08-26-2002