1
Service Instructions
________
English
__________
Delivery date:
Supplier:
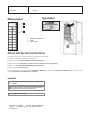
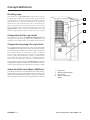
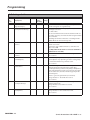
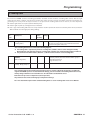
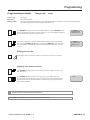
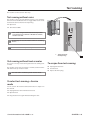
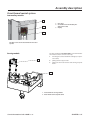
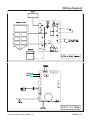
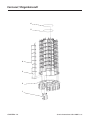
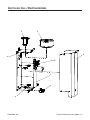
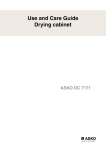
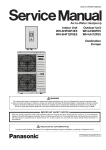
Type label
Menu panel
1
z
2
3
1. Display with instructions
2. Drink
3. LED for drink
About the Service Instructions
The Service Instructions are aimed at persons trained to use the product.
The Service Instructions is devided into 4 chapters.
Chapter 1 contains concept definitions and safety instructions
Chapter 2 contains loading tables, system overview and directions for programming
Chapter 3 contains troubleshooting with repair instructions
Chapter 4 contains spare parts lists.
As well as the Service Instructions, there is an Operator’s Manual that describes the functions and handling of the machine. It also
contains installation and maintenance instructions. Symbols
Warns of actions that can lead to injury, or an important
reminder.
Instructions for the correct use of the machine, to avoid
disrupting the functioning of the machine.
Notes, comments or useful tips.
Manufacturer: JEDE AB
Box 303 SE-542 23 MARIESTAD,
Sweden
Tel +46(0)501 67 000 Fax +46(0)501 67 067
www.jede.com
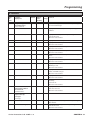
General
1
_____________________________________
Service instructions Jede
1200E
_____________________________________
In this chapter
q
Important notes for your safety
q
Concept definitions
Contents
________________________________________
5 Important notes for your safety
________________________________________
6 Concept definitions
6
6
6
6
7
7
7
7
Drinking cups
Compartments for cup stacks
Compartment groups for cup stacks
Separate drink cartridges
Compartment groups for cartridges
Refrigerating element
Internal machine for cold drinks
Water output
________________________________________
CHAPTER 1 - 4
Service Instructions Jede 1200E rev 02
Important notes for your safety
These instructions and warnings have been provided to help you avoid misuse and unnecessary risks and should be read before the
machine is installed and used.
Only use this product in the way that it is designed to be used. All other use will risk injury to people and
damage to the product.
Please study these instructions carefully before servicing the drinks machine. This is essential for correct
installation of the machine, and a requirement for the terms of the guarantee to be valid.
Store these operating instructions in a suitable, safe place.
Never use cleaning agents containing solvents. These can cause damage to the machine and may give off
toxic gases. There is also a risk of fire and explosion.
The water tank in the machine contains hot water and can cause burns if touched.
The highest quality materials and care during production will not prevent wear to the inlet hose. The hose
must therefore be checked regularly. Replacing it in time will prevent damage and injury from the water.
For safety reasons, repairs must be carried out by a professional. Repairs not carried out by a professional
can put the user and functioning of the machine at risk.
The machine is only completely free from current if the mains plug is out or the mains switch is off.
The power point must be in a position where the plug can be easily removed if necessary.
Check that the power rating corresponds to the data on the type label and that the main circuit is earthed
correctly, according to the current standard. We recommend that the main circuit is fitted with an earth
fault breaker.
Before putting the plug into the socket – check that the water connection has been carried out in accordance
with the instructions, the main tap is open and the tank has been filled with water.
The manufacturer declines all responsibility if the electrical connection is not carried out according to the
operating instructions.
Further safety instructions can be found later on in the Service Instructions.
Service Instructions Jede 1200E rev02
CHAPTER 1 - 5
Concept definitions
Drinking cups
The machine has a cup carousel with cup stacks. Each cup is
pre-filled by the supplier to contain exactly the right amount
of ingredients of the highest quality. The drink is made by
adding just hot or cold (see below) water. Preparing the
drinks in the cups eliminates the risk of mixing flavours.
1
2
Once a drink has been selected (and paid for, if necessary)
the cup carousel rotates so the correct cup stack reaches the
cup presenter. A cup is released and filled with hot or cold
water. The cup presenter rotates and the cup can be reached.
3
Compartments for cup stacks
The carousel has space for 11 numbered compartments with
cup stacks. The cup stacks are positioned according to a loading table, which should always be available for the machine.
4
Compartment groups for cup stacks
The 11 compartments with cup stacks can be connected together
into groups with the software. This option extends the period before a particular type of drink, such as coffee, needs to be filled up.
For example, coffee can be found in group 1 (compartments 1+2+3), coffee with sugar in group 2 (compartments
4+5+6), coffee with whitener in group 3 (compartments
7+8), coffee with sugar and whitener in group 4 (compartments 9+10) and chocolate in group 5 (compartment 11).
By using groups, the next compartment in the group is used when a
compartment is empty. The machine does not use the next compartment in a group until the first compartment is registered as empty.
Separate drink cartridges (additives)
As an option, the machine can be fitted with a total of four drink cartridges, which may be sugar, milk powder or other, as an option. This
allows drinks to be varied further, eg with extra sugar or milk. These
drink cartridges are placed in a line to the right of the cup carousel.
CHAPTER 1 - 6
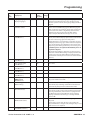
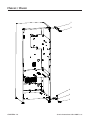
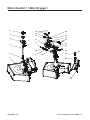
1.
2.
3.
4.
Cup carousel
Water tank with insulation
Cup presenter
Space for refrigerating
element
Service Instructions Jede 1200E rev 02
Concept definitions
Compartment groups for cartridges
As in the case for the cup stacks, the four drink cartridges are alsow
arranged into groups. By using groups, the next cartridge in the
group is used when a cartridge is empty. The machine does not use
the next cartridge in a group until the first one is registered as empty.
See the following example:
Additive
Drink cartridges
"2+2"
A
"4"
A
"2+1+1"
A
"1+1+1+1"
A
A
A
A
B
Number of additive groups
B
B
2
See the loading table No 7 - 9
A
A
1
See the loading table No 10 - 12
B
C
3
See the loading table No 13 - 15
C
D
4
See the loading table No 16 - 18
1
2
One button on the menu panel can
only handle two of these additive
groups.
3
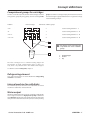
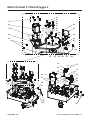
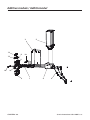
1. Feeding hopper
2. Partition
3.
Cup
The four cartridges have a common feeding hopper for
the powder. To avoid contamination (taste or other reason), there is an partition wall in the middle of the hopper.
See further section 'Loading table', chapter 2.
Refrigerating element
As an option, the machine can also be fitted with a refrigerating
element for cold drinks.
Internal machine for cold drinks
As an further option, the machine can be fitted with an internal
machine for cold drinks, called CanVender.
Water output
All mixing of drinks takes place in the cup. For drinks requiring froth,
such as cappuccino, there is a high-pressure pump in addition to
the outlet valve. The high-pressure pump always starts, with a time
delay, after the outlet valve has been opened, to avoid splashing.
Service Instructions Jede 1200E rev02
CHAPTER 1 - 7
Gematech Innovation
Doc.No: 36 544/E- 1rev 02
2
_______________________________________
Control system
Service Instructions Jede 1200E
_______________________________________
In this chapter
q
Loading table
q
System overview
q
Programming
________
English
__________
CHAPTER 2
Contents
___________________________________________________________________________________
3
Loading table
3 Buttons
4 Loading table variations without additives
5 Loading table variations with additives "in drinks button"
___________________________________________________________________________________
7
System overview
7 Subsystems
7 Document overview
7 Authorisation
7 Custom programming
7 Recipe programming
7 System programming
7 The machine's functional modes
___________________________________________________________________________________
8
Programming
8 Programming mode
8 Button functions in programming mode
9 Menus
9 End programming
9 Changing parameters
9 Displaying statistics
10 Menu overview
23 Menu summary
24 Programming example Enter service code . .. . . . . . . . .. . . . . . . . . . . . . . . . .. . . . . . . . . . . . .Menu 0
25 Programming example Common or individual prices . . . . . . . . . . . . . . . . . . . . . . . . . . . . .Menu 11
26 Programming example Individual drink prices . . . . . . . . . . . . . . . . . . . . . . . . . . . . . . . . . . . Menus 21-38
27 Programming example Change tubes - status. . . . . . . . . . . . . . . . . . . . . . . . . . . . . . . . . . . . Menu 44
28 Programming example Changing the maximum number of doses in a drinks cartridge Menu 72
29 Programming example Programming an additive for a selected basic drink . . . . . . . .Menus 21-38
___________________________________________________________________________________
CHAPTER 2 - 10
Service Instructions Jede 1200E rev. 02
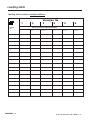
Loading table
A loading table specifies the compartment in which a cup
stack should be placed and how the machine’s 11 compartments can be arranged into groups by means of the software.
The machine’s E-PROM contains a number of different loading
table variations. The machine is delivered with one of the loading
tables loaded in the working memory. This loading table can easily
be changed for one of the others according to the list below. The
variations can also be modified according to individual requirements. For more information see section ‘Menu summary, menus
60 and 61’.
It is very important that the selected loading table is
followed when loading drinks cartridges. Otherwise
the drinks menu on the front of the machine will not
be correct.
Buttons
Button no 1
Button no 10
Button no 2
Button no 11
Button no 3
Button no 12
Button no 4
Button no 13
Button no 5
Button no 14
Button no 6
Button no 15
Button no 7
Button no 16
Button no 8
Button no 17
Button no 9
Button no 18
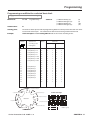
Loading table no:_______________________
Compartment in cup carousel
Drink 1
2
Group no
In the Operator's
Manual there is a
loading table for the
current machine giving the right positions
for the different cup
stacks on the carousel
3
4
5
6
7
8
9
10
11
Service Instructions Jede 1200E rev. 02
CHAPTER 2 - 11
Loading table
Loading table variations without additives
1
2
Button
No
Variation No
3
4
5
6
Carousel position / Compartment number
1
1
1+2
1+2+3
1+2
1+2+3
1+2+3
2
2
3+4
4+5
3+4
4+5+6
4+5+6
3
3
5+6
6+7
5+6
7+8
7+8+9
4
4
7
8
7+8
-
-
5
5
8
-
-
-
-
6
6
-
-
-
-
-
7
-
-
-
-
-
-
8
CV1
CV1
CV1
CV1
CV1
CV1
9
CV2
CV2
CV2
CV2
CV2
CV2
10
7
9
9
9+10
9+10
10
11
8
10
10
11
11
11
12
9
11
11
1+2:Esp
1+2+3:Esp
1+2+3:Esp
13
10
1+2:Esp
1+2+3:Esp
-
-
-
14
11
-
-
-
-
-
15
1:Esp
-
-
-
-
-
16
-
-
-
-
-
-
17
CV3
CV3
CV3
CV3
CV3
CV3
18
CV4
CV4
CV4
CV4
CV4
CV4
CHAPTER 2 - 12
Service Instructions Jede 1200E rev. 02
Loading table
Varianter av laddningsschema med additiv i dryckesknappen
7
8
Button
No
Variation No
9
10
11
12
Carousel position / Compartment number
Additiv 2 + 2
A
A
B
B
Additiv 4
A
A
A
A
1
1
1+2
1+2+3
1
1+2
1+2+3
2
1+A
1+2+A
1+2+3+A
1+A
1+2+A
1+2+3X
3
1+B
1+2+AX
1+2+3+AX
1+AX
1+2+AX
1+2+3+A
4
1+A+B
1+2+B
1+2+3+B
1:Esp
1+2:Esp
1+2+3+AX
5
2
1+2+BX
1+2+3+BX
2
1+2:Esp+A
1+2+3:Esp
6
3
1+2+A+B
1+2+3+A+B
3
3+4
1+2+3:Esp+A
7
4
1+2:Esp
1+2+3:Esp
4
-
-
8
CV1
CV1
CV1
CV1
CV1
CV1
9
CV2
CV2
CV2
CV2
CV2
CV2
10
5
3+4
4+5
5
5+6
4+5
11
6
5+6
6+7
6
7
6+7
12
7
7
8
7
8
8
13
8
8
9
8
9
9
14
9
9
10
9
10
10
15
10
10
11
10
11
11
16
11
11
-
11
-
-
17
CV3
CV3
CV3
CV3
CV3
CV3
18
CV4
CV4
CV4
CV4
CV4
CV4
Esp
= To make ESPRESSO, less water is added
A
= additive
B
= additive
X
CV
= extra dose of the additive
= Canvender
= additive group
Service Instructions Jede 1200E rev. 02
In the Operator's Manual there is a loading table for the
current machine giving the right positions for the different
cup stacks on the carousel
One button on the menu panel can only handle two of
the additive groups.
CHAPTER 2 - 13
Loading table
13
14
Button
No
Variation No
15
16
17
18
Carousel position / Compartment number
Additiv 2 + 1 + 1
A
A
B
C
Additiv 1 + 1 + 1 + 1
A
B
C
D
1
1
1+2
1+2+3
1
1+2
1+2+3
2
1+A
1+2+A
1+2+3+A
1+A
1+2+A
1+2+3+A
3
1+B
1+2+B
1+2+3+B
1+B
1+2+B
1+2+3+B
4
1+C
1+2+C
1+2+3+C
1+C
1+2+C
1+2+3+C
5
2
1+2+A+C
1+2+3+A+C
2
3+4
4+5
6
3
1+2+A+B
1+2+3+A+B
3
5+6
6+7
7
4
1+2+B+C
1+2+3+B+C
4
7
-
8
CV1
CV1
CV1
CV1
CV1
CV1
9
CV2
CV2
CV2
CV2
CV2
CV2
10
5
3+4
4+5
5
8
8
11
6
5+6
6+7
6
9
9
12
7
7
8
7
10
10
13
8
8
9
8
11
11
14
9
9
10
9
11+A
11+D
15
10
10
11
10
11+B
11+DX
16
11
11
-
11+D
11+D
-
17
CV3
CV3
CV3
CV3
CV3
CV3
18
CV4
CV4
CV4
CV4
CV4
CV4
A
B
C
D
X
CV
= additive
= additive
= additive
= additive
= extra dose of the additive
= Canvender
= additive group
CHAPTER 2 - 14
In the Operator's Manual there is a loading table for the
current machine giving the right positions for the different cup stacks on the carousel
One button on the menu panel can only handle two
of the additive groups.
Service Instructions Jede 1200E rev. 02
System overview
Subsystem
The system consists of the following subsystems
As an optional extra, the machine can be fitted with drink supplements in the form of powder cartridges. Programming with these
supplements requires authorisation B.
qThe control unit for the order module, BM
See also ‘Menus’ below - authorisation B.
qControl unit for serving module, SM
qThe control unit for the tank module - TM
See also the section ‘Circuit board control system in
chapter 3
Document overview
These Service Instructions describe all the parameters that can
be programmed / displayed and the commands that can be
executed.
The Operator’s Manual describes the programming that can be
carried out by the user himself/herself without calling on the
service staff.
Authorisation
The system has three authorisation levels, A, B and C, linked to the
type of programming.
qCustomer programming (authorisation level A). Described in
the ‘Operator’s Manual’.
qRecipe programming (authorisation level B)
qSystem programming (authorisation level C)
There is a separate access code for each authorisation level. For
authorisation level A, the service code is preset to 0000 and does
not need to be entered. Configuration at this authority level is
carried out by the user.
Service codes B and C are also preset, and are given in the delivery
documentation.
Staff who will handle recipes and systems, ie authorisation levels
B and C, enter these codes from menu ”Enter Password”, No 0. This
opens the menus that require these codes. (See below and also the
programming examples later on in these instructions.)
Authorisation level B covers level A, and authorisation level C
covers level B.
Customer programming
System programming
From here you can edit whether the default setting should apply,
select the country and coin table to use, set the water temperature
in the tank and reset all statistical information.
See also under ‘Menus’ below - authorisation C.
The machine’s functional modes
The machine has three different ‘states’ or functional modes.
qOperating mode
qService mode
qProgramming mode
Operating mode
Setting: Put the plug into the wall socket with the door of the
machine closed.
When it has powered up, data is read from E-PROM and stored in
RAM. To speed up reading and writing to E-PROM, nothing else
is done during this time. The display cannot be updated and is
turned off. During the very first start-up, so-called initial start-up,
certain data is initiated and written back to E-PROM. It takes longer
to write to than to read from E-PROM, and the display is therefore
turned off for longer than at other start-ups.
When start-up is complete, the machine is ready for operation.
Drink selection starts when a button is pressed. If no button is
pressed within 10 seconds, drink selection ends.
Payment starts when a coin is inserted into the coin dispenser.
The balance is shown on the display.
If a drink has been selected but the balance is too low, payment
starts after the drink has been selected. The display shows the
amount due. If no coin is inserted for 10 seconds, drink selection
ends.
Authorisation A also allows some non-editable statistics to be displayed, such as total sales value, value in coin box (if the machine
contains a coin dispenser), total number of sales, total number of
sales per drink and total number of errors per error code.
Service mode
See also ‘Menus’ below - authorisation A.
qTake the plug out of the wall socket with the door closed.
To set: qOpen the door
Recipe programming
qPut the plug back into the wall socket.
As the standard version of this machine contains cups with the
correct amount and type of ingredient, their compositions cannot
be changed. The amount of water and whether the high-pressure
pump should be activated can be set from here, however.
In this mode the machine’s function can be run without activating
the water function (filling and heating up the water) see e.g. the
section ’Test running’ further on in the manual (chapter 3)
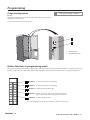
Programming mode
Service Instructions Jede 1200E rev. 02
See next page.
CHAPTER 2 - 15
Programming
Programming mode
The program language is in English.
To set: Open the door when the machine is in operating mode and press the programming button inside the door.
The door can now be closed or remain open.
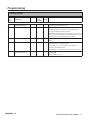
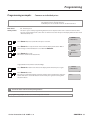
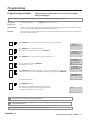
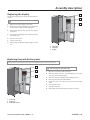
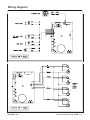
1
2
1.
Network socket
2.
Programming button
Button functions in programming mode
When the programming button has been depressed, the menu panel buttons change their function. Buttons 1 - 4 and buttons 6 are now
used for programming. The LED for the relevant button will light and show green when the button has a programming function
Button 1 Increases the number on the display.
Button 2 Decreases the number on the display.
Button 3 Confirms that the number is OK.
Button 4 Returns one level up to the main menu. If there is only
”one level deep” you come directly to the main menu.
Button 6 Ends programming mode.
The remaining buttons on the menu panel have no function in this mode.
CHAPTER 2 - 16
Service Instructions Jede 1200E rev. 02
Programming
Menus
Statistical information and values that can be changed can be
accessed by selecting the main menu and, where relevant, the
submenu.
The main menu is shown on the display with the menu number
and name.
The submenu is shown with the name preceded by ”=”.
It takes a few seconds for the data to be stored and during this
time the display is turned off.
If you have pressed button 6 or disconnected the power, the
menu panel buttons will change back into drink selection buttons after restart.
Some menus require a service code to change the parameter
value.
Selecting a main menu
Use the buttons on the front of the machine to choose menus,
see previous page.
When the programming button is pressed, you will first go to main
menu ”Enter Password”, No 0.
qUse button 1 to increase the main menu number.
qUse button 2 to decrease the main menu number.
qUse button 3 to select the main menu number.
1
PROG (A)
0 Enter Password
2
Changing parameters
If you have selected a menu/submenu with button 3, you will
automatically go to the relevant parameter.
The parameter is displayed on the left. If the parameter consists of
more than one number, it can sometimes be changed in groups.
qUse button 1 to increase the value.
qUse button 2 to decrease the value.
qUse button 3 to edit the next group or to finish (if the last group
has been edited).
A parameter value that can be changed will flash when it
is shown.
Displaying statistics
2
Selecting a submenu
If you have selected a main menu with one or more submenus
with button 3 above, you will automatically go to the first submenu
after pressing the button.
The display may show for example ”=Price”.
PROG (A)
21 Ingredient Key 1
=Price
qUse button 1 to scroll through the submenus.
qUse button 2 to go back through the list.
qUse button 3 to select the submenu that is shown, and the parameter value will be displayed.
The microprocessor gradually stores data that can be used as
statistical information.
Statistics that can be displayed are: total sales value, value in
coin box, total sales per drink (f the machine contains a coin
dispenser), total number of servings, total number of errors
per error code, number of free drinks, number of servings
payed with token, number of servings payed with MDB-Card,
value of servings payed with token or MDB-Card, value filled
to the MDB-Card, value to the tubes (if the machine contains a
coin dispenser), value to the box and if the machine has erased
the balanced credit after 90 sec (the value can be seen under
menu 80).
NB! Menus 80:1, 83:1 and 84:1-18 will not be deleted when
a new upgraded software is discovered on start-up and the
EPROM is erased.
qUse button 4 to return to the previous main menu.
End programming
qPress button 6, when in the relevant main menu (the LED
will show green), to leave the machine’s programming mode.
Any changes will only be stored after button 6 has been
pressed.
You must be at the main menu when pushing button 6.
If you want to undo a change or cannot remember what
has been changed, you can disconnect the power to
prevent the changes from being saved.
If the plug is taken out like this, the door must be closed
before the plug is put back in. Otherwise the machine
will start up in the service mode.
Service Instructions Jede 1200E rev. 02
CHAPTER 2 - 17
Programming
Menu overview
The programming of the machine is based on a number of menus.
The display on the front of the machine has four rows, each with 20 possible characters.
Some parameters can be changed and some cannot, the latter are in the form of statistical information etc.
Statistical information and parameters that can be changed can be accessed by selecting the main menu and, where relevant, the
submenu.
Applies to program version 12.01.02
Other versions may deviate from this description
1. System............................page 10
2. Price.................................page 12
3. Selecting a drink.........page 14
4. Payment...................... page 16
5. Water system.............. page 18
6. Loading table...............page 19
7. Compartment..............page 20
8. Statistics........................page 21
1.System
Main-/
Submenu
Description
{"Display text"}
Default
Authorisation
Visibility
Change
0
Service code
{"Enter Password"}
0000
ABC
-
Comment
The user can enter a password to change authority level.
The authority level is always (A) when the configuration
program is started.
The current level of authority is indicated on the first
display row like; (A), (B) or (C).
1
2
Machine type
{"Machine Type"}
Jede
1200
BC
Seriel number
{"Asset Tag"}
JEDEHC
ABC
*
The machine type is displayed. (JEDE1200).
Not editable.
BC
Machine identification
Displays the EVA-DTS machine asset tag identifier.
Current character is marked by [ ].
Use buttons 1 and 2 to move between the characters.
Pressing key 3 selects the marked character and the
parameter is altered by using keys 1 and 2 and set using
key 3.
The white space character is displayed as “(space)” and
may only be used to set the length of the asset tag i.e
terminate the asset tag string. Length may be between 0
and 8 characters.
Available characters are digits, capital letters and white
space.
Authority level > A is required to change.
CHAPTER 2 - 18
Service Instructions Jede 1200E rev. 02
Programming
Main-/
Submenu
Description
{"Display text"}
Default
Authorisation
Visibility
Change
3
Set default values
{"Set defaults"}
NO
BC
C
Comment
Sets all parameters except menu 51 and 52 to default
values. Level C authority is needed to set defaults.YES/NO
Note!
Consider carefully the effect of resetting the machine
to the default setting. All customised settings will be
deleted. For the effect of the default setting - see the
section ’Menu overview’.
5
Software version
{"SW-Versions"}
(1)
(2)
-
BC
Submenus display software version information (six
digits). Not editable.
{"=BM Version"}
-
BC
Displays the version of the BM software.
{"=SM Version"}
-
BC
Displays the version of the SM software.
(3)
{"=TM Version"}
-
BC
Displays the version of the TM software.
6
Screensaver
-
ABC
C
With this menu, it is possible for the user to specify
the text which will be shown on the LCD screen in the
"Screensaver" position, in other words, when the machine
shows "Welcome" for 15 seconds. The text appears for 15
seconds, or the length of time needed for the whole text
to scroll over the screen (maximum 30 characters).
8
CanVendor
{”CanVendorOption”}
ABC
-
Submenus handle settings regarding the Jede Can
Vendor.
(1)
{”=Enable CanVendor?”}
ABC
BC
Enables/disables a Jede Can Vendor.
NO
If set to YES, a Can Vendor must be installed in order to start
the machine, else error E30 will occur.
Buttons 8,9,17 and 18 are reserved and not configurable for
can vendor as long as can vendor is enabled.
(Keys 8 and 17 are free if menu 8:6 is set to “YES”).
(2)
{”=CanPrice”}
0000
ABC
BC
Sets the Can price. Values 00.00-99.99
(3)
{"=Disable Discount?"}
NO
ABC
C
Enables/disables the over all discount (menu 48) for Cans.
(4)
{”=Disable FreeSwitch?”}
NO
ABC
C
Enables/disables the effect of the free switch on the BM3
board for Cans.
(5)
{”=CV Target Temp.”}
+8°C
ABC
C
Sets the preferred target temperature for the CanVendor
(°C).
(6)
{"=CV Two-Button-Mode?"} NO
ABC
C
Merges/splits CanVendor lines.
If set to YES, CanVendor line 1&2 and 3&4 (from left to right)
are connected and form two CanVendor boxgroups.
Can Vends are made using two buttons, so two additional
ingredient keys becomes available (8 and 17).
(7)
{"=Disable CV TOKEN?"}
NO
ABC
C
If set to “YES” a can vendor product may not be paid for using
a vend TOKEN. Authority > B is needed to change.
9
Button beep?
{"=Button-Beep?"}
YES
ABC
ABC
Turns beep sound when a button is pressed on/off.
Service Instructions Jede 1200E rev. 02
YES/NO
CHAPTER 2 - 19
Programming
2.Price
Main-/
Submenu
Description
{"Display text"}
Default
Authorisation
Visibility
Change
11
Same price for all?
{"All same price"}
YES
ABC
BC
Comment
Sets the same price for all (in-cup) products condition.
If set to YES the price set in menu 12 applies.
Authority > A is needed to change.
12
Common price for all
{"Price for all"}
0
ABC
BC
Sets the common price for all (in-cup) products.
The price only applies if menu 11 is set to YES.
Authority > A is needed to change.
13
Autoclearing of credits.
{"Autoclear credit?"}
NO
ABC
BC
Engages/disengages the autoclearing of credits.
NO = If previous user have overpaid, the available
balance can be used by next user with no time
limit.
YES = Any available balance disappears after 90
seconds. The sum of erased balance can be seen in
the statistics in menu 80, submenu {"=Autoclear
Value"}
Authority > A is needed to change.
14
Jackpot
{"Jackpot Settings"}
-
ABC
(1)
{"=Enable Jackpot?"}
NO
ABC
Submenus set parameters regarding the winning
function.
BC
Enables/disables the jackpot function.
If set to YES, in-cup products can be won. If the product
costs > 0 and the customer is lucky, credits will remain
after purchase and the display and LEDs will indicate that
the beverage was won.
Only in-cup products can be won.
Authority > A is needed to change.
(2)
{"=Wins per 100 drinks"}
002
ABC
BC
Wins per 100 drinks sets the average win percentage. It
has no effect if 14:1 is not set to YES. Default value is 2,
meaning 2 wins per 100 servings, not necessarily exactly
every 50 serving but a total of 20 +/- 5 wins per 1000
servings on average.
Values 0-100.
Authority > A is needed to change.
15
Handles coin types
{"Coins To Block"}
C
With an MDB change giver connected and enabled
under menu 40:1 this menu handles the coin types the
unit can accept. Each coin type can be blocked (YES) or
not (NO). The settings here will apply when the inventory
tube coin levels are sufficient. Authority > B is needed to
change.
If MDB Change Giver is not activated (menu 40:1 set to
“NO”) “Check MDB Settings” will be displayed.
If an MDB change giver can not be detected, “Check
Change Giver” will be displayed.
There will be a slight delay as the machine initializes the
change giver. The text “Wait” will be replaced by the first
handled coin type on success.
CHAPTER 2 - 20
Service Instructions Jede 1200E rev. 02
Programming
Main-/
Submenu
Description
{"Display text"}
Default
(1) - (10) {"=Block Coin Type"}
Authorisation
Visibility
Change
C
Comment
If set to “YES”, the coin type of the sub menu will be
blocked during normal operation.
Each sub menu handles one of the coin types the change
giver accepts. The coin type is displayed in fractions of
the currency. “0.10” means 10 € cent for instance if the
change giver is of type Euro.
“TKN” refers to TOKEN and N.A (not available) will be
displayed on the sub menus following all handled coin
types and TKN if applicable.
16
Handles the coin types
the unit can accept.
{"On Low Change"}
C
With an MDB change giver connected and enabled
under menu 40:1 this menu handles the coin types the
unit can accept.
Each coin type can be blocked (YES) or not (NO). The
settings here will apply when there is not sufficient
inventory tube coin level, i.e. low change condition.
Authority > B is needed to change.
If MDB Change Giver is not activated (menu 40:1 set to
“NO”) “Check MDB Settings” will be displayed.
If an MDB change giver can not be detected, “Check
Change Giver” will be displayed.
There will be a slight delay as the machine initializes the
change giver. The text “Wait” will be replaced by the first
handled coin type on success.
(1) - (10) {"=Block Coin Type"}
C
If set to “YES” the coin type of the sub menu will be
blocked when in low change condition (currently less
than 5 coins in at least one inventory tube)
Each sub menu handles one of the coin types the change
giver accepts.
The coin type is displayed in fractions of the currency.
“0.10” means 10 € cent for instance if the change giver is
of type Euro.
“TKN” refers to TOKEN and N.A (not available) will be
displayed on the sub menus following all handled coin
types and TKN if applicable.
Service Instructions Jede 1200E rev. 02
CHAPTER 2 - 21
Programming
3. Selecting a drink
Main-/
Submenu
Description
{"Display text"}
Default
Authorisation
Visibility
Change
Comment
21
Button 1
{"Ingredient Key 1"}
-
-
-
Menus 21 to 38 handle the 18 ingredient keys. Submenus
handle settings for one ingredient key.
(1)
Button 1:
{"=Compartment Group"}
1
ABC
BC
Box group (0-number of boxgroups, max 11) for the
beverage is selected.
0 = “Not In Use”.
If set to CanVendor-X the rest of the sub menus will not
be visible, since they are irrelevant when using the button
for Can Vendor.
Disabling Can Vendor on menu 8:1 or enabling CV-TwoButton-Mode on menu 8:6 changes this.
(2)
Button 1:
{"=Price"}
0
ABC**)
ABC
Sets the individual price for the product.
Values 00.00-99.99.
Parameter is only editable if menu 11, “Same Price For
all?”, is set to NO.
**) Only visible if sub menu 1 is not set to CanVendorX (Menu 8:1 is set to YES)
Button 1:
{"=Valve"}
0
(4)
Button 1:
{"=ExtraOutput"}
1
ABC*')
BC
(5)
Button 1:
{"=ValveTime"}
38
ABC**)
BC
(3)
ABC**)
BC
Specifies the outlet valve for the button’s ingredient.
**) See above
Sets extra output options, such as pump and/or water
spoon. Options vary depending on “Valve” setting. Pump
is not allowed when using cold water valve.
**) See above
Shows how long time the outlet valve is open.
This time limits the total time for the ‘pump delay’
("=PumpStartDelay") and the ‘time pump’ ("=PumpTime").
If the total of both these times is less than the open time
for the outlet valve, the water will run by gravity for the
remaining time.
Value 0 = gives the general time (see menu 50)
Range of values 0 - 150 tenths of a second.
**) See above
(6)
Button 1:
{"=PumpStartDelay"}
10
ABC**)
BC
(7)
Button 1:
{"=PumpTime"}
28
ABC**)
BC
Shows how long time after the water dosage has started
that the pump starts.
Range of values 0-100 tenths of a second.
**) See above
Shows for how long time the pump runs.
Range of values 0 – 100 tenths of a second.
**) See above
CHAPTER 2 - 22
Service Instructions Jede 1200E rev. 02
Programming
Main-/
Submenu
Description
{"Display text"}
Default
Authorisation
Visibility
(8)
Button 1
{"=Additive Group (1)"}
No
ABC**)
Additive
Change
BC
Comment
Shows if an additive (eg milk powder) is in the drink
cartridge in group 1.
Alternatives:
"No additive"
"Additive active"
One button on the menu panel can only handle two of
the additive groups.
If an additive is activated, "AdditiveGroupX" will be
shown, where X can be A, B, C or D depending on
which loading table is active. (A, B, C and D stand in
this case for the class of additive groups in the loading
table (q.v.).
**) See above
(9)
Button 1
{"=Additive Dosages (1)"}
0
ABC**)
BC
Shows the dosage (number of presses) per portion.
Range of values 0 – 10.
Value 1 = One dosage of the additive is dispensed
when button 1 is pressed if this button is
connected to an additive.
Value 2 = Two dosages of the additive are dispensed
when button 1 is pressed.
Value 3 = etc
**) See above
(10)
Button 1
{"=Additive Group (2)"}
No
ABC**)
Additive
BC
Shows if an additive (eg sugar) is in the powder cartridge
in group 2.
Alternatives:
"No additive"
"Additive active"
One button on the menu panel can only handle two of
the additive groups.
If an additive is activated, "AdditiveGroupX" will be
shown, where X can be A, B, C or D depending on
which loading table is active. (A, B, C and D stand in
this case for the class of additive groups in the loading
table (q.v.).
**) See above
(11)
Button 1
{"=Additive Dosages (2)"}
0
ABC**)
BC
Shows the dosage (number of presses) per portion.
Range of values 0 – 10.
Value 1 = One dosage of the additive is dispensed
when button 1 is pressed, if this button is
connected to an additive.
Value 2 = Two dosages of the additive are dispensed
when button 1 is pressed.
Value 3 = etc
**) See above
22-38
(1-11)
Applies to Button 2 - 18
See button 1.
Service Instructions Jede 1200E rev. 02
CHAPTER 2 - 23
Programming
4.Payment
Menu 40,41,42
These menus are linked to the payment mechanism and can vary according to customer's wishes.
Menu 43
The right language should be set on the display.
Menu 44
Running handling of the coin mechanism and coin box for machines not having free dispensing.
Menu 45 - 48
These menus deal with the payment key. If the facility is to be present and if so, how it is to be used.
Main-/
Submenu
Description
{"Display text"}
Default
Authorisation
Visibility
Change
40
MDB/ICP
{"MDB/ICP units"}
NO
ABC
C
Activates/deactivates support for MDB (Multi Drop Bus)
units. When enabling MDB, if menu 12 is 0, menu 11 is
set to YES and menu 12 is set to 1.00 (0.25 if menu 41,
“CoinTable”, is set to Great Britain).
(1)
{"=Change Giver?"}
NO
ABC
C
If set to YES a MDB change giver has to be connected at
startup, otherwise error E25 occurs.
(2)
{"=Key/Card Reader?"}
NO
ABG
C
If set to YES a MDB key/card reader has to be connected
at startup, otherwise error E27 occurs.
41
Preferred cointable
{"Cointable"}
Sweden ABC
C
Sets the preferred cointable.
Country
Sweden
Cyprus
Germany
Germany 2
Norway
42
Normally this is done automatically when a MDB unit
identifies itself. Values Swedish-User Defined.
Country
Ireland
Iceland
Portugal
Finland
Poland
Cointable setup
{"Cointable setup"}
Comment
Country
France 2
France
Hungary
Turkey
Greece
-
BC
Country
Spain
Slovenia
USA
The
Netherlands
Czech
C
Country
Great Britain 2
Great Britain
Denmark
Switzerland
Russia
Country
Austria
Belgium
Euro
Token
User defined
If menu 41 is set to User Defined, the cointable can be
edited I the submenus.
Used if the parameter "Coin table" is set to "User
defined".
The lowest value is edited on Submenu 1 and the
highest on Submenu 6.
Submenu 7 shows the number of decimals possible on
the display.
(1)
First value of coin type
{"=CoinValue-1"}
-
BC
C
Sets the value of coin type 1.
Values 00.00-99.99.
(2)
Next value of coin type
{"=CoinValue-2"}
-
BC
C
Sets the value of coin type 2.
Values 00.00-99.99.
(3)
Next value of coin type
{"=CoinValue-3"}
-
BC
C
Sets the value of coin type 3.
Values 00.00-99.99.
(4)
Next value of coin type
{"=CoinValue-4"}
-
BC
C
Sets the value of coin type 4.
Values 00.00-99.99.
(5)
Next value of coin type
{"=CoinValue-5"}
0
BC
C
Sets the value of coin type 5.
Values 00.00-99.99.
(6)
Highest value of coin type
{"=CoinValue-6"}
0
BC
C
Sets the value of coin type 6.
Values 00.00-99.99.
(7)
Number of decimals
{"=NbrOfDecimals"}
0
BC
C
Sets the number of decimals used when displaying credit,
rest or price on the display.
CHAPTER 2 - 24
Service Instructions Jede 1200E rev. 02
Programming
Main-/
Submenu
Description
{"Display text"}
Default
Authorisation
Visibility
43
Language, display
{"DisplayLanguage"}
Swedish BC
C
Sets the preferred display language. If language is set to
other than Swedish, German, French, English, Finnish,
Danish, Spanish or Czech, the language displayed will be
English.
44
Cointube status
{"Cointube-status"}
-
BC
-
Sub menus hold information about the number of coins
in the connected MDB change giver. MDB change giver,
40:1 needs to be set to “YES”. A change giver needs to be
connected. There will be a slight delay as the machine
initializes the change giver. The text “Wait” will be
replaced by the first handled coin type on success.
(1)
First cointube status
{"=NbrOfCoins:"}
-
BC
*)
If an MDB-changegiver is connected and menu 40:1 is set
to YES, menus 44:1-6 display reported value and number
of coins in the change giver’s inventory tubes.
Change
Comment
If ingredient key 1 is pressed when a particular coin type
is displayed, the change giver will be ordered to dispense
one coin of that type. Not editable by other means than
dispensing coins with ingredient key 1 or inserting coins.
*) Authority level > A required to fill. Authority level > B
required to dispense.
(If “Check Change Giver” is displayed, no change giver is
detected. If “Check MDB Settings” is displayed, menu 40:1
needs to be set to YES. If “Not Allowed” is displayed the
password for authority level C needs to be entered under
menu 0)
(2)
Second cointube status
{"=NbrOfCoins:"}
-
BC
*)
See above.
(3)
Third cointube status
{"=NbrOfCoins:"}
-
BC
*)
See above.
(4)
Fourth cointube status
{"=NbrOfCoins:"}
-
BC
*)
See above.
(5)
Fifth cointube status
{"=NbrOfCoins:"}
-
BC
*)
See above.
(6)
Sixth cointube status
{"=NbrOfCoins:"}
-
BC
*)
See above.
45
Possibility to revalue an
MDB key/card.
{"MDB-Revalue?"}
NO
ABC
C
Activates/deactivates the possibility to revalue an MDB
key/card. Default value is NO.
46
Multivending?
{"Multivending"}
NO
ABC
C
Enables/disables the multivending feature.
Escrow function
{"Escrow allowed?"}
NO
MDB.card discount
{"MDB-Card discount"}
0
47
48
If set to YES, any remaining credits will not be returned
automatically after purchase. Default value is NO.
ABC
C
Enables/disables escrow function.
If set to YES credits can be inserted and then returned by
pressing returnbutton, if the machine is equipped with
an MDB-changegiver with sufficient change, without
buying a product i.e functioning as a changer. Default
value is NO.
ABC
BC
Sets a discount for customer purchasing using an MDB
key/card.
If discount is greater than the price of a product, the
key/card will not be charged at all, although a key or card
with at least 0.01 is required.
49
Token acceptance
{"Val. TOKEN enabled?"}
YES
Service Instructions Jede 1200E rev. 02
ABC
C
Enables/diables token acceptance in validator.
CHAPTER 2 - 25
Programming
5. Water system
Main-/
Submenu
Description
{"Display text"}
Default
Authorisation
Visibility
Change
Comment
50
Watersettings
{"Def. Watersettings"}
-
ABC
-
Submenus handle default values regarding valve –and
pumptime for all ingredient keys.
(1)
{"=Def. ValveTime"}
38
ABC
C
This menu sets the global “ValveTime” value and updates
the “ValveTime” value on menus 21-38:6 “ValveTime”.
21-38:7, “PumpTime” will be set to Def.
ValveTime minus Def.PumpStartDelay. The value is used
when a new loadingtable is selected under menu 60 even
if the value in the loadingtable selected differs.
(2)
{"=Def. PumpStartDelay"}
10
ABC
C
Works like menu 50:1, but handles the “PumpStartDelay”
value.
(3)
{"=Water TestMode"}
-
ABC
-
Used for a normal water dose (for testing). The tank
module must be in stand-by mode.
Press button 1 to start a water dose with the same
settings as for drinks button 1.
Press button 2 to end a water dose that has been started.
51
Target temperature
{"Water Temperature"}
80°C
ABC
C
Sets the preferred target temperature (°C) for the tank
module (TM).
Range of values 75 - 90.
CHAPTER 2 - 26
Service Instructions Jede 1200E rev. 02
Programming
6. Loading table
Menu 60
The machine's EPROM contains all loading possibilities available on that machine. A loading table ensures that the right
drink emerges when a button is depressed and that the drink correctly consists of powder and water. No further programming is necessary if the factory-set values are accepted. If the loading table has been chosen, it is thus important
qthat the right stickers are in place (with or without prices),
qthat the right cup and any cartridges have been installed
qthat a copy of the loading table has been set up inside the machine (or that this has been assured by other means) so that the
different drinks are in the right place during refilling.
Main-/
Submenu
Description
{"Display text"}
Default
Authorisation
Visibility
Change
60
Loading table (selected)
{"Loading Table"}
1
ABC
BC
Comment
Selects and loading table. All values on menus 21:1-38:12,
except 21-38:3 Price, will be set to predefined values for the
selected loading table. Values 1-18.
Once a loading table has been selected, the following happens:
qThe loading table is copied to the parameter ‘Loading table (editable)’ where it can be changed manually.
Manual changes only affect the parameter ‘Loading table (editable)’. The standard loading table is unaffected.
qThe parameters for drinks buttons (‘Button X....’) take their values from the selected loading table.
61
Loading table
(editable)
{"Edit Loading Table"}
(1) - (16) Compartment
{"=Comp. Group, Comp -"}
BC
0
BC
Each submenu represents one compartment
(carousel position). The value shows to which group a
compartment belongs.
Range of values 0-16.
BC
16 sub menus
Once a loading table has been loaded into the working memory, it can be edited. This change does not affect the
‘original’ in E-PROM. If you are not satisfied with the change, you can reload the same loading table from menu 60,
and any changes that have been made will be lost. An edited table can thus NOT be saved.
Each submenu represents a compartment (carousel position).
The parameter value shows to which group a compartment belongs.
For a more detailed description of the standard loading table see section ’Loading table’ in the Service Manual.
Service Instructions Jede 1200E rev. 02
CHAPTER 2 - 27
Programming
7. Compartment
Menu 72
It is important to check this menu if cartridges are being used as an extra addition. Each cartridge is marked with
a maximum value for the number of doses which it can supply. This figure should be noted down in the vicinity
of the machine and checked every time a new cartridge is fitted. There is a risk otherwise that no signal will be re ceived when replacement is necessary or that the cartridge's content will not be used as effective as it should be.
Main-/
Submenu
Description
{"Display text"}
Default
Authorisation
Visibility
72
Number of cups in a
ABC
cup stack /number of
dosages in a full drink
cartridge
{"Nbr cups/dosages"}
Change
-
Comment
Shows how many cups there are in a cup stack /number
of dosages there are in a full drink cartridge
Range of values 0-500.
Each submenu represents one stack / drink cartridge. 1 - 11 = cup stacks in the carousel.
Each new drink cartridge contains a fixed number of dosages. A list of recommended values is available from the retailer. The
value must correspond to the value that the machine’s microprocessor knows for the drink. If the values differ, they must be
adjusted.
(1) - (11) Number of cups in the cup
stack
{"=Cups/Dos,Comp. -"}
90*)
ABC
A
*) 90 cups in a full stack.
(12)
- (15)
180*)
ABC
A
If menu 60 is set to > 6, submenus 12-15 handle additive
cartridge dosages 1-4 like above.
Number of dosages
in the drink cartridge
{"=Dos.,Cartridge -"}
*) 180 number of dosages in a full cartridge
73
Number of cups /dosages (dafault)
{"Def. Nbr cups/dos."}
ABC
(1)
Number of cups in the cup
stack
(default)
{"=Def.cups, stack"}
90
ABC
Number of dosages in the
drink cartridge
(default)
{"=Def.dosages, cart."}
180
(2)
CHAPTER 2 - 28
Submenus set the default values used when setting a
new or reloading the same loading table under menu
60.
A
Sets default number of cups per stack.
If the machine is reset to "Basic setting" by means of
Menu 3, the number of cups will be reset to this value
for all 11 compartments on the carousel.
After basic setting, Menu 72 must be checked.
ABC
A
Sets default number of dosages per additive cartridge.
Authority A is enough to change.
If the machine is "Reset" by means of Menu 3, the
maximum number of doses is reset to this value for
all four cartridges. After resetting, Menu 72 will thus
need checking.
Service Instructions Jede 1200E rev. 02
Programming
8. Statistics
Main-/
Submenu
Description
{"Display text"}
Default
Authorisation
Visibility
Change
Comment
80
In-cup beverages and
canned beverages.
{"Sales Statistics"}
-
ABC
-
Submenus display sales statistics for in-cup beverages
and canned beverages.
(1)
{"=In-Cup Acc. Total"}
-
ABC
-
Displays total value of dispensed in-cup beverages. Not
editable.
(2)
{"=In-Cup Res. Total"}
-
ABC
-
Displays value of dispensed in-cup beverages since last
reset of this value.
Menu 89 resets statistics.
(3)
{"=Cans Acc Total"}
-
ABC
-
Displays total value of dispensed cans. Not editable.
(4)
{"=Cans Res. Total"}
-
ABC
-
Displays the value of dispensed cans since last reset.
(5)
{"=Nbr of TOKEN Vends"}
-
ABC
-
(6)
{"=Val. of TOKEN Vends"}
-
ABC
-
Menu 89 resets statistics.
Displays the number of vends paid with a token.
Menu 89 resets statistics.
Displays the value of all vends paid with token.
Menu 89 resets statistics.
(7)
{"=Nbr Cashless Vends"}
-
ABC
-
Displays the number of vends paid with an MDB-key/
card.
(8)
{"=Value Cashless Vends"}
-
ABC
-
Displays the value of vends paid with an MDB-key/card.
(9)
{"=Value of Revalue"}
-
ABC
-
(10)
{"=Coinvalue to Tubes"}
-
ABC
-
Menu 89 resets statistics.
Menu 89 resets statistics.
Displays the value that has been transferred/revalued to
MDB-keys/cards.
Menu 89 resets statistics.
Displays the value of all coins inserted and routed to the
tubes of an MDB-changer.
Menu 89 resets statistics.
(11)
{"=Coinvalue to Cust."}
-
ABC
-
Displays the value of all coins returned to customers.
Menu 89 resets statistics.
(12)
{"=Autocleared Value"}
-
ABC
-
Displays the value of all credits erased after 90 seconds
inactivity.
See menu 13.
Menu 89 resets statistics. 81
Value of inserted coins
routed to the coin box
since last reset.
{"CoinBox-value"}
-
83
Total amount of
dispensed in-cup
beverages.
{"Servings"}
-
ABC
-
(1)
{"=Acc. In-Cups Served"}
-
ABC
-
ABC
-
Displays the value of inserted coins routed to the coin
box since last reset.
Menu 89 resets statistics.
Displays total amount of dispensed in-cup beverages.
Not editable.
(2)
{"=Resetable Servings"}
-
ABC
-
Displays number of dispensed in-cup beverages since last
reset of this value.
Menu 89 resets statistics.
Service Instructions Jede 1200E rev. 02
CHAPTER 2 - 29
Programming
Main-/
Submenu
Description
{"Display text"}
Default
Authorisation
Visibility
Change
(3)
{"=Acc. Cans Served"}
-
ABC
-
(4)
{"=Res. Cans Served"}
-
ABC
-
84
Total number of sold
items per button.
{"Servings per Button"}
-
ABC
-
(1-18)
"=Recipe X"}
-
ABC
-
85
Number of prepared
beverages per ingredient
key since last reset.
{"Res. Serv. per Btn"}
-
ABC
-
(1-18)
Sales per drink
{"=Recipe X"}
-
ABC
-
Comment
Displays total amount of dispensed.
Not editable
Displays the number of dispensed cans since last reset.
Menu 89 resets statistics.
Submenus 1-18 display total number of sold items per
button.
Not editable.
Submenus 1-18 display number of prepared beverages
per button since last reset.
Menu 89 resets statistics.
86
Number of free drinks
served.
{"FreeDrinks served"}
-
BC
-
Displays number of free drinks served.
87
Number of errors per
error type.
{"Errors"}
-
ABC
-
Submenus display number of errors per error type.
(1-37)
{"=EXX —”}
ABC
Submenus 1-37 display number of errors per error type.
Not editable.
89
90
All resetable statistics
{"Reset All Statist."}
NO
EVA-DTS password
{"Reset EVA-DTS Pwd?"}
NO
BC
C
If YES is selected all resetable statistics are cleared.
All EVA-DTS resetable fields will be reset as if an audit list
1 had occurred. Authority > B is needed to reset values.
C
C
If YES is selected the password required for collecting
audit data using an EVA-DTS audit data collector will be
reset to 0000.
The password will be set again the first time an audit data
collector unit using a password other than 0000 collects
audit data from the machine.
CHAPTER 2 - 30
Service Instructions Jede 1200E rev. 02
Programming
Menu summary
Things to consider before delivery
Menu 60
The machine’s EPROM contains all the loading variations set up for
this machine, currently 8. A loading table ensures that the right
drink is dispensed when a button is pressed, and that the drink has
the right amount of powder and water. No further programming
is needed if the factory settings are kept. If the loading table has
been selected, it is therefore important
qthat the correct menu stickers are in place (with or without
prices),
qthat the correct drink cartridges are fitted,
qthat a copy of the loading table is put up inside the machine (or
that this is safeguarded in some other way) so that the different
drinks end up in the right places when they are refilled.
Menus 40, 41
These menus relate to the payment equipment, which may vary
to suit customer requirements.
Menu 43
The right language should be correctly set on the display.
Programming when the machine is in use
It should normally be possible for this programming to be
carried out by the customer and at the customer’s site.
Menus 11, 12 and 13
These menus relate to the pricing of drinks and they may be
adjusted as required.
Menu 44
Day-to-day handling of coin dispensers and money boxes for
machines that do not serve free drinks.
Menu 72
It is important to check this menu if powder cartridges are used
as extra supplements. Each powder cartridge is labelled with
the maximum number of doses that can be dispensed. Make
a note of this number by the machine and check it each time
a new powder cartridge is fitted. Otherwise, there is a risk that
no signal will be given when it needs to be changed or that the
contents of the cartridge are not used as efficiently as possible.
Menus 80 - 89
Deal with statistics on usage.
Menus 45 - 48
These menus relate to the payment key, if this option should be
available and, if so, how it should be used.
Menu 72
See below.
Service Instructions Jede 1200E rev. 02
CHAPTER 2 - 31
Programming
Programming example:
Enter service code
Here the service staff can enter the authorisation code B or C to access and configure the menus that require these authorisation levels.
The preset authorisation code for B is 9317
for C is 1001
Main menu:
0 ”Enter Password”
Initial position:
The door has been opened and the programming button presed. The door can either be closed or remain open.
The display shows main menu ”Enter Password”, no 0.
1
Press button 3 to accept the menu choice. Now the display shows ’00’
PROG (A)
0 Enter Password
00
2
Press preset code 1001 (for authorisation C) by increasing the parameter value with
button 1 or decreasing it with button 2.
Press button 3 to accept and go to the next group of numbers.
PROG (A)
0 Enter Password
1001
3
When the last number has been entered, press button 3 to accept.
The code is now shown on the bottom line.
PROG (A)
0 Enter Password
1001
1001
To go to another menu
4
Press button 4 to return to the menus. The display shows ”Enter Password” again.
5
Press button 1 to go to the menu requiring the Service Code
PROG (A)
0 Enter Password
You have to be in a main menu to be able to use button 6 to conclude. The LEDs next to the relevant programming
buttons will show green during programming when in programming mode.
Note!
After ending configuration with button 6, the service code returns to A (0000)
CHAPTER 2 - 32
Service Instructions Jede 1200E rev. 02
Programming
Programming example:
Common or individual prices.
In our example we have used menu 11, which sets whether we want a common price for the drinks.
The common price is set under menu 12.
Individual prices are set under menus 21 -38 submenu ”Price”
Service code
B or C
Main menu:
11 ”All same price?”
Initial position:
The door is open and the programming button has been depressed. The service code for Level B or above
has been entered under menu 0. The door can either be closed or left open. The display will show main menu
”Enter Password”, no 0.
PROG (B)
11 AllSamePrice?
1
2
3
Press button 1 (increase) until ”All same price?” is shown.
Press button 3 to accept the menu choice. Now the display shows either ”NO” or
”YES”. Change to ”YES” with button 1 or to ”NO” with button 2.
Press button 3 to accept.
The choice is shown on the bottom line.
PROG (B)
11 AllSamePrice?
NO
PROG (B)
11 AllSamePrice?
YES
YES
To go to another menu, finish or save the change:
4
5
Press button 4 to return to the menus. The display shows ”All same price?” again.
PROG (B)
11 AllSamePrice?
Press button 6 to finish.
The change is now implemented and stored. It takes a few seconds for the data to be
stored. If the door is closed the buttons on the menu panel go back to being drink
selection buttons.
Start....
You must be at the main menu when pushing button 6.
This programming example can also be found in the Operator’s Manual
Service Instructions Jede 1200E rev. 02
CHAPTER 2 - 33
Programming
Programming example:
Individual drink prices
This setting is only applicable if individual drink prices have been set from Menu 11 by answering NO to this menu option. See
the programming example. Individual drink prices are set from this menu.
Main menu:
21 –38 ”Ingredient Key”
Submenu ”Price”
Menu 21 refers to drink no 1 according to the menu panel (usually coffee).
Menu 22 refers to drink no 2 according to the menu panel etc.
Only the submenu "Price" is available without an authorisation code. Other submenus require
Authorisation Code B.
Initial position:
The door has been opened and the programming button pressed. The door can either be closed or remain
open. The display shows main menu ”Enter Password”, no 0.
Example:
Illustrates how to set the price of drink no 1 to 20 eurocent. Prices for other drinks are set in the same way.
1
Press button 1 (increase) until menu ”Ingredient Key 1”.
PROG
21 Ingredient Key 1
2
Press button 3 to accept the menu option. Go to submenu ”Price” using button 1.
PROG (A)
21 Ingredient Key 1
=Price
3
Press button 3 to accept the menu choice and go to the parameter value. Now the
display shows:
PROG (A)
21 Ingredient Key 1
=Price
00.00
4
Increase the value with button 1 (or reduce it with button 2). Accept the price shown
with button 3.
5
Press button 4 to return to main menu ”Ingredient Key 1” again. We can now continue
to the next drink with button 1, etc. or…..
PROG (A)
21 Ingredient Key 1
=Price
00.20
PROG (A)
21 Ingredient Key 1
To end and save changes:
Press button 6 to finish.
The change has now been implemented and saved. It takes a few seconds for the data
to be stored. If the door is closed the buttons on the menu panel go back to being drink
selection buttons. If all drinks have been priced, button 6 just needs to be pressed once
to apply to all.
6
Start....
You must be at the main menu when pushing button 6.
This programming example can also be found in the Operator’s Manual
CHAPTER 2 - 34
Service Instructions Jede 1200E rev. 02
Programming
Programming example:
Service code
Change tubes – status
C (change)
Main menu:
44 ”Coin tube status”
Initial position:
The door has been opened and the programming button pressed. The door can either be closed or remain
open. The display shows main menu ”Enter Password”, no 0.
1
Press button 1 to go to main menu ”Cointube status”. Accept with button 3. This
takes you to the first coin tube in the coin dispenser. ”0.05” on the display shows that
the coin tube holds 5-eurocent (or others) coins.
PROG (C)
44 Cointube-status
=NbrOfCoins:0.05
2
If you want to fill up this coin type, or alternatively empty the coins into the coin
box, accept with button 3. (Otherwise continue with button 1 to the next coin
tube.) The last line of the display now shows the number of coins in the coin tube,
e.g. ”10”.
PROG (C)
44 Cointube-status
=NbrOfCoins:0.05
10
Refilling the coin tube
3
Fill up with 5-eurocent coins. The number ”10” increases as each coin is inserted.
Emptying coins into the coin box
3
4
Press button 1 to empty the coins into the coin box. The number ”10” decreases
with each press.
Press button 3 to proceed to the next coin tube or press button 6 to end.
The change is now implemented and stored. It takes a few seconds for the data to
be stored. If the door is closed the buttons on the menu panel go back to being
drink selection buttons.
Start....
You must be at the main menu when pushing button 6.
This programming example can also be found in the Operator’s Manual
Service Instructions Jede 1200E rev. 02
CHAPTER 2 - 35
Programming
Programming example: Changing the number of doses for a drinks cartridge being exchanged
Relevant when adjusting the standard values for the cartridges under the current loading programme.
Main menu: 72 ”Nbr cups/dosages”
Submenu ”=Cups/dos., Cartr. 01”
Service code:
B
Initial position:
The door has been opened and the programming button has been pressed. The door can either be closed or
remain open.The display shows main menu ”Enter Password”, no 0.
Example:
In this example, the empty drinks cartridge is on the far left of the row. The machine will be re-programmed
from dosage value 130 to 150.
1
Press button 1 (increase) until the menu ”72 Nbr cups/dosages” is shown
2
Press button 3 to accept the menu choice. Go to submenu ”=Cups/dos., Cartr. 01” with button 1.
PROG (B)
72 Nbr cups/dosages
PROG (B)
72 Nbr cups/dosages
=Dos. Cartridge 01
Press button 3 to accept and go to the parameter value, 130.
3
PROG (B)
72 Nbr cups/dosages
=Dos. Cartridge 01
130
Increase the value to 150 with button 1.
Press button 3 to accept.
4
Press button 3 to the return to submenu, i.e. to be able to adjust or check the value
for further cartridges. Return to Main Menu ”72 Nbr cups/dosages” using button 4.
5
PROG (B)
72 Nbr cups/dosages
=Dos. Cartridge 01
150
PROG (B)
72 Nbr cups/dosages
To end and save changes:
Press button 6 to finish.
The change is now implemented and saved. 130 dosages
have now been changed to 150 dosages for the drinks
cartridge in compartment no 1 on the row.
6
Start....
You must be at the main menu when pushing button 6.
Note! The cartridge must be changed for the number of dosages in the cartridge to correspond to the
value that has been set.
This programming example can also be found in the Operator’s Manual
CHAPTER 2 - 36
Service Instructions Jede 1200E rev. 02
Programming
Programming an additive for a selected basic drink
Only applies to machines fitted with drink cartridges.
Main menu: 21 - 38 "Ingredient Key -"
Submenu B
Authorisation:
{"=Additive Group (1)"}
{"=Additive Dosages (1)"}
{"=Additive Group (2)"}
{"=Additive Dosages (2)"}
(8)
(9)
(10)
(11)
Starting point: The door has been opened and the programming button has been pressed. The door can either
be closed or remain open. The authorisation code has been changed to B from menu 0.
Example:
In this example we follow loading table 14 and set the values according to this:
Button
Variation 14
Menu
according to the
loading table
1
Comp.Group 1
2
Comp.Group 1+A
3
Submenu
(8)
(9)
(10)
(11)
21
0
0
0
0
22
A
1
0
0
Comp.Group 1+B
23
0
0
B
1
4
Comp.Group 1+C
24
0
0
C
1
5
Comp.Group 1+A+C
25
A
1
C
1
6
Comp.Group 1+A+B
26
A
1
B
1
7
Comp.Group 1+B+C
27
B
1
C
1
8
28
0
0
0
0
9
29
0
0
0
0
10
Comp.Group 2
30
0
0
0
0
11
Comp.Group 3
31
0
0
0
0
12
Comp.Group 4
32
0
0
0
0
13
Comp.Group 5
33
0
0
0
0
14
Comp.Group 6
34
0
0
0
0
15
Comp.Group 7
35
0
0
0
0
16
Comp.Group 8
36
0
0
0
0
17
37
0
0
0
0
18
38
0
0
0
0
6
7
Compartment Group 3
5
Compartment Group 4
8
9
Carousel
4
Compartment Group 5
Compartment Group 6
10
Compartment Group 2
3
2
1
Compartment Group 1
11
Service Instructions Jede 1200E rev. 02
Drink cartridges
Compartment Group 7
A
A
B
C
Compartment Group 8
= additive group
CHAPTER 2 - 37
Gematech Innovation
Doc.No: 36 544/E- 2 rev 02
3
_______________________________________
Repair/Adjusting
Service Instructions Jede 1200E
_______________________________________
In this chapter
q
Test running
q
Troubleshooting
qAssembly description
qAdjusting and resetting
qWiring diagram
qService
qGuarantee
qTechnical data
________
English
__________
Contents
________________________________________________
3
Test runnin
3
Test running without coins
3
Test running without heat or water
3
To select test-running = Service mode
3
To escape from test-running
________________________________________________
4
Troubleshooting
4
Troubleshooting using error codes
8
Troubleshooting, otherwise
________________________________________________
10 Assembly description
10 Replacing the inlet valve
11 Replacing the outlet valve and pump
12 Replacing the temperature sensor
13 Replacing the level sensor
14 Replacing the overheating protection
15 Replacing the display
15 Replacing the push button panel
16 Replacing the the coin dispenser
17 Circuit board control system
________________________________________________
19 Adjusting and Resetting
19 Resetting the overfill protection
20 Resetting the overheating protection
________________________________________________
21 Wiring diagram
________________________________________________
25 Service
________________________________________________
25 Guarantee
________________________________________________
25 Technical data
________________________________________________
CHAPTER 3 - 42
Service Instructions Jede 1200E rev. 02
Test running
The machine can be test-run in two ways:
Test running without coins
The machine can be test-run without inserting a coin. All other
functions remain unaffected. There is a toggle switch on the circuit
board on the door to switch to free dispensing.
qOpen door
qTurn switch to “ON”.
If the switch setting should include CanVendor products
as well, the meny 8, submenu "=Disable Free Switch",
must be set to 'NO'
Do not forget to reset the switch to “OFF” on concluding
the test.
This method should only be used by trained staff.
1. Toggle switch for
free dispensing
1
Test running without heat or water
This can be one way of test-running functions not utilising heat
or water.
To escape from test-running
The machine can be test-run exactly as normal, but the machine
will neither heat up nor take in water.
qShut the door
qUnplug from the mains
qReplace the mains plug.
The water tank is not filled up under 'Test Run' mode.
To select test-running = Service
mode
See the section ‘The machine’s functional modes’ in chapter 2 in
thes manual.
qUnplug from the mains with the door closed.
qOpen the door
qPlug into the mains again without shutting the door.
Service Instructions Jede 1200E rev. 02
CHAPTER 3 - 43
Troubleshooting
Troubleshooting using error codes
Error
code
Description
Cause / Remedy
E00
Machine out of order
No communication between the PCboards and/or the display.
qBM out of order.
qThe jumper in the TM is lost.
E01
Timeout carousel
qThe carousel cannot find the right
position.
qThe carousel is stuck.
Check that it is screwed in correctly and that nothing is stopping it moving.
E02
Timeout cup presenter.
The presenter is stuck.
Locate the fault.
E03
Overpower motors
High power consumption by any of
motor, pump, inlet- or outlet valve.
Measure the resistance
E04
Dispensing failure.
Cups stick together, do not dispense.
Red diode marks the stack (when door is open).
Acknowledge with button 3, 3 times/stack.
E05
Photocell does not
register carousel.
The fault is not stored in the error
memory - cannot be displayed.
E06
Cup in place.
There is a cup or other object where the Remove the cup.
cup should be.
E07
Driptray full
qDrain and clean the driptray.
qCheck connections for good contact.
E08
Internal error processor
(SM)
qInternal error in the SM PC-board.
qToo old EPROM together w. new TM
PCB.
qChange the the PCB.
E09
RS-485 error (SM) SM-, TM- or display PCB broken.
Change by try.
E10
Maximum time for first
filling obstructed qWater supply obstructed
qMake sure water filling is reaching the machine
(temporary interruption to the mains water
supply may be the cause of the fault)
qIf the machine is equipped with a water filter
- check if the filter is blocked and if it is, replace
the cartridge.
qClean inlet valve filter
qInlet valve not opening
qMeasure voltage at valve outputs when
purchasing a drink. If voltage = 20 to 25 V, the
inlet valve is defective and needs changing. If
the voltage is below 20 V, see if the float
switch is indicating low water (0 - 1 W). If not,
replace switch, otherwise circuit board.
qWater leaking from the tank
qSee fault: ’Machine leaking water’.
E11
Maximum level not
reached within 3 servings
The overfill protector
has not triggered
CHAPTER 3 - 44
Service Instructions Jede 1200E rev. 02
Troubleshooting
Error
code
Description
Cause / Remedy
E10
Maximum time for first
filling obstructed qFloat switch in tank has not given
signal to interrupt flow of water.
qCheck that the switch is correctly seated (straight)
and then measure its resistance in raised position. If resistance is below 3 MW, the switch is
defective and needs changing.
Maximum level not
reached within 3 servings
qFloat switch working but circuit
board or inlet valve defective.
qReset level control, check connections between
float switch, circuit board and inlet valve. Then
measure voltage on inlet valve when purchasing
drink. If the voltage (24 V approx.) is not interrupted when the float switch indicates high water lever the circuit board is defective and needs
changing. If the voltage is interrupted but water
continues to flow in, the inlet valve is defective
and needs changing.
E11
The overfill protection
has triggered. The
overfill protector can
be reset, see section
’Resetting the overfill
protector’ E12
Overpower, exits
High power consumption by any of
pump, inlet- or outlet valve.
Measure the resistance.
E13
Low temperature
Temperature in water
tank below 50º C.
If the temperature fails to rise:
qNo current reaching machine
qCheck mains cable and fuse
qOverheating protection triggered
qTemperature sensor not working.
qHeater element faulty
E14
qReset as per description in section ’Resetting
the overheating protector’.
qChange the temperature sensor.
qChange the heater element
Illogical temperature
qTemperature wrongly set or temTemperature recorded
perature sensor faulty
in water tank below 1º C
or above 110º C
qToo little water in tank
qChange the temperature sensor (can not be
adjusted)
E15
Internal fault in micro-
processor
Computer fault in tank module
Change the PC-board by try.
E16
RS-485 fault
qSM, TM-card or display PCB broken.
qChange by try.
qThe ”jumper” is not in the correct
position
qAdjust
E17
E18
Fault on push-button
panel
MDB/ICP-error, no
answer
qSee ’E10, E11’
qFault in connections to/from control qChecking wiring
panel
qWires to control card not connected
(no buttons working)
qCheck and plug in poss. loose contact.
qFault on control card (no buttons
working)
qChange the PCB.
qOne or more buttons malfunctioning
qChange the push-button panel.
MDB-error in the change giver, key
system or BM PVB.
Check, and change the broken device.
Service Instructions Jede 1200E rev. 02
CHAPTER 3 - 45
Troubleshooting
Error
code
Description
Cause / Remedy
E19
Internal fault local processor (BM)
qShorting bar J11 missing on door
card
qCheck shorting bar J11 (adjacent programming button)
qData error in PC-Board BM
qChange
qA coin or objekt is stuk in the coin
tube
qClear the tube
qPress the coin return button
qThere may be magnetic object or
rubbish in the coin dispenser.
qDismantle coin dispenser and remove any rubbish.
qThe coin dispenser is full
qEmpty the coin box
qThe coin mechanism defective
qReplace the coin mechanism.
qPoor fit between the coin tube and
the coin dispenseer.
qCheck that the opening of the coin tube is
lined up with the input of the coin dispenser.
Check the communication.
E21
Coin tube activated
E22
Timout initiating
The display has no communication with the BM or TM PCB..
E23
Timeout serving
Cannot be shown. The error is self-correcting.
E24
Display error, no answer
The display broken.
E25
MDB- change-giver not Change-giver defective
responding
Change it.
E26
MDB billvalidator, no answer
The billvalidator broken.
Change it.
E27
MDB Keyreader, no answer
The card reader is broken.
Change it.
E28
MDB Universal slave, no answer
The slave is broken.
Change it.
E29
EEPROM, write/read
error
EEPROM is broken.
Change the BM PCB.
E30
No response from Can- qThe CanVendor is faulty or not con- qReplace/Check connecting.
Vendor
nected properly.
qMenu 8:1 in wrong position.
E31
Time out CanVendor
service
E32
Motor overcurrent Can- Faulty CanVendor
Vendor
CHAPTER 3 - 46
Change it.
qCheck the setting.
qCanVendor is not properly connected qCheck connection.
.
qCanVendor is faulty.
qReplace the CanVendor.
Replace the CanVendor
Service Instructions Jede 1200E rev. 02
Troubleshooting
Error
code
Description
Cause / Remedy
E33
Low or high temperature CanVendor has not reached the menu 8:4 Increase "=CV Target Temp."
CanVendor
"=CV Target Temp." ± 5 °C
Let the CanVendor compressor continue cooling
the beverages.
E34
CanVendor reports il- qThe temperature sensor faulty.
qReplace the temperature sensor .
logical temperature.
qThe CanVendor not properly initi- qCheck the installation.
ated.
E35
Compressor error Can- CanVendor reports internal compressor Replace the CanVendor
Vendor
error
E36
Dispensation error on CanVendor reports dispensation error
CanVendor
Service Instructions Jede 1200E rev. 02
Check the CanVendor for stuck cans or bent dispensers.
CHAPTER 3 - 47
Troubleshooting
Troubleshooting, otherwise
Description
Cause
Remedy
The coin dispenser
is not accepting
coins
qDefective coin
qTry another coin
qIncorrect coin denomination
qCheck allowable coin denominations.
qMismatch between coin mechanism and country in system program.
qCompare coin mechanism with program setting.
Correct any errors by reprogramming or changing
coin mechanism.
qThe coin mechanism defective
qReplace the coin mechanism
qMDB not activated
qActivate MDB (Programming menu 40)
qMDB key/card used and key charging not permitted
qRemove key/card or activate charging (Programming menu 45)
The coins do not fall qThe coin box is full
down into the coin
dispenser
qA foreign object or coin has got stuck in the
coin tube.
qPoor fit between the coin tube and coin dispenser.
No display text
Machine leaking or
flooding
Too little water
filling
CHAPTER 3 - 48
qEmpty the coin box
qPress the coin return button.
qCheck that the opening to the coin tube is directly
above the inlet to the coin dispenser.
qThere is no power
qCheck the fuse and wall
qThe display is broken.
qChange it.
qEEPROM in wrong position.
qCheck.
qLevel control in inlet valve malfunctioning
qReplace inlet valve. See section ” Replacing the inlet
valve”. Seek and cure cause of overfilling. See error
codes E10, E11.
qLeak at heater element or float switch.
qCheck tank gasket and make sure nuts are tight.
qInlet or outlet valve dripping.
qCheck hose connections and replace valve.
qWater supply time wrongly programmed
qCheck setting on main menus 21-28, submenus 6, 7
and 8.
qToo low water pressure. Tank not filling up.
qIncrease pressure if possible. Otherwise increase
amount of water via menu 21:6
qLow water level in tank.
qSee Error codes E10, E11
qOutlet valve blocked
qRemove limescale and dirt.
qHose constricted
qReplace kinked hose.
Service Instructions Jede 1200E rev. 02
Troubleshooting
Description
Cause
Remedy
Water not flowing
out into cups.
qFaulty outlet valve or circuit board
qCheck first that connection between the circuit
board and the outlet valve look right. Measure the
voltage at the outlet valve when ordering a drink. If
voltage is below 20 V the circuit board is defective
and needs changing. If the voltage is 20 - 25 V and
the outlet valve does not open, the valve is defective
and needs changing.
See section: ”Replacing the outlet valve”.
qWater tank empty
Service Instructions Jede 1200E rev. 02
qSee Error codes E10. E11.
CHAPTER 3 - 49
Assembly description
Replacing the inlet valve
The water tank is mounted on a movable bracket inside the machine. Remove the carousel to access the inlet valve.
Removing the carousel
2
1
Take the plug out of the wall socket
1
3
1. Markings on the dispenser arm
2. Cup dispenser
3. Dispenser arm
Start by removing all the cup stacks.
Make a note of their positions in the carousel!
2
Unscrew the knob in the middle of the cup carousel.
3
Turn the carousel so the markings on the dispenser
arm are aligned with one of the cup dispensers.
4
Lift out the carousel upwards and outwards.
5
Place the carousel on a level surface so that none of
the cup dispensers are pushed up.
Replacing the inlet valve
6
Turn the water tap off before the machine.
7
Remove the tank lid and place a bucket under the
drain hose.
Note! The water may be hot!
2
1
8
Loosen the clip on the drain hose and let the water
run into the bucket.
9
Loosen the inlet hose, overflow hose and hose to
thewater tank.
10 Loosen the securing screws on the valve and replace
the valve.
3
11 Fix the clip to the drain hose and replace the tank
lid.
Replacing the carousel
12 Replace the carousel. Make sure the guide pin on the
mounting plate fits into the hole in the carousel.
Check that no cup dispensers have been pushed
up. If any have, pull them down while holding
the cup stack. Start with the nearest one and
continue by turning the carousel manually anticlockwise.
13 Close the door.
14 Turn on the pressure with the water tap and put the
plug in.
4
5
6
7
1.
2.
3.
4.
5.
6.
7.
Afterwards check that there are no leaks.
Hose for ventilating the inlet valve
Overflow hose between the top of the water tank and the inlet valve.
Hose to water tank
Inlet valve
Tank support
Drain hose
Clip
CHAPTER 3 - 50
Service Instructions Jede 1200E rev. 02
Assembly description
Replacing the outlet valve and pump
The pump and valve are fitted together as one unit to the water tank. The function of the pump is to provide greater water flow to
make froth for certain drinks.
Remove the cup carousel as described in the previous section ‘Replacing the inlet valve’.
1
Take the plug out of the wall socket
1
Turn the water tap off before the machine.
2
Remove the tank cover and place a bucket under the drain
hose.
Note! The water may be hot!
3
Loosen the clip from the drain hose and let the water run into
the bucket.
4
Remove the cover from the water unit. Use a screwdriver.
5
Cut the tie holding the pump.
6
Dismantle the hoses and cabling.
Label the cables so they can be put back in the right
places.
2
3
7
Pull the unit straight out.
8
Replace the whole unit. A complete valve unit is available as
a spare part.
9
Push the pump unit back into place and put on a new tie.
10 Replace the cables and hoses.
11 Replace the cover plate.
4
12 Replace the clip on the drain hose.
13 Close the door.
5
14 Turn on the pressure with the water tap and put the plug back
in.
Afterwards check that there are no leaks.
1.
2.
3.
4.
5.
Tank cover plate
Pump
Tie
Valve
Feeder hose to cup
Afterwards check for leaks.
Service Instructions Jede 1200E rev. 02
CHAPTER 3 - 51
Assembly description
Replacing the temperature sensor
The temperature sensor is fitted on a tube at the bottom of the
tank.
2
It is easier to do this operatin if the tank will be demounted and
leaned. For that reason the tank must first be emptied.
1
Remove the cup carousel as described in the previous section
‘Replacing the inlet valve’.
3
Take the plug out of the wall socket
1
Turn the water tap off before the machine.
2
Remove the tank cover and place a bucket under the drain
hose.
3
Undo the clip on the drain hose and let the water run into
the bucket.
Note! The water may be hot!
4�������������������������������������������������������
Remove the tank cover as described in the previous section.
5 Undo the screws holding the protection cover over the
electric cabinet and take it out.
4
5
6 Undo the screws holding the water tank unit and take it
out.
7
Pull the sensor from the tank straight down.
8
Remove the cable connection J 5 on the control card for the
tank module. The cable is blue-white-black.
9
Replace in reverse order.
6
10 Close the door, open the water tap and put the plug back
in.
1. Temperature sensor
2. Blue-white-black cable for the temperature sensor
3. Electric cabinet
4. Fastening screws
5. Protection cover
6. Control card for the Tank module
The tank module with removed cover over the
electrical cabinet
CHAPTER 3 - 52
Service Instructions Jede 1200E rev. 02
Assembly description
Replacing the level sensor
1
Remove the cup carousel as described in the section ‘Replacing the inlet valve’.
2
Take the plug out of the wall socket
1
Turn the water tap off before the machine.
2
Remove the tank cover and place a bucket under the drain
hose.
Note! The water may be hot!
3
Undo the clip on the drain hose and let the water run into
the bucket.
4�����������������������������������������������������������
Undo the screws holding the protection cover over the electric cabinet and take it out.
3
1.
2.
3.
4.
5.
6.
4
Control card for the Tank module
Electric cabinet
Fastening screws
Protection cover
Level sensor
Securing nut for the level sensor
5
Undo the cable J 4 on the conntrol card for the tank/service
module. See wiring diagram TM-module.
6
Undo the nut on the outside and remove the faulty sensor.
Remove the old joint as well!
7
Fit the new level sensor with a new joint. Do not over tighten
the nut so the thread is damaged, but tight enough for the
level sensor to make a seal to the water tank.
8
Cut the new cables to a suitable length. Peel back the ends
and fit to connection J 4 on the control card.
9
Reassemble in reverse order.
10 Close the door.
11 Turn on the pressure with the water tap and put in the
plug.
5
6
Afterwards check that there are no
leaks.
Service Instructions Jede 1200E rev. 02
CHAPTER 3 - 53
Assembly description
Replacing the overheating protection
The overheating protection is threaded into the tank bottom. It can be reached if the service cover plate on the tank cover is removed.
Remove the cup carousel as described in the section ‘Replacing the inlet valve’.
Check that the plug is out.
Remember that the machine contains hot water and
that the water tank and cover may be hot.
1 Remove the tank cover as described in previous section.
2 Release the screw holding the service cover plate and remove
it. The water tank bottom will now be visible.
3�����������������������������������������������������������
Dismantle both the high voltage connections on the overheating protection.
4
Undo the overheating protection from the bracket and replace
the unit.
5
Replace in reverse order.
6
Close the door and put the plug back in.
1
2
1.
2.
3.
4.
3
Service cover plate
Bottom part of the water tank
Overheating protection
Reset button
3
4
CHAPTER 3 - 54
Service Instructions Jede 1200E rev. 02
Assembly description
Replacing the display
1
The display is fixed to the inside of the door with two
screws.
2
Pull the plug out of the wall socket.
3
1
Open the main door and the inner door.
2
Undo the connection J 18 on the PC-board for the
intermediary module. See wiring diagram.
3
Release the display cover, unscrew the display
andreplace.
4
Connect the new display to the control card with
the ribbon cable.
5
Close the inner door.
6
Close the main door.
7
Put the plug into the wall socket and give it a test
run.
1. Inner door
2. PC-board
3. Display
Replacing the push-button panel
Before dismantling the push-button panel, the display must be removed. See above.
1
Take the plug out of the wall socket.
2
1
Open the main door and the inner door.
2
Undo the ribbon cable on the push-button panel on the
control card. See wiring diagram.
3
Undo the screws that holding the push-button panel.
4
Push the panel out backwards/inwards.
5
Fit the new one in the same way and connect the ribbon
cable.
6
Close the inner door.
7
Close the main door.
8
Put the plug into the wall socket and give it a test run.
3
1. Inner door
2. PC-board
3. Push-button panel
Service Instructions Jede 1200E rev. 02
CHAPTER 3 - 55
Assembly description
Replacing the coin dispenser
The coin dispenser is accessible when the front door is open.
Take the plug out of the wall.
1
Open the door.
2
Undo the cable from the coin dispenser.
3
Remove the coin dispenser.
4
Connect the new dispenser using the ribbon cable.
5
Close the door.
6
Put the plug into the wall socket and give it a test run.
Type MARS: This type has three catches to hold the coin
dispenser in place. One on the left, one on
the right and one at the bottom.
CHAPTER 3 - 56
Service Instructions Jede 1200E rev. 02
Assembly description
Circuit board control system
Intermediary module
1
1. Inner door
2. PC-board for the intermediary module (master card)
3. Display
2
3
The figure shows the PC-board with the inner door
opened.
Serving module
The PC-board for the Serving module can be found under
the motor bracket. It can be accessed by:
1
1
removing the carousel and drinks cartridges (see previous section)
2
pulling out the cup presenter
3
pulling out the motor bracket and turning it upside
down
2
1. PC-board for the Serving module
2. Motor bracket turned upside down.
Service Instructions Jede 1200E rev. 02
CHAPTER 3 - 57
Assembly description
Tank module
The PC-board for the Tank module can be found at the electronic
cabinet. It can be accessed by:
1
removing the carousel and drinks cartridges (see previous
section)
2
Undo the two screws holding the cover plate according to
the picture.
3
pulling out the cover plate.
1
2
1.
2.
3.
4.
3
CHAPTER 3 - 58
PC-board for the Tank module
Electronic cabinet.
Screws holding the cover plate.
Cover plate
4
Service Instructions Jede 1200E rev. 02
Adjustment and resetting
Resetting the overflow protection
The overflow protection consists of a hose between the top of the water tank and the inlet valve. To even out the pressure, the hose
is vented. If the tank becomes overfull, the hose will fill with the water which is blocking the inlet valve. To reset the protection, the
overflow hose must be released from the inlet valve and emptied
Check that the plug is out
1
Turn off the water supply with the water tap.
2
Open the door
3
Locate the overflow hose connection to the inlet valve (left
side). Release the hose connection and empty all water out
of the hose
4
Slacken the water connection somewhat in order to release
the pressure.
Turn on the pressure with the water
tap before putting the plug into the
wall socket!
Afterwards check for leaks.
5 Refit the hose and water connection.
6 Close the door.
7 Turn on the pressure with the water tap and put the plug into
the wall socket.
1
2
3
1. Hose for ventilating the
inlet valve
2 Overflow hose between
the inlet valve and the
water tank
3. Hose to the watertank
4. Inlet valve
5. Tank support
5
4
Service Instructions Jede 1200E rev. 02
CHAPTER 3 - 59
Adjustment and resetting
Resetting the overheating protection
The overheating protection is threaded in the bottom of the watertank. It can be seen if the service lid is demounted.
1
Remove the cup carousel as described in the section ‘Replacing the inlet valve’.
Take the plug out of the wall socket and wait for about
10 minutes.
Remember that the machine contains hot water and
that the water tank and cover may be hot.
1
Remove the cover from the water unit. Use a screwdriver.
See figure.
2
Release the screw holding the service cover plate and
remove it. See figure. The water tank bottom will now be
visible.
3
Locate the overheating protection as shown in figure and
press the reset button with a screwdriver.
4
Refit the carousel.
5
Close the door.
6
Put the plug back in.
2
4
3
1. Cover plate
2. Service cover
3. Bottom part of the watertank
4. Overheating pretection
5. Reset button
CHAPTER 3 - 60
5
Service Instructions Jede 1200E rev. 02
Wiring diagram
1
2
Overheating trip
Element
Vacuum tube
Varistor
TANKMODUL
43749
Ballast
SERVERINGSMODUL
BEORDRINGSMODUL
43744
49050
T230/18V
SuppressionFilter
48041
Overwiev of the modules.
Gl
Rö
Bn
Or
Bl
Gl
Vi
Photoswitch
Carousellposition
Rö
230V
50Hz
4 3 21
J4
Rö
Sv
Gn
Vi
J3
J5
Photoswitch:
"Cup in carousell"
Steppingmotor
Cuprotator
J6
49050
Bn
Bn Rö Or Gl
Rö
Or
Photoswitch:
Cup in disp.position.
J7
Bn
Rö
Or
Bn
Rö
Or
J8
J12
J9
J10
Photoswitch:
Cup in customerpos.
J11
J1
J2
Steppingmotor
Carousell
48042
S - Module 1200
48050-J3-J4-J5-J7-J8-J9
Service Instructions Jede 1200E rev. 02
CHAPTER 3 - 61
Wiring diagram
Microswitch Drip-tray
J4
J3
Electromagnetic locking
device for cupserver
J5
J6
49050
J7
J8
J12
J9
1
J10
2
Gl
12
11
10
9
8
7
6
5
4
3
2
1
Bn
Sv
Bl
Gn
Gl
Cupdispensing motor
RÖ
J11
Sv
M
Vi
J2
J1
Rö
Gl
Bl
Gn
48043
S - Module 1200
48050-J10-J11-J12
Hallsensor:Cupserverposition.
J12
J18
J10
J13
J17
Coinmec(Alternative)
J7
J14
Validator (Alternative)
J6
J15
J20
43744
J16
J5
J19
J3
J4
J2 J1
12345
48044
BM3 - Module 1200
43744-J3-J4
CHAPTER 3 - 62
Service Instructions Jede 1200E rev. 02
Wiring diagram
Service Instructions Jede 1200E rev. 02
CHAPTER 3 - 63
Wiring diagram
CHAPTER 3 - 64
Service Instructions Jede 1200E rev. 02
Service
Guarantee
Always state the machine type when ordering service. This information can be found on the type label.
JEDE AB will accept responsibility for faults resulting from defects
in the design, materials or manufacture for a period of 2 years (guarantee period). Faults must be reported to JEDE AB or its nearest
retailer. Parts confirmed faulty by JEDE AB during the guarantee
period are replaced by supplying a new fault-free or repaired part.
JEDE has no responsibility beyond supplying such replacements.
This guarantee does not apply in cases of careless handling of the
machine and only on condition that the care instructions have been
followed and that the machine has been used with JEDE’s drinks,
for which it is designed.
To ensure continued problem-free function of your machine, you
can sign a service and care agreement. More information about
this can be obtained from your local machine supplier.
The guarantee ceases to apply if original parts are not used, and
JEDE AB cannot accept responsibility for any damage resulting from
or in connection with the use of parts that are not original.
A guarantee note is enclosed with every machine. Follow the
instructions on it.
Technical data
Weight:
98 kg excl. Cup stacks/cartridges and payment mechanism
Height, machine:
1830 mm
Width:
650 mm
Depth:
600 mm
Voltage:
230 -240 V
Current:
10 A external fuse
Power:
2100 W
Control voltage:
24 V DC
Tank:
Volume 2.5 litres
Capacity:
11 cup stacks, 4 JEDEMATIC cartridges
Connection pressure water:
0.2 -6.0 bars
Service Instructions Jede 1200E rev. 02
CHAPTER 3 - 65
Gematech Innovation
Doc.No: 36 544/E- 3 rev 02
4
_______________________________________
Spare Parts List
Service Instructions Jede 1200E
_______________________________________
In this chapter
q
Spare parts list Door
q
Spare parts list Carousel
q
Spare parts list Chassis
q
Spare parts list Motor bracket 1
q
Spare parts list Motor bracket 2
q
Spare parts list Water tank
q
Spare parts list Electronik box
q
Spare parts list Cup presenter
qSpare parts list Additive module
________
English
__________
Contents
________________________________________________
4 Spare parts list Door
________________________________________________
6 Spare parts list Carousel
________________________________________________
8 Spare parts list Chassis
________________________________________________
10 Spare parts list Motor Bracket 1
________________________________________________
12 Spare parts list Motor Bracket 2
________________________________________________
14 Spare parts list Water Tank
________________________________________________
16 Spare parts list Component Support
________________________________________________
18 Spare parts list Cup presenter
________________________________________________
20 Spare parts list Additive module
________________________________________________
CHAPTER 4 - 70
Service Instructions Jede 1200E rev.02
Door / Dörr
22
6
7
5
4
3
2
1
16
9
8
10
20
11
12
13
23
19
18
17
21
15
14
CHAPTER 4 - 72
Service Instructions Jede 1200E rev.02
Door / Dörr
07-11
Pos. No
Part No
Benämning
Term
1
44055
Mikrobrytare
Microswitch
2
36473
Skyddsglas
Display glass
3
36463
Display
Display
4
36523
Fäste display MSPM-3-01 Richco
Fixation for display MSPM-3-01 Richo
5
36356-2
Fästplåt display
Attachment plate for display
6
43744
Kretskort BM3
PC-board BM3
7
36524
Fäste kretskort EHCBS-7-5-01 Richco
Fixation for PC-board EHCBS-7-5-01 Richo
8
48676
Lysrörshållare
Fluorecent tube holder
9
36702
Tryckknappspanel
Pushbutton panel
10
36700
Stöd för tryckknappspanel
Support for pushbutton panel
11
36525
Skruv, stöd MRT-TT-M4x6
Screw for support MRT-TT-M4x6
12
43006
Reaktor
Coil L15 240V
13
37018
Lysrör 30W/840/895mm/E83 43714
Fluorecent tube 30W/840/895mm/E83 43714
14
48677
Lysrörshållare
Fluorecent tube holder
15
47222
Glimmtändare
Starter
16
36372
Övre gångledsstyrning
Upper hinge guide
17
36448
Medbringare
Rocker arm
18
36393
Lås
Lock
19
36396
Spanjolett
Rod latch
20
36416
Fönster kpl
Window Jede 1200 E, complete unit
21
36531
Mellanplåt kpl. med bild
Cover with picture, complete unit
22
36650
Ljuslåda
Light box
23
L15 240V
Rengjöringsdekal
24
36476
Summer och lysdiod kpl
Buzzer and LED, complete unit
25
36478
Programerings switch kpl
Programming switch, complete unit
26
36487
Kontakt RJ45
Connection RJ 45
27
36488
Gratis switch
Free-vending switch
28
36481
Dörr kpl neutral
Door, basic model, complete unit
Service Instructions Jede 1200E rev. 02
CHAPTER 4 - 73
Carousel / Bägarkarusell
6
5
4
3
2
1
CHAPTER 4 - 74
Service Instructions Jede 1200E rev.02
Carousel / Bägarkarusell
07-11
Pos.No
Part No
Benämning
Term
Antal
Qty
1
43591
Bägardispenser, komplett
Cup splitter, complete unit
11
36099
Bägar dispenser, komplett 73,5 mm
Cup splitter, complete unit 73,5 mm
11
2
48583-4
Karusellplatta
Carousel base
1
3
48686
Skruv, PTK 50 x 16
Screw, PTK 50 x 16
33
4
43581
Bägarkorg
Cup basket
11
36091
Bägarkorg 73,5 mm
Cup basket 73,5 mm
11
5
48965
Ring, övre, för karusell
Ring, upper, for carousel
1
6
48986
Ring, inre, för karusell
Ring, inner, for carousel
1
43839
Karusell, komplett
Carousel, complete unit
1
36101
Karusell, komplett 73,5 mm
Carousel, complete unit 73,5 mm
1
Service Instructions Jede 1200E rev. 02
CHAPTER 4 - 75
Chassis / Chassi
1
2
4
3
2
CHAPTER 4 - 76
Service Instructions Jede 1200E rev.02
Chassis / Chassi
07-11
Pos. No
Part No
Benämning
Term
Antal
Qty
1
36373-2
Gångled övre 1200E
Hinge upper, 1200E
1
2
36371
Gliddel, gångjärn 1200E
Hinge slider, 1200E
2
3
37374
Gångled, nedre, 1200E
Hinge, lower 1200E
1
4
36490
Hylsa
Sleeve
1
Service Instructions Jede 1200E rev. 02
CHAPTER 4 - 77
Motor bracket 1 / Motorbrygga 1
6
15
14
13
5
4
7
3
8
50
22
18
19
12
11
21
22
10
2
1
9
23
20
25
24
26
27
CHAPTER 4 - 78
Service Instructions Jede 1200E rev.02
Motor bracket 1 / Motorbrygga 1
09-12
Pos. No Part No
Benämning
Term
Antal
Qty
1
48917-1
Motorbrygga
Motor shelf
1
2
48679
Bussning med krage
Bushing with collar
1
3
43239
Axel kompl. (inneh. Pos:3,4,7,8)
Shaft, compl. Unit (cont.ref: 3,4,7,8)
1
4
*
Se pos. 3
See ref. 3
5
47898
Bricka
Spacer
1
6
49389
Ratt, M8 x 20mm
Knob, M8 x 20mm
1
7
*
Se pos. 3
See ref. 3
8
*
Se pos. 3
See ref. 3
9
43352
Konsoll, dispemserarm, komplett
Bracket, dispensing arm, compl.unit
1
11
43229
Axel, 6 x 65mm
Shaft, 6 x 65mm
1
12
*
Se pos. 9
See ref. 9
13
*
Se pos. 9
See ref. 9
14
*
Se pos. 9
See ref. 9
15
47761
Skruv, M5 x 10mm
Screw, M5 x 10mm
18
43370
Skruv, 4,3 x 20mm
Screw, 4,3 x 20mm
19
*
Se pos. 3
See ref. 3
20
*
Se pos. 3
See ref. 3
21
*
Se pos. 3
See ref. 3
22
*
Se pos. 3
See ref. 3
23
48914-5
Dispenserarm
Dispensing arm
1
24
36233
Rör, vattenutmatning
Pipe, wateroutlet
1
25
36233
Rör, vattenutmatning
Pipe, wateroutlet
1
26
43547
Rörhållare, utloppsrör
Holder, pipe
1
27
36065-1
Fläktkanal
Funnel for ventilator
1
<>
43095
Fläkt (24VDC)
Fan (24VDC)
1
<>
43838-2
Motorhylla, komplett, utbytes
Motor unit, complete, exchange
1
3
16
17
Service Instructions Jede 1200E rev. 02
CHAPTER 4 - 79
Motor bracket 2 / Motorbrygga 2
18
31
35
36
37
38
39
15
30
15,13
32
33
46
47
40
41
29
48
33
49
28
44
28
34
42
43 40
33
18
45
57
56
52
51
50
18
18
55
54
53
58
59
28
60
33
18
18
50
CHAPTER 4 - 80
28
Service Instructions Jede 1200E rev.02
Motor bracket 2 / Motorbrygga 2
02-10-15
Pos. No
Part No
Benämning
Term
Antal
Qty
28
43105
Fäste för buntband
Clip for tiestrap
2
29
43249
Fäste för karusellmotor
Bracket, carouselmotor
1
30
4