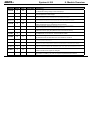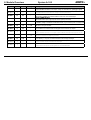
1
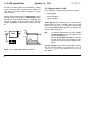
SYSTEM A - 100
Owner’s Manual
doepfer Musikelektronik Gmbh
Important safety notes
E
System A - 100
Warning:
A
doepfer
Important safety notes.
Inside the A-100 power supply are dangerous voltages. It is essential to take careful note of the
following safety instructions:
Whenever electrical equipment is used, several
basic precautions need to be taken, including the
following:
• Before opening up the case or moving a module or
blanking panel, always take the mains power
supply plug out. This applies equally to removing
or replacing any panel or module.
• Before using any part of the instrument, read the
instructions and notes carefully.
• The instrument may only be used for the purpose
described in this operating manual. Due to safety
reasons, the instrument must never be used for
other purposes not described in this manual. If you
are not sure about the intended purpose of the
instrument please contact an expert.
• The instrument may only be operated with the
voltage written on the power input on the rear panel.
• Before opening the case disconnect the power plug.
• All eventual modifications must only be carried out
by a qualified person who will follow the valid safety
instructions. Every modification should becarried
out only at the manufacturer or an authorized service company. Any modification not released by the
manufacturer leads to the extinction of the operation permission.
• The instrument must never be operated outdoors
but only in dry, closed rooms. Never use the instru-
• All empty spaces in the rack must be filled with
blanking panels.
• Before use, the top and bottom covers must also be
properly fixed in place. If modules are permanently
fixed (eg. built into a 19” rack case) then the top of
the highest of the rack systems and the bottom of
the lowest must have their covers properly fitted.
The instrument must never be operated outdoors but
only in dry, closed rooms. Never use the instrument in
a humid or wet environment nor near inflammables.
ii
doepfer
•
•
•
•
•
•
•
System A - 100
ment in a humid or wet environment nor near
inflammables.
Do not use this instrument in damp environments,
or close to water.
No liquids or conducting materials must get into the
instrument. If this should happen the instrument
must be disconnected from power immediately and
be examined, cleaned and eventually be repaired
by a qualified person
Do not use this instrument in close proximity to heat
sources such as radiators or ovens. Don’t leave it
in direct sunlight.
This instrument must be assembled or installed in a
19” rack in a way that guarantees sufficient ventilation and air circulation.
The instrument must not be exposed to temperatures above 50°C or below -10 °C. In use, the
instrument must be at a minimum temperature of
10 °C.
Keep the top side of the instrument free in order to
guarantee proper ventilation, otherwise the instrument could be overheated. Never place heavy objects on the instrument.
This instrument can, without any external amplification or in combination with a headphone or speaker
amplifier, produce sound levels which can damage
your hearing. Don’t work at high sound levels for
prolonged periods of time, and don’t ever use levels
which cause discomfort.
Important safety notes
• The instrument’s mains power supply lead should
be disconnected if it is not used for any substantial
period. If there is any damage the cables must be
repaired or replaced by an authorized person
• Do not tread on the mains supply lead.
• In disconnecting the lead, pull the plug, not the
cable.
• If this instrument is connected to others, check in
their manuals for connection instructions.
• Make particularly sure that no object falls into the
instrument, and that no liquid gets into it.
• Transport the instrument carefully, never let it fall or
overturn. Make sure that during transport and in use
the instrument has a proper stand and does not fall,
slip or turn over because persons could be injured
• The instrument must be checked and serviced by a
qualified technician in the following cases:
a. the power supply lead or connector is damaged
in any way,
b. an object or fluid has somehow got into the
instrument,
c. the instrument was exposed to rain,
d. the instrument stops working properly or starts
to behave erratically,
e. the instrument is knocked over or dropped and/
or its case is damaged.
• As stated above, there are no user-serviceable
parts in the instrument. Refer all repairs to qualified
service personnel.
iii
Contents
System A - 100
Contents
Important safety notes .......................................... ii
doepfer
4. A-100 BS Basic Systems .................... 13
Contents ................................................................. iv
About this manual ................................................... v
5. Accessories .............................................. 15
Introduction ............................................................ vi
6. Items included as standard ............... 17
1. Important notes ................................. 1
1.1 Connecting to the electricity supply ........ 1
7. Further reading ....................................... 19
1.2 Installation .............................................. 1
1.3 Care and maintenance ........................... 1
2. Overall design ............................................ 3
2.1 Introduction ............................................ 3
8. Module overview ..................................... 21
9. Appendix .......................................... 29
9.1 Adding a 5 V power supply ................... 29
2.2 Installing modules .................................. 4
9.2 Installing the AD5 low-cost 5V adaptor 31
2.3 Interconnecting modules ........................ 6
3. Signal flow in the A-100 ........................ 7
3.1 The principles of voltage control ............ 7
3.2 Signals in the A-100 ............................... 8
3.3 The System Bus in the A-100 ................ 9
3.4 Integrating the A-100 with MIDI ........... 11
iv
9.3 Using the Mini power supply/bus .......... 33
10. Using the modules
H
Because the A-100 is a modular system,
each module has its own separate manual,
which can be inserted into this ring-binder.
doepfer
System A - 100
About this manual
This user manual describes the A-100 modular synthesizer system, and explains how to use each section of
it.
If this is your first time using the A-100, please
make sure you are familiar with all the safety instructions (eg. pages ii - iv) and important notes
(chapter 1).
Because of the modular nature of the A-100, this
manual is also designed to be modular.
Chapter 2 (Overall design) describes the physical
make-up of the system - and particularly how to install
the individual modules into the 19” rack.
Chapter 3 (The A-100 signal flow) details the A-100’s
signal path: the basic principles of voltage control, how
to bring MIDI into the equation, and the possibilities for
voltage-controlled modulation.
Chapter 4 describes the A-100 Basic System.
Chapter 5 details accessories.
Chapter 6 explains the standard items included.
Chapter 7 suggests further reading.
About this manual
Chapter 8 (Module overview) gives a run-down of the
individual modules presently available, and an idea of
their potential uses.
Chapter 9 (Appendix) deals with installing an extra 5V
power supply, for modules such as the A-190 and
A-191.
Detailed descriptions of the individual modules follow, in self-contained chapters, with descriptions,
user examples, and patching aids. When buying individual modules, the relevant manual chapters which
are included should be inserted into this ring binder.
In the manual, you’ll find various symbols used:
A
important user and safety advice
H
note
➀ ...
diagram numbering of module controls
...
diagram numbering of module in / outputs
❒
next step in a list of instructions
P
practical hint or tip
v
Introduction
System A - 100
Introduction
In the A-100, Doepfer have produced a capable and
versatile analog modular synthesizer, built in the style
of the classic modular systems of the seventies.
The renaissance of analog synthesis in the last few
years shows that analog sound production has a vital
place alongside sampling and digital synthesis, and
can produce sounds that are unobtainable by any other
means. In addition to the unique sounds of its oscillators, filters, amplifiers, phasers, frequency shifters,
wave-modifiers, different control sources, and so on,
analog synthesis can provide almost unbounded modulation opportunities, conventional and unconventional - limited only by the number and variety of modules
available.
In designing the A-100, our priorities were: good sound
quality; ease of integration into a MIDI system; diversity
of modules available; and, maybe most important of
all, affordability.
Of course, a modular system doesn’t just have advantages. Creative work with an audio construction kit like
this takes time and practice, especially to start with.
vi
doepfer
Anyone who wants to be able to check out all its
available sounds at the press of a button will be very
disappointed with a modular system. Each unique
sound has to be puzzled out, and may never be exactly
repeated.
Nor are there any fixed rules for connecting the various
modules. A modular is an open system, in which
practically anything is possible, and that’s where the
fun really starts. Diversity and experimentation - and
sometimes lateral thinking - are the keys to its power.
Although the user manuals for each module are very
comprehensive, they can’t substitute entirely for a general overview and knowledge of analog synthesis.
Some very good specialised books have been written
on the subject, and although some may be out of print,
it’s crucial to find one or two of them, and learn from
them. With that, the whole world of modular systems
will open up to you, and you’ll suddenly appreciate their
fascination and sheer sonic power.
We hope your A-100 brings you serious pleasure!
July, 2009
doepfer musikelektronik gmbh
doepfer
System A - 100
1. Important notes
1. Important information
1.2 Installation
A
• Do not expose the A-100 to rain or moisture.
• Operation is allowed only in a dry environment in a
closed room but not in the open country.
• The installation near a large amplifier or other
equipment which uses powerful mains transformers may cause hum.
• Do not install the A-100 in close proximity to equipment which produces an electromagnetic field
(monitors, computers, etc.), to avoid the possibility
of mutual interference.
• Use in a dusty environment should be avoided.
As well as the important safety notice
(see ii - iii) please also read and take
note of the following points.
1.1 Connecting to the electricity supply
• The system A-100 must only be connected to the
mains voltage that is specified at the back of the
A-100 frame (220 V to 240 V / 50 Hz or 110 to 120
V / 60 Hz).
• If the fuse has to be replaced only the type of fuse
specified at the back of the A-100 frame is allowed.
If another fuse is used the warranty is void and the
A-100 may be damaged. The fuse is located at the
mains inlet on the back of the A-100 frame
(exception: suitcase version with mains inlet at the
front). To replace the fuse one has to disconnect
the mains cable and remove the fuse holder (e.g.
with the aid of a screw driver). The fuse holder is a
small black plastic part that is inserted into the
mains inlet.
• Do not connect the A-100 to a socket or outlet
which is also being used by equipment such as
electric motors, lighting dimmers, etc, which can
cause interference. Use a separate outlet for the
A-100.
1.3 Care and maintenance
• Apart from cleaning the instrument, no other usermaintenance is recommended, of the modules or
system busses. Internal maintenance should be
carried out only by qualified technicians (see pages
ii - iii: "Important safety notice").
• For regular cleaning, use a soft, dry, or slightly
damp cloth. To remove dirt, if necessary, use a
cloth slightly moistened with a very diluted mild
detergent. This should be more than sufficient to
clean the instrument. Never use solvents like
petrol, alcohol, or thinners.
1
System A -100
doepfer
Fuse values for different mains voltages and power supplies
Type of power supply
2
Mains voltage
A-100NT12
(standard power supply, 650 mA output
current)
A-100PSU2
(power supply with ring core/toroid
transformer and 1.2A output current)
115V
250 mA time lag (slow blow)
630 - 800 mA time lag (slow blow)
230V
125 mA time lag (slow blow)
315 - 400 mA time lag (slow blow)
doepfer
2. Overall design
System A - 100
2. Overall design
2.1 Introduction
The A-100 modular system is based on a standard 19”
rack system A-100 G into which individual Modules
can be fitted in any chosen layout.
The rack system (see Fig. 1) conforms to the 19”
standard, and consists of two sections each 3U high,
tied together by 6U side panels. It contains two system
busses (1), the internal power supply (2) , and the
main electrical supply socket (3).
Module front panels are all 3U high. Their width is
measured in HP (1 HP = 5.08 mm). The rack system
has a usable width of 84 HP (see Fig. 1). If the
modules you install don’t use up the entire 84 HP, then
you must cover up the spaces with blanking panels.
In each rack system there are two system bus bars
(one for each section), to each of which up to 14
modules can be connected, using ribbon cable. The
bus bar serves to supply power to the modules, and
also to send control voltages etc. to some of the
modules (see Chapter 3).
4
3 HU
1
2
3
1
84 HP
Fig. 1: A look inside the A-100 G rack system
The rack system power supply produces voltages of
+12 V and -12 V and can put out a maximum current
of 650 mA. In setting up a modular system, make sure
that the total current required by all the modules doesn’t exceed this maximum. If it does, then a second
power supply (see Accessories) will need to be installed (at position 4, Fig.1). As a rule, though, one
power supply should be sufficient for a rack system.
3
2. Overall design
System A - 100
H
2.2 Installing modules
A
Ignoring this warning can result in damage to
your system, and will void your guarantee!
Important:
Once you’ve checked that there is sufficient current in
reserve for the extra module/s, there’s nothing to stop
you going ahead and installing them. Read on!
Before you install a module into the rack
system:
D First of all, take the A-100’s plug out of the wall
socket.
D Calculate the total current requirement
of existing modules plus the new module/s.
D Plug the supplied ribbon cable into the module’s
bus socket (see 1 in Fig. 2). As a rule, the cable is
16-way, but some modules only have a 10-way
cable. Look carefully at the cable, and then press
the appropriate connector onto the module’s bus
pins (see 2 in Fig. 2).
D Check that this total is less than 1200mA.
D If it is, the existing power supply is fine.
D But if the total current requirement is
more than 1200 mA, you must install a
second power supply (see Accessories)
before installing the module/s. Follow the
installation notes that come with the second power supply.
4
doepfer
A
Check very carefully that it is connected so
that the coloured marking on the ribbon
cable is at the bottom of the module’s
connector (see 3 in Fig. 2), and that the
connection is perfect, and pushed fully
home, not at a slight angle. Failure to
check this may result in the module’s instant
destruction as soon as the power is turned
back on.
doepfer
2. Overall design
System A - 100
Bus Board
Fig. 2:
Connecting the ribbon cable to the module
D Now join the free end of the ribbon cable (see 2 in
Fig. 3) to the nearest available position on the
system bus board (see 1 in Fig. 3).
A Check very carefully that it is connected so
that the coloured marking on the ribbon
cable is at the bottom of the bus connector
(see 3 in Fig. 3), and it is pushed fully
home, not at a slight angle. Failure to
check this may result in the module’s instant
destruction as soon as the power is turned
back on!
Fig. 3:
Connecting the ribbon cable to the bus
board.
H
When you’re installing extra modules, it may
be necessary to take another module or two
out, to allow you easier access to the bus
board.
D Place the module carefully into the space in the
rack, and fasten it firmly in place with the supplied
screws. Put back any covers or blanking plates,
and screw them in firmly.
D Now plug the system A-100 back into the main
power supply, and switch it on.
D Test out the newly installed module.
If it doesn’t seem to be working as expected, immediately disconnect the system from the power
supply again.
5
2. Overall design
System A - 100
A-110
In this case, double-check the connections, making
completely sure that the ribbon cable is the right
way round where it connects to the module and the
bus.
doepfer
VCO
A-118
STANDARD VCO
-2
SYNC
Range
NOISE /
RANDOM
White
Blue
0
0
Tune
0
Colored
0
10
CV 2
Rate
CV 3
0
10
Level
0
Audio In
Random
Output
VCO
STANDARD VCO
10
0
A-145
LFO
0
lin
In 1
A
10
0
10
0
10
0
10
0
10
In 2
10
Input 3
Output
In 3
S
0
PW
10
Input 4
Output
10
0
Reset In
H
L
10
Frequ.
Range
In 4
R
Frequ.
M
0
Inverse
Output
H
10
Output
L
M
ADSR
Control
Time
Range
Fig. 4: Example of a personal patch sheet.
6
10
D
10
10
0
Input 2
Retrig.
10
PW CV 2
0
exp
Input 1
0
0
10
Out
10
ADSR A-138 MIXER
A-140
0
Tune
PW CV 2
0
Res.
Gate
Range
CV 2
PW CV 1
10
In 2
10
0
0
0
In 1
Audio Out
Random
+ Control
-
+2
0
10
Audio In 2
Audio Out
10
-2
0
Lev.
0
SYNC
10
CV 1
10
PW CV 2
A-110
0
Audio In 1
10
0
10
CV 3
PW
PW CV 2
Gain
0
CV 2
10
CV 2
For connecting modules to each other, you need
mono mini-jack (∅
∅ 3.5 mm) patch leads. You can
obtain patch leads from us (see Accessories in chapter 5) in different lengths.
10
10
0
CV 1
2.3 Interconnecting modules
0
CV 2
0
0
Photocopy the patch sheets for each of your modules,
cut these out, and stick them onto a sheet of paper in
the order in which they occur in your system (see Fig.
4). Then photocopy this sheet, and use the copies to
note down good settings and patches.
10
Red
CV 2
Once your system is assembled and operational, you
should make use of the the patch sheets which come
with each module.
CV 1
10
CV 2
PW CV 1
LOW PASS FILTER
CV 1
Freq.
+2
CV 1
VCF 1 A-130 VCA-LIN.
A-120
Out
doepfer
System A - 100
3. Signal flow in the A-100
Input
3. A-100 signal flow
Low Pass Filt er
f
c
VCO
Output
Pit ch
Output
3.1 The Principles of Voltage Control
What makes analogue synthesizers (and modular systems in particular) special is that the important parameters of the sound sources (VCO, noise, etc.) and
modifiers (VCF, VCA, etc.) can be altered not just by
hand, but by voltage control.
This principle was turned into reality by the “father of
the analogue synthesizer”, Robert Moog, who produced the first commercially available synthesizer in the
sixties. It gives vast flexibility and the potential to
make sounds that have never been made before.
Fig. 5 shows the principle of voltage control, with
examples of control voltages affecting a filter (VCF)
and an oscillator (VCO).
In the case of the VCF, the parameter which is being
voltage-controlled is the Cut-Off Frequency fc. The
amount of control voltage input present changes the
cut-off frequency, and thus the frequency of the signal
that the VCF lets through - see the shaded area in the
diagram.
CV Input
CV Input
CV
CV
t
t
Out
fc
Freq .
fc
Freq.
Fig. 5: The principles of voltage control
In the case of the VCO, it’s the pitch which is controlled by a voltage: an increase of 1 volt corresponds to
an increase of one octave in the pitch.
With a sudden change of voltage, the pitch changes
suddenly, while with a smoother, continuous change,
portamento is created.
7
3. A-100 signal flow
System A - 100
doepfer
As well as modules which can be affected by voltage
control, there are other modules like the ADSR and
LFO which themselves produce voltages to control
other modules.
3.2 Signals in the A-100
Usually, these modules need a Trigger Signal to bring
them into action. For instance, a GATE Signal, corresponding to a key being pressed on a keyboard, can
set off an ADSR, which then puts out its variable
voltage “envelope” to affect other modules (see Fig.
6).
• Control voltages
In the System A-100 there are three types of signal:
• Audio Signals
• Trigger voltages
Audio Signals are produced by the sound source
Modules (such as VCO or NOISE), and lie in the range
from -5 V to +5 V (10 VSS). The System A-100 can also
let you use external Audio Signals (e.g. Microphone,
Electric Guitar, Keyboard).
GATE
GATE
ADSR
CV Out
H
+5V
0V
On
Off
t
CV Out
To interface satisfactorily, the level of external Audio Signals must be brought up to the
A-100’s operating level.
Module A-119 (External Input), is ideal for
this job, having among other things an internal pre-amp, and two inputs of different sensitivity.
t
Fig. 6: The envelope generated by an ADSR
8
Control voltages, as produced by modulation sources
like the LFO and ADSR, are typically from -2.5 V to
+2.5 V (5 VSS) for the LFO, and from 0 V to +8 V for
the ADSR.
doepfer
System A - 100
Trigger or Gate Signals, which start a process or
function, are typically from 0 V to +5V or 0V to +12 V,
with the trigger occurring as the leading edge of the
waveform shoots up from 0 V to +5V/12 V. The A-100
modules usually output +12V, but the corresponding
inputs of A-100 modules (e.g. Gate, Clock, Reset) will
also work with lower levels (typ. +5V).
These definitions of the various signals, and the distinctions between them - sound sources and modulation sources - are right in principle, but a modular
system like the A-100 often makes a mockery of them.
In a modular set-up, all of the modules produce voltages, and can be used as control voltages or triggers,
thus blurring the distinction between the various types.
For example, the output from an LFO can be used as
an audio signal, as a control voltage for a VCF or VCA,
or as a trigger signals for a sequence.
It’s just about true to say that anything can be modulated by anything else, so that a modular system gives
the musician extraordinary flexibility and individuality.
3. A-100 signal flow
3.3 The System Bus in the A-100
The A-100’s System Bus supplies power to the modules. It also carries the internal control system
(INT.GATE and INT.CV), which some of the modules
(such as the VCO A-110, or ADSR A-140) can tap into.
You can choose whether these modules receive these
signals, by altering an internal jumper.
1
7
J1
8
J2
14
INT. Gate
INT. CV
+5 V
+12 V
GND
-12 V
Fig. 7: The A-100 system bus
If you use the A-190 MIDI-/CV-Interface in your system, when you press a key on your MIDI keyboard,
the gate and CV1 signals from the A-190 will be sent
via the INT.GATE and INT.CV to all modules on the
bus.
The INT.GATE and INT.CV signal busses can be split
into two equal halves by removing jumpers J1 and
J2 (see Fig. 7), so that for each whole bus, you can
have two separate CV/GATE subsystems.
9
3. A-100 signal flow
System A - 100
doepfer
If on the other hand you’d like to have the same
internal CV and gate available on two busses at
once, you need to link the two together, with the
special CV/gate leads, the A-100 BC.
This is how you go about it:
D Remove the A-100 from the electrical supply.
D Remove Jumpers J1 and J2(see p.9) from the
upper (see Fig. 8 !) and lower (see Fig. 8 ")
system bus boards.
➀
➁
D Replace the jumpers with the special CV / gate
leads, A-100 BC (see Fig. 8 1, 2).
A
10
Make absolutely sure that you connect the
leads correctly, joining up the upper INT CV
with the lower INT CV, and the upper INT
GATE with the lower, to avoid possible
damage when you switch back on!
Fig. 8:
Making a common INT.CV and INT.GATE
signal path between the upper and lower
busses.
doepfer
System A - 100
3.4 Integrating the A-100 with MIDI
To link the A-100 into a MIDI system, you can use
external MIDI interfaces like our MCV4, MSY2 or
MCV24.
The MIDI-CV/SYNC Interface A-190-1 is a MIDI-toCV/Gate/Sync interface with the following outputs:
• CV 1 (for pitch control, 12 Bit)
• CV 2 (any MIDI-Controller, 8 Bit)
• Gate
• Clock
• Start / Stop
The A-190 automatically sends pitch control CV and
gate information out on the INT.CV and INT.GATE
busses.
3. A-100 signal flow
VC Modules like the A-141 VC-ADSR and A-147
VC-LFO can be controlled via the A-190-1 or A-190-2,
so that, for instance, a continuous MIDI controller can
alter envelope parameters in real time. Since these
controllers can be recorded by a MIDI sequencer, VC
modules are effectively programmable.
Analog sequencing can be provided by the A-155 or
the external MAQ 16/3 MIDI Analog Sequencer.
To convert up to 16 control voltages in the range
0...+5V (e.g. from a Theremin A-178 or Joy-Stick
A-174-1 or Foot-Controller A-177-2 or ribbon controller
A-198) into MIDI controllers the CV-to-MIDI interface
A-192 is the right choice.
Another solution is the usage of the low cost MIDI-CV
Interface A-190-2 which has one Gate and four CV
outputs available.
Another suitable MIDI-CV Interface for A-100 was the
24-channel MCV24, a 19” rackmount with its own
power supply. As the MCV24 is no longer in production
you will have to try to find a second hand unit.
11
3. A-100
A-100signal
signalflow
flow
12
System A - 100
doepfer
doepfer
System A - 100
4. A-100 Basic Systems
It’s not in the nature of modular systems to have hard
and fast rules about which modules should be included. But if you’re just starting out along the modular
path, it may be difficult to choose a sensible first set of
modules. Accordingly, we’ve designed Basic Systems
with all the modules mounted in a rack system, and 30
patch leads thrown in as well. For an exact run-down
of the modules included in Basic System 1 (A100BS1), see the table on the right of this page, and
the illustration on the next page. To integrate BS1 it
into a MIDI system, you would need a separate MIDI
interface, such as an MCV4 or MCV24. In the Basic
System 2 (A-100BS2) the MIDI interface A-190 is
included (instead of A-150 and A-162). We also have
available a small Mini System (A-100MS). See our
topic prospectus for details.
The purpose and function of other modules will become more apparent as you work with your system,
and you will be able to decide which extra modules you
need for your particular purposes.
In the future other types of complete systems may be
available. We are planning an Expansion System containing nearly all modules not included in the Basic
Systems, a Vocoder System and a Sound Processing
System without VCO’s for external audio signals.
4. A-100 Basic System
Pos. Quantity Module Function
HP
2
A-110
VCO
20
1
A-114
Dual Ring Modulator
4
u
1
A-115
Audio Divider
8
p
1
A-116
Waveform Processor
8
p
1
A-138b
Mixer (log)
8
e
1
A-120
VCF 1 - 24 dB Low Pass
8
r
1
A-121
12 dB Multimode Filter
12
1
A-130
VCA (lin)
8
1
A-131
VCA (log)
8
1
A-118
Noise / Random
8
1
A-148
Dual Sample & Hold
4
l
2
A-145
LFO
16
o
1
A-160
Clock Divider
4
w
1
A-161
Clock Sequencer
4
e
1
A-180
Multiples
4
r
1
A-138 a
1
A-170
Mixer (lin)
8
Dual Slew Limiter
8
1
A-150
Dual VCS
4
1
A-162
Dual Trigger Delay
8
2
A-140
ADSR
16
13
4. A-100 BS Basic system
14
System A - 100
doepfer
System A - 100
doepfer
Part
5. Accessories
Description
A-100BUS
Separate system bus
One bus board with 14 connectors for connecting modules, 3 control LEDs (+12,-12,+5V)
A-100AD5
5V Low cost adapter
Additional power supply producing +5 V / 100 mA; can be connected to any free socket on the
system bus board. For modules which require 5V (eg. A-113, 190, 191). This is a cheaper alternative to the NT5 +5 V power supply.
A-100NT5
Separate 5 V power supply
+5 V / 500mA additional power supply, assembled and tested.
A-100PSU2
Separate 12 V power supply
+/-12 V 1200mA additional power supply, assembled and tested.
A-100B...
A-100B84P
A-100C ...
Blanking panels / back panels
B1: 1 HP / B2: 2 HP / B4: 4 HP / B8: 8 HP / B42: 42 HP / B84: 84HP
Back panel for power supply
Punched ready for power supply installation, with switches, safety fixings, and power supply
connection cable.
Patch lead
Leads with two moulded 3.5mm plugs C30: 30 cm / C50: 50 cm / C80: 80 cm / C120: 120 cm
continued on next page ...
Subject to change without notice
15
5. Accessories
Part
A-100OPM
A-100SM
16
System A - 100
doepfer
Description
A-100 User Manual
Contains detailed description and instructions for use of all the currently available modules. It
is included when you buy a complete system (A-100BS1, BS2, MS). When buying individual
modules or frames, you have to order the manual separately. If you order the manual in advance the price for the manual will be credited when ordering a complete system later (not only
a single module).
A-100 Service Manual
Contains the schematics, silk screens, parts lists, assembly, test, basic principles and adjustment instructions of all currently available modules. The words (e.g. assembly instructions) are
in German language but schematics, components overlays and parts lists are international.
Available only to A-100 customers.
Subject to change without notice
doepfer
System A - 100
6. Standard items included
6. Items included as standard
A-100G3/G6 - Rack System 3HU/6HU
The following parts are included in each order:
• Rack system, completely assembled, including
two system bus boards, one 12V, 650mA power
supply, internal power cables.
A-100BS1/BS2/MS - Basic Systems
• Rack system (basic frame), completely assembled, including two system bus boards, one 12V,
650mA power supply, internal power cables.
• External power lead.
• +5V supply is not included
• All modules specified for the System (BS1, BS2 or
MS) completely assembled, tested and mounted
into the frame
A- XXX - any module
• 30 patch leads for A-100BS1 and BS2
• Ribbon cable for connection to the system bus.
• 15 patch lead for A-100MS
• External power lead.
• Complete instruction manual (containing the manuals of all modules)
• Module A-XXX.
• Fixing screws.
The instruction manual is not included when ordering
a single module or frame. In this case the complete
instruction manual has to be ordered additionally!
• +5V supply is not included (only the +5V low cost
adapter for A-100BS1 and MS)
17
6. Standard items included
18
System A - 100
doepfer
doepfer
System A - 100
7. Further reading
The resources in the following list should help you
increase your knowledge of analog synthesis, and the
skill with which you can use modular systems like the
A-100.
Specialist books
In English
7. Further reading
Synthesizer Technique ISBN 0-88188-715-3 and
Synthesizer Basics ISBN 0-88188-714-5 - (revised
re-prints of very useful and authoritative articles from
Keyboard magazine, by Moog, Rhea, Milano, Coster,
Duke, Powell, Gleeson, DeFuria, Anderton, et al.)
Crombie, The Synthesizer & Electronic Keyboard
Handbook ISBN 0 330 28681 1, and The New Complete Synthesizer ISBN 0-7119-0701-3 (The latter
especially is a good general introduction.)
Allen Strange, Electronic Music Systems, Techniques and Controls, 2nd edition, Wm. C. Brown Co.
Publishers, Iowa, USA. ISBN 0-697-03602-2*
Trythall, Principles and Practice of Electronic Music, 1973, ISBN 0-448-40002-6 (an early classic.)
This book by Allen Strange is very comprehensive and
thoroughly recommended, because as well as all of
the basics it also includes a huge number of patches
and practical tips. It’s easy to read, instructive and
very well organised. If your bookstore has trouble
ordering a copy, then try the publishers. In Europe, try
McGraw-Hill Publishing, tel +44 (0)1628 502500; or
Susurreal, tel +44 (0)1363 774627), who had copies at
£25 including postage in late 1996.
Forrest, The A-Z of Analogue Synthesisers, Part
One (A-M), ISBN 0 9524377 0 8*, and
Part Two (N-Z), ISBN 0 9524377 1 6* :
Susurreal, England. tel +44 (0)1363 774627, fax +44
(0)1363 777872, email: [email protected]
(A background read rather than great technical help.)
Vail, Vintage Synthesizers, GPI Books / Miller Freeman Inc. San Francisco, 1993, ISBN 0-87930-275-5*
(A background read rather than great technical help.)
Chamberlin, Musical applications of microprocessors, Hayden Book Company, Rochelle Park / New
Jersey, 1980, ISBN 0-8104-5773-3
* Only the books whose ISBN numbers are followed by
an asterisk are definitely in print as of Dec 1996.
19
7. Further reading
System A - 100
doepfer
Specialist books in German
Elrad, Heise-Verlag Hannover
Dellmann / Thewes, Synthesizer-Handbuch, Musik
Media / Augsburger Druck- und Verlagshaus, 1985
Electronic Musician, Polyphony Publishing Co.,
Oklahoma City / USA
Enders, Die Klangwelt des Musiksynthesizers,
Franzis-Verlag München, 1985, ISBN 3-7723-7761-0
Electronics and Music Maker / Music Technology,
Cambridge, England.
Chapman, Formant Musik-Synthesizer, ElektorVerlag Aachen, 1979, ISBN 3-921608-10-4
Polyphony, Polyphony Publishing Co., Oklahoma City
/ USA
Aigner, Formant Musik-SynthesizerErweiterungen, Elektor-Verlag Aachen, 1981,
ISBN 3-921608-19-8
Synthesource (Curtis/CEM house magazine)
Becker, Synthesizer von gestern, Musik Media Verlag Augsburg, 1990, ISBN 3-927954-00-4
Becker, Synthesizer von gestern Vol. 2, Musik Media Verlag Augsburg, 1995, ISBN 3-927954-01-2
A very good introduction to the basic techniques and
programming methods of digital and analogue synthesis can be found in the 120-minute video "The Secrets of Analog and Digital Synthesis" by Steve deFuria (VH017, Warner Bros.).
Specialist magazines
The following useful magazines can mostly only be
found second-hand or may possibly be available in
some libraries, for photocopying articles.
Elektor, Elektor-Verlag Aachen
20
Video
8. Module Overview
System A-100
The following table may be used for planning and arranging an A-100
system regarding to need of space and current.
8. Module Overview
(as of July 2009)
Module
A-101-1
A-101-2
A-101-3
A-101-9
A-102
Width Current Current@5V
[mA]
[mA]
[HP]
16
8
30
8
8
DOEPFER
30
20
50
40
30
Description
-
Vactrol Steiner Filter
-
Lowpass Gate
-
12-Stage Modular Vactrol Phase Filter
-
Dual Universal Vactrol Module
-
Diode Lowpass (combined manual A-102/A-103)
Vactrol filter with different inputs (!) for low/band/highpass
Combination of lowpass and VCA with vactrol (vactrol = LED/LDR- combination)
Modular phaser with separate in/outputs for each stage and 2 polarizers
4 voltaged controlled resistors for modification of other modules
voltage controlled 18 dB low pass with diodes as frequency controlling elements
A-103
8
30
-
18 dB Lowpass (combined manual A-102/A-103)
A-104
20
30
-
Trautonium Formant Filter
-
SSM 24 dB Lowpass (combined manual A-105/A-122)
A-105
8
20
A-106-1
14
40
-
A-106-5
8
30
-
A-106-6
A-107
12
26
50
200
-
voltage controlled 18 dB low pass (with TB303 type transistor ladder)
Quad Low/Band Pass Filter as used in the so-called Trautonium (see A-113)
voltage controlled 24 dB low pass with the legendary SSM2044 circuit
X-treme filter
voltage controlled MS20 filter clone, low/highpass simultaneously, +/- clipping controls
SEM filter
voltage controlled 12 dB filter (SEM type), lowpass/notch/highpass with mixer, bandpass
XP filter
voltage controlled filter (XP type) with 15 different filter types
Multitype Morphing Filter
voltage controlled multitype filter with 36 different filter types and morphing feature
21
System A-100
DOEPFER
Module
Width
Curr.
Curr.@5V
A-108
12
40
-
A-109
20
40
-
A-110
10
70
-
A-111-1
14
40
-
A-111-5
26
80
-
A-112
50
-
A-113
26
30
100
A-114
4
40
-
A-115
8
20
-
A-116
8
20
-
A-117
8
20
-
A-118
A-119
A-120
22
10
8
8
8
20
30
30
-
8. Module Overview
Description
6/12/24/48 dB Low Pass / Band Pass
voltage controlled low pass (ladder type) with 4 different slopes and bandpass
Voltage Controlled Signal Processor
combination of 24 dB low pass, VCA and panning unit (CEM3379 based)
VCO (Standard)
voltage controlled Oscillator with 4 different waveforms, hard-sync input
VCO (High End)
like A-110 but improved waveforms, linear FM input, soft-sync input
Synthesizer Voice
miniature synthesizer voice with VCO, VCF, VCA, ADSR and two LFOs
SAMPLER
8 bit sampler and wavetable oscillator
Submarmonic Generator
Sound Generation unit as used in the so-called Trautonium (4 subharmonic oscillators)
Dual Ring Modulator
2 separate ring modulators
Audio Divider
frequency divider for audio signals (rectangle waveforms)
WP - VC Waveform Processor
module for dynamic waveform modification
DNG / 808 - Digital Noise / Random Clock / 808-Source
digital noise and clock generator, 808-like sound source
Noise / Random
analog noise generator with white and adjustable colored noise, random voltage
External Input / Envelope Follower
Input module for external audio signals, includes envelope follower and gate generator
VCF 1 - 24 dB Low Pass 1
voltage controlled 24 dB low pass (Moog type)
8. Module Overview
System A-100
Module
Width
Curr.
Curr.@5V
A-121
12
30
-
Description
VCF 2 - 12 dB Multimode Filter
-
VCF 3 - 24 dB Low Pass 2 (combined manual A-105/A-122)
A-122
8
20
DOEPFER
voltage controlled 12 dB multimode filter (low pass, high pass, band pass, notch)
voltage controlled 24 dB low pass (with CEM3320, Oberheim type)
A-123
8
20
-
VCF 4 - 24 dB High Pass (module no longer available)voltage controlled 24 dB high
A-124
8
30
-
VCF 5 - 12 dB Wasp Multimode Filter
pass
reproduction of the strange multimode filter used in the EDP Wasp Synthesizer
A-125
8
20
-
VCP - Voltage Controlled Phaser
A-126
8
80
-
VCFS - Voltage Controlled Frequency Shifter
-
VCRF - Triple Voltage Controlled Resonance Filter
-
Fixed Filter Bank
-
Vocoder Analysis Section
A-127
A-128
A-129-1
28
20
20
100
20
100
voltage controlled FET based phase shifter with resonance
voltage controlled analog frequency shifter
3 independent voltage controlled band pass filters with 3 LFOs
filter bank with 15 band filters
Analysis section of the modular vocoder
A-129-2
12
80
-
Vocoder Synthesis Section
A-129-3
16
40
-
Vocoder Slew Limiter
-
SLC - Slew Limiter Controller
-
VUV - Voiced / Unvoiced Detector
A-129-4
A-129-5
8
8
30
30
synthesis section of the modular vocoder
universal 5-fold voltage controlled slew limiter/attenuator/offset generator
controller module for slew limiter function of A-129/3
module for recognition of "voiced/unvoiced" speech
23
System A-100
DOEPFER
Module
Width
Curr.
A-130
8
20
voltage controlled amplifier with linear response
VCA - Voltage Controlled Amplifier
8
20
-
A-132-1
4
20
-
Dual Low Cost VCA
-
Quad VCA
A-132-3
8
8
30
30
-
voltage controlled amplifier with exponential response
two simple voltage controlled amplifier with linear response
four VCAs with independent inputs and outputs, common loudness/level control
Dual linear/exponential VCA
two separate VCAs with selectable control scale (switch, linear or exponential)
A-133
8
30
-
Dual Voltage Controlled Polarizer
A-134-1
8
40
-
VC PAN - Voltage Controlled Panning / Crossfader
two special VCAs with positive and negative (=inverting) amplification
module for voltage controlled panning or crossfading
A-134-2
4
20
-
Dual VC Crossfader
A-135-1
22
30
-
VC MIX - Voltage Controlled Mixer
A-135-2
24
Curr.@5V Description
VCA - Voltage Controlled Amplifier
-
A-131
A-132-2
8. Module Overview
?
?
-
A-136
8
30
-
A-137-1
14
40
-
A-137-2
14
30
-
Two separate voltage controlled crossfaders
4 separate VCAs with common output
VCF/VCA/Panning subsystem (still under development)
subsystem with VCFs with VCQ, VCAs and VC panning units with common stereo output
Distortion/Waveshaper
distortion and wave-shaping / wave-modifying module with extensive control possib.
Voltage Controlled Wave-Multiplier I
waveform multiplier with 4 VC parameters: Multiples, Harmonics, Folding, Symmetry
Voltage Controlled Wave-Multiplier II
makes one sawtooth VCO sound like five VCOs (four VC algorithmic phase shifters)
8. Module Overview
Module
A-138
a/b/c
A-138d
A-138e
Width
Curr.
8
10/20c
8
16
20
10
System A-100
Curr.@5V Description
Mixer, mixer for audio or control voltages
-
(a: linear or b: logarithmic controls or c: polarizing mixer)
-
A-138m
~20
~?
-
A-138x
8
0
-
A-139
8
100
-
A-140
8
20
-
A-141
14
30
-
A-142
8
40
DOEPFER
-
A-143-1
28
70
-
A-143-2
26
70
-
A-143-3
14
70
-
A-143-9
8
30
-
Manual Crossfader / Effect Insert Module
manually controlled crossfader and module to insert external effect units
Quad Three-Way Crossfader / Mixer / Polarizer
four separate three-way crossfader (i.e. fading between 3 different input signals)
4 x 4 Matrix Mixer (still under development)
matrix mixer with four inputs and four outputs, each row can be switched to uni/bipolar
Mix Expander
expanding unit for A-138a/b, expands the number of available inputs to 9
Headphone Amplifier (module no longer available)
stereo headphone amplifier with separate level and common loudness control
ADSR - Envelope Generator
envelope generator with 4 parameters: attack, decay, sustain, release; retrigger function
VC-ADSR - Voltage Controlled Envelope Generator
voltage controlled envelope generator with 4 voltage controlled parameters
VC Decay
voltage controlled envelope generator with one voltage controlled decay
Complex Envelope Generator / Quad AD
Four daisy chained AD type envelope generators with polarizing mixer
Quad ADSR
Four ADSR envelope generators with EOA/EOD/EOR gate outputs and retrigger feature
Quad LFO
Four LFO modulation oscillators with triangle, rectangle and saw outputs, range switch
Quadrature LFO/VCO
voltage controlled LFO/VCO, four sine outputs with 90 degrees phase shift between e.a.
25
System A-100
DOEPFER
Module
Width
Curr.
A-144
8
30
A-145
A-146
A-147
8
8
30
20
40
Curr.@5V Description
Morphing Controller
-
control voltage modifier to obtain morphing effects in combination with A-135
-
LFO 1
-
LFO 2
-
VCLFO
modulation oscillator with 5 waveforms
modulation oscillator with 2 waveforms and waveshape control
voltage controlled modulation oscillator with 4 waveforms
A-148
4
20
-
Dual S&H
A-149-1
12
40
-
Quantized/Stored Random Voltages
A-149-2
4
40
-
A-150
4
30
-
A-151
4
20
-
A-152
A-154
A-155
A-156
26
8
16
22
50
8
40
60
100
50
8. Module Overview
-
two independent sample & hold devices
Replica of the legendary Buchla module "Source of Uncertainty" (part 1)
Digital Random Voltages
expansion module for A-149-1, generates 8 digital random voltages/gates (high/low)
Dual VCS - Voltage Controlled Switsches
two independent voltage controlled switches
Quad Sequential Switch
electronical "rotary switch" with 4 positions
Voltage Addressed Switch
electronical 8-fold "rotary switch" with voltage controlled addressing
Enhanced Sequencer Controller
Expansion module for A-155, adds additional running modes and features to A-155
Analog / Trigger Sequencer
8 step analog and trigger sequencer
Dual Quantizer
two control voltage quantizers with special selection features
8. Module Overview
Module
Width
Curr.
A-160
4
40
A-161
A-162
A-163
A-164-1
4
8
8
6
20
40
40
10
System A-100
Curr.@5V Description
Clock Divider
-
frequency divider for clock/gate signals
-
A-165
4
20
-
A-166
8
40
-
A-167
8
20
-
A-170
8
20
-
A-171
8
20
-
A-172
4
10
-
A-174-1
10
40
-
A-174-2
~14
~20
DOEPFER
-
Clock Sequencer
clock sequencer expansion for clock divider A-160
Dual Trigger Delay
two independent trigger delay devices
Voltage Controlled Divider
divides the frequency of an audio signal by an integer factor controlled from a CV
Manual Gate Module
three manually generated gate/trigger signals
Dual Trigger Modifier
two independent trigger modifiers (inverter + transition edge detector)
Logic Module
dual module with logical AND/OR/EXOR combinations + 2 logical inverters
Analog Comparator/Offset-Generator/Subtractor
compares the difference of two voltages with fixed value and generates a gate from this
Dual Slew Limiter
two independent portamento controllers or integrators
VC Slew Limiter
voltage controlled portamento controller/integrator
Maximum/Minimum Selector
selects from up to 4 analog inputs the maximum and minimum voltage
Joy Stick
module with 2 separate CV outputs controlled by the X/Y position of the joy stick
Wheels Module (still under development)
2 wheels, factor setting: one with, one without reset spring, uni- or bipolar CV output
27
System A-100
DOEPFER
Module
Width
Curr.
A-175
4
20
28
Curr.@5V Description
Dual Voltage Inverter
-
two independent analog voltage inverter with displays
A-176
8
20
-
A-177-1
8
30
-
A-177-4
4
~ 20
8. Module Overview
-
A-178
8
60
-
A-179
8
60
-
A-180
4
-
-
CVS - Control Voltage Source
3 manual adjustable control voltages
External Foot Controller I (module no longer available)
interface module for 2 foot controlers and one double foot switch
External Foot Controller II (still under development)
simple interface module for one foot controller and one double foot switch
Theremin Control Voltage Source
variable voltage/gate source controlled by hand movement
Light Controled Voltage Source (module no longer available)
variable voltage/gate source controlled by light intensity
Multiples I
8-fold multi connector (may be splitted into two 4-fold multi connectors)
Multiples II
A-181
4
-
-
A-182
6
0
-
Switched Multiple
A-183-1
4
0
-
Dual Attenuator (still under development)
two simple passive attenuators
A-183-2
4
~ 20
-
A-183-3
4
~ 20
-
A-185-1
4
30
-
A-185-2
6
30
-
two multiples with 3.5 mm and 1/4“ mono and stereo sockets
eight sockets that can be switched to one of two busses or turned off
Offset Generator + Attenuator/Polarizer (still under development)
generates an offset voltage that is added to an attenuated or inverted input voltage
Amplifier (still under development)
simple DC coupled amplifier with adjustable gain, max. gain can be swithed to 1,2 or 4
Bus Access Module
module for access to bus signals CV and gate
Precision Adder / Bus Access
high precision CV adder (0,1%) with four inputs and optional access to bus CV
8. Module Overview
System A-100
Module
Width
Curr.
A-186
4
0
A-187-1
?
?
A-188-1
14
80
-
A-188-2
30
120
-
A-189-1
8
60
Curr.@5V Description
Gate / Trigger Combiner
7 inputs that are "OR-wired" to the output, mainly for combination of gate/trigger signals
Voltage Controlled DSP Effects Module (still under development)
DSP based effects module with four voltage controlled parameters
-
A-190-1
10
10
• / 50
A-190-2
6
30
-
A-190-3
?
?
DOEPFER
-
A-191
12
30
• / 50
A-192-1
12
100
-
BBD Module
BBD module, available with 6 different BBD circuits from 128 to 4096 stages
Tapped BBD Module
BBD module with 6 taps, single outputs and two (stereo) submixers
Voltage Controlled Bit Modifier
16 different voltage controlled bit modification effects (e.g. bit cruncher) with VC sample rate
MIDI-CV/SYNC-Interface
MIDI-to-CV and sync interface
MIDI-CV-Interface
low cost MIDI-to-CV interface with manual glide control and four CV outputs
Polyphonic MIDI/USB-CV-Interface (still under development)
Midi-CV interface with four CV and gate outputs, different monophonic/polyphonic modes
MIDI-CV-Interface/Shepard Generator (module no longer available)16-fold
MIDI-to-CV interface and Shepard generator
Voltage-to-MIDI Interface
16 CV inputs (0...+5V) are converted into MIDI control change messages
CV/Gate-to-Midi/USB-Interface (still under development)
A-192-2
?
?
-
converts CV/Gate signals into Midi note messages
A-195-1
?
?
-
Pitch-to-CV/Gate/Midi/USB-Interface (still under development)
converts clean monophonic audio signals into CV/Gate/Midi/UBS
29
System A-100
DOEPFER
Module
Width
Curr.
A-196
8
40
A-197-1
14
50
-
A-197-2
34
100
-
A-198
8
40
-
A-199
30
10
80
8. Module Overview
Curr.@5V Description
Phase Locked Loop Module (PLL)
-
linear VCO + 3 phase comparators + lowpass in the form of a so-called PLL circuit
-
Analog Meter (module no longer available)Analog display (moving coil instrument with
back light), 3 display modes
LCD Scope (available only as kit without the scope)
kit to install a Velleman LCD scope into the A-100 system
Trautonium / Ribbon-Controller
Trautonium manual resp. ribbon controller, made of module + manual
Spring Reverb
electronically simulated reverb by means of 3 spiral springs
8. Module Overview
System A-100
DOEPFER
31
DOEPFER
32
System A-100
8. Module Overview
doepfer
System A - 100
9.1 Adding a 5V power supply
Some A-100 modules, for instance the A-113, A-190 or
A-191, need an extra 5 V power supply, as well as the
standard one. You can provide this with the A-100
NT5 5 V supply (or in certain circumstances, you can
use the 100 AD5 5 V adaptor - see 9.2).
A
If you are considering installing and
connecting the NT5, it’s crucial to take
note of the following safety instructions:
• The installation and connection of the
NT5 must only be carried out by a
qualified electrician or technician.
• If no suitable expert is available, the
rack must be sent to a service centre
or direct to Doepfer Musikelektronik
for the power supply to be fitted.
• Danger!
Before installation and
connection of the power supply, it is
essential that the whole rack is isolated completely from the mains current.
9. Appendix
The 5V power supply needs to be mounted near to the
main power input, on the blank upper back panel with
four stand-offs, nuts, serrated washers, and bolts.
Newer back panels (about since summer 1999) are
already equipped with 4 monting holes required for the
5V supply. For back panels manufactured earlier the 4
holes have to be drilled to receive the power supply
fixing bolts (Ø from. 3 to 3.5mm).
The NT5 connection diagram (Fig. 10) is on the next
page. Check again that the rack is totally disconnected
from the mains power supply, then:D Remove the two 115/230V mains cables (normally
blue and black or brown cables) from the 12V
power supply mains input, and reconnect them to
the corresponding mains connectors on the 5V
supply. The case shield / GND cables/connections
remain unchanged as the shielding is connected
directly to the metal frame (the yellow/green cable).
D Join up the two parallel connectors from the 5V
mains input to the mains input of the 12V supply
(using the correct wires from the blue and black or
brown ones supplied).
D Connect the two low voltage outputs of the 5V
supply (ground and +5V) to the system bus board
which requires the 5V supply.
29
9. Appendix
t o t he
connect ors of
t he bus board
System A - 100
doepfer
GND
(black )
blue
blue
+5 V
(re d)
black
black or brown
blue
blue
Fig. 10: NT5 power supply connections
30
black
black or brown
f rom m ains
inlet
doepfer
A
System A - 100
9. Appendix
The yellow/green wire is the safety (earth)
connection, and must be never replaced by
a different colour.
➂
up
oben
If you’ve been using the AD5 low-cost 5V adaptor, but
are now installing an NT5, you must remove the AD5
before commissioning the NT5!
➀
➁
rotered
Markierung
mark
9.2 Installing the AD5 low-cost 5V adaptor
The AD5 can be used for the 5V power supply, as long
as the following applies:
• The current for the modules that require a 5V
supply doesn’t exceed 100 mA (e.g. only one A-190
or A-191)
• There is enough current handling still available on
the +12V supply to cope with the current requirements of the 5V modules.
The AD5 adaptor can be connected to any available
16-way socket on the system bus board (see Fig. 11).
This will feed +5V to modules on that bus, as long as
their current requirements don’t exceed 100mA.
Fig. 11: Connecting the
5V low-cost adaptor
(1: system bus board, 2: AD5, 3: heat sink)
To install the AD5, do the following:
Isolate the A-100 rack from the mains power supply by removing the main plug.
D Carefully insert the AD5 into a free socket on the
bus board.
A
Make sure that the AD5 is the right way up,
and aligned correctly with the bus socket.
The correct position is shown on a sticker
(with the arrow pointing upwards, and the
red mark at the bottom - see Fig. 11).
31
9. Appendix
System A - 100
The fins of the heat sink should be facing to
the right.
It’s vital to make certain that the 16-way
plug and socket marry exactly, and aren’t
displaced up or down a pin, or to the left or
right. If they are misaligned, the adaptor and/
or the power supply may be damaged immediately you switch on.
32
doepfer
doepfer
System A - 100
9.3. Using the mini power supply/
bus
9.3.1. Introduction
The A-100 MNT (Mini power supply / bus) is composed of a miniature power supply and system bus, with
connectors for four modules. It’s designed to be
used with a small set-up of just a few modules, in your
own custom-designed case.
The idea is that then you can use individual A-100
modules - for instance the filters, the filterbank, ferquency shifter, sampler, MIDI interface, etc. - as
free-standing pieces of equipment, which can easily
be integrated with your other instruments or recording equipment.
The power supply provides the usual A-100 system
requirements of +12 V and -12 V, and an additional +5
V supply, for the few modulses (for instance A-190,
A-191) which need it.
The maximum current loading capacity totals 100
mA for +/- 12 V and/or 50 mA for the +5 V supply.
The sytem bus provides connections for four System
A-100 modules. As well as the power supply, it also
carries "INT.CV" and "INT.GATE" connections (see
9. Appendix
A-100 manual, main introduction, chapter 3, ‘The
A-100 signal flow’.).
The A-100 MNT is supplied as standard with an external power supply, which has to be connected to the
socket on the MNT’s circuit board.
A
The external power supply’s transformer supplies alternating current (AC).
If you want to use another power supply
instead of the one supplied, it must have a
voltage output of about 7 to 9 V AC and a
capacity of at least 300 mA.
If you connect an external power supply
which produces direct current (DC), the
A-100 MNT simply won’t work!
A
Both the A-100 MNT and any connected modules must be firmly fixed into a proper casing.
Any sort of "flying construction" is absolutely discouraged, because if two conductors from separate
modules accidentally make contact, (for instance if the
bus-bars from one module ended up touching another
module’s bus-bars), damage will almost certainly result.
In cases like that, the DOEPFER guarantee is definitely
void.
33
9. Appendix
System A - 100
doepfer
9.3.2. A-100 MNT - Overview
➀
➁
Controls:
In- / Outputs:
1 LED :
LED indicator for +12 V supply.
2 LED :
LED indicator for -12 V supply.
34
! BU 1 :
Input for external power supply (7 ...
9 V AC)
" ST 1 ... ST 4 :
Bus output
modules.
sockets
for
four
System A - 100
doepfer
9. Appendix
9.3.3. Controls / indicators
" ST 1 ... ST 4
1 LED
The sockets labelled " on the diagram on p.2 are
where the modules are connected.
•
2 LED
LEDs 1 and 2 indicate that the power supply is
working properly. Once the MNT is connected, both
LEDs should come on.
A
If both LEDs don’t come on, first of all check
that mains power is available at the socket
which the MNT power supply was connected
to; then that the mains adaptor is actually
putting out voltages, and that a DC adaptor
hasn’t been used by mistake. If both these
points are checked, then the MNT must be
defective. The same applies if just one of the
LEDs comes on.
9.3.4. In- / outputs
! BU 1
This is the socket to which the plug from the external
power supply is connected.
So... to connect modules up to the MNT .....
D Disconnect the power supply lead from socket !.
D Connect the ribbon cable supplied with each
module to the module’s bus connector
(see 1 in Fig. 1). As a rule, this is 16-way, but on
some modules it’s only 10-way. Check that the
cable connector is oriented correctly, (see 2 in Fig.
1), and press it on to the module’s bus pins.
A
Be very careful to ensure that the coloured
marking on the ribbon cable is at the bottom
of the module’s connector (see 3 in Fig.
1) and that the connection is perfect, and
pushed fully home, not at a slight angle.
Failure to check this may result in the module’s instant destruction as soon as the power
is re-connected.
35
9. Appendix
System A - 100
doepfer
3
Busplatine
bus board
1
Best
ückungsseite
components
side
3
Fig. 2:
2
Connecting the ribbon cable to the bus
board.
D Now fix the module solidly in its case.
1
Fig. 1:
2
Connecting the ribbon cable to the module
D Now join the free end of the ribbon cable (see 2 in
Fig. 2) to the nearest available position on the
system bus board (see 1 in Fig. 2).
A
36
Again ensure that the coloured marking on
the ribbon cable is at the bottom of the
module’s connector (see 3 in Fig. 1) and
that the connection is perfect, and pushed
fully home, not at a slight angle. Failure to
check this may again result in disaster.
D Re-connect the A-100 MNT’s power supply, and
then switch on the mains again.
D Test out the newly installed module.
If it doesn’t seem to be working as expected, immediately disconnect the system from the power supply again.
In this case, double-check the connections, making
completely sure that the ribbon cable is the right
way round where it connects to the module and to
the bus.