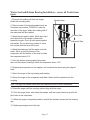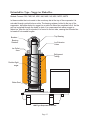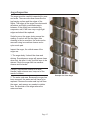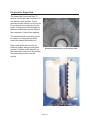
1
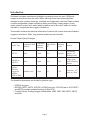
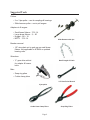
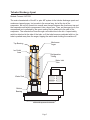
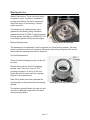
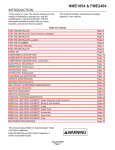
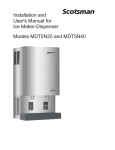
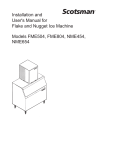
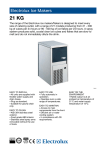
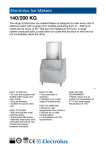
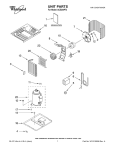
Flaked and Nugget
Ice Machines
Technical
Service Information
Table of Contents
Introduction
. . . . . . . . . . . . . . . . . . . . . . . . . . . . . . . . . . Page 2
Definitions . . . . . . . . . . . . . . . . . . . . . . . . . . . . . . . . . . . Page 3
Suggested Tools . . . . . . . . . . . . . . . . . . . . . . . . . . . . . . . . Page 4
Tubular Discharge Spout
. . . . . . . . . . . . . . . . . . . . . . . . . . . Page 5
Auger Removal - AFE325 . . . . . . . . . . . . . . . . . . . . . . . . . . . Page 6
Center Point Breaker
. . . . . . . . . . . . . . . . . . . . . . . . . . . . . Page 7
MDT3 and MDT4 Variation
. . . . . . . . . . . . . . . . . . . . . . . . . . Page 8
Auger Removal - AFE400, or MDT3, MDT4 . . . . . . . . . . . . . . . . . . Page 9
Auger Removal - MFE400 . . . . . . . . . . . . . . . . . . . . . . . . . . . Page 10
Bearing and Evaporator Service - all 2 inch brass & 1/10 HP . . . . . . . . . Page 11
Water Seal and Bottom Bearing Installation - covers all 2 inch brass types . . Page 12
Extruded Ice Type - Nugget or Flaked Ice . . . . . . . . . . . . . . . . . . . Page 13
Auger Removal
. . . . . . . . . . . . . . . . . . . . . . . . . . . . . . . . Page 14
Auger Inspection . . . . . . . . . . . . . . . . . . . . . . . . . . . . . . . . Page 15
Evaporator Inspection . . . . . . . . . . . . . . . . . . . . . . . . . . . . . Page 16
Bearing Service . . . . . . . . . . . . . . . . . . . . . . . . . . . . . . . . Page 17
Water Seal Installation . . . . . . . . . . . . . . . . . . . . . . . . . . . . Page 18
Addendum - New Bearing Design May 2010
. . . . . . . . . . . . . . . . . Page 19
Introduction
Scotsman has been manufacturing flaked ice machines since the early 1950s and
nugget ice machines since the early 1980s. Although there have been significant
changes in drive systems, bearings, materials and refrigeration, the basic flaker remains
a vertical refrigerated cylinder containing water and a slowly rotating auger. As the
auger rotates it pushes soft, water laden crystalline ice to the outlet, where it is either
extruded or compressed into nugget or flaked ice.
This booklet contains the technical information to service all current and recent flaked or
nugget ice machines. Older, long obsolete models are not included.
Current Flaker System Designs
Model Type
Evaporator
Evaporator Wall
Auger Motor
Nominal
Material
HP
Diameter
Metering
device
Breaker
AFE325
Brass
2 inch
1/10
Cap tube
Flat bearing
retainer, ice
discharge tube
AFE400 or
AFE424
Brass
2 inch
1/10
TXV
Center point
breaker/bearing
retainer
Prodigy
Flaker or
Nugget Ice
Machine,
NME or FME
Stainless steel
3 inch
1/4
TXV
Extrusion - 16
holes or 6 slots
The booklet's procedures are divided by platform type:
• AFE325 and prior
• MFE400, MDT3, MDT4, AFE400, AFE424 and prior. AFE424 new in 2010. MDT3
and MDT4 received updated bearings in May 2010.
• Prodigy Flakers, Prodigy Nugget Ice Machines, NME, FME, NSE, MDT5, MDT6
and prior
Page 2
Definitions
Breaker: The top bearing retainer that causes the soft ice to be compressed.
Auger: Stainless steel shaft with one or two spiral flights on it. Forces the flaked ice up
the walls of the evaporator.
Double-Flight Auger: Has two spirals to lift ice, 180 degrees from each other.
Rifling: grooves machined into the inside walls of the evaporator. Helps to guide the ice
vertically.
Water seal: A two piece seal, one rotating one stationary. The rotating part moves with
the auger.
Evaporator: Refrigerated tube of either stainless steel or brass, surrounded by a
continuous copper tube that contains the refrigerant. Also known as worm tube or
freezer.
Direct drive: Refers to the gear reducer with the motor rotor directly engaging gears.
Bearing retainer: Contains the bearing used to support the auger.
General Flaked or Nugget Ice Machine Cleaning Instructions see specific model's manual for complete instructions
Mineral scale on the auger and evaporator walls will reduce ice making efficiency and
add extra load to the auger drive system. Regular cleaning with ice machine cleaner will
reduce that load and improve ice output.
1. Switch the ice machine off.
2. Shut off the water to the evaporator.
3. Drain the reservoir and evaporator.
4. Mix 8 ounces of ice machine cleaner with 3 quarts of potable water.
5. Pour the cleaning solution into the reservoir until it is full.
6. Soak the machine with cleaner solution for 15 minutes.
7. Switch the ice machine on and pour the remainder of the cleaning solution into the
reservoir until it is all used.
8. Open the water valve and let fresh water into the ice machine.
9. Discard any ice that was made during cleaning.
Page 3
Suggested Tools
Pullers:
• 2 or 3 jaw puller – use for couplings & bearings
• Slide hammer puller – use to pull augers
Adapters to fit augers:
•
•
•
•
Small brass flakers – 7/16 -14
Large brass flakers – ½ - 20
Nugget - 5/8 – 18
MDT2 - 7/16 -14
Slide Hammer with tips
Breaker removal
• 1/8" wire chain cut to grab cap on small brass
flakers. Not applicable to AFE424 or updated
bearing units.
Wrenches:
• ½” gear drive ratchet
for adapter & freezer
bolts
Small Length of Chain
Misc:
• Snap ring pliers
• Corbin clamp pliers
1/2" Gear Drive Wrench
3-jaw puller
Corbin Hose Clamp Pliers
Page 4
Snap Ring Pliers
Tubular Discharge Spout
Models Covered: AFE325
The main characteristic of the AF or prior MF system is the tubular discharge spout and
mushroom-topped auger. Ice is made in the normal way, but at the top of the
evaporator, the soft ice forced into a small area formed between the mushroom top and
the evaporator wall which compresses it into a dryer form. Then, as the auger turns, the
compressed ice is collected by the spout casting that is attached to the side of the
evaporator. The collected ice flows through a movable tube to the bin. A spout safety
switch is attached to the side of the tube, so if the tube becomes restricted with ice, the
tube is pushed away from the auger, tripping the switch and shutting the machine off.
Mushroom
Auger
Top Bearing
Ice Outlet
Area
Refrigeration
Tubing
Water Inlet
Tube
Water Seal
Bottom
Bearing
AFE325 Evaporator Schematic
Page 5
Auger Removal - AFE325
1. Disconnect electrical power.
2. Shut off water supply and drain reservoir and
evaporator.
3. Pull up on black rubber cap and remove it.
4. Remove two allen head screws holding spout
assembly to evaporator and disconnect spout from
evaporator.
Allen
Head
Screw
Retaining
Screw
Spout Removal
5. Remove one screw holding top bearing retainer to
evaporator. It is holding the spout mounting plate to
the evaporator.
6. Pull up on cap hook to remove auger. If more
force is required, use a 12 inch length of 1/8" chain,
with each end cut into a hook. Remove the cap hook
and insert the chain into the holes. Insert a wrench
or hammer through the chain and pull up to pull out
the auger.
Cap Hook
Spout
Top View, Spout Removal
Another method is to use a slide hammer puller. To
use, use a snap ring pliers to remove the cap hook
and the cap.
Remove the bolt at the top of the auger.
Thread the slide hammer into the auger, and use the
slide to remove the auger.
Using Chain
Using Slide Hammer
Page 6
Center Point Breaker
Models Covered: AFE400, MDT3, MDT4, MFE400 and many prior
In this type of flaker, ice is made in the usual way but at the
top of the evaporator there is a brass bearing retainer. This
bearing retainer is shaped with a tapered base facing the
auger that slopes upward to the ice discharge spout. The
tapered base has two slopes with a point in between, so two
streams of ice are formed as ice is forced against it.
As ice is made it is pushed up the evaporator by the auger. At
the top of the auger the ice is compressed against the
tapered base of the bearing retainer. This squeezes much of
the water out of the ice and forces the compressed ice into
the ice discharge spout.
Center Point Breaker
Top Bearing
Ice Breaker /
Bearing
Retainer
Ice Outlet
Area
Auger
Coupling
AFE400 Evaporator Schematic
Page 7
MDT3 and MDT4 Variation
The MDT3 and MDT4 evaporators are very similar to the AFE400, but there are
differences. They include:
•
•
•
•
Double-flight auger - use began June 2005
Two-row ball top bearing
Longer evaporator and auger
Capillary tube metering device
The MFE400 also has the two-row top bearing and longer evaporator but it does not
have the double flight auger.
Top
Bearing
Spout
Ice Outlet
Area
Double-flight
or two spiral
auger
MDT4 Evaporator Schematic
Page 8
Auger Removal - AFE400, or MDT3, MDT4
1. Disconnect electrical power.
2. Shut off water supply and drain reservoir and
evaporator.
3. Remove necessary panels to get access to the
side of the evaporator opposite the spout.
4. Remove two permagum plugs from evaporator
side.
Remove Permagum
5. Remove the two phillips head screws located
under the the permagum.
6. Pull up on cap hook to remove auger. If more
force is required, use a 12 inch length of 1/8" chain,
with each end cut into a hook. Remove the cap hook
and insert the chain into the holes. Insert a wrench
or hammer through the chain and pull up to pull out
the auger.
Note: Bearing enclosure
changed in 2007 and top
bearing changed May
2010. Both have a plastic
cap and the cap hook or
chain method will not
apply. An inch and a half
Tee can be attached and
use for pulling.
Remove Two Screws
Revised Design
Another method is to use a slide hammer puller. To
use, use a snap ring pliers to remove the cap hook
and the cap.
Connect Chain - Prior to May 2010
Remove the bolt at the top of the auger.
Thread the slide hammer into the auger, and use the
slide to remove the auger.
Attach Slide Hammer
Page 9
Auger Removal - MFE400
1. Disconnect electrical power.
Foam Cap
2. Shut off water supply and drain reservoir
and evaporator.
3. Remove necessary panels to get access
to the side of the evaporator opposite the
spout.
4. Remove styrofoam cap.
5. Remove two screws from the side of the
evaporator.
6. Pull up on cap hook to remove auger.
If more force is required, use a 12 inch
length of 1/8" chain, with each end cut into
a hook. Remove the cap hook and insert
the chain into the holes. Insert a wrench or
hammer through the chain and pull up to
pull out the auger.
Back View of MFE400
Another method is to
use a slide hammer
puller. To use, use a
snap ring pliers to
remove the cap hook
and the cap.
Remove the bolt at the
top of the auger.
Thread the slide
hammer into the auger,
and use the slide to
remove the auger.
Remove Two Screws
Page 10
Pull Auger Up and Out
Bearing and Evaporator Service - all 2 inch brass & 1/10 HP
After the auger has been removed, the bottom half of the water seal and the bottom
bearing will still be in the bottom of the evaporator. To remove them:
1. Remove the evaporator from the adapter stand.
2. Push or tap down on the water seal to remove both parts.
Note: Always replace BOTH bearings AND the water seal when replacing either part.
Ball bearing type: The top bearing can be removed by a press if the bearing is intact. If
the inner race slips out of the bearing, the entire bearing retainer/breaker with a new
bearing must be installed.
Note: The bearing cannot be greased in the field. Overfilling with grease will cause
bearing failure.
Roller bearing type: The bearing can be replaced. See page 19.
Coupling Removal
The coupling that connects the auger splines to the output shaft of the gear reducer
usually stays on the gear reducer when the auger is removed. The splines are
pre-lubricated at the factory and can also be lubricated in the field using the grease
fitting on the side.
Occasionally the coupling will stick to the output shaft and resist removal. In those
cases use of a two or three jaw puller is recommended to remove the coupling.
Evaporator Inspection
The brass evaporator shouldn't need to be replaced unless the auger has come into
contact with the inside wall. The inside wall contains vertical grooves or rifling that can
be used as a guide to determine if the evaporator can be salvaged. Shallow marks from
the auger can be honed and sanded out. However, if the auger has gouged the
evaporator wall as deep as the vertical groove, the evaporator should be replaced.
Evaporator Service
The brass evaporator can be honed using an automotive cylinder hone, followed by
vertical sanding to remove the honing marks. All marks on the inside of the evaporator
wall must be vertical.
Page 11
Water Seal and Bottom Bearing Installation - covers all 2 inch brass
types
1. Remove old rotating half from the auger.
Clean the mounting area.
Sealant Here
2. Place a bead of food grade sealant (such as
Scotsman part number 19-0529-01) onto the
shoulder of the auger where the rotating half of
the water seal will be installed.
3. Wash the new seal in water. While wet, slip it
onto the bottom of the auger, rubber side
toward the auger. Push up until seated against
the sealant. Do not allow any sealant to come
into contact with the face of the seal.
Rubber Side
Smooth Side
4. Wash the stationary half the water seal with
water. Slip it up into the bottom of the
evaporator until the bottom of the seal is inside
the evaporator about 1/4".
5. Push the bottom bearing against the water
seal until the bottom bearing is inside the evaporator about 1/16".
6. Replace the evaporator on the adapter, and re-attach the stand using the original
bolts.
7. Attach the auger to the top bearing and breaker.
8. Return the auger to the evaporator and slide it down until the splines touch the
coupling.
Note: Pre-align the breaker holes with the evaporator holes to aid in installation.
9. Rotate the auger until the coupling splines align with the auger.
10. Push the auger down, and rotate the breaker until the screw holes line up with the
pilot holes in the evaporator.
11. When the auger is completely seated, reinstall the breaker screws and the bearing
cap.
12. Replace permagum and foam top.
Page 12
Extruded Ice Type - Nugget or Flaked Ice
Models Covered: FM, FME, ND, NDE, NM, NME, NS, NSE, MDT5, MDT6
In these models the ice is made in the usual way but at the top of the evaporator it is
extruded through vertical holes or slots. The bearing retainer, bolted to the top of the
evaporator, has either holes for nugget ice or slots for flaked ice machined into it. As the
soft ice is pushed through the holes or slots, it is compressed into either nugget or
flaked ice. After the ice is extruded, it is forced to the out side, causing the extruded ice
to break off into usable lengths.
Top Bearing
Breaker /
Bearing
Retainer
Ice Extrusion
Holes
Ice Outlet
Area
Refrigerant
Tubing
Double-flight
auger
Water Seal
NME Type Evaporator Schematic
Page 13
Auger Removal
1. Disconnect electrical power.
2. Shut off water supply and drain reservoir and evaporator.
3. Remove necessary panels
4. Remove ice chute cover.
5. Unscrew ice sweep.
6. The auger and breaker/bearing may now be removed
as an assembly.
a. Unscrew 4 allen head cap screws holding breaker to
evaporator.
b. Lift up on breaker and remove auger from evaporator.
Ice Sweep Removed
Note: If the auger is stuck, the breaker must be
removed from the auger.
The breaker may be removed from the auger and
evaporator without disturbing the auger.
a. Unscrew breaker cover from breaker (left hand
threads)
b. Unscrew auger stud from top of auger.
Remove allen head cap screws
c. Unscrew 4 allen head cap screws holding breaker to
evaporator.
d. Lift up & remove breaker from evaporator.
e. Lift up and remove auger from evaporator.
Note: If the auger is stuck use a slide hammer type puller
to pull on the auger at the threaded hole. The size of that
hole is 5/8"-18.
Attach Slide Hammer
Page 14
Auger Inspection
The auger must be carefully inspected for wear
and scale. There are also wear areas like the
top bearing surface and the edges of the
flights. The edges of the auger have horizontal
serrations and highly machined areas in
between. If the auger has contacted the
evaporator wall, it will have very rough flight
edges and should be replaced.
Scale forms on the auger during normal ice
making. If scale is still on the auger after
cleaning in the ice machine, the scale can be
removed using ice machine cleaner and a
nylon scrub pad.
Inspect the auger, the critical areas of the
auger are:
1. The auger body. It should be clean and
shining. Sometimes an auger will appear clean
when wet, but after it is dry it will be seen to be
stained. Scrub the auger with ice machine
cleaner and hot water.
Caution: Ice machine cleaner is an acid.
Handle it with extreme care, keep out of the
reach of children.
Example of a Clean Auger
2. The water seal area. Because the auger has
been removed, the water seal will have to be
replaced. Remove the water seal top half from
the auger, and remove any sealant or debris
from the shoulder of the auger where the
water seal was.
Page 15
Evaporator Inspection
The evaporator's inner wall has 12
shallow vertical grooves machined into
the stainless steel surface. These
grooves provide direction for the ice as
it is pushed up the evaporator by the
auger. If the grooves are damaged or
there are radial marks on the inside of
the evaporator, it should be replaced.
The stainless steel evaporator cannot
be honed, as honing leaves radial
marks that cannot be sanded out.
Most scale will be removed by ice
machine cleaner during the de-scale
process. Stubborn scale deposits on
the evaporator surface can be sanded,
but the sanding motion must be
vertical.
Example of Scale Build Up on Evaporator Wall
Sanding the Evaporator
Page 16
Bearing Service
Inspect the bearing. There should be plenty
of grease in sight. If grease is needed the
bearing and breaker should be removed to
check the action of the bearing. It should
rotate smoothly.
Needle
If the bearing only needs grease, inject
grease into the bearing using Scotsman
grease needle pn 02-3559-01 and Scotsman
bearing grease cartridge, pn A36808-001. Be
sure to inject grease evenly and thoroughly.
Adding Grease Using Needle
Bearing Replacement
The bearing can be replaced if it can be pressed out of the bearing retainer. An arbor
press is required to remove the bearing. Whenever the bearing is replaced the two lip
seals under the bearing must also be replaced.
Lip Seal Replacement
Press out the old bearing and pry out the old
lip seals.
PVC
Coupling
Place the first new lip seal in the bearing
retainer, the U faces up. Use a 2" PVC
coupling and place it in the U of the seal.
Press the seal into place with the coupling.
Repeat for the second seal.
After the lip seals have been replaced the
new bearing can be pressed into the bearing
retainer.
The breaker generally does not wear out and
need to be replaced unless there has been
severe bearing failure.
Page 17
Inserting Lip Seal Using PVC Coupling
Water Seal Installation
To Remove the Water Seal: (Assuming all steps to remove the auger have been
performed.)
1. The gearmotor/evaporator assembly will have to be exposed.
2. Remove the 4 hex head cap screws holding the evaporator to the gearmotor
assembly. Lift the evaporator up and off of the gearmotor.
3. Remove the wire retainer from the groove under the water seal.
4. Pull or drive out the lower half of the water seal.
To Replace the Water Seal:
1. Lubricate the water seal with water, and push the water seal into the bottom of the
evaporator slightly past the groove for the snap ring.
2. Replace the snap ring and pull the water seal down against it.
3. The part of the water seal that rotates with the auger must also be replaced. Remove
the old part from the auger and clean the mounting area.
4. Place a small bead of food grade silastic sealant (such as 732 RTV or Scotsman part
number 19-0529-01) on the area of the auger where the water seal is to be mounted.
5. Carefully push the water seal (rubber side against the auger shoulder and the
silastic.)
Do not get any sealant onto the face of the seal.
6. Allow the auger and seal to air dry until the silastic is dry on the surface.
7. If the original water seal was leaking, it would be a good idea to inspect the interior of
the gearmotor.
8. Assemble auger to breaker, carefully insert auger into evaporator. Rotate to engage
gear reducer shaft.
Page 18
Addendum - New Bearing Design May 2010
Applies to MDT3, MDT4 and AFE424
The replacement top bearing, breaker and auger for the AFE400/424, MDT3 and MDT4
have been changed. They are significantly different from the prior parts. Two kits have
been developed.
The AFE400/424 bearing and auger kit is 02-4578-01.
The MDT3 & MDT4 bearing and auger kit is 02-4578-02. It also fits MFE400.
Each kit is complete with new auger,
top and bottom bearings and water
seal.
Thrust
Washer
Removal of the auger is the same as
on page 9.
The top bearing can be replaced.
1. Get access to the top of the
evaporator.
Roller
Bearing
Thrust
Bearing
2. Remove cap from top of breaker.
Top Bearing Construction
3. Loosen but do not remove bolt
holding auger to bearing.
4. Remove two phillips head screws from side of breaker.
5. Attach a T (like on page 9) to the top of the breaker.
6. Pull auger up and out of the unit.
7. Remove bolt holding auger to bearing, pull bearing from auger.
8. Remove retaining ring from inside of breaker, just above roller section. Early 2010
parts did not have a retaining ring.
9. Invert breaker and drive old bearing out of breaker.
10. Assemble new bearing. Bearing will be installed in two sections, first the roller
section and then the thrust section.
Page 19
The roller section must be held together during installation. Suggested method:
a) Assemble a 1.75" 5/16 - 18 bolt, 2 flat washers and a 1/2" long piece of 3/4" PVC
tubing. The tubing must be cut square.
Bottom
b) Install parts onto new bearing as shown.
c) Drive the bearing into the breaker cavity by
lightly tapping on the bolt (the PCV helps to
avoid damaging the bearing surface).
Remove bolt, spacer and washers when
done.
Note: Remove the outside o-ring and put the
breaker into the evaporator tube to support
the breaker while driving in the bearing. Be
sure to put the o-ring back onto the outside of
the breaker during final assembly.
3/4" PVC
Tube
Roller Section with Installation Tool
Retaining Ring
Thrust Section:
a) Insert retaining ring (when used) into
groove inside breaker.
b) Add about 1 oz of grease to thrust bearing
and place on top of roller bearing housing.
Note: Grease is Mobilith SCHPM460,
Scotsman part number 19-0662-02.
Roller Section Installed
c) Place thrust washer onto top of thrust
bearing.
d) Install onto auger.
e) Install and tighten bolt.
f) Attach cap, be sure it is on tight.
11. Install auger into evaporator.
Note: New bottom bearing and water seal
recommended.
Grease and Thrust Bearing Added
Page 20
SCOTSMAN
775 Corporate Woods Parkway
Vernon Hills, IL 60061
800-533-6006
www.scotsman-ice.com
291-830