1
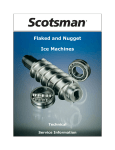
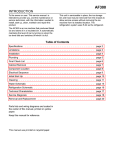
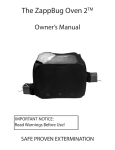
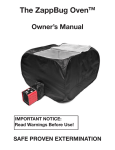
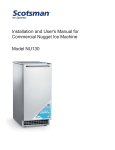
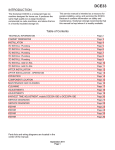
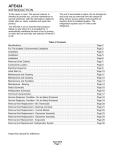
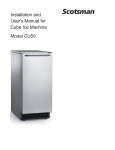
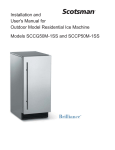
Installation and
User's Manual for
Flaked Ice Machine with Storage Bin
Model AFE400
Air or Water Cooled
AFE400
INTRODUCTION
To the owner or user: This service manual is
intended to provide you, and the maintenance or
service technician, with the information needed to
install, start up, clean, maintain and repair this
product.
The AFE400 is an ice machine that produces
flaked ice and stores it in a insulated bin. It
automatically maintains the level of ice by turning
on when the ice level falls and switches off when it
is full.
This unit in serviceable in place; the ice storage bin
and hood may be removed from the chassis to
allow service access without removing the ice
machine from its installed location. The
refrigeration system uses R-134a as the
refrigerant.
Table of Contents
Specifications · · · · · · · · · · · · · · · · · · · · · · · · · · · · · · · · · · · · · · · · · · · Page 2
For The Installer: Environmental Limitations · · · · · · · · · · · · · · · · · · · · · · · · · · · Page 3
Installation · · · · · · · · · · · · · · · · · · · · · · · · · · · · · · · · · · · · · · · · · · · · Page 4
Installation: Water and Drain · · · · · · · · · · · · · · · · · · · · · · · · · · · · · · · · · · · Page 5
Installation · · · · · · · · · · · · · · · · · · · · · · · · · · · · · · · · · · · · · · · · · · · · Page 6
Removal of the Cabinet · · · · · · · · · · · · · · · · · · · · · · · · · · · · · · · · · · · · · · Page 7
Initial Start Up · · · · · · · · · · · · · · · · · · · · · · · · · · · · · · · · · · · · · · · · · · · Page 8
Maintenance and Cleaning · · · · · · · · · · · · · · · · · · · · · · · · · · · · · · · · · · · · Page 9
Maintenance and Cleaning · · · · · · · · · · · · · · · · · · · · · · · · · · · · · · · · · · · · Page 10
Maintenance and Sanitation · · · · · · · · · · · · · · · · · · · · · · · · · · · · · · · · · · · Page 11
Maintenance - Bearing · · · · · · · · · · · · · · · · · · · · · · · · · · · · · · · · · · · · · · Page 12
What to Do Before Calling for Service · · · · · · · · · · · · · · · · · · · · · · · · · · · · · · Page 13
Keep this manual for reference.
February 2009
Page 1
AFE400
Specifications
14.25
IN
The nameplate is located
on the back panel.
A serial number plate is
located behind the right
grill, in front of the control
box, on the base.
SERIAL
NUMBER
PLATE
The unit is equipped with an electrical power cord,
but should only be plugged into a circuit dedicated
to the ice machine.
Model Number Dimensions
(w/o) legs
HxWxD
AFE400A-1
33 x 24 14 x 24
AFE400W-1
same
AFE400A-6
33 x 24 14 x 24
Basic
Ice
Electrical Type
Condenser Typical Maximum
Type
Amps Fuse
115/60/1
same
230/50/1
Air
same
Air
Flake
same
Flake
A scoop and legs (6") are included.
February 2009
Page 2
9
same
9
15
same
15
AFE400
For The Installer: Environmental Limitations
The ice machine must be installed indoors in a
controlled environment.
Minimum
Maximum
Air Temp
0
50 F.
1000F.
Water Temp
400F.
1000F.
Water Pressure
20 PSI
80 PSI
Voltage (60 Hz)
103.5
126.5
Voltage (50 Hz)
207
253
Airflow on air cooled models:
AIR OUT
Operating the ice machine outside of the above
limitations, or outdoors, is potentially damaging to
the machine, and it is misuse of the machine. This
may void the warranty.
Scotsman Ice Systems are designed and
manufactured with the highest regard for safety
and performance. They meet or exceed the
standards of UL, NSF, and other agencies.
Scotsman assumes no liability or responsibility of
any kind for products manufactured by Scotsman
that have been altered in any way, including the
use of any part and/or other components not
specifically approved by Scotsman.
AIR IN
· Intake through the right grill.
· Exhaust from the left grill.
Do not install where this air flow is blocked.
The AFE400 has a removable cabinet. When
installed, the machine should have some extra
clearance (1/8") on the left and right sides so that
the cabinet may be easily removed when the
machine is in place.
Scotsman reserves the right to make design
changes and/or improvements at any time.
Specifications and design are subject to change
without notice.
February 2009
Page 3
AFE400
Installation
Water
The water supply for this ice machine has been in
contact with many materials since it fell from the
sky as rain. All rain is slightly acidic, and tends to
dissolve the materials it comes in contact with.
During water’s journey to the ice machine, it has
flowed over and through the ground, been picked
up by a municipal or private pump, forced through
a series of pipes of differing construction and may
have been treated by the municipality providing the
water.
The water supplied to this ice machine will then
contain a variety of substances that will likely show
up as solids during the ice making process. These
solids are similar to those found when water is
boiled out of a saucepan. Only the water boils
away, and the minerals that were in the water
solidify in the pan. During ice making the water is
frozen into ice, and many of the minerals stay
behind in the ice machine water system. After time
the minerals will have to be dissolved by ice
machine cleaner, then flushed away during the
cleaning process.
An ice machine is a food manufacturing plant; it
takes a raw material, in this case water, and
transforms it into a food product, ice. The purity of
the water is very important in obtaining pure ice
and in maximizing product life.
The water to the ice machine should be filtered.
Water filters vary greatly in ability and function.
Install one that filters out suspended solids to a
dimension of 5 microns or less. The finer the filter
the better, but finer filters may plug-up sooner than
course ones. It may be necessary to add a course
filter ahead of the fine filter to prolong filter life.
This ice machine may be installed in the open or
under a counter. No clearance is required at the
sides or top beyond what’s needed to place the
cabinet into position. Air cooled models blow air in
and out through the grills at the front. Space is
required for utility connections at the back.
The ice machine is not designed for outdoor
use. It must be installed indoors, in a controlled
environment. The air and water temperatures
must not exceed rated limits.
Electrical power is supplied through a cord
connected to the unit. All local codes must be
followed.
Pre-installation:
1. Inspect the place where the ice machine is to be
installed. Check for:
· space for the cabinet
· water supply,
· drain availability
· and electrical power supply.
No extension cords are allowed. The building drain
inlet must be lower than the drain outlet(s) at the
back of the ice machine. The water supply must
have a hand shut off valve accessible when the
unit is installed.
2. Determine the method of installation, is the
machine to be installed under the counter? Is the
drain in the floor under the machine? Is the water
inlet accessible from the top?
Have the water tested. Either acidic water or
alkaline water will cause corrosion. Dissolved
solids cannot be filtered out. Check with a water
treatment specialist regarding testing, treatment
and filters.
February 2009
Page 4
AFE400
Installation: Water and Drain
For The Plumber
1. Connect cold potable water to the 3/8" male
flare at the top back of the cabinet. A water filter is
recommended. Flush the water line prior to
connecting to the ice machine.
A loop of copper tubing may be used between the
ice machine and the water supply. This will allow
the ice machine to be pulled out from its installed
location without disconnecting the water line. No
back-flow preventer is required in the inlet potable
water line because provision for that is
incorporated in this N.S.F. listed product (the float
seat is above the reservoir water level and cannot
siphon).
2. Connect a drain tube the drain fitting. If water
cooled, the drain tubes must be run separately.
The bin drain fitting is 3/4" FPT, and it is plastic. Do
not overheat.
· Drain tube material must be rigid and meet local
code.
· Traps in the bin drain line without vents ahead
of them will cause poor draining.
· The bin drain must be vented if there is a long
horizontal run (5’ or more). All drains are
gravity, and must have a minimum fall of 1/4"
per foot of horizontal run.
· Maintain the air gap required by local code
between the end of the drain tubes and the
building drain receptacle.
· Drain tubing should be insulated to prevent
condensation from forming on the tubing.
3. Water cooled models have a separate 3/8" FPT
fitting for condenser water inlet. Do not filter water
to this connection. The condenser drain is 1/2"
FPT and does not need a vent.
AIR COOLED
PLUMBING
CONNECTIONS
POTABLE
WATER
INLET
BIN DRAIN
WATER COOLED
PLUMBING
FLOOR
DRAIN
RESERVOIR
OVERFLOW
DRAIN
POTABLE
WATER INLET
CONDENSER
DRAIN
CONDENSER
INLET
February 2009
Page 5
AFE400
Installation
For The Electrician
This is a cord-connected unit, and must be on a
separate single phase power supply. Check the
nameplate for the correct voltage. The maximum
fuse size for this circuit should be 15 amps, per the
nameplate use fuses, or HACR circuit breakers.
Follow All Local Codes - THIS UNIT MUST BE
GROUNDED. Do not use extension cords and do
not disable or by-pass ground plug on electrical
plug.
After Utility Connections:
1. Level the cabinet, use the leg levelers on the
end of the legs to adjust the cabinet height. (Legs
should have been installed when the unit was
unpacked).
2. Wash the bin and hood. If desired, the interior of
the bin could be sanitized.
3. Locate the scoop, wash it and have it available
for use when needed.
Final Check List
1. Is the ice maker cabinet in a room where
ambient temperatures are within the minimum and
maximum temperatures specified?
12. Has the owner/user been given the name and
telephone number of the authorized Scotsman
Service Agency serving that location?
2. Has the water supply been connected?
3. Is the water pressure adequate?
4. Have the water connections been checked for
water leaks?
5. Have the drain connections been made?
6. Have the drain connections been checked for
leaks?
7. Is the cabinet level?
8. Is the ice machine plugged into an electrical
power supply of the correct voltage and is the ice
machine the only load on that circuit?
9. Has all of the shipping material been removed
from the inside of the cabinet?
10. Has the bin and cabinet been wiped clean and
sanitized?
11. Has the Customer Evaluation & Warranty
Registration form been filled out? Check for correct
model and serial numbers from the nameplate,
then mail the completed form to Scotsman.
February 2009
Page 6
AFE400
Removal of the Cabinet
One of the most useful features of this ice machine
is the ability to remove the cabinet from the ice
machine without removing the ice machine from its
installed position.
STEP 2
To Remove:
1. Switch the master switch to OFF. Be certain the
ice machine has been switched off.
2. Open the bin door and turn the knobs to
unscrew the mounting bolts at the left and right
inside of the ice storage bin. Remove the mounting
bolts.
3. Pull the hood and door assembly straight out
until it can be lifted up. Caution: the door may be
free to come out the back of the hood when
removed from the cabinet base.
STEP 3
4. To remove the cabinet base the hood must be
removed first.
5. Remove 4 screws and the two grills at the front
of the base.
6. In the area exposed when the grills are removed
are two knobs similar to those removed in step 2.
Unscrew and remove the two knobs.
7. Locate bin drain. Loosen hose clamp holding
drain tube to fitting and pull the drain tube off of the
fitting.
8. Lift up the front of the base and rotate the base
up and off of the ice machine.
The machine is now exposed for service.
STEP 5
STEP 8
STEP 6
BIN
DRAIN
February 2009
Page 7
HOOD
AFE400
Initial Start Up
After the final check list has been gone through,
the ice machine may be started up.
1. Open the water shut off valve and allow the
reservoir to fill with water. The ice machine will not
operate without 20 pounds of water pressure.
Note: The reservoir cannot be seen without
removing the hood and cover plate, do not adjust
float level unless the float does not shut off or
overflows out the drain.
2. Remove two screws and the right grill.
3. Locate the master switch and switch it to ON.
4. On air cooled models the fan motor will begin to
turn, and warm air will be discharged from the left
front of the ice machine.
On water cooled models warm water will begin to
flow from the condenser drain.
5. The water temperature in the evaporator will
soon drop below freezing and ice will begin to flow
out of the chute. The first bits of ice will not be has
hard nor dry as it will after about 10 minutes of ice
production.
6. Allow the ice machine to operate for about 20
minutes. Then pour clean water into the bin to melt
the ice. This will flush out most manufacturing or
shipping materials that may have strayed into the
water/ice making system.
7. Check the operation of the bin thermostat by
placing ice over the sensing tube. A properly
operating bin thermostat will open when ice covers
the sensing tube. When the bin thermostat opens,
the compressor will stop, but the auger motor will
continue to operate, pushing out ice that has
formed in the evaporator.
The bin will fill with ice until the top of the ice pile
covers the bin thermostat sensing tube. At that
point the lower part of the ice pile will be very close
to the bottom edge of the door opening.
Note: The thermostat is adjustable to allow for
variations in altitude. Rotating the adjustment knob
counterclockwise will adjust the thermostat to open
and close at warmer temperatures. Adjustment
should not be needed unless the altitude is greater
than 2,000 ft.
After adjustment, place ice on the thermostat tube
to check that the machine shuts off at the new
setting.
8. Replace all the grill and close the bin door. The
ice machine is now ready for automatic operation.
February 2009
Page 8
AFE400
Maintenance and Cleaning
Cleaning Schedule:
· Scrub the outside and inside of the cabinet
once a week with soap and water.
· Sanitize the bin interior once a month.
· Clean the water system and air cooled
condenser a minimum of twice per year. If in an
area of high mineral concentration in the water
supply, clean water system 4 times a year.
This ice machine will perform at its best when kept
clean. There are two areas to keep clean: The
water system including the water reservoir, auger
and evaporator surface; and the air cooled
condenser filter and the condenser itself.
Air Filter (air cooled only):
1. Remove the grill on the right front of the unit.
2. Remove two screws and the bracket holding the
filter to the condenser.
Note: If the unit has been operated without the
filter in place, the fins of the condenser will become
fouled with dirt, and must be cleaned. Scotsman
recommends that only the surface of the
condenser be cleaned with the bin in place. A
vacuum cleaner with a soft brush attachment will
extract most loose dust stuck to the surface of the
condenser fins. If there is any doubt about dirt
inside the fins of the condenser, the cabinet should
be removed and a qualified service agent should
clean the condenser.
Water cooled units:
The water cooled condenser may, over time and
under certain water conditions, become internally
restricted by minerals. These will have to be
dissolved by acid or the condenser replaced. Only
a qualified service agent should attempt this type
of service.
3. Pull the filter forward and twist it slightly to pull it
though the slot in the front base of the ice
machine.
Remove Bracket
4. Wash the surface of the filter off with cold water,
or, if torn or so dirty it can’t be cleaned, replace
with a new filter.
Remove Filter
5. Return the filter to its installed position.
6. Replace the bracket removed in step 2.
7. Replace the grill. Do not operate the unit without
the filter in place.
February 2009
Page 9
AFE400
Maintenance and Cleaning
Cleaning Water System:
The water system is cleaned by pumping a mixture
of water and Scotsman Ice Machine Cleaner
through the water reservoir into the evaporator and
into the ice storage bin as ice.
15. Pour the cleaning solution into the reservoir
until it is full and wait 20 minutes.
POURING CLEANING
SOLUTION INTO
RESERVOIR
1. Locate the master switch, and move it to the
OFF position.
2. Empty the bin of ice.
3. Locate knobs holding hood to bin and remove
them.
4. Remove hood from ice machine.
RESERVOIR
5. Remove the right and left grills.
6. Locate knobs holding bin to chassis and
remove.
7. Disconnect drain hose from bin.
8. Lift up on front of bin and rotate bin off of
chassis.
9. Remove cover plate over reservoir.
10. Block the float up to shut off water flow.
11. Locate the evaporator drain, unplug it and drain
the evaporator. Re-plug the drain.
12. Place the bin back onto the chassis.
13. Reconnect the drain hose to the bin drain.
14. Mix a solution of 1.5 quarts of warm (950F. 1150F.) water and 4 ounces of Scotsman Clear 1
Ice Machine Scale Remover.
Scotsman Ice Machine
Scale Remover
contains acids. These
compounds may cause
burns.
If swallowed, DO NOT
induce vomiting. Give
large amounts of water or
milk. Call Physician
immediately. In case of
external contact, flush
with water.
KEEP OUT OF THE
REACH OF CHILDREN.
16. Move the master switch to ON, continue to
pour cleaning solution into the reservoir until it has
all been used.
17. After all of the solution has been poured in,
remove the block from under the float.
18. Operate the unit for 15 more minutes.
19. Pour clean water into the bin to melt any ice
produced during cleaning.
Note: The ice making portion of the water system
should be sanitized after cleaning by repeating
steps 15-18, except substitute an the following
sanitizing solution for the cleaning solution.
· Mix a sanitizing solution of 1 ounce of
household bleach to 2 gallons of warm (95 oF. 115oF.) water.
20. Replace the grills, cover plate and hood.
21. The unit is now ready for automatic operation
or sanitizing of the ice storage bin.
April 2009
Page 10
AFE400
Maintenance and Sanitation
The interior liner of the bin is in contact with a food
grade product: ice. The storage bin must be
cleaned regularly to maintain a sanitary
environment. Once a week cleaning with soap and
water, a hot water rinse and an air dry is a basic
procedure. Scale that may form on the plastic liner
can be removed by scrubbing the surface with a
mixture of Scotsman Ice Machine Cleaner and hot
water. Remove any scale prior to cleaning.
To Remove Scale:
1. Mix a cleaning solution of 4 ounces of Scotsman
Ice Machine Cleaner to 4 pints of hot (950F.-1100F.)
water.
Scotsman Ice Machine
Cleaner contains acids.
These compounds may
cause burns.
If swallowed, DO NOT
induce vomiting. Give
large amounts of water or
milk. Call Physician
immediately. In case of
external contact, flush
with water.
KEEP OUT OF THE
REACH OF CHILDREN.
2. Using rubber gloves, dip a nylon scouring pad
into the cleaning solution and scrub the scale off
the liner.
3. After the scale has been removed, rinse all
surfaces inside the bin with clean, potable water.
To Sanitize the bin interior:
The hood must be removed from the storage bin
so that the joint between the two can be cleaned
and sanitized.
Use an approved sanitizer and follow the directions
and warnings of that sanitizer or use the following
instructions for use of household bleach, if it meets
local codes:
1. Mix sanitizing solution of 1 ounce of household
bleach to 2 gallons of water.
2. Using clean rubber gloves and a clean cloth,
wipe all interior surfaces of ice storage bin, hood
and door with sanitizing solution. Be sure and wipe
the joint between the hood and bin with the
sanitizing solution. Use a clean brush to thoroughly
swab all interior surfaces with the sanitizing
solution.
3. Reassemble and allow to air dry.
Stainless Steel Components Inside Bin
The stainless steel parts in the bin also require
periodic cleaning. Chemicals in the water supply,
such as chlorine, cause brown stains to appear on
the surface of the stainless steel parts.
1. General Cleaning - staining is usually removed
by washing the parts with ordinary cleaning powder
such as Bon-Ami or Copper-Glo and water. After
cleaning, rinse with clear water.
2. Water treatment. The chlorine enters the
machine from the municipal water supply. It can be
removed from the water supply by using a charcoal
or activated carbon water filter to treat the water to
the ice machine. If staining is severe, filters of this
type are recommended.
Exterior Cabinet Cleaning:
The exterior cabinet may be cleaned by scrubbing
with soap and water. Do not use cleaners
containing petroleum products.
A nylon type brush may be used to scrub stubborn
deposits.
To remove the hood:
1. Open the storage bin door and locate the knobs
at the right and left inside wall.
2. Unscrew and remove the two knobs.
3. Pull the hood assembly and door straight out
from the ice machine. Note: the door may be
removed from the back of the hood when the hood
is off.
February 2009
Page 11
AFE400
Maintenance - Bearing
Evaporator and Auger Inspection
The bearings and water seal should be checked
once per year.
Ice Breaker and Auger Removal for Inspection
7. After the auger has dried, check condition of the
auger’s finish, it should be clean and shiny. If not,
scrub with Scotsman ice machine cleaner and a
clean brush.
8. Reverse all of the above to reassemble.
Note: The auger can’t be pulled out when the unit
is installed under the counter.
Electrical shock
hazard.
Electrical shock can
cause personal injury.
Disconnect power before
beginning to service
components.
1. Remove the hood, door and ice storage bin.
2. Remove stainless steel cover plate.
3. Remove cover from reservoir, and block the float
or shut off the water supply.
4. Locate evaporator drain and drain the
evaporator/reservoir.
5. Remove sealing cap and check the top bearing
surface for water, rust, or wear. replace it if
required.
Sealing Cap
6. Attach removal tool and lift auger from
evaporator.
February 2009
Page 12
AFE400
What to Do Before Calling for Service
If the machine is off, not making ice:
1. Check the water supply to the ice machine. The
machine is designed to shut off f there is no water
to it. Check the water filters (if there are any).
2. Check the power supply to the machine. Reset
the breaker if it is tripped.
3. If both water and power have been checked and
are available, try switching the power Off for an
hour, then reconnect power. The machine should
restart.
If this procedure restarts the machine, service
should be called the next time the machine stops.
February 2009
Page 13
SCOTSMAN ICE SYSTEMS
775 Corporate Woods Parkway, Vernon Hills, IL 60061
800-533-6006
www.scotsman-ice.com
17-3289 -01