1
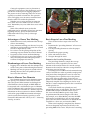
Thinning Pine Trees
by the Leave Tree Method
At some point after establishment,
both natural and planted pine stands in
the South need thinning at some point as
tree crowns grow together and trees start
to compete with one another. Thinning
removes trees of lower quality and/or
vigor, increasing the overall health and
quality of the residual stand.
Images of evenly spaced rows of
similarly sized trees come to mind when
most people think of pine plantations.
However, in reality, many planted stands
across the state have a significant number
of volunteer stems growing among those
that were planted. These additional stems
in plantations, as well as the large number
often found in natural stands, can provide
extra challenges when attempting to reduce
stand densities to appropriate levels.
While not always the case, current
thinning techniques, rules, and systems
may be overly complicated for some private
landowners. Extensive testing by the USDA
Forest Service under actual sale conditions
has shown that leave tree thinning in
overstocked pine stands results in a more
consistent silvicultural treatment and
higher yields per acre than other methods.
The relative simplicity of the leave tree
method makes it applicable on private
timberlands by nonforesters.
This publication details the method
known as “leave tree marking,” named so
because you mark trees that you are going
to “leave.” The method is different from
the more widely used selective marking
technique. With selective marking, the
poorest-quality, diseased trees and trees that
are undesirable to the goals of ownership
are selectively marked to be cut. Leave tree
marking is used in early thinnings to leave
the best potential crop trees. The method
is especially applicable in young, dense
stands where more trees are to be cut than
left. After the first or second thinning, you
can switch to selective marking because
fewer trees will be cut than left. Selective
marking is used in these later thinnings to
remove poorer-quality trees.
Both methods are used to achieve the
same end results—removing poor trees
and retaining the highest-quality trees.
Regardless of which marking technique
you use, make sure the method used is
written into the cutting contract between
the landowner and contractor. Additionally,
be positive that the logging crew is aware
of which marking technique was used. For
information on how to include marking
technique in your cutting contract, see
Mississippi State University Extension
Service Management Technical Note 19F
Sample Thinning Contract. With a little
training and experience using the leave tree
method, you can choose the best tree in a
small area and leave it marked as a future
crop tree.
An additional item to consider when
using any thinning method in a first
thinning is the issue of access. The overall
high densities encountered in both natural
stands and plantations dictate the removal
of “corridors,” or rows of trees, so that
equipment may access the remainder of
the stand.
In stands that have been naturally
regenerated, cutting corridors should be
flagged or marked so that logging crews
may remove the trees within them. The
width and direction of corridors will
depend on several factors, including
the size of logging equipment to be
used, topography, the per-acre density
desired for the residual stand, and your
management goals.
Cutting for equipment access in plantations is
a somewhat easier process. Row thinning is used to
provide the needed space for logging equipment.
The process involves removing entire rows of trees,
typically every third or fourth row. This provides
access for logging crews to remove unmarked trees
from the other rows within the plantation.
Whether you are using corridors or removing
rows, make sure not to mark leave trees in these
areas. Remember, every tree within these areas will be
removed.
Some of the technical terms used in this
publication may be unfamiliar. If you have questions
regarding their use, please consult Extension
Publication 1250 Forestry Terms for Mississippi
Landowners.
Figure 1. DBH measurement. (Photo by Adam Rohnke)
Advantages of Leave Tree Marking
Basic Steps in Leave Tree Marking
• Nonforesters more easily understand the concept
of leave tree marking.
• It may minimize marking costs because less paint
and labor is used to mark leave trees than to mark
cut trees in high-density stands.
• It is easier to see the spacing and quality of the
remaining crop trees before the stand is thinned.
• It typically results in more uniform thinnings.
• Cut marked trees are easy to spot at the loading
deck, and stumps marked with paint provide
evidence of improper tree removal.
These are the five basic steps to the leave tree
method:
1. Determine the “prevailing diameter” of leave trees
in the stand.
2. Use the prevailing diameter to select the proper
spacing.
3. Determine the proper spacing.
4. Select and mark leave trees.
5. Navigate through the stand.
Determine the Prevailing Diameter
The prevailing diameter is simply the average
diameter class of the acceptable leave trees most
common in the stand of interest. It is not the average
diameter in the stand, but rather the average diameter
of the trees you want to leave.
Prevailing leave tree DBH can be determined using
a tally of selected trees taken at periodic sample points
along cruise lines throughout the stand. A cruise line
is an imaginary line or path that crosses the planted
rows or the slopes at right angles. Cruise lines are
placed so that the DBH of acceptable leave trees will be
adequately sampled. Plot sampling can also be used,
but this is a more complicated process that a consultant
would typically use.
Cruise lines should cross planted rows and
topographic changes at right angles. The lines should
be about 150 feet apart in smaller stands of just a
few acres and about 300 feet apart in large stands.
At predetermined distances along the cruise lines
(for example, every 50 to 100 feet), measure the DBH
of the nearest acceptable leave tree. At each sample
point, select the nearest dominant or co-dominant tree
acceptable as a leave tree, and record its DBH.
When stand sampling is completed, the diameter
class most frequently represented in the tally is the
prevailing DBH of leave trees. Tally the trees according
Disadvantages of Leave Tree Marking
• Logging crews unfamiliar with the technique may
cut the wrong trees without thorough instruction.
• Marking costs may be greater in second or third
thinnings because there will probably be more
leave trees than take trees.
How to Measure Tree Diameter
Tree diameter must be used to determine proper
tree spacing. Tree diameter is measured at 4½ feet
above the ground. Measurements at this height are
called diameter at breast height, or DBH. DBH can
be measured with a steel diameter tape or a Biltmore
stick. The Biltmore stick is quick and easy to use but
is not as accurate or consistent as a diameter tape. For
information on how to construct or obtain a Biltmore
stick and on proper DBH measurement techniques,
consult your Extension forestry specialist, or read
Extension Publication 1473 4-H Project No. 7: Measuring
Standing Sawtimber.
2
it also gets larger in crown diameter and needs
more growing space. Tree spacing controls diameter
growth, so if your goal is to produce large sawtimber
trees as quickly as possible, you need to thin every 5
to 10 years to optimize increased diameter growth.
Remember, the numbers below are averages and
will vary across the stand. The expectation is not to
achieve exact tree spacing or numbers, but to perform
a thinning with trees spaced near the spacing values
listed below.
to their diameter to the nearest inch. Determining the
proper DBH is important because the prevailing DBH
of the leave trees is used to select the proper spacing.
Use the Spacing Table
It is best to use the age and site index of the
stand to select the spacing because this will result in
complete site utilization for optimum growth and
yield. However, if stand age and site index are not
known, a reasonable spacing can be obtained using
Table 1 for loblolly pine with only prevailing leave tree
DBH.
Table 1 is used to determine how many trees to
leave per acre and the desired spacing of leave trees
for average-, low-, and high-quality sites. An example
of how to use the table is as follows: If the prevailing
DBH is 8 inches, look within the row for 8-inch trees. In
this case, leave trees should be spaced 15 feet apart on
low-quality sites, 14 feet apart on average sites, and 13
feet apart on high-quality sites. On average sites, about
222 trees per acre will be left using this spacing. If you
are familiar with measuring basal area, an average site
“rule-of-thumb” basal area target is the same as site
index for the stand.
Notice across the same row that for a given DBH,
more trees per acre are left on higher-quality sites than
on those of lower quality. A higher-quality site has
more productive soil and can support more trees than
a lower-quality site.
Now look at the potential for site productivity
(trees/acre) down the same column; fewer leave trees
are required per-acre for larger diameters than for
smaller diameters. As a tree gets larger in diameter,
Lay off the Spacing Grid
For the sake of discussion, assume you have
determined a desired spacing of 15 feet in your pine
stand. Next, you must divide the stand into a grid
of imaginary squares, each measuring 15 feet on
each side. It is not necessary to actually mark and/
or flag these squares before marking leave trees. The
grid system is just a simple way to understand the
method and get you started. A compass will help you
walk straight lines and keep squares in their proper
locations, but you can use a string as a guide as you
gain navigating experience. Aerial photographs and
maps can be used to check your progress as you move
through the stand.
A series of compass lines, 15 feet apart in this
instance, will be used to guide you through the stand
as you mark leave trees. You may want to tie flagging
along your compass lines as you move through the
stand. Vinyl flagging provides an easy visual reference
point to follow as you travel back and forth through
the plantation marking trees.
Table 1. Spacing by prevailing leave tree DBH and site quality.* DBH
(inches)
Low-quality site BA 70
(trees/acre)
Spacing
(feet)
Average site BA 80
(trees/acre)
Spacing
(feet)
High-quality site BA 90
(trees/acre)
Spacing
(feet)
6
360
11 x 11
436
10 x 10
436
10 x 10
7
258
13 x 13
303
12 x 12
360
11 x 11
8
194
15 x 15
222
14 x 14
258
13 x 13
9
151
17 x 17
170
16 x 16
194
15 x 15
10
134
18 x 18
151
17 x 17
170
16 x 16
11
109
20 x 20
121
19 x 19
134
18 x 18
12
90
22 x 22
99
21 x 21
121
19 x 19
13
76
24 x 24
90
22 x 22
99
21 x 21
*Adapted from USDA Forest Service Manual for the Kisatchie National Forest, Louisiana.
3
If you choose to flag your compass lines, make
sure that you maintain straight lines by turning around
and checking for linear accuracy. Each line will run
through the center of a row of the imaginary squares.
Begin your first compass line half of the spacing
distance into the edge of the pine stand (7½ feet in this
case). For example, if you begin at the southeast corner
of the stand, your first compass line should begin 7½
feet from the south and 7½ feet from the east stand
boundaries. This will place you in the center of your
first imaginary 15- by 15-foot square. You can use a
measuring or logger’s tape to help you judge the size
of the square.
Select and Mark the Leave Trees
The purpose of this step is to select the highestquality tree within the square. Be sure to inspect all
trees within the square, including all four corners.
Only one tree should be selected, and it can be
located anywhere within the square’s boundaries.
An acceptable leave tree should be free of disease
and relatively straight, and have a well-formed, full
crown in the main canopy layer or above the crowns of
surrounding trees. Remember, your intent is to leave
the best trees and cut those of lower quality. If two or
more trees are equally acceptable, the tree nearest to
the center of the grid should be selected.
If no “good” tree is present, a less desirable tree
(forked, crooked, small, etc.) may be used in the square
rather than leaving the area empty. Again, choose
the best tree available in each given square. After
selecting the tree you plan to leave, mark it with paint
using a large slash at eye level and at ground level
on the stump. Consider logging direction, and make
eye level marks facing the expected cutting direction.
Figure 2. Compass lines marking access corridor. (Photo by James Floyd)
Make sure to use paint generously so that loggers can
see this is a marked leave tree. The stump mark is
extremely important because it will likely serve as the
only evidence that the tree was marked in the event
of improper cutting. Use a good-quality tree marking
paint with lasting power.
Figure 3. Sample layout of spacing grid.
4
After Marking Is Complete
Leave tree marking is not difficult, but, upon
completion, you should check your work for largescale mistakes. Take time to walk back through the
stand and observe the spacing of leave trees. The paint
marks let you see what the stand will look like after it
has been thinned. Now is the time to catch any major
errors. Once the stand is thinned, any unchecked
mistakes may be irreversible. The next time you
thin, you will need to use a different color paint to
differentiate leave trees from those to be cut.
Figure 4. Marked trees. (Photo by Adam Rohnke)
Navigate through the Stand
After you have successfully found and marked
the leave tree in your first square, use your compass
and measuring tape to help you move from the center
of the first square to the center of the next, or you can
pace the distance if you are familiar with your pace
length. Mark the best tree in that square and keep
going. Once you have reached the opposite side of the
stand, move over the full spacing distance (15 feet in
this example) and start a new line parallel to the first.
Continue back and forth until you have covered the
entire stand.
You may find it helpful to use two measuring
tapes to achieve the desired spacing distance. A tape
will also help you visualize boundaries of the square.
Lay one tape down along your compass line and
place the other perpendicular to the first. The crossing
point of the tapes is the center of the square. You can
use this method until you have mastered judging
the correct distance between square centers and their
boundaries. As you gain experience selecting trees and
judging proper spacing distance, you will find that you
can navigate and mark leave trees very close to the
desired spacing, using compass lines and grid squares
occasionally as a check.
Figure 5. Unmarked trees being removed. (Photo by James Floyd)
The condition of your stand will be much
improved after thinning, and you can take pride
that you have marked it yourself. You have not only
increased the diameter growth of residual trees, but
you have also reduced the chances of damage from
pine beetles and disease. Additionally, trees that would
not have survived until the next logging reentry have
been removed, capturing revenue that would have
been lost if the stand were left unthinned.
Thinning does have some risks. You might
lose a few skinned or damaged trees to various
environmental factors. Additionally, there is a greater
5
Additional Reading
risk of storm/ice damage in recently thinned stands.
However, the risk of losing a few trees to thinning
is greatly offset when considering the much greater
health and economic risks involved with leaving a
stand unthinned. For more information detailing
the dangers of leaving a pine stand unthinned, see
Extension Publication 2732 Protect Your Pine Plantation
Investment by Thinning.
If you are uncomfortable marking your pine stand
for thinning, consulting foresters can also help you
on a commission or fee basis. Contact information
for consulting foresters can be obtained at www.cfr.
msstate.edu/borf. You can search by county, city, or
the forester’s last name. Foresters on this list must be
registered with the state, which sets standards for their
credentials. For information on selecting a forestry
consultant, read Extension Publication 2718 Choosing a
Consulting Forester.
For more information and publications about leave
tree marking and other thinning techniques, contact
your area Extension forestry specialist or Mississippi
Forestry Commission county service forester. The
Mississippi State University Extension Service also
has various publications to help you manage your
timber. These can be found at www.msucares.com, or
you can contact your county Extension agent for more
information.
Remember, when considering a thin in your pine
stand, either thin on your terms, or Mother Nature will
do it on hers.
Timothy Traugott and Stephen Dicke. 2006. Are My
Pine Trees Ready To Thin? P2260.
Mississippi State University Extension Service.
James Henderson and Andrew Londo. 2012. Protect
Your Pine Plantation by Thinning P2732.
Mississippi State University Extension Service.
John Kushla and Andrew Londo. Forestry Terms for
Mississippi Landowners P1250. Mississippi
State University Extension Service
Jason Gordon. 2012. Choosing a Consulting Forester
P2718. Mississippi State University
Extension Service.
Jason Gordon. 4H Project No. 7: Measuring Standing
Sawtimber P1473. Mississippi State
University Extension Service.
Timothy Traugott and Stephen Dicke. 2006. Sample
Pine Thinning Contract MTN 19F.
Mississippi State University Extension Service.
Figure 6. Completed thin. (Photo by James Floyd)
6
Copyright 2014 by Mississippi State University. All rights reserved. This publication may be copied and distributed
without alteration for nonprofit educational purposes provided that credit is given to the Mississippi State
University Extension Service.
By Andrew B. Self, Assistant Extension Professor, and Robert C. Parker, former Professor, Forestry.
Discrimination based upon race, color, religion, sex, national origin, age, disability, or veteran’s status is
a violation of federal and state law and MSU policy and will not be tolerated. Discrimination based upon
sexual orientation or group affiliation is a violation of MSU policy and will not be tolerated.
Publication 2832
Extension Service of Mississippi State University, cooperating with U.S. Department of Agriculture.
Published in furtherance of Acts of Congress, May 8 and June 30, 1914. GARY B. JACKSON, Director
(POD-04-14)