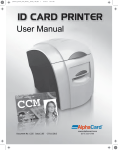
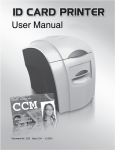
1
DCP100
ÐÚÊÎÂÎÄÑÒÂÎ
Îôèöèàëåí ïðåäñòàâèòåë: Êîìèòåêñ ÎÎÄ
Ñîôèÿ, áóë. “Цариградско шосе” 115А
Digital Identification Solutions GmbH
CONTENTS
INTRODUCTION AND CONVENTIONS
2
Section 1-1
The EDIsecure Printing Process
3
Section 1-2
EDIsecure DCP100 Key Features
3
Section 1-3
EDIsecure DCP100 Specification
4
Section 1-4
Description of Operation
5
Section 1-5
Component Location
6
Section 1-6
Dye Film Options
8
Section 1-7
Loading the Dye Film
8
Section 1-8
Card Specification
9
Section 1
SECTION 1 INTRODUCTION TO THE EDISECURE DCP100 /
Section 2-1
Philosophy
10
Section 2-2
Recommended Tools and Software
10
Section 2
SECTION 2 SERVICE REQUIREMENTS
Section 3-1
Using the Cleaning Card
11
Section 3-2
Cleaning the Thermal Printhead
11
EDIsecure DCP100 Service Manual
Section 3
SECTION 3. CLEANING INSTRUCTIONS
2
Section 1
Section 1
Digital Identification Solutions GmbH
SECTION 1 INTRODUCTION TO THE EDISECURE DCP100
Section 1.1 The Printing Process
The EDIsecure DCP100 printers use Dye Diffusion Thermal Transfer Technology to print high
quality colour images and text directly onto CR80 Gloss PVC Cards. This is often also called
direct surface printing.
Heat is provided from the printhead at 300 dots per inch and applied to the dye film passing
between the printhead and the PVC card. The standard dye film or ribbon as it is sometimes
called contains panels of Yellow (Y) Magenta (M) Cyan (C) Black (K) and Clear Overlay (O) to
print a full coloured card with black resin text. This five panel film is often called YMCKO film.
There are three phases required to print a CR80 card.
1.
2.
3.
RHDS
PC Data Processing The PC compiles data into a format that can be sent
directly to the printer’s thermal printhead via the USB port.
PC Data Transfer (Downloading) When the data has been processed by
the PC, downloading will commence, this is indicated by both the EDIsecure
Status Monitor display on the PC screen and also by the green indicator light
on the Printer flashing. Downloading the data to the Printer takes
approximately 10 seconds, with the printing taking a further 20 seconds.
Colour Printing Cycle The incoming data to the printer has a frame format
as follows:
Printer
Yellow
Magenta
Cyan
Black
ETX
Command
Data
Data
Data
Data
information
The frame is preceded with a start of header command, then followed by
printer set up information such as the card size and number of copies. The
frame is then terminated with an end of text command.
When the printer has received the set up information and begins to receive
the colour data it will begin to print. The dye film will be advanced to the
yellow panel, a card must be offered to the printer and it is moved to the start
of print position. The printhead will be lowered and printing will commence.
When the yellow panel has been printed the card will be brought back to the
start of print position and the dye film advanced to the magenta panel and the
process repeated. This process will be repeated a total of five times to print a
full colour card with black text and overcoat.
Section 1.2 EDIsecure DCP100 Key Features
•
•
•
•
•
•
•
•
•
Downloads and prints a full card image in around 45 seconds, dependant on PC
Universal Series Bus Port printer interface
Full Bleed Edge to Edge printing as standard option
Advanced fault diagnosis using on screen fault display
Drop in dye film loading with automatic detection and set up for dye film type
Whisper quiet operation thanks to advanced stepping drive system
Simple no mess cleaning operation
Printhead cooling fan allowing the printer to print continuously
Automatically adjusts to cater for a variety of card thickness’
EDIsecure DCP100 Service Manual
3
Section 1
Section 1
Digital Identification Solutions GmbH
Section 1.3 EDIsecure DCP100 Specification
Print Speed (YMCKO) Around 45 sec per card including download
Duty Cycle
No limits specified for both high and low throughput
Security Features
Holokote anti forgery protection Custom security mark when used
with the Holokote card and Printer Locking
Printer Interface
Universal Serial Bus (USB rev 1.1) port
Memory
2MB
Dye Film Loading
Simple drop in loading (no threading)
Dye Film Set Up
Automatically detects dye film type
Software
Supplied with Windows driver software with on screen status (local or
network operation)
Power Source
Internal Power Supply auto ranging 90 to 265 volts AC 47 – 63 Hz
100 watt max load
OEM Customisation
Firmware is stored in upgradeable flash EPROM and product can be
re-badged for OEM quantities
6.7” W x 8.8” H x 8.25” L (170mm x 225mm x 210mm)
6lb (2.7kg)
Black / Silver
Dye Sublimation
300 dpi (11.8 dots/mm)
ISO standard CR-80
0.015” to 0.63” (0.38mm to 1.6mm)
EDIsecure PVC or PVC/Polyester sandwich with PVC surface for dye
sub-printing
Single card Hand fed
Full Bleed 1000 pixels (86.9mm)
Full Bleed 624 pixels (54mm)
Dimensions
Weight
Colour
Print Method
Resolution
Card Size
Card Thickness
Card Material
Card Capacity
Print Length
Print Width
Operating Temperature
Operating Environment
Safety
EMC
50°F to 85°F (10°C to 30°C)
Sheltered office environment
CE certified – UL listing USA and Canada
EN 50 081-1 and EN 50 082-1 (Europe) FCC pt 15 curve A (USA) &
CSA 08.8 curve A (Canada)
EDIsecure DCP100 Service Manual
4
Section 1
Section 1
Digital Identification Solutions GmbH
Section 1.4 Description of Operation
The print process was explained in Section 1-1 of this manual, this section aims to explain
how the DCP100 printers actually carry out the print operation.
Preparing to Print
When power is applied to the printer it enters a set up and check cycle, this can be split into 4
phases.
1.
2.
3.
4.
5.
The cams which operate the printhead lifting arms (cam followers), are
moved and set in the print start position. (If necessary)
The RFID system checks the Dyefilm cassette tag.
Dyefilm slack is taken up.
The stepper motor is rotated and this drives the print rollers and clears any
remaining cards from the card path.
If the dye film fitted is recognised, the dye film motor winds the dye film
forward. The dye film sensor identifies the panels and aligns the dye film in
the print start position with the lead edge of the yellow panel below the
printhead.
The Print Process
When data transfer (downloading) finishes power is supplied to the stepper motor. This draws
the card into the printer from the front fascia slot. The stepper motor continues to draw the
card backward along the card path until it arrives at the start of print position, the card start
optical sensor locates the card and stops the stepper motor.
On completion of card positioning the cams are moved, the cam ramps move to the rear and
the printhead is lowered. The stepper motor drives the card forward under the printhead while
simultaneously the yellow dye panel is also drawn under the printhead and printing of the
yellow panel takes place.
On completion of printing the yellow panel, the dye film motor stops drawing the film forward,
the cam motor is rotated, the cam ramps are moved forward and the printhead is lifted clear
of the card and dye film. The stepper motor reverses its direction of drive and the card is
moved forward to the start of print position.
The print operation is then repeated for each of the dye film panels. On completion of the
application of the overcoat panel the stepper motor reverses to drive the card forward along
the card path and the card is partially ejected from the front fascia.
EDIsecure DCP100 Service Manual
5
Section 1
Section 1
Digital Identification Solutions GmbH
Section 1.5 Component Location
Front View
card feed slot
DC power socket
status LED
Test button
Front View
USB port
Rear View
Internal View
Printhead adjust screw
Printhead Element
Dyefilm Cassette
EDIsecure DCP100 Service Manual
6
Section 1
Section 1
Digital Identification Solutions GmbH
Section 1.5 Component Location
Front View
Слот-ръчно подаване на карта
Конектор захранване
Статус
Тест бутон
Изглед отпред
USB конектор
Изглед отзад
Вътрешен изглед
Печатаща глава
Касета с лента
EDIsecure DCP100 Service Manual
7
Section 1
Section 1
Digital Identification Solutions GmbH
Section 1.6 Dye Film Options
Note: The dye film is supplied in consumables packs complete with cards.
•
YMCKO - five panel film - Yellow, Magenta, Cyan, Resin Black and clear Overcoat. Full
colour, 100 images per roll. Generally used to print colour images and black text /
barcodes. Note: This film is for DCP100 use only.
•
K - Monochrome Resin Black, no Overcoat, 500 images per roll.
Prints monochrome images without overcoat.
Available in Black
Section 1.7 Loading the Dye Film
•
•
•
•
•
Operate the top cover release catch and lift open the
cover.
Open a new dye film cassette.
Place the cassette into the 4 cradles left side first and
press it into place. The orientation is correct when the
arrows on the cassette are on the top and pointing to
the rear of the printer. Ensure the gear (rear right)
engages with the spool.
Gently close the top cover until it clicks into the
closed position.
The printer will automatically recognise the type of
film that has been loaded by reading the RFID tag
when it resets.
Шпула за задвижване
на лентата
RFID Таг
Поставяне на лента
Индикатор за посока
Касета с лента
EDIsecure DCP100 Service Manual
8
Section 1
Section 1
Digital Identification Solutions GmbH
Section 1.8 Card Specification
• Only EDIsecure ISO CR80 standard PVC cards should be used in these printers.
• When ordering card stock the cards and dye film are supplied as a kit. (see parts list).
CAUTION
FAILURE TO USE THE APPROVED CARDS MAY CAUSE PRINT REGISTRATION
PROBLEMS OR POSSIBLE DAMAGE TO THE CARD GUIDE SYSTEM OR PRINTHEAD.
Card Size:
Must be:
86.5 mm wide x 53.98mm high (3.375” x 2.125”)
Card Thickness:
Minimum
0.38mm (0.015”)
Standard
0.76mm (0.030”)
Maximum
1.60mm (0.063”)
To obtain good quality prints the card must be:
•
•
•
•
•
Free from dirt and grease.
Free from surface contamination.
Free from pits and bumps in the surface.
Free from burrs at the edge of the card.
Completely flat.
Printable Area of the Card:
The DCP100 printers offer high quality edge to edge (full bleed) printing. Thus the whole
upper surface of the card may be utilised by the customer.
Maximum Page Size - 1000 pixels (85.6mm) x 624 pixels (54mm)
For full bleed printing guillotined cards are recommended, as pressed or stamped PVC cards
have edge roll off which can cause a white line around the edge of the card.
Smart and Proximity Cards:
Smart cards must conform to the ISO 7816 specification with the chip contacts being below
the surface of the card. It is unwise to print graphics or text directly adjacent to the chip as
colour variation may be noticed.
Proximity cards must be completely flat with no sign of the chip or antenna being visible in the
surface of the card.
Recommended Cards:
Premium cards for use in these printers are supplied in ready to use
protective dispensers to ensure that print image quality is maintained
and the printhead is protected from damage.
Using the dispenser keeps unused card stock clean and free from
dust. It also presents the card in such a way that the card is held by
the corner edges. This avoids finger marks on the card surface.
EDIsecure DCP100 Service Manual
9
Digital Identification Solutions GmbH
SECTION 2 SERVICE REQUIREMENTS
Repair and Maintenance:
The repair and maintenance philosophy for the EDIsecure DCP Series of printer is for repairs
to be carried out by replacement of defective modules.
The printer has been specifically designed to comprise four main modules:
• The Power Supply Unit
• The Printed Circuit Boards
• The Print Engine Assembly
• The Thermal Printhead
Field Repair:
We have taken every precaution in the design and manufacture of the DCP100 range of
printers, and user problems should be rare. Nevertheless we have tried to anticipate any
possible problems occurring in the field due to misuse, accidental failure or component failure.
This manual should enable the Service Agent to identify any module or component that has
failed, replace it, and carry out the appropriate setting up and testing to ensure satisfactory
operation.
Section 2
Section 2
Section 2.1 Philosophy
Section 2.2 Recommended Tools and Software
The following tools are recommended to support the EDIsecure DCP Series printers in the
field.
IBM PC or IBM Compatible Clone :
Pentium 100MHz or faster (with USB ports)
32 Mbytes memory or above
3 Gigabyte hard drive
8 speed CD ROM or faster
SVGA monitor with greater than 800x600 screen resolution
Recommended PC Software :
Microsoft Windows software (98, Me, XP, VISTA, WIN7)
EDIsecure Windows Driver (preferably the latest version)
EDIsecure Support Tools (loaded separately from the driver CD)
Graphics or Publishing or EDIsecure CMS software
EDIsecure DCP100 Service Manual
10
Digital Identification Solutions GmbH
SECTION 3 CLEANING INSTRUCTIONS
Section 3
Section 3
For a long life and reliable operation, we recommend that your DCP100 printer be cleaned
every time you replace the dye film cassette. A cleaning kit can be purchased for this and
comprises 5 cleaning cards and a cleaning pen.
Section 3.1 Using the Cleaning Card
Open the top cover and remove the dye film cassette.
Using a pair of scissors, open the sealed pack containing
the cleaning card.
This card has absorbent surfaces impregnated with
isopropyl alcohol.
Press and release the test push button on the rear of the
printer. The rollers will all begin to rotate. Insert the narrow
end of the cleaning card into the card feed aperture at the
front, the printer will take in the cleaning card, clean the
internal rollers, and then eject the card.
Repeat this procedure several times turning the card over.
The card is not re-useable.
Replace the dye film cassette.
Section 3.2 Cleaning the Thermal Print Head
Open the top cover.
Accumulated dye film residues may be removed from the surface of the thermal printhead
using the solvent pen provided with the cleaning kit.
Remove the cap and gently draw the pen tip along the entire edge of the thermal printhead.
The pen may be reused several times before it loses its effectiveness.
EDIsecure DCP100 Service Manual
11