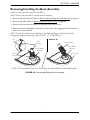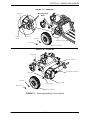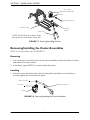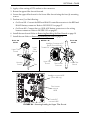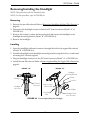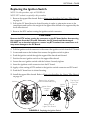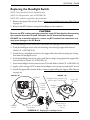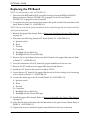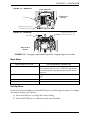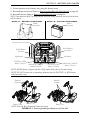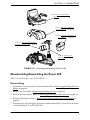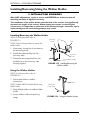
1
Service Manual
HMV™Highly
Maneuverable Vehicle
Zoom 300 and Zoom 400
DEALER: Keep this manual. The procedures
in this manual must be performed by a
qualified technician.
For more information regarding
Invacare products, parts, and services,
please visit www.invacare.com
WARNING
THE PROCEDURES IN THIS SERVICE MANUAL MUST BE
PERFORMED BY A QUALIFIED TECHNICIAN.
DO NOT SERVICE OR OPERATE THIS EQUIPMENT WITHOUT
FIRST READING AND UNDERSTANDING (1) THE OWNER’S
OPERATOR AND MAINTENANCE MANUAL AND (2) THE SERVICE
MANUAL. IF YOU ARE UNABLE TO UNDERSTAND THE
WARNINGS, CAUTIONS AND INSTRUCTIONS, CONTACT
INVACARE TECHNICAL SUPPORT BEFORE ATTEMPTING TO
SERVICE OR OPERATE THIS EQUIPMENT - OTHERWISE, INJURY
OR DAMAGE MAY RESULT.
NOTE: Updated versions of this manual are available on www.invacare.com.
Zoom 300 and Zoom 400
2
Part No 1122167
TABLE OF CONTENTS
TABLE OF CONTENTS
SPECIAL NOTES ................................................................................ 8
TYPICAL PRODUCT PARAMETERS .................................................... 9
LABEL LOCATIONS ......................................................................... 10
On Zoom 300 ...........................................................................................................................................10
On Zoom 400 ...........................................................................................................................................11
SECTION 1—GENERAL GUIDELINES ................................................. 12
Repair or Service Information ...............................................................................................................12
Operation Information ............................................................................................................................12
Tire Pressure .............................................................................................................................................13
Electrical .....................................................................................................................................................13
Grounding Instructions.......................................................................................................................13
Batteries......................................................................................................................................................13
Charging Batteries ...............................................................................................................................14
Rain Test.....................................................................................................................................................14
Weight Limitation.....................................................................................................................................14
SECTION 2—EMI INFORMATION ..................................................... 15
SECTION 3—SAFETY INSPECTION ................................................... 17
Checklist .....................................................................................................................................................17
SECTION 4—SEAT ........................................................................... 19
Removing/Installing the Seat...................................................................................................................19
Removing ...............................................................................................................................................19
Installing..................................................................................................................................................19
Removing/Installing the Seat Post .........................................................................................................20
Removing ...............................................................................................................................................20
Installing..................................................................................................................................................20
Adjusting Seat Height...............................................................................................................................21
Removing/Installing the Seat Pivot........................................................................................................21
Removing ...............................................................................................................................................21
Installing..................................................................................................................................................21
Adjusting Seat Depth ...............................................................................................................................22
90° Seat Swivel Adjustment ...................................................................................................................23
Removing/Installing the Seat Positioning Strap ..................................................................................24
SECTION 5—ARMS ......................................................................... 25
Part No 1122167
3
Zoom 300 and Zoom 400
TABLE OF CONTENTS
TABLE OF CONTENTS
Removing/Installing/Adjusting Arms .....................................................................................................25
Removing/Installing ..............................................................................................................................25
Adjusting Arm Width..........................................................................................................................26
Adjusting Arm Angle ...........................................................................................................................26
Adjusting Arm Height .........................................................................................................................27
Replacing Armrest Pads ..........................................................................................................................28
Removing/Installing Arm Support Bracket..........................................................................................28
SECTION 6—SHROUDS .................................................................... 30
Removing/Installing the Rear Shroud ...................................................................................................30
Removing ...............................................................................................................................................30
Installing .................................................................................................................................................30
Removing/Installing the Front Shroud .................................................................................................31
Zoom 300 ..............................................................................................................................................31
Zoom 400 ..............................................................................................................................................32
Removing/Installing the Boot Assembly ..............................................................................................33
SECTION 7—WHEELS AND CASTERS ................................................ 34
Removing/Installing the Drive Wheels ................................................................................................34
Removing ..............................................................................................................................................34
Installing..................................................................................................................................................34
Removing/Installing the Front Wheel ..................................................................................................36
Removing ...............................................................................................................................................36
Installing..................................................................................................................................................36
Removing/Installing the Fork..................................................................................................................37
Removing ...............................................................................................................................................37
Installing..................................................................................................................................................37
Removing/Installing the Caster Assemblies ........................................................................................38
Removing ...............................................................................................................................................38
Installing..................................................................................................................................................38
Replacing Foam-Filled Tires Onto Wheel Rims ................................................................................39
SECTION 8—TILLER ........................................................................ 40
Removing/Installing the Tiller.................................................................................................................40
Zoom 300 ..............................................................................................................................................40
Zoom 400 ..............................................................................................................................................41
Adjusting the Tiller Angle .......................................................................................................................43
Replacing Handgrips.................................................................................................................................43
Zoom 300 and Zoom 400
4
Part No 1122167
TABLE OF CONTENTS
TABLE OF CONTENTS
Removing/Installing the Upper Tiller Shroud.....................................................................................44
Removing ...............................................................................................................................................44
Installing..................................................................................................................................................44
Removing/Installing the Rear Tiller Shroud ........................................................................................46
Removing ...............................................................................................................................................46
Installing..................................................................................................................................................46
Removing/Installing the Headlight.........................................................................................................47
Removing ...............................................................................................................................................47
Installing..................................................................................................................................................47
Removing/Installing the Headlight Mounting Bracket/Front Tiller Shroud .................................48
Removing ...............................................................................................................................................48
Installing..................................................................................................................................................48
Replacing the Ignition Switch .................................................................................................................49
Replacing the Horn ..................................................................................................................................50
Replacing the Headlight Switch .............................................................................................................51
Replacing the PC Board ..........................................................................................................................52
Removing/Installing the Tiller Angle Adjustment Assembly ...........................................................54
Removing ...............................................................................................................................................54
Installing..................................................................................................................................................54
Replacing the Tiller Wiring Harness ....................................................................................................55
Changing to Left-Handed Operation ...................................................................................................58
Replacing the Throttle Assembly..........................................................................................................58
Calibrating Throttle Potentiometer .....................................................................................................59
Mechanical Method..............................................................................................................................59
Programming Method .........................................................................................................................61
SECTION 9—SWINGARMS ............................................................... 62
Removing/Installing the Swingarms.......................................................................................................62
Removing ..............................................................................................................................................62
Installing..................................................................................................................................................62
SECTION 10—TRANSAXLE ............................................................. 64
Removing/Installing the Transaxle ........................................................................................................64
Removing ..............................................................................................................................................64
Installing..................................................................................................................................................64
Removing/Installing the Brake Release Lever.....................................................................................65
Removing ...............................................................................................................................................65
Installing..................................................................................................................................................65
Part No 1122167
5
Zoom 300 and Zoom 400
TABLE OF CONTENTS
TABLE OF CONTENTS
Disengaging/Engaging the Brake Release Lever .................................................................................66
SECTION 11—CONTROLLER ............................................................ 68
Removing/Installing the Controller ......................................................................................................68
Removing ...............................................................................................................................................68
Installing..................................................................................................................................................69
Replacing the Controller Tray...............................................................................................................70
Zoom 300 ..............................................................................................................................................70
Zoom 400 ..............................................................................................................................................72
Removing/Installing Rear Wiring Harness ..........................................................................................74
Replacing/Resetting the Circuit Breaker .............................................................................................76
Replacing ................................................................................................................................................76
Resetting Circuit Breaker ..................................................................................................................78
Replacing the Fuse....................................................................................................................................79
Changing to Left-Handed Operation ...................................................................................................80
Programming the Controller .................................................................................................................80
Plugging in the Programmer ..............................................................................................................80
Main Menu .............................................................................................................................................81
Set Up Menu .........................................................................................................................................81
Options Menu.......................................................................................................................................82
Speed Lever in Neutral Menu ...........................................................................................................83
Controller Version Menu...................................................................................................................83
SECTION 12—BATTERIES AND CHARGER ....................................... 84
Recommended Battery Type .................................................................................................................85
Removing/Installing the Batteries on Zoom 300...............................................................................86
Removing ...............................................................................................................................................86
Installing..................................................................................................................................................86
Removing/Installing the Batteries on Zoom 400...............................................................................88
Removing ...............................................................................................................................................88
Installing..................................................................................................................................................88
Connecting/Disconnecting the Battery Cables on the Zoom 400 ...............................................90
Connecting ............................................................................................................................................90
Disconnecting .......................................................................................................................................91
Replacing the Charger .............................................................................................................................92
Zoom 300 ..............................................................................................................................................92
Zoom 400 ..............................................................................................................................................95
Zoom 300 and Zoom 400
6
Part No 1122167
Charging the Batteries.............................................................................................................................97
On-Board Battery Charger................................................................................................................97
Battery Charger Operation - Charger Indicator Light on Tiller...............................................98
SECTION 13—MAINTENANCE AND TROUBLESHOOTING ................. 99
Storing the Scooter..................................................................................................................................99
Suggested Maintenance Procedures .....................................................................................................99
Lubrication Points.................................................................................................................................. 100
Electrical .................................................................................................................................................. 100
Controller ............................................................................................................................................... 101
Error Codes............................................................................................................................................ 102
SECTION 14—TRANSPORTING ...................................................... 104
Disassembling/Assembling the Zoom 300 ....................................................................................... 104
Disassembling..................................................................................................................................... 104
Assembling.......................................................................................................................................... 104
Disassembling/Assembling the Zoom 400 ....................................................................................... 105
Disassembling..................................................................................................................................... 105
Assembling.......................................................................................................................................... 106
SECTION 15—SCOOTER ACCESSORIES ........................................... 108
Removing/Installing the Front Basket................................................................................................ 108
Removing/Installing the Front Basket Mounting Bracket ............................................................. 109
Removing ............................................................................................................................................ 109
Installing............................................................................................................................................... 109
Installing/Removing the Crutch/Cane Holder................................................................................. 110
Installing............................................................................................................................................... 110
Removing ............................................................................................................................................ 110
Installing/Removing the Safety Flag .................................................................................................... 111
Installing............................................................................................................................................... 111
Removing ............................................................................................................................................ 111
Installing/Removing/Using the Walker Holder .............................................................................. 112
Installing/Removing the Walker Holder ...................................................................................... 112
Using the Walker Holder................................................................................................................ 112
Installing/Removing the Rear Mounted Basket ............................................................................... 113
Installing............................................................................................................................................... 113
Removing ............................................................................................................................................ 113
LIMITED WARRANTY ................................................................... 115
Part No 1122167
7
Zoom 300 and Zoom 400
SPECIAL NOTES
SPECIAL NOTES
Signal words are used in this manual and apply to hazards or unsafe practices which
could result in personal injury or property damage. Refer to the table below for
definitions of the signal words.
SIGNAL WORD
MEANING
DANGER
Danger indicates an imminently hazardous situation which,
if not avoided, will result in death or serious injury.
WARNING
Warning indicates a potentially hazardous situation which, if
not avoided, could result in death or serious injury.
CAUTION
Caution indicates a potentially hazardous situation which, if
not avoided, may result in property damage.
NOTICE
THE INFORMATION CONTAINED IN THIS DOCUMENT IS SUBJECT TO
CHANGE WITHOUT NOTICE.
As a manufacturer of powered scooters, Invacare endeavors to supply a wide
variety of powered scooters to meet many needs of the end user. However, final
selection of the type of powered scooter to be used by an individual rests solely with
the user and his/her healthcare professional capable of making such a selection.
TIE-DOWN RESTRAINTS AND SEAT RESTRAINTS
Powered scooter users should NOT be transported in vehicles of any kind while in
the powered scooter. As of this date, the Department of Transportation has not
approved any tie-down systems for transportation of a user while in a powered
scooter, in a moving vehicle of any type.
It is Invacare’s position that users of powered scooters should be transferred into
appropriate seating in vehicles for transportation and use be made of the restraints
made available by the auto industry. Invacare cannot and does not recommend any
powered scooter transportation systems.
SEAT POSITIONING STRAP
It is the obligation of the dealers, therapists and other healthcare professionals to
determine if a seating restraint is required to ensure the safe operation of this
equipment by the user. Serious injury can occur in the event of a fall from a
powered scooter.
WARNING
The seat positioning strap is a positioning belt ONLY. It is not designed for use as a
safety device withstanding high stress loads such as auto or aircraft safety belts. If
signs of wear appear, belt must be replaced immediately.
Invacare products are specifically designed and manufactured for use in conjunction
with Invacare accessories. Accessories designed by other manufacturers have not
been tested by Invacare and are not recommended for use with Invacare products.
Part No 1122167
8
Zoom 300 and Zoom 400
TYPICAL PRODUCT PARAMETERS
TYPICAL PRODUCT PARAMETERS
ZOOM 300
OVERALL DIMENSIONS*
BASE LENGTH:
BASE WIDTH:
STEP HEIGHT
(Floor Pan to Ground):
SEAT HEIGHT
(Floor Pan to Seat Cushion):
SEAT DIMENSIONS
WIDTH:
DEPTH:
BACK HEIGHT:
ARM DIMENSIONS
LENGTH:
HEIGHT BETWEEN SEAT AND ARMS:
WIDTH BETWEEN ARMS:
ZOOM 400
44 in.
22.5 in.
46 in.
24 in.
3.5 in.
4.5 in.
17-19 in.
17-19 in.
16 in.
16, 17, 18 in.
15 in.
18 in.
16, 17, 18 in.
17 in.
18 in.
16, 17, 18 in.
17 in.
20 in.
18, 19, 20 in.
19 in.
13 in.
7- 9 in.
16 in. seat — 16-22 in.
18 in. seat — 18-24 in.
13 in.
7- 9 in.
18 in. seat — 18-24 in.
20 in. seat — 20-26 in.
SPEED RANGE:
0 - 4.5 m.p.h.
(Factory setting - 3.5 m.p.h.)
0 - 4.5 m.p.h.
(Factory setting - 5.5 m.p.h.)
MAXIMUM WEIGHT LIMITATION:
300 lbs
400 lbs
MAXIMUM INCLINE CAPABILITY:
8° Grade
8° Grade
WHEELS
FRONT WHEEL:
DRIVE WHEEL:
REAR CASTER:
7 in. x 2 in.
8 in. x 3 in.
1 in. x 5 in.
8 in. x 2 in.
10 in. x 3 in.
1 in. x 5 in.
TURNING RADIUS:
29 in.
32 in.
WEIGHT OF PRODUCT
FRONT BASE SECTION (WITH BASKET):
REAR BASE SECTION (WITH SHROUDS):
ENTIRE BASE SECTION:
SEAT (WITH ARMS):
BATTERIES (QUANTITY - 2):
N/A
N/A
71 lbs
31 lbs
18 lbs
53 lbs
48 lbs
TOTAL WEIGHT OF PRODUCT
(Including Batteries):
120 lbs
185 lbs
38 lbs
46 lbs
*NOTE: Zoom 300 parameters are based on an 18-inch wide seat. Zoom 400 parameters are based
on a 20-inch wide seat.
Part No 1122167
9
Zoom 300 and Zoom 400
LABEL LOCATIONS
LABEL LOCATIONS
On Zoom 300
NOTE: Serial Number
is located under the
rear shroud.
NOTE: Warning Label 1118359
is located under the rear shroud.
Scooter
Frame
! WARNING
Pinch Point.
1079203
NOTE: Warning Label
1079203 is also located
on the other swingarm.
Part No 1122167
10
Zoom 300 and Zoom 400
LABEL LOCATIONS
On Zoom 400
NOTE: Serial Number
is located under the
rear shroud.
DO NOT operate the scooter unless the tiller is in the locked position.
DO NOT lean against or pull forward on the tiller while mounting or
dismounting the scooter. Otherwise, injury may occur.
-------------------------------------------------------------------------------------------DO NOT lift scooter up by the front or rear shroud. Otherwise injury
or damage to the scooter may occur.
NOTE: Warning Label 1125362
is located under the rear shroud.
1118373 Rev A
Rear Frame Assembly
! WARNING
Pinch Point.
1079203
Front Frame Assembly
! WARNING
Pinch Point.
1079203
Part No 1122167
11
Zoom 300 and Zoom 400
SECTION 1—GENERAL GUIDELINES
SECTION 1—GENERAL GUIDELINES
WARNING
SECTION 1 - GENERAL GUIDELINES contains important information for the safe
operation and use of this product. DO NOT use or service this product or any
available optional equipment without first completely reading and understanding
these instructions and any additional instructional material such as Owner’s
Manuals, Service Manuals or Instruction Sheets supplied with this product or
optional equipment. If you are unable to understand the Warnings, Cautions or
Instructions, contact a healthcare professional, dealer or technical personnel before
attempting to use or service this equipment - otherwise, injury or damage may
occur.
Repair or Service Information
Set-up of the electronic control unit is to be performed only by qualified technicians. The
final adjustments of the controller may affect other activities of the powered scooter.
Damage to the equipment could occur under these circumstances.
DO NOT service or adjust your powered scooter while occupied, unless otherwise noted.
Operation Information
Invacare products are specifically designed and manufactured for use in conjunction with
Invacare accessories. Accessories designed by other manufacturers have not been tested
by Invacare and are not recommended for use with Invacare products.
Performance adjustments should only be made by professionals of the healthcare field or
persons fully conversant with this process and the driver's capabilities. Incorrect settings
could cause injury to the driver, bystanders, damage to the scooter and to surrounding
property.
After the powered scooter has been set-up/adjusted, check to make sure that the powered
scooter performs to the specifications entered during the set-up procedure. If the
powered scooter does not perform to specifications, turn the powered scooter off
immediately and reenter set-up specifications. Repeat this section until the powered
scooter performs to specifications.
Before using the scooter, verify that the motor is plugged into the harness.
DO NOT connect any medical devices such as ventilators, life support machines, etc., to
the battery. This could cause unexpected failure of the device and the powered scooter.
DO NOT attempt to lift the powered scooter by any removable (detachable) parts. Lifting
by means of any removable (detachable) parts of a powered scooter may result in injury
to the user or damage to the powered scooter.
DO NOT attempt to lift the powered scooter by its tiller, seat or shrouds.
Zoom 300 and Zoom 400
12
Part No 1122167
SECTION 1—GENERAL GUIDELINES
DO NOT stand on the frame of the powered scooter.
DO NOT stand on the shroud(s) of the powered scooter.
DO NOT adjust the seat position outside the specifications recommended by the
manufacturer.
After making any tiller angle adjustment and before use, the tiller must be securely locked
into position. Otherwise the user may fall from the scooter resulting in bodily harm and/
or damage to the scooter. Gently push/pull the tiller to ensure that the tiller is securely
engaged.
On Zoom 400 only - Before use, ensure that the frame lock lever is in the locked position
securing the front and rear frame assemblies together. Otherwise injury and/or damage
may occur.
DO NOT use an escalator to move a powered scooter between floors. Serious bodily
injury may occur.
DO NOT overtighten hardware attaching to the frame. This could cause damage to the
frame tubing.
Avoid storage or use near external flame or combustible products.
Tire Pressure
Ensure that the powered scooter has the proper tire pressure (P.S.I.). DO NOT overinflate
the tires. Failure to follow these recommendations may cause the tire to explode and
cause bodily harm. The recommended tire pressure is listed on the side wall of the tire.
Electrical
Grounding Instructions
DO NOT, under any circumstances, cut or remove the round grounding prong from any
plug used with or for Invacare products. Some devices are equipped with three-prong
(grounding) plugs for protection against possible shock hazards. Where a two-prong wall
receptacle is encountered, it is the personal responsibility and obligation of the customer
to contact a qualified electrician and have the two-prong receptacle replaced with a
properly grounded three-prong wall receptacle in accordance with the National Electrical
Code. If you must use an extension cord, use only a three-wire extension cord having the
same or higher electrical rating as the device being connected. In addition, Invacare has
placed RED/ORANGE warning tags on some equipment. DO NOT remove these tags.
Batteries
The warranty and performance specifications contained in this manual are based on the
use of deep cycle gel cell batteries. Invacare strongly recommends their use as the power
source for this unit.
Part No 1122167
13
Zoom 300 and Zoom 400
SECTION 1—GENERAL GUIDELINES
Carefully read battery/battery charger information prior to installing or servicing the
powered scooter.
Charging Batteries
NEVER attempt to recharge the batteries by attaching cables directly to the battery
terminals.
DO NOT attempt to recharge the batteries and operate the wheelchair at the same time.
DO NOT operate wheelchair with extension cord attached to the AC cable.
DO NOT attempt to recharge the batteries when the wheelchair has been exposed to any
type of moisture.
DO NOT attempt to recharge the batteries when the wheelchair is outside.
DO NOT sit in the wheelchair while charging the batteries.
Read and carefully follow the manufacturer’s instructions for each charger (supplied or
purchased). If charging instructions are not supplied, consult a qualified technician for
proper procedures.
When using an extension cord, use only a three (3) wire extension cord having at least 16
AWG (American Wire Gauge) wire and the same or higher electrical rating as the device being
connected. Use of improper extension cord could result in risk of fire and electric shock.
Ensure the pins of the extension cord plug are the same number, size, and shape as those
on the charger.
DO NOT under any circumstances cut or remove the round grounding plug from the
charger AC cable plug or the extension cord plug.
Three (3) prong to two (2) prong adapters should not be used. Use of three (3) prong
adapters can result in improper grounding and present a shock hazard to the user.
Rain Test
Invacare has tested its powered scooters in accordance with ISO 7176 “Rain Test.” Passing
this test means that the end user or his/her attendant should have sufficient time to
remove his/her powered scooter from a rain storm and retain powered scooter operation.
DO NOT leave powered scooter in a rain storm of any kind.
DO NOT leave powered scooter in a damp area for any length of time.
Weight Limitation
The weight limitation for the Zoom 300 is 300 lbs.
The weight limitation for the Zoom 400 is 400 lbs.
If so equipped, the front basket is rated for a maximum loading capacity of 10 lbs.
Zoom 300 and Zoom 400
14
Part No 1122167
SECTION 2—EMI INFORMATION
SECTION 2—EMI INFORMATION
WARNING
CAUTION: IT IS VERY IMPORTANT THAT YOU READ THIS INFORMATION
REGARDING THE POSSIBLE EFFECTS OF ELECTROMAGNETIC
INTERFERENCE ON YOUR POWERED WHEELCHAIR.
Electromagnetic Interference (EMI) From Radio Wave Sources
Powered wheelchairs and motorized scooters (in this text, both will be referred to
as powered wheelchairs) may be susceptible to electromagnetic interference (EMI),
which is interfering electromagnetic energy (EM) emitted from sources such as
radio stations, TV stations, amateur radio (HAM) transmitters, two way radios, and
cellular phones. The interference (from radio wave sources) can cause the powered
wheelchair to release its brakes, move by itself, or move in unintended directions. It
can also permanently damage the powered wheelchair's control system. The
intensity of the interfering EM energy can be measured in volts per meter (V/m).
Each powered wheelchair can resist EMI up to a certain intensity. This is called its
"immunity level." The higher the immunity level, the greater the protection. At this
time, current technology is capable of achieving at least a 20 V/m immunity level,
which would provide useful protection from the more common sources of radiated
EMI.
There are a number of sources of relatively intense electromagnetic fields in the
everyday environment. Some of these sources are obvious and easy to avoid.
Others are not apparent and exposure is unavoidable. However, we believe that by
following the warnings listed below, your risk to EMI will be minimized.
The sources of radiated EMI can be broadly classified into three types:
1) Hand-held Portable transceivers (transmitters-receivers with the antenna
mounted directly on the transmitting unit. Examples include: citizens band (CB)
radios, "walkie talkie", security, fire and police transceivers, cellular telephones,
and other personal communication devices).
NOTE: Some cellular telephones and similar devices transmit signals while they are ON,
even when not being used.
2) Medium-range mobile transceivers, such as those used in police cars, fire trucks,
ambulances and taxis. These usually have the antenna mounted on the outside of
the vehicle; and
3) Long-range transmitters and transceivers, such as commercial broadcast
transmitters (radio and TV broadcast antenna towers) and amateur (HAM)
radios.
NOTE: Other types of hand-held devices, such as cordless phones, laptop computers,
AM/FM radios, TV sets, CD players, cassette players, and small appliances, such as electric shavers and hair dryers, so far as we know, are not likely to cause EMI problems to
your powered wheelchair.
Part No 1122167
15
Zoom 300 and Zoom 400
SECTION 2—EMI INFORMATION
WARNING
Powered Wheelchair Electromagnetic Interference (EMI)
Because EM energy rapidly becomes more intense as one moves closer to the
transmitting antenna (source), the EM fields from hand-held radio wave sources
(transceivers) are of special concern. It is possible to unintentionally bring high
levels of EM energy very close to the powered wheelchair's control system while
using these devices. This can affect powered wheelchair movement and braking.
Therefore, the warnings listed below are recommended to prevent possible
interference with the control system of the powered wheelchair.
Electromagnetic interference (EMI) from sources such as radio and TV stations,
amateur radio (HAM) transmitters, two-way radios, and cellular phones can affect
powered wheelchairs and motorized scooters.
FOLLOWING THE WARNINGS LISTED BELOW SHOULD REDUCE THE
CHANCE OF UNINTENDED BRAKE RELEASE OR POWERED WHEELCHAIR
MOVEMENT WHICH COULD RESULT IN SERIOUS INJURY.
1) Do not operate hand-held transceivers (transmitters receivers), such as citizens
band (CB) radios, or turn ON personal communication devices, such as cellular
phones, while the powered wheelchair is turned ON;
2) Be aware of nearby transmitters, such as radio or TV stations, and try to avoid
coming close to them;
3) If unintended movement or brake release occurs, turn the powered wheelchair
OFF as soon as it is safe;
4) Be aware that adding accessories or components, or modifying the powered
wheelchair, may make it more susceptible to EMI (NOTE: There is no easy way
to evaluate their effect on the overall immunity of the powered wheelchair); and
5) Report all incidents of unintended movement or brake release to the powered
wheelchair manufacturer, and note whether there is a source of EMI nearby.
Important Information
1) 20 volts per meter (V/m) is a generally achievable and useful immunity level
against EMI (as of May 1994) (the higher the level, the greater the protection);
2) This device has been tested to a radiated immunity level of 20 volts per meter.
Modification of any kind to the electronics of this wheelchair as manufactured by
Invacare may adversely affect the RFI immunity levels.
Zoom 300 and Zoom 400
16
Part No 1122167
SECTION 3—SAFETY INSPECTION
SECTION 3—SAFETY INSPECTION
Checklist
These adjustments should be made whenever you service this product, especially as a
part of the initial set up. Follow these maintenance procedures:
WARNING
Before performing any maintenance, adjustment or service, turn power OFF and
remove key from ignition.
CAUTION
As with any vehicle, the wheels and tires should be checked periodically for cracks
and wear, and should be replaced.
❑ Ensure powered scooter drives straight (no excessive drag or pull to one side).
❑ Check frame for damage and corrosion.
❑ Ensure that the brake release lever is easy to engage/disengage.
❑ Ensure that tiller adjustment handle engages and disengages properly and securely.
❑ Ensure that the scooter stops completely when throttle is released (i.e., does not
continue to roll as if the throttle is activated).
❑ Clean upholstery and armrests.
❑ Ensure adjustable height arms operate and lock securely.
❑ Ensure armrest pad sits flush against arm tube.
❑ Inspect the seat upholstery for rips and tears.
❑ Inspect seat swivel for release and engagement (seat locks into the determined swivel
positions).
❑ Inspect the seat positioning strap for signs of wear. Replace if worn or damaged.
❑ Ensure that the buckle on the seat positioning strap latches. Replace if necessary.
❑ Verify that the hardware that attaches the seat positioning strap to the seat frame is
secure and undamaged. Replace if necessary.
❑ Ensure that the seat mounting hardware is securely tightened.
❑ Inspect for excessive side movement or binding when the drive wheels are raised and/
or turned.
❑ Inspect front wheel/fork assembly for proper tension by spinning the wheel. The front
wheel should come to a gradual stop.
❑ Check brake for binding or interference with travel.
❑ Check the front fork for damage or corrosion.
Part No 1122167
17
Zoom 300 and Zoom 400
SECTION 3—SAFETY INSPECTION
❑ Tighten locknut if the front wheel wobbles noticeably or loosen locknut if the wheel
binds to a stop.
❑ Ensure that the fork stem bearing set is tight.
❑ Ensure that wheel bearings are clean and free of moisture.
❑ Ensure that the bolts and fasteners on the caster assemblies are tight.
❑ Inspect caster assembly for proper tension by spinning the caster. The caster should
come to a gradual stop.
❑ Inspect tires for flat spots and wear.
❑ Clean molded body shrouds.
❑ Lubricate the top of the seat post using a Teflon®lubricant.
❑ Ensure that the anti-roll safety feature is working properly. The scooter should not
free-wheel downhill.
Zoom 300 and Zoom 400
18
Part No 1122167
SECTION 4—SEAT
SECTION 4—SEAT
WARNING
After ANY adjustments, repair or service and BEFORE use, make sure that all
attaching hardware is tightened securely - otherwise injury or damage may result.
Before performing any maintenance, adjustment or service, turn power OFF and
remove key from ignition.
Removing/Installing the Seat
NOTE: For this procedure, refer to FIGURE 4.1.
Removing
1. Fold down seat back.
2. Pulling up on the seat lever, lift the seat assembly off the seat post.
Installing
1. Align the seat pivot with the seat post.
2. Pulling up on the seat lever, lower the seat assembly onto the seat post.
NOTE: If necessary, slightly twist seat assembly back and forth to lock in place.
3. Release seat lever and lift up on seat assembly to ensure the seat is secure.
Seat Back
Seat
Seat Pivot
(Located under the Seat)
Seat Lever
Seat Post
FIGURE 4.1 Removing/Installing the Seat
Part No 1122167
19
Zoom 300 and Zoom 400
SECTION 4—SEAT
Removing/Installing the Seat Post
WARNING
Ensure that the seat post mounting screw is properly engaged and locked. Otherwise, injury and/or damage may result.
NOTE: For this procedure, refer to FIGURE 4.2.
NOTE: Take note of position and orientation of the seat post and seat post mounting screw before
removing.
Removing
1. Remove the seat. Refer to Removing/Installing the Seat on page 19.
2. Remove the mounting screw, locknut, and two (2) washers securing the seat post to
the frame post, refer to FIGURE 4.2.
3. Lift seat post up and remove from frame post.
Installing
1. Insert the seat post into the frame post and align the frame post mounting hole with
the desired seat post mounting hole, refer to FIGURE 4.2.
2. Using the mounting screw, locknut, and two (2) washers, secure the seat post to the
frame post.
3. Install the seat. Refer to Removing/Installing the Seat on page 19.
Seat Post
Seat Post Mounting Holes
Washer
Locknut
Mounting Screw
Washer
Frame Post
Mounting Hole
Frame Post
NOTE: Seat post on Zoom 300
shown. Seat post on Zoom 400
installs the same way.
FIGURE 4.2 Removing/Installing the Seat Post
Zoom 300 and Zoom 400
20
Part No 1122167
SECTION 4—SEAT
Adjusting Seat Height
NOTE: For this procedure, refer to FIGURE 4.3.
NOTE: The seat post has three (3) height settings.
1. Remove the seat. Refer to Removing/Installing the Seat on page 19.
2. Remove the mounting screw, locknut,
and two (2) washers securing the seat
post to the frame post.
17” Mounting
Hole
3. Align one (1) of the three (3) seat post
mounting holes with the frame post
mounting hole to achieve desired seat
height (FIGURE 4.3).
Seat Post
18”
Mounting
Hole
19” Mounting
Hole
4. Using the mounting screw, locknut,
and two (2) washers, secure the seat
post to the frame post.
FIGURE 4.3 Adjusting Seat Height
5. Install the seat. Refer to Removing/
Installing the Seat on page 19.
Removing/Installing the Seat Pivot
NOTE: For this procedure, refer to FIGURE 4.4.
Removing
1. Remove the seat. Refer to Removing/
Installing the Seat on page 19.
2. Remove the four (4) mounting bolts
and washers that secure the seat pivot
to the seat.
Seat
Installing
Seat Pivot
Washers
1. Install the four (4) mounting bolts and
washers to secure the seat pivot to the
seat. Securely tighten.
Washers
2. Install the seat. Refer to Removing/
Installing the Seat on page 19.
Mounting
Bolts
Mounting
Bolts
FIGURE 4.4 Removing/Installing the Seat
Pivot
Part No 1122167
21
Zoom 300 and Zoom 400
SECTION 4—SEAT
Adjusting Seat Depth
WARNING
DO NOT adjust the seat position outside the specifications recommended by the
manufacturer. Otherwise, injury to user or damage to scooter may result.
NOTE: For this procedure, refer to FIGURE 4.5.
1. Remove the seat assembly from the scooter. Refer to Removing/Installing the Seat on
page 19.
2. Remove the adjustable width arms. Refer to Removing/Installing/Adjusting Arms on
page 25.
3. Remove the six (6) mounting screws located under the seat that secure the back
assembly to the seat base.
4. Adjust back assembly to one (1) of three (3) mounting positions.
5. Reinstall the six (6) mounting screws securing the back assembly to the seat base.
Securely tighten.
6. Reinstall the adjustable width arms. Refer to Removing/Installing/Adjusting Arms on
page 25.
7. Reinstall the seat assembly onto the scooter. Refer to Removing/Installing the Seat on
page 19.
NOTE: Mounting positions are in reverse order. For example, Depth-Low is the highest position.
Seat Base
Mounting Positions
Mounting
Screws
Mounting
Screws
Depth Low
Back
Assembly
Seat Base
Mounting
Screws
Depth Medium
Back
Assembly
Seat Base
Mounting
Holes
Mounting Screws
Back
Assembly
Depth High
Back
Assembly
Seat Base
FIGURE 4.5 Adjusting Seat Depth
Zoom 300 and Zoom 400
22
Part No 1122167
SECTION 4—SEAT
90° Seat Swivel Adjustment
WARNING
Ensure that seat is locked into the forward position before and during operation of
the scooter. Otherwise, injury to the user and/or damage to the scooter may result.
CAUTION
DO NOT use the seat swivel option when accessories are installed (such as safety
flag, crutch/cane holder, etc.) and the seat is mounted in lowest height adjustment
position. Otherwise, damage to the scooter may occur.
NOTE: For this procedure, refer to FIGURE 4.6.
NOTE: The seat lever is located just beneath the seat on the right side.
8. Pull the seat lever up to rotate the seat.
NOTE: The seat locks in position at 90° intervals. The seat is locked when an audible click is heard.
9. Rotate the seat to the desired position.
10. Release seat lever to lock seat in desired position.
View From Back
Top View
Seat
Seat
Seat Lever
FIGURE 4.6 90° Seat Swivel Adjustment
Part No 1122167
23
Zoom 300 and Zoom 400
SECTION 4—SEAT
Removing/Installing the Seat Positioning Strap
WARNING
The seat positioning strap is a positioning belt only. It is not designed for use as a
safety device withstanding high stress loads such as auto or aircraft safety belts. If
signs of wear appear, belt must be replaced immediately.
ALWAYS wear your seat positioning strap.
NOTE: For this procedure, refer to FIGURE 4.7.
1. Remove the two (2) mounting screws and washers that secure the seat positioning
straps to the arm frame.
2. Remove the halves of the seat positioning strap from the arm frame.
3. Reposition the halves of new seat positioning strap underneath arm frame.
4. Reinstall the two (2) mounting screws and washers that secure the seat positioning
straps to the arm frame. Securely tighten.
Arm Frame
One Half (½) of Seat
Positioning Strap
One Half (½) of Seat
Positioning Strap
Washer
Mounting Screw
Washer
Mounting Screw
FIGURE 4.7 Removing/Installing the Seat Positioning Strap
Zoom 300 and Zoom 400
24
Part No 1122167
SECTION 5—ARMS
SECTION 5—ARMS
WARNING
After ANY adjustments, repair or service and BEFORE use, make sure all attaching
hardware is tightened securely - otherwise injury or damage may result.
Before performing any maintenance, adjustment or service, turn power off and
remove key from ignition.
Removing/Installing/Adjusting Arms
Removing/Installing
NOTE: For this procedure, refer to FIGURE 5.1.
NOTE: Reverse this procedure to install the arms.
1. Loosen adjustment knob that secures the arm to the arm support bracket.
2. Remove the arm from the arm support bracket.
3. If necessary, repeat STEPS 1-2 to remove the remaining arm.
Arm
Arm Mounting Tube
Adjustment Knobs
Arm Support Bracket
FIGURE 5.1 Removing/Installing/Adjusting Arms
Part No 1122167
25
Zoom 300 and Zoom 400
SECTION 5—ARMS
Adjusting Arm Width
NOTE: For this procedure, refer to FIGURE 5.1.
NOTE: The arm width can be adjusted between 18 inches and 22 inches.
NOTE: Changing the width of the arms may also affect the overall width of the powered scooter.
Use caution when traveling through doorways.
1. Loosen the adjustment knob on one (1) arm located beneath the seat frame on the arm
support bracket. Refer to FIGURE 5.1.
CAUTION
The arm can be adjusted to a maximum distance of 4½ inches from the inside of the
arm to the top of the mounting shaft. If the arm is adjusted beyond the maximum
4½ inches, the arm will fall out.
2. Move arm in or out to the desired position.
3. Retighten adjustment knob securely.
4. Measure distance between back and inside of arm.
NOTE: For proper balance, adjust both arms to the same distance away from the back.
5. Repeat STEPS 1-4 for opposite arm, setting it at the distance determined in STEP 4.
Adjusting Arm Angle
NOTE: For this procedure, refer to FIGURE 5.2.
NOTE: Arm angle can be adjusted between 8° and 10°.
1. Lift up the arm.
2. Loosen the jam nut.
3. Adjust the adjustment screw up or down to the desired arm angle.
4. Tighten the jam nut.
5. To position the opposite arm at the same angle, count the exposed threads after the
jam nut has been tightened.
6. Set the opposite arm to position determined in STEP 5.
Zoom 300 and Zoom 400
26
Part No 1122167
SECTION 5—ARMS
Arm
Adjustment
Screw
Count Exposed
Threads
STEP 5
Arm
Mounting
Tube
Jam Nut
FIGURE 5.2 Adjusting Arm Angle
Adjusting Arm Height
NOTE: For this procedure, refer to FIGURE 5.3.
NOTE: The arm height can be adjusted between 1 inch and 3 inches.
1. Remove the lock knob that secures the arm to the arm mounting tube.
2. Adjust the arm to desired height.
3. Reinstall the lock knob that secures the arm to the arm mounting tube and tighten
securely.
4. Repeat STEPS 1-3 for opposite arm, if necessary.
Arm
Lock Knob
Arm Mounting Tube
FIGURE 5.3 Adjusting Arm Height
Part No 1122167
27
Zoom 300 and Zoom 400
SECTION 5—ARMS
Replacing Armrest Pads
NOTE: For this procedure, refer to
FIGURE 5.4.
Arm Pad
1. Remove the two (2) mounting screws
that secure the armrest pad to arm.
2. Remove the old armrest pad.
3. Install new armrest pad and securely
tighten with existing mounting screws.
Arm
4. If necessary, repeat STEPS 1-3 to
replace the other armrest pad.
Mounting Screws
FIGURE 5.4 Replacing Armrest Pads
Removing/Installing Arm Support Bracket
NOTE: For this procedure, refer to FIGURE 5.5.
NOTE: Reverse this procedure to install the arm support bracket.
1. Remove the seat from the scooter. Refer to Removing/Installing the Seat on page 19.
2. Remove the arms from the seat assembly. Refer to Removing/Installing/Adjusting
Arms on page 25.
3. Turn the seat over and remove the six (6) mounting screws, washers and spacers that
secure the arm support bracket to the seat assembly.
4. Remove the arm support bracket.
Zoom 300 and Zoom 400
28
Part No 1122167
SECTION 5—ARMS
Side View
Seat
Assembly
Arm
Spacers
Arm Support
Bracket
Arm
Washers
Mounting Screws
Bottom View
Arm
Arm
Arm Support
Bracket
Mounting Screws,
Spacers, and Washers
Mounting Screws,
Spacers, and Washers
FIGURE 5.5 Removing/Installing Arm Support Bracket
Part No 1122167
29
Zoom 300 and Zoom 400
SECTION 6—SHROUDS
SECTION 6—SHROUDS
WARNING
After ANY adjustments, repair or service and BEFORE use, make sure that all
attaching hardware is tightened securely - otherwise injury or damage may result.
Before performing any maintenance, adjustment or service, turn power OFF and
remove key from ignition.
Removing/Installing the Rear Shroud
NOTE: For this procedure, refer to FIGURE 6.1.
Removing
1. Remove the seat. Refer to Removing/Installing the Seat on page 19.
2. Disengage the hook-and-loop strips securing the rear shroud to the frame by pulling
up on the shroud.
3. Lift the rear shroud off the seat post.
Installing
1. Align the tabs on the rear shroud with the slots in the front shroud.
2. Place rear shroud on the frame and press down slightly to engage the hook-and-loop
strips on the rear shroud (not shown) with those on the scooter frame.
3. Install the seat. Refer to Removing/Installing the Seat on page 19.
DETAIL “B” - ZOOM 400
DETAIL “A” - ZOOM 300
Rear
Shroud
Rear Shroud
Tabs
Hook-and-Loop
Strips
Seat Post
Tabs
Frame
Location
of Slots
Front
Shroud
Seat Post
Hook-and-Loop
Strips
Frame
Front Shroud
Hook-and-Loop Strips
FIGURE 6.1 Removing/Installing the Rear Shroud
Zoom 300 and Zoom 400
30
Part No 1122167
SECTION 6—SHROUDS
Removing/Installing the Front Shroud
Zoom 300
NOTE: For this procedure, refer to FIGURE 6.2.
NOTE: Reverse this procedure to install the front shroud on the scooter frame.
1. Remove the seat. Refer to Removing/Installing the Seat on page 19.
2. Remove the rear shroud. Refer to Removing/Installing the Rear Shroud on page 30.
3. Remove the batteries. Refer to Removing/Installing the Batteries on Zoom 300 on
page 86.
4. Disconnect the tiller wiring harness from the rear wiring harness. Refer to
FIGURE 8.13 on page page 56.
5. Disengage the boot from the front shroud. Refer to Removing/Installing the Boot
Assembly on page 33.
6. Slide the boot up the tiller.
7. Remove the tiller. Refer to Removing/Installing the Tiller on page 40.
8. Remove the floormat on the front shroud by pulling up and away.
9. Remove the four (4) mounting screws that secure the front shroud to the scooter
frame.
10. Once the tiller is removed, slide the boot off the tiller and front shroud off the scooter.
Mounting Screws
Boot Assembly
Front Shroud
NOTE: Floormat, Tiller and Fork Assemblies, and Scooter frame are not shown.
FIGURE 6.2 Removing/Installing the Front Shroud - Zoom 300
Part No 1122167
31
Zoom 300 and Zoom 400
SECTION 6—SHROUDS
Zoom 400
NOTE: For this procedure, refer to FIGURE 6.3.
NOTE: Reverse this procedure to install the front shroud on the scooter frame.
1. Remove the seat. Refer to Removing/Installing the Seat on page 19.
2. Remove the rear shroud. Refer to Removing/Installing the Rear Shroud on page 30.
3. Remove the batteries. Refer to Removing/Installing the Batteries on Zoom 400 on
page 88.
4. Disconnect the tiller wiring harness from the rear wiring harness. Refer to
FIGURE 8.14 on page 57.
5. Disengage the boot from the front shroud. Refer to Removing/Installing the Boot
Assembly on page 33.
6. Remove the tiller. Refer to Removing/Installing the Tiller on page 40.
7. Remove the floormat on the front shroud by pulling up and away.
8. Remove the four (4) mounting screws that secure the front shroud to the scooter
frame.
9. Once the tiller is removed, slide the boot off the tiller and front shroud off the scooter.
NOTE: The boot will have to be slipped off the front basket bracket after disengaging the boot from
the tabs.
10.
Mounting Screws
Boot Assembly
Front Basket Bracket
goes through HERE
Front Shroud
NOTE: Floormat, tiller and fork assemblies, and scooter frame are not shown.
FIGURE 6.3 Removing/Installing the Front Shroud - Zoom 400
Zoom 300 and Zoom 400
32
Part No 1122167
SECTION 6—SHROUDS
Removing/Installing the Boot Assembly
NOTE: For this procedure, refer to FIGURE 6.4.
NOTE: Reverse this procedure to install the boot assembly.
1. Remove the front shroud. Refer to Removing/Installing the Front Shroud on page 31.
2. Remove the tiller. Refer to Removing/Installing the Tiller on page 40.
3. Remove the front shroud and boot assembly from the scooter.
4. Remove the boot assembly from the front shroud by disengaging the boot from the
tabs on the front shroud.
NOTE: On the Zoom 400, the boot will have to be slipped off the front basket bracket after
disengaging the boot from the tabs. Refer to Detail “A” of FIGURE 6.4.
Tab
DETAIL “A”
Boot
Assembly
Boot Assembly
Front Basket
Bracket
Front Basket
Bracket
Front
Shroud
Front Shroud
NOTE: The Zoom 400 is shown. The Zoom 300 is the same without the front basket bracket.
FIGURE 6.4 Removing/Installing the Boot Assembly
Part No 1122167
33
Zoom 300 and Zoom 400
SECTION 7—WHEELS AND CASTERS
SECTION 7—WHEELS AND CASTERS
WARNING
After any adjustments, repair or service and before use, make sure that all attaching
hardware is tightened securely - otherwise injury or damage may result.
Before performing any maintenance, adjustment or service, turn power Off and
remove key from ignition.
Removing/Installing the Drive Wheels
NOTE: For this procedure, refer to FIGURE 7.1.
Removing
1. Turn power off and remove the key from the ignition.
2. Remove the seat. Refer to Removing/Installing the Seat on page 19.
3. Remove the rear shroud. Refer to Removing/Installing the Rear Shroud on page 30.
4. Place the scooter frame up on blocks so that the drive wheels are off the ground.
5. Remove the hex nut and washer that secure the drive wheel to the drive shaft. Discard
hex nut.
6. Use a wheel puller, if necessary, to remove the existing drive wheel from the drive
shaft.
7. Remove keystock from drive shaft. Set aside.
8. If necessary, repeat STEPS 1-6 to remove other drive wheel.
Installing
1. Place keystock in cutout on drive shaft as shown in FIGURE 7.1.
NOTE: The keystock in the drive shaft MUST lineup with the cutout in the wheel hub.
2. Install the drive wheel onto the drive shaft.
NOTE: If necessary, use a rubber hammer to gently tap drive wheel completely into position on the
drive shaft.
3. Secure wheel to drive shaft using the washer and new hex nut. Securely tighten.
NOTE: A new hex nut should be used when reinstalling the wheel.
4. Repeat STEPS 1-3 to install the other drive wheel.
5. Install the rear shroud. Refer to Removing/Installing the Rear Shroud on page 30.
6. Install the seat. Refer to Removing/Installing the Seat on page 19.
Zoom 300 and Zoom 400
34
Part No 1122167
SECTION 7—WHEELS AND CASTERS
DETAIL “A” - ZOOM 300
Keystock
Drive
Shaft
Warning: Pinch
Point
Cutout
Washer
Scooter Frame
Hex Nut
Drive Wheel
DETAIL “B” - ZOOM 400
Swingarm
Scooter Frame
Transaxle Assembly
Keystock
Washer
Drive Shaft
Cutout
Hex Nut
Drive Wheel
FIGURE 7.1 Removing/Installing the Drive Wheels
Part No 1122167
35
Zoom 300 and Zoom 400
SECTION 7—WHEELS AND CASTERS
Removing/Installing the Front Wheel
NOTE: For this procedure, refer to FIGURE 7.2.
NOTE: Take note of position and orientation of wheel and mounting hardware before removing.
Removing
1. Turn power off and remove the key from the ignition.
2. Place the front of the powered scooter up on blocks so that the front wheel is off the
ground.
3. Remove the mounting screw, locknut and two (2) spacers that secure the front wheel
to the fork.
4. Remove front wheel from fork.
Installing
WARNING
Front wheel MUST be mounted in the lower mounting holes for both the Zoom 300
and Zoom 400 - otherwise injury may result.
NOTE: Before installing the front wheel, check the fork for bending. If bent, replace the fork. Refer
to Removing/Installing the Fork on page 37.
1. Align front wheel with the lower fork mounting holes.
2. Secure the front wheel to the fork using the mounting screw, locknut and two (2)
spacers.
3. Securely tighten the front wheel mounting hardware.
Fork
Mounting Screw
Lower Fork
Mounting Hole
Spacer
Spacer
Locknut
Front Wheel
FIGURE 7.2 Removing/Installing the Front Wheel
Zoom 300 and Zoom 400
36
Part No 1122167
SECTION 7—WHEELS AND CASTERS
Removing/Installing the Fork
NOTE: For this procedure, refer to FIGURE 7.3, FIGURE 12.2, and FIGURE 12.3.
Removing
1. Remove the seat. Refer to Removing/Installing the Seat on page 19.
2. Remove the rear shroud. Refer to Removing/Installing the Rear Shroud on page 30.
3. Disconnect the RED and BLACK battery connector from the wiring harness assembly.
Refer to FIGURE 12.2 on page 87 for the Zoom 300 and FIGURE 12.3 on page 89 for the
Zoom 400.
4. Remove the boot assembly. Refer to Removing/Installing the Boot Assembly on
page 33.
5. Remove the tiller. Refer to Removing/Installing the Tiller on page 40.
6. Remove the two (2) mounting bolts that secure the tiller angle adjustment assembly to
the front fork. Refer to FIGURE 7.3.
7. Slide front fork out of the fork stem mount on the scooter frame.
Installing
1. Slide front fork into the fork stem mount.
2. Place the tiller angle adjustment assembly on the front fork.
3. Install the two (2) mounting bolts to secure tiller angle adjustment assembly to the
front fork. Securely tighten (FIGURE 7.3).
4. Install the tiller assembly. Refer to Removing/Installing the Tiller on page 40.
5. Install the boot assembly. Refer to Removing/Installing the Boot Assembly on page 33.
6. Connect the RED and BLACK battery connector to the wiring harness assembly. Refer
to FIGURE 12.2 on page 87 for the Zoom 300 and FIGURE 12.3 on page 89 for the
Zoom 400.
7. Install the rear shroud. Refer to Removing/Installing the Rear Shroud on page 30.
8. Install the seat. Refer to Removing/Installing the Seat on page 19.
Part No 1122167
37
Zoom 300 and Zoom 400
SECTION 7—WHEELS AND CASTERS
Tiller Angle
Adjustment Assembly
Washers
Mounting Screws
Scooter Frame
Fork Stem
Mount
Front Fork
NOTE: Zoom 300 frame is shown. Front
fork mounts the same way to Zoom 400.
FIGURE 7.3 Removing/Installing the Fork
Removing/Installing the Caster Assemblies
NOTE: For this procedure, refer to FIGURE 7.4.
Removing
1. Use a wrench to turn the hex nut on the caster assembly counter-clockwise to loosen
and remove the caster wheel.
2. If necessary, repeat STEPS 1 to remove the other caster.
Installing
1. Insert the caster wheel into the caster housing and turn the hex nut clockwise to
securely tighten the caster wheel in place.
Caster Housing
Swingarm Assembly
Hex Nut
Caster
FIGURE 7.4 Removing/Installing the Caster Assemblies
Zoom 300 and Zoom 400
38
Part No 1122167
SECTION 7—WHEELS AND CASTERS
Replacing Foam-Filled Tires Onto Wheel Rims
NOTE: For this procedure, refer to FIGURE 7.5.
NOTE: During initial use of scooter, user may experience a flat spot on wheels. Flat spot will
disappear with continual use of scooter.
1. Remove the wheel from the drive shaft. Refer to Removing/Installing the Drive
Wheels on page 34.
2. Perform one (1) of the following:
• Replacing Existing Tire and Rim: Discard existing tire and hub. Proceed to STEP 3.
• Replacing Existing Rim Only: Perform the following i. Remove the four (4) existing mounting screws, lock washers and nuts that
secure the existing outer rim, inner rim and hub to the existing tire.
ii. Discard existing mounting hardware, rims and hub.
3. When installing the new two-piece hub into a new pneumatic tire, if necessary, place
the inner tube into the tire.
4. Insert the outer rim and inner rim into the new/existing tire.
5. Insert the hub into the inner rim and align the four (4) mounting holes of the hub, inner
rim and outer rim.
6. Using the four (4) mounting screws, lock washers and hex nuts, secure the outer rim
to the inner rim and hub. Torque hex nuts to 160-200 in-lbs ± 20.
7. Install the drive wheel on the drive shaft. Refer to Removing/Installing the Drive
Wheels on page 34.
Washers
Outer Rim
Locknuts
Mounting Screws
Hub
Wheel Hub
Cutout
Inner Rim
FIGURE 7.5 Replacing Foam-Filled Tires Onto Wheel Rims
Part No 1122167
39
Zoom 300 and Zoom 400
SECTION 8—TILLER
SECTION 8—TILLER
WARNING
After any adjustments, repair or service and before use, make sure that all attaching
hardware is tightened securely - otherwise injury or damage may result.
Before performing any maintenance, adjustment or service, turn power OFF and
remove key from ignition.
Removing/Installing the Tiller
Zoom 300
NOTE: For this procedure, refer to FIGURE 8.1, FIGURE 8.13, and FIGURE 12.2.
NOTE: Reverse this procedure to install the tiller.
1. Turn power off and remove the key from the ignition.
2. Remove the seat. Refer to Removing/Installing the Seat on page 19.
3. Remove the rear shroud. Refer to Removing/Installing the Rear Shroud on page 30.
4. Disconnect the controller from the batteries by pulling the RED and BLACK controller
connector from the RED and BLACK battery connector. Refer to FIGURE 12.2 on
page 87.
5. Remove the basket. Refer to Removing/Installing the Front Basket on page 108.
6. Disengage the boot and slide it up the tiller to expose the tiller angle adjustment
assembly.
7. Disconnect the tiller wiring harness from the rear wiring harness. Refer to
FIGURE 8.13 on page 56.
8. Remove the upper tiller shroud. Refer to Removing/Installing the Upper Tiller Shroud
on page 44.
9. Remove the mounting screw and “P” clip securing the tiller harness cable to the tiller
(Detail “C” of FIGURE 8.1.).
10. Pull the tiller harness cable through the hole in the lower tiller shroud.
11. Remove the two (2) locknuts, mounting screws, tube clamps and cable bracket that
secure the tiller to the tiller angle adjustment assembly (Detail “A of FIGURE 8.1).
12. Disconnect the tiller angle adjustment cable from the actuator wedge by performing
the following (Detail “D” of FIGURE 8.1.):
A. Lift up the actuator wedge until the tiller angle adjustment cable is slack.
B. Pull the tiller angle adjustment cable from the actuator wedge.
13. Remove the tiller.
Zoom 300 and Zoom 400
40
Part No 1122167
SECTION 8—TILLER
Zoom 400
NOTE: For this procedure, refer to FIGURE 8.1, FIGURE 8.14 and FIGURE 12.3.
NOTE: Reverse this procedure to install the tiller.
1. Turn power off and remove the key from the ignition.
2. Remove the seat. Refer to Removing/Installing the Seat on page 19.
3. Remove the rear shroud. Refer to Removing/Installing the Rear Shroud on page 30.
4. Disconnect the two (2) BLACK battery connectors from the wiring harness connectors.
Refer to FIGURE 12.3 on page 89.
5. Remove the rear tiller shroud. Refer to Removing/Installing the Rear Tiller Shroud on
page 46.
6. Remove the headlight. Refer to Removing/Installing the Headlight on page 47.
7. Remove the headlight mounting bracket and front tiller shroud. Refer to Removing/
Installing the Headlight Mounting Bracket/Front Tiller Shroud on page 48.
8. Disengage the boot and slide it up the tiller to expose the tiller angle adjustment
assembly.
NOTE: The boot will have to be slipped off the front basket bracket after disengaging the boot from
the tabs.
9. Disconnect the tiller wiring harness from the rear wiring harness. Refer to
FIGURE 8.14 on page 57.
10. Cut the tie-wrap securing the tiller harness cable and tiller angle adjustment cable to
the tiller.
11. Remove the upper tiller shroud. Refer to Removing/Installing the Upper Tiller Shroud
on page 44.
12. Remove the mounting screw and “P” clip securing the tiller harness cable to the tiller
(Detail “C”, FIGURE 8.1.)
13. Pull the tiller harness cable through the hole in the lower tiller shroud.
14. Remove the two (2) locknuts, mounting screws, tube clamps and cable bracket that
secure the tiller to the tiller angle adjustment assembly (Detail “B” of FIGURE 8.1).
15. Disconnect the tiller angle adjustment cable from the actuator wedge by performing
the following (Detail “D” of FIGURE 8.1.):
A. Lift up the actuator wedge until the tiller angle adjustment cable is slack.
B. Pull the tiller angle adjustment cable weight from the actuator wedge.
16. Remove the tiller.
Part No 1122167
41
Zoom 300 and Zoom 400
SECTION 8—TILLER
DETAIL “A” - ZOOM 300
DETAIL “B” - ZOOM 400
Tiller
Cable
Bracket
Tiller
Coved
Washers
Mounting
Screws
Coved
Washers
Mounting
Screws
Locknuts
Locknuts
Cable Bracket
Tiller Angle
Adjustment
Assembly
Tiller Angle
Adjustment
Assembly
DETAIL “C” - INTERIOR
CONTROL BOX
DETAIL “D” - TILLER ANGLE
ADJUSTMENT ASSEMBLY
Tiller
Harness
Cable
“P” Clip
Mounting
Screw
Hole in Lower
Tiller Shroud
(hidden from
view)
Angle
Adjustment
Cable
Angle
Adjustment
Cable
Actuator
Wedge
Actuator
Wedge
FIGURE 8.1 Removing/Installing the Tiller
Zoom 300 and Zoom 400
42
Part No 1122167
SECTION 8—TILLER
Adjusting the Tiller Angle
WARNING
Ensure that tiller is properly adjusted before driving the scooter.
After making any tiller angle adjustments and before use, the tiller MUST be
securely locked into position. Otherwise, a fall from the scooter could occur causing
bodily injury and/or damage to the scooter. Gently, push/pull against tiller to ensure
that the tiller is securely engaged into the adjustment plate.
NOTE: For this procedure, refer to FIGURE 8.2.
NOTE: The powered scooter has an adjustable
tiller. The tiller locks into a position that is most
comfortable for you. The tiller also folds down
for transportation and storage.
Tiller Release Lever
Tiller
1. Pull up on the tiller release lever
located under the right tiller handle.
Up to
Unlock
Right Tiller
Handle
2. Push/pull the tiller to the desired angle
and release the tiller release lever.
Down to
Lock
3. Gently, push/pull against tiller to
ensure that the tiller is securely
engaged into the locking mechanism.
NOTE: The tiller is locked in position when an
audible "click" is heard.
FIGURE 8.2 Adjusting the Tiller Angle
Replacing Handgrips
NOTE: For this procedure, refer to FIGURE 8.3
1. Cut the hangrip along the tiller handle.
Handgrip
2. Remove the cut handgrip from the tiller
handle.
Tiller Assembly
3. Spray the inside of the new handgrip
with hairspray.
4. Slide the new handgrip onto the tiller
handle.
Tiller Handle
(Under the Handgrip)
5. Repeat STEPS 1 and 4 for the other
handgrip.
Part No 1122167
FIGURE 8.3 Replacing Handgrips
43
Zoom 300 and Zoom 400
SECTION 8—TILLER
Removing/Installing the Upper Tiller Shroud
NOTE: For this procedure, refer to FIGURE 8.4.
Removing
1. Turn power off and remove the key from the ignition.
2. Remove the seat. Refer to Removing/Installing the Seat on page 19.
3. Remove the rear shroud. Refer to Removing/Installing the Rear Shroud on page 30.
4. Perform one (1) of the following:
• On Zoom 300 - Disconnect the RED and BLACK controller connector from the RED
and BLACK battery connector. Refer to FIGURE 12.2 on page 87.
• On Zoom 400 - Disconnect the two (2) BLACK battery connectors from the wiring
harness connectors. Refer to FIGURE 12.3 on page 87.
5. Remove the four (4) mounting screws that secure the upper tiller shroud to the lower
tiller shroud.
CAUTION
Carefully rotate the upper tiller shroud backward to avoid damaging the internal
wiring, otherwise scooter will not operate properly.
6. Gently, rotate the upper tiller shroud backward exposing the internal wiring.
7. Remove the RTV sealant coating the connectors to the PC board.
CAUTION
Remove any RTV sealant coating the connector on the PC board before disconnecting
the connector from the PC board. Otherwise, the PC board could be damaged.
DO NOT use a chemical solvent to remove any RTV sealant from connectors as it
may cause damage to the PC Board.
8. Disconnect the following from the PC board (Detail “A” of FIGURE 8.4):
A. Throttle IDC
B. Headlight connector (Zoom 400 only)
C. Tiller harness connector
Installing
1. Connect the following to the PC board (Detail “B” of FIGURE 8.4):
A. Throttle IDC
B. Headlight connector (Zoom 400 only)
C. Tiller harness connector
Zoom 300 and Zoom 400
44
Part No 1122167
SECTION 8—TILLER
2. Apply a thin coating of RTV sealant to the connectors.
3. Rotate the upper tiller shroud forward.
4. Secure the upper tiller shroud to the lower tiller shroud using the four (4) mounting
screws.
5. Perform one (1) of the following:
• On Zoom 300 - Connect the RED and BLACK controller connector to the RED and
BLACK battery connector. Refer to FIGURE 12.2 on page 87.
• On Zoom 400 - Connect the two (2) BLACK battery connectors to the wiring
harness connectors. Refer to FIGURE 12.3 on page 87.
6. Install the rear shroud. Refer to Removing/Installing the Rear Shroud on page 30.
7. Install the seat. Refer to Removing/Installing the Seat on page 19.
Zoom 300
Shown
Upper Tiller
Shroud
Mounting
Screws
DETAIL “A”
Lower
Tiller
Shroud
Tiller
Headlight Connector to PC
Board (Zoom 400 only)
Throttle IDC
Upper Tiller
Shroud
Zoom 400
Shown
Lower Tiller
Shroud
Tiller Harness
Connector
DETAIL “B”
Headlight connects HERE
(Zoom 400 only)
Tiller Harness
connects
HERE
Throttle IDC
connects HERE
FIGURE 8.4 Removing/Installing the Upper Tiller Shroud
Part No 1122167
45
Zoom 300 and Zoom 400
SECTION 8—TILLER
Removing/Installing the Rear Tiller Shroud
NOTE: This procedure is for the Zoom 400 only.
NOTE: For this procedure, refer to FIGURE 8.5.
Removing
1. Remove the four (4) mounting screws that secure the rear tiller shroud to the front
tiller shroud.
Installing
1. Secure the rear tiller shroud to the front tiller shroud using the four (4) mounting
screws. Securely tighten.
Mounting Screws
Front Tiller
Shroud
Lower Tiller Shroud
Mounting Screws
FIGURE 8.5 Removing/Installing the Rear Tiller Shroud
Zoom 300 and Zoom 400
46
Part No 1122167
SECTION 8—TILLER
Removing/Installing the Headlight
NOTE: This procedure is for the Zoom 400 only.
NOTE: For this procedure, refer to FIGURE 8.6.
Removing
1. Remove the rear tiller shroud. Refer to Removing/Installing the Rear Tiller Shroud on
page 46.
2. Disconnect the headlight connector from the PC board connector (Detail “A” of
FIGURE 8.6).
3. Remove the locknut, washer and mounting bolt that secure the headlight to the
headlight mounting bracket (Detail “B” of FIGURE 8.6).
4. Remove the headlight.
Installing
1. Insert the headlight cable and connector through the hole in the upper tiller shroud
(Detail “B” of FIGURE 8.6).
2. Install the headlight on the headlight mounting bracket using the locknut, washer and
mounting bolt. Securely tighten.
3. Plug the headlight connector to the PC board connector (Detail “A” of FIGURE 8.6).
4. Install the rear tiller shroud. Refer to Removing/Installing the Upper Tiller Shroud on
page 44.
DETAIL “A”
DETAIL “B”
Headlight
Mounting Bracket
Washer
Headlight
Locknut
Headlight
Connector
PC Board
Connector
Hole in Upper
Tiller Shroud
Headlight
Mounting
Bolt
Headlight Cable
and Connector
FIGURE 8.6 Removing/Installing the Headlight
Part No 1122167
47
Zoom 300 and Zoom 400
SECTION 8—TILLER
Removing/Installing the Headlight Mounting Bracket/
Front Tiller Shroud
NOTE: This procedure is for the Zoom 400
only.
Front Tiller
Shroud
NOTE: For this procedure, refer to
FIGURE 8.7.
Headlight
Mounting
Bracket
Removing
1. Remove the headlight. Refer to
Removing/Installing the Headlight on
page 47.
Tiller
Assembly
Mounting
Screws
2. Remove the two (2) mounting screws
that secure the headlight mounting
bracket and the front tiller shroud to
the tiller assembly.
FIGURE 8.7 Removing/Installing the
Headlight Mounting Bracket/Front Tiller
Shroud
3. Remove the headlight mounting
bracket and the front tiller shroud.
Installing
1. Position the headlight mounting bracket and the front tiller shroud onto the tiller
assembly.
2. Secure the front tiller shroud and the headlight mounting bracket using the two (2)
mounting screws.
3. Install the headlight. Refer to Removing/Installing the Headlight on page 47.
4. Install the rear shroud. Refer to Removing/Installing the Rear Tiller Shroud on
page 46.
Zoom 300 and Zoom 400
48
Part No 1122167
SECTION 8—TILLER
Replacing the Ignition Switch
NOTE: For this procedure, refer to FIGURE 8.8.
NOTE: RTV sealant is required for this procedure.
1. Remove the upper tiller shroud. Refer to Removing/Installing the Upper Tiller Shroud
on page 44.
2. Pull up the PC board from its slotted housing in order to gain easier access to the
components and to allow the weight of the upper tiller shroud to be supported by the
lower tiller shroud
3. Remove the RTV sealant coating the ignition switch connector.
CAUTION
Remove the RTV sealant coating the connector on the PC board before disconnecting
the connector from the PC board. Otherwise, the PC board could be damaged.
DO NOT use a chemical solvent to remove any RTV sealant from connectors as it
may cause damage to the PC Board.
4. Pull the ignition switch connector to disconnect the ignition switch from the PC board.
5. Loosen and remove the locknut that secures the ignition switch in place.
6. Push the ignition switch through the upper tiller shroud and discard.
7. Position the new ignition switch on the upper tiller shroud.
8. Secure the new ignition switch with the locknut. Securely tighten.
9. Insert the ignition switch connector into the PC board.
10. Apply a thin coating of RTV sealant to the ignition switch connector and PC board.
11. Push the PC board into its slotted housing.
12. Install the upper tiller shroud. Refer to Removing/Installing the Upper Tiller Shroud
on page 44.
Bottom View of Ignition
Switch and Attached Wiring
Locknut
Ignition Switch
connects
HERE
PC Board
Ignition
Switch
Top View of
Lower Tiller
Shroud
Bottom View of
Upper Tiller Shroud
FIGURE 8.8 Replacing the Ignition Switch
Part No 1122167
49
Zoom 300 and Zoom 400
SECTION 8—TILLER
Replacing the Horn
NOTE: For this procedure, refer to FIGURE 8.9.
NOTE: RTV sealant is required for this prodcedure.
1. Remove the upper tiller shroud. Refer to Removing/Installing the Upper Tiller Shroud
on page 44.
2. Remove the RTV sealant coating the horn connector.
CAUTION
Remove any RTV sealant coating the connector on the PC board before disconnecting
the connector from the PC board. Otherwise, the PC board could be damaged.
DO NOT use a chemical solvent to remove any RTV sealant from connectors as it
may cause damage to the PC Board.
3. Pull the horn switch connector to disconnect the horn switch from the PC board.
4. Push the horn switch with the attaching wires through upper tiller shroud in the
direction of the arrow shown in Detail “B” of FIGURE 8.9 and discard.
5. Install the new horn switch into the upper tiller shroud by inserting the wiring first
then the horn.
6. Push the horn switch into place until the housing is snug against the upper tiller
shroud. Refer to Detail “A” of FIGURE 8.9.
7. Insert the horn switch connector into the PC board. Refer to Detail “B” of FIGURE 8.9.
8. Apply a thin coating of RTV sealant to the horn switch connector and PC board.
9. Install the upper tiller shroud. Refer to Removing/Installing the Upper Tiller Shroud
on page 44.
DETAIL “B”
DETAIL “A”
PC Board
Horn Switch should be snug
against Upper Tiller Shroud
Pull Horn
Switch and
Wires out in
this direction
Upper Tiller
Shroud
Horn
Switch
Top View of
Lower Tiller
Shroud
Horn Switch
connects Horn Switch and Wiring
HERE
Bottom View of
Upper Tiller Shroud
FIGURE 8.9 Replacing the Horn
Zoom 300 and Zoom 400
50
Part No 1122167
SECTION 8—TILLER
Replacing the Headlight Switch
NOTE: This procedure is for the Zoom 400 only.
NOTE: For this procedure, refer to FIGURE 8.10.
NOTE: RTV sealant is required for this prodcedure.
1. Remove the upper tiller shroud. Refer to Removing/Installing the Upper Tiller Shroud
on page 44.
2. Remove the RTV sealant coating the headlight switch connector.
CAUTION
Remove any RTV sealant coating the connector on the PC board before disconnecting
the connector from the PC board. Otherwise, the PC board could be damaged.
DO NOT use a chemical solvent to remove any RTV sealant from connectors as it
may cause damage to the PC Board.
3. Pull the headlight switch connector to disconnect the headlight switch from the PC board.
4. Push the headlight switch with the attaching wires through upper tiller shroud.
(Detail “B” of FIGURE 8.10).
5. Install the new headlight switch into the upper tiller shroud by inserting the wiring
first then the headlight switch.
6. Push the headlight switch into place until the housing is snug against the upper tiller
shroud. Refer to Detail “B” of FIGURE 8.10.
7. Insert the headlight switch connector into PC board. Refer to Detail “B” of FIGURE 8.10.
8. Apply a thin coating of RTV sealant the headlight switch connector and the PC board.
9. Install the upper tiller shroud. Refer to Removing/Installing the Upper Tiller Shroud
on page 44.
DETAIL “B”
DETAIL “A”
PC Board
Headlight Switch should be snug
against Upper Tiller Shroud
Headlight
Switch
connects
HERE
Headlight
Switch
Upper Tiller
Shroud
Headlight
Switch
Top View of
Lower Tiller
Shroud
Bottom View of Upper
Tiller Shroud
FIGURE 8.10 Replacing the Headlight Switch
Part No 1122167
51
Zoom 300 and Zoom 400
SECTION 8—TILLER
Replacing the PC Board
NOTE: For this procedure, refer to FIGURE 8.11.
1. Disconnect the RED and BLACK controller connector from the RED and BLACK
battery connector. Refer to FIGURE 12.2 on page 87 for the Zoom 300 and
FIGURE 12.3 on page 89 for the Zoom 400.
2. Loosen the set screw (not shown) that secures the speed control knob and remove the
knob. Refer to Detail “A” of FIGURE 8.11.
NOTE: The set screw for the speed control knob can be reached through the access hole in the back
of the speed control knob.
3. Remove the upper tiller shroud. Refer to Removing/Installing the Upper Tiller Shroud
on page 44.
4. Disconnect the following from the PC board (Detail “B” of FIGURE 8.11):
A.
B.
C.
D.
E.
F.
Ignition switch
Horn
Throttle
Controller
Headlight (Zoom 400 Only)
Headlight Switch (Zoom 400 Only)
5. Remove the six (6) locknuts that secure the PC board to the upper tiller shroud. Refer
to Detail “C” of FIGURE 8.11.
6. Note the orientation of the PC board for proper installation of the new one.
7. Remove the PC board from the upper tiller shroud and discard.
8. Install new PC board in the position noted in STEP 6.
9. Secure the new PC board to the upper tiller shroud with the existing six (6) mounting
screws. Refer to Detail “C” of FIGURE 8.11.
10. Connect the following to the PC board (Detail “B” of FIGURE 8.11):
A.
B.
C.
D.
E.
F.
Ignition switch
Horn
Throttle
Controller
Headlight (Zoom 400 Only)
Headlight Switch (Zoom 400 Only)
11. Install the upper tiller shroud. Refer to Removing/Installing the Upper Tiller Shroud
on page 44.
12. Align the flat side of the stem with the hash mark on the speed control knob. Refer to
Detail “A” of FIGURE 8.11.
13. Tighten the set screw inside the speed control knob (not shown) to the stem.
Zoom 300 and Zoom 400
52
Part No 1122167
SECTION 8—TILLER
DETAIL “A”
Stem
Flat Part
on Stem
DETAIL “C”
Speed Control
Knob
Hash Mark
Locknuts
Locknuts
NOTE: Only upper tiller shroud
shown for clarity.
Ignition Switch
connects HERE
DETAIL “B”
Throttle connects
HERE
Bottom View of
Upper Tiller Shroud
Top View of
Lower Tiller
Shroud
Controller
connects
HERE
Horn connects
HERE
Headlight Switch
connects HERE
(Zoom 400 Only)
Headlight
connects HERE
(Zoom 400 Only)
PC Board
FIGURE 8.11 Replacing the PC Board
Part No 1122167
53
Zoom 300 and Zoom 400
SECTION 8—TILLER
Removing/Installing the Tiller Angle Adjustment
Assembly
NOTE: For this procedure, refer to FIGURE 8.12.
Removing
1. Remove the tiller. Refer to Removing/Installing the Tiller on page 40.
2. Remove the two (2) mounting bolts that secure the tiller angle adjustment assembly to
the front fork. Refer to FIGURE 8.12.
Installing
1. Install the two (2) mounting bolts to secure tiller angle adjustment assembly to the
front fork. Securely tighten (FIGURE 8.12).
2. Install the tiller. Refer to Removing/Installing the Tiller on page 40.
Mounting Bolts
Tiller Angle
Adjustment Assembly
Front Fork
NOTE: Zoom 300 shown.
Zoom 400 is the same.
FIGURE 8.12 Removing/Installing the Tiller Angle Adjustment Assembly
Zoom 300 and Zoom 400
54
Part No 1122167
SECTION 8—TILLER
Replacing the Tiller Wiring Harness
NOTE: For this procedure, refer to FIGURE 8.13 and FIGURE 8.14.
1. Turn power off and remove the key from the ignition.
2. Remove the seat. Refer to Removing/Installing the Seat on page 19.
3. Remove the rear shroud. Refer to Removing/Installing the Rear Shroud on page 30.
4. Perform one (1) of the following to remove the batteries:
• For Zoom 300 - Refer to Removing/Installing the Batteries on Zoom 300 on page 86.
• For Zoom 400 - Refer to Removing/Installing the Batteries on Zoom 400 on page 88.
5. Remove the front shroud. Refer to Removing/Installing the Front Shroud on page 31.
6. Disconnect the tiller wiring harness connector from the rear wiring harness
(FIGURE 8.13 for Zoom 300, FIGURE 8.14 for Zoom 400).
7. Mark the positions of the tie-wraps for replacing them later.
8. Cut the tie-wraps securing the tiller wiring harness to the frame.
NOTE:
•
For the Zoom 400 - Refer to FIGURE 8.14.
•
For the Zoom 300 - Refer to FIGURE 8.13.
NOTE: The scooter may have to be elevated on blocks to access all tie-wraps.
9. Remove the tiller wiring harness from the scooter.
10. Secure the new tiller wiring harness to the frame with tie-wraps at the positions
marked.
NOTE: The scooter may have to be lifted to access all tie-wrap points.
11. Connect the tiller wiring harness connector to the rear wiring harness connector
(FIGURE 8.13 for Zoom 300, FIGURE 8.14 for Zoom 400).
12. Replace the front shroud. Refer to Removing/Installing the Front Shroud on page 31.
13. Perform one (1) of the following to install the batteries:
• For Zoom 300 - Refer to Removing/Installing the Batteries on Zoom 300 on page 86.
• For Zoom 400 - Refer to Removing/Installing the Batteries on Zoom 400 on page 88.
14. Replace the rear shroud. Refer to Removing/Installing the Front Shroud on page 31
15. Replace seat. Refer to Removing/Installing the Seat on page 19.
Part No 1122167
55
Zoom 300 and Zoom 400
SECTION 8—TILLER
Bottom View
Tie-Wraps
Tiller Wiring
Harness
NOTE: Transaxle not
shown for clarity.
Tie-Wraps
Top View
Tiller Wiring
Harness
Tie-Wrap
Top of
Batteries
Tie-Wraps
Top View - Rear
Tie-Wraps
Top of
Batteries
Tiller Wiring
Harness Connector
Rear Wiring
Harness Connector
Rear Wiring
Harness
FIGURE 8.13 Replacing the Tiller Wiring Harness - 300
Zoom 300 and Zoom 400
56
Part No 1122167
SECTION 8—TILLER
Bottom View
Tiller Wiring Harness
Tie-Wraps
Tie-Wraps
Tie-Wraps
Top of Batteries
Top View
Tie-Wraps
Tie-Wraps
Tiller Wiring Harness
Top View - Rear
Top of Batteries
Tiller Wiring
Harness
Connector
Rear Wiring
Harness
Rear Wiring
Harness Connector
FIGURE 8.14 Replacing the Tiller Wiring Harness - Zoom 400
Part No 1122167
57
Zoom 300 and Zoom 400
SECTION 8—TILLER
Changing to Left-Handed Operation
For this procedure, refer to Changing to Left-Handed Operation on page 80.
Replacing the Throttle Assembly
NOTE: For this procedure, refer to FIGURE 8.15 and FIGURE 12.2 on page 87.
1. Turn power OFF and remove the key from the ignition.
2. Perform one (1) of the following to remove the batteries:
• For Zoom 300 - refer to Removing/Installing the Batteries on Zoom 300 on page 86.
• For Zoom 400 - refer to Removing/Installing the Batteries on Zoom 400 on page 88.
3. Remove the upper tiller shroud. Refer to Removing/Installing the Upper Tiller Shroud
on page 44.
4. Remove any RTV sealant from the throttle IDC connector on the PC board (Detail “A”
of FIGURE 8.15).
5. Disconnect the throttle IDC from the header on the PC board (Detail “A” of
FIGURE 8.15).
6. Remove the two (2) locknuts from the throttle mounting bracket and slide the existing
throttle assembly out of the holes (Detail “B” of FIGURE 8.15).
7. Install the new throttle assembly into the mounting holes on the throttle mounting
bracket (Detail “B” of FIGURE 8.15).
8. Replace the two (2) locknuts. Tighten to 25 inch-lbs ± 20% (Detail “B” of FIGURE 8.15).
NOTE: Ensure that the lower tiller shroud fits in-between the throttle bracket and tiller lever. Refer
to Detail “B” of FIGURE 8.15.
9. Connect the throttle IDC into the throttle IDC header (Detail “A” of FIGURE 8.15).
10. Apply RTV sealant to the throttle IDC header.
11. Replace the upper tiller shroud. Refer to Removing/Installing the Upper Tiller Shroud
on page 44.
12. Perform one (1) of the following to replace the batteries:
• For Zoom 300 - Refer to Removing/Installing the Batteries on Zoom 300 on page 86.
• For Zoom 400 - Refer to Removing/Installing the Batteries on Zoom 400 on page 88.
13. Reinstall the rear shroud. Refer to Removing/Installing the Rear Shroud on page 30.
14. Reinstall the seat. Refer to Removing/Installing the Seat on page 19.
15. Insert the key into the ignition and turn it to the ON position.
NOTE: The Status LED light on the control panel should be solid GREEN. If the Status LED light
is not solid, refer to Error Codes on page 102 or call Invacare Technical Service Department.
Zoom 300 and Zoom 400
58
Part No 1122167
SECTION 8—TILLER
DETAIL “A” - DISCONNECT/CONNECT THE THROTTLE IDC
PC
Board
BOTTOM View of
Upper Tiller Shroud
Throttle IDC
Header
Locknuts
Throttle IDC
TOP View of
Lower Tiller
Shroud
Throttle
Assembly
DETAIL “B” - REPLACING THE THROTTLE ASSEMBLY
Throttle Potentiometer Assembled
Lower Tiller
Shroud
Throttle
Bracket
Throttle
Bracket
Lower Tiller
Shroud
Tiller Lever
Throttle
Assembly
Tiller
Lever
FIGURE 8.15 Replacing the Throttle Assembly
Calibrating Throttle Potentiometer
Mechanical Method
NOTE: For this procedure, refer to Detail “A” of FIGURE 8.15 and FIGURE 8.16.
NOTE: This procedure should be performed only when one (1) of the following occurs:
• Scooter does not drive and the Status LED blinks six (6) or seven (7) times.
• After replacing the throttle assembly and the scooter does not drive (the Status LED blinks
six [6] or seven [7] times).
1. Turn power off and remove the key from the ignition.
2. Disengage the brake release lever. Refer to Disengaging/Engaging the Brake Release
Lever on page 66.
Part No 1122167
59
Zoom 300 and Zoom 400
SECTION 8—TILLER
3. Put a block under the frame of the scooter to raise the drive wheels off the ground for
testing purposes.
4. Remove the upper tiller shroud. Refer to Removing/Installing the Upper Tiller Shroud
on page 44.
5. Using a 5/64” allen head tool, loosen the two (2) set screws slightly. Refer to
FIGURE 8.16.
NOTE: DO NOT remove the set screws.
6. Turn the key to the ON position.
7. Locate the RED and WHITE wires from the throttle potentiometer.
8. Using a digital volt meter, take a DC voltage reading from the RED and WHITE wires.
A reading of 2.3 VDC (±0.2) should be displayed. If the reading does not fall within
this range, go to STEP 9.
NOTE: A normal reading is around 2.3 VDC (±0.2), but if the Status LED continues to blink six
(6) times, the throttle pot needs to be re-calibrated.
9. To re-calibrate the throttle pot, perform the following:
A. Leave the digital multimeter hooked up to the red and white wires.
B. Using a small flat screwdriver, adjust the throttle potentiometer by turning the
potentiometer clockwise or counter-clockwise until the multimeter reading is
around 2.3 Volts (±0.2).
10. When the throttle potentiometer is re-calibrated and the reading falls within the
recommended range, tighten the two (2) set screws.
11. Replace the upper tiller shroud. Refer to Removing/Installing the Upper Tiller Shroud
on page 44.
12. Engage the brake release lever. Refer to Disengaging/Engaging the Brake Release
Lever on page 66.
13. Turn the power to the scooter off then on again.
14. Look at the Status LED. A solid GREEN LED should be displayed and the scooter can
be driven.
15. Test drive the scooter.
NOTE: If the scooter does not drive, repeat this procedure. If the scooter still does not drive, call
Invacare at the number listed on the back cover of this manual.
Zoom 300 and Zoom 400
60
Part No 1122167
SECTION 8—TILLER
Throttle IDC
Wires from Throttle
Potentiometer
Throttle
Potentiometer
Lower Tiller
Shroud
Throttle
Lever
Set Screws
Throttle
Lever
FIGURE 8.16 Calibrating Throttle Potentiometer
Programming Method
NOTE: For this procedure, refer to FIGURE 8.16.
NOTE: Before performing this procedure, review Programming the Controller on page 80
NOTE: This menu is used to calibrate the throttle potentiometer for neutral such that when the
throttle is at rest (in neutral), the controller reads a voltage that translates to zero speed. The default
voltage for zero speed is 2.3 VDC (±0.2).
1. Plug in the programmer. Refer to Plugging in the Programmer on page 80.
2. From the Main menu, select the Speed Lever in Neutral menu option.
3. Loosen the two (2) set screws in the throttle assembly, refer to FIGURE 8.16.
4. Rotate the throttle shaft slowly until the buzzer sounds.
NOTE: If the controller version is 2.46 or higher, the Status LED will also glow.
5. Press ENTER to confirm the value when finished.
Part No 1122167
61
Zoom 300 and Zoom 400
SECTION 9—SWINGARMS
SECTION 9—SWINGARMS
WARNING
After any adjustments, repair or service and before use, make sure that all attaching
hardware is tightened securely - otherwise injury or damage may result.
Before performing any maintenance, adjustment or service, turn power OFF and
remove key from ignition.
Removing/Installing the Swingarms
NOTE: For this procedure, refer to FIGURE 9.1.
Removing
1. Turn power OFF and remove the key from the ignition.
2. Remove the seat. Refer to Removing/Installing the Seat on page 19.
3. Remove the rear shroud. Refer to Removing/Installing the Rear Shroud on page 30.
4. Remove the batteries. Refer to Removing/Installing the Batteries on Zoom 300 on
page 86 and Removing/Installing the Batteries on Zoom 400 on page 88.
5. Remove the drive wheel. Refer to Removing/Installing the Drive Wheels on page 34.
6. Support the transaxle.
7. Remove the cotter pin on the swingarm.
8. Slide out the two (2) washers, two (2) glide bearings and swingarm assembly.
9. Remove the viscous element from the drive shaft.
10. If necessary, repeat STEPS 5-8 for the other swingarm assembly.
Installing
1. Install the viscous element on the drive shaft.
2. Install the two (2) washers, two (2) bearing glides and swingarm assembly as shown
in FIGURE 9.1.
3. Install the cotter pin on the swingarm.
4. Install the drive wheel. Refer to Removing/Installing the Drive Wheels on page 34.
5. If necessary, repeat STEPS 1-4 for the other swingarm assembly.
6. Install the batteries. Refer to Removing/Installing the Batteries on Zoom 300 on
page 86 and and Removing/Installing the Batteries on Zoom 400 on page 88.
7. Install the rear shroud. Refer to Removing/Installing the Rear Shroud on page 30.
8. Install the seat. Refer to Removing/Installing the Seat on page 19.
Zoom 300 and Zoom 400
62
Part No 1122167
SECTION 9—SWINGARMS
Swingarm
Assembly
Glide
Bearings
Washer
Drive
Shaft
Washer
Viscous
Element
Cotter Pin
Drive
Wheel
Transaxle
Assembly
Viscous Element
Base Frame
NOTE: Swingarm on Zoom 300 shown. Swingarm on
Zoom 400 removes/installs the same way.
FIGURE 9.1 Removing/Installing the Swingarms
Part No 1122167
63
Zoom 300 and Zoom 400
SECTION 10—TRANSAXLE
SECTION 10—TRANSAXLE
WARNING
After any adjustments, repair or service and before use, make sure that all attaching
hardware is tightened securely - otherwise injury or damage may result.
Before performing any maintenance, adjustment or service, turn power off and
remove key from ignition.
Removing/Installing the Transaxle
NOTE: For this procedure, refer to FIGURE 10.1 and FIGURE 11.1.
Removing
1. Turn power off and remove the key from the ignition.
2. Remove the seat. Refer to Removing/Installing the Seat on page 19.
3. Remove the rear shroud. Refer to Removing/Installing the Rear Shroud on page 30.
4. Disconnect the 4-way motor connector from the controller. Refer to FIGURE 11.1.
5. On Zoom 400 only - disassemble the scooter. Refer to Disassembling/Assembling the
Zoom 400 on page 105.
6. Remove the batteries. Refer to Removing/Installing the Batteries on Zoom 300 on
page 86 or Removing/Installing the Batteries on Zoom 400 on page 88.
7. Remove both drive wheels. Refer to Removing/Installing the Drive Wheels on
page 34.
8. Remove both swingarms and viscous elements from the frame. Refer to Removing/
Installing the Swingarms on page 62.
9. Once the swingarm and viscous elements are removed, the transaxle will be free to be
removed.
Installing
1. Align the transaxle along the bottom of the frame.
2. Install the viscous element on drive shaft of the transaxle.
3. Install both swingarms and viscous elements. Refer to Removing/Installing the
Swingarms on page 62.
4. Install both drive wheels. Refer to Removing/Installing the Drive Wheels on page 34.
5. Install the batteries.
6. Reconnect the 4-way motor connector to the controller. Refer to FIGURE 11.1.
Zoom 300 and Zoom 400
64
Part No 1122167
SECTION 10—TRANSAXLE
7. On Zoom 400 only - Assemble the scooter. Refer to Disassembling/Assembling the
Zoom 400 on page 105.
8. Install the rear shroud. Refer to Removing/Installing the Rear Shroud on page 30.
9. Install the seat. Refer to Removing/Installing the Seat on page 19.
NOTE: Zoom 300 shown. Zoom
400 transaxle removes/installs
the same way.
Swingarm
Assembly
Glide
Bearings
Washer
Drive
Shaft
Swingarm and
Caster Assembly
Viscous Element
Washer
Base Frame
Cotter Pin
Drive Wheel
Viscous
Element
Transaxle
Assembly
FIGURE 10.1 Removing/Installing the Transaxle
Removing/Installing the Brake Release Lever
NOTE: For this procedure, refer to FIGURE 10.2.
Removing
1. Remove the seat. Refer to Removing/Installing the Seat on page 19.
2. Remove the rear shroud. Refer to Removing/Installing the Rear Shroud on page 30.
3. On Zoom 400 only - Disassemble the scooter. Refer to Disassembling/Assembling the
Zoom 400 on page 105.
4. Remove the cotter pin and washer that attach the brake release lever to the lever
mounting bracket on the transaxle.
5. Twist off the rubber tip from the end of the brake release lever.
6. Remove the brake release lever by sliding it out of the controller tray.
Installing
1. Slide the brake release lever through the slot in the controller tray.
2. Slide the brake release lever into the slot on the lever mounting bracket on the
transaxle.
3. Install the rubber tip onto the end of the brake release lever.
4. Install the washer and cotter pin to secure the brake release lever to the transaxle.
Part No 1122167
65
Zoom 300 and Zoom 400
SECTION 10—TRANSAXLE
5. On Zoom 400 only - Assemble the scooter. Refer to Disassembling/Assembling the
Zoom 400 on page 105.
6. Install the rear shroud. Refer to Removing/Installing the Rear Shroud on page 30.
7. Install the seat. Refer to Removing/Installing the Seat on page 19.
Slot on Controller Tray
for Brake Release Lever
Cotter Pin
Controller
Tray
DETAIL “A” - BRAKE RELEASE
LEVER INSTALLED
Brake Release
Lever
Rubber
Tip
Washer
Transaxle
Lever Mounting
Bracket
Brake
Release
Lever
Washer
Cotter Pin
NOTE: Zoom 300 shown. Zoom 400 brake release lever removes/installs the same way.
FIGURE 10.2 Removing/Installing the Brake Release Lever
Disengaging/Engaging the Brake Release Lever
WARNING
Ensure that the brake-release lever is in the engaged position before driving. There
should be an audible "click" when stopping and starting.
NOTE: For this procedure, refer to FIGURE 10.3.
The brake release lever manually engages and disengages the brake. The brake release
lever is located under the shroud near the left caster assembly.
1. Perform one (1) of the following:
• To Disengage - Pull the brake release lever out in the direction shown in
FIGURE 10.3.
NOTE: When the brake release lever is disengaged (lever pulled out) and the key is removed, the
powered scooter can be pushed. The powered scooter cannot be driven with the brake in the
disengaged (lever pulled out) position.
• To Engage - Push the brake release lever in, in the direction shown in FIGURE 10.3.
Zoom 300 and Zoom 400
66
Part No 1122167
SECTION 10—TRANSAXLE
NOTE: The brake MUST be engaged (lever pushed in) in normal driving conditions. Activation
of the throttle control lever automatically releases the brake so that the powered scooter can drive.
Releasing the throttle control lever automatically engages the brake so as to prevent the powered
scooter from rolling on its own.
Controller
Tray
Transaxle
Engaged
(Push Lever In)
Brake Release
Lever
NOTE: Zoom 300 shown. Zoom 400 brake
release lever engages the same way.
Disengaged
(Pull Lever Out)
FIGURE 10.3 Disengaging/Engaging the Brake Release Lever
Part No 1122167
67
Zoom 300 and Zoom 400
SECTION 11—CONTROLLER
SECTION 11—CONTROLLER
WARNING
After any adjustments, repair or service and before use, make sure that all attaching
hardware is tightened securely - otherwise injury or damage may result.
Before performing any maintenance, adjustment or service, turn power OFF and
remove key from ignition.
Removing/Installing the Controller
NOTE: For this procedure, refer to FIGURE 11.1.
Removing
1. Turn power off and remove the key from the ignition.
2. Remove the seat. Refer to Removing/Installing the Seat on page 19.
3. Remove the rear shroud. Refer to Removing/Installing the Rear Shroud on page 30.
4. Perform one (1) of the following:
• On Zoom 300 - Disconnect the RED and BLACK controller connector from the RED
and BLACK battery connector. Refer to FIGURE 12.2 on page 87.
• On Zoom 400 - Disconnect the two (2) BLACK battery connectors from the wiring
harness connectors. Refer to FIGURE 12.3 on page 89.
5. Remove the batteries. Refer to Removing/Installing the Batteries on Zoom 300 on
page 86 and Removing/Installing the Batteries on Zoom 400 on page 88.
6. On Zoom 400 only:
A. Disassemble the scooter. Refer to Disassembling/Assembling the Zoom 400 on
page 105.
B. Remove the battery charger. Refer to Replacing the Charger on page 92.
7. Disconnect the following from the controller (Detail “C” of FIGURE 11.1):
• 6-way rear harness connector
• 8-way rear harness connector
• 4-way motor connector
8. Remove the three (3) mounting screws and locknuts that secure the controller on the
controller tray.
Zoom 300 and Zoom 400
68
Part No 1122167
SECTION 11—CONTROLLER
DETAIL “B” - ZOOM 400
DETAIL “A” - ZOOM 300
Locknuts
Mounting
Screws
Controller
Controller
Base Frame
Controller
Tray
Locknuts
Locknut
Mounting
Screws
Controller
Tray
Scooter Frame
DETAIL “C” - LOCATION OF CONNECTORS
4-way Motor Connector
connects HERE
Controller
on Zoom
300
6-way Rear Harness
Connector connects HERE
6-way Rear Harness
Connector
connects HERE
Controller on
Zoom 400
8-way Rear Harness
Connector connects
HERE
8-way Rear Harness
Connector
connects HERE
4-way Motor Connector
connects HERE
FIGURE 11.1 Removing/Installing the Controller
Installing
1. Ensure that the power is off and the key is removed from the ignition.
2. Install the controller on the controller tray using three (3) mounting screws and
locknuts. Securely tighten.
3. Connect the following to the controller (Detail “C” of FIGURE 11.1):
• 6-way rear harness connector
• 8-way rear harness connector
• 4-way motor connector
4. On Zoom 400 only:
A. Install the battery charger. Refer to Replacing the Charger on page 92.
B. Assemble the scooter. Refer to Disassembling/Assembling the Zoom 400 on
page 105.
Part No 1122167
69
Zoom 300 and Zoom 400
SECTION 11—CONTROLLER
5. Install the batteries. Refer to Removing/Installing the Batteries on Zoom 300 on
page 86 and Removing/Installing the Batteries on Zoom 400 on page 88.
6. Perform one (1) of the following:
• On Zoom 300 - Connect the RED and BLACK controller connector to the RED and
BLACK battery connector. Refer to FIGURE 12.2 on page 87.
• On Zoom 400 - Connect the two (2) BLACK battery connectors to the wiring
harness connectors. Refer to FIGURE 12.3 on page 89.
7. Install the rear shroud. Refer to Removing/Installing the Rear Shroud on page 30.
8. Install the seat. Refer to Removing/Installing the Seat on page 19.
Replacing the Controller Tray
Zoom 300
NOTE: For this procedure, refer to FIGURE 12.2, FIGURE 8.13, FIGURE 11.1, and
FIGURE 11.2.
1. Turn power OFF and remove the key from the ignition.
2. Remove the seat. Refer to Removing/Installing the Seat on page 19.
3. Remove the rear shroud. Refer to Removing/Installing the Rear Shroud on page 30.
4. Disconnect the RED and BLACK controller connector from the RED and BLACK
battery connector. Refer to FIGURE 12.2 on page 87.
5. Remove the batteries. Refer to Removing/Installing the Batteries on Zoom 300 on
page 86 and Removing/Installing the Batteries on Zoom 400 on page 88
6. Remove the charger. Refer to Replacing the Charger on page 92.
7. Remove the controller. Refer to Removing/Installing the Controller on page 68.
8. Remove the cricuit breaker. Refer to Replacing/Resetting the Circuit Breaker on
page 76.
9. Disconnect the tiller wiring harness from the rear wiring harness (Refer to
FIGURE 8.13).
10. Remove the rear wiring harness. Refer to Removing/Installing Rear Wiring Harness
on page 74.
11. Remove the brake release rod. Refer to Removing/Installing the Brake Release Lever
on page 65.
12. Remove the four (4) mounting bolts, eight (8) washers and four (4) locknuts that secure
the controller tray to the scooter frame.
13. Install the new controller tray on the scooter frame and secure with four (4) mounting
bolts, eight (8) washers and four (4) locknuts. Securely tighten. Refer to FIGURE 11.2.
Zoom 300 and Zoom 400
70
Part No 1122167
SECTION 11—CONTROLLER
14. Install the brake release rod. Refer to Removing/Installing the Brake Release Lever on
page 65.
15. Install the controller. Refer to Removing/Installing the Controller on page 68.
16. Install the charger. Refer to Replacing the Charger on page 92.
17. Install the circuit breaker. Refer to Replacing/Resetting the Circuit Breaker on page 76.
18. Install the rear wiring harness. Refer to Removing/Installing Rear Wiring Harness on
page 74.
19. Connect the tiller wiring harness to the rear wiring harness (refer to FIGURE 8.13).
20. Install the batteries. Refer to Removing/Installing the Batteries on Zoom 300 on
page 86 or Removing/Installing the Batteries on Zoom 400 on page 88.
21. Install the rear shroud. Refer to Removing/Installing the Rear Shroud on page 30.
22. Install the seat. Refer to Removing/Installing the Seat on page 19.
Mounting Bolts
Washers
Washer
Brake Release Rod
Controller Tray
Scooter Frame
Locknuts
FIGURE 11.2 Replacing the Controller Tray - Zoom 300
Part No 1122167
71
Zoom 300 and Zoom 400
SECTION 11—CONTROLLER
Zoom 400
NOTE: For this procedure, refer to FIGURE 8.14, FIGURE 11.1, FIGURE 11.3, and
FIGURE 12.2.
1. Turn power OFF and remove the key from the ignition.
2. Disassemble the scooter. Refer to Disassembling/Assembling the Zoom 400 on
page 105.
3. Remove the charger. Refer to Replacing the Charger on page 92.
4. Remove the controller. Refer to Removing/Installing the Controller on page 68.
5. Disconnect the tiller wiring harness from the rear wiring harness. Refer to
FIGURE 8.14.
6. Remove the rear wiring harness. Refer to Removing/Installing Rear Wiring Harness
on page 74.
7. Remove the circuit breaker. Refer to Replacing/Resetting the Circuit Breaker on
page 76.
8. Remove the four (4) mounting bolts, eight (8) washers and four (4) locknuts that secure
the controller tray to the scooter frame.
9. Remove the two (2) screws that mount the left connector to the controller tray
(Detail “A” of FIGURE 11.3).
10. Repeat STEP 9 for the right connector.
11. Remove the locknut that secures the circuitbreaker to the controller tray.
12. Install the left connector using the two (2) screws as shown in Detail “A” of
FIGURE 11.3.
13. Repeat STEP 12 for the right connector.
14. Install the controller. Refer to Removing/Installing the Controller on page 68.
15. Install the charger. Refer to Replacing the Charger on page 92.
16. Install the circuit breaker. Refer to Replacing/Resetting the Circuit Breaker on page 76
17. Install the controller tray on the scooter frame and secure with four (4) mounting bolts,
eight (8) washers and four (4) locknuts. Securely tighten. Refer to FIGURE 11.3.
18. Install the rear wiring harness. Refer to Removing/Installing Rear Wiring Harness on
page 74.
19. Connect the tiller wiring harness to the rear wiring harness. Refer to FIGURE 8.14.
20. Assemble the scooter. Refer to Disassembling/Assembling the Zoom 400 on page 105.
Zoom 300 and Zoom 400
72
Part No 1122167
SECTION 11—CONTROLLER
Mounting Bolts
Washers
Washers
Controller Tray
Scooter Frame
Washer
Locknuts
Washer
Locknut
NOTE: Wiring harness not shown.
DETAIL “A” - REMOVE/INSTALL WIRING HARNESS CONNECTORS
Mounting Bolts
Controller
Tray
Connector
Connector
Locknuts
Circuit Breaker
NOTE: Charger, Controller and Wiring harness shown removed.
FIGURE 11.3 Replacing the Controller Tray - Zoom 400
Part No 1122167
73
Zoom 300 and Zoom 400
SECTION 11—CONTROLLER
Removing/Installing Rear Wiring Harness
NOTE: For this procedure, refer to FIGURE 11.4.
NOTE: To install the rear wiring harness, reverse this procedure.
1. Disconnect the following from the controller.
• 6-way rear harness connector
• 8-way rear harness connector
• 4-way motor connector
2. Disconnect the batteries. Refer to Removing/Installing the Batteries on Zoom 300 on
page 86 or refer to Removing/Installing the Batteries on Zoom 400 on page 88.
3. Disconnect the circuit breaker. Refer to Replacing/Resetting the Circuit Breaker on
page 76.
4. On Zoom 400 only:
A. Remove the four (4) mounting screws securing the battery connectors to the frame.
B. Remove the rear harness connector from controller tray.
5. Remove the two (2) screws and locknuts securing the charger connector to the
controller tray.
6. Lift the wiring harness from the controller tray.
Zoom 300 and Zoom 400
74
Part No 1122167
SECTION 11—CONTROLLER
Mounting Screws
Battery
Connector
DETAIL “A” - ZOOM 400
Battery
Connector
Circuit
Breaker
Screws
Controller
Tray
Charger
Connector
Rear Harness
Connector
Locknuts
4-Way
Connector
6-Way
Connector
Screws
8-Way
Connector
DETAIL “B” - ZOOM 300
Battery
Connector
6-Way
Connector
Charger
Connector
4-Way
Connector
Rear Harness
Connector
8-Way
Connector
Controller
Tray
Locknuts
Circuit Breaker
FIGURE 11.4 Removing/Installing Rear Wiring Harness
Part No 1122167
75
Zoom 300 and Zoom 400
SECTION 11—CONTROLLER
Replacing/Resetting the Circuit Breaker
Replacing
NOTE: For this procedure, refer to FIGURE 11.5, FIGURE 12.2, and FIGURE 12.3.
1. Turn power OFF and remove the key from the ignition.
2. Remove the seat. Refer to Removing/Installing the Seat on page 19.
3. Remove the rear shroud. Refer to Removing/Installing the Rear Shroud on page 30.
4. Perform one (1) of the following:
• On Zoom 300 - Disconnect the controller from the batteries by pulling the RED and
BLACK controller connector from the RED and BLACK battery connector. Refer to
FIGURE 12.2.
• On Zoom 400 - Disconnect the controller from the batteries by pulling the two (2)
BLACK battery connectors from the BLACK wiring harness connectors. Refer to
FIGURE 12.3.
5. Remove the YELLOW metal connectors of the wiring harness from the circuit breaker.
6. Remove the two (2) locknuts that secure the circuit breaker to the controller tray.
7. Remove the circuit breaker.
8. Position the new circuit breaker so that it passes through the mounting hole on the
controller tray.
9. Position the locknuts on the end of the circuit breaker and securely tighten.
10. Connect the YELLOW metal connectors from the wiring harness to the metal
connectors of the circuit breaker.
11. Perform one (1) of the following:
• On Zoom 300 - Connect the controller from the batteries by pulling the RED and
BLACK controller connector from the RED and BLACK battery connector. Refer to
FIGURE 12.2.
• On Zoom 400 - Connect the controller from the batteries by pulling the two (2)
BLACK battery connectors from the BLACK wiring harness connectors. Refer to
FIGURE 12.3.
12. Install the rear shroud. Refer to Removing/Installing the Rear Shroud on page 30.
13. Install the seat. Refer to Removing/Installing the Seat on page 19.
Zoom 300 and Zoom 400
76
Part No 1122167
SECTION 11—CONTROLLER
DETAIL “A” - ZOOM 300
YELLOW Metal Connectors
from Wiring Harness
Locknuts
Controller Tray
DETAIL “B” - ZOOM 400
Circuit
Breaker
Circuit Breaker
Mounting Hole
YELLOW Metal Connectors
from Wiring Harness
Controller Tray
Circuit
Breaker
Locknuts
Circuit Breaker
Mounting Hole
FIGURE 11.5 Replacing/Resetting the Circuit Breaker - Replacing
Part No 1122167
77
Zoom 300 and Zoom 400
SECTION 11—CONTROLLER
Resetting Circuit Breaker
WARNING
NEVER defeat or bypass the circuit breaker. ONLY replace with a circuit breaker
with same rating.
If a circuit breaker repeatedly trips, DO NOT use the scooter. This may indicate
that a short circuit condition exists. Investigate potential causes and correct before
returning scooter to service.
NOTE: For this procedure, refer to FIGURE 11.6.
NOTE: Key must be removed from ignition before resetting circuit breaker.
1. Remove the seat. Refer to Removing/Installing the Seat on page 19.
2. Remove the rear shroud. Refer to Removing/Installing the Rear Shroud on page 30.
3. To reset, do one (1) of the following:
• For Zoom 300 - Press circuit breaker button located at rear of the controller tray.
• For Zoom 400 - Press circuit breaker button located at front of controller tray.
4. Reverse STEPS 1-2 to reassemble the powered scooter.
Top View of Scooter
DETAIL “A” - ZOOM 300
Circuit Breaker
Button
Controller
Tray
DETAIL “B” - ZOOM 400
Top View of Scooter
Scooter Frame
Controller
Tray
Rear Frame
Assembly
Circuit Breaker Button
(under scooter frame)
FIGURE 11.6 Replacing/Resetting the Circuit Breaker - Resetting Circuit Breaker
Zoom 300 and Zoom 400
78
Part No 1122167
SECTION 11—CONTROLLER
Replacing the Fuse
WARNING
NEVER defeat or bypass any fuse. ONLY replace with a fuse with same rating.
If the fuse blows repeatedly, DO NOT use the scooter. This may indicate that a
short circuit condition exists. Investigate potential causes and correct before
returning scooter to service.
NOTE: For this procedure, refer to FIGURE 11.7.
1. Remove the seat. Refer to Removing/Installing the Seat on page 19.
2. Remove the rear shroud. Refer to Removing/Installing the Rear Shroud on page 30.
NOTE: Two (2) fuse holders are located on the wiring harness.
NOTE: Replace existing blown fuse with a new fuse of the same rating.
3. Pull fuse out and install new fuse (Detail “A” of FIGURE 11.7).
4. Reverse STEPS 1-4 to reassemble the powered scooter.
Fuse Holder
Rear Wiring
Harness
DETAIL “A”
To
Batteries
Fuse
Fuse
Holder
Fuse
Holder
Controller
FIGURE 11.7 Replacing the Fuse
Part No 1122167
79
Zoom 300 and Zoom 400
SECTION 11—CONTROLLER
Changing to Left-Handed Operation
NOTE: For this procedure, refer to FIGURE 11.8.
NOTE: The default factory is setting is OFF.
NOTE: For more information, refer to Programming the Controller on page 80.
1. Plug in the programmer to the programmer port on the controller.
2. Press the MENU key to access the Options Menu.
3. From the Options Menu, select Pot Reverse menu.
4. Press the VARY key to change the current setting to ON.
NOTE: The default factory is setting is OFF.
5. Press the ENTER key to confirm the value when finished.
6. Unplug the programmer from the programmer port.
Programming the Controller
Plugging in the Programmer
WARNING
Disengage the brake release lever before making any programming changes. The
scooter will drive if the brake release lever is engaged.
NOTE: For this procedure, refer to FIGURE 11.8.
1. Turn power off and remove the key from the ignition.
2. Remove the seat. Refer to Removing/Installing the Seat on page 19.
3. Remove the rear shroud. Refer to Removing/Installing the Rear Shroud on page 30.
4. Insert the key in the ignition and turn power on.
5. Locate the programmer port on the controller and remove the black protective cap.
6. Plug in the DS100 programmer into the programmer port.
NOTE: After a few seconds, if a fault is indicated on the display, refer to the back of the
programming card (provided with the programmer) for details.
7. Press the MENU key to scroll through all of the menus available with the programmer.
Zoom 300 and Zoom 400
80
Part No 1122167
SECTION 11—CONTROLLER
DETAIL “A” - ZOOM 300
Front of Scooter
Top View of
Scooter
Controller
Programmer Port with
Protective End Cap
Rear of Scooter
Programmer Port with
Protective End Cap
DETAIL “B” - ZOOM 400
Controller
Rear View of
Scooter
FIGURE 11.8 Changing to Left-Handed Operation - Programming the Controller
Main Menu
MAIN MENU OPTIONS
PROGRAMMABLE PARAMETERS
SET UP MENU
Customize scooter for the user’s driving preferences or environment by adjusting features such as - Acceleration, Deceleration,
Forward Speed, Reverse Speed, Reduce Speed, Buzzer Volume,
Sleep Time.
OPTION MENU
Change two factory preset values - Potentiometer Reverse, Enable
Sleep.
SPEED LEVER IN NEUTRAL MENU
Calibrate the throttle about neutral.
CONTROLLER VERSION MENU
Displays the version of Controller software.
Set Up Menu
On the Set Up menu display, press the NEXT key to scroll through the options. To change
the current setting of the options:
A. Press the VARY key to change the current setting.
B. Press the ENTER key to confirm the value when finished.
Part No 1122167
81
Zoom 300 and Zoom 400
SECTION 11—CONTROLLER
OPTIONS
FACTORY
DEFAULT
SETTING
1
ACCELERATION
3
2
DECELERATION
7
3
FORWARD SPEED
10
4
REVERSE SPEED
4
5
6
REDUCE SPEED
BUZZER VOLUME
5
RANGE
1
Slowest acceleration to maximum forward speed.
10
Fastest acceleration to maximum forward speed.
1
Slowest deceleration from maximum forward speed.
10
Fastest deceleration from maximum forward speed.
1
Slowest forward speed.
10
Fastest forward speed.
1
Slowest reverse speed.
10
Fastest reverse speed.
1
Slowest limit of maximum forward speed and maximum reverse speed.
10
Fastest limit of maximum forward speed and maximum reverse speed.
1
Turns the horn/buzzer OFF.
10
Turns the horn/buzzer ON, 10 being the highest
volume setting.
2-10
7
SLEEP TIME
30
DESCRIPTION
5
Fastest sleep time setting for the scooter (the
scooter powers down after 5 minutes of inactivity).
60
Slowest sleep time setting for the scooter (the
scooter powers down after 60 minutes of inactivity).
Options Menu
NOTE: Options Menu settings are either ON or OFF.
To change the current setting of the options:
A. Press the VARY key to change the current setting.
B. Press the ENTER key to confirm the value when finished.
OPTIONS
1
2
POT REVERSE
ENABLE SLEEP
Zoom 300 and Zoom 400
FACTORY
DEFAULT
SETTING
RANGE
ON
Polarity of the Throttle Potentiometer is reversed
(Left Hand Drive)
OFF
Normal polarity of the Throttle Potentiometer
(Right Hand Drive)
ON
Sleep time is enabled.
OFF
Sleep time is disabled.
OFF
ON
DESCRIPTION
82
Part No 1122167
SECTION 11—CONTROLLER
Speed Lever in Neutral Menu
This menu is used to calibrate the throttle potentiometer for neutral such that when the
throttle is at rest (in neutral), the controller reads a voltage that translates to zero speed.
The default voltage for zero speed is 2.3 VDC (±0.2).
1. Select the Speed Lever in Neutral menu option.
2. Loosen the two (2) set screws in the throttle assembly.
3. Rotate the throttle shaft slowly until the buzzer sounds.
NOTE: If the controller version is 2.46 or higher, the Status LED will also glow.
4. Press ENTER to confirm the value when finished.
Controller Version Menu
This menu is used to display the current version of the Controller software.
Part No 1122167
83
Zoom 300 and Zoom 400
SECTION 12—BATTERIES AND CHARGER
SECTION 12—BATTERIES AND
CHARGER
WARNING
Before performing any maintenance adjustment or service, turn power OFF and
remove key from ignition.
NEVER allow any of your tools and/or battery cable(s) to contact BOTH battery
terminal(s)/post(s) at the same time. An electrical short may occur and serious
personal injury or damage may occur.
The use of rubber gloves and chemical goggles and face shield is recommended
when working with batteries.
Always use a battery lifting strap when lifting a battery. It is the most convenient
method and assures that the battery acid will not spill. It also helps to prolong the
life of the battery.
DO NOT tip the batteries. Keep the batteries in an upright position.
Invacare strongly recommends that battery installation and battery replacement
always be done by a qualified technician.
All battery terminals caps (two [2] on the LEFT battery and two [2] on the RIGHT
battery) MUST be installed prior to use.
DO NOT remove fuse or mounting hardware from the POSITIVE (+) RED battery
cable/mounting screw.
On Zoom 400 only - Battery terminal configuration shown below MUST be used.
Batteries that have the reversed terminal configuration MUST NOT be used otherwise serious injury or damage may occur.
DO NOT USE
POSITIVE
(+) Battery
Terminal
NEGATIVE (-)
Battery Terminal
Zoom 300 and Zoom 400
POSITIVE
(+) Battery
Terminal
84
NEGATIVE
(-) Battery
Terminal
Part No 1122167
SECTION 12—BATTERIES AND CHARGER
CAUTION
When connecting the battery cables to the batteries, the battery cables MUST be
connected to the battery terminals/posts as shown in FIGURE 12.2 for Zoom 300
and FIGURE 12.5 for Zoom 400 - otherwise damage to the battery may result.
For proper battery connection, batteries MUST use post style terminals with
mounting holes through the terminal.
NOTE: If there is battery acid in the bottom of the battery tray or on the sides of the battery(ies),
apply baking soda to these areas to neutralize the battery acid. Before reinstalling the existing or
new battery(ies), clean the baking soda from the battery tray or battery(ies) being sure to avoid
contact with skin and eyes. Determine source of contamination. Never install/reinstall a battery
with a cracked or otherwise damaged case.
Recommended Battery Type
WARNING
The warranty and performance specifications contained in this manual are based on
the use of deep cycle gel cell batteries. Invacare strongly recommends their use as
the power source for this unit.
CAUTION
Failure to use the correct battery size and/or voltage may cause damage to the
powered scooter and give unsatisfactory performance.
Zoom 300 powered scooter uses two (2) 12 volt, 12 Amp-hour (12AH) batteries.
Zoom 400 powered scooter uses two (2) 12 volt, 31 Amp-hour (U1) batteries.
NOTE: Recommended battery type is spill proof and requires no maintenance except routine
charging.
NOTE: Charge batteries daily. Do not allow batteries to completely discharge.
NOTE: Invacare recommends that both batteries be replaced if one (1) battery is defective.
DETAIL “A” - BATTERY USED ON
ZOOM 300
12 Volt, 12 Amp-Hour
(12 AH) Battery
FIGURE 12.1
Part No 1122167
DETAIL “B” - BATTERY USED ON ZOOM 400
12 Volt, 31 Amp-Hour
(U1) Battery
Recommended Battery Type
85
Zoom 300 and Zoom 400
SECTION 12—BATTERIES AND CHARGER
Removing/Installing the Batteries on Zoom 300
NOTE: When removing or installing batteries, ensure that the battery harness connectors
completely grip the terminals of the battery. Connection should be tight and secure. Pliers can be
used to gently crimp the contact to strengthen the connection.
Removing
NOTE: For this procedure, refer to FIGURE 12.2.
1. Place the powered scooter in a well ventilated area.
CAUTION
Work should be performed in an area without risking damage to carpeting or floor
covering.
2. Turn power OFF and remove the key from the ignition.
3. Remove the seat. Refer to Removing/Installing the Seat on page 34.
4. Remove the rear shroud. Refer to Removing/Installing the Rear Shroud on page 44.
5. Pull the hook-and-loop fastening battery strap apart.
6. Disconnect the RED and BLACK battery connector from the wiring harness assembly
(Detail “B” of FIGURE 12.2).
7. Disconnect the wiring harness from the batteries by holding the connectors and
pulling them in the following order (Detail “B” of FIGURE 12.2):
A. NEGATIVE (-) BLACK battery cable from the NEGATIVE (-) battery terminal/post
on the left battery.
B. POSITIVE (+) RED battery cable from POSITIVE (+) battery terminal/post on the
right battery.
C. WHITE Battery Cable (Jumper) from the POSITIVE (+) battery terminal/post on
the left battery and the NEGATIVE (-) battery terminal/post on the right battery.
8. Remove the existing batteries from battery tray by lifting the batteries out in the
direction shown in Detail “A” of FIGURE 12.2.
Installing
1. Place the powered scooter in a well ventilated area.
CAUTION
Work should be performed in an area without risking damage to carpeting or floor
covering.
2. Turn power off and remove the key from the ignition.
3. Remove the seat. Refer to Removing/Installing the Seat on page 34.
4. Remove the rear shroud. Refer to Removing/Installing the Rear Shroud on page 44.
Zoom 300 and Zoom 400
86
Part No 1122167
SECTION 12—BATTERIES AND CHARGER
5. Install two (2) batteries into the battery tray.
6. Connect the wiring harness to the new batteries in the following order (Detail “B” of
FIGURE 12.2):
A. NEGATIVE (-) BLACK battery cable to the NEGATIVE (-) battery terminal/post on
the LEFT battery.
B. POSITIVE (+) RED battery cable to POSITIVE (+) battery terminal/post on the right
battery.
C. WHITE Battery Cable (Jumper) to the POSITIVE (+) battery terminal/post on the
left battery and the NEGATIVE (-) battery terminal/post on the right battery.
7. Connect the RED and BLACK battery connector to the wiring harness assembly.
Tighten securely.
8. Secure batteries in the battery tray using the hook-and-loop battery strap (Detail “A”
of FIGURE 12.2).
9. Reinstall the rear shroud. Refer to Removing/Installing the Rear Shroud on page 44.
10. Reinstall the seat. Refer to Removing/Installing the Seat on page 34.
NOTE: New batteries MUST be fully charged BEFORE using, otherwise the life of the batteries
will be reduced.
11. If necessary, charge the batteries. Refer to Charging the Batteries on page 97.
DETAIL “A” - REMOVING/
INSTALLING THE
BATTERIES
NOTE: Seat and
Rear Shroud not
shown for clarity.
Batteries
Installed
Batteries
Removed
Battery Tray
Battery
Strap
Battery Tray
RED and BLACK
Battery Connector
DETAIL “B” - BATTERY
WIRING HARNESS
50-Amp Fuse
POSITIVE (+) RED
Battery Cable
RIGHT
BATTERY
LEFT
BATTERY
WHITE Battery
Cable (Jumper)
NEGATIVE (-) BLACK
Battery Cable
POSITIVE (+) RED
Battery Terminal
NEGATIVE (-) BLACK
Battery Terminal
NEGATIVE (-) BLACK
Battery Terminal
POSITIVE (+) RED
Battery Terminal
FIGURE 12.2 Removing/Installing the Batteries on Zoom 300
Part No 1122167
87
Zoom 300 and Zoom 400
SECTION 12—BATTERIES AND CHARGER
Removing/Installing the Batteries on Zoom 400
NOTE: For this procedure, refer to FIGURE 12.3.
Removing
1. Place the powered scooter in a well ventilated area.
CAUTION
Work should be performed in an area without risking damage to carpeting or floor
covering.
2. Turn power off and remove the key from the ignition.
3. Remove the seat. Refer to Removing/Installing the Seat on page 34.
4. Remove the rear shroud. Refer to Removing/Installing the Rear Shroud on page 44.
5. Disconnect the two (2) BLACK battery connectors from the wiring harness connectors
(Detail “C” of FIGURE 12.3).
6. Pull the hook and loop fastening battery strap apart.
7. Perform one (1) of the following to remove the battery from the battery tray
(Detail “D” of FIGURE 12.3):
• Batteries with Built-in Lifting Strap - Use built in lifting strap to remove the battery
from the battery tray (Detail “B” of FIGURE 12.3).
• Batteries without Built-in Lifting Strap - Use a battery lifting strap to remove the
battery from the battery tray (Detail “A” of FIGURE 12.3).
8. Disconnect the battery cable. Refer to Connecting/Disconnecting the Battery Cables on
the Zoom 400 on page 90.
Installing
1. Connect the battery cable. Refer to Connecting/Disconnecting the Battery Cables on
the Zoom 400 on page 90.
2. Place the powered scooter in a well ventilated area where work can be performed
without risking damage to carpeting or floor covering.
3. Turn power OFF and remove the key from the ignition.
4. Remove the seat. Refer to Removing/Installing the Seat on page 34.
5. Remove the rear shroud. Refer to Removing/Installing the Rear Shroud on page 44.
6. Perform one (1) of the following to position the battery into the battery tray
(Detail “D” of FIGURE 12.3):
• Batteries with Built-in Lifting Strap - Use built in lifting strap to position battery
onto the battery tray (Detail “B” of FIGURE 12.3).
• Batteries without Built-in Lifting Strap - Use a battery lifting strap to position
battery onto battery tray. When battery is in proper position, remove lifting strap
(Detail “A” of FIGURE 12.3).
7. Connect the two (2) BLACK battery connectors to the wiring harness connectors
(Detail “C” of FIGURE 12.3).
Zoom 300 and Zoom 400
88
Part No 1122167
SECTION 12—BATTERIES AND CHARGER
8. Secure batteries in the battery tray using the battery strap.
9. Reinstall the rear shroud. Refer to Removing/Installing the Rear Shroud on page 44.
10. Reinstall the seat. Refer to Removing/Installing the Seat on page 34.
NOTE: New batteries MUST be fully charged BEFORE using, otherwise the life of the batteries
will be reduced.
DETAIL “A” - BATTERY LIFTING STRAPS
DETAIL “B” - BUILT-IN LIFTING STRAPS
Battery
Lifting Straps
Built-in
Lifting Straps
DETAIL “C” - BATTERY WIRING HARNESS
Wiring Harness Connectors
BLACK Battery
Connector
BLACK Battery
Connector
Left Battery
Right Battery
POSITIVE (+) RED
Battery Terminal
POSITIVE (+) RED
Battery Terminal
NEGATIVE (-) BLACK
Battery Terminal
NEGATIVE (-) BLACK
Battery Terminal
NOTE: NEVER defeat or bypass any fuse. Only replace with a fuse of the same rating.
NOTE: DO NOT remove fuse or mounting hardware from the POSITIVE (+) RED battery
cable/mounting screw.
DETAIL “D” - REMOVING/INSTALLING THE BATTERIES
Batteries
Removed
Battery Strap
Batteries
Installed
Battery Tray
Battery Tray
NOTE: Seat and Rear Shroud not shown for clarity.
FIGURE 12.3 Removing/Installing the Batteries on Zoom 400
Part No 1122167
89
Zoom 300 and Zoom 400
SECTION 12—BATTERIES AND CHARGER
Connecting/Disconnecting the Battery Cables on the
Zoom 400
WARNING
On Zoom 400 only - Battery terminal configuration shown below MUST be used.
Batteries that have the reversed terminal configuration MUST NOT be used otherwise serious injury or damage may occur.
DO NOT USE
POSITIVE
(+) Battery
Terminal
NEGATIVE (-)
Battery Terminal
NEGATIVE
(-) Battery
Terminal
POSITIVE
(+) Battery
Terminal
NEVER allow any of your tools and/or battery cable(s) to contact BOTH battery
terminal(s)/post(s) at the same time. An electrical short may occur and serious
personal injury or damage may occur.
The use of rubber gloves and chemical goggles and face shield is recommended
when working with batteries.
Do not remove fuse or mounting hardware from the POSITIVE (+) RED battery
cable/mounting screw.
NEVER defeat or bypass any fuse. ONLY replace with a fuse of the same rating.
NOTE: For this procedure, refer to FIGURE 12.4 and FIGURE 12.5.
Connecting
1. Install battery terminal cap(s) onto battery cable(s) as follows (FIGURE 12.4):
A. RED battery terminal cap onto RED battery cable.
B. GREY battery terminal cap onto BLACK battery cable.
Battery Cable
Battery Terminal Cap
NOTE: Only battery cable and terminal cap shown. Both caps install in the same manner.
FIGURE 12.4 Connecting/Disconnecting the Battery Cables on the Zoom 400 - Installing
Battery Terminal Caps
Zoom 300 and Zoom 400
90
Part No 1122167
SECTION 12—BATTERIES AND CHARGER
WARNING
When connecting the battery cables to the batteries, the battery cables MUST be
connected to the battery terminals/posts as shown in FIGURE 12.5, otherwise damage to the battery cable may result when installing battery terminal caps.
2. Connect battery cable(s) to battery(ies) terminal(s)/post(s):
A. NEGATIVE (-) BLACK battery cable to NEGATIVE (-) battery terminal/post.
B. POSITIVE (+) RED battery cable to POSITIVE (+) battery terminal/post.
3. Secure the battery cable(s)/ring terminal(s) to the battery terminal(s)/post(s), BLACK
to NEGATIVE (-) and red to POSITIVE (+), with the provided 1/4-20 x 5/8-inch hex
flange screw and hex flange locknut. Securely tighten.
4. Verify all battery cable(s)/ring terminal(s) are correctly installed and securely
tightened.
5. Slide terminal cap(s) down battery cable(s) and onto battery clamps.
6. Secure each terminal cap in place with a tie-wrap [use tie-wraps 11½ inches long].
Refer to Detail “A” of FIGURE 12.5.
7. Remove the seat. Refer to Removing/Installing the Seat on page 34.
8. Remove the rear shroud. Refer to Removing/Installing the Rear Shroud on page 44.
9. Position the batteries on the scooter. Refer to Removing/Installing the Batteries on
Zoom 400 on page 88.
NOTE: New Battery(ies) MUST be fully charged before using, otherwise the life of the battery(ies)
will be reduced.
10. If necessary, charge the battery(ies). Refer to Charging the Batteries on page 97.
11. Install the rear shroud. Refer to Removing/Installing the Rear Shroud on page 44.
12. Install the seat. Refer to Removing/Installing the Seat on page 34.
Disconnecting
WARNING
The use of rubber gloves and chemical goggles and face shield is recommended
when working with batteries.
NEVER allow any of your tools and/or battery cable(s) to contact both battery terminal(s)/post(s) at the same time. An electrical short may occur and serious personal injury or damage may occur.
1. Remove the seat. Refer to Removing/Installing the Seat on page 34.
2. Remove the rear shroud. Refer to Removing/Installing the Rear Shroud on page 44.
3. Remove the batteries. Refer to Removing/Installing the Batteries on Zoom 400 on
page 88.
Part No 1122167
91
Zoom 300 and Zoom 400
SECTION 12—BATTERIES AND CHARGER
4. Cut the tie-wrap that secure each the battery terminal cap in place.
5. Slide terminal cap(s) UP on the battery cable(s).
6. Disconnect battery cable(s) from battery(ies) terminal(s)/post(s):
A. POSITIVE (+) RED battery cable from the POSITIVE (+) battery terminal/post.
B. NEGATIVE (-) BLACK battery cable from NEGATIVE (-) battery terminal/post.
To BLACK Battery
Connector
DETAIL “A” - TERMINAL CAPS
TIE-WRAPS
NEGATIVE (-)
Terminal Cap
POSITIVE (+)
Terminal Cap
NEGATIVE (-)
Battery
Terminal
U1
Battery
Battery Handle
Battery
Terminal Caps
Locknut
BLACK
Battery
Cable
Locknut
RED Battery Cable
POSITIVE (+)
Battery Terminal
with Bracket
Tie-Wraps
U1 Battery
NOTE: Only battery cable and terminal cap shown. Both caps install in the same manner.
NOTE: DO NOT remove fuse or mounting hardware from the POSITIVE (+) RED battery
cable/mounting screw.
FIGURE 12.5 Connecting/Disconnecting the Battery Cables on the Zoom 400
Replacing the Charger
Zoom 300
NOTE: For this procedure, refer to FIGURE 12.6 and FIGURE 12.2.
1. Place the powered scooter in a well ventilated area.
CAUTION
Work should be performed in an area without risking damage to carpeting or floor
covering.
2. Turn power off and remove the key from the ignition.
3. Remove the seat. Refer to Removing/Installing the Seat on page 19.
Zoom 300 and Zoom 400
92
Part No 1122167
SECTION 12—BATTERIES AND CHARGER
4. Remove the rear shroud. Refer to Removing/Installing the Rear Shroud on page 30.
5. Disconnect the controller from the batteries by pulling the RED and BLACK controller
connector from the RED and BLACK battery connector. Refer to Detail “B” of
FIGURE 12.2.
6. Remove the two (2) mounting screws and locknuts that mount the AC receptacle (to
charger) to the controller tray. Refer to Detail “B” FIGURE 12.6.
7. Disconnect the DC charger connector from the charger port.
8. If the AC receptacle wire runs below the circuit breaker, remove the YELLOW metal
connectors of the wiring harness from the circuit breaker (not shown).
9. Cut the tie-wraps securing charger to controller tray (Detail “A” of FIGURE 12.6).
10. Cut the tie-wrap securing the DC charger connector cable to scooter frame (Detail “A”
of FIGURE 12.6).
11. Remove the existing charger.
12. Place the new charger on the controller tray and secure it to the controller tray using
a tie-wrap as shown in Detail “A” of FIGURE 12.6.
13. Tie-wrap the charger cables in three places as shown in Detail “B” FIGURE 12.6.
14. If necessary, Connect the YELLOW metal connectors from the wiring harness to the
metal connectors of the circuit breaker (not shown).
15. Secure the AC receptacle to charger to the controller tray using the two (2) mounting
screws and locknuts.
16. Insert the DC charger connector into the charger port.
17. Tie-wrap the DC charger cable to the scooter frame as shown in Detail “B” of
FIGURE 12.6.
18. Connect the RED and BLACK controller connector to the RED and BLACK battery
connector. Refer to Detail “B” of FIGURE 12.2.
19. Install the rear shroud. Refer to Removing/Installing the Rear Shroud on page 30.
20. Install the seat. Refer to Removing/Installing the Seat on page 19.
21. Insert the key into the ignition and turn the power on to drive the scooter.
Part No 1122167
93
Zoom 300 and Zoom 400
SECTION 12—BATTERIES AND CHARGER
Charger
DETAIL “A” - CHARGER REMOVED
Controller Tray
Tie-Wrap
Charger Port
DC Charger
Connector
AC
Receptacle
to Charger
Locknuts
DETAIL “B” - CHARGER
INSTALLED
Charger
Mounting Screws
Tie-Wrap
Scooter
Frame
Tie-Wraps
Tie-Wrap
DC Charger
Cable
Charger Cable to
AC Receptacle
DC Charger
Connector
AC Receptacle
to Charger
NOTE: Connectors to Controller not shown for clarity.
FIGURE 12.6 Replacing the Charger - Zoom 300
Zoom 300 and Zoom 400
94
Part No 1122167
SECTION 12—BATTERIES AND CHARGER
Zoom 400
NOTE: For this procedure, refer to FIGURE 12.7 and FIGURE 12.2.
1. Place the powered scooter in a well ventilated area where work can be performed
without risking damage to carpeting or floor covering.
2. Turn power off and remove the key from the ignition.
3. Remove the seat. Refer to Removing/Installing the Seat on page 19.
4. Remove the rear shroud. Refer to Removing/Installing the Rear Shroud on page 30.
5. Disconnect the two (2) BLACK battery connectors from the wiring harness connectors.
Refer to Detail “C” of FIGURE 12.3.
6. Remove the two (2) mounting screws and locknuts that mount the AC receptacle (to
charger) to the controller tray. Refer to Detail “B” FIGURE 12.7.
7. Disconnect the DC charger connector from the charger port.
8. Cut the tie-wraps securing the DC charger connector cable to scooter frame, refer to
Detail “B” of FIGURE 12.7.
9. Cut the tie-wraps securing the charger to the controller tray, refer to Detail “B” of
FIGURE 12.7.
10. Remove the existing charger.
11. Place the new charger on the controller tray and secure it to the controller tray using
tie-wraps as shown in Detail “B” of FIGURE 12.7.
12. Tie-wrap the charger cables in three places as shown in Detail “B” FIGURE 12.7.
13. Secure the AC receptacle to charger to the controller tray using the two (2) mounting
screws and locknuts.
14. Insert the DC charger connector into the charger port.
15. Tie-wrap the DC charger cable to the scooter frame as shown in Detail “B” of
FIGURE 12.7.
16. Connect the two (2) BLACK battery connectors to the wiring harness connectors. Refer
to Detail “C” of FIGURE 12.3.
17. Install the rear shroud. Refer to Removing/Installing the Rear Shroud on page 30.
18. Install the seat. Refer to Removing/Installing the Seat on page 19.
19. Insert the key into the ignition and turn the power on to drive the scooter.
Part No 1122167
95
Zoom 300 and Zoom 400
SECTION 12—BATTERIES AND CHARGER
AC Receptacle
to Charger
DC
Charger
Connector
Charger
DETAIL “A” CHARGER
REMOVED
DETAIL “B” CHARGER
INSTALLED
AC Receptacle to
Charger
Locknuts
Controller
Tray
Tie-Wraps
Mounting
Screws
DC
Charger
Connector
TieWrap
Controller
Tray
Charger Port
(hidden from view)
Charger
NOTE: Connectors to Controller
not shown for clarity.
FIGURE 12.7 Replacing the Charger - Zoom 400
Zoom 300 and Zoom 400
96
Part No 1122167
SECTION 12—BATTERIES AND CHARGER
Charging the Batteries
WARNING
NEVER attempt to recharge the batteries by attaching cables directly to the
battery terminals or clamps.
DO NOT attempt to recharge the batteries and operate the powered scooter at
the same time.
If the circuit breaker trips repeatedly, IMMEDIATELY unplug charger and contact
Invacare Technical Service Department.
CAUTION
New batteries MUST be fully charged prior to initial use of the powered scooter.
Always charge new batteries before initial use or battery life will be reduced.
As a general rule, you should recharge your batteries nightly to assure the longest
possible life and to minimize required charging time. Plan to recharge them when
you do not anticipate using the powered scooter.
On-Board Battery Charger
NOTE: For this procedure, refer to FIGURE 12.8.
NOTE: The powered scooter is designed with an electrical lockout to prevent it from being driven
while the charger is plugged into an outlet.
1. Plug AC power cord into on-board battery charger port located on the rear bumper.
2. Plug AC power cord into 110-volt wall outlet.
3. Refer to Battery Charger Operation - Charger Indicator Light on Tiller on page 98.
AC Power Cord
Rear Shroud
Charger Port
Rear Shroud
NOTE: Charger port on Zoom 300 shown.
Charger port on Zoom 400 is similar.
FIGURE 12.8 Charging the Batteries
Part No 1122167
97
Zoom 300 and Zoom 400
SECTION 12—BATTERIES AND CHARGER
Battery Charger Operation - Charger Indicator Light on Tiller
NOTE: If the scooter is turned on while charging, the battery charge indicator will show the
batteries at FULL charge. The charger must be unplugged and the powered scooter must be ON to
show actual battery charge level.
NOTE: For this procedure, refer to FIGURE 12.9.
1. The charging indicator will illuminate Solid RED indicating that the charger is ON.
2. If the charger is plugged in and the charger indicator is OFF, the charger is
disconnected. Check that all connections are secure. If Charge LED indicator is still
OFF, unplug AC power cord from the on-board battery charger and wall outlet.
Contact dealer or a qualified technician.
DETAIL “A” - ZOOM 300 CONTROL PANEL
DETAIL “B” - ZOOM 400 CONTROL PANEL
BATTERY LEVEL
OFF
STATUS
CHARGING
ON
STATUS INDICATOR
STATUS
Solid GREEN
Normal
Blinking GREEN
Refer to Error Codes on page 102.
CHARGING INDICATOR
STATUS
Solid RED
Charger Plugged In
LED Off
Not Charging
FIGURE 12.9 Battery Charger Operation - Charger Indicator Light on Tiller
Zoom 300 and Zoom 400
98
Part No 1122167
SECTION 13—MAINTENANCE AND TROUBLESHOOTING
SECTION 13—MAINTENANCE AND
TROUBLESHOOTING
WARNING
After ANY adjustments, repair or service and BEFORE use, make sure that all
attaching hardware is tightened securely - otherwise, injury or damage may occur.
Before performing any maintenance, adjustment or service, turn power OFF and
remove key from ignition.
DO NOT overtighten hardware attaching to the frame. This could cause damage to
the frame.
Storing the Scooter
WARNING
Use care in storage. DO NOT allow any metallic objects to contact the exposed
terminals.
1. Before storing the scooter for prolonged periods of time, perform the following.
A. Charge the batteries. Refer to Charging the Batteries on page 97.
B. Remove the batteries. Refer to Removing/Installing the Batteries on Zoom 300 on
page 86 or refer to Removing/Installing the Batteries on Zoom 400 on page 88.
2. Before use, recharge batteries. Refer to Charging the Batteries on page 97.
Suggested Maintenance Procedures
1. Before using the powered scooter, make sure all nuts and bolts are tight. Check any
parts for damage or wear and replace. Check all parts for proper adjustment.
2. Ensure that batteries are properly maintained and charged as required.
3. The wheels and tires should be checked periodically for cracks and wear, and should
be replaced by a qualified technician if damaged.
4. Regularly check for loose nuts and/or bolts in the front and drive wheels. If loose, have
them adjusted by a qualified technician.
5. Clean dirt, dust and grease from exposed components.
6. Periodically have the bearings of the front wheel checked to make sure they are clean
and free from moisture.
Part No 1122167
99
Zoom 300 and Zoom 400
SECTION 13—MAINTENANCE AND TROUBLESHOOTING
Lubrication Points
NOTE: For this procedure, refer to FIGURE 13.1.
1. Every six (6) months, lubricate the top of the seat post using a Teflon lubricant.
Seat Post
(TOP)
Seat
FIGURE 13.1 Lubrication Points
Electrical
SYMPTOM
Batteries draw excessive current
when charging.
PROBABLE CAUSE
SOLUTIONS
Battery failure.
Check batteries. Replace if necessary.
Electrical malfunction.
Contact Invacare for service.
Battery failure.
Check batteries. Replace if necessary.
Malfunctioning battery
charger.
Contact Invacare for Service.
Electrical malfunction
Contact Invacare for Service.
Battery indicator flashes the
charge level is low - too soon
after being recharged.
Batteries not charged.
Check charger. Replace if necessary.
Weak batteries
Replace batteries if necessary. Contact Invacare for Service.
Motor “chatters” or runs irregular.
Electrical malfunction.
Contact Invacare for Service.
Powered scooter does not
respond to commands.
Poor battery terminal connection.
Clean terminals.
Power indicator off - even after
recharging.
Electrical malfunction.
Contact Invacare for Service.
Battery indicator flashes the
charge level is low - immediately
after recharge.
Zoom 300 and Zoom 400
100
Part No 1122167
SECTION 13—MAINTENANCE AND TROUBLESHOOTING
Controller
NOTE: For this procedure, refer to FIGURE 13.2.
SYMPTOM
PROBABLE CAUSE
Status light is OFF.
Programmer is plugged in.
SOLUTIONS
Unplug programmer.
Battery supply voltage may Connect a voltmeter between Battery + and Battery -,
negative probe on Battery -. The voltmeter should
not be present on the
measure between 23 and 27 volts.
controller terminals.
• If the voltage is negative, check for correct battery wiring polarity.
• If the voltage is 0V, check the circuit breaker and for
open circuit wiring.
Status light is permanently ON, but the
scooter does not move.
Key may be off or the
wiring and fuses may not be
intact.
Status LED may not be
fitted correctly.
Connect a voltmeter between the Key Switch terminal
and Battery -. The voltmeter should read at least 20
volts.
• If the voltage is 0V, use the voltmeter to check the wiring
from Battery + to the key switch itself and back to the Key
Switch terminal.
Park brake solenoid or
relay may not be working.
Move the throttle to the full-speed position and listen
carefully for the operation of the park-brake solenoid or
the relay in the controller.
• If you can hear the solenoid or the relay, the problem is
not with the throttle or inhibit circuitry.
• If you can hear the solenoid but the motor does not
turn, look for an open circuit in the motor wiring.
Connect a voltmeter between Battery - and the following
Voltage on the Throttle
terminals may be incorrect Throttle pins:
0.5±0.1 V
when Throttle is in neutral. Battery - » Throttle Battery - » Throttle Wiper
2.5±0.1 V
Battery - » Throttle +
4.5±0.1 V
When the Throttle is moved in the forward and
reverse directions, the voltage on Throttle Wiper
should increase and decrease by 2V.
• If the throttle voltages are incorrect, an incorrect throttle
potentiometer is being used and/or it is not correctly
calibrated.
• If the voltage swing does not occur, check the
potentiometer and wiring for open circuits.
Status light is FLASHING.
Part No 1122167
Voltage on the Motor
terminals may be incorrect.
Connect a voltmeter between Park Brake + and Park
Brake - The voltmeter should measure 0V when
the throttle is in neutral. The voltmeter should
measure 24V when the throttle is out of neutral.
• If the voltages are incorrect, check the park brake and
park brake wiring.
Inhibit status may be
incorrect.
Connect a voltmeter between Inhibit and Battery -. The
voltmeter should measure 5V.
• If the voltage is 0V, check that an inhibit switch is not
engaged (e.g., from the battery charger). When 0V is
applied to this terminal, driving will be inhibited.
Check Error Codes chart on page 102.
101
Zoom 300 and Zoom 400
SECTION 13—MAINTENANCE AND TROUBLESHOOTING
Battery Battery +
Motor Park Brake +
Park Brake Motor +
Forw/Rev
Inhibit
Throttle +
Throttle Wiper
Throttle Key Switch
Buzzer Reduce Speed
FIGURE 13.2 Controller
Error Codes
NUMBER OF
FLASHES
FAULT
IMPACT ON
SCOOTER
NOTES
1
Battery needs
recharging.
Will Drive
Battery charge is running low. Recharge the batteries
as soon as possible.
2
Battery voltage
too low.
Drive Inhibited
Battery charge is empty. Recharge the batteries. If the
scooter is left off for a few minutes, battery charge
may recover sufficiently to allow driving for a short
period of time.
3
Battery voltage
too high.
Drive Inhibited
Battery charge is too high. Scooter will charge batteries
when traveling down slopes or decelerating. Excessive
charging in this manner may cause this fault. Turn the
scooter power off and then back on again.
4
Current limit
time-out.
Drive Inhibited
The scooter has drawn too much current for too
long, possibly because the motor has been overworked, jammed or stalled. Turn the scooter power
off, leave for a few minutes and then turn back on
again.
Zoom 300 and Zoom 400
102
Part No 1122167
SECTION 13—MAINTENANCE AND TROUBLESHOOTING
NUMBER OF
FLASHES
FAULT
IMPACT ON
SCOOTER
5
Brake fault.
Drive Inhibited
Check that the park brake release lever is in the
engaged position. The park brake coil or wiring is
faulty. Check the park brake and wiring.
6
Out of Neutral
at power up.
Drive Inhibited
Throttle is not in neutral position when turning the
key switch on. Return the throttle to neutral, turn
power off and back on again. Throttle may need to be
re-calibrated.
7
Speed Pot
error.
Drive Inhibited
The throttle or its wiring is faulty. Check wiring.
8
Motor volts
error.
Drive Inhibited
The motor or its wiring is faulty. Check wiring.
9
Other internal
errors.
Drive Inhibited
Call Invacare Technical Services Department.
Part No 1122167
NOTES
103
Zoom 300 and Zoom 400
SECTION 14—TRANSPORTING
SECTION 14—TRANSPORTING
WARNING
After ANY adjustments, repair or service and BEFORE use, make sure that all
attaching hardware is tightened securely; otherwise serious injury or damage may
result.
Disassembling/Assembling the Zoom 300
NOTE: For this procedure, refer to FIGURE 14.1.
Disassembling
1. If installed on scooter, remove the front basket. Refer to Removing/Installing the Front
Basket on page 64.
2. Remove the seat. Refer to Removing/Installing the Seat on page 34.
3. Remove the rear shroud. Refer to Removing/Installing the Rear Shroud on page 44.
4. Remove the batteries. Refer to Removing/Installing the Batteries on Zoom 300 on
page 50.
5. Fold tiller down to lowest locked position. Refer to Adjusting the Tiller Angle on
page 43.
Assembling
1. Unfold tiller. Refer to Adjusting the Tiller Angle on page 43.
2. Install the batteries. Refer to Removing/Installing the Batteries on Zoom 300 on
page 50.
3. Install the rear shroud. Refer to Removing/Installing the Rear Shroud on page 44.
4. Install the seat. Refer to Removing/Installing the Seat on page 34.
5. If desired, install the front basket. Refer to Removing/Installing the Front Basket on
page 64.
Zoom 300 and Zoom 400
104
Part No 1122167
SECTION 14—TRANSPORTING
Refer to Removing/Installing
the Seat on page 34
Refer to Removing/Installing
the Rear Shroud on page 44
Refer to Removing/Installing the
Front Basket on page 64
Refer to Removing/Installing the
Batteries on Zoom 300 on page 50
Refer to Adjusting the
Tiller Angle on page 43
FIGURE 14.1 Disassembling/Assembling the Zoom 300
Disassembling/Assembling the Zoom 400
NOTE: For this procedure, refer to FIGURE 14.2.
Disassembling
1. If installed on scooter, remove the front basket. Refer to Removing/Installing the Front
Basket on page 64.
2. Remove the seat. Refer to Removing/Installing the Seat on page 34.
3. Remove the rear shroud. Refer to Removing/Installing the Rear Shroud on page 44.
4. Remove the batteries. Refer to Removing/Installing the Batteries on Zoom 400 on
page 53.
5. Disconnect the 4-housing motor [located under marker label # 1] connector from the
controller (Detail “B” of FIGURE 14.2).
Part No 1122167
105
Zoom 300 and Zoom 400
SECTION 14—TRANSPORTING
6. Perform the following to separate the front frame assembly from the rear frame
assembly:
A. Use the one hand to firmly hold the tiller handle.
B. Using the other hand, firmly hold the YELLOW frame lock lever [located under
marker label # 2]and pull UP to the Unlocked position as shown in Detail “C” of
FIGURE 14.2.
NOTE: The frame lock lever remains in the unlocked position when the front frame assembly is
separated from the rear frame assembly.
C. Lift the front frame assembly so that the mounting brackets disengage from the
rear frame assembly as shown in Detail “C” of FIGURE 14.2.
D. Separate the front frame assembly from the rear frame assembly.
7. Fold tiller down to lowest locked position. Refer to Adjusting the Tiller Angle on
page 43.
Assembling
1. Unfold tiller. Refer to Adjusting the Tiller Angle on page 43.
2. Ensure that the tiller is in the highest locked position.
3. Perform the following to connect the front frame assembly to the rear frame assembly
(Detail “C” of FIGURE 14.2):
A. Use the one hand to firmly hold the tiller handle.
B. Using the other hand, firmly hold the front frame assembly and align with the
REAR frame assembly.
NOTE: The frame lock lever remains in the unlocked position when the front frame assembly is
separated from the rear frame assembly.
WARNING
When reassembling scooter, ensure the frame lock lever is in the LOCKED position
securing the FRONT and REAR frame assemblies together. Otherwise, injury and/
or damage may result.
C. Lower the front frame assembly so that the mounting brackets engage with the
rear frame assembly.
NOTE: The mounting brackets are engaged when an audible “click” is heard. The YELLOW frame
lock lever automatically locks in place.
4. Connect the 4-housing motor connector [located under marker label # 1] to the
controller (Detail “B” of FIGURE 14.2).
5. Install the batteries. Refer to Removing/Installing the Batteries on Zoom 400 on
page 53.
6. Install the rear shroud. Refer to Removing/Installing the Rear Shroud on page 44.
Zoom 300 and Zoom 400
106
Part No 1122167
SECTION 14—TRANSPORTING
7. Install the seat. Refer to Removing/Installing the Seat on page 34.
8. If desired, install the front basket. Refer to Removing/Installing the Front Basket on
page 64.
DETAIL “A” - ASSEMBLE/
DISASSEMBLE ZOOM 400
Refer to Removing/Installing
the Seat on page 34
DETAIL “B” - DISCONNECT MOTOR
AND BATTERY CONNECTORS
Motor Connector
Refer to Removing/Installing
the Rear Shroud on page 44
Controller
1
Refer to Removing/
Installing the Batteries on
Zoom 400 on page 53
1
Refer to Removing/
Installing the Front
Basket on page 64
Rear Frame
Assembly
Front Frame
Assembly
Refer to
Adjusting the
Tiller Angle on
page 43
BLACK
Battery
Connectors
RIGHT
Battery
LEFT
Battery
2
Front Frame
Assembly
UP to Unlock
Tiller Handle
2
DOWN
to Lock
Mounting
Bracket
2
Front Frame
Assembly
DETAIL “C” - REMOVE/
INSTALL FRONT FRAME
FROM REAR FRAME
ASSEMBLY
Frame
Lock
Lever
Mounting
Bracket
Rear Frame
Assembly
FIGURE 14.2 Disassembling/Assembling the Zoom 400
Part No 1122167
107
Zoom 300 and Zoom 400
SECTION 15—SCOOTER ACCESSORIES
SECTION 15—SCOOTER
ACCESSORIES
WARNING
After ANY adjustments, repair or service and BEFORE use, make sure that all
attaching hardware is tightened securely - otherwise injury or damage may result.
Before performing any maintenance, adjustment or service, turn power OFF and
remove key from ignition.
Removing/Installing the Front Basket
NOTE: For this procedure, refer to FIGURE 15.1.
1. To remove: Lift up on the basket and remove it from the mounting clips.
2. To install:
A. Align the slots of the basket with the mounting clips on the tiller.
B. Push down on the basket to secure it in place.
DETAIL “A” - ZOOM 300
Slots
Tiller
Front
Basket
Mounting Clips
DETAIL “B” - ZOOM 400
Slots
Tiller
Front Basket
Mounting Clips
FIGURE 15.1 Removing/Installing the Front Basket
Zoom 300 and Zoom 400
108
Part No 1122167
SECTION 15—SCOOTER ACCESSORIES
Removing/Installing the Front Basket Mounting Bracket
NOTE: For this procedure, refer to FIGURE 15.2.
Removing
1. Remove the front basket. Refer to Removing/Installing the Front Basket on page 108.
2. Perform one (1) of the following:
• On Zoom 300 - Remove the two (2) mounting screws, locknuts and washers that
secure the front basket mounting bracket to the tiller.
• On Zoom 400 - Remove the two (2) mounting screws, locknuts and washers that
secure the front basket mounting bracket to the mounting tab in the scooter frame.
Installing
1. Perform one (1) of the following:
• On Zoom 300 - Install the front basket mounting bracket to the tiller using the two
(2) mounting screws, locknuts and washers.
• On Zoom 400 - Install the front basket mounting bracket to the mounting tab in the
scooter frame using the two (2) mounting screws, locknuts and washers.
2. Install the front basket. Refer to Removing/Installing the Front Basket on page 108.
DETAIL “A” - ZOOM 300
Washers
Front Basket
Mounting Bracket
Locknuts
NOTE: Front
basket not shown.
Mounting Screws
Tiller
Assembly
DETAIL “B” - ZOOM 400
Mounting
Tab
Scooter Frame
Assembly
Front Basket
Mounting Bracket
Front Basket
Mounting Screws
Washers
Locknuts
FIGURE 15.2 Removing/Installing the Front Basket Mounting Bracket
Part No 1122167
109
Zoom 300 and Zoom 400
SECTION 15—SCOOTER ACCESSORIES
Installing/Removing the Crutch/Cane Holder
WARNING
The installation of the crutch/cane holder onto the back of the scooter seat significantly increases the length of the scooter. When turning the scooter or swiveling
the scooter seat, it is important to take note of this increased length - otherwise,
injury and/or damage to the surrounding property may result.
NOTE: For this procedure, refer to FIGURE 15.3.
NOTE: The Crutch/Cane Holder, Safety Flag and Oxygen Holder all install into the accessory
tube; ONLY one (1) of these may be installed at a time.
Installing
1. Install the crutch/cane holder into the accessory tube located on the back of the seat.
2. Install the mounting knob to secure the crutch/cane holder in place. Securely tighten.
3. Align the slot on the base with the hook on the crutch/cane holder and slide base down
into position.
Removing
1. Remove the crutch/cane holder from the accessory tube.
2. Remove the mounting knob that secures the crutch/cane holder in place.
3. Remove the crutch/cane holder from the accessory tube.
Crutch Cane Holder
Mounting
Knob
Seat
Accessory Tube
Hook
Base
FIGURE 15.3 Installing/Removing the Crutch/Cane Holder
Zoom 300 and Zoom 400
110
Part No 1122167
SECTION 15—SCOOTER ACCESSORIES
Installing/Removing the Safety Flag
WARNING
The installation of the safety flag onto the back of the scooter seat significantly
increases the length of the scooter. When turning the scooter or swiveling the
scooter seat, it is important to take note of this increased length - otherwise, injury
and/or damage to the surrounding property may result.
NOTE: For this procedure, refer to FIGURE 15.4.
Installing
1. Install the bracket into the accessory tube located on the back of the seat.
2. Install mounting knob to secure the bracket in place. Securely tighten.
3. Install safety flag into bracket.
Removing
1. Remove the safety flag from the bracket.
2. Remove the mounting knob that secures the bracket in place.
3. Remove the bracket from the accessory tube located on the back of the seat.
Mounting Knob
Seat
Safety Flag
Bracket
Accessory Tube
FIGURE 15.4 Installing/Removing the Safety Flag
Part No 1122167
111
Zoom 300 and Zoom 400
SECTION 15—SCOOTER ACCESSORIES
Installing/Removing/Using the Walker Holder
INSTALLATION WARNINGS
After ANY adjustments, repair or service and BEFORE use, make sure that all
attaching hardware is tightened securely.
The installation of the walker holder onto the back of the scooter seat significantly
increases the length of the scooter. When turning the scooter or swiveling the
scooter seat, it is important to take note of this increased length - otherwise, injury
and/or damage to the surrounding property may result.
Installing/Removing the Walker Holder
NOTE: For this procedure, refer to
FIGURE 15.5.
Mounting
Knob
NOTE: Reverse this procedure to remove the
walker holder.
Seat
1. If necessary, loosen but do not remove
the mounting knob.
2. Install the walker holder into the
accessory tube.
Accessory
Tube
Walker Holder
3. Thread the mounting knob into the
welded nut on the accessory tube.
Securely tighten.
FIGURE 15.5 Installing/Removing the
Walker Holder
Using the Walker Holder
NOTE: For this procedure, refer to
FIGURE 15.6.
1. Fold walker. Refer to walker
instructions.
Hook
NOTE: Walker MUST be folded before using
walker holder.
Hook and
Loop Strap
2. Hang folded walker on walker holder
hooks.
3. Secure walker with hook and loop
straps.
Zoom 300 and Zoom 400
FIGURE 15.6 Using the Walker Holder
112
Part No 1122167
SECTION 15—SCOOTER ACCESSORIES
Installing/Removing the Rear Mounted Basket
WARNING
The rear mounted basket is rated for a maximum capacity of ten (10) lbs.
After ANY adjustments, repair or service and BEFORE use, make sure that all
attaching hardware is tightened securely.
The installation of the basket and basket bracket onto the back of the scooter seat
increases the length of the scooter. When turning the scooter or swiveling the
scooter seat, it is important to take note of this increased length - otherwise, injury
and/or damage to surrounding property may occur.
NOTE: For this procedure, refer to FIGURE 15.7.
Installing
1. If necessary, loosen but do not remove the mounting knob.
2. Install the basket bracket into the accessory tube.
3. Thread the mounting knob into the welded nut on the accessory tube. Securely
tighten.
4. Align the mounting clips on the bracket with the slots on the basket and slide the
basket DOWN securely into position.
Removing
1. Remove the basket from the bracket.
2. Loosen the mounting knob.
3. Remove the basket bracket from the accessory tube.
4. Tighten the mounting knob.
Mounting
Knob
Seat
Rear Basket
Accessory Tube
Slots
Mounting Clips
Basket Bracket
FIGURE 15.7 Installing/Removing the Rear Mounted Basket
Part No 1122167
113
Zoom 300 and Zoom 400
SECTION 15—SCOOTER ACCESSORIES
NOTES
Zoom 300 and Zoom 400
114
Part No 1122167
LIMITED WARRANTY
LIMITED WARRANTY
PLEASE NOTE: THE WARRANTY BELOW HAS BEEN DRAFTED TO COMPLY WITH
FEDERAL LAW APPLICABLE TO PRODUCTS MANUFACTURED AFTER JULY 4, 1975.
This warranty is extended only to the original purchaser/user of our products.
This warranty gives you specific legal rights and you may also have other legal rights which vary
from state to state.
Invacare warrants this product to be free from defects in materials and workmanship for a
period of eighteen (18) months on electrical and transaxle and three (3) years on frame from
date of purchase. If within such warranty period any such product shall be proven to be
defective, such product shall be repaired or replaced at Invacare's option. This warranty does
not include any labor or shipping charges incurred in replacement part installation or repair of
any such product. Invacare’s sole obligation and your exclusive remedy under this warranty
shall be limited to such repair and/or replacement.
For warranty service, please contact the dealer from whom you purchased your Invacare
product. In the event you do not receive satisfactory warranty service, please write directly to
Invacare at the address on the bottom of the back cover. Provide dealer's name address, date of
purchase, indicate nature of the defect and, if the product is serialized, indicate the serial
number. Do not return products to our factory without our prior consent.
LIMITATIONS AND EXCLUSIONS: THE FOREGOING WARRANTY SHALL NOT APPLY
TO SERIAL NUMBERED PRODUCTS IF THE SERIAL NUMBER HAS BEEN REMOVED OR
DEFACED, PRODUCTS SUBJECT TO NEGLIGENCE, ACCIDENT, IMPROPER OPERATION,
MAINTENANCE OR STORAGE, COMMERCIAL OR INSTITUTIONAL USE, PRODUCTS
MODIFIED WITHOUT INVACARE'S EXPRESS WRITTEN CONSENT INCLUDING, BUT
NOT LIMITED TO, MODIFICATION THROUGH THE USE OF UNAUTHORIZED PARTS OR
ATTACHMENTS; PRODUCTS DAMAGED BY REASON OF REPAIRS MADE TO ANY
COMPONENT WITHOUT THE SPECIFIC CONSENT OF INVACARE, OR TO A PRODUCT
DAMAGED BY CIRCUMSTANCES BEYOND INVACARE'S CONTROL, AND SUCH
EVALUATION WILL BE SOLELY DETERMINED BY INVACARE. THE WARRANTY SHALL
NOT APPLY TO PROBLEMS ARISING FROM NORMAL WEAR OR FAILURE TO ADHERE
TO THESE INSTRUCTIONS. A CHANGE IN OPERATING NOISE, PARTICULARLY
RELATIVE TO MOTORS AND GEARBOXES DOES NOT CONSTITUTE A FAILURE. ALL
SUCH DEVICES WILL EXHIBIT A CHANGE IN OPERATING NOISE DUE TO AGING.
THE FOREGOING EXPRESS WARRANTY IS EXCLUSIVE AND IN LIEU OF ANY OTHER
WARRANTIES WHATSOEVER, WHETHER EXPRESS OR IMPLIED, INCLUDING THE
IMPLIED WARRANTIES OF MERCHANTABILITY AND FITNESS FOR A PARTICULAR
PURPOSE, AND THE SOLE REMEDY FOR VIOLATIONS OF ANY WARRANTY
WHATSOEVER, SHALL BE LIMITED TO REPAIR OR REPLACEMENT OF THE DEFECTIVE
PRODUCT PURSUANT TO THE TERMS CONTAINED HEREIN; THE APPLICATION OF
ANY IMPLIED WARRANTY WHATSOEVER SHALL NOT EXTEND BEYOND THE
DURATION OF THE EXPRESS WARRANTY PROVIDED HEREIN. INVACARE SHALL NOT
BE LIABLE FOR ANY CONSEQUENTIAL OR INCIDENTAL DAMAGES WHATSOEVER.
THIS WARRANTY SHALL BE EXTENDED TO COMPLY WITH STATE/PROVINCIAL
LAWS AND REQUIREMENTS.
Part No 1122167
115
Zoom 300 and Zoom 400
Invacare Corporation
www.invacare.com
USA
One Invacare Way
Elyria, Ohio USA
44036-2125
800-333-6900
Canada
570 Matheson Blvd E Unit 8
Mississauga Ontario
L4Z 4G4 Canada
800-668-5324
Invacare is a registered trademark of
Invacare Corporation.
Teflon is a registered trademark of E.I.
DuPont Nemours and Company.
Yes, you can. and HMV are trademarks of
Invacare Corporation.
© 2005 Invacare Corporation
Part No 1122167
Rev B - 06/05