1
by the simple addition of one resistor. One can
only presume that many designers aren’t aware of
this effect. Either that, or the bean counters figure
spending one cent per amplifier to shave a fraction
of a percent off the distortion figures at 10kHz isn’t
worth it. Neve certainly thought it was.
The other significant area that has left me scratching
my head when repairing the faulty modules is the
console’s entire grounding system. All good audio
designers understand that ‘ground’ is a relative thing
and relying on it as a reference point for all console
subsections leads to the potential for all sorts of
noise problems. Neve understood grounding: there’s
a whole page in the manual on it that talks about
exactly how to earth the console and its relationship
to all outboard you might attach. However, beyond
the external grounding of the console every subcircuit within the console, every individual mic pre,
each EQ, aux send, etc. has its own local ground.
Rather than attempting to make ground everywhere,
it appears in a console at exactly the same voltage
and with 0Ω between all the points (which is an
impossible task); the myriad ground points are all
connected to the main grounding point with 100Ω
resistors. This approach is known as ‘soft’ grounding,
and if done well, effectively decouples each circuit
subsection from all the others, minimising noise
issues. This is a particularly unusual technique in a
console, and while it achieves its aim, it can make
troubleshooting a bit trickier.
THE DOWNSIDE
The downside to the 5534 opamp employed in the
console is heat. The 5534 is a hungry IC opamp
consuming 4mA of power supply current, and there
are lots of 5534s in a 51 Series console! A typical
36-channel console will dissipate around 500 watts
of heat, so most modest-sized control rooms won’t
need heating in winter! This heat factor is the most
significant issue pertaining to the reliability of these
consoles, and the major cause of failure in a number
of specific parts.
The most obvious of these is the Philips capacitors
that were originally installed throughout the
console, with the dreaded blue axial capacitor
employed as a coupling cap in the signal paths.
Many pro audio manufacturers in the UK and
Europe used these capacitors in the 1980s. Why the
dread? Simply that they don’t last. All electrolytic
capacitors are degraded over time with heat, and
with circuit boards stuffed with 5534 mini radiators
all stacked back-to-back inside the 51 Series channel
modules and only a small space for heat to rise
out around the knobs, it gets pretty damn warm.
I have a couple of 51 Series channel strips in the
workshop at the moment that an owner bought on
the understanding that they’d been recapped in 1998
– i.e., had all the electrolytic capacitors replaced.
Indeed they had. However, the replacement caps
chosen were the same Philips (now BC components)
capacitors, which probably seemed like a good idea
at the time – keeping the original brand. These
caps, which have had less than 10 years of use,
are all knackered and need to be replaced again. I
always use capacitors rated for high temperature
environments, these days they cost the same as
standard temperature range capacitors. Time will
tell how long these will last, but I’m punting on
somewhere in the order of 20 years rather than less
than 10. Fortunately for Andy, his console had been
recapped, and not using the Phillips capacitors. With
very little use since then, the capacitors are still in
good condition.
RECAPPING
Recapping consoles is pretty much a de rigueur
activity in the workshop, however, the 51 Series
has lots of capacitors; far more than in most other
equivalent consoles. The amount of disassembly
required to perform the capacitor replacement
opens up the second big can of worms in these
consoles. All input channel sub-modules – say the
EQ module or the mic/line module – consist of
two circuit boards back-to-back (or is that really
front-to-front?). The boards are interconnected with
flat ribbon-style cables through which power, audio
signals, and switching contacts shoot back and forth
between the two PCBs. The flat cables (or FSPs as the
service manual refers to them) consist of a number
of flat thin strips of metal sandwiched between two
insulating sheets, usually Teflon.
Once again, over time, the heat gets to these FSPs
causing the insulating sheets to fall off, leaving a
bunch of conducting metal strips flapping in the
breeze. Prising a pair of boards apart to replace
capacitors is often the final straw for these FSPs, and
the job of replacing a capacitor or two often leads
to replacing the damaged flat cable. If you’re really
careful not to disturb the cable too much you can
do the capacitor replacement, put the two boards
back together and poke the insulating sheets back
into place, keeping your fingers crossed that the bare
metal strips will stay in place and not conspire to
touch one another.
Over the years I’ve seen all sorts of approaches to
dealing with the cables. From ripping them out
and replacing each strip with a group of individual
insulated wires, to tricks with masking tape, glue
and wishful thinking holding it all together. The
best solution is to simply replace the FSP with a
new one and these are still readily available. What’s
more, they’re now made using a much more robust
and heatproof insulating sheet. Problem is, they’re
hideously expensive and time consuming to replace.
Depending on the client’s budget, sometimes I’ll
resort to tricks and wishful thinking rather than
replace them if I reckon we can get away with it.
The biggest issue (at least to the console’s operator)
is the no longer latching pushbutton switches.
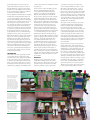
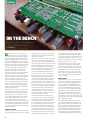
The dreaded ribbon-style
cables ferry power, audio
signals and switching
contacts. These flat
cables (or FSPs as the
service manual refers to
them) consist of a number
of flat thin strips of metal
sandwiched between two
insulating sheets, usually
Teflon. Most are degraded
and pose a major threat to
the console’s reliability.
Sealed pots are difficult
to clean, but there’s a cap
on the back that can be
removed permanently,
which allows cleaning
sprays in to do their job.
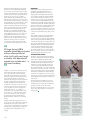
Broken dialstat switches
have been the greatest
bugbear for 51 Series
Neve console owners for
years – until now. They’re
available once again (for
a price) and Rob’s also
repairs them brilliantly
– Ed.
AT 65