1
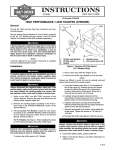
INSTRUCTIONS
®
REV. 06-25-2002
-J02527
Kit Number 31335-03
HIGH PERFORMANCE 1.4KW STARTER (BLACK)
General
1
i01872a
This kit fits 1994 and later Big Twin, Evolution and Twin
Cam 88 engines.
3
See the Service Parts illustration for a list of items contained
in this kit. FLT Models will also require a new Oil Spout
Gasket, Part Number 62432-93A (available separately).
2
1WARNING
A Service Manual is required to install this kit. The rider's
safety depends upon the correct installation of this kit. If
the procedure is not within your capabilities or you do
not have the correct tools, have your Harley-Davidson
dealer perform the installation. Improper installation of
this kit could result in death or serious injury.
NOTE
A Service Manual for your model motorcycle is available
from your Harley-Davidson dealer.
5
1.
2.
3.
4
Oil filler cap/ dipstick
Oil filler spout
Gasket
4.
5.
Breather hose
Hex socket screw (4)
Figure 1. Remove Oil Filler Spout (FLT Only)
Installation
1WARNING
To protect against shock and accidental start-up of
vehicle, disconnect the battery cables, negative cable
first, before proceeding. Inadequate safety precautions
could result in death or serious injury.
1WARNING
Always disconnect the negative battery cable first. If the
positive battery cable should contact ground with the negative cable installed, the resulting sparks may cause a battery explosion which could result in death or serious injury.
1. Refer to the SEAT and BATTERY sections of the
Service Manual. Remove the seat and disconnect the
battery cables, negative cable first.
2. Remove the existing starter according to the instructions found in the STARTER REMOVAL section of the
Service Manual.
3. For all except FLT Models: Install the new starter
according to the STARTER INSTALLATION instructions
for the original equipment starter found in the Service
Manual. Proceed to Step 4.
For FLT Models: See Figure 1. When installing this starter
on FLT model motorcycles, remove the oil filler spout.
1CAUTION
Perform this installation when the engine is cool.
Working near the exhaust system when the engine is
hot could result in minor or moderate injury.
To remove the oil filler spout on FLT Models:
a. Place a drain pan under the engine oil pan.
b. Remove the oil filler cap/ dipstick (1) and set aside.
NOTE
Screws are difficult to reach, but can be carefully removed
without disconnecting the exhaust system.
c. Leave the breather hose (item 4, if so equipped) to
the oil filler spout (2). Remove the four hex socket
screws (5) holding the spout to the transmission
housing. Remove the oil filler spout. Wrap with a
shop rag and set aside, out of the way.
d. Carefully scrape all gasket material from the
transmission housing, being sure not to cut into the
gasket surface on the transmission housing.
e. Install the new starter according to the STARTER
INSTALLATION instructions for the original equipment
starter found in the Service Manual.
f. Place the new gasket (3) in position, and re-attach the
oil filler spout. Tighten the screws to 7-9 ft-lbs (9.512.2 Nm).
g. Re-install the oil filler cap/ dipstick. Check the oil level.
1WARNING
Always connect the positive battery cable first. If the
positive cable should contact ground with the negative
cable installed, the resulting sparks may cause a battery
explosion which could result in death or serious injury.
4. Connect the battery cables, positive cable first.
5. Refer to the Service Manual, and follow instructions to
install the seat.
1WARNING
After installing seat, pull upward on front of seat to be
sure it is locked in position. If seat is loose, it could
result in shifting during vehicle operation, loss of control of vehicle, death or serious injury.
1 of 2
®
Part No. 31335-03
Service Parts
High Performance 1.4KW Starter (Black)
4
sp31559-99b
3
Date 06-02
6
7
5
3
8
2
9
1
10
11
13
12
23
15
16
14
20 21
17 18
22
19
27
26
25
24
30
29
28
Item
1
2
3
4
5
6
7
8
9
10
11
12
13
14
15
16
Note:
Description
Bearing, Ball (15mm I.D.)
Bearing, Ball (8mm I.D.)
“O”-Ring, Yoke (2)
Holder Assembly, Starter Brush
(includes Brush Springs)
Spring, Starter Brush (4)
Drain Vent
End Frame, Starter
(Unpainted. See Note.)
Through Bolt (Chrome) (2)
Screw, Chrome, w/ “O”-Ring (2)
Cap, Terminal (Rubber)
Nut, Flange
Washer
Switch Assembly
(Unpainted. See Note.)
Gear, Idler
Roller, Idler
Retainer, Idler
Part No.
8871
8883
31695-90
Item
17
18
19
31518-90
31661-90
31660-90
20
21
22
23
24
31519-90
3624
1036
31662-90
3403
6217
31538-98
31525-90
9077
31530-90
25
26
27
28
29
30
31
Description
Ball, Steel
Spring, Return
Repair Kit, Starter
(incl. Plunger and Gasket)
Plunger Sub-Assembly
Gasket, Switch
Solenoid Cover (Black)
Bolt w/ Washer (3)
Clutch Sub-Assembly, Starter
(incl. Clutch, Spring & Shaft)
Clutch, Starter
Spring
Shaft, Output
Housing, Starter
(Unpainted. See Note.)
“O”-Ring
Bolt, Starter (w/ Washer) (2)
Nut w/ Washer (not shown)
Part No.
8879
31600-90
31604-91
31665-90
31687-90
31688-90
31689-90
31516-94
31663-90
31692-90
31664-94
31510-90
11116
928
31694-90
Paint unpainted parts with Harley-Davidson
Black Texture Aerosol touch-up, Part Number
98606BF
-J02527
2 of 2