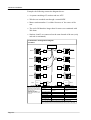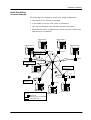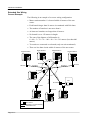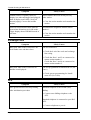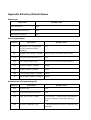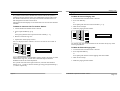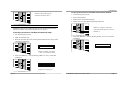
1
Telstra Commander i+ Product Service Manual Commander i+ and Commander i (incorporating Installation and Maintenance Manual) Serial Item 749/028 Issue 2 Documentation Purpose This document has been developed as an extension to the traditional Technical Installation and Maintenance manual. It now encompasses all aspects of the product - ranging from system installation to customer training policies and support. Learning materials contained in this document should be used to supplement regional training initiatives where provided, alternatively, where local training is not available, provide adequate reference information for the service technician to become proficient on the product without additional technical training. This document now replaces the Commander i System Installation manual - issue 1. All copies of issue 1 documentation should be replaced and securely destroyed. Scope of Document The document includes all reference and support information to facilitate the installation and assurance of the Commander i+ digital keysystems and peripheral equipment. The documentation also includes information relevant to both the Commander i and Commander i+ systems. Distribution Distribution of copies of this Commander i+ System Manual will be made available under Serial/ Item 749 / 28 Updated versions of this document will also be made available for circulation to TELSTRA staff via the INTRANET at address: http://mws.cdn.telstra.com.au/bgdocs/regnsant/tcrac.htm Suggestions about this manual The following form is provided for your suggestions. Please photocopy this page and complete all details. When completed, mail your comments to : Telstra Commander Remote Access Centre Locked Bag 1634 Adelaide SA 5800 or Fax the details to 1800 044 113 Name : ................................................................................................................... Designation : ................................................................................................................... Region : ................................................................................................................... Operations Group : Address : Business and Government Commercial / SDU ................................................................................................................... ................................................................................................................... ..................................................................................Postcode:................. Telephone: ................................................................................................................... Fax: ................................................................................................................... Manual: Commander i+ Product Service Manual (Issue 2) Suggestions: ............................................................................................................................... ...................................................................................................................................................... . ...................................................................................................................................................... . ...................................................................................................................................................... . ...................................................................................................................................................... . ...................................................................................................................................................... . ...................................................................................................................................................... . ...................................................................................................................................................... . Telstra Commander Remote Access Centre The Telstra Commander Remote Access Centre [TCRAC] has been established to nationally service Telstra’s new and expanding range of Commander Small Business Telephone Systems. The leap forward in technology and customer demands have enabled Telstra to radically improve customer service, processes and reduce business costs to worlds best practice benchmarks. Established in May 1995 it provides a full range of remote facilities including provisioning, fault diagnosis and rectification, sales and technical support enhancing customer service. A one point contact for Customers , Telstra Technicians and Sales staff with queries on product configuration, administration, programming and fault rectification of the Commander NT and Commander i and i+ Systems, peripherals and integrated application packages. This has been accomplished through the establishment of a Customer Helpline, a Technical Helpline and a Product Development Team to monitor both current and future products. Apart from being a fault reporting centre the TCRAC offers a range of value added services for both internal and external customers. It is chartered to clear 70 percent of customer calls at first point of contact with the centre, effectively reducing site visits and response times while increasing customer satisfaction and reducing costs. The centre offers customers streamlined service for: • System advice • Customer assistance • Remote diagnosis and rectification of faults • Configuration reprogramming to change functions & features to meet customer needs • National support to all Telstra Sales and Technical staff to the highest levels of expertise: • System functions & features and system detailing • Equipment compatibility and modification • Remote diagnosis and assistance • Process and procedure advice The establishment of the TCRAC offers many customer benefits: • Quick & easy Customer Helpline, Installation and Repair service with less interruption to their customers business • Highly skilled customer focussed interface • Consistency of quality service & processes for all Telstra customers The TCRAC is strategically positioned to assist Telstra technical staff and its customers by providing highly focussed and cost effective Commander CPE support. By contributing towards reducing Telstra's product unit costs on CPE, it is helping to keep Telstra competitive in the telecommunications marketplace - thus securing the profitability and the future of our company. Telstra Commander Remote Access Centre The Telstra Commander Remote Access Centre has been set up by Telstra to help you in the tasks of installing and maintaining your Telstra Commander i. Help Desk Documentation Support The Help Desk is staffed by personnel experienced in If you find any problems with the documentation for all areas of Customer Premises Equipment. Call them this Commander i+ product, please tell us. during normal working hours for support on: We want to know if you find any of the following problems: • installation procedures • programming issues • fault issues • mistakes in the manual • detailing • any part is hard to understand • equipment compatibility • difficulty in locating a subject • modifications, etc. • format hard to follow, etc. The staff at Telstra Commander Remote Access Centre are keen to assist. However, please read carefully the documentation provided with the product before calling. To contact the Commander Remote Access Centre: For Customers FREECALL 1800 809 882* FREEFAX 1800 044 113* For Telstra Staff FREECALL 1800 809 881* FREEFAX 1800 044 113* * Calls from a mobile phone are charged at the applicable mobile rate These numbers are staffed from 8:00 am to 7:00 pm (EST) from Monday to Friday Table of Contents Table of Contents Chapter One Introduction to the Commander i+ ...................................................... 1-1 General..................................................................................................................................... 1-1 Product Overview..................................................................................................................... 1-1 Marketing Position / Applications ............................................................................................. 1-2 Commander i+ Enhancements................................................................................................... 1-3 Station Case Enhancements ............................................................................................. 1-3 Feature Enhancements ..................................................................................................... 1-3 Connection Diagram................................................................................................................. 1-5 Keystation Diagram .................................................................................................................. 1-6 Chapter Two System Description.............................................................................. 2-1 Capacity ................................................................................................................................... 2-1 Specific Telephone Stations ...................................................................................................... 2-2 PSTN Master Station ...................................................................................................... 2-2 Standard Station.............................................................................................................. 2-2 Options..................................................................................................................................... 2-2 Analogue Facilities Unit (AFU)........................................................................................ 2-2 Door Station Door Unlock .............................................................................................. 2-2 Music-On-Hold (MOH)................................................................................................... 2-3 External Paging Interface................................................................................................. 2-3 Battery Back-Up ............................................................................................................. 2-3 Chapter Three Hardware Installation ........................................................................ 3-1 Introduction.............................................................................................................................. 3-1 Component Safety Precautions ................................................................................................. 3-1 Installation Checklist................................................................................................................. 3-2 Configuration Diagram ............................................................................................................. 3-3 Installation Procedures.............................................................................................................. 3-5 Customer Responsibilities................................................................................................ 3-5 System Bus Wiring .......................................................................................................... 3-5 System Bus Terminal Socket ......................................................................................... 3-14 Music On Hold .............................................................................................................. 3-15 External Ringer ............................................................................................................. 3-17 Wall Mounting Key Stations.......................................................................................... 3-17 Battery Backup.............................................................................................................. 3-19 Analogue Facilities Unit (AFU)...................................................................................... 3-22 AFU Fax Switch i+ AFU only ....................................................................................... 3-23 Door Station.................................................................................................................. 3-24 Door Unlock ................................................................................................................. 3-25 External Paging ............................................................................................................. 3-26 System Initialisation................................................................................................................ 3-28 Cabling Check ............................................................................................................... 3-28 Station Numbering......................................................................................................... 3-28 Memory Clear ............................................................................................................... 3-29 Station Number Clear .................................................................................................... 3-29 Start-Up of the AFU (AFU Numbering) ........................................................................ 3-30 Commander i+ Product Service Manual - Issue 2 Table of Contents - i Table of Contents System Check ................................................................................................................3-31 System Programming .....................................................................................................3-31 System Programming Back-up .......................................................................................3-31 Moving Office.........................................................................................................................3-32 Chapter Four Programming ....................................................................................... 4-1 Overview ..................................................................................................................................4-1 Passwords........................................................................................................................4-1 Programming Keys...........................................................................................................4-2 Memory Clear..................................................................................................................4-2 Menus.......................................................................................................................................4-3 01: Repertory............................................................................................................................4-3 02: Lock (Enable / Disable )......................................................................................................4-3 03: User Programming ..............................................................................................................4-4 01u Personal Speed Dial Numbers....................................................................................4-4 02u One-Touch Speed Dial Numbers ...............................................................................4-4 03u Headset Enable/Disable .............................................................................................4-5 04u Paging Enable/Disable ...............................................................................................4-5 05u Password ..................................................................................................................4-5 06u Call Waiting Enable/Disable ......................................................................................4-5 04: Administration Programming...............................................................................................4-6 01a Set Time....................................................................................................................4-6 02a System Speed Dial.....................................................................................................4-6 03a PSTN Line Access (Day/Night) .................................................................................4-7 04a Station Call Barring Class (Day/Night) ......................................................................4-7 05a DSS Extension Display..............................................................................................4-8 06a Send Data..................................................................................................................4-9 07a User Password Reset .................................................................................................4-9 08a Admin Password .......................................................................................................4-9 09a Ring Mode - PSTN (Day/Night) ..............................................................................4-10 10a Remote Report ........................................................................................................4-10 11a Serial Number .........................................................................................................4-11 12a Hold Reminder Time (Day / Night ).........................................................................4-11 05: Installation Programming ..................................................................................................4-12 01i Number of Stations ..................................................................................................4-12 02i Number of AFU Ports ..............................................................................................4-12 03i Number of External PSTN Lines ..............................................................................4-13 04i Barred ISD Prefixes .................................................................................................4-13 05i Barred STD Prefixes ................................................................................................4-14 06i Mobiles Prefixes.......................................................................................................4-14 07i Common Allowed Prefixes .......................................................................................4-15 08i PSTN Line Settings..................................................................................................4-15 09i PABX Access Digit..................................................................................................4-16 10i Music on Hold Source..............................................................................................4-16 11i Install Password .......................................................................................................4-17 12i Door Station (Day/Night).........................................................................................4-17 13i Devices (Fax, Answering Machine, Door Station) ....................................................4-18 14i Interdigit Time-Out ..................................................................................................4-19 15i Timer Door Opener..................................................................................................4-20 Table of Contents - ii Table of Contents 16i Type Door Opener................................................................................................... 4-20 17i Data Connection...................................................................................................... 4-21 18i AFU Software Version ............................................................................................ 4-21 19i Keystation Diagnostics............................................................................................. 4-21 20i Help Desk ID........................................................................................................... 4-23 06: Night Status (Enable/Disable ) .......................................................................................... 4-24 AFU Programming Summary.................................................................................................. 4-25 Administration Menu ..................................................................................................... 4-25 Installation Menu........................................................................................................... 4-25 Chapter Five Commander User Training Strategy ................................................... 5-1 Background.............................................................................................................................. 5-1 Strategy.................................................................................................................................... 5-1 Commander i+ User Training Policy ......................................................................................... 5-2 Installation....................................................................................................................... 5-2 Post Initial Training Support............................................................................................ 5-2 Basic Customer Training Comparison for NT & i Commander CPE................................. 5-2 System Administrator Training ................................................................................................. 5-3 Core System Administrator Training................................................................................ 5-3 Training the System Administrator to coach terminal users .............................................. 5-3 Customer ‘End User’ Training......................................................................................... 5-4 Additional Customer Training.......................................................................................... 5-4 Chapter Six Maintenance and Troubleshooting....................................................... 6-1 Introduction.............................................................................................................................. 6-1 Keystations............................................................................................................................... 6-1 Exchange Lines ........................................................................................................................ 6-2 AFU ......................................................................................................................................... 6-2 Master Station Replacement ..................................................................................................... 6-3 MOH Card ...................................................................................................................... 6-3 AFU Initialisation ............................................................................................................ 6-3 Appendix A Installation Summary Appendix B Factory Default Settings Appendix C Serial / Item Numbers Appendix D System User Guide Appendix E Quick Reference Card Appendix F AFU User Guide Appendix G Technical Bulletins Commander i+ Product Service Manual - Issue 2 Table Of Contents - iii Table of Contents FOR SAFETY REASONS, COMMANDER i+ MUST BE INSTALLED BY AUTHORISED SERVICE PERSONNEL IN ACCORDANCE WITH AUSTEL TS009 STANDARD Table of Contents - iv Chapter One Introduction to the Commander i+ System Chapter One Introduction to the Commander i+ General The Commander i+ system is a leading edge digital keysystem ideally suited to small business and residential applications. It has been designed as a system that will accommodate both present and future telecommunication requirements. The stations are of clear, simple aesthetic design fitted with two liquid crystal displays. These displays provide clear information and easy guidance on the operation and use of the system’s various functions. Ease of installation and simple programming are two key attributes augmenting the extensive feature list of the Commander i+ system. Product Overview The Commander i+ is a KSU-less (no main equipment) system designed for residential and small business markets. There are two types of station; Master and Standard. An Analogue Facilities Unit (AFU) is available which provides two analogue ports and you can have up to two AFUs per system (4 analogue ports). Each system configuration requires at least one Master station, providing for a capacity of two (2) exchange lines. A second Master station can be added, which enables the system to handle four (4) exchange lines. The maximum capacity of a Commander i+ system is four (4) exchange lines, eight (8) digital keystations and four (4) analogue ports. The system has been designed with user, installer and distributor in mind so there is no necessity for voluminous Installation & Programming Manuals and System User Guides. The principal objective in the development of this system has been simplicity for users and installers whilst still providing extensive features. Commander i+ Product Service Manual - Issue 2 Page 1-1 Introduction to the Commander i+ Marketing Position / Applications The Commander i+ system is aimed at the lower end of the keysystem market for up to four (4) lines, eight (8) keystations and four (4) analogue ports. Typical customers include: • small owner-operated businesses (eg. retail, SOHO, professional) • owner managed and branch offices (eg. real estate agents, small manufacturers) • residential The system addresses these needs by offering customer requirements at this end of the market; namely convenience, and an affordable price. A large and varied range of features is offered which is certain to meet the requirements of this customer segment. The Commander i+ system is sold in European markets and, as new enhancements evolve, these will be passed on to the Australian market. The target markets for the Commander i+ are as follows: • New or existing businesses that currently require several stations and one (1) exchange line but anticipate growth to three (3) or four (4) lines in the short or medium term. • New or existing businesses with two exchange lines, requiring either additional stations, increased commercial efficiency provided by particular Commander features, or both. Such businesses may have two single-line services. • Large businesses requiring telephone and intercom features at small branches, such as in ‘shop-front’ locations. • Large businesses requiring improved features linked to a PABX (eg. call screening, direct intercom calls, paging, multiple line appearance, handsfree, conference). Page 1-2 Introduction to the Commander i+ Commander i+ Enhancements The Commander i keysystem has recently had an upgrade of its many features and facilities to create the Commander i+. The keystation case has also been revised to give a cleaner and more elegant look and now has the ability to be wall mounted. Station Case Enhancements The following enhancements have been made to the keystation case to improve both the look of the keystation and provide wall mounting: • The microphone hole on the top of the case has been removed. • The indent on the top of the case has been removed. • DSS panel and paper label have been combined into the one panel. • The DSS retaining flap has been removed. • The HOLD key is now coloured red. • LCD display panel has been made the same colour as the dial keys. • The keystation can be wall mounted using the optional wall mounting bracket. • A handset park clip has been added to the top of the station to provide a position to park the handset when the keystation is wall mounted. Feature Enhancements Handset Receiver Volume Control The handset receiver level can now be adjusted anytime when on a call. There are now five volume levels. Exclusive Hold Calls placed on exclusive hold now remain on exclusive hold indefinitely rather than reverting back to common hold after a length of time. Hold Timer The length of time a call is on hold before recalling to the holding Commander i+ Product Service Manual - Issue 2 Page 1-3 Introduction to the Commander i+ station is now programmable at the administrator level (12a). There are four settings: 1 - 30 seconds 2 - 60 seconds 3 - 90 seconds 4 - 120 seconds Hold Recall Transfer Recall Held calls or transferred calls reverting back to the holding / transferring keystation now ring with a more urgent recall ring. The keystation display also now indicates that the line is reverting. Line 1 reverting Call Waiting The call waiting tone can now be enabled / disabled by programming at the user level (06u). System Speed Dial System speed dial numbers appear in locations 11 - 30 on each keystation. They are now programmed into locations 11 - 30 at the administrator level. Incoming Call Display Incoming calls are now indicated on the keystation display as follows: Page 1-4 Intercom calls External Calls Stn 2 ringing Line 1 ringing Introduction to the Commander i+ Connection Diagram Network Master Station AFU System Bus AFU Commander i+ Product Service Manual - Issue 2 Page 1-5 Introduction to the Commander i+ Keystation Diagram ➀LINE Keys To access external lines. Unused line keys can be programmed as one-touch speed dial keys. ➁FUNCTION Keys RECALL Key To send a hookflash to the line. 1 HOLD Key To put an active line call in common or exclusive hold. DND Key (Do Not Disturb) To block all audible signals from incoming calls. 2 L1 1 L2 2 L3 3 L4 4 RECALL 5 HO LD 6 DN D 7 REDIAL 8 VO L+ /- IN T M UTE/AA HF/G L 7 6 2 3 ABC D EF 1 4 5 6 GHI JKL MNO 7 8 9 PQ RS TU V W XYZ * 0 # RLS REDIAL Key • To automatically redial the last number dialled. • To select one of four ring tones whilst keystation is ringing. VOL +/- Key To adjust the speaker, handset and ringing volume. MUTE/AA Key • To mute the built-in handsfree and handset microphone during a call. • To activate intercom Automatic Answer. HF/GL Key To activate handsfree speaker and group listening facilities. INT Key To make an intercom call. ➂ICON Display This provides a display of system activities as well as the status of the keystation. For more information refer to Visual Signals. ➃RLS (Release) Key • To release an active call whilst in handsfree mode of operation. • To exit programming mode. • To release an active call whilst in headset Page 1-6 i 3 mode of operation. 4 5 Introduction to the Commander i+ System ➄i Key • To enter programming mode. • To confirm programming entries. ➅LED Lamp (Red-Green) Red Steady - No intercom channel is available. Red Flashing - Message wait status. Green Flashing - Visual ring. ➆DIRECT ACCESS Keys These keys have five functions: • Direct Station Select (DSS) To make an intercom call. • One-Touch Speed Dial To dial stored numbers. • Page To make a paging call by selecting your own DSS key with keystation idle. • Conference Key To start a three-party conference by selecting your own DSS key during enquiry call. • Message Waiting To leave a message wait indication. Commander i+ System Installation Manual - Issue 2 Page 1 - 2 Chapter Two System Description Chapter Two System Description Capacity The Commander i+ system is able to connect up to 4 external PSTN lines, 8 keystations and up to 4 standard tone telephone terminals (via the Analogue Facilities Unit - AFU). Ports 16 Exchange Connections • PSTN (analogue) Lines 4 Keystations (digital) 8 Analogue Ports 4 Simultaneous Calls * 5 Door Station or External Paging Interface 1 Paging Zones • Internal 1 • External 1 Abbreviated Dialling • System 20 • Keystation 10 per keystation * Note: There can be a maximum of 5 simultaneous calls on the system at any one time. Each PSTN exchange line reserves one call channel. These channels are reserved regardless of whether they are in use or not. The remaining channels are then used for internal (intercom) calls. For example, if there are two PSTN exchange lines on the system there can be 2 simultaneous exchange calls and 3 intercom calls. If there are four PSTN exchange lines on the system then there can be 4 simultaneous exchange calls and 1 intercom call. Commander i+ Product Service Manual - Issue 2 Page 2-1 System Description Specific Telephone Stations Two types of telephone stations are provided, a PSTN Master station, and a Standard station. Outside appearance of all stations are the same. To identify the station, check the product label on its base. PSTN Master Station A PSTN Master station allows for the connection of up to two external trunk lines, and it is possible to connect two PSTN Master stations in a system. This allows up to four external lines that can be accessed from the entire system or to specific stations. Standard Station The Standard station has the same general appearance and the same features as the Master station, but does not provide direct connection to the external lines. Options Analogue Facilities Unit (AFU) The AFU is an optional interface of the Commander i+ system, allowing for connection of up to 2 standard tone telephone terminals (telephone sets, cordless, multi-function telephones, FAX, answering machines, modems, etc) or one standard tone telephone terminal and a door station / external paging interface. A maximum of two AFUs can be connected to one system, giving a total of 4 telephone terminals, but with the following limitations: • Only one Door Station OR external paging interface per system. • Only one Door Unlock per system (in combination with the door station). Door Station Door Unlock A door station is available as an option which allows a station user to make and receive calls plus monitor activity in the door station area. Connection is via the AFU (Analogue Facilities Unit). A door unlock can also be connected to the AFU. While in communication with a door station, the door may be unlocked by Page 2-2 System Description pressing the [Recall] key on a keystation or by dialling 1 when using a single line telephone. (Note: An approved door unlock must be provided by the customer). Music-On-Hold (MOH) There are three types of MOH available on the system: • Simple chimes • Internal MOH - 32 seconds of continuous digitised music • External MOH interface Internal MOH is available as an optional daughter board which plugs into the PSTN Master Station printed board assembly. External MOH can be connected to each master station in the system via an approved Line Isolation Unit (LIU). External Paging Interface Note: The external paging interface has not been formally released by Telstra at the time of publication. An external paging interface is available as an option which allows the system to be connected to an external paging amplifier system via an approved Line Isolation Unit (LIU). Battery Back-Up Note: The battery backup unit has not been formally released by Telstra at the time of publication. Battery back-up is available as an option for each individual keystation via an add-on unit installed in series with the keystation bus. Back-up time of approximately two (2) hours is provided. The back-up unit contains one rechargeable 6V, 1.2 AH battery. To have access to exchange lines and system features in the event of power failure the master stations must be connected to the battery back-up unit. Commander i+ Product Service Manual - Issue 2 Page 2-3 Chapter Three Hardware Installation Chapter Three Hardware Installation Introduction This chapter describes the procedures for installing the Commander i+ system hardware. An Installation Checklist is provided, which summarises all the hardware installation procedures. Each point in the checklist is then covered in detail, with full installation procedures and additional relevant information. Where appropriate, illustrations are provided. Component Safety Precautions The Commander i+ equipment contains a considerable number of MOS and other static-sensitive components. To reduce the incidence of premature failure due to static discharge, you must take the following precautions: • Never attempt to repair power plug-packs in the field. They are powered from the 240V mains supply and contain hazardous voltages. • Always discharge static from yourself before handling any Printed Board Assembly (PBA), and wear an antistatic wrist strap connected to earth. • Always handle PBAs by the edges. • Never touch PBA tracks or connectors. Contaminants introduced by fingers can cause corrosion and high resistance connections. • Never touch or straighten components, especially the ceramic sub assemblies. They are physically delicate and finger pressure can fracture component leads (even if the leads do not actually break). • To protect PBAs against physical damage and damage due to static discharge, always wrap them in an anti-static package and place them in the protective packaging provided with the new item. • Bus cabling is not polarity-sensitive. Commander i+ Product Service Manual - Issue 2 Page 3-1 Hardware Installation Installation Checklist Use the following checklist in conjunction with the detailed procedures to ensure that the Telstra Commander i+ system is correctly installed. • Check that the equipment supplied is as listed on the System Order Form. • Unpack all equipment and check for any damage incurred during transit. • Locate and mount all equipment. Ensure that all system elements including cabling are not installed near sources of electromagnetic radiation (eg, antennae, photocopiers, electric control panels, transformers, radiotherapy equipment). • Install cabling for system Bus. • Install cabling for external lines. • Install any ancillary cabling (external MOH/station based alarm). • Connect all stations to the system Bus. • Assign station numbers to each keystation. • Connect any AFUs to the system Bus. • Initialise the AFUs and allocate an AFU number. • Test station cabling by making an Intercom Call between the two stations the greatest distance apart. • Test external line cabling by checking the presence of external dial tone. • Program customer data. • Back-up customer data to second master station (if present). • Final test of system and features. • Complete customer record. Page 3-2 Hardware Installation Configuration Diagram In order to record the configuration used during installation it is essential to fill in the configuration block diagram showing how the keystations and AFUs are connected. Simply draw a line indicating what each unit (keystation / AFU) is connected to. On the drawn line write in the approximate cable length. The termination resistor used should also be recorded. This form is included in Appendix A and can be photocopied as required. After completing the form it can be left on site with the system administrator. Commander i Configuration Diagram Location: MDF Master 1 Master 2 / Standard 2 Standard 3 Standard 4 Standard 5 Standard 6 Standard 7 AFU 1 Standard 8 AFU Bus Wiring Rules - Maximum bus length: 200 metres. - Terminations: 100 ohms at ends of the bus only (2 terminations only). - No more than four keystations / AFUs within any 15 metre segment of cable. - Master stations can be anywhere on the bus. Commander i+ Product Service Manual - Issue 2 AFU Star Wiring Rules Master Station Number 1 Position Termination Basic Star Master station number 1 located within 60 metres of star centre 200 ohms on the end of every branch longer than 10 metres See Note 1 8 2 See Note 2 AFU 2 Extended Star Master station number 1 located within 10 metres of star centre 200 ohms on the end of every branch longer than 10 metres See Note 1 9 See Note 2 2 Max number of branches Min number of branches longer than 10 metres Max branch length 150 60 Total sum of all branches See Note 3 Maximum 400 metres Max number of units per 2 2 branch Max number of units 4 4 within 10 metres of star Note 1: If two units are connected on a branch then only the end unit is terminated. Note 2: There must be at least two branches longer than 10 metres Note 3: If there are 8 branches at 60 metres the total length is 480 m (8 x 60 m = 480 metres) Page 3-3 Hardware Installation Example: the following connection diagram shows: • A system consisting of 5 stations and one AFU. • Wired as an extended star through a central MDF. • Master station number 1 is within 10 metres of the centre of the star. • The end of all branches longer than 10 metres are terminated with 200 ohms. • Stations 4 and 5 are connected on the same branch of the star (only end unit is terminated). Commander i Configuration Diagram Location: MDF No term 5m 35 m Master 1 200 ohm Master 2 / Standard 2 200 ohm 40 m 75 m Standard 3 No term Standard 4 200 ohm 60 m Standard 5 Standard 6 Standard 7 AFU 1 Standard 8 AFU Bus Wiring Rules - Maximum bus length: 200 metres. - Terminations: 100 ohms at ends of the bus only (2 terminations only). - No more than four keystations / AFUs within any 15 metre segment of cable. - Master stations can be anywhere on the bus. Page 3-4 200 ohm 25 m Star Wiring Rules Master Station Number 1 Position Termination AFU Basic Star Master station number 1 located within 60 metres of star centre 200 ohms on the end of every branch longer than 10 metres See Note 1 8 2 See Note 2 AFU 2 Extended Star Master station number 1 located within 10 metres of star centre 200 ohms on the end of every branch longer than 10 metres See Note 1 9 See Note 2 2 Max number of branches Min number of branches longer than 10 metres Max branch length 150 60 Total sum of all branches See Note 3 Maximum 400 metres Max number of units per 2 2 branch Max number of units 4 4 within 10 metres of star Note 1: If two units are connected on a branch then only the end unit is terminated. Note 2: There must be at least two branches longer than 10 metres Note 3: If there are 8 branches at 60 metres the total length is 480 m (8 x 60 m = 480 metres) Hardware Installation Installation Procedures Customer Responsibilities The customer is responsible for providing: • Satisfactory lighting for installation and maintenance • Single-phase, correctly earthed, 240V, 10A, 50 Hz AC generalpurpose power outlets (GPO), one for every keystation and AFU. The outlets must be easily accessible and kept clear of obstructions. System Bus Wiring The system is controlled by master station number 1 and requires all the keystations (master and standard) and AFUs to be connected to the system bus. The system bus is a simple single twisted pair cable which is not polarity sensitive. The system bus can be configured as: • A straight bus where all keystations and AFUs are “daisy chained” from one unit to the next. • Star bus where all keystations and AFUs are star wired from a central point. For each bus configuration there are rules defining: • bus length • termination resistance • number of units per branch Commander i+ Product Service Manual - Issue 2 Page 3-5 Hardware Installation BUS Termination Three resistors (100 ohm, 150 ohm and 200 ohm) are supplied with the system bus terminal socket. They are located in a plastic bag inside the socket. BU S These resistors are used to terminate the system bus in accordance with the wiring rules detailed in the following pages. Note: 150 ohm resistor is provided but is no longer required for bus termination. Resistor Colour Code 100 ohm Brown Black Black Black Red 150 ohm Brown Green Black Black Red 200 ohm Red Black Black Black Red Cable All cabling lengths referred to this in manual are based on 0.5 mm diameter cable. The length of any cabling can be estimated by measuring the resistance of the cable when shorted at one end (ensure any equipment has been disconnected from the cable. The standard cable resistance for 0.5 mm cable is 97.8 ohms / 1000 m Page 3-6 Cable pair length (metres) Resistance (ohms) Cable pair length (metres) Resistance (ohms) 10 2.0 90 17.6 20 3.9 100 19.6 30 5.9 110 21.5 40 7.8 120 23.5 50 9.8 130 25.4 60 11.7 140 27.4 70 13.7 150 29.3 80 15.6 160 31.3 Hardware Installation Straight Bus 200 m 100 ohm 100 ohm AFU RLS RLS RLS RLS Legend Bus Socket Bus Wiring (0.5 mm diameter) Station Bus Cord • Maximum bus length: 200 metres • Terminations: 100 ohms at the ends of the bus only (2 terminations only) • No more than four keystations / AFUs within any 15 metre segment of cable. • Master stations can be anywhere on the bus. Commander i+ Product Service Manual - Issue 2 Page 3-7 Hardware Installation Star Configurations There can be two types of star wiring: • Basic star - where all keystations and AFUs are located within 60 metres of the central wiring point. • Extended star- where the leg lengths can be extended to a maximum of 150 metres and the master stations must be within 10 metres of the centre. Master Station Standard Station r es et No resistor 10 m Standard Station 200 ohm Length = a metr metres Length = e es Length = c metres = Le ng th s tre me 200 ohms =d Standard Station th ng Le bm etr es No resistor AFU No resistor 200 ohms 200 ohms Standard Station Legend Bus Socket Bus Wiring (0.5 mm diameter) Station Bus Cord Page 3-8 Standard Station Standard Station 200 ohms Hardware Installation Star Wiring Rules Rules Basic Star Extended Star Master Station Number 1 Position Master station number 1 is located within 60 metres of the star centre. Master station number 1 is located within 10 metres of the star centre. Termination 200 ohms on the end of every branch longer than 10 metres. 200 ohms on the end of every branch longer than 10 metres. See Note 1 See Note 1 Maximum number of branches 8 9 Minimum number of branches longer than 10 metres 2 2 See Note 2 See Note 2 Maximum branch length 60 150 Total sum of all branch lengths See Note 3 Maximum 400 metres Maximum number of units per branch 2 2 Maximum number of units within 10 metres of the centre of the star. 4 4 Note 1 If two units are connected on the same branch then only the end unit is terminated. Note 2 There must be at least two branches longer than 10 metres. Note 3 If there are 8 branches at 60 metres then the total length is 480 metres (8 x 60 metres = 480 metres). Commander i+ Product Service Manual - Issue 2 Page 3-9 Hardware Installation Basic Star Wiring Correct Example The following is an example of a correct wiring configuration: • Each branch longer than 10 metres is terminated with 200 ohms. • Number of branches is not more than 8. • At least two branches are longer than 10 metres. • No branch is over 60 metres in length. • Two units are connected on a branch (only end unit terminated). • There are less than 4 units within 10 metres of the star centre. Master Station 2 Master Station 1 Standard Station Standard Station 200 ohms 200 ohms m 60 200 ohm 60 m 10 metres 60 metres 60 metres 200 ohms 3m 40 metres s tre me 30 Standard Station 50 me tre s No resistor AFU No resistor 200 ohm 200 ohms 200 ohms Standard Station Legend Standard Station Bus Socket Bus Wiring (0.5 mm diameter) Station Bus Cord Page 3-10 Standard Station Hardware Installation Basic Star Wiring Incorrect Example The following is an example of an incorrect wiring configuration: 1. One branch is over 60 metres in length. 2. A unit within 10 metres of the centre is terminated. 3. One unit is terminated with 100 ohms instead of 200 ohms. 1. More than one unit is terminated on a branch (only the end unit on a branch must be terminated). Master Station 2 Master Station 1 Standard Station Standard Station 200 ohms 10 metres m 60 ✘1 200 ohms 60 m Branch length longer than 60 metres Unit within 10 metres of centre is terminated 200 ohms 60 metres 100 metres 200 ohm 3m ✘3 100 ohm Star termination is 200 ohms ✘4 s tre me 30 Standard Station 40 metres ✘2 50 me tre s 200 ohm Only end of branch is terminated AFU 200 ohms 200 ohms 200 ohms Standard Station Legend Standard Station Standard Station Bus Socket Bus Wiring (0.5 mm diameter) Station Bus Cord Commander i+ Product Service Manual - Issue 2 Page 3-11 Hardware Installation Extended Star Wiring Correct Example The following is an example of a correct wiring configuration: • Master station number 1 is located within 10 metres of the star centre. • Each branch longer than 10 metres is terminated with 200 ohms. • The number of branches is not more than 9. • At least two branches are longer than 10 metres. • No branch is over 150 metres in length. • The sum of the distance of all branches is: 6 + 40+ 5 + 70 + 70 + 100 + 80 + 20 = 391 metres (less than 400 metres) • Two units are connected on a branch (only one unit terminated). • There are less than 4 units within 10 metres of the star centre. Master Station 1 Standard Station Master Station 2 10 metres m 200 ohms 20 No resistor 40 metres 200 ohms 80 metres 6 m 200 ohm Standard Station 5m 70 metres es etr 0m 10 Standard Station 70 me tre s No resistor AFU No resistor 200 ohms 200 ohms 200 ohms Standard Station Legend Bus Socket Bus Wiring (0.5 mm diameter) Station Bus Cord Page 3-12 Standard Station Standard Station Hardware Installation Extended Star Wiring Incorrect Example The following is an example of an incorrect wiring configuration: 1. Master station number 1 is located more than 10 metres from the centre. 2. A unit within 10 metres of the centre is terminated. 3. One unit is terminated with 100 ohms instead of 200 ohms. 4. More than one unit is terminated on a branch (only the end unit on a branch must be terminated). 5. One branch is over 150 metres in length. 1. The sum of the distance of all branches is greater than 400 metres: 50 + 100 + 3 + 50 + 80 + 40 + 160 = 483 metres Master Station 1 Legend Bus Socket Bus Wiring (0.5 mm diameter) Station Bus Cord ✘1 10 m Master station more than 10 metres from star centre Standard Station 200 ohms 50 metres Standard Station The sum of each branch is more than 400 metres 50+100+3+50+80 +40+160=483 m res et ✘6 100 metres 200 ohm Unit within 10 metres of centre is terminated ✘2 3m length longer ✘5 Branch than 150 metres 200 ohm Only end of branch is terminated Star termination is 200 ohms 80 metres 50 100 ohm es ✘3 ✘4 tr me me tre s 40 Standard Station 200 ohms s 160 metre AFU 200 ohms 200 ohms 200 ohms Standard Station Standard Station Standard Station Commander i+ Product Service Manual - Issue 2 Page 3-13 Hardware Installation System Bus Terminal Socket Each keystation (Master and Standard) must be connected to the system bus by means of the supplied 2.5 metre cord (six conductors). This must be inserted in the bus terminal socket attached to the power plug. BUS Option Connection Terminals Master Station - External Music on Hold Standard Station - External Ringer The system bus terminal socket also provides connection for External Music On Hold in the case of the master station and an external ringer in the case of the standard station. Refer to the Music On Hold section on page 3-15 and the External Ringer on page 3-17 for further details on these options. Extending Keystation Power Connection If a mains outlet is not available near the keystation, the maximum distance from a keystation to the mains power can be increased by up to 20 metres. This is achieved by attaching a second terminal socket (as shown on the following pages). Page 3-14 Hardware Installation BUS 20 m External (Analogue) Line Wiring The external analogue lines must be wired to the terminal socket that is supplied with each PSTN Master station. Use the supplied standard 8conductor cable (2.5 metres) to connect the keystation to the socket, which also allows the connection of two emergency telephones in case of power failure. Line A Line B Power Fail Line A Power Fail Line B Music On Hold Internal MOH If the PSTN system requires internal MOH, the Internal Music On Hold board must be installed on the PSTN Master station PBA. The board installation is as shown below: • Unscrew the two screws on the base of the keystation and remove the base moulding Commander i+ Product Service Manual - Issue 2 Page 3-15 Hardware Installation • Insert the daughter board into the 3-pin and 4-pin sockets on the Master station PBA, as shown in the above figure. Ensure that the daughter board is fully inserted and that it sits flat and securely. • Reassemble the base moulding. Master Station PBA MOH Bo ard 3-pin connector 4-pin connector The MOH board installed into the master station only provides internal MOH for the two lines connected to that master station. If a second master station is connected to the system then a second internal MOH board must be installed into the second master station. This will provide internal MOH to the lines connected to the second master station. External MOH External MOH is connected to the master station through the master station’s system bus terminal socket. External MOH must be connected through an Austel approved Line Isolation Unit (LIU). BUS External Music on Hold (Connected via LIU) 1 2 A BC 3 5 6 JK L MN O 7 8 PQ RS TUV * 0 Master Station D EF 4 GHI 9 W XYZ # RLS i The external music connected to the master station only provides MOH Page 3-16 Hardware Installation for the lines connected to that master station. If a second master station is connected to the system then external music source must also be connected to the second master station. This will provide external music to the lines connected to the second master station. External Ringer An ACA (formerly Austel) approved external ringer can be connected to a standard station through the standard station’s system bus terminal socket. The standard station external ringer interface provides a 5V, 3 mA output. BUS + External Ringer - Standard Station Wall Mounting Key Stations Standard keystations can be wall mounted using the Wall Mounting Kit, WMK-i and a six conductor wall mounting plate. Master keystations can be wall mounted in a similar manner to the standard keystation but will require the exchange line cord to be run out from the top of station and connected to the exchange line terminal socket. Fit and cable the six-conductor wall mounting plate. Refer to Extending Keystation Power on page 3-14 for information on extending the distance from a keystation’s plug-pack. Commander i+ Product Service Manual - Issue 2 Page 3-17 Hardware Installation White Power Power + Option Connection Terminals Blue Yellow Black Red Green Master Station - External Music On Hold Standard Station - External Ringer BUS Front View Supplied Wall Plate Fit the handset retaining clip to the top cover of the keystation. • Push out the handset retaining clip from the wall mount bracket. • Position the handset retaining clip in the position provided as shown. • Using the small screw provided fix the handset retaining clip to the top cover. • Insert the screw cover into the handset retaining clip. Fit the keystation to the wall mounting bracket. • Connect the system bus cable to the keystation and pass it through the wall mount bracket window as shown. • Connect the external line cable to the master keystation and run the cable out from the top of the station and connect to the external line terminal socket (master stations only). Page 3-18 Hardware Installation • Attach the wall mounting bracket to the keystation base using the three larger screws provided. • Connect the system bus cable to the wall mounting plate. • Attach the keystation to the wall mounting plate by placing the wall bracket keyholes over the wall mount plate’s retaining screws and then sliding the keystation down to lock it onto the plate. Battery Backup Note: The battery back-up has not been formally released by Telstra at the time of publication Each Commander i keystation (Master or Standard) can be connected with a Battery Backup Unit (BBU) to keep the station functioning normally for up to two hours in the event of mains power failure. To ensure that the system operates during a power failure then master station number 1 must be equipped with a BBU. If a second master station is provided on the system then it should also be equipped with a BBU to ensure access to the external lines connected to the second master station in the event of power failure. Note: Stations without battery back-up are not operational during a power failure. Commander i+ Product Service Manual - Issue 2 Page 3-19 Hardware Installation The BBU is contained in one wall mounted plastic case (size 16 cm x 20 cm) and is connected in series between the system bus wall socket and the station. plugpack wall socket 2.5 m cable 1.5 m cable BBU A BC D EF GHI JK L MN O PQ RS TU V W XYZ • The cable connection from the BBU to the station is 1.5 metres and is factory fitted to the BBU. • The BBU is connected to the wall socket using the same 6-wire cable used to connect the station to the BUS: this cable is part of the station assembly. The BBU has one printed board equipped with: 1. Sealed lead acid battery, voltage 6V and capacity 1.2 Ah. The battery is shipped fully charged. 2. Circuitry for battery charging and discharge control: the battery lasts for about two hours in normal operation and takes about 13 hours to fully re-charge. 3. One 2AG style fuse [F1] of 0.5A, 250V to protect the battery output 4. One jumper link [CN3] to disconnect the battery during transport and storage: • 2-3: Battery disconnected (factory setting) • 1-2: Battery connected (operational condition) 5. Two-colour LED [L1] to indicate the operational status: • green for mains operation, • red for battery operation Page 3-20 Hardware Installation 6. Two RJ12 connectors: • [CN1] entry of the BUS cable plug from the system bus wallsocket • [CN2] 2.5 m cable to the station - factory fitted. CN3 + - 1 2 3 Battery 6V, 1.2Ah CN3 1-2 Battery Connected Operational condition 2-3 Battery Disconnected Factory setting For transport and storage F1 0.5A CN2 CN1 L1 To Station From Wall Socket Installation and Connection 1. Wall mount the BBU within 2.5 m of the wall socket and 1.5 m of the station. Note: The case cannot be opened without a tool. The tool can be a screwdriver used to push the latch on the front side (see figure), releasing the upper shell to rotate to vertical position. When wall mounting the BBU ensure that there is enough space left under the unit to allow insertion of a tool to open the case. battery + rotate to open Sockets Push to unlock cover Ensure enough space is left under the BBU to insert a tool to open the case 142.0 mm Mounting Template Commander i+ Product Service Manual - Issue 2 Page 3-21 Hardware Installation 1. Open the BBU case and swap the jumper CN3 from position 2-3 to position 1-2: the LED should light steadily red. Close the case, taking care that the cable connected to CN2 passes through the small circular opening on the front side of BBU. If the LED does not light red then the battery voltage is low (below 5.6 Volts) and needs to be charged for about 13 hours before operation. Continue with steps 3 and 4 to begin charging the battery. 2. Connect the cable of the BBU to the station: if the battery is charged then the station will power up. 3. Connect the bus cable coming from the wall-socket to CN1: the LED should light steadily green. 4. The BBU is now correctly installed. Analogue Facilities Unit (AFU) Wall Installation of AFU Install the AFU near the mains outlet. The AFU can be fastened to the wall with 5 mm diameter screws. These are supplied with the system. Mounting Template 130.0 mm FRONT VIEW Sliding Cover AC/DC Adaptor Extension A Page 3-22 Bus Extension B Door unlock Hardware Installation Connection of Internal BUS Cable Open the sliding cover to access the internal socket. • Plug the 6-wire AFU Bus Cord into this socket. Connection of Analogue Terminals (cordless, fax, answering machines etc) To Connect Using RJ12 Jacks: • Close the sliding cover. • Connect the telephone(s) using the two modular RJ12 jacks. The extension interfaces are equipped with internal protection against power surges. However, for increased safety in the case of outdoor installations, it is advisable to use specific protection devices (eg. gas dischargers). Connection of AFU Plugpack • Close the cover (this is most important). • Insert the power cord of the AFU plugpack (supplied with a four pin plug) into the power connector socket on the front left-hand side of the AFU. IMPORTANT NOTE: When connecting the AFU plugpack to the mains, you have five seconds to start-up the initial configuration (or to re-start a new configuration). Refer to System initialisation AFU Numbering. AFU Fax Switch i+ AFU only Note: The i+ AFU has not been formally released by Telstra at the time of publication. The AFU has fax switch functionality that allows inter-working between an answering machine and fax machine. If a call routed to the answering machine is a fax call then the AFU detects that the call is a fax call and automatically transfers the call to the fax machine. Commander i+ Product Service Manual - Issue 2 Page 3-23 Hardware Installation This feature would typically be used when the office is unattended. Voice calls are recorded on the answering machine and fax calls are transferred to the fax machine. • The answering machine is connected to AFU extension A. • The fax machine is connected to AFU extension B. To programme the system for Fax switch operation refer to Installation Programming - 13i Devices (Fax, Answering Machine, Door Station). Door Station AFU 749/ 8 Door Station / External paging connected to extension B 90.0 mm RJ-12 Socket 749/38 Wall Mounting Template Door Station 749/4 From AFU Door Station Terminal Block Wiring • Remove the screw from the top of the door station. • Remove the rear cover by hinging out and down. Page 3-24 Hardware Installation • Feed the cable from the AFU through the hole in the rear cover and mount the cover to the wall. • Terminate the cable to the outside terminals of the terminal block polarity is unimportant. • Attach the front assembly to the rear cover and replace the top retaining screw. To programme the system for Door station operation refer to Installation Programming - 12i Door Station (Day / Night) and 13i Devices (Fax, Answering Machine, Door Station). Door Unlock The door unlock facility is provided using the following additional equipment: • Telstra Door Unlock Interface (727 / 29) • Plug Pack (749 / 40 AFU Plugpack) to power the Telstra Door Unlock Interface Telstra Customer Responsibility Responsibility Power Pack 749/40 Red / Green Red+ Door Unlock Interface 727 / 29 FRONT VIEW Brown / Yellow Black - Red Black Orange not connected Green not connected Sliding Cover 1 White Blue SD22127 2 To door unlock mechanism 3 Green Orange AFU 749 / 8 Blue 0V White 5V Safety Warning: The wiring between the Door Unlock Interface contacts and the door mechanism must not share the same cable as the door station or any other telecommunications wiring. Installation • Cut the connector from the Plugpack and remove 25 mm from the outer sheath. • Strip 10 mm of insulation from the red and green wires of the Plugpack , join together and connect to the red (+) wire of the Door unlock Interface Unit. • Strip 10 mm of insulation from the brown and yellow wires of the Plugpack , join together and connect to the black (-) wire of the Commander i+ Product Service Manual - Issue 2 Page 3-25 Hardware Installation Door unlock Interface Unit. • Connect the white (5V) and blue (0V) wires of the Door Unlock Interface Unit to the AFU door unlock terminals as per the diagram. Note that the connections are polarity sensitive. • The orange and green wires for the Door Unlock Interface Unit are not used for this application. After installation the correct operation of the door unlock interface can be tested. When the door unlock is idle (not operated): • The Door Unlock Interface LED is OFF. • The output between contacts 2 - 3 is open. • The output between contacts 1-3 is short. When the door unlock is activated: • The Door Unlock Interface LED turns on and stays on for the duration specified in system programming. • The output between contacts 2 - 3 is short for the duration specified in system programming. • The output between contacts 1-3 is open for the duration specified in system programming. To programme the length of time the door unlock opens refer to Installation Programming - 15i Timer Door Opener. External Paging Note: The external paging interface has not been formally released by Telstra at the time of publication The external paging interface connects to the AFU in the same manner as for the door station. There can only be one door station or external paging interface connected to the system. The external paging interface must be connected to an ACA (formally Austel) compliant paging unit. • Remove the screw from the top of the external paging unit. • Remove the rear cover by hinging out and down. Page 3-26 Hardware Installation • Feed the cable from the AFU and the cable to the external paging system through the hole in the rear cover and mount the cover to the wall. • Terminate the cable from the AFU to the outside terminals of the terminal block - polarity is unimportant. • Terminate the cable to the external paging system to the inner terminals of the terminal block - polarity is unimportant. To external paging system From AFU • Make a test external paging call and adjust the output level pot as required. • Attach the front assembly to the rear cover and replace the top retaining screw. To programme the system for external paging operation refer to Installation Programming - 13i Devices (Fax, Answering Machine, Door Station). Commander i+ Product Service Manual - Issue 2 Page 3-27 Hardware Installation System Initialisation Cabling Check • Ensure that the system bus is correctly cabled and terminated to the keystations and AFUs. • Ensure that the external lines are correctly cabled and terminated to the master stations. • Ensure that the system options are correctly cabled and terminated. Station Numbering • Switch on the plug-packs for each keystation. • Connect the BUS and external line cords of the Master station to the system bus and external line terminal sockets respectively. • Assign station number to the first master station. • After powering up the display will show: Master =? If this is not displayed, carry out a ‘Memory Clear’ operation, as described in the following pages. • Press [DSS1] and the station will become Master station number 1. • If the second Master is needed, repeat the four steps above, pressing [DSS2] to designate Master station number 2. • Start connecting the Standard stations, one at a time, giving each a different identity. Do this by pressing the appropriate [DSS] key. WARNING: If you allocate the same identity to more than one keystation, they will not work correctly. You will have to temporarily disconnect from the Bus the keystation you wish to have that identity, perform ‘Station Number Clear’ (as described in the following pages) on each of the other stations with the same identity, allocating them different identities, and then reconnect the original keystation. The same operation must be carried out whenever you want to change a terminal identity. Page 3-28 Hardware Installation Memory Clear The memory of any keystation can be cleared from the keystation’s diagnostic menu. If you reset the memory on master station 1 all system programming will be reset to the factory default values. If you reset the memory on standard keystations then the standard keystation’s personal speed dial numbers will be cleared. There are two methods of entering diagnostic mode: • Method 1 From installation programming - 19i Keystation Diagnostics • Method 2 By powering up the keystation while pressing the [i] key. To clear the keystation memory: • Dial 3 to step through the diagnostic menus until the following display is shown. 1:NumClr 2:MemClr 3> • Dial 2 to clear the keystation’s memory. Station Number Clear The station number of any keystation can be cleared from the keystation’s diagnostic menu. There are two methods of entering diagnostic mode: • Method 1 From installation programming - 19i Keystation Diagnostics • Method 2 By powering up the keystation while pressing the [i] key. To clear the keystation’s station number: • Dial 3 to step through the diagnostic menus until the following display is shown. 1:NumClr 2:MemClr 3> • Dial 1 to clear the keystation’s station number. Commander i+ Product Service Manual - Issue 2 Page 3-29 Hardware Installation Start-Up of the AFU (AFU Numbering) It is necessary to assign an identity number to the AFU at the initial installation or whenever master station number 1 is replaced. This identity number automatically assigns station numbers to the analogue devices that connect to the AFU’s extensions. The AFU is initialised using a standard tone dialling telephone connected to extension A. 1. Plug a standard tone dialling telephone to extension A. 2. Connect the AFU BUS cable to the System bus socket. Ensure that Master station number 1 is already installed and has been assigned its station number (station 1). 3. Turn on the AFU plug-pack and observe the AFU LED. The LED lights steadily for five seconds. If, after this time, it still lights steadily, then the AFU has been previously configured.. 4. Turn off the AFU plug-pack to prepare for assigning a number to the AFU The next four instructions (steps 5 to 8) must be completed within the initial five seconds after power-on. 5. Turn on the AFU plug-pack. 6. Lift the handset of the telephone connected to extension A. 7. Dial [*]. 8. Replace the handset. The above four steps (steps 5 to 8) clears the AFU memory (and the LED starts flashing). The AFU is now ready to receive its identity number. 9. Lift the handset of the telephone connected to extension A (no dialtone will be heard) and dial the appropriate one digit identity number for the AFU (using the table on the next page). This assigns the station numbers to both extension port A and extension port B. Page 3-30 AFU Number Extension A Station Number Extension B Station Number 1 9 * 2 0 # Hardware Installation AFU 1 A B AFU 2 A B Station 9 Station # Station * Station 0 10. Replace the handset. The LED lights steadily. The internal dial tone is heard when the handset is lifted. 11. To change the AFU identity number (from AFU 1 to AFU 2 or vice versa), repeat steps 4 to 10 inclusive, as described above. 12. Switch the AFU power OFF then after 20 seconds turn the power ON. This is to ensure correct operation when connected to the Commander i+. System Check To test that the installation is correct, perform an intercom call between the stations that are the greatest bus distance apart. System Programming Once you are sure that all the stations are in working order, it is possible to start the system configuration, as described in Chapter Four - Programming. System Programming Back-up System programming must be backed-up by transferring the data to a second master station if present. This will allow the second master station to take control of the system in the event that the first master station is removed or powered down. System programming back-up can be done by doing a Send Data transfer (refer Chapter Four System Programming) for stations of the Commander i+ Product Service Manual - Issue 2 Page 3-31 Hardware Installation same type. That is, Commander i to Commander i (phase 1 to phase 1) or Commander i+ to Commander i+ (phase 2 to phase 2). Note: Only Master stations of the same software version number should perform the Send Data operation otherwise corrupted programming data may occur. If the system has different versions of master stations then observe the following procedure. • Disconnect master station number 1 from the system. • Wait approximately 20 seconds for the second master station to take over the system control. • Enter programme mode (from any station). • Programme all customer data (eg, speed dial, barring, ring assignments, number of lines, stations, AFU ports etc.). • Turn the power off • Re-connect master station number 1. • Power the system on. Moving Office The Commander i+ system allows users to easily re-locate individual stations or the entire system to a different location without the need for difficult and time consuming re-programming or re-wiring. This is made possible by permanently storing the configuration of the system in the Master station using non-volatile memory(EEPROM). If a user moves to a different office, all that is necessary is to unplug the station and take it to the new location. When plugged in at the new location, the keystation will retain its original identity (ie. DSS key number), all of the programmed settings, the ten Personal Speed Dial numbers and also the One-Touch Speed Dial numbers stored for that keystation. The other users on the system will not notice any difference in system (DSS) operation. When moving a Master station the exchange connections will also need to be moved. If the whole system is to be moved to a new office location, the two wire bus and the permanent programming memory enables the system simply to be picked up and plugged in at the new site with minimal effort. Page 3-32 Chapter Four Programming Chapter Four Programming Overview The configuration of the system is accessible from any connected keystation. There are three levels of programming available. • USER Programming - sets individual station options • ADMINISTRATION Programming - sets system options and features. • INSTALLATION Programming - configures the system. For a full list of default programming settings, refer to Appendix B, Factory Default Values. Passwords There are three passwords for the three different levels of programming: • USER Programming Default Value = 0000. • ADMINISTRATION Programming Default Value = 0000. • INSTALLATION Programming Default Value = 6990. The installation password can be used to also access the administration programming. If the USER password is forgotten, you can reset it to the factory default value by carrying out the appropriate Administration Programming procedure (07a User Password Reset). You can then dial a new user password via User Programming (05u Password). If the Administration password is forgotten, then the installation password can be used to enter administration programming. You can set a new administration password using sub-menu 08a Admin Password. If the Installation password is lost, perform a ‘memory clear’ on master station 1. All programming information will return to the factory default settings and will need to be reprogrammed. Commander i+ Product Service Manual - Issue 2 Page 4-1 Programming Programming Keys The keys used during configuration are: • [i] Program key, used to enter the configuration mode, confirm menu options taken and also to confirm selected items. • [RLS] Used as an escape key. • [1 - #] Keypad, used for dialling telephone numbers, selecting stations for intercom calls, selecting speed-dial numbers (0 - 30) and for entering numbers when in configuration mode. The * and # keys are used to scroll backwards and forwards through the main menu and submenus. They are also used in systems of more than eight stations, for making intercom calls to station numbers 10 and 12 respectively. • [RECALL] Used to insert Hookflash in repertory numbers. • [REDIAL] Used to insert Pause in repertory numbers. Memory Clear The memory of any keystation can be cleared from the keystation’s diagnostic menu. If you reset the memory on master station 1 all system programming will be reset to the factory default values. If you reset the memory on standard keystations then the standard keystation’s personal speed dial numbers will be cleared. There are two methods of entering diagnostic mode: • Method 1 From installation programming - 19i Keystation Diagnostics • Method 2 By powering up the keystation while pressing the [i] key. To clear the keystation memory: • Dial 3 to step through the diagnostic menus until the following display is shown. 1:NumClr 2:MemClr 3> • Dial 2 to clear the keystation’s memory. Page 4-2 Programming Menus If you press [i], the keystation is placed in configuration mode and the display shows the first menu (01: Repertory). With the [*] and [#] keys you can scroll backwards and forwards through the main menu items: 01: Repertory 02: Lock Enable/Disable 03: User 04: Admin 05: Install 06: Night Mode Enable/Disable. Some items are programmable for both Day and Night modes, as indicated on the display (D/N). To program Night configuration, the system must be in Night mode during programming. 01: Repertory This is the main menu in the configuration mode. It enables you to view the 30 stored numbers (ten personal speed dial numbers followed by twenty system speed dial numbers). The Default setting is: Clear • Press [i] The number stored in location 01 is displayed. • Use the [*] and [#] keys to scroll backwards and forwards in the display of the 30 stored numbers. Alternatively you can go directly to a specific location by dialling the two digit address (01 to 30) • Press [RLS] twice to exit the configuration mode. 02: Lock (Enable / Disable ) A keystation can be prevented from making all outside calls other than those numbers in the system speed dial or numbers in the common allowed numbers list (07i). The Default setting is: Lock Disable • Press [i] twice This causes the locking status of the keystation to change. If the keystation was already locked, the User, Administration or Installation password is required before the keystation is permitted to be unlocked. You can exit this Main menu item by pressing [RLS]. Commander i+ Product Service Manual - Issue 2 Page 4-3 Programming 03: User Programming The following programming procedures are pertinent only to the specific keystation on which you are operating. For full details on User Programming refer to the System User Guide. • Press [i] to access the User sub menus. To scroll up and down the sub menus, use the [*] and [#] keys. Alternatively, dial the sub menu number (01 - 06). 01u Personal Speed Dial Numbers Each keystation can be programmed with up to ten ‘Personal Speed Dial’ numbers. The Default setting is: No numbers stored • Press [i] and the first stored number is displayed. • Select the desired location (01 - 10) by dialling the number or by using the [*] and [#] keys to scroll backwards and forwards. • Press [i] to display the > Prompt. • Dial the number to be stored and confirm by pressing [i]. A pause can be stored by pressing [REDIAL]. A hookflash can be stored by pressing [RECALL]. 02u One-Touch Speed Dial Numbers Every DSS key except your own and any unused line key can be programmed to store a ‘One-Touch Speed Dial’ number. The Default setting is: Clear • Press [i] and the contents of the first register [DSS1] is displayed. • Select the desired location (01 - 11) by dialling the number or by using the [*] and [#] keys to scroll backwards and forwards. Note: Locations 01 through 08 correspond to [DSS1] to [DSS8]; locations 09 through 11 correspond to lines 2, 3 and 4. • Press [i] to display the > Prompt. Page 4-4 Programming • Dial the number to be stored and confirm by pressing [i]. 03u Headset Enable/Disable • Press [i] twice to enable (if disabled) or disable (if enabled) the Headset operation. The Default setting is: Disable 04u Paging Enable/Disable • Press [i] twice to enable (if disabled) or disable (if enabled) the receipt of paging calls. The Default setting is: Enable 05u Password The Default setting for the user password is: 0000 • Press [i] to display the > prompt. • Dial the four digit current user password. • Dial the new password and confirm by pressing [i]. • Press [RLS] to exit from the User main menu. 06u Call Waiting Enable/Disable This option is only available for the Commander i+ system • Press [i] twice to enable (if disabled) or disable (if enabled) the Call Waiting setting. The Default setting is: Enable Note: It is not recommended to disable call waiting when single line telephones are used as AFU extensions. Calls initiated from single line telephones will not receive busy tone when the called party is on another call. When call waiting is disabled by the called party they only receive visual indication of the incoming call. Commander i+ Product Service Manual - Issue 2 Page 4-5 Programming 04: Administration Programming The following procedures are to be undertaken by the System Administrator, as access is only made available upon entry of the administration password. For full details on Administration Programming please refer to the System User Guide. To Gain Access to the Administration Sub Menus: • Press [i]. • Dial the four digit Administration password and press [i]. The first sub menu is displayed. If the password is incorrect, the Admin menu is displayed. Press [i] and re-enter the correct password or press [RLS] to exit. • To scroll up and down the sub menus use the [*] and [#] keys. Alternatively, dial the sub menu number. 01a Set Time The Default setting is: Clear • Press [i] to display the > prompt. • Dial the time in twenty-four hour format, using four digits (two for the hour followed by two for the minutes). • Press [i] to confirm the new time. 02a System Speed Dial The Default setting is: Clear A maximum of twenty system speed dial telephone numbers may be stored. These can be accessed by any station. • Press [i] and the first stored number is displayed. • Select the desired location (11 - 30) by dialling the number or by using the [*] and [#] keys to scroll backwards and forwards. • Press [i] to display the > prompt. • Dial the number to be stored and press [i] to confirm. A pause can be stored by pressing [REDIAL]. A hookflash can be stored by pressing [RECALL]. Page 4-6 Programming 03a PSTN Line Access (Day/Night) A PSTN line access status is allocated to each station, one for each available line. This procedure is to be carried out for both day and night modes of operation. There are three line access status values: 0 1 2 Fully Restricted Access Semi Restricted Access (incoming calls only) No Restriction The Default setting for all 4 lines, Day and Night is: 222222222222 • Press [i] and the line access restrictions programmed for line 01 are displayed for each of the 12 extensions. • Select the desired line (01 - 04) by dialling the number or by using the [*] and [#] keys to scroll backwards and forwards. • Press [i] to display the > prompt. • Dial the appropriate settings for the twelve stations for the selected line number. You must enter a value for all twelve, even though there may be fewer stations connected to the system. • Press [i] to confirm the new setting. Note: The system must be in night mode to programme the night mode settings. 04a Station Call Barring Class (Day/Night) Every station is assigned a call barring status. This operation is to be carried out for both day and night modes of operation. There are five call barring classes: 0 No Barring. 1 Barred only to ISD prefixes (04i). 2 Barred to ISD prefixes (04i), STD prefixes (05i), but specified mobiles (06i) and common allowed prefixes (07i) are allowed. 3 Barred to ISD prefixes (06i) STD prefixes (05i) and mobile prefixes (06i), but specified common allowed prefixes (07i) are allowed. 4 Only specified common allowed prefixes (07i) are allowed. Commander i+ Product Service Manual - Issue 2 Page 4-7 Programming The Default setting for Day and Night at all twelve stations is: 0 • Press [i] and the Station Class programmed for Station 1 is displayed. • Select the desired station (01 - 12) by dialling the number or by using the [*] and [#] keys to scroll backwards and forwards. • Press [i] to display the > prompt. • Dial the appropriate call barring class for the selected station. • Press [i] to confirm the setting. Note: The system must be in night mode to programme the night mode settings. 05a DSS Extension Display This facility allows you to allocate a station number to a particular DSS key and / or intercom number. Normally, station 1 is allocated to [DSS1], station 2 to [DSS2] and so on, with station 12 allocated to the [#] intercom number. The Default setting is: 123456789*0#- Stations 1 to 8 are assigned to [DSS1] to [DSS8] and stations 9, [*], 0 and [#] have intercom call numbers of 9, [*], 0 and [#] respectively. Note: the intercom call number is determined by this programming. • Press [i] to display the > prompt. • Dial the DSS and Intercom Call Number allocations in station number sequence. You must enter all twelve DSS identifiers (1 - #), even though there may be fewer than twelve stations in the system. • Press [i] to confirm. The station number retains the same value originally assigned at startup for each programming procedure (eg. the original station number will be used for programming the line access, station call barring, Door Station enabling and for resetting the user password). The intercom call number is changed accordingly. Note 1: Station Number = Number originally assigned at start-up to each terminal (keystation or AFU extension). Note 2: Internal/Intercom Call Number = Number to be dialled to call Page 4-8 Programming the terminal (keystation or AFU extension). Note 3: DSS = Key corresponding to the first 8 Internal/Intercom Call Numbers. 06a Send Data This sub menu is used to transmit all system data from the Master station number 1 to the second Master station if equipped. This operation is for configuration backup only and can be initiated from any keystation. It takes 30 - 45 seconds to complete the process. The Default setting is: Not Applicable • Press [i] to initiate the sending of the data. Note: Only Master stations of the same software version number should perform this operation otherwise corrupted programming data may occur. The software version of the station can be checked from the diagnostic menu (19i). 07a User Password Reset The user password for a particular keystation can be reset to the default value. The Default setting is: Not Applicable • Press [i] to display the > prompt. • Dial the original station number to be reset (1 - 8). • Press [i] to confirm. 08a Admin Password The administration password can be changed at any time. The Default setting is: 0000 • Press [i] to display the > prompt. • Dial the new four digit administration password. • Press [i] to confirm. Commander i+ Product Service Manual - Issue 2 Page 4-9 Programming 09a Ring Mode PSTN (Day/Night) The ring mode for the PSTN lines is set for each station. There can be different ring modes for day and night modes of operation. The Default setting for Day and Night is: 111111111111 • Press [i] and the Ring Mode programmed for line 1 is displayed. • Select the desired line number (01 - 04) by dialling the number or by using the [*] and [#] keys to scroll backwards and forwards. • Press [i] to display the > Prompt. • Dial the desired Ring Mode on the selected line, according to the following options: 1. Immediate Ring 2. Delayed Ring (10 seconds) 3. Ring Excluded. • Press [i] to confirm the Ring Mode. WARNING: Be careful to avoid ring disabling or delaying for all stations for the same line. Note: The system must be in night mode to programme the night mode settings. 10a Remote Report This facility displays the date and time of the last remote maintenance session. In addition, the number of remote maintenance sessions performed to date is also displayed The Default setting for Remote Report is: Not Applicable. The number of remote maintenance sessions is displayed. After approximately three seconds the display shows the time and date of the last remote maintenance session. Page 4-10 Programming 11a Serial Number A remote maintenance serial number may be allocated to the system by the Telstra Commander Remote Access Centre. After approximately three seconds the serial number will be displayed. The Default setting for Serial number is: Not Applicable. 12a Hold Reminder Time (Day / Night ) This option is only available for the Commander i+ system The length of time a call is on common hold or exclusive hold before the call rings back at the holding station is programmable. There can be different hold reminder times for day and night modes of operation. There are four possible settings. • Press [i] to display the > prompt • Dial 1, 2, 3 or 4 to select the hold reminder time 1 2 3 4 30 seconds 60 second 90 seconds 120 seconds • Press [i] to confirm. The Default setting for hold reminder time, Day and Night is: 2 - 60 seconds. Note: The system must be in night mode to programme the night mode settings. Commander i+ Product Service Manual - Issue 2 Page 4-11 Programming 05: Installation Programming The following procedures can only be carried out after the installation password is entered. To Gain Access to the Installation Sub Menus: • Press [i] • Dial the four digit Installation password and press [i] to confirm. The first Installation sub menu is displayed • To scroll up and down the sub menus use the [*] and [#] keys. Alternatively, dial the sub menu number (01 - 19). 01i Number of Stations The current number of master and standard keystations connected to the system is displayed. This does not include any standard tone telephone devices connected to AFUs. The Default setting is: 8 To Change the Number of Stations: • Press [i] to display the > prompt. • Dial the number of stations assigned to DSS keys. • Press [i] to confirm. If the number dialled is less than 8, all icons for any unassigned DSS Keys are deactivated. Conversely, if the number of assigned stations dialled is greater than the number of stations actually installed, then all icons for the excess DSS keys are activated. 02i Number of AFU Ports The current number of AFU Ports connected to standard tone telephone devices is displayed. The Default setting is: 4 To change the Number of AFU Ports: • Press [i] to display the > prompt. • Dial the number of AFUs ports 0 No AFU ports (No AFUs) Page 4-12 Programming 2 4 Two AFU ports (1 AFU only) Four AFU ports (2 AFUs) • Press [i] to confirm. 03i Number of External PSTN Lines The current number of external PSTN lines connected to the system is displayed. The Default setting is: 4 To change this number: • Press [i] to display the > prompt. • Dial the number of external lines connected to the system. • Press [i] to confirm. The maximum number of simultaneous conversations on the system bus is 5 (4 external and 1 intercom, or 2 external and 3 intercom). The correct setting of External Lines is therefore important as each external line reduces the number of simultaneous intercom conversations. 04i Barred ISD Prefixes Ten ISD and high charge information prefixes can be stored on the system. Any station that is assigned a Call Barring Class of 1, 2 or 3 will be barred from calling these prefixes (note that Call Barring Class 4 only permits calls to be made to common allowed prefixes). Note: Station call barring class is assigned in administration programming - 04a. The Default prefixes are: 001, 14, 19, 0101, 0055, 009, *, 12 • Press [i] to display the first stored ISD prefix. • Select the desired ISD prefix location (01 - 10) by dialling the number or by using the [*] and [#] keys to scroll backwards and forwards. • Press [i] to display the > prompt. • Dial the appropriate ISD prefix for the selected location. Commander i+ Product Service Manual - Issue 2 Page 4-13 Programming Each prefix can be up to four digits. • Press [i] to confirm the setting. 05i Barred STD Prefixes Ten STD prefixes can be stored on the system. Any station that is assigned a Call Barring Class of 2 or 3 will be barred from calling these prefixes (note that Call Barring Class 4 only permits calls to be made to common allowed prefixes). Note: Station call barring class is assigned in administration programming - 04a. The Default prefixes are: 0 • Press [i] to display the first stored STD prefix. • Select the desired STD prefix location (01 - 10) by dialling the number or by using the [*] and [#] keys to scroll backwards and forwards. • Press [i] to display the > prompt. • Dial the appropriate STD prefix for the selected location. Each prefix can be up to four digits. • Press [i] to confirm the setting. 06i Mobiles Prefixes Ten Mobiles prefixes can be stored on the system. These prefixes are to be considered as barring prefixes for stations with a Call Barring Class 3, but allowed prefixes for stations with a Call Barring Class 1 and 2. Note: Station call barring class is assigned in administration programming - 04a. The Default prefixes are: 041, 018, 019, 015, 014, 017 • Press [i] to display the first stored Mobiles prefix. • Select the desired Mobiles prefix location (01 - 10) by dialling the number or by using the [*] and [#] keys to scroll backwards and forwards. • Press [i] to display the > prompt. Page 4-14 Programming • Dial the appropriate Mobiles prefix for the selected location. Each prefix can be up to four digits. • Press [i] to confirm the setting. 07i Common Allowed Prefixes Eight Common Allowed prefixes can be stored on the system. These prefixes are to be considered as the only allowed prefixes for stations with a Call Barring Class 4, and allowed prefixes for stations with a Call Barring Class 1, 2 or 3. Note: Station call barring class is assigned in administration programming - 04a. The Default prefixes are: 1800, 013, 13, 016, 1100 • Press [i] to display the first stored Common Allowed prefix. • Select the desired Common Allowed prefix location (01 - 08) by dialling the number or by using the [*] and [#] keys to scroll backwards and forwards. • Press [i] to display the > prompt. • Dial the appropriate Common Allowed prefix for the selected location. Each prefix can be up to four digits. • Press [i] to confirm the setting. Note: Already included in this table are the prefixes 000 and 1144. These are ‘masked’ prefixes and cannot be modified. 08i PSTN Line Settings The settings for each of the PSTN lines (maximum four) is required to be programmed. The Default settings for all four lines are: 101100 • Press [i] to display the values of the settings for the first line. • Select a line (01 - 04) by dialling the number or by using the [*] and [#] keys to scroll backwards and forwards. • Press [i] to display the > prompt. Commander i+ Product Service Manual - Issue 2 Page 4-15 Programming • Dial the appropriate digits for the selected line. POS MEANING OPTIONS 1 Dial Mode 0 : Pulse 1 : Tone 2 Connect to 0 : Exchange 1 : PABX 3 Balance Impedance 0 : Long Line 1 : Short Line 4 Gain setting 0 : High 1 : Low 5 Parallel Station ① 0 : No detection 1 : Yes detection 6 Hook-Flash 0 : 110 ms/ 1 : 270 ms/ 2 : 450 ms/ 3 : 700 ms ① Select ‘1’ if a data terminal or fax is in parallel with the external line. This will prevent the Commander i/i+ system from seizing the shared line when the data terminal or fax is using the line. • Press [i] to confirm the setting. 09i PABX Access Digit Two single digit PABX access codes can be assigned. The Default setting for both locations is: 0 • Press [i] to display the first of two PABX access digits. • Select the desired access digit location (01 or 02) by dialling the number or by using the [*] and [#] keys to scroll backwards and forwards. • Press [i] to display the > prompt. • Dial the appropriate digit (any dial key digit) for the selected PABX access digit. • Press [i] to confirm the setting. 10i Music on Hold Source There are three types of sound that can be transmitted on held PSTN lines; Simple Tone (I), Internal Music (M) and External Music Source (E). The letter corresponding to the existing selection is displayed. The Default setting is: 1 (Simple tone) Page 4-16 Programming • Press [i] to display the > prompt. • Dial 1, 2 or 3 to select the desired type of Music on Hold. 1 Simple Tone 2 Internal Music - 32 seconds of continuous digitised music 3 External Music Source • Press [i] to confirm. The new setting will be displayed. If internal music is selected then the Music on Hold daughter board must be installed on Master station 1 for lines 1 and 2, and Master station 2 for lines 3 and 4. Similarly, if external music source is selected then the external music source must be connected to Master station 1 for lines 1 and 2, and Master station 2 for lines 3 and 4. 11i Install Password This sub menu is used to change the installation password. The Default setting is: 6990 • Press [i] to display the > prompt. • Dial the new four digit installation password. • Press [i] to confirm. If the installation password is forgotten then the master station 1 will need to be cleared to reset the password back to its factory default setting. All other programming will also be reset back to its factory default settings and will need to be reprogrammed. 12i Door Station (Day/Night) The display shows which stations are able to receive calls from the Door Station. The settings for all twelve stations are displayed. These can be different for Day and Night modes of operation. The Default setting is: 111111111111 (Day and Night) • Press [i] to display the > prompt. • Dial one digit for each of the twelve stations (even though there may not be twelve stations in the system), from station 1 through to Commander i+ Product Service Manual - Issue 2 Page 4-17 Programming station 12. 0 1 = = Disabled Enabled • Press [i] to confirm. The new settings will be displayed. Note: The system must be in night mode to programme the night mode settings. 13i Devices (Fax, Answering Machine, Door Station) This sub menu is used to define the AFU ports used for fax switch operation and the AFU ports used for connection of the Door Station / External Paging Interface The existing assignments, where appropriate, are displayed. Note: The fax switch option requires the i+ AFU which has not been formally released by Telstra at the time of publication. AFU 1 A B AFU 2 A B Station 9 Station # Station * Station 0 The Default setting is: Not Applicable • Press [i] to display the > prompt. • Dial up to three characters, as per the following table. Press another digit (eg. ‘6’), to register a blank. Page 4-18 Programming Character Position Meaning Assignment of internal number AFU 1 AFU 2 1-F FAX * # 2-A Answering Machine 9 0 3-D Door Station / External Paging * # • Press [i] to confirm. The new settings are displayed. For setting fax switch operation the answering machine and facsimile machine must be connected to the same AFU with the answering machine connected to extension A of the AFU and the facsimile machine connected to extension B of the AFU. Door station / External paging interfaces must be connected to extension B of the AFU. Example 1: To set up a fax switch on AFU 1 (only available on i+ AFU) and a door station on AFU 2 then the following is programmed; F A D Dialled * 9 # Displayed * 9 # Example 2: To set up only a door station / external paging interface on AFU 1 then the following is programmed; Dialled Displayed F A D 6 6 * * 14i Interdigit TimeOut This is the time-out that defines the end of dialling to the outside line from a telephone set connected to an AFU. When this time has elapsed, (in case the external line is decadic) the external dialling is stopped and Commander i+ Product Service Manual - Issue 2 Page 4-19 Programming the AFU becomes fully transparent to the DTMF dialling from the telephone terminal. This can allow, for example, a continuation of outside DTMF dialling in transparent mode. The display shows the current time-out in seconds (three digits). The Default setting is: 010 • Press [i] to display the > prompt . • Dial the desired timeout in seconds (you must enter three digits). • Press [i] to confirm. The latest setting will be displayed. 15i Timer Door Opener This is the time interval during which the Door Unlock (Opener) interface remains operational, after the Door Unlock (Opener) command has been given. The display shows the current time interval in seconds (two digits), but the value is normally set to four or five seconds. The Default setting is: 05 • Press [i] to display the > prompt. • Dial the desired time interval in seconds (you must enter two digits). • Press [i] to confirm. The latest setting will be displayed. 16i Type Door Opener This setting is used to select the type of door unlock (opener) interface used with the system. Only one type of door opener is available for the system and therefore this setting does not need to be changed. The Default setting is: 0 and should not be changed • Press [i] to display the > prompt. • Dial 0 for Commander i /i+ type only - do not change this setting. • Press [i] to confirm. The latest setting will be displayed. Setting 1 is only used in Europe. Page 4-20 Programming 17i Data Connection This setting is used when connecting ‘non-voice’ terminals to the AFU interfaces. With such terminals (eg. Fax, modem) the DTMF Dialling is fully transparent from the outset (no interdigit timeout is set) and no intermediate tones are transmitted in case there are incoming calls on other lines during a conversation. The display shows which AFU terminals are categorised as ‘non-voice’ terminals. The settings for all four terminals are displayed. The Default setting is: 0000 • Press [i] to display the > prompt. • Dial one digit for each of the four terminals (even though there may not be four terminals in the system), from 9 through to #. 0 1 = = Voice terminal Non-voice terminal • Press [i] to confirm. The latest setting will be displayed. 18i AFU Software Version The display shows the current version of the AFU software . The Default setting is: Not Applicable. 19i Keystation Diagnostics Diagnostics can be run on any keystation. During the test sequence, the keystation is isolated from the system bus. Entering this menu on Master station number 1 will reset the system clock. Note: Another way to run Diagnostics is by pressing [i] and connecting the system bus line cord. The Default setting is: Not Applicable • Press [i] to display the start-up condition of the test sequence. Whilst the keystation is in diagnostics mode, the LED will light with two colours simultaneously (red and green). There are six display menus that comprise the Keystation Diagnostic Test Sequence. Commander i+ Product Service Manual - Issue 2 Page 4-21 Programming To Test Displays and Keyboard Keys: • Dial 1 to test the Display and Icons. All Icons and segments are activated for about two seconds. • Dial 2 to test the keyboard. Dial every key on the keyboard. Each key pressed is shown with a corresponding character on the Display. • Press [i]. The character ‘p’ is shown for a few seconds, after which the diagnostic menu is re-displayed. • Dial 3 to go to the next diagnostic menu or press [RLS] to exit from the Diagnostic Test Sequence. To Test Handset and Handsfree Microphones: • Dial 1 to test the handset microphone. The voice level is indicated by the number of squares shown on the display. • Dial 2 to test the Handsfree microphone. As above, the voice level is indicated by the number of squares shown on the display. • Press [i] to return to the original display. • Dial 3 to go to the next diagnostic menu or press [RLS] to exit from the Diagnostic Test Sequence. To Test Speaker and Music On Hold: • Dial 1 to test the Speaker with the current ringing melody. • Dial 2 to test the Internal Music on Hold (MOH). This menu selection appears only if you are performing this test on a Master station. • Dial 3 to go to the next diagnostic menu or press [RLS] to exit from the Diagnostic Test Sequence. To Test Bus Controller and Non Volatile Memory: • Dial 1 to test the Bus controller. Bus Free Page 4-22 Bus controller OK Programming At least one of the other stations on the bus is a master station. Bus Free Bus Controller OK There is no other station on the bus that is a master station. Bus Malfunction Bus Controller faulty. • Dial 2 to test the internal non volatile memory (EEPROM). Memory status, station type and station number are displayed. For example, OK Master 1 for a master station number 1 or OK basic 3 for standard station number 3. Memory Status OK - internal memory OK. Clear - all programming in the station is factory default. NOK - memory error. • Dial 3 to go to the next diagnostic menu or press [RLS] to exit from the Diagnostic Test Sequence. To Clear the Station Number and Reset Non Volatile Memory: • Dial 1 to clear the station number. The new station number will be requested when you exit the test phase. • Dial 2 to reset the internal non volatile memory EEPROM and recover the default configuration. For a standard station, only the personal speed dial numbers will be cleared. • Dial 3 to go to the next menu or press [RLS] to exit from the Diagnostic Test Sequence To Display Station Software Version : This display menu displays the station software version. • Dial 3 to return to the first Diagnostic menu or press [RLS] to exit from the Diagnostic Test Sequence. 20i Help Desk ID This facility allows the phone number of the Telstra Commander Remote Access Centre to be entered.. This permits the Commander i+ system to automatically answer incoming calls from the Telstra Commander Remote Access Centre. Commander i+ Product Service Manual - Issue 2 Page 4-23 Programming Note: The ability for the Commander i+ to automatically answer calls from the Telstra Commander Remote Access Centre is currently not available. The Default setting is: Clear • Press [i] to display the > prompt. • Dial the phone number of the Telstra Commander Remote Access Centre. The phone number can display the wild card character ‘*’. The wild card character matches any single digit in the number thus allowing a range of line numbers to be used for calling into the system. • Press [i] to confirm the number. 06: Night Status (Enable/Disable ) The Night Status allows one system to have a different set of call distribution and station configuration for night-time operation. It is generally used for after hours operation, or whenever the office is not staffed. The current setting is displayed. The Default setting is: Night Disable (or Day mode) • Press [i] to enable/disable Night Status. A password is required. It can be the User, Administration or Installation password. • Dial a four digit password. • Press [i] to confirm change of status. The latest status will be displayed. • Press [RLS] to exit this main menu item. Page 4-24 Programming AFU Programming Summary For every AFU you may modify a number of items. These are under the control of the Commander i+ Administration and Installation configuration menus, and are listed below. For full details on the programming procedures and default values, refer to Administration Programming and Installation Programming in this manual. The items marked ‘Day / Night’ are to be configured for both Day and Night modes of operation. Administration Menu 02a System Speed Dial Twenty numbers, each with a maximum of 24 digits. 03a Line Access (Day / Night) Unrestricted, Semi-Restricted (incoming calls only), Restricted 04a Station Class (Day / Night) No Barring (Class 0), Barring (Class 1 - 4) 05a DSS Assign the station number (9, 0, *, #) to the DSS keys or to other intercom numbers 09a Ring Mode (Day / Night) Immediate Ring, Delayed Ring (10 seconds), Ring Excluded. Installation Menu 02i Number of AFU ports Sets the number of AFU ports (2 per AFU). 12i Door Station (Day / Night) Enable or Disable incoming calls from the Door Station. 13i Devices Assign the AFU ports for fax / answering machine switch operation and / or door station operation. 14i Interdigit Time-Out Sets the interdigit time-out to stop external dialling when the external line is decadic (maximum 999 seconds). 15i Timer Door Opener Sets the duration of the door-opener signal (maximum 99 seconds). 17i Data Connections This setting allows for no-tones / no-interruptions communication from non-voice terminals (eg. Fax, modems). 18i AFU Software This setting allows for no-tones / no-interruptions communication from non-voice terminals (eg. Fax, modems). Commander i+ Product Service Manual - Issue 2 Page 4-25 Chapter Five Commander Customer Training Chapter Five Commander User Training Strategy Background Commander user training has been a service strategy deployed by Telstra to create value to the customer on purchasing their system. Traditionally this training has been delivered by customer trainers either on site or in a classroom environment for larger Commander systems and by technicians for the smaller systems. In 1993 research conducted by Telstra, revealed that the customers want their staff to be able to work the system immediately after installation, They only wanted 15-30 minutes training which covered the basic facilities of the phone. Technicians were considered by the customer, as the ideal person to show customers how to use their system. Training individually or in small groups on their premises were seen as more convenient for our customers. Customers were willing to pay for any additional training required after that. The launch of the Commander NT in 1996 saw the Technicians conducting basic user and system administrator training to both Commercial and Corporate customers. Because of the Commander i+ simplicity, this was expanded to cover all aspects of customer training on the Commander i+ keysystem and peripheral equipment. Strategy Commander customer training is designed to enable the customer to be able to use their Commander system from the time of installation. The customer training policy outlined will support the Commander strategy of the system being easy to use, confirm the customer's buying decision, give added value to Commander, provide business benefits to the customer and also encourage usage of Telstra's network. Technicians and/or Customer trainers (where available) will provide tailor made customer training packages according to the customers requirements on complex Commander CPE while Field Technicians only will provide the total customer training package for the Commander i. Commander i+ Product Service Manual - Issue 2 Page 5-1 Customer Training Commander i+ User Training Policy Installation At the time of installation a user training session will be conducted by the technician to ensure the customer can use their Commander i+ system after installation. The customer will be given free "basic" user training as outlined in this document. Post Initial Training Support Any queries relating to the Commander user training can be referred to the Telstra Commander Remote Access Centre - 1800 809 882, Basic Customer Training Comparison for NT & i Commander CPE NT132 & NT40 Core System System Admin Training i408 Core System Approx. 45 min. Approx 20 mins. Using the System Administration Manual guide the system administrator through programming. Give as much hands on training as possible. Using the System Administration Manual guide the system administrator through programming. Give as much hands on training as possible. Approx 20 minutes Train the System Admin to train end users End User Training Page 5-2 Use the keystation feature card and user card as the familiarisation template. Inclusive in time allocation for System Administration Training Approx 5 minutes per user Approx 5 minutes per user Use the keystation feature card and user card as the familiarisation template. Give as much hands on training as possible. Use the Quick Reference Card as the familiarisation template. Give as much hands on training as possible. Customer Training System Administrator Training Core System Administrator Training • Outline the role and responsibilities of the System Administrator. • Passwords ⇒ demonstrate the method of accessing Administrator programming. ⇒ demonstrate the method of entering and exiting the Administrator programming mode. ⇒ changing the System Administration Password ⇒ how to reset user password • Enter into the ADMIN program ⇒ show the programming categories available. ⇒ how to change time settings ⇒ show example of setting up speed dial ⇒ how to initiate station call baring (class of service) ⇒ Exchange line ring assignments ⇒ night service activation / deactivation Note Give the system administrator as much hands on as is possible in the given time window. Also allow time for questions regarding programming and the System Administration manual. Training the System Administrator to coach terminal users Using the key station feature card and user card as the familiarisation template and: • demonstrate the different ICONS Commander i+ Product Service Manual - Issue 2 Page 5-3 Customer Training • explain and demonstrate RING TYPES and RING VOLUMES • demonstrate the methods of making outgoing calls • demonstrate methods of answering incoming calls • explain and demonstrate HOLD and EXCLUSIVE HOLD. • demonstrate TRANSFER of calls by various means. • demonstrate HANDSFREE facility. • demonstrate using SYSTEM SPEED DIAL and how to programme PERSONAL SPEED DIAL • demonstrate how to program information under feature keys Customer ‘End User’ Training As you commission each extension , where the end users are available, show them the key station user guide and feature card. Cover how to: • make and receive Internal and External calls • put a call on Hold and Transfer calls. Encourage them to go to their System Administrator for other details. The end user familiarisation can be done in groups of up to 5 (Optional. Depends on the installation required). Hand out the Commander i+ Support Centre card and ensure the System Administrator understands fault reporting and inquiry process with the Telstra Commander Remote Access Centre. Ensure customer ‘end users’ report all faults or enquires to the customer's System Administrator. Additional Customer Training Additional Commander user training (including country areas) requested by the customer can be done by the on-site technician at FFS rates. Additional customer training post installation should be arranged by the customer by contacting the Telstra Commander Remote Access Centre on FREECALL 1800 809 882 or FREEFAX 1800 044 113. Page 5-4 Chapter Six Maintenance and Troubleshooting Chapter Six Maintenance and Troubleshooting Introduction This chapter provides the information necessary to maintain and troubleshoot the Commander i+ key stations and systems. Keystations Symptom Station does not power up (blank displays, keyboard not operational). Likely Causes Faulty plugpack or broken connection to the plugpack. • Check the plugpack wiring and output voltage (8-16 V depending on the mains voltage). Station displays station number only (eg Basic: 4). No connection to the bus. • Check the six wire bus cord, bus wiring and termination. • Check that the master station is connected to the bus and is operating. Station shows incorrect characters on the display eg II:QQ instead of HH: MM. Incorrect resistor termination on station or bus wiring incorrect. • Check the station’s resistor termination. • Check the system bus cabling meets the wiring rules. After assigning a station number on a standard station (station initialisation), station shows blank display. Station number has been already used by another station. • Clear the station number and renumber the station. Number of stations specified in Install menu (01i No. Stations) is less than actual number of keystations connected. • Re-programme 01i No. Stations Station exceeds specified wiring limits. • Check the wiring rules. Commander i+ Product Service Manual - Issue 2 Page 6-1 Trouble Shooting & Maintenance Symptom Likely Causes Standard station originally shows no display, but when unplugged and plugged back in display comes back. Noisy on internal paging. Can not dial another station. Station number has been already used by other station. Icons on second master show different icons when all stations are in idle mode. Upper display shows HH:MM instead of real time. Second master assigned as Master station number 1. • Clear the station number and renumber the station. • Clear the station number and renumber the station. Exchange Lines Symptom Busy tone when a line is selected. Line icon flashes once and then clears. Likely Causes Line not connected. • Check the 8-wire line cords and exchange line wiring. • Check that lines 1 and 2 are connected to master station number 1. Check that lines 3 and 4 are connected to master station number 2. Busy tone when a line is selected. No handset icon displayed. Line not programmed in Install menu 03i (No. Lines:) • Check system programming for Install menu 03i (No. Lines) AFU Symptom AFU green LED does not stop flashing after initialisation procedure Likely Causes Standard telephone is not DTMF (tone) dialling. • Connect tone dialling telephone to the AFU. Standard telephone is connected to port B of AFU. • Connect telephone to port A. Page 6-2 Trouble Shooting & Maintenance Symptom Likely Causes AFU is not connected to system bus. • Check 6-wire bus cord, bus wiring and termination. Analog station connected to AFU selects a Two AFUs in the system initialised with the line after dialling 0 but the line is noisy. same AFU number (eg “1”). • Re-initialise the second AFU and reassign the AFU number to 2. AFU LED lights steadily, but no dial tone present on the analog station connected. Number of AFU ports specified in Install menu (02i No. AFU ports) is less than actual number of ports wired. For example: Number of AFU ports is set to 2 while 2 AFUs are connected (should be set to 4 ports). • Check the system programming 02i No. AFU ports. Master Station Replacement MOH Card If the master station is to be replaced then ensure that any music-onhold daughter boards installed in the master stations are removed and then re-inserted into the replacement master station. The presence of MOH cards can be tested in the Station Diagnostics (19i) for that station. AFU Initialisation If master station number 1 is being replaced then the AFUs should be fully re-initialised after the master station has been replaced. This includes the power off / on sequence. Commander i+ Product Service Manual - Issue 2 Page - 6-3 Appendix A Installation Summary Appendix A Installation Summary - Brief Reminder For Successful Installation Wiring • The length of system bus wiring shall not exceed the length specified in this document. • Correct terminations must be used. Station Connection • Master station number 1 should be initialised first. Initially programming should be left as default. • Station number is to be assigned for each keystation. If unsure of the station number or if concerned that two stations have the same station number, lift the handset on each station - the handset icon will flash next to the DSS key for that station. Another way is to temporarily disconnect all master stations - standard stations would then blink their station number (for example - Basic: 4). If the same station number is used for two stations, then perform a Number Clear and assign the correct number. • Once stations are properly initialised, customise the system as per user needs. • Check that exchange lines can be selected. AFU connection • In Install menu set number of ports (2 for one AFU, 4 for two AFUs). • Connect AFU to the bus. • Standard tone dialling telephone must be connected to port A of AFU to initialise the AFU. • Switch the AFU power ON and within 5 second: • lift the handset. • dial * (green LED is flashing). • hang up (LED is now steady). • Then: • Press 1 for AFU number 1 (extensions 9 and * ) - first AFU. • Press 2 for AFU number 2 (extensions 0 and #) - second AFU. • Switch the AFU power OFF and then after 20 seconds turn the power ON. This is to assure correct operation when connected to the Commander i+. Commander i+ Product Service Manual - Issue 2 Page A - 1 Installation Summary Door Station Connection • In 13i FAD of Install menu enter * in the third position for connection to AFU number 1 or # in the third position for AFU number 2. • Connect the door station to Port B of the AFU. • Test the door station by making and receiving a call to the door station. System Programming Back-Up • Back-up system programming data to a second master station if present. This will allow the second master station to take control of the system in the event that the first master station is removed or powered down. • If master stations are of the same software version then use the Send Data function (refer Chapter Four System Programming). That is, Commander i to Commander i (phase 1 to phase 1) or Commander i+ to Commander i+ (phase 2 to phase 2). Note: Only Master stations of the same software version number should perform the Send Data operation otherwise corrupted programming data may occur. • If the system has different versions of master stations then observe the following procedure. • Disconnect master station number 1 from the system. • Wait approximately 20 seconds for the second master station to take over the system control. • Enter programme mode (from any station). • Programme all customer data (eg, speed dial, barring, ring assignments, number of lines, stations, AFU ports etc.). • Turn the power off. • Re-connect master station number 1. • Power the system on. A-2 Installation Summary Commander i Configuration Diagram Location: MDF Master 1 Master 2 / Standard 2 Standard 3 Standard 4 Standard 5 Standard 6 Standard 7 AFU 1 Standard 8 AFU Bus Wiring Rules - Maximum bus length: 200 metres. - Terminations: 100 ohms at ends of the bus only (2 terminations only). - No more than four keystations / AFUs within any 15 metre segment of cable. - Master stations can be anywhere on the bus. AFU Star Wiring Rules Master Station Number 1 Position Termination Basic Star Master station number 1 located within 60 metres of star centre 200 ohms on the end of every branch longer than 10 metres See Note 1 8 2 See Note 2 AFU 2 Extended Star Master station number 1 located within 10 metres of star centre 200 ohms on the end of every branch longer than 10 metres See Note 1 9 2 See Note 2 Max number of branches Min number of branches longer than 10 metres 150 Max branch length 60 Maximum 400 metres Total sum of all branches See Note 3 2 Max number of units per 2 branch 4 Max number of units 4 within 10 metres of star Note 1: If two units are connected on a branch then only the end unit is terminated. Note 2: There must be at least two branches longer than 10 metres Note 3: If there are 8 branches at 60 metres the total length is 480 m (8 x 60 m = 480 metres) Commander i+ Product Service Manual - Issue 2 Page A - 3 Installation Summary Programming Summary Sheet Administration Programming 02a - System Speed Dial 02a - System Speed Dial 11 21 12 22 13 23 14 24 15 25 16 26 17 27 18 28 19 29 20 30 03a - PSTN Line Access Line 1 2 3 4 Day Night Station Number Station Number 5 6 7 8 9 * 0 # 1 2 3 4 5 6 7 8 9 * 0 # (2) (2) (2) (2) (2) (2) (2) (2) (2) (2) (2) (2) (2) (2) (2) (2) (2) (2) (2) (2) (2) (2) (2) (2) 1 2 3 4 0 - Fully restricted 1 - Semi restricted (incoming calls only) 2 - Unrestricted 04a - Station Call Barring Class 1 2 3 4 Day Night Station Number Station Number 5 6 7 8 9 * 0 # 1 2 3 4 5 6 7 8 9 * 0 # (0) (0) (0) (0) (0) (0) (0) (0) (0) (0) (0) (0) (0) (0) (0) (0) (0) (0) (0) (0) (0) (0) (0) (0) 0 - No Barring 1 - Barred ISD 2 - Barred ISD, STD Default values are shown in brackets. A-4 3 - Barred ISD, STD, mobiles 4 - Common Allowed Numbers only Installation Summary 05a - DSS Extension Display Station Number 1 2 3 4 5 6 7 8 9 * 0 # 09a - PSTN Ring mode Line 1 2 3 4 Day Night Station Number Station Number 5 6 7 8 9 * 0 # 1 2 3 4 5 6 7 8 9 * 0 # (1) (1) (1) (1) (1) (1) (1) (1) (1) (1) (1) (1) (1) (1) (1) (1) (1) (1) (1) (1) (1) (1) (1) (1) 1 2 3 4 1 - Immediate Ring 2 - Delayed Ring 3 - No Ring 12a Hold Reminder Time (2) 1 - 30 seconds 3 - 90 seconds 2 - 60 seconds 4 - 120 seconds Default values are shown in brackets. Commander i+ Product Service Manual - Issue 2 Page A - 5 Installation Summary Installation programming 01i No. of Stations 02i No. of AFU ports 03i No. of PSTN Lines (8) (4) (4) Enter the number of keystations Enter the number of AFU ports Enter the number of PSTN lines 04i Barred ISD Prefixes 05i Barred STD Prefixes 1 (001) 1 2 (14) 3 (0) 06i Mobile Prefixes 07i Common Allowed Prefixes 1 (041) 1 (1800) 2 2 (018) 2 (013) (19) 3 3 (019) 3 (13) 4 (0101) 4 4 (015) 4 (016) 5 (0055) 5 5 (014) 5 (1100) 6 (009) 6 6 (017) 6 7 (*) 7 7 7 8 (12) 8 8 8 9 9 9 10 10 10 08i - PSTN Line Settings Line Dial Mode Connection Balance Imp Gain Setting Parallel Stn Hook Flash (1) (0) (1) (1) (0) (0) 0 - Pulse 0 - Direct 0 - Long 0 - High 0 - No detect 0 - 110 ms 1 - Tone 1 - PABX 1 - Short 1 - Low 1 - Yes detect 1 - 270 ms 1 2 3 4 2 - 450 ms 3 - 700 ms Default values are shown in brackets. A-6 Installation Summary 09i PABX Access Digits 10i PSTN MOH Source 1 (0) 2 (0) (1) 1 - Simple tone Enter the PABX Access Codes 2 - Internal MOH (requires MOH card) 3 - External MOH 12i - Door Station Ring Assignment 1 2 3 4 Day Night Station Number Station Number 5 6 7 8 9 * 0 # 1 2 3 4 5 6 7 8 9 * 0 # (1) (1) (1) (1) (1) (1) (1) (1) (1) (1) (1) (1) (1) (1) (1) (1) (1) (1) (1) (1) (1) (1) (1) (1) 0 - Ring Disabled 13i Devices (Fax, Answering M/C, Door) F A 1 - Ring Enabled 14i Interdigit Timeout 0 - Ring Disabled 15i Timer - Door Opener 16i Type - Door Opener D (10) *-AFU 1 9-AFU 1 *-AFU 1 #-AFU 2 0-AFU 2 #-AFU 2 Enter the timeout in seconds 17i Data Connection AFU Stn 1 - Ring Enabled (5) Enter the time in seconds (0) 0 - Commander i 1 - Do not use 20i Help Desk ID Setting 9 (0) * (0) Enter the telephone 0 (0) number of TCRAC # () (0) 0 = Voice terminal 1 = Non-voice terminal Default values are shown in brackets. Commander i+ Product Service Manual - Issue 2 Page A - 7 Appendix B Factory Default Values Appendix B Factory Default Values Passwords Item Name Default Value User Password 0000 Administration Password 0000 Installation Password 6990 User Programming Item No. Item Name Default Value 01 Repertory View (10 personal and 20 system speed dial numbers) Clear 02 Station Lock (Disable / Enable) Unlock (station can make outside calls) 01u Personal Speed Dial (max 10) Clear 02u User Programmable Key Clear (no one-touch speed-dial numbers) 03u Headset (Enable / Disable) Disable 04u Paging (Enable / Disable) Enable 06u Call Waiting (Enable / Disable) Enable 06 Night Status (Enable / Disable) Disable Administration Programming (04) Item No. Item Name Default Value 01a System Time Clear 02a System Speed Dial (max 20) Clear 03a Line Access (Day / Night) 222222222222 - No line access restriction for all twelve stations on four lines, Day and Night 04a Station Call Barring Class 0 - No call barring for all twelve stations, Day and Night Installation Summary Item No. Item Name Default Value 05a DSS Extension Display 123456789*0# 06a Send Data Not Applicable 07a User Password Reset Not Applicable 08a Admin Password Not Applicable 09a Ring Mode – PSTN (Day / Night) 111111111111 (Day and Night) – Immediate Ring 10a Remote Report Clear 11a Serial Number Clear 12a Hold Reminder Time (Day / Night) 2 – 60 seconds Installation Programming (05) Item No. Item Name Default Value 01i Number of Stations 8 02i Number of AFU Ports 4 03i Number of External PSTN Lines 2 04i Barred ISD Prefixes 001, 14, 19, 0101, 0055, 009, *, 12 05i Barred STD Prefixes 0 06i Mobiles Prefix Table 041, 018, 019, 015, 014, 017 07i Common Allowed Prefixes 1800, 013, 13, 016, 1100 08i PSTN Line Settings 101100 - Tone dial mode, connect to exchange, short line balance impedance, low gain, no detection of parallel device, 110 ms Hookflash for all four lines 09i PABX Access Digit 0 - for both prefix locations 10i Music on Hold Source 1 - Simple tone 12i Door Station Ring Assignment (Day / Night) 111111111111 - Enabled for all twelve stations, Day and Night Commander i+ Product Service Manual - Issue 2 Page A - 3 Item No. Item Name Default Value 13i Devices (Internal Numbers) Clear 14i Interdigit Time-out 010 seconds 15i Timer Door Opener 05 seconds 16i Type Door Station 0 - Commander type (1 - not used in Australia) 17i Data Connection 0000 - Voice connection 18i AFU Software Version Not applicable 19i Keystation Diagnostics Not applicable 20i Help Desk ID Clear Installation Summary Appendix C Commander i+ Serial / Item Numbers Commander i+ Product Service Manual - Issue 2 Page A - 5 Appendix C Commander i+ Serial / Item Numbers Serial/Item Description Alcatel Part No. 749/00001 Station, Master Commander i TS-i412-M 8CF 00058 7104 YY 749/00002 Station, Standard, Commander i TS-i412-S 8CF 00058 7105 YY 749/00003 Station, ISDN Master Commander i+ TS-i412-IM 8CF 00058 7106 YY 749/00004 Station, Door Commander i+ DS-i 8CF 00052 5363 YY 749/00008 Base Unit, Analogue Facilities Unit AFU-i 8CF 00058 7110 YY 749/00009 PBA, Commander i+ CLI 8CF 00058 7111 YY 749/00010 PBA, Commander i+ Internal MOH Card A MOH-A-i 8CF 00058 7112 YY 749/00015 Line Cord, Master Station LC-i-M 8CF 00058 7117 YY 749/00016 Bus Cord, Master & Standard Station LC-i-S 8CF 00058 7118 YY 749/00017 Cord, Handset Commander i+ HC-i 8CF 00058 7119 YY 749/00018 Handset Commander i+ HS-i 8CF 00058 7120 YY 749/00019 Wall Mounting Kit, Commander i+ WMK-i 3AU 30075 AAAA AA 749/00020 Plug Pack, Socket Commander i+ PPS-i 8CF 00058 7162 YY 749/00021 Battery, Station Backup Commander i+ BBU-i 8CF 00058 7163 YY 749/00022 Directory Card, Commander i+ DC-i 8CF 00058 7164 YY 749/00023 Card, DSS Commander i+ DOC-i-DSS 8CF 00058 7165 YY 749/00024 Manual, Station QRC Commander i+ DOC-i-QRC 8CF 00058 7166 YY 749/00025 Manual, System User Guide DOC-i-SUG 8CF 00058 7167 YY 749/00026 Manual, SLT QRC Commander i+ DOC-i-QRSLT 8CF 00058 7168 YY 749/00028 Manual, I&M Commander i+ DOC-i-IM 8CF 00058 7170 YY 749/00030 Manual, PSRM Commander i+ DOC-i-PSRM 8CF 00058 7172 YY 749/00031 Brochure, Sales Commander i+ DOC-i-SB - 749/00032 Poster, Commander i+ DOC-i-PR - 749/00035 AFU User Guide 3AU 30060 AAAA AA 749/00037 Station AC Adaptor, PP-i 8CF 00058 7296 YY 749/00038 Station Bus Terminal Block 8CF 00058 7294 YY 749/00039 Station Line Terminal Block 8CF 00058 7295 YY 749/00040 AFU AC Adaptor, AFU-PP-i 8CF 00058 7293 YY Serial/Item Description Alcatel Part No. 749/00041 DSS Panel - Commander i 8CF 00058 7297 YY 749/00042 Station, Master Commander i+ TS-i412-M 8CF 00058 7325 YY 749/00043 Station, Standard Commander i+ TS-i412-S 8CF 00058 7326 YY 749/00046 Hookswitch Springs 3AU 30069 ABAA AA Appendix D Commander i+ System User Guide Telstra Commander i+ System User Guide Serial Item 749/025 Issue 2 Telstra Commander Remote Access Centre The Telstra Commander Remote Access Centre has been set up by Telstra to help you administer and maintain your Telstra Commander i+. Help Desk Documentation Support The Help Desk is staffed by personnel experienced in all areas of the Commander i+. Call them for support on: If you find any problems with the documentation for this Commander i+ product, please tell us. • fault reporting. • system administration and programming. We want to know if you find any of the following problems: • mistakes in the manual. • user training needs. • any part is hard to understand. • other product support inquiries. • difficulty in locating a subject. • format hard to follow, etc. The staff at Telstra Commander Remote Access Centre are keen to assist. However, please read carefully the documentation provided with the product before calling. To contact the Commander Remote Access Centre: FREECALL 1800 809 882* FREEFAX 1800 044 113* * Calls from a mobile phone are charged at the applicable mobile rate. These numbers are staffed from 8:00 am to 7:00 pm (EST) from Monday to Friday. Table of Contents 1. Getting To Know Your Commander i+.................................. 1-1 Keystation Diagram............................................................................................1-2 Key Description .................................................................................................1-3 Audible Signals..................................................................................................1-4 Choice of Ring Melody / Volume .......................................................................1-4 Handset Receiver Volume Control......................................................................1-4 Call Barring .......................................................................................................1-5 Handsfree / Group Listening ..............................................................................1-5 Visual Signals....................................................................................................1-5 2. Answering Calls ..................................................................... 2-1 Intercom Calls....................................................................................................2-2 Automatic Intercom Answer ...............................................................................2-2 Internal Paging Calls ..........................................................................................2-3 Door Station Calls..............................................................................................2-4 External Calls ....................................................................................................2-4 System Call Waiting ..........................................................................................2-4 3. Making Calls ........................................................................... 3-1 Intercom Calls....................................................................................................3-2 Paging Calls.......................................................................................................3-3 Door Station Calls..............................................................................................3-4 External Calls ....................................................................................................3-4 Last Number Redial...................................................................................3-4 Speed Dialling...........................................................................................3-5 One-Touch Speed Dialling.........................................................................3-6 Remote Maintenance ......................................................................................... 5-5 6. Programming ..........................................................................6-1 Menus ............................................................................................................... 6-2 01 Repertory...................................................................................................... 6-2 02 Keystation Locking ....................................................................................... 6-3 06 Night Status Enable/Disable ......................................................................... 6-4 03 User Programming ........................................................................................ 6-5 01u Personal Speed Dial Numbers............................................................. 6-5 02u One-Touch Speed Dial Numbers......................................................... 6-6 03u Headset Enable/Disable...................................................................... 6-7 04u Paging Enable/Disable........................................................................ 6-7 05u Password ............................................................................................ 6-8 06u Call Waiting Enable/Disable............................................................... 6-9 04 Administration Programming ...................................................................... 6-10 01a Keystation Time ............................................................................... 6-10 02a System Speed Dial Numbers ............................................................. 6-11 03a Line Access - PSTN.......................................................................... 6-12 04a Station Call Barring Class................................................................. 6-13 05a DSS Extension Display..................................................................... 6-14 06a Send Data ......................................................................................... 6-15 07a User Password Reset......................................................................... 6-16 08a Administration Password .................................................................. 6-17 09a Ring Mode - PSTN ........................................................................... 6-18 10a Remote Report.................................................................................. 6-19 11a Serial Number .................................................................................. 6-20 12a Hold Timer ....................................................................................... 6-21 4. Call Handling .......................................................................... 4-1 Holding Calls.....................................................................................................4-2 Inquiry Calls ......................................................................................................4-3 Transferring Calls ..............................................................................................4-4 Conference Calls................................................................................................4-6 FOR SAFETY REASONS, COMMANDER i+ MUST BE INSTALLED BY AUTHORISED SERVICE PERSONNEL IN ACCORDANCE WITH AUSTEL TS009 STANDARD 5. Other Facilities ....................................................................... 5-1 Message Wait ....................................................................................................5-2 PSTN Decadic to Tone Signalling ......................................................................5-3 Do Not Disturb (DND).......................................................................................5-3 Microphone Mute...............................................................................................5-4 Monitor..............................................................................................................5-4 Table of Contents i Commander i+ System User Guide - Issue 2 Table of Contents ii 1. Getting To Know Your Commander i+ Getting To Know Your Commander i Keystation Diagram Key Description ➀LINE Keys ➂ICON Display To access external lines. Unused line keys can be programmed as one-touch speed dial keys. This provides a display of system activities as well as the status of the keystation. For more information, refer to Visual Signals on page 16. ➁FUNCTION Keys RECALL Key To send a hookflash to the line. HOLD Key To put an active line call in common or exclusive hold. 1 2 L1 1 L2 2 L3 3 L4 4 7 6 2 3 A BC D EF 4 5 6 G HI JK L MNO 1 REC ALL 5 H O LD 6 DN D 7 RED IAL 8 VO L+ /- IN T M U TE/AA H F/G L 7 8 9 PQ RS TU V W X YZ 0 # * b) To exit programming mode. c) To release an active call whilst in headset mode of operation. (Do Not Disturb) To block all audible signals for incoming calls. ➄i Key REDIAL Key a) To enter programming mode. a) To automatically redial the last number dialled. b) To confirm programming entries. b) To select one of four ring tones whilst keystation is ringing. LED Lamp (Red-Green) Red Steady - No intercom channel available. Red Flashing - Message wait status. Green Flashing - Visual ring. VOL +/- Key To adjust the speaker, handset and ringing volume. MUTE/AA Key a) To mute the built-in handsfree and handset microphone during a call. HF/GL Key i a) To release an active call whilst in handsfree mode of operation. DND Key b) To activate intercom Automatic Answer. RLS ➃RLS (Release) Key To activate handsfree speaker and group listening facilities. ➅ ➆DIRECT ACCESS Keys These keys have five functions: a) Direct Station Select (DSS) To make an intercom call. b) One-Touch Speed Dial To dial stored numbers. c) INT Key 3 4 5 To make an intercom call. d) Conference Key To start a three-party conference by selecting your own DSS key during enquiry call. e) Page 1-2 Commander i System User Guide - Issue 2 Page To make a paging call by selecting your own DSS key with keystation idle. Message Waiting To leave a message wait indication. Page 1-3 Getting To Know Your Commander i Audible Signals SIGNAL Normal ring Internal ring Recall ring Double chime Two burst tones Single burst tone Single tone repeated Call Barring MEANING External call Intercom call Call on hold for too long or an unanswered transferred call ringing back Incoming Door Phone call Page call - calling station Page call - receiving stations Call waiting Choice of Ring Melody / Volume There are four ring melodies and five ring volume levels available for each keystation. Setting the ring melody and volume is allowed while the keystation is ringing: • Press [REDIAL] to change the ring melody • Press [VOL +/-] to change the ring volume level The most recent settings will remain stored for all subsequent incoming calls. Day and night ring settings are to be made separately. Handset Receiver Volume Control The received volume can be adjusted anytime during a call. • Press [VOL +/-] to change the handset receiver volume level The most recent setting will remain stored for all subsequent calls. The handset receiver volume control operates independently of the ringer volume control. Page 1-4 Each station can be assigned one of five classes of call barring: CLASS # MEANING Class 0 All calls permitted. Class 1 Calls to ISD and info call prefixes barred. Calls to STD, mobile and common allowed prefixes permitted. Class 2 Calls to ISD, STD and info call prefixes barred. Calls to specified mobile and common allowed prefixes permitted. Class 3 Calls to ISD, STD, mobile and info call prefixes barred. Local calls and calls to specified common allowed prefixes permitted. Class 4 Only calls to specified Common Allowed prefixes permitted. The call barring class for each station can be changed at any time by the System Administrator. For more information refer to Administration Programming - 04a Station Call Barring Class, described on page 613. The allowed prefixes for ISD, STD, Mobiles and Common Allowed are set up at the time of installation. For more information refer to the Commander i+ System Installation Manual. Note that the System Speed Dial numbers (see page 6-11) override the Call Barring class set for any station. Handsfree / Group Listening Each keystation is equipped with handsfree and group listening facilities. • Press the [HF/GL] key to switch between handset - handsfree - group listening modes (in that order). In group listening mode, both the handset (for listening and speaking) and the keystation speaker are activated. However, the handsfree microphone is turned off. The three bars next to the [HF/GL] key are lit only in handsfree mode (see page 1-6 for a diagram of icon displays). Commander i System User Guide - Issue 2 Page 1-5 Getting To Know Your Commander i Visual Signals The top display of the Commander i+ provides clock information as well as incoming call indication, active call status, and call duration. It is also used for programming purposes. The icon display provides an instantaneous view of the status of the system as well as the settings of the keystation. The diagram below provides a summary of the icons and explains the meaning of each symbol: line 1 engaged on anotherstation incom ing call on line 2 line 3 on exclusive hold atthis station this station talking on line 4 nightm ode activated D N D activated on this station L1 1 L2 2 L3 3 L4 4 REC ALL 5 H O LD 6 DN D 7 RED IAL 8 current speaker/ handset volum e level VO L + /- IN T transm ission m uted M U TE/AA H F/G L own station off-hook; station in headsetm ode m essage wait from Stn 3 Stn 5 on D N D Stn 6 unplugged this stn talking to Stn 8 incom ing intercom call handsfree activated flashing steady Page 1-6 Commander i System User Guide - Issue 2 Page 1-7 2. Answering Calls Answering Calls Intercom Calls Internal Paging Calls To Answer Intercom Calls Ringing at Your Keystation: • Hear the intercom ring signal. The flashing icons below indicate an intercom call from station number 8. To Answer A Paging Call: • Hear the paging call through keystation speaker. • Lift the handset or, to answer in handsfree, press [HF/GL], [INT] or the [DSS] key of the calling station. 7 REDIAL Announcements can be made through the speakers of idle keystations pre-programmed to receive paging calls. 8 7 VOL + /- INT MUTE/AA HF/GL Stn 8 ringing REDIAL • Lift the handset or, to answer in handsfree, press [HF/GL], [INT] or the [DSS] key of the calling station. Automatic Intercom Answer To Set Your Keystation For Automatic Intercom Answer: • Press [MUTE/AA] while the phone is idle to activate the automatic answer intercom facility. HF/GL Upon receiving an incoming intercom call, the keystation automatically answers and two-way speech is established in handsfree mode. One beep is heard from the speaker before the speech path is connected. Page 2-2 Int Paging VOL + /- INT MUTE/AA HF/GL The icons show a paging call coming from station number 8. Door Station Calls To Answer A Call From The Door Station: • Hear the door station chime. • Lift the handset and speak. VOL + /MUTE/AA 8 • Press [RECALL] to activate the door opener. Door station calls will only chime at keystations programmed to receive them. Commander i System User Guide - Issue 2 Page 2-3 Answering Calls External Calls To Answer An External Call: • Hear the incoming ring signal • Lift the handset of the ringing station or lift the handset and press flashing line key of another station. The icon shows an incoming call on line 1. L1 1 PSTN System: L2 2 Line 1 ringing L3 3 4 Each station can be programmed to have an instant ring, delayed ring or no ring signal for any of the available lines. However, the ring mode setting does not affect the ability of a station to answer an incoming call. For more information on the ring mode settings refer to Administration Programming - 09a Ring Mode - PSTN on page 6-18. System Call Waiting Call Waiting is available on the system for both internal and external calls. A short tone burst is heard every twenty seconds if you are already busy on a call and another incoming call arrives at your station. Each keystation can be programmed to enable or disable the call waiting tone. Refer to User Programming - 06u Call Waiting Enable / Disable on page 6-9. Page 2-4 Commander i System User Guide - Issue 2 Page 2-5 3. Making Calls Making Calls Intercom Calls Paging Calls It is possible to have three simultaneous internal calls if the system is configured for two external lines, two simultaneous internal calls in the case of three external lines, and only one internal call where there is a full configuration of four external lines. The keystation LED displays in red when there are no intercom channels available. To Make An Internal Paging Call: To Make An Intercom Call To Another Station: • Hear two short beeps. • Lift the handset if handset mode is desired. • Make the paging announcement. • Press required DSS key [1-8] or Press [INT] and dial the required intercom number [1 - #]. • Hear the intercom ring tone. • Speak when called party answers. The icon displayed below indicates an intercom call has been made to station 3. L1 1 L2 2 L3 3 • Press own DSS key or Press [INT] and dial own intercom number [1 - #]. L1 1 L2 2 L3 3 Paging 4 An internal page call can be answered as an intercom call by any of the receiving keystations. To Make An External Paging Call: I3 4 If the called keystation is in automatic answer mode, a long beep is heard instead of the ring tone, and the call is automatically answered in handsfree mode at the called keystation. For systems with more than eight extensions, intercom calls made to stations 9, 10, 11 and 12 must be made by pressing [INT] and dialling 9, *, 0 and # respectively. Page 3-2 • Lift the handset if handset mode is desired. • Lift the handset if handset mode is desired. • Press required DSS key or Press [INT] and dial the external paging intercom number • Hear one short beep. • Make the paging announcement. Commander i System User Guide - Issue 2 Page 3-3 Making Calls • Press a free [LINE] and wait for dial tone. Door Station Calls • Press [REDIAL]. To Call The Door Station: • Lift the handset if handset mode is desired. • Press required DSS key [1-8] or Press [INT] and dial the Door Station intercom number. • Hear a short beep and speak to the Door Station. • Press [RECALL] to activate the Door Opener. Speed Dialling This facility allows each keystation to access the ten personal speed dial numbers (01 - 10) and the twenty system speed dial numbers (11 - 30). For speed dial number storing procedures refer to User Programming 01u Personal Speed Dial Numbers on page 6-5 and Administration Programming - 02a System Speed Dial Numbers on page 6-11. To Dial a Stored Number: External Calls • Lift the handset if handset mode is desired. To Make An External Call: • Lift handset if handset mode is desired. • Press a free [LINE] and wait for dial tone. The selected [LINE] icon appears as engaged at all other keystations. L1 1 L2 2 L3 3 4 • Dial the external number. • Press a free [LINE] and wait for dial tone. • Press [i] and dial the speed dial address number (01-30) or Scroll up and down the repertory numbers using the [*] and [#] keys until the desired number is displayed, and press [i] again. Refer to the slide-out speed dial list attached to the keystation. L2T 14: 99991234 L1T: 99991234 • Speak when the called party answers. Speed dial numbers can be dialled out in succession (chain dialling). One-Touch Speed Dialling L2T 99991234 • Speak when the called party answers. The call timer commences after ten seconds. Last Number Redial To Redial: • Lift the handset if handset mode is desired. Page 3-4 • Speak when the called party answers. Every DSS key except your own and every unused line key can be programmed to store a number of up to 24 digits. For one-touch speed dial number storing procedure refer User Programming - 02u One-Touch Speed Dial Numbers on page 6-6. To Dial a Stored One-Touch Number: • Press a free [LINE] and wait for dial tone. Press the key containing the stored number. Commander i System User Guide - Issue 2 Page 3-5 4. Call Handling Call Handling Holding Calls L1 1 • Ask the external party to wait. L2 2 • Press [HOLD] Intercom dial tone is heard after placing a call on hold. L3 3 To Place An External Call On Common Hold: L1 1 L2 2 L3 3 4 Line 2 Reverting 4 Held-line icon appears on every station and the held party hears Music-on-Hold*. The other stations will have the icon steady and not flashing. To Place An External Call On Exclusive Hold: • Ask the external party to wait. • Press [HOLD] twice. L1 1 • Replace the handset L2 2 To Retrieve A Held Call From Any Keystation: L3 3 • Lift the handset if handset mode is desired. Line 2 in exclusive hold on this station. 4 • Press held [LINE]. L1 1 L1 1 L2 2 L2 2 L3 3 L3 3 4 4 • Replace the handset. Call retrieval is the same as for calls placed on Common Hold, but can only be carried out on the holding keystation. Inquiry Calls To Handle An Inquiry Call: Icon shown on your keystation. Icons shown on other keystations. If a call on hold is not retrieved within the pre-programmed time, recall ringing is heard at the holding station. For further information on setting the hold timer refer to Administration Programming - 12a Hold Timer on page 6-20. • The standard Music On Hold is a non-musical tone. Thirty two seconds of digitised music is available as an option, as is external Music On Hold. Page 4-2 • Ask the external party to wait. Make an intercom call (see page 3-2). Commander i System User Guide - Issue 2 Page 4-3 Call Handling L1 1 L2 2 L3 3 Outside party is automatically put on exclusive hold and cannot be retrieved by any other station. L1 1 L2 2 L3 3 4 4 • Make your inquiry. • Return to the held call by pressing the held [LINE]. If a call on hold is not retrieved within the pre-programmed time, recall ringing is heard at the holding station. For further information on setting the hold timer refer to Administration Programming - 12a Hold Timer on page 6-12. At the transferred keystation the call is presented as an incoming call and the display indicates which station is transferring the call. L1 1 L2 2 L3 3 Stn 3 transf Line 2 4 Transferring Calls Any external call can be transferred to another station. To Transfer A Call: • Immediately make an intercom call (this will result in the call being placed on exclusive hold). L1 1 L2 2 L3 3 4 If the called station does not answer the transferred call within the preprogrammed time, the call will revert back to the original station. L1 1 L2 2 L3 3 I1 Station 3 talking to station 1, line 2 on exclusive hold Transfer Without Announcement (Camp On): Line 2 Reverting 4 Transfer With Announcement: • Wait for the answer and offer the call. • Hang up. • Hang up before the called party answers or upon hearing busy / ring tone. Page 4-4 Commander i System User Guide - Issue 2 Page 4-5 Call Handling L1 1 L2 2 L3 3 To Set Up A Conference Call With Two External Parties: Station 1 has picked up the transferred call on line 2 • Ask external party to wait. • Press a free [LINE]. • Make call to second external party . 4 • Inform the new party about impending conference. L1 1 L2 2 L3 3 Conference Calls Conference calls can be conducted between one external party and two stations or between two external parties and one station. To Set Up A Conference Call With One External Party: • Ask external party to wait. • Make an intercom call. • Wait for intercom call to be answered and inform the new party of the impending conference. L1 1 L2 2 L3 3 Station 3 ready for conference call with outside parties on line 1 and line 2. 4 • Press own DSS key - with the flashing middle bar icon- to start the conference. L1 1 L2 2 L3 3 Conference 4 I1 4 Station 3 talking to station 1, line 2 on exclusive hold • Press own DSS key - with the flashing middle bar icon- to start the conference. L1 1 L2 2 L3 3 Conference 4 Conference in progress. Page 4-6 Commander i System User Guide - Issue 2 Page 4-7 5. Other Facilities Other Facilities Message Wait PSTN Decadic to Tone Signalling An intercom caller can leave a visual message on another keystation to call back. To Activate Tone Signalling On A PSTN Decadic Line: To Leave A Message Wait On Another Keystation: • Press a free [LINE]. L3P • Make an intercom call. • Press [*]. L3T • Dial the desired number. L3T 1234567 • If you hear a busy tone or the call is unanswered, press the DSS key again. The called keystation will get the following indication: L1 1 L2 2 L3 3 To Resume Decadic Dialling: L3P • Press [RECALL]. Message wait from Station 2. 4 LED flashes Red. Do Not Disturb (DND) This facility allows you to block audible signalling on your keystation. You can still answer external calls as normal by lifting the handset and pressing the flashing line key. To Cancel A Message Wait Left On Another Keystation: To Activate/Deactivate DND With Keystation Idle: • Make an intercom call to the keystation. • Press [DND]. All calls to the keystation are inhibited. Calling station receives a busy tone. • Hang-up - the message wait is cancelled. To Answer A Message Wait On Your Keystation: • Lift handset if handset mode is desired. • Press the DSS key with the Message Waiting icon activated ([DSS2] in the above diagram). • Speak when the called party answers. HOLD DND 7 DND activated. REDIAL To Activate DND With Keystation On A Call: • Press [DND]. Whilst the call is in progress, further incoming calls are inhibited. DND mode clears when call ends. Page 5-2 Commander i System User Guide - Issue 2 Page 5-3 Other Facilities Microphone Mute To Activate/Deactivate Muting Of Your Keystation: • Press [MUTE/AA] during a telephone conversation. The handset microphone or the handsfree microphone (depending upon the mode of use) is de-activated when the keystation is muted. Monitor To Monitor An Area In The Vicinity Of Another Keystation: • On the keystation closest to the area to be monitored, press the DSS key [1-8] of the monitoring keystation or Press [INT] and dial the intercom number of the monitoring keystation. Remote Maintenance Telstra can remotely program and interrogate your Commander i+ from the Telstra Commander Remote Access Centre. Telstra can analyse problems and change configurations without the need to visit your premises. For security reasons, this feature can only be activated by the system administrator. Warning: this feature should not be used except under the directions of a Telstra representative. Before using this feature call the Telstra Commander Remote Access Centre Remote maintenance takes place on Line 1. Ensure that Line 1 is available and the first master keystation in your system is idle. If you wish to continue talking to a Telstra representative during the remote maintenance session you will need to call the Telstra Commander Remote Access Centre on a line other than Line 1. To Start Remote Maintenance: • On the monitoring keystation, press [HF/GL], [INT] or the DSS key of the calling keystation, to answer the intercom call in handsfree mode. • Place a call to the Telstra Commander Remote Access Centre using Line 1. • On the monitoring keystation, press [MUTE/AA] to deactivate microphone. Monitoring is now in progress. • When requested by the Telstra representative, Press [i] 9 9 To Cease Monitoring: • Enter the four digit administration password and press [i] to confirm. Your call with the Telstra representative will be placed on hold automatically. • Press [RLS] on the monitoring keystation. • Follow the instructions of the Telstra representative. Pass: If the password is incorrect, the keystation will return to the Telstra Commander Remote Access Centre call. Press [i] 9 9 and re-enter the correct password • Wait for the Remote Maintenance System to answer and say “Welcome to the Telstra Commander Remote Access Centre ...” Page 5-4 Commander i System User Guide - Issue 2 Page 5-5 Other Facilities L1 1 L2 2 L3 3 4 All the icons of the first master station and the line used for the Remote Maintenance call are flashing • Press the DSS key of the first master keystation. Remote Maintenance is now in progress. To Start Remote Maintenance And Continue Your Conversation With The Telstra Commander Remote Access Centre: L1 1 L2 2 L3 3 4 All the icons of the first master station and the line used for the Remote Maintenance call are flashing • Press the DSS key of the first master keystation. • Return to your original call with the Telstra representative by selecting the line on hold. • Follow the directions of the Telstra representative. Remote Maintenance is now in progress • Place a call to the Telstra Commander Remote Access Centre using a line other than Line 1. • Follow the instructions of the Telstra representative. • When requested by the Telstra representative , Press [i] 9 9 Pass: • Enter the four digit administration password and press [i] to confirm. Your call with the Telstra representative will be placed on hold automatically. If the password is incorrect, the keystation will return to the Telstra Commander Remote Access Centre call. Press [i] 9 9 and re-enter the correct password • Wait for dial tone. • Enter the phone number given to you by the Telstra representative. • Wait for the Remote Maintenance System to answer the call and say “Welcome to the Telstra Commander Remote Access Centre ...” Page 5-6 Commander i System User Guide - Issue 2 Page 5-7 6. Programming Programming • Press [RLS] twice to exit. Menus Programming of the Commander i+ is accessible at any connected keystation. There are three passwords for the different levels of programming; User, Administration and Installation. Details regarding the User and Administration functions have been included in this User Guide. For information on Installation functions, refer to the Commander i+ Installation Manual. 01: Repertory The first menu (Main Menu) is displayed. • Press [*] and [#] to move up and down the menu items. Alternatively, dial the number of the desired menu item. 01: Repertory 02: Lock Enable/Disable 03: User 04: Admin 05: Install 06: Night Mode Enable/Disable To Activate Keystation Locking: 01: Repertory • Dial 02 or press [#] to go to the Lock menu. 02: Lock Disable • Press [i] twice. 02: Lock Enable • Press [RLS] to exit. Locked 19:32 24 The keystation is now locked. To Remove Keystation Locking: • Press [i] to enter programming mode. 01: Repertory • Dial 02 or press [#] to go to the Lock menu. 02: Lock 01 Repertory • Press [i] to change lock status. This menu enables you to view the contents of the thirty stored telephone numbers -10 personal speed dial numbers (01 to 10) and 20 system speed dial numbers (11 to 30). To Display Stored Speed Dial Numbers: • Press [i] to enter programming mode . 01: Repertory • Press [i] to display the first number . 01: • Dial the required two digit address [01 to 30]. Alternatively, scroll up or down the list of numbers using the [*] and [#] keys. Page 6-2 A keystation can be prevented from making all external calls other than those numbers in the allowed numbers list or system speed dial numbers. • Press [i] to enter programming mode. To Display Menu Options: • Press [i] to enter programming mode . 02 Keystation Locking Enable Pass: Password is requested. This can be the User, Administration or Installation Password. • Enter user password. Pass:**** • Press [i] to confirm or [RLS] to cancel. 02: Lock Disable If password entered is valid, the keystation is unlocked. • Press [RLS] to exit. Commander i System User Guide - Issue 2 19:34 27 Page 6-3 Programming 06 Night Status Enable/Disable 03 User Programming The Night Status allows a system to have a different set of call distribution and station configuration for night-time operation. It is generally used for after hours operation, or whenever the office is not staffed. Configuration for night mode should be programmed when the system is in night mode, and likewise for day mode. This also affects each station's ring setting To Enable/Disable Night Status: The following programming procedures can be performed at any Commander i+ keystation. The settings are unique to each keystation. 01u Personal Speed Dial Numbers Each keystation can be programmed with a maximum of ten personal speed dial numbers and up to ten one-touch speed dial keys. These are in addition to the twenty system speed dial numbers and can only be used at the keystation where the numbers are stored. To Store Personal Speed Dial Numbers: • Press [i] to enter programming mode. 01: Repertory • Press 06 to go to the Night Status menu. 06:NightMode Disable The current setting is displayed. • Press [i] to change Day/Night status. Pass: Password is requested. It can be the Administration or Installation password. • Enter four digit password. Pass:**** • Press [i] to confirm change or [RLS] to cancel If password entered is valid, the status is changed. 06:NightMode Enable • Press [RLS] to exit. • Press [i] to enter programming mode. 01: Repertory • Dial 03 to go to the User menu. 03: User • Press [i] to confirm. 01uPers. Speed Dial • Press [i] again. 01: The first personal speed dial number is displayed (and the number, if there is one already stored in location 01). • Dial 01 - 10 to select the desired location. Alternatively, scroll up or down the ten personal speed dial locations using the [*] and [#] keys. • Press [i] to confirm the location. > • Enter the number to be stored. >99554688 • Press [i] once to confirm, twice to re-renter or [RLS] to cancel. • Repeat the above steps after selecting another location number. L4 RECALL HOLD Page 6-4 5 Night Mode activated, icon displayed at every station • Press [RLS] three times to exit. 14:36 01 Each number can contain up to 24 digits. Personal speed dial numbers 01 - 10 appear as speed dial numbers 01 - 10 in each keystation’s speed dial memory (11 - 30 being taken up by the system speed dial numbers). The Commander i System User Guide - Issue 2 Page 6-5 Programming speed dial stored should be recorded on the speed dial directory card attached to the underside of every keystation. Note: Pressing [REDIAL] will store a pause, [RECALL] will store a hookflash. 02u One-Touch Speed Dial Numbers 03u Headset Enable/Disable A keystation handset may be replaced by a suitable Austel permitted headset. When connected and activated, the RLS key is used to perform the hookswitch function. To Enable/Disable Headset: Any DSS key (except your own) and any unused line key can be programmed to store a number of up to 24 digits. • Press [i] to enter programming mode. 01: Repertory To Store One-Touch Speed Dial Numbers: • Dial 03 to go to the User menu. 03: User • Press [i] to enter programming mode. 01: Repertory • Press [i] to confirm. 01uPers. Speed Dial • Dial 03 to go to User menu. 03: User • Dial 03 to go to the Headset option. 03uHeadset Disable • Press [i] to confirm. 01uPers. Speed Dial • Press [i] twice to change the setting. 03uHeadset Enable • Dial 02 to go to User Programmable Keys. 02uUser Program. Key • Press [RLS] three times to exit. • Press [i] to enter. 01: • Dial 01 - 11 to go to the desired location. Alternatively, scroll up or down the speed dial locations using the [*] and [#] keys. • Press [i] to enter the number. > • Enter the number to be stored. >99556788 • Repeat the above steps after selecting another location number. 14:36 01 Note: Locations 01 to 08 correspond to [DSS1] to [DSS8]. Locations 09 to 11 correspond to [L2], [L3] and [L4] (if unused). Page 6-6 1 L2 2 L3 3 Permanently flashing own DSS indicates headset mode activated 04u Paging Enable/Disable • Press [i] once to confirm, twice to re-enter or [RLS] to cancel. • Press [RLS] four times to exit. L1 A keystation can be programmed so that it does not receive paging calls. To Enable/Disable Paging: • Press [i] to enter programming mode. 01: Repertory • Dial 03 to go to the User menu. 03: User • Press [i] to confirm. 01uPers. Speed Dial • Dial 04 to go to the Paging option. 04uPaging Enable Commander i System User Guide - Issue 2 Page 6-7 Programming • Press [i] twice to change the setting. 04uPaging Disable A keystation can be programmed so that it does not receive the call waiting tone when a second call (external or internal) arrives at the keystation. • Press [RLS] three times to exit. 05u Password There is a facility to change the user (or keystation) password. The user password is required for operations such as Keystation Locking. To Change a User Password: • Press [i] to enter programming mode. 01: Repertory • Dial 03 to go to the User menu. 03: User • Press [i] to confirm. 01uPers. Speed Dial • Dial 05 to go to the password option. 05uPassword • Press [i] to change password. Pass: The current User password is required. • Enter current User password. Pass:**** If the password is incorrect, The Password menu is displayed. Press [i] and re-enter correct password or press [RLS] to exit. The new User password is requested. • Enter four digit User password. 06u Call Waiting Enable/Disable To Enable/Disable Call Waiting: • Press [i] to enter programming mode. 01: Repertory • Dial 03 to go to the User menu. 03: User • Press [i] to confirm. 01u Pers. Speed Dial • Dial 06 to go to the Call Waiting option. 06u Call Wait Enable • Press [i] twice to change the setting. 06u Call Wait Disable • Press [RLS] three times to exit. Note: It is not recommended that call waiting is disabled when single line telephones are used as AFU extensions. Calls initialised from single line telephones will not receive busy tone when the called party is on another call. The called party will only receive visual indication of the incoming call when call waiting is disabled. New Pass: New Pass:**** • Press [i] to accept password. • Press [RLS] three times to exit. Page 6-8 Commander i System User Guide - Issue 2 Page 6-9 Programming 04 Administration Programming 02a System Speed Dial Numbers The following programming procedures can be performed at any Commander i+ keystation, provided that the Administration password or the Installation password is entered. 01a Keystation Time A maximum of twenty system speed dial telephone numbers may be stored. These can be accessed by any station. The maximum size for any number is twenty four digits. Press [REDIAL] to store a pause, [RECALL] to store a hookflash. Every keystation connected to the system displays the same time. To Store System Speed Dial Numbers: To Set the Time • Press [i] to enter programming mode. 01: Repertory • Press [i] to enter programming mode. 01: Repertory • Dial 04 to go to the Administration menu. 04: Admin • Dial 04 to go to the Administration menu. 04: Admin • Press [i] to confirm. Pass: • Press [i] to confirm. Pass: 01aSet Time: 16:24 • Enter four digit administration password and press [i] twice. • Enter four digit administration password and press [i ]. Pass:**** If the password is incorrect, the Admin menu is displayed. Press [i] and re-enter correct password or press [RLS] to exit. If the password is incorrect, re-enter correct password or press [RLS] twice to exit. • Enter time in twenty-four hour format, using four digits (two for the hour followed by two for the minutes). >1624 • Press [i] to store new time. 01aSet Time: 16:24 • Press [RLS] twice to exit. 16:24 03 • Enter 02 to go to the System Speed Dial option. 02aSyst. Speed Dial • Press [i] to confirm. 11: The location of the first system speed dial number is displayed (and the number stored if there is one). System speed dial numbers are stored in locations 11 to 30. • Dial 11 - 30 to select the desired number location. • Press [i] to confirm the location. > • Enter the number to be stored. >996666776 • Press [i] once to confirm, twice to re-enter or [RLS] to cancel. • If desired, repeat the above process by selecting another speed dial location and storing the desired number. Page 6-10 Commander i System User Guide - Issue 2 Programming • Enter the appropriate setting for the twelve stations. • Press [RLS] four times to exit. 03a Line Access - PSTN A PSTN line access status is allocated to each station, one for each of the available lines. This operation is to be carried out for both Day and Night modes of operation. There are three line access status values: 0 Fully Restricted Access 1 Semi Restricted Access (incoming calls only) 2 No Restriction To Set Line Access Status: 01: Repertory • Dial 04 to go to the Administration menu. 04: Admin • Press [i] to confirm. Pass: • Enter four digit administration password and press [i ]. 01aSet Time: 16:24 If the password is incorrect, the Admin menu is displayed. Press [i] and re-enter correct password or press [RLS] to exit. • Enter 03 to go to the Line Access option . 03aLine Access D • Press [i] to confirm. 01:222222222222 The line access status value for each of the possible twelve stations is displayed for line 01. • Dial 01 - 04 to select the desired line number. Alternatively, scroll up or down the line numbers using the [*] and [#] keys. Page 6-12 You must enter twelve values even though you may not have twelve stations. If any of the entered numbers are invalid, the original setting for that station will be retained. • Press [i] once to confirm, twice to re-enter or [RLS] to cancel • If desired, repeat the above process by selecting another line number and entering the appropriate status codes • Press [RLS] four times to exit. 04a Station Call Barring Class • Press [i] to enter programming mode. • Press [i] to confirm the location. >110222111022 > A call barring status is assigned to every station. This operation is to be carried out for both Day and Night operations. There are five call barring classes: 0 No Barring 1 Barred to ISD prefixes, but mobiles and common allowed prefixes allowed 2 Barred to ISD / STD prefixes, but mobiles and common allowed prefixes allowed 3 Barred to ISD / STD and mobile prefixes, but common allowed prefixes allowed 4 Only common allowed prefixes allowed To Set Call Barring Class: • Press [i] to enter programming mode. 01: Repertory • Dial 04 to go to the Administration menu. 04: Admin • Press [i] to confirm. Pass: • Enter four digit administration password and press [i]. 01aSet Time: 16:24 Commander i System User Guide - Issue 2 Page 6-11 Programming If the password is incorrect, the Admin menu is displayed. Press [i] and re-enter correct password or press [RLS] to exit. • Enter 04 to go to the Station Class option. 04aStation class D • Press [i] to confirm. 01:0 The call barring class for station 1 is displayed. • Dial 01 - 12 to select the desired station. Alternatively, scroll up or down the station numbers using the [*] and [#] keys. • Enter four digit administration password and press [i]. 01aSet Time: 16:24 If the password is incorrect, the Admin menu is displayed. Press [i] and re-enter correct password or press [RLS] to exit. • Enter 05 to go to the DSS option. 05aDSS123456789*0# The position in which each of the DSS keys is displayed indicates which station is connected to it. In the example shown below, station 3 is connected to [DSS6] and station 6 is connected to [DSS3]. • Press [i] to confirm the station number. > • Press [i] to confirm. > • Enter the appropriate call barring class. >3 • Enter the station/DSS key allocations in the desired sequence. >126453789*0# • Press [i] once to confirm, twice to re-enter or [RLS] to cancel. You must enter all twelve different DSS identifiers (1 - #), even though you may not have twelve stations. • If desired, repeat the above process by selecting another station number and entering the appropriate call barring class. • Press [i] once to confirm, twice to re-enter or [RLS] to cancel. • Press [RLS] four times to exit. • Press [RLS] three times to exit. 05a DSS Extension Display This facility allows you to allocate a station number to a particular DSS key and / or intercom number. Normally, station 1 is allocated to [DSS1], station 2 to [DSS2] and so on, with station 12 allocated to the [#] intercom number. Note: The intercom call number is determined by this programming. To Change DSS Display Key: Note: For the programming of Lines Access, Ring Modes, Station Call Barring and User Password Reset, the station number is kept independent of the allocation made here. 06a Send Data This is a command used to transmit all system data from the first Master station (lines 1 and 2) to the second Master if one is connected. This operation is for configuration backup only and must be initiated from the first Master. • Press [i] to enter programming mode. 01: Repertory • Dial 04 to go to the Administration menu. 04: Admin • Press [i] to enter programming mode. 01: Repertory • Press [i] to confirm. Pass: • Dial 04 to go to the Administration menu. 04: Admin • Press [i] to confirm. Pass: Page 6-14 To Send The Data: Commander i System User Guide - Issue 2 Page 6-13 Programming • Enter four digit administration password and press [i]. 01aSet Time: 16:24 If the password is incorrect, the Admin menu is displayed. Press [i] and re-enter correct password or press [RLS] to exit. • Enter 06 to go to the Send Data option . 06aSend data • Press [i] to initiate the sending of the data. It takes about 30-45 seconds to complete the process. Underscore signs are shown on the Master display, indicating that the operation is in progress. During this time, the system is frozen. At the completion of the sending of data, ‘OK’ is displayed. 07a User Password Reset To Reset The User Password To The Factory Default Setting: • Press [RLS] three times to exit. 08a Administration Password To Set The Administration Password: • Press [i] to enter programming mode. 01: Repertory • Dial 04 to go to the Administration menu. 04: Admin • Press [i] to confirm. Pass: • Enter four digit administration password and press [i ]. 01aSet Time: 16:24 If the password is incorrect, the Admin menu is displayed. Press [i] and re-enter correct password or press [RLS] to exit. • Enter 08 to go to the Admin Password option. 08aAdmin Pass 04: Admin • Press [i] to confirm. > • Press [i] to confirm. Pass: • Enter four digit password. • Enter four digit administration password and press [i]. 01aSet Time: 16:24 • Press [i] to confirm. • Press [i] to enter programming mode. 01: Repertory • Dial 04 to go to the Administration menu. If the password is incorrect, the Admin menu is displayed. Press [i] and re-enter correct password or press [RLS] to exit. • Enter 07 to go to the User Password Reset option. 07aUser Pass. reset • Press [i] to confirm. > • Press [RLS] three times to exit. • Enter keystation number to be reset (1- 8). • Press [i] to confirm. Page 6-16 Commander i System User Guide - Issue 2 6-15 Page 6-17 Programming 09a Ring Mode - PSTN The ring mode is allocated to each station, one for each of the available PSTN lines. This operation is to be carried out for both Day and Night modes of operation. There are three possible settings: 1 Immediate Ring 2 Delayed Ring (10 seconds) 3 Ring Excluded You must enter twelve values, even though you may not have twelve stations. If any of the entered numbers is invalid, the original setting for that station will be retained. • Press [i] once to confirm, twice to re-enter or [RLS] to cancel. • Repeat the above steps for the other available line numbers. • Press [RLS] four times to exit. WARNING: Be careful to avoid ring disabling or delaying for all stations for the same line. 10a Remote Report To Select Ring Mode (Day or Night): This facility displays the date and time of the last remote maintenance session. In addition, the number of remote maintenance sessions performed to date is also displayed • Press [i] to enter programming mode. 01: Repertory • Dial 04 to go to the Administration menu. 04: Admin • Press [i] to confirm. Pass: To view the time and date of the last remote maintenance session: • Enter four digit Administration password and press [i ]. 01aSet Time: 16:24 • Press [i] to enter programming mode. 01: Repertory • Dial 04 to go to the Administration menu. 04: Admin • Press [i] to confirm. Pass: • Enter four digit Administration password and press [i ]. 01aSet Time: 16:24 If the password is incorrect, the Admin menu is displayed. Press [i] and re-enter correct password or press [RLS] to exit. • Dial 09 to go to the Ring Mode option. 09aRing Mode • Press [i] to confirm. 01:111111111111 D The Ring Mode value for each of the possible twelve stations is displayed for line 01 • Dial 01 - 04 to select the desired line number. Alternatively, scroll up or down the line numbers using the [*] and [#] keys. If the password is incorrect, the Admin menu is displayed. Press [i] and re-enter correct password or press [RLS] to exit. • Dial 10 to go to the Remote Report display. 10aRemoteReport 015 • Press [i] to confirm the location. > The number of remote maintenance sessions is displayed. • Enter the appropriate setting for the twelve stations. >111112113333 After approximately three seconds the display shows the time and date of the last remote maintenance session. Page 6-18 Commander i System User Guide - Issue 2 16/04 14:23 Page 6-19 Programming • Dial 04 to go to the Administration menu. • Press [RLS] three times to exit. • Press [i] to confirm. 11a Serial Number A remote maintenance serial number may be allocated to the system by the Telstra Commander Remote Access Centre. • Enter four digit Administration password and press [i]. 04: Admin Pass: 01aSet Time:16:24 To Display The Remote Maintenance Serial Number: • Press [i] to enter programming mode. 01: Repertory • Dial 04 to go to the Administration menu. 04: Admin • Press [i] to confirm. Pass: • Enter four digit Administration password and press [i ]. 01aSet Time: 16:24 If the password is incorrect, the Admin menu is displayed. Press [i] and re-enter correct password or press [RLS] to exit. • Dial 11 to go to the Serial Number option. 11aSerial #47218432 If the password is incorrect, the Admin menu is displayed. Press [i] and re-enter correct password or press [RLS] to exit. • Dial 12 to go to the Hold Timer option. 12aHold Timer 2D • Press [i] to confirm. > • Enter the appropriate setting for the system. >3 • Press [i] once to confirm, twice to re-enter or [RLS] to cancel. • Press [RLS] three times to exit. • Press [RLS] three times to exit. 12a Hold Timer The length of time a call is on common hold or exclusive hold before the call rings back at the holding station is programmable. There are four possible settings: 1 30 seconds 2 60 second 3 90 seconds 4 120 seconds To Set The Hold Timer (Day Or Night): • Press [i] to enter programming mode. Page 6-20 01: Repertory Commander i System User Guide - Issue 2 Page 6-21 Appendix F Commander i+ AFU User Guide Telstra Commander i Analogue Facilities Unit User Guide Serial Item 749/35 Issue 2 Table of Contents Telstra Commander Remote Access Centre The Telstra Commander Remote Access Centre has been set up by Telstra to help you administer and maintain your Telstra Commander i+. Help Desk Documentation Support The Help Desk is staffed by personnel experienced in all areas of the Commander i+. Call them for support on: If you find any problems with the documentation for this Commander i+ product, please tell us. • fault reporting. • system administration and programming. We want to know if you find any of the following problems: • mistakes in the manual. • user training needs. • any part is hard to understand. • other product support inquiries. • difficulty in locating a subject. • format hard to follow, etc. The staff at Telstra Commander Remote Access Centre are keen to assist. However, please read carefully the documentation provided with the product before calling. These numbers are staffed from 8:00 am to 7:00 pm (EST) from Monday to Friday. Table of Contents 1. Introduction ............................................................................1-1 Introduction ....................................................................................................... 1-2 Main Characteristics.......................................................................................... 1-2 Main Features.................................................................................................... 1-2 Audible Signals ................................................................................................. 1-4 2. How To Use The AFU .............................................................2-1 Foreword ........................................................................................................... 2-2 Internal Calls ..................................................................................................... 2-2 To Make an Internal Call:.......................................................................... 2-2 To Answer an Internal Call:....................................................................... 2-2 To Make a Paging Call:............................................................................. 2-2 External Calls.................................................................................................... 2-3 To Make an External Call:......................................................................... 2-3 To Answer an External Call:...................................................................... 2-3 To Place an External Call On Hold:........................................................... 2-3 To Resume an External Call that is On Hold:............................................. 2-4 To Transfer an External Call: .................................................................... 2-4 Speed Dialling................................................................................................... 2-5 To Use System Speed Dialling on an External Line: .................................. 2-5 To Use Speed Dialling on a PABX Line: ................................................... 2-5 Access to Network / PABX Services(Call Waiting or Call Transfer)................... 2-5 Dialling Facilities .............................................................................................. 2-6 To Continue Dialling After a Delay ........................................................... 2-6 To Change Mode of Dialling ..................................................................... 2-6 Door Station / Door Opener ............................................................................... 2-6 To Operate the Door Opener (Call from Door Station):.............................. 2-6 To Operate the Door Opener (Without A Call from Door station):.............. 2-6 3. AFU Quick Reference Card ....................................................3-1 To contact the Commander Remote Access Centre: FREECALL 1800 809 882* FREEFAX 1800 044 113* FOR SAFETY REASONS, COMMANDER i MUST BE INSTALLED BY AUTHORISED SERVICE PERSONNEL IN ACCORDANCE WITH AUSTEL TS009 STANDARD * Calls from a mobile phone are charged at the applicable mobile rate. Commander i+ AFU User Guide - Issue 2 Table of Contents i 1. Introduction Introduction This manual describes the operating instructions for the Commander i Analogue Facilities Unit (AFU). • Main Characteristics The Analogue Facilities Unit (AFU) is an optional interface to the Commander i system, allowing for connection of up to two standard Tone telephone terminals (telephone sets, cordless, multi-function telephones, FAX machines, answering machines, modems, etc) or one standard tone telephone terminal and one door station / external paging interface. A maximum of two AFUs can be connected to one system. This provides for a total of four telephone terminals with the following limitations: • Only one Door Station or external paging interface per system. • • • Only one Door Unlock per system (in combination with the door station). Main Features The main features supported by telephones connected to the AFU are as follows: • Internal Calls To call and communicate between stations. • Internal Paging To broadcast a loudspeaker message to keystations and wait for an answer. • External Calls To selectively engage external or PABX lines. • Restriction to Outside Calls for Each Extension To restrict a station from incoming and/or outgoing access to any lines. • Call Barring on Outside Line To prohibit a station from dialling certain types of calls such as international calls, STD calls and calls to mobiles. • System Speed Dialling Page 1-2 • • • Introduction To provide a station with the ability to dial the twenty system common speed dial numbers, each number made up of a maximum of 24 digits. Night Service To be able to activate with a single command, a different set of call distribution and station configuration for night-time operation (eg. at the closing time of the office, all incoming calls can be diverted to an extension to which an answering machine is connected). Call on Hold To give a station the ability to place an external call on exclusive hold (eg. to consult a colleague or call another station before resuming the external call or transferring it to another station) or common hold (eg. to pick up the call from a different station). Call Transfer (With or Without Announcement) To enable a station to transfer an external call to another station, whether it is free or busy. The transferring station can transfer the call with or without announcement. Access to Post-Dialling Services To permit continuation of dialling mid conversation. Door Station / Door Opener Interface To provide a connection to the Commander i door station, with the ability of using each system station to receive calls, answer them and control the opening of the door. External Paging Interface To provide a connection to the Commander i external paging interface. This provides connection to an external paging system to allow stations to make external paging calls. Commander i+ AFU User Guide - Issue 2 Page 1-3 Introduction Audible Signals Ring Type Double ring Fast single ring Slow single ring Single tone repeated through handset Page 1-4 Call Type External call or transferred call reverting Internal call Door station call Call waiting Commander i+ AFU User Guide - Issue 2 Page 1-5 2. How To Use The AFU How To Use The AFU Foreword When you lift the handset, you will hear a continuous tone. This is the internal dial tone. At this point it is possible to make: • Internal Calls. • External Calls. Once you have lifted the handset, you have ten seconds in which to dial the desired number. If you have not dialled the number within this time, you will hear a busy tone and will not be able to carry out any operation. Hang up and lift the handset to resume normal operation. Internal Calls To Make an Internal Call: • Lift the handset and listen for internal dial tone. • Dial 4 and then dial the station number Stations are numbered from 1 to 9 then *, 0, and # If all the internal channels are busy then you will hear busy tone. To Answer an Internal Call: • Lift the handset of the station that is ringing. To Make a Paging Call: External Calls To Make an External Call: • Lift the handset and listen for internal dial tone. • Dial: 0 to access a direct external line or 8 to access a PABX line. • When you hear the external dial tone, dial the required external number. You will hear a busy tone if there is no available line. To Answer an External Call: • Lift the handset of the station that is ringing. If you are already engaged on a call when a new call arrives, you are alerted by a sequence of short beeps (call waiting tones). You can transfer the current caller or put the call on hold in order to answer the new incoming call. To Place an External Call On Hold: • Press the RECALL or ‘Flash’ key. • Wait for the internal dial tone. • Lift the handset and listen for internal dial tone. • Dial 1 to place the call in Common Hold. • Dial 4 and then dial your own number. Any station can now pick up the call. • Replace the handset and make any other call. • Broadcast a voice message. If all the internal channels are busy then you will hear busy tone. The first station that answers becomes connected to the caller in the same way as an internal call. All keystations programmed to receive paging calls are alerted with a ‘double beep’ on the loudspeaker and also a message on the display. Page 2-2 If a call on hold is not retrieved within the pre-programmed time, recall ringing is heard at the holding station. For further information on setting the hold timer please refer to Administration Programming in the System User Guide. Commander i+ AFU User Guide - Issue 2 Page 2-3 How To Use The AFU To Resume an External Call that is On Hold: • Pick up the handset. • Wait for the internal dial tone. • Dial 1. If more than one call is on hold then the call on the highest number line is retrieved first. That is, a held call on line 4 will be retrieved first before a held call on line 2. During Night Status, you can resume any call placed in Common Hold. In Day Status, you can only resume a call put in Common Hold by yourself. To Transfer an External Call: This procedure is for when you are talking to an external party and wish to transfer the call to another station. • Press the [RECALL] or ‘Flash’ key. • Wait for the internal dial tone. • Dial 2, dial 4 and then dial the station number. • Replace the handset before the called station answers if you wish to transfer ‘without announcement’ or Wait for the answer, offer the call, and replace the handset to transfer ‘with announcement’. • If the called extension does not accept the call, press the [RECALL] or ‘Flash’ key to resume the outside call. • If the operator of the called extension replaces the handset, the external communication is automatically restored. If the called station does not answer the transferred call within the preprogrammed time, the call will revert back to your phone. Speed Dialling You can dial on both direct external and PABX lines, a repertory number stored in the System Speed Dial (numbered from 11 to 30). Note: System Speed Dial is not subject to Station Class Of Service Barring. To Use System Speed Dialling on an External Line: • Lift the handset and wait until you hear the internal dial tone • Dial 7 followed by 0, and wait for the external dial tone • Dial the desired speed dial address (11 - 30). To Use Speed Dialling on a PABX Line: • Lift the handset and wait until you hear the internal dial tone • Dial 7 followed by 8, and wait for the external dial tone • Dial the desired speed dial address (11 - 30). A pause of three seconds is automatically inserted between the PABX access digit (normally 0) and the outside number. If the System Speed Dial number is not compatible with the line selected (eg. a PABX only number to an external line) or where there is no available line, you will hear a busy tone. Access to Network / PABX Services(Call Waiting or Call Transfer) When using Network or PABX Services you will need to send a timed loop break/ hookflash to the external line. • Press the [RECALL] or ‘Flash’ key • Wait for the internal dial tone • Dial # Page 2-4 Commander i+ AFU User Guide - Issue 2 Page 2-5 How To Use The AFU Dialling Facilities To Continue Dialling After a Delay When you are in the middle of dialling an external number and have paused longer than the interdigit time-out, carry out the following instructions. If the External Line is Tone (DTMF): • Dial the remaining numbers If the External Line is Pulse (Decadic): • Press the RECALL or ‘Flash’ key and wait for the internal dial tone • Dial 0 followed by the remaining digits of the number being dialled To Change Mode of Dialling To change the mode of dialling to the external line from Pulse (Decadic) to Tone (DTMF): • Press the RECALL or ‘Flash’ key and wait for the internal dial tone • Dial * followed by the required number Door Station / Door Opener It is possible to answer the door station and operate the door opener (if equipped) from any station when in conversation with the door station. To Operate the Door Opener (Call from Door Station): • Lift the handset to answer a door station call • Dial 1 To Operate the Door Opener (Without A Call from Door station): • Lift the handset and listen for internal dial tone • Dial 4 and then dial the door station number. You will be in conversation with the door station • Dial 1 to operate the door opener Page 2-6 Commander i+ AFU User Guide - Issue 2 Page 2-7 3. AFU Quick Reference Card Quick Reference Card Making Calls AFU Quick Reference Card Holding Calls To Make an External Call on a Direct External Line: ❐ ❐ ❐ Lift handset and listen for internal dial tone Dial 0 and wait for the external dial tone Dial required number ❐ ❐ ❐ To Recover A Call on Hold: ❐ Lift handset and listen for internal dial tone Dial 1 ❐ ❐ Inquiry Calls/Transfers ❐ ❐ To Make an Internal Call: ❐ ❐ Lift handset and listen for internal dial tone Dial 4 and then dial the required internal extension number (1 to #) To Make an Inquiry Call: ❐ ❐ ❐ ❐ ❐ To Make a Paging Call: ❐ ❐ ❐ Lift handset and listen for internal dial tone Dial 4 and then dial your own number Make paging announcement Automatic Dialling To Speed-Dial on a Direct External Line: ❐ ❐ ❐ Lift handset Dial 70 and wait for dial tone Dial required system speed-dial number (11 to 30) To Speed-Dial on a PABX Line: ❐ ❐ ❐ Lift handset Dial 78 and wait for dial tone Dial required system speed-dial number (11 to 30) Page 3-2 Dial * Ask outside caller to wait Press [RECALL] key and listen for internal dial tone Dial 1 To Make an External Call on a PABX Line: Lift handset and listen for internal dial tone Dial 8 and wait for the PABX dial tone Dial required number ❐ Ask outside caller to wait Press [RECALL] key and listen for internal dial tone Dial 2 Dial 4 and then the required internal extension number (1 to #) Return to held call by pressing the [RECALL] key or Replace handset to transfer call to the other extension Additional Functions To Flash to External Line: ❐ ❐ Press [RECALL] key and listen for internal dial tone Dial # To Continue to Dial After Interdigit Timeout: ❐ ❐ Press [RECALL] key and listen for internal dial tone Dial 0 To Change Dial Mode From Pulse (Decadic) to Tone (DTMF): ❐ Press [RECALL] key and listen for internal dial tone Commander i+ AFU User Guide - Issue 2 Installation Summary Appendix G Technical Bulletins Commander i+ Product Service Manual - Issue 2 Page A - 9 L1 1 L2 2 L3 3 L4 4 RECALL 5 H O LD 6 DND 7 REDIAL 8 1 VO L+ /- IN T M U TE/AA H F/G L 2 3 ABC D EF 4 5 6 GHI JKL M NO 7 8 9 PQ RS TU V W XYZ 0 # * RLS i Technical Bulletin BULLETIN No.9 January 1997 No. of pages, including this one: 2 This bulletin has been issued by Sales Development and Training, Commander Sales Operations - Susan Pearson (08) 8202 9648 Technical Bulletin Ref: i1000 DOCUMENTS INCLUDED IN THIS BULLETIN: DATE EQUIPMENT TOPIC REFERENCE 13.1.97 Commander i Potential Faint Reception i1000 This bulletin has been issued by Sales Development and Training, Commander Sales Operations - Susan Pearson (08) 8202 9648 Series 9 2 January 1997 Technical Bulletin Ref: i1000 13.1.98 Commander i Potential Faint Reception Introduction There have been isolated cases of Commander i customers experiencing faint reception. Programming In the vast majority of cases these difficulties can be overcome by changing programming data. The programming area to check is: 05 install 08i line settings ( refer to page 4 - 12 of System Installation Manual ) Current default data for each line is: 101100* *note that this default data has changed since the manuals were printed. The ‘1’ in positions 3 & 4 of this string represent: Balance Impedance: 1: Short Line Gain Setting: 1: Low ( PABX ) This bulletin has been issued by Sales Development and Training, Commander Sales Operations - Susan Pearson (08) 8202 9648 Series 9 3 January 1997 Technical Bulletin Ref: i1000 By changing one or both of these settings to ‘0’ for Long Line and / or ‘0’ for High ( C.O. ) most faint reception difficulties can be rectified. Where programming changes are unsuccessful Although the programming changes will work in most circumstances, there may still be occasions where the faint reception is still a problem. In these cases please contact the Telstra Commander Remote Access Centre on 1800 809 881 for further help. The Future Work is being done with the manufacturer to assess whether any changes to default data are required at manufacture. Later bulletins will keep everyone up to date. For further information please contact the Telstra Commander Remote Access Centre on 1800 809 881. This bulletin has been issued by Sales Development and Training, Commander Sales Operations - Susan Pearson (08) 8202 9648 Series 9 4 January 1997 TELSTRA IN CONFIDENCE L1 1 L2 2 L3 3 L4 4 RECALL 5 H O LD 6 DND 7 REDIAL 8 1 VO L+ /- IN T M U TE/AA H F/G L 2 3 ABC D EF 4 5 GHI JKL 6 M NO 7 8 9 PQ RS TU V W XYZ 0 # * RLS i Technical Bulletin BULLETIN No. 17 March 1997 This bulletin has been issued by Sales Development and Training, Commander Sales Operations - Susan Pearson (08) 8202 9648 Technical Bulletin Ref: i1001 No. of pages, including this one: 3 DOCUMENTS INCLUDED IN THIS BULLETIN: DATE EQUIPMENT TOPIC REFERENCE 3.3.97 Commander i Modification to improve i1001 Receive Level Volume This bulletin has been issued by Sales Development and Training, Commander Sales Operations - Susan Pearson (08) 8202 9648 Series 17 2 February 1997 Technical Bulletin Ref: i1001 Commander i Modification to improve Receive Level Volume Introduction This bulletin is a follow up to tech bulletin #9 which discusses how to handle customers experiencing difficulty with receive level volume on the Commander i408. A minority of customers have experienced difficulty with reception volume on the Commander i408. This is particularly the case with noisy environments or sites with long distances from the local exchange. As the Commander i408 does not as yet have variable receive volume control, a modification to internal Handset acoustics has been designed which provides a significant increase to the handset receive level. This modification will be incorporated in all future stock commencing from March. It should be noted that less than 10% of installations have experienced this difficulty, however wherever possible Telstra will continue to develop and enhance its products. This bulletin addresses the process on how to handle customers who require higher than normal Handset Receive Volume. Step 1. System Programming As discussed in bulletin #9 the first step is to check the system programming. The programming area to check is: 05 install 08i line settings This bulletin has been issued by Sales Development and Training, Commander Sales Operations - Susan Pearson (08) 8202 9648 Series 17 3 February 1997 Technical Bulletin Ref: i1001 (refer to page 4 - 12 of System Installation Manual) Current default data is: 101100* *note that this default data has changed since the manuals were printed. Remember to change the setting for each line. The ‘1’ in positions 3 & 4 of this string represent: Balance Impedance: 1: Short Line Gain Setting: 1: Low ( PABX ) By changing one or both of these settings to ‘0’ for Long Line and / or ‘0’ for High ( C.O. ) most customers report the new levels are acceptable. The default will be changed to 100000 once new stock arrives in March. If this improvement is insufficient continue to Step 2. This bulletin has been issued by Sales Development and Training, Commander Sales Operations - Susan Pearson (08) 8202 9648 Series 17 4 February 1997 Technical Bulletin Ref: i1001 Step 2 Handset Improvements Existing customers who may require more receive volume must have their details referred to the Telstra Commander Remote Access Centre (TCRAC). These customers will be logged onto a database and when Handset change-over stock is available it will be sent out to them. The customer will have the option of changing handsets themselves or if requested a technician may be despatched to do this. Any existing customer who is experiencing difficulties who is not on the current TCRAC database will not receive this modification. This modification is not available to existing customers via any other process. Therefore please ensure that the above process is followed. Future Product Enhancements It is expected that this latest modification will satisfy almost all applications except physical hearing loss or extremely loud noisy environments. However mid 97 there is planned as an added enhancement to the Commander i408, adjustable volume control for handset reception. This will be available to all new customers, a trade up price will be available for existing customers. This bulletin has been issued by Sales Development and Training, Commander Sales Operations - Susan Pearson (08) 8202 9648 Series 17 5 February 1997 TELSTRA IN CONFIDENCE L1 1 L2 2 L3 3 L4 4 RECALL 5 H O LD 6 DND 7 REDIAL 8 1 VO L+ /- IN T M U TE/AA H F/G L 2 3 ABC D EF 4 5 GHI JKL 6 M NO 7 8 9 PQ RS TU V W XYZ 0 # * RLS i Commander i Technical Bulletin BULLETIN No.27 This bulletin has been issued by Sales Development and Training, Commander Sales Operations - Susan Pearson (08) 8202 9648 Technical Bulletin Ref: i1003 May 1997 No. of pages, including this one: 2 DOCUMENTS INCLUDED IN THIS BULLETIN: DATE EQUIPMENT TOPIC REFERENCE 28.5.97 Commander i Station Based Amplifiers i1003 This bulletin has been issued by Sales Development and Training, Commander Sales Operations - Susan Pearson (08) 8202 9648 Series 27 2 May 1997 Technical Bulletin Ref: i1001 Station Based Amplifiers on Commander i When installing Station Based Amplifiers ( 727/34 ) with Commander i stations, the issue of each individual station needs to be checked. Stations of issue PCS02 will not support the Station Based Amplifier of the type that is supplied as 727/34. To ensure correct operation of the Station Based Amplifier, the Commander i station needs to be of PCS01 issue. If the Station Based Amplifier is required at an existing station of PCS02 issue a station of PCS01 will need to be sourced to replace the existing station. Station issue is printed on the label glued to the underside of each station. Phase 2 Commander i stations will be completely compatible with the Station Based Amplifier. For further information please contact the Telstra Commander Remote Access Centre on This bulletin has been issued by Sales Development and Training, Commander Sales Operations - Susan Pearson (08) 8202 9648 Series 17 3 February 1997 Technical Bulletin Ref: i1003 1800 809 881. This bulletin has been issued by Sales Development and Training, Commander Sales Operations - Susan Pearson (08) 8202 9648 Series 27 4 May 1997 TELSTRA IN CONFIDENCE L1 1 L2 2 L3 3 L4 4 RECALL 5 H O LD 6 DND 7 REDIAL 8 1 VO L+ /- IN T M U TE/AA H F/G L 2 3 ABC D EF 4 5 GHI JKL 6 M NO 7 8 9 PQ RS TU V W XYZ 0 # * RLS i Commander i Technical Bulletin BULLETIN No.35 This bulletin has been issued by Sales Development and Training, Commander Sales Operations - Susan Pearson (08) 8202 9648 Technical Bulletin Ref: i1004 June 1997 No. of pages, including this one: 2 DOCUMENTS INCLUDED IN THIS BULLETIN: DATE EQUIPMENT TOPIC REFERENCE 11.6.97 Commander i Maintenance Serial i1004 & Item Update This bulletin has been issued by Sales Development and Training, Commander Sales Operations - Susan Pearson (08) 8202 9648 Series 35 2 June 1997 Technical Bulletin Ref: i1001 Maintenance Serial & Item Update on Commander i This bulletin is to advise and update the Serial & Items available for maintenance replacement and or expansion parts available for the i408. Serial/Item Description Comments 749/10 PBA _ COMMANDER i MOH CARD 32 Second digitally recorded Music On Hold Card 749/15 CORD LINE _ MASTER KEYSTATION Line Cord from Terminal socket to Master Keystation 749/16 CORD BUS _ KEYSTATION & AFU Bus Cord from Terminal socket to Keystation & AFU 749/17 CORD HANDSET _ COMMANDER i Cord only from station to Handset 749/18 HANDSET _ COMMANDER i Handset only 749/22 DIRECTORY CARD _ COMMANDER i System/Keystation Abbreviated Number Directory card 749/23 AFU SYSTEM USER GUIDE Analogue Feature Unit User Guide 749/24 MANUAL _ STATION QRC COMMANDER i Keystation Quick Reference Card 749/25 MANUAL _ SYSTEM USER GUIDE System User Guide 749/26 MANUAL _ SLT QRC COMMANDER i SLT extension Quick Reference Card 749/37 ADAPTOR _ AC KEYSTATION POWER Master & Standard Keystation Power Supply Plug Pack _____________________________________________________________________________________ _________________________This bulletin has been issued by Sales Development and Training, Commander Sales Operations - Susan Pearson (08) 84017857 STRICTLY FOR TELSTRA STAFF USE ONLY Technical Bulletin Ref: i1004 COMMANDER i 749/38 TERMINAL BLOCK _ BUS COMMANDER i Bus Socket for Keystation & AFU 749/39 TERMINAL BLOCK _ LINE COMMANDER i Line Socket for Master Keystation 749/40 ADAPTOR _ AC AFU COMMANDER i Analogue Feature Unit Power Supply Plug Pack 749/41 PANEL _ DSS COMMANDER i Station DSS panel plastic cover These parts are available via the normal parts ordering process. For further information please contact the Telstra Commander Remote Access Centre on 1800 809 881. This bulletin has been issued by Sales Development and Training, Commander Sales Operations - Susan Pearson (08) 8202 9648 Series 35 4 June 1997 TELSTRA IN CONFIDENCE L1 1 L2 2 L3 3 L4 4 RECALL 5 H O LD 6 DND 7 REDIAL 8 1 VO L+ /- IN T M U TE/AA H F/G L 2 3 ABC D EF 4 5 GHI JKL 6 M NO 7 8 9 PQ RS TU V W XYZ 0 # * RLS i Commander i Technical Bulletin BULLETIN No. 57 This bulletin has been issued by Sales Development and Training, Commander Sales Operations - Susan Pearson (08) 8202 9648 STRICTLY FOR TELSTRA STAFF ONLY Technical Bulletin Ref: i1007 TELSTRA IN CONFIDENCE February 1998 No. of pages, including this one: 2 DOCUMENTS INCLUDED IN THIS BULLETIN: DATE EQUIPMENT TOPIC REFERENCE 4.12.98 Commander i Phase 1 Switch hook i1007 Spring Replacement 749/46 This bulletin has been issued by Sales Development and Training, Commander Sales Operations - Susan Pearson (08) 8202 9648 Bulletin 57 STRICTLY FOR TELSTRA STAFF ONLY 2 January 1998 Technical Bulletin Ref: i1001 Phase 1 Switch hook Spring Replacement 749/46 Since the release of Phase 1 Version of Commander i Master & Standard stations, it has been established that the Switch hook Springs on some stations can lose their tension and cause problems with calls going into handsfree. If the spring is not strong enough to achieve full movement of the switch hook then contact on the circuit board is not made, if the line key is pressed in this state a call will go into handsfree automatically because the System will recognise the Switch hook as Onhook (hung up). The Phase 2 Stations have an improved compression spring that can be fitted to the Phase 1 Stations (Master & Standard). The spring is now available in packs of 20 with the Serial and Item number of 749/46. Warning: IF MASTER STATION 1 OR 2 ARE BEING MODIFIED THE SYSTEM WILL NOT FUNCTION CORRECTLY UNTIL THE STATIONS ARE RECONNECTED. Material List: Phase 2 compression spring Serial Item Number 749/46 (Pack of 20) Tools Required: Small Phillips head screw Driver PBA Antistatic matt Method: 1. Disconnect all cords to the back of the station. 2. Remove the 2 phillips head screws in the base of the station. _____________________________________________________________________________________ _________________________This bulletin has been issued by Sales Development and Training, Commander Sales Operations - Susan Pearson (08) 84017857 STRICTLY FOR TELSTRA STAFF USE ONLY Technical Bulletin Ref: i1007 TELSTRA IN CONFIDENCE 3. With the station still facing down lift the base off of the station. 4. Observing all PBA Antistatic handling precautions disconnect the speaker connector from the circuit board then remove the 15 phillips head screws that retain the circuit board, remove the circuit board being careful not to damage the display or button pad that may stay attached to the circuit board or may stay installed in the front of the station. 5. Press the two sides of the switch hook mechanism inwards to remove from the two raised pivot posts on the station case. 6. Replace the Phase 1 compression spring with the new Phase 2 compression spring (749/46) 7. Reassemble the station using steps 3 to 5 in reverse order being careful to replace all of the 15 screws into the correct position. 8. Once the station is assembled to this point then the flat extension spring should be removed from the base of the station and discarded, if this spring is left inplace then the handpiece will not hangup correctly. 9. Reassemble the station using steps 1 & 2 in reverse order and test the station for correct operation both offhook using the handpiece and on hook in handsfree. For more information please contact the Telstra Commander Remote Access Centre on 1800 809 881 This bulletin has been issued by Sales Development and Training, Commander Sales Operations - Susan Pearson (08) 8202 9648 Bulletin 57 STRICTLY FOR TELSTRA STAFF ONLY 4 January 1998 TELSTRA IN CONFIDENCE L1 1 L2 2 L3 3 L4 4 RECALL 5 H O LD 6 DND 7 REDIAL 8 1 VO L+ /- IN T M U TE/AA H F/G L 2 3 ABC D EF 4 5 GHI JKL 6 M NO 7 8 9 PQ RS TU V W XYZ 0 # * RLS i Commander i Technical Bulletin BULLETIN No. 59 This bulletin has been issued by Sales Development and Training, Commander Sales Operations - Susan Pearson (08) 8202 9648 STRICTLY FOR TELSTRA STAFF ONLY Technical Bulletin Ref: i1008 TELSTRA IN CONFIDENCE January 1998 No. of pages, including this one: 3 DOCUMENTS INCLUDED IN THIS BULLETIN: DATE EQUIPMENT TOPIC REFERENCE 29.1.98 Commander i Reinstallation of i1008 Music on Hold cards This bulletin has been issued by Sales Development and Training, Commander Sales Operations - Susan Pearson (08) 8202 9648 Bulletin 59 STRICTLY FOR TELSTRA STAFF USE ONLY 2 January 1998 Technical Bulletin Ref: i1008 TELSTRA IN CONFIDENCE Reinstallation of Music on Hold cards The Commander i System has three options for Music on Hold: Simple Tones (I), Internal (M) and External Music (E). The Internal Music is provided by the installation of an optional PBA (749/10) within the Master station. This card supplies 32 seconds of repeated music that can be turned on or off in Install Programming section 10i (Music on Hold Source). In many instances Master Stations are being replaced on maintenance visits and the Music on Hold card is NOT being reinstalled into the replacement Master station. This is causing customer dissatisfaction and additional rework and cost, when replacing a Master station we MUST check for the presence of the Music on Hold card using the process below and reinstall in the new Master station. The Internal Music on Hold can be tested in 19i (Station Diagnostics), follow the steps on page 4-16 & 4-17 of your Installation Manual. WARNING the above test is only effective when performed on the Master station being replaced. If it is established by the above process that an Internal music on Hold card is installed in the station you are replacing or you just want to physically check for its presence then follow the steps below. Tools Required: Small Phillips head screw Driver PBA Antistatic matt Method: 1. Unplug all RJ connectors from base of station leaving cords under retaining lugs. 2. Remove the 2 phillips head screws in the base of the station. This bulletin has been issued by Sales Development and Training, Commander Sales Operations - Susan Pearson (08) 8202 9648 Bulletin 59 STRICTLY FOR TELSTRA STAFF USE ONLY 3 January 1998 Technical Bulletin Ref: i1008 TELSTRA IN CONFIDENCE 3. With the station still facing down lift the base off of the station. 4. Observing all PBA Antistatic handling precautions check for the presence of the Music on Hold card (with the station still facing down and the switch hook at the top the Music on Hold card is a small daughter board directly below the switch hook) See diagram on next page. 5. If installed remove the card for reinstallation in the replacement Master station, once the card has been removed or if the card was not installed reassemble the station. 6. Follow the above steps for installing the Music on Hold card in the replacement Master station and programme the System for Internal Music (option 2 ) in 10i(Music on Hold Source). 7. Once assembled connect the Master station to the bus and test for Music on hold by placing an external call on hold and correct operation of all other facilities. For more information please contact the Telstra Commander Remote Access Centre on 1800 809 881 This bulletin has been issued by Sales Development and Training, Commander Sales Operations - Susan Pearson (08) 8202 9648 Bulletin 59 STRICTLY FOR TELSTRA STAFF USE ONLY 4 January 1998 Technical Bulletin Ref: i1008 TELSTRA IN CONFIDENCE CLI Master Station PBA MOH Board 3-pin connector 4-pin connector This bulletin has been issued by Sales Development and Training, Commander Sales Operations - Susan Pearson (08) 8202 9648 Bulletin 59 STRICTLY FOR TELSTRA STAFF USE ONLY 5 January 1998 Technical Bulletin Ref: i1008 TELSTRA IN CONFIDENCE For more information please contact the Telstra Commander Remote Access Centre on 1800 809 881 This bulletin has been issued by Sales Development and Training, Commander Sales Operations - Susan Pearson (08) 8202 9648 Bulletin 59 STRICTLY FOR TELSTRA STAFF USE ONLY 6 January 1998 TELSTRA IN CONFIDENCE L1 1 L2 2 L3 3 L4 4 RECALL 5 H O LD 6 DND 7 REDIAL 8 1 VO L+ /- IN T M U TE/AA H F/G L 2 3 ABC D EF 4 5 GHI JKL 6 M NO 7 8 9 PQ RS TU V W XYZ 0 # * RLS i Commander i Technical Bulletin BULLETIN No. 60 This bulletin has been issued by Sales Development and Training, Commander Sales Operations - Susan Pearson (08) 8202 9648 STRICTLY FOR TELSTRA STAFF ONLY Technical Bulletin Ref: i1009 TELSTRA IN CONFIDENCE February 1998 No. of pages, including this one: 3 DOCUMENTS INCLUDED IN THIS BULLETIN: DATE EQUIPMENT TOPIC REFERENCE 9.2.98 Commander i Transfer of data i1009 between Master stations This bulletin has been issued by Sales Development and Training, Commander Sales Operations - Susan Pearson (08) 8202 9648 Bulletin 60 STRICTLY FOR TELSTRA STAFF USE ONLY 2 February 1998 Technical Bulletin Ref: i1009 TELSTRA IN CONFIDENCE Transfer of data between Master stations (06a Send Data) The Commander i System has the ability to transfer System Data (06a Send Data) between Master stations and is a useful tool to backup System Data from Master station 1 to Master station 2. This command is used to transmit all system data from the first Master station (lines 1 and 2) to the second Master (lines 3 or 4) if one is connected. This operation is for configuration backup and can be initiated from any station. It can also be used to transfer configuration Data to a replacement Master station. This should only be performed between like Master stations (e.g. Phase1 to Phase1 & Phase2 to Phase2). 06a Send Data. Caution: Data send will freeze any activity on Master 1 and Master 2 until completed. To Send The Data: • Press [i] to enter programming mode. • Dial 04 to go to the Administration menu. • Press [i] to confirm. • Enter four digit administration password and press [i]. 01: Repertory 04: Admin Pass: 01aSet Time: If the password is incorrect, the Admin menu is displayed. Press [i] and re-enter correct password or press [RLS] to exit. • Enter 06 to go to the Send Data option. 06aSend data • Press [i] to initiate the sending of the data. Note: It takes about 30-45 seconds to complete the process. Underscore signs are shown on the Master display, indicating that the operation is in progress. During this time, the Master stations are frozen. At the completion of the sending of data, ‘OK’ is displayed. If Send Data is used to Transfer Data from a faulty Master station 1 to a replacement Master station and the System only has one Master station, then Standard station 2 will need to be disconnected temporarily to allow another Master station to be connected to the bus as DSS 2 (Master stations can only be connected as DSS 1 or DSS 2). Once Send Data is complete using the above procedure & ‘OK’ is displayed on Master station 1 press release, now disconnect This bulletin has been issued by Sales Development and Training, Commander Sales Operations - Susan Pearson (08) 8202 9648 Bulletin 60 STRICTLY FOR TELSTRA STAFF USE ONLY 3 January 1998 Technical Bulletin Ref: i1009 TELSTRA IN CONFIDENCE Master station 1 and install the replacement Master station in its place. You will now need to perform a number clear 19 i (Station Diagnostics) 1: NumClr and renumber the replacement Master station as DSS 1, you can now reinstall Standard Station 2 and test the System for correct operation. If Send Data is to be performed on a System with 2 Master stations then the process is a lot easier. Send Data from Master station 1 to Master station 2 then perform a number clear 19 i (Station Diagnostics) on Master station 2 and renumber as DSS 1, now install the replacement station as DSS 2 and test System for correct operation. This bulletin has been issued by Sales Development and Training, Commander Sales Operations - Susan Pearson (08) 8202 9648 Bulletin 60 STRICTLY FOR TELSTRA STAFF USE ONLY 4 February 1998 Technical Bulletin Ref: i1009 TELSTRA IN CONFIDENCE Note: Using the above process will delete User Speed Dials for DSS 1 & DSS 2 also Volume settings for Receiver, Handsfree and Ring will reset to default. No other User, Admin or System Data be lost. Note: Please check for the presence of MOH cards and reinstall into the replacement Master stn. WARNING: Transferring of Data is performed in Administration Programming 06a (Send Data). This must not be performed between unlike Master stations (e.g. Phase1 to Phase2 or Phase2 to Phase 1). Data corruption will occur if this warning is ignored This can also affect System operation at a later date that will cause additional rework and cost. For more information please contact the Telstra Commander Remote Access Centre on 1800 809 881 This bulletin has been issued by Sales Development and Training, Commander Sales Operations - Susan Pearson (08) 8202 9648 Bulletin 60 STRICTLY FOR TELSTRA STAFF USE ONLY 5 January 1998 TELSTRA IN CONFIDENCE L1 1 L2 2 L3 3 L4 4 RECALL 5 H O LD 6 DND 7 REDIAL 8 1 VO L+ /- IN T M U TE/AA H F/G L 2 3 ABC D EF 4 5 GHI JKL 6 M NO 7 8 9 PQ RS TU V W XYZ 0 # * RLS i Commander i+ Technical Bulletin BULLETIN No. 62 This bulletin has been issued by Sales Development and Training, Commander Sales Operations - Susan Pearson (08) 8401 7857 STRICTLY FOR TELSTRA STAFF ONLY Technical Bulletin Ref: i1010 TELSTRA IN CONFIDENCE March 1998 No. of pages, including this one: 5 DOCUMENTS INCLUDED IN THIS BULLETIN: DATE EQUIPMENT TOPIC REFERENCE 2.3.98 Commander i+ Release i1010 For more information please contact the Telstra Commander Remote Access Centre on 1800 809 881 This bulletin has been issued by Sales Development and Training, Commander Sales Operations - Susan Pearson (08) 8401 7857 Bulletin 62 2 March 1998 Technical Bulletin Ref: i1010 TELSTRA IN CONFIDENCE Commander “i+” Release Since the introduction of the Commander “i” Master station ( Phase 2), released in August 1997 as a Hybrid (Phase 2 Master stations with Phase1 standards) a number of problems have been identified with the Phase 2 Master station and have all been resolved in the latest software version (Commander “i+”). The new Commander “i+” Master and Standard stations will be released for sale and rental from 11/03/98. All known problems associated with the Phase 2 Master station can all be resolved by replacement of the Phase 2 Master station with the new release of (Commander “i+” Master station). There is now an extensive retrofit procedure underway to replace all Phase 2 Master stations to address the known problems associated with this version of software. See page 4 for retrofit and upgrade procedures. Below is a list of all known problems associated with the Phase 2 Master which have all been resolved in this version of software. 1. Stations intermittently can display incorrect information in 2 ways: • Station displays have additional icons displayed permanently or flashing. • Station displays have no icons displayed (blank) when stations and lines are busy. Note: There have also been a limited release of Phase 2 Standard stations which may also exhibit faulty displays. 2. Intermittently after a Power failure at Master station 1 or releasing out of 19i (Station diagnostics) in Install Programming it is possible for the customer data to be corrupted temporarily or in some cases permanently. The system in this state may exhibit one or more of the following problems: • Standard and Master stations can have the station lock facility enabled. • Standard and Master stations can have the headset facility enabled. For more information please contact the Telstra Commander Remote Access Centre on 1800 809 881 This bulletin has been issued by Sales Development and Training, Commander Sales Operations - Susan Pearson (08) 8401 7857 Bulletin 62 3 March 1998 Technical Bulletin Ref: i1010 TELSTRA IN CONFIDENCE • System and Personal Speed Dial numbers cannot be dialled from all stations (L1T is displayed not L1T + Speed Dial number on the stations top display). • Redial cannot be dialled at all stations (L1T displayed not L1T + last number dialled on the stations top display). • SLT's connected to a AFU can receive Phantom Rings. • Stations can dial external numbers and are not subjected to their current station Call Barring Class. • Stations are unable to seize External lines. Note: By looking in Install and Admin. programming it is possible to see incorrect values and corruption of the customer data. 3. Station Personal speed dial numbers dialled from standard stations have an additional key press of the "i" key to dial the speed dial number. 4. Station One-Touch Speed Dialling numbers cannot store the Recall facility in the digits to be dialled. 5. Systems configured with only 2 Keystations have various trouble with the second station only (regardless if Station 2 is Master or Standard). This can also occur with system configurations of 2 Keystations and AFU's. The following problems can be experienced from Station 2: • Digits not registering on the keypad when dialling off hook from Station number 2 only • Slow dialling speed from Station number 2 only • Intermittently system internal dial tone will not be received on lift off of the handset from Station number 2 only. Intermittently calls can not be hung up from Station number 2 only. For more information please contact the Telstra Commander Remote Access Centre on 1800 809 881 This bulletin has been issued by Sales Development and Training, Commander Sales Operations - Susan Pearson (08) 8401 7857 Bulletin 62 4 March 1998 Technical Bulletin Ref: i1010 TELSTRA IN CONFIDENCE Note: None of these problems will be Exhibited in Handsfree. 6. The AFU ring (cadence) is the same for internal calls as external calls (both have external ring cadence), this means that the customer using a SLT connected to an AFU will not be able to distinguish the difference between an Internal or an External call. 7. SLTs connected to an AFU may experience the following problems intermittently: • Missed digits during dialling and redial from the SLT resulting in RVAs from the Network, and no call progress. • No system internal dial tone when going off hook. • No clear down of a call after replacing the handset. • Slow dialling. With the new version of Commander “i+” there is now an additional procedure that must always be completed when initialising an AFU with a Commander “i+” Master station. The AFU power must be switched off for a minimum of 20 Seconds once the AFU Initialisation sequence has been completed then switched back on. This additional procedure will be in all future documentation. The new full AFU initialisation sequence including the additional procedure above (as described on the next page) must be performed under the following circumstances: 1. If a system is being installed for the first time with a Commander “i+” Master station as master station number 1 and the system is equipped with an AFU/AFU’s the new full AFU initialisation procedure (as described on the next page) must be performed on all AFU’s 2. If a Phase 1 or Phase 2 Master station is being replaced with a Commander “i+” Master station as master station number 1 on the system equipped with an AFU/AFU’s the new full AFU initialisation procedure (as described on the next page) must be performed on all AFU’s. Note: Replacement of a Commander “i+” Master station with another Commander “i+” Master station does not require the new full AFU initialisation. For more information please contact the Telstra Commander Remote Access Centre on 1800 809 881 This bulletin has been issued by Sales Development and Training, Commander Sales Operations - Susan Pearson (08) 8401 7857 Bulletin 62 5 March 1998 Technical Bulletin Ref: i1010 TELSTRA IN CONFIDENCE For more information please contact the Telstra Commander Remote Access Centre on 1800 809 881 This bulletin has been issued by Sales Development and Training, Commander Sales Operations - Susan Pearson (08) 8401 7857 Bulletin 62 6 March 1998 Technical Bulletin Ref: i1010 TELSTRA IN CONFIDENCE AFU Initialisation Procedure 1. Plug a standard tone dialling telephone to extension A. 2. Connect the AFU Bus cable to the System Bus socket. Ensure that Master 1 is installed and assigned DSS 1. 3. Turn on the AFU plug pack and observe the AFU LED. The LED lights steadily for five seconds. If, after this time, it still lights steadily, then the AFU has been previously configured, otherwise it is being installed for the first time. 4. Turn off the AFU plug pack to prepare for assigning a number to the AFU. Steps 5 to 8 must be completed within the initial five seconds after power on 5. Turn on the AFU plug pack. 6. Lift the handset of the standard tone telephone connected to extension port A. 7. Dial [*]. 8. Replace the handset. The above operation clears the AFU memory (and the LED starts flashing). The AFU is now ready to receive its new identity number. 9. Lift the handset of the standard tone telephone connected to extension port A (no dialtone will be heard) and dial the appropriate one digit identity number for the AFU (using the table below) This assigns the station numbers to both extension Port A & extension Port B. 10.Replace the handset. The LED lights steadily. Internal Dial tone will now be heard when the handset is lifted. 11.To change the AFU identity number for AFU 1 to AFU 2 or visa versa, repeat steps 4 to 10 inclusive. 12.Switch the AFU power off, then after 20 seconds turn the power on. This will ensure the correct operation of the AFU when connected to the Commander “i+”. AFU & Identity Number Port A Station Number Port B Station Number 1 9 * For more information please contact the Telstra Commander Remote Access Centre on 1800 809 881 This bulletin has been issued by Sales Development and Training, Commander Sales Operations - Susan Pearson (08) 8401 7857 Bulletin 62 7 March 1998 Technical Bulletin Ref: i1010 TELSTRA IN CONFIDENCE 2 0 # AFU 1 A AFU 2 B A B Station 9 Station # Station * Station 0 Item not Addressed by the Release of the Commander “i+” 1. It has been discovered that the Last number Redial facility does not work for the first number dialled on a new system installation or if the power is lost to the Master station number 1 after installation, it will work after a short period of time or after another phone number is dialled. Note: This is a minor problem and will be addressed at the first available opportunity in the future. Retrofit and Upgrade Procedures There is now an extensive retrofit procedure underway to replace all Phase 2 Master stations to address the known problems associated with this version of software. Telstra and the Manufacturer (Alcatel) are replacing all Phase 2 stations from the field, all customer sites with Phase 2 Installations have been identified (using S*Plus) and these sites will all be replaced as soon as possible, at no charge to the Customer or Telstra. This will increase the Install workload in the short term but will reduce Maintenance visits and improve product reliability in the long run. This will leave us with a stable base of satisfied Commander “i” Customers. Note: The Commander “i+” Master and Standard stations must ONLY be used for maintenance replacements of Phase 2 Master & Standard stations and are NOT to be used for Phase 1 Master & Standard station replacements. WARNING: When replacing Phase 2 Master stations with Commander “ i+” Master For more information please contact the Telstra Commander Remote Access Centre on 1800 809 881 This bulletin has been issued by Sales Development and Training, Commander Sales Operations - Susan Pearson (08) 8401 7857 Bulletin 62 8 March 1998 Technical Bulletin Ref: i1010 TELSTRA IN CONFIDENCE stations the Send Data facility performed in Administration Programming (06a) must NOT be used to transfer system data due to the potential data corruption problem highlighted with the Phase 2 Master station. (see point 2 page 1 ) If this warning is ignored corrupted customer data may be transferred to the Commander “i+” Master station that could affect system operation. What if an existing Commander i customer wants the added features offered by the Commander i+ ? Customers wishing to add all features except for variable volume control, red hold buttons & the ability to wall mount standard stations to their existing Commander i system need to change their Master Station only Master Station number 1 needs to be changed. The cost of this upgrade to Commander i+ Master Station for both rental and purchased systems is a once only equipment charge of $360 and normal Fee For Service charges for the installation and programming. To fully upgrade to a complete Commander i+ system (giving variable volume control and red hold buttons to all stations plus the ability to wall mount Master & Standard stations) all Stations on the system need to be changed. The Master Station is $360 (as above) and Standard Stations are a once only charge of $190 each. Note: Master Station #1 holds the software for variable volume control...swapping a Commander i+ Standard Station for an original Phase 1 Standard without having a Commander i+ Master Station WILL NOT provide variable volume control on that Standard station. Important: Normal sales and ordering processes apply when a customer wishes to upgrade their equipment. Note: The Station Based Amplifier 727/34 will function correctly with the Commander “i+” Standard Station. For more information please contact the Telstra Commander Remote Access Centre on 1800 809 881 This bulletin has been issued by Sales Development and Training, Commander Sales Operations - Susan Pearson (08) 8401 7857 Bulletin 62 9 March 1998