1
EN
VEGA Transmitter
This transmitter is designed for use in garage doors with non-continuous
operation. It can be used without restriction in all European Union Member States.
Use this transmitter only as described in these instructions, and do not modify
or manipulate in any way unless indicated.
Features
• Class: Spin code
• Operating temperature (ºC): -20 / +55
• Power supply: 1 3V battery, type CR2032
• Frequency: 433.92MHz (VE02 and VE04); 868.35 MHz (VE02/868 and VE04/868)
• Transmission power: <10 mW
Programming the code in the receiver
A) Using the receiver
1 Enable the programming mode in the receiver (see the receiver instructions
manual).
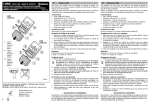
2 Press the on button (1 or 2) for the transmitter to be memorised. If
programming has been carried out correctly, the receiver gives out a
confirmation signal.
3 When all the controls have been memorised, disable the programming
mode of the receiver.
B) By way of a pre-programmed transmitter
1 Bring the programmed transmitter up to the receiver, at a distance of 1 or
2 metres. Press the buttons (1) and (2) at the same time and then release
them. The LED (3) comes on and goes off after two seconds.
2 The LED (3) will light up again by itself; when this happens, press the (1)
and (2) buttons again at the same time and do not release them until the
LED flashes.
3 When the LED stops flashing, the transmitter sends the programming start
signal, activating the receiver programming mode. The programming of
the new transmitters can now start.
4 Press the button of the channel to be programmed in the transmitter you
want to memorise.
5 If required, other transmitters can be programmed by pressing the
corresponding channel.
6 When 10 seconds have passed since the last programming, the receiver
finishes programming mode and remains ready for operation.
Use: Press the on button (1 or 2) to enable the required channel. If required,
use the support piece (4) to secure the transmitter in place.
Battery energy-saving mode
If, for any reason, any of the buttons are kept pressed down for more than 3
seconds, battery energy-saving mode is enabled (the LED flashes and the
transmitter stops transmitting). To disable this function:
1 Press the buttons (1) and (2) at the same time and then release them: the
LED comes on and goes off after 2 seconds.
2 The LED will light up again by itself; when this happens, press the (2)
button again and keep it pressed down until the LED flashes: battery
energy-saving mode is now disabled.
This function can be restored by once again carrying out steps 1 and 2.
Changing the battery
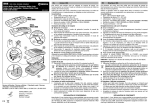
1 Dismount the transmitter by removing the screw (5) and extracting the
battery (6).
The batteries contain contaminating substances and must NEVER
be discarded along with common waste. Batteries must be taken to
a suitable collection facility, in line with local regulations, for subsequent
treatment.
2 Position the new battery, respecting the polarity. Only use batteries of
the same type and size as the originals.
O In order to avoid electrical shocks, handle the batteries at the edge
(see figure). Do not recharge the batteries.
3 Mount the plate (7) on the lower frame (8).
4 Finally, position the cover (9) and the screw (5).
If the transmitter does not work correctly
• Check that the battery is charged.
• Make sure the transmitter code is programmed in the receiver. If in doubt,
carry out new programming.
• Check that the receiver works correctly: check using another transmitter.
PT
Emissor VEGA
Este emissor está previsto para ser utilizado em portas de garagem com
funcionamento não contínuo. Pode ser utilizado sem restrições em todos os
estados da União Europeia.
Utilize este emissor somente como descrito nestas instruções e não faça
modificações ou manipulações que não estejam consideradas nestas instruções.
Características
• Classe: código variável (Spin code)
• Temperatura de funcionamento (ºC): -20 / +55
• Alimentação: 1 pilha de 3V tipo CR2032
• Frequência: 433,92MHz (VE02 e VE04); 868,35 MHz (VE02/868 e VE04/868)
• Potência de emissão: <10 mW
Gravação do código no receptor
A) Através do receptor
1 No receptor, active o modo de gravação (consulte o manual de instruções
do receptor).
2 Prima o botão de funcionamento (1 ou 2) do emissor que deseja
memorizar. Se a gravação foi realizada correctamente, o receptor emite
um sinal de confirmação.
3 Quando tiver memorizado todos os emissores, desactive o modo de
gravação do receptor.
B) Através de um emissor já programado
1 Aproxime-se do receptor com o emissor já programado, a uma distância
de 1 ou 2 metros. Prima simultaneamente os botões (1) e (2) e, de seguida,
solte-os. O LED (3) acende-se e, após dois segundos, apaga-se.
2 O LED (3) se acenderá novamente por si mesmo e, nesse momento, prima
novamente os botões (1) e (2) simultaneamente e não solte até piscar o
LED.
3 Quando o LED deixar de piscar, o emissor envia o sinal de início de
programação, activando o modo de gravação do receptor. Pode iniciar a
gravação dos novos emissores.
4 No emissor que deseja memorizar, prima o botão do canal que queira
gravar.
5 Se desejar, grave outros emissores premindo o canal correspondente.
6 Transcorridos 10 segundos desde a última gravação, o receptor finaliza o
modo de gravação e esta pronto para funcionar.
Utilização
Prima o botão de funcionamento (1 ou 2) para activar o canal desejado. Se
desejar, utilize o suporte (4) para instalar o emissor num local fixo.
Modo de poupança de bateria
Se, por alguma razão, for mantido premido algum dos botões por mais de 3
segundos, é activado o modo de poupança da bateria (o LED pisca e o emissor
deixa de transmitir). Para desabilitar esta função:
1 Prima simultaneamente os botões (1) e (2) e, de seguida, solte-os: o LED
acende-se e após 2 segundos apaga-se novamente.
2 O LED se acenderá novamente por si mesmo e, nesse momento, prima o
botão (2) e mantenha-o premido até que o LED comece a piscar: o modo
de poupança de bateria já está desabilitado.
Se deseja reabilitar esta função, repita os passos 1 e 2.
Troca da pilha
1 Desmonte o emissor, retirando o parafuso (5) e extraia a pilha (6).
Como as pilhas contêm substâncias poluentes, NUNCA as deposite
no lixo ou nos contentores de resíduos comuns. Recorra a um
centro de limpeza e de recolha de resíduos para o seu posterior
tratamento, respeitando as regulamentações locais.
2 Coloque a pilha nova, respeitando a polaridade. Utilize somente
pilhas do mesmo tipo e tamanho das originais.
O Para evitar descargas, manuseie as pilhas segurando-as pela borda
(ver figura). Não recarregue as pilhas.
3 Monte a placa (7) sobre a carcaça inferior (8).
4 Por último, coloque a tampa (9) e o parafuso (5).
Se o emissor não funciona correctamente
• Verifique se a pilha está carregada.
• Assegure-se de que o código do emissor está gravado no receptor. Se tiver
dúvidas, faça uma nova gravação.
• Verifique se o receptor funciona correctamente: prove com outro emissor.
DE
Sender VEGA
Dieser Sender ist für die Verwendung mit Garagentoren mit Intervallbetrieb vorgesehen. Er
kann ohne Beschränkungen in allen Ländern der Europäischen Union verwendet werden.
Verwenden Sie diesen Sender nur gemäß dieser Anleitung und führen Sie keine
Veränderungen oder Eingriffe durch, die nicht in dieser Anleitung erwähnt sind.
Eigenschaften
• Klasse: Wechselcode (Spin-Code)
• Betriebstemperatur (ºC): -20 / +55
• Stromversorgung: 1 3V-Batterie Typ CR2032
• Frequenz: 433,92MHz (VE02 und VE04); 868,35 MHz (VE02/868 und VE04/868)
• Sendeleistung: <10 mW
Speichern des Codes im Empfänger
A) Mit dem Empfänger
1 Aktivieren
Sie
den
Speichermodus
des
Empfängers
(siehe
Gebrauchsanleitung Empfänger).
2 Drücken Sie die Starttaste (1 oder 2) des Senders, den Sie speichern
möchten. Wurde der Speichervorgang korrekt durchgeführt, gibt der
Empfänger ein Bestätigungssignal aus.
3 Nachdem alle Sender gespeichert worden sind, deaktivieren Sie den
Speichermodus des Empfängers.
B) Anhand eines bereits programmierten Senders
1 Nähern Sie sich dem Empfänger mit dem bereits programmierten Sender
auf 1 bis 2 Meter. Drücken Sie gleichzeitig die Tasten (1) und (2) und lassen
Sie sie wieder los. LED (3) leuchtet auf und erlischt nach zwei Sekunden.
2 Wenn LED (3) von alleine erneut aufleuchtet, drücken Sie erneut gleichzeitig
die Tasten (1) und (2) und lassen diese erst los, wenn die LED blinkt.
3 Wenn die LED nicht mehr blinkt, schickt der Sender ein Signal für den
Programmierbeginn und aktiviert damit den Speichermodus des
Empfängers. Jetzt können die neuen Sender gespeichert werden.
4 Drücken Sie die Taste des Kanals, der gespeichert werden soll, an dem
Sender, der gespeichert werden soll.
5 Weitere Sender können durch Drücken des entsprechenden Kanals
gespeichert werden.
6 10 Sekunden nach dem letzten Speichervorgang beendet der Empfänger
den Speichermodus und ist betriebsbereit.
Verwendung: Drücken Sie die Starttaste (1 oder 2), um den gewünschten
Kanal zu aktivieren. Wenn Sie möchten, können Sie die Halterung (4)
verwenden, um den Sender an einem festen Platz unterzubringen.
Batteriesparbetrieb: Wird eine der Tasten länger als 3 Sekunden gedrückt
gehalten, aktiviert sich der Sparbetrieb der Batterie (die LED blinkt und der
Sender beendet die Übertragung). Deaktivierung dieser Funktion:
1 Drücken Sie gleichzeitig die Tasten (1) und (2) und lassen Sie sie dann los.
Die LED leuchtet auf und erlischt nach 2 Sekunden wieder.
2 Wenn die LED erneut von alleine angeht, drücken Sie die Taste (2) und
halten sie so lange gedrückt, bis die LED zu blinken anfängt: der
Batteriesparbetrieb ist jetzt deaktiviert.
Wenn Sie diese Funktion wieder aktivieren möchten, wiederholen Sie die Schritte 1 und 2.
Batteriewechsel
1 Öffnen Sie den Sender durch Herausdrehen der Schraube (5) und nehmen
Sie die Batterie (6) heraus.
Die Batterien enthalten giftige Stoffe, deshalb dürfen Sie NIEMALS
in den Hausmüll oder andere normale Abfallbehälter geworfen
werden. Geben Sie sie bitte in die speziall dafür vorgesehenen Behälter.
2 Setzen Sie die neue Batterie unter Berücksichtigung der Polarität ein.
Verwenden Sie ausschließlich Batterien des gleichen Typs und der
gleichen Größe wie die Originalbatterien.
O Um Stromschläge zu vermeiden, fassen Sie die Batterien bitte seitlich
an (siehe Abbildung). Laden Sie die Batterien nicht wieder auf.
3 Montieren Sie die Tafel (7) auf der unteren Hälfte des Gehäuses (8).
4 Zuletzt bringen Sie den Deckel (9) und die Schraube (5) an.
Wenn der Sender nicht ordnungsgemäß funktioniert
• Prüfen Sie, ob die Batterie geladen ist.
• Stellen Sie sicher, dass der Code des Senders im Empfänger gespeichert ist.
Im Zweifelsfall speichern Sie den Code erneut.
• Prüfen Sie, ob der Empfänger ordnungsgemäß funktioniert: Versuchen Sie
es mit einem anderen Sender.