1
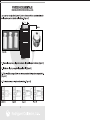
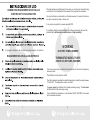
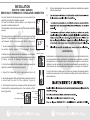
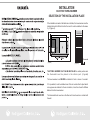
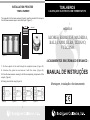
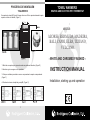
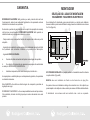
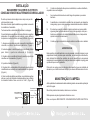
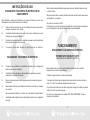
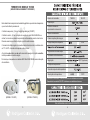
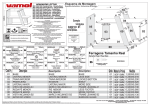
RADIADORES SECATOALLAS
CALEFACCIÓN Y ELÉCTRICOS CON TERMOSTATO
MODELOS:
AZORES, BERMUDA, MADEIRA,
BALI, CAPRI, ELBA, TIZIANO,
VULCANO.
RADIADORES SECATOALLAS
1
GUARANTEE
RODRIGUEZ CALDERÓN, S.A. guarantee that this product has been tested
before being packed and it works correctly and in consequence it doesn’t present
any working or quality defect.
If during the guarantee period (2 years from purchase date) don’t work correctly,
RODRIGUEZ CALDERÓN S.A. will repair or replace this apparatus under the
following conditions:
RADIADORES SECATOALLAS ELÉCTRICOS
600
Checking with the corresponding purchase invoice the date when it was
purchased.
The guarantee will only be applied when there is quality lack in the materials
used or in the manufacturing processes.
The guarantee WILL NOT BE APPLIED:
a) When the installation process, installation and using instructions indicated
in this MANUAL are not observed.
b) If it has been manipulated by people or companies not authorized
specifically by RODRIGUEZ CALDERÓN S.A.
c) Unexpected accidents, as floods, fire, rays, etc.
The repairs or replacements which are reflected on this guarantee, don’t allow
the extension or replacement of the guarantee.
This GUARANTEE don’t affect to the legal rights of the buyer, foreseen by the
law in force.
RODRIGUEZ CALDERÓN S.A. is not responsible by any kind of damage,
fortuitous or accidental, due to infringe any instruction related to this product.
9
2
K)
The supply cable can not be replaced, if it is damaged, the apparatus must
be rejected.
L)
The electrical connections and the switches must be out of reach from the
people who use the shower or bathtub.
M)
The resistance and thermostat has a security device. It will disconnect the
towel warmer in case of any anomaly.
N)
It is normal when the towel warmer works by first time, it can throw out
some liquid drops through the security valve (which must be always in the
superior part). It happens due to the liquid which is in the towel warmer
interior increase its volume when it is heated.
O)
The connection cable can not be in contact with the towel warmer.
RADIADORES SECATOALLAS ELÉCTRICOS
40-80mm
WARNINGS:
This apparatus is not managed to be used by persons (inclusive kids) whose
physical capacities, sensorials or mentals are reduced, or they can lack of
experience or knowledge, except if they have been supervised or they have
received instructions relative to the apparatus use by a person responsible of their
security. The kids must be looked after to assure that they don’t play with the
apparatus.
In order to avoid a danger for the youngest kids, the apparatus should be installed
at least to 600mm from the floor.
MAINTENANCE AND CLEANING
The high quality of the towel warmer finished guarantee an excellent protection
against the corrosion.
For the towel warmer cleaning UNPLUG THE TOWEL WARMER FROM THE
POWER SUPPLY.
Don’t use dissolvents, abrasives or corrosives.
Use a cloth slightly wet or dry.
3
8
USING INTRUCTIONS
ELECTRIC AND HEATING TOWEL WARMERS
, dicha clavija debe ser accesible una vez instalado el
radiador.
This radiator is valid for the installation in bathrooms. Please read carefully the
instructions before the installation.
A)
This instruction manual must be conserved and delivered to any other new
user.
B)
The superface of this towel warmer can be very hot, please take care of
the kids don’t approach to it.
C)
It is normal that in the towel warmer superior part can concentrate dust
particles which can darken the wall.
D)
The air vent must always place in towel warmer superior part.
ELECTRIC TOWEL WARMERS
3
FUNCIONAMIENTO
RADIADORES SECATOALLAS ELÉCTRICOS
TERMOSTATO MODELO TH-SPX
(RADIADORES ACABADO COLOR BLANCO)
E)
F)
Check that the resistance and thermostat match with the electrical grid
voltage.
The use of this radiator is forbidden in presence of gases, explosives and
inflammable liquids.
Este radiador incorpora un termostato electronico que controla la temperatura
que se le ha fijado previamente.
El botón de la izquierda tiene la función conectar/desconectar.
G)
The towel warmer must be disconnected from the lectrical grid when you
have to manipulate it.
El comando de la derecha regula la temperatura seleccionada, siendo su rango
entre 7ºC y 30ºC. La escala de la temperatura no es lineal.
H)
This towel warmer can not be installed in front of a plug or socket.
I)
This towel warmer must always be installed in vertical position and the
thermostat in the inferior part.
El piloto color verde indica que no está consumiendo energía. El piloto color
rojo indica que está consumiendo energía.
J)
The installation of this radiator must be made according the laws in force.
7
Es normal que la temperatura en el radiador NO SEA UNIFORME, esto es debido
a la situación de la resistencia.
4
TECHNICAL CHARACTERISTICS
RESISTANCE AND THERMOSTAT
TERMOSTATO MODELO THESIS
(RADIADORES ACABADO CROMO)
Thermostat Model
THESIS
Power supply
Maximum heating power of the
element
Insulation class
central
Water protection class
Impact protection box
Working temperature
Storage temperature
color verde
está
color rojo
no
Working humidity
Regulation
Integral and Proportional
Temperature setting
Temperature setting range
Temperature Resolution
The thermostat model THESIS is installed on the chromed towel warmers.
The thermostat model TH-SPX is installed on the white towel warmers.
RADIATOR HEIGHT
RADIATOR HEIGHT
(MODELO THESIS)
(MODELO TH-SPX)
RADIATOR HEIGHT
According with the norm
5
6
THERMOSTAT MODEL THESIS
(CHROME COLOR TOWEL WARMER)
This towel warmer has an electronic thermostat which control the temperature
previously fixed.
Modelo de termostato
THESIS
TH-SPX
The left button, (1) has the function On/Off.
The central button, (2) has the connection function during TWO HOURS, if it is
connected, it will work to the maximum temperature continuously during 2 hours.
After this time, it will return to the function previously fixed.
IK04
The right command regulates the selected temperature, being the range between
7ºC and 30ºC. The temperature scale is not lineal.
The green colour led indicates that it is not consuming energy. The red colour
led indicates that it is consuming energy.
It is normal that the temperature on the radiator IS NOT UNIFORM, it is caused
by the resistance situation.
ON/OFF (hystéresis)
1/10ºC
El modelo de termostato THESIS se instala en los radiadores cromados.
El modelo de termostato TH-SPX se instala en los radiadores blancos.
W
W
(MODEL THESIS)
5
W
6
COMÚN PARA RADIADORES SECATOALLAS
ELÉCTRICOS Y DE CALEFACCIÓN
This towel warmer is perfectly ready to be used, you only have to connect the plug
on the socket. Once installed the towel warmer, the plug must be accessible.
You must not make any intervention on the towel warmer. You must not introduce
any liquid, unscrew the caps or the air vent.
It only can be connected to a power supply of 230V.
It is obligatory that the circuits which supply to these equipments, they must be
protected with a differential protection device of high sensibility.
WORKING
El purgador siempre ha de situarse en la parte superior del radiador.
RADIADORES SECATOALLAS ELÉCTRICOS
ELECTRIC TOWEL WARMER
THERMOSTAT MODEL TH-SPX
(WHITE COLOR TOWEL WARMER)
This towel warmer has an electronic thermostat which control the temperature
previously fixed.
The left button has the function On/Off.
The right command regulates the selected temperature, being the range between
7ºC and 30ºC. The temperature scale is not lineal.
The green colour led indicates that it is not consuming energy. The red colour
led indicates that it is consuming energy.
It is normal that the temperature on the radiator IS NOT UNIFORM, it is caused
by the resistance situation.
7
4
INSTALLATION
K)
ELECTRIC TOWEL WARMER
RESISTANCE / THERMOSTAT / REGULATOR CONNECTION
You must check that the towel warmer is not connected to the
electrical grid during the installation process.
You must not introduce metallic objects or your fingers in the
connection resistance/thermostat.
The thermostat must be disconnected until finishing the installation
process.
The towel warmer must be installed on the wall using the suitable
supports .The thermostat must be installed to a distance from the
wall between 40mm (minimum) and 80mm. (Figure H).
1. You must make sure that the resistance has a joint and it must
be correctly situated; replace it if it is damaged. (Figure I)
2. Before joining the thermostat with the resistance, turn the plastic
ring to match the reference point A with the opened padlock symbol
B, taking care not to damage the piece. (Figure J).
40-80mm
N)
(Figure H)
joint
Ñ)
(Figure I)
ADVERTENCIAS:
Reference point A
Opened padlock
symbol B
(Figure J)
5. Join the thermostat until the end A of heating element is correctly
in contact with the end B of the regulator. (Figure L)
6. Turn the plastic ring to close, clockwise, until the reference point
A match with the closed padlock symbol. You must hear a “Click”
sound. (Figure M).
End A of heating
Este aparato no está destinado para ser usado por personas (incluidos niños)
cuyas capacidades físicas, sensoriales o mentales estén reducidas, o carezcan
de experiencia o conocimiento, salvo si han tenido supervisión o instrucciones
relativas al uso del aparato por una persona responsable de su seguridad. Los
niños deberían ser supervisados para asegurar que no juegan con el aparato.
Con el fin de evitar un peligro para los niños muy jóvenes, este aparato debería
instalarse de manera que el raíl calentado más bajo esté al menos 600mm por
encima del suelo.
4. Adjust the thermostat to the towel warmer.(Figure K)
(Figure K)
element
End B of the
regulator
Closed padlock symbol
(Figure M)
3
L)
M)
3. Join the thermostat with the resistance making pressure and
adjust the contacts if it is necessary. (Figure K).
Reference point A
El cable de alimentación no puede ser sustituido, si está dañado, el aparato
debe ser desechado.
(Figure L)
8
INSTALLATION
ELECTRIC TOWEL WARMER
SELECTION OF THE INSTALLATION PLACE
El
If the installation is made in the bathroom or kitchen, the towel warmer must be
installed at least to 600mm from the floor and it must be installed in the areas
2 y 3 (figure A).
es de
Thermostat
(Figure A)
(Figure B)
THE TOWEL WARMER ONLY CAN BE INSTALLED in vertical position and
the thermostat must be placed in the inferior part. (FigureB)
The towel warmer must NEVER be installed in front or down of a socket.
If it is possible, it must be installed near of the air currents. Each object which
can supposes an obstacle for the air circulation, it must be at least to 500mm
distance from the towel warmer.
The thermostat must never be on the floor and it must never be in contact with
the wall.
9
2
INSTALLATION PROCESS
TOALHEIROS
TOWEL WARMER
CALEFAÇAO E ELECTRICOS COM TERMOSTATCTO
The supports to fix the towel warmers (Figure H) must be placed to 80 mm aprox.
from the towel warmer superior and inferior part. (Figure C)
air vent
MODELOS:
AZORES, BERMUDA, MADEIRA,
BALI, CAPRI, ELBA, TIZIANO,
VULCANO.
(Figure I)
(Figure H)
(Figure C)
- ACABAMENTOS EM CROMADO E BRANCO -
1. Fix the supports to the wall through the supplied screws. (Figure D).
2. Introduce the guide bar and assure it with the screw. (Figure E).
3. Place the towel warmer, assuring it with the corresponding components of the
support. (Figure F)
MANUAL DE INSTRUÇOES
4. Finally, place the trim cap. (Figure G).
Montagem, instalaçao e funcionamento
(Figure D)
(Figure E)
(Figure F)
1
(Figure G)
PROCESSO DE MONTAGEM
TOWEL WARMERS
TOALHEIROS
HEATING AND ELECTRIC WITH THERMOSTAT
Os suportes de retençao (Figura H) devem situar-se a 80 mm aproximadamente da parte
superior e inferior do radiador. (Figura C)
MODELS:
AZORES, BERMUDA, MADEIRA,
BALI, CAPRI, ELBA, TIZIANO,
VULCANO.
- WHITE AND CHROMED FINISHED 1. Mete-lhe os suportes para a parede usando os parafusos fornecidos (Figura D)
2. Introduza o guia e segure-o com o parafuso.
INSTRUCTION MANUAL
3. Coloque o radiador, prendendo-o com os componentes de suporte correspondente.
(Figura F)
4. Finalmente colocar o tampao de guarniçao. (Figura G)
1
Installation, starting up and operation
GARANTIA
MONTAGEM
SELEÇÃO DO LUGAR DE MONTAGEM
RADIADORES TOALHEIROS ELECTRICOS
RODRIGUEZ CALDERÓN S.A. garante que este produto está em bom
funcionamento, antes de ser embalado foi testado e não apresenta nenhum
defeito de funcionamento ou qualidade.
Se a instalação for efectuada numa casa de banho ou cozinha, este toalheiro
deve-se instalar a pelo menos 600mm do solo e deverá ser instalado nos volumes
2 e 3 da (figura A)
Se durante o período de garantia (dois anos a partir da aquisição do mesmo)
não funcione correctamente, RODRIGUEZ CALDERÓN S.A. reparará ou
substituirá este conjunto segundo indicações a baixo:
. Comprovando com a respectiva factura de compra com a data em que foi
adquirido.
. A garantia só se aplicará quando sejam vistos problemas derivados da falta
de qualidade nos materiais utilizados no processo de fabricação.
. A garantia NÃO É APLICAVEL:
a.
Quando não lidas as devidas instruções de montagem do aparelho.
b.
Se o objecto foi manipulado por pessoas ou empresas não autorizadas
a venda por RODRIGUEZ CALDERÓN S.A.
c.
Acidentes imprevistos, tais como inundações, incêndio etc.…
As reparações ou substituições que contemplem esta garantia, não permitem
a extensão da mesma.
Esta GARANTIA não afecta os direitos legais do comprador, previstos na
legislação em vigor.
RODRIGUEZ CALDERÓN S.A. não se responsabiliza de nenhum tipo de dano,
furto acidental, derivado de infringir qualquer norma relacionada com este
produto.
9
SO PODE SER INSTALADO na posição vertical e o termóstato deve ficar situado
na parte inferior. (Figura B)
NUNCA deve ser instalado em frente ou de baixo de um plug fixo.
Se possível deve ser instalado ao abrigo das correntes de ar. Um objecto que
possa impedir a circulação de ar deve estar a pelo menos a 500mm deste toalheiro.
O termóstato
nunca deve estar em contacto com o solo ou a parede.
2
INSTALAÇÃO
K.
O cabo de alimentação não pode ser substituído, se estiver danificado,
o aparelho deve ser desligado.
RADIADORES TOALHEIROS ELECTRICOS
CONEXÃO RESISTENCIA/TERMOSTATO/REGULADOR
Durante o processo de montagem deve comprovar que não
está conectado á rede.
Não deve introduzir objectos metálicos ou os dedos na conexão
da resistência / termóstato.
Ter desconectado o termóstato até terminar a montagem.
40-80mm
L.
As conexões eléctricas devem estar longe das pessoas que usam a
banheira.
M.
A resistência e o termóstato do radiador tem incorporado um dispositivo
de segurança, que no caso de qualquer anomalia desconectam o radiador.
N.
É normal que quando o radiador é ligado a primeira vez, possa deitar
algumas gotas de líquido através da válvula de segurança, visto que o
liquido que está dentro do radiador aumenta de volume e temperatura
quando entra em funcionamento.
Ñ.
O cabo que liga á corrente não deve de estar em contacto com o radiador.
O seca toalhas deve-se instalar na parede utilizando os suportes
adequados. O regulador deve ser instalado a uma distância
da parede a menos de 40mm (mínimo) a 80mm. (Figura H)
1. Assegure-se que tem uma junta e que está correctamente
colocada, se estiver danificada substitui-la. (Figura I)
ADVERTENCIAS:
2. Antes de engatar o cartucho quente, girar a anilha de plástico
para fechar o ponto de referencia A. (Figura J)
3. Engatar sobre a resistência fazendo pressão e ajustar as
conexões se for necessário. (Figura K)
4. Ajustar ao toalheiro (Figura K)
Símbolo de cadeado
abierto B
Este aparelho não está destinado a uso de pessoas (incluindo crianças) cujas
capacidades físicas, mentais sejam reduzidas, ou carência de conhecimento,
salvo tenham tido instruções relativas ao uso do aparelho por uma pessoa
responsável da sua segurança. As crianças devem ser avisadas do perigo para
que não brinquem com o aparelho.
5. Engatar até á extremidade A do elemento quente esteja
correctamente em contacto com a extremidade B do regulador.
(Figura L)
Para evitar um perigo para as crianças, este aparelho deve ser instalado de
maneira a que o raide mais baixo esteja a pelo menos 600mm acima do solo.
6. Girar a anilha de plástico para fechar, no sentido das agulhas
até que o ponto de referência A esteja ajustado com o símbolo
do cadeado fechado. Deve ouvir-se um “click”. (Figura M)
MANUTENÇÃO E LIMPEZA
A alta qualidade dos acabamentos deste radiador garante uma excelente protecção
contra ferrugens.
Extremidade A do
elemento quente
Símbolo de cadeado
fechado
3
Extremidade B do
regulador
Não utilize produtos dissolventes, abrasivos ou corrosivos.
Utilize apenas um pano ligeiramente húmido ou seco.
Para sua limpeza DESCONECTE O RADIADOR DA PARTE ELECTRICA.
8
INSTRUÇÕES DE USO
RADIADORES TOALHEIROS ELECTRICOS E DE
AQUECIMENTO
Este radiador é valido para instalações em casas de banho, por favor, leia
atentamente as instruções antes de ser instalado.
A.
Este manual de instruções de uso de instalação deve ser conservado e
entregue a qualquer novo usuário.
B.
A superfície deste radiador pode estar muito quente, certifique-se que as
crianças não se aproximam dele.
C.
É normal que na parte superior do radiador se possam encontrar partículas
de pó que podem escurecer a parede.
D.
O purgador deve estar sempre na parte superior do toalheiro.
Este radiador está perfeitamente preparado para ser utilizado, basta conectar
a cavilha á base.
Não deve intervir sobre o mesmo. Não deve introduzir nenhum líquido, desenroscar
os tampões ou o purgador.
Só pode ser conectado a 230V.
É obrigatório que os circuitos que alimentam este conjunto estejam protegidos
por um dispositivo de protecção diferencial de alta sensibilidade.
FUNCIONAMENTO
RADIADORES TOALHEIROS ELECTRICOS
RADIADORES TOALHEIROS ELECTRICOS
TERMOSTATO MODELO TH-SPX
(RADIADORES ACABAMENTO BRANCO)
E.
Comprove que a resistência e termóstato coincidem com a voltagem da
rede em que vai ser conectado.
F.
A utilização destes radiadores está proibida em presença de gases,
explosivos ou líquidos inflamáveis.
O botão da esquerda tem a função ligar/desligar.
G.
Deve ser desconectado da rede sempre que seja necessário alguma
intervenção.
O comando da direita regula a temperatura seleccionada, sendo a sua faixa
entre 7ºC e 30ºC. A escala da temperatura não é linear.
H.
Este toalheiro não deve ser instalado em frente a uma ficha e/ou tomada
de corrente.
A luz piloto verde indica que não está consumindo energia. A luz piloto vermelha
indica que está a consumir energia.
I.
Deve ser sempre instalado na vertical com o termóstato na parte inferior.
J.
A instalação deste radiador deve ser efectuada de acordo com a legislação
em vigor.
É normal que a temperatura no radiador NÃO SEJA UNIFORME, devido a
situação da resistência.
7
Este radiador tem incorporado um termóstato electrónico que controla a
temperatura que se fixou previamente.
4
TERMOSTATO MODELO THESIS
(RADIADORES ACABAMENTO CROMADO)
Modelo do termóstato
Este radiador tem incorporado um termóstato electrónico que controla a temperatura
que se tenha fixado previamente.
O botão da esquerda, (1) tem a função ligar/desligar (ON/OFF)
TH-SPX
THESIS
Alimentação
Potência máxima de
aquecimento do elemento
Classe de isolamento
O botão do centro, (2) tem a função de conexão durante DUAS HORAS se o
activar, funcionará na máxima temperatura continuamente durante duas horas.
Passado esse tempo voltará a função que tinha anteriormente.
Classe de protecção de agua
Caixa protecção de impactos
IK04
O comando da direita regula a temperatura seleccionada, sendo a sua faixa entre
os 7ºC a 30ºC. A escala da temperatura não é linear.
A luz piloto verde indica que não está consumindo energia. A luz piloto vermelha
indica que está a consumir energia.
É normal que a temperatura no radiador NÃO SEJA UNIFORME, devido á situação
da resistência.
Temperatura de conservação
Humidade de funcionamento
Regulação
ON/OFF (hystéresis)
Fixação da temperatura
Intervalo de ajuste de temperatura
1/10ºC
Resolução de temperatura
O modelo do termóstato THESIS instala-se nos radiadores cromados.
O modelo do termóstato TH-SPX instala-se nos radiadores brancos.
W
W
(MODELO THESIS)
(MODELO TH-SPX)
W
Em conformidade com a norma CEI EN 60335-1
5
6