1
MAINTENANCE
ENGLISH
INTRODUCTION
Weak, Faible, Schwach, Debole, Devil, Fraco
RADIO CONTROLLED CLOCK
MODEL : RM981/ 981U (UK Version)
Receiving, Recevant, Empfang,
Ricezione, Recibiendo, A receber
A
B
-
RF controlled Clock and Calendar
-
Backlight for night viewing
A.
E
3.
Do not subject the unit to excessive: force, shock, dust, temperature, or
humidity. Such treatment may result in malfunction, a shorter electronic
life span, damaged batteries, or distorted parts.
Dual Alarm (Single and Weekday Alarm) with Snooze function
LCD Display
-Displays clock function
C.
ALARM BUTTON
-Press to toggle among Weekday Alarm, Single Alarm and Calendar mode
-Press and hold for 3 seconds to enter the alarm time setting mode when
the respective alarm mode is in display
F
Fig. 1
E.
Fig. 7
SNOOZE BUTTON
-Press to turn on the backlight for 5 seconds
-Press to activate the 8-minute Snooze function when alarm goes off
B.
D.
F.
MODE BUTTON
-Press to toggle among the following displays:
Clock with Second ➝ Clock with Weekday ➝ Clock with offset hour ➝ …
-Press and hold for 3 seconds to enter the clock setting mode
UP & DOWN BUTTONS
-Press to increase or decrease the value of a setting
-Press to activate or deactivate the alarm when the respective alarm time is
shown
HOW TO USE THE BACKLIGHT
Press the SNOOZE button to turn on the backlight for 5 seconds.
ABOUT RADIO RECEPTION [FIG. 3]
RM981/ RM981U is designed to synchronize its calendar clock automatically
once it is brought within range of the Frankfurt DCF77 radio signal (MSF60 for
UK version).
Fig. 8
When RM981/ RM981U is within range, the radio-controlled mechanism will
override all manual setting.
When the unit is receiving signal, the Radio Reception symbol will start to blink.
Generally, complete reception takes around 2 to 10 minutes depending on the
strength of the radio signal.
To enable the reception again, press and hold the UP button for 3 seconds. The
Radio Reception symbol will blink and the unit will search for RF signal
automatically.
hora de compensación de 2a hora/zona horaria
Zeitzonenversatz einstellen
Ajustar a diferença horária da 2a. zona de fuso horário
Language
Langues
Sprache
Lingue
Idiomas
Lingua
Day-of-the-week
Affichage du jour
Giorno della settimana Día de la semana
Monday
Lundi
Montag
Lunedí
Lunes
Segunda
Tuesday
Mardi
Dienstag
Martedí
Martes
Terça
Wednesday
Mercredi
Mittwoch
Mercoledí
Miércoles
Quarta
Thursday
Jeudi
Donnerstag
Glovedí
Jueves
Quinta
Wochentaganzeige
Dia de Semana
Friday
Vendredi
Freitag
Venerdí
Viernes
Sexta
Saturday
Samedi
Samstag
Sabato
Sábado
Sábado
Sunday
Dimanche
Sonntag
Domenica
Domingo
Domingo
English
Anglais
Englisch
Inglese
Inglés
Inglês
Hintergrundbeleuchutung für das Lesen im Dunkeln
-
Double alarme : alarme simple et alarme des jours de la semaine avec
fonction snooze
-
Zweifacher Alarm (Einfach Alarm und Wochentagalarm) mit
Schlummerfunktion
COMMANDE DE REPETITION DE REVEIL
- Appuyer pour activer le rétro-éclairage pendant 5 secondes
- Appuyer pour activer la répétition de réveil 8 minutes quand l'alarme se
déclenche.
:
-5°C to 50°C
B.
AFFICHAGE LCD
- Affiche la pendule
Radio Control
:
By Radio signal generated from Germany
DCF77 (MSF60 for UK)
C.
Calendar
:
Weekday in English, German, French,
Italian and Spanish
Day / Month
COMMANDE D'ALARME
- Appuyer pour alterner entre alarme de jour de semaine, alarme simple et
mode de calendrier
- Appuyer pendant 3 secondes pour entrer le mode de réglage de l'heure
d'alarme quand le mode d'alarme respectif est affiché.
Clock Functions
12 / 24 hour format
:
+/-0.5 second/day (when RF is disabled)
Hour Offset
:
+/- 9 hours
D.
E.
Battery Type
:
1 piece of UM3 or "AA" size 1.5V alkaline battery
Unit Dimension
:
105 x 90 x 55 mm (H x W x D)
Unit Weight
:
138 g (without battery)
F.
COMMANDE DE MODE
- Appuyer pour faire alterner les affichages suivants :
Pendule avec secondes / Pendule avec jour de semaine / Pendule avec
heure compensée
- Appuyer pendant 3 secondes pour entrer le mode de réglage de la pendule.
This device complies with the essential requirements of Article 3 of the R&TTE
1999/5/EC Directive, if used for its intended use and that the following standard(s)
has been applied:
Applied standards
ETS 300 683 : 1997
Efficient use of the radio frequency spectrum (Article 3.2 of the R&TTE
Directive)
Applied standards
EN300 220 –1 : 1997
INTENDED USE OF THE DEVICE
Note: Interference from sources such as TV sets can affect the signal. If, after
batteries have been inserted for ten minutes, the signal is not received, then set
the time manually (see section: How To Set The Clock & Calendar Manually).
- The contents of this manual may not be reproduced without the
permission of the manufacturer.
Follow the same procedures to set and activate the Single and/or Weekday Alarm.
French
Français
Französisch
Francese
Francés
Francês
Italian
Italian
Italienisch
Italiano
Italiano
Italíano
Spanish
Espagnol
Spanisch
Spagnolo
Español
Espanhol
3 Sekunden lang drücken und festhalten
Prima durante 3 segundos
Ne pas toucher les composants internes de l’appareil. Ceci rendra nul la
garantie et peut causer des dommages. L’appareil ne contient aucun
composant pouvant être réparé par l’utilisateur.
5.
Utiliser uniquement des piles neuves du type préconisé dans le manuel
d’utilisation.
6.
Lire soigneusement le manuel d’instructions avant de faire fonctionner
l’appareil.
SNOOZE-TASTE
-Schaltet die Hintergrundbeleuchtung für 5 Sekunden ein
-Aktiviert die 8-Minuten-Schlummerfunktion, wenn der Alarm ertönt
B.
FLÜSSIGKRISTALLANZEIGE
-Zeigt die Uhrzeit an
C.
ALARMTASTE
-Dient zum Umschalten zwischen Wochentagalarm, dem einmaligen Alarm
und der Uhrzeit
-Drücken und 3 Sekunden lang festhalten, um den Alarmzeiteinstellmodus
für den jeweils angezeigten Alarmmodus aufzurufen
D.
MODE TASTE
-Dient zum Umschalten zwischen folgenden Anzeigen:
Uhr mit Sekunde / Uhr mit Wochentag / Datum / Uhr mit Stundenversatz
-Drücken und 3 Sekunden lang festhalten, um den Uhrzeiteinstellmodus
aufzurufen
E.
(+)-AUF und (-) Ab- TASTEN
-Dient zum Erhöhen/Vermindern eines eingestellten Wertes
-Dient zum Aktivieren oder Deaktivieren des Alarms, wenn die
entsprechende Alarmzeit angezeigt wird
F.
BATTERIEFACH
-Platz für eine UM-3 Batterie oder "AA".
SPÉCIFICATIONS
Température de fonctionnement : -5°C à 50°C
Fonctions de réveil
Calendrier
: Jour de semaine en anglais, allemand,
français, italian, eapagnol
Mois / Date
LOGEMENT DE LA PILE
- Utilise 1 pile UM-3 ou AA/R6 alcaline
Format horaire
: Format 12 / 24 heures
Précision
: +/- 0,5 seconde/jour
(quand le RF est désactivé)
Horaire Compensation
: +/- 9 heures
INSTALLATION DE LA PILE [Fig. 2a]
Remarque : Remplacer la pile par une neuve quand l'indicateur de pile faible
] s'affiche [Fig. 2b]
[
A.
BATTERIE EINLEGEN [Fig. 2a]
Hinweis: Neue Batterien einlegen, wenn die Batterie-Schwach-Anzeige[
erscheint [Fig. 2b]
]
Spécifications générales
EINSCHALTEN DER HINTERGRUNDBELEUCHTUNG
Type de pile
: 1 pile UM3 ou "AA/R6", 1,5, alcaline
COMMENT UTILISER LE RETRO-ECLAIRAGE
Dimensions de l'appareil
: 105 x 90 x 55 mm (H x l x L)
Appuyer sur SNOOZE pour allumer le rétro-éclairage pendant 5 secondes.
Poids de l'appareil
: 138 g (sans piles)
SUR LA RECEPTION RADIO [FIG. 3]
REMARQUE CONCERNANT LA CONFORMITE
Le RM981/ RM981U est conçu pour synchroniser automatiquement sa pendulecalendrier dès que celle-ci se trouve à portée du signal radio DCF-77 de Francfort
(MSF60 pour la version Royaume-Uni).
Attention : Tout changement ou modification apporté à cet appareil sans
l’approbation expresse de la partie responsable de sa conformité risque d’annuler
le droit de l’utilisateur à se servir de cet équipement.
Quand le RM981/ RM981U est dans ce rayon d'émission, le mécanisme radiocommandé supplante tous les réglages manuels.
Note de conformité R&TTE
Wenn die RM981/ RM981U in dem Bereich betrieben wird, setzt die
funkgesteuerte Synchronisation alle manuellen Einstellungen außer Kraft.
Lors d’une utilisation adéquate et si les standards suivants ont été respectés, cet
appareil est conforme aux spécifications de l’article 3 de la directive R&TTE
1999/5/EC.
Sobald das Gerät das Signal, nach dem aktivieren, empfängt, beginnt das
Empfangssymbol zu blinken. Je nach Stärke des Signals dauert es ca. 2 - 10
Minuten, bis der Empfang abgeschlossen ist.
Compatibilité électromagnétique: (article 3.1.b de la directive R&TTE)
Um den Empfang des Signals manuell zu deaktivieren, drücken und halten Sie
die (-)-Taste 3 Sekunden lang, bis das Empfangssymbol verschwindet.
Pour désactiver manuellement la réception du signal RF, appuyer sur la
commande DOWN pendant 3 secondes jusqu'à ce que le symbole de réception
radio disparaisse.
Standards appliqués:
Pour réactiver la réception, appuyer sur la commande UP pendant 3 secondes.
Le symbole de réception radio se mettra à clignoter et l'appareil recherchera
automatiquement le signal RF.
Standards appliqués:
ETS 300 683 : 1997
Utilisation efficace du spectre de fréquences radio (article 3.2 de la directive
R&TTE)
EN 300 220-1 : 1997
UTILISATION CONFORME DU PRODUIT
Interférences
La réception peut être gênée par un certain nombre de facteurs. Pour une meilleure
réception, placer l’appareil à l’écart de tous objets métalliques et appareils
électriques.
ATTENTION
Note: Les interférences de sources telles que les téléviseurs peuvent gêner les
signaux. En cas de non-réception de signaux DCF77 dix minutes après que les
piles ont été mises en place, régler l’heure manuellement (voir la section :
Comment règler manuellement la pendule et le calendrier).
- Le contenu de ce livret est susceptible de modifications sans avis
préalable.
COMMENT REGLER MANUELLEMENT LA
PENDULE ET LE CALENDRIER [Fig. 4] ET [Fig. 5]
- Le contenu de ce livret ne peut être reproduit sans l’autorisation du
fabricant.
Noter que pour utiliser la pendule sur un autre fuseau horaire [Fig. 6], il est
nécessaire de règler une deuxième heure compensée sur la pendule. Quand celleci est règlée (par ex. +1), l'heure affichée est l'heure RF + 1 heure.
COMMENT REGLER ET ACTIVER L'ALARME
Drücken Sie die SNOOZE-Taste, um die Beleuchtung für 5 Sekunden
einzuschalten.
ÜBER DEN FUNKEMPFANG [FIG. 3]
Bei Eintritt in den Sendebereich 1500 km um Frankfurt, DCF-77 (MSF60 für
die britische Version), wird die RM981/ RM981U Kalenderuhr automatisch
synchronisiert.
Um den Empfang wieder zu aktivieren, drücken und halten Sie die (+)-Taste 3
Sekunden lang. Das Empfangssymbol beginnt zu blinken, wobei das Gerät
automatisch nach dem Funksignal sucht.
Interferenzen
Der Empfang kann durch verschiedene Faktoren beeinträchtigt werden. Um einen
optimalen Empfang zu gewährleisten, sollten Sie das Gerät nicht in der Nähe
von metallischen Gegenständen und elektrischen Geräten aufstellen.
Anmerkung: Störungen durch Interferenzquellen, wie z.B. durch TV-Geräte,
können den Empfang des Signals beeinträchtigen. Wenn zehn Minuten nach
dem Einlegen der Batterien noch kein DCF77 Zeitsignal empfangen wurde,
sollten Sie die Uhr manuell einstellen. (siehe Abschnitt: Wie Uhrzeit und
Kalender manuell eingestellt werden).
- En raison des restrictions imposées par l’impression, les affichages
figurant dans ce livret peuvent différer de ceux du produit.
WIE UHRZEIT UND KALENDER MANUELL
EINGESTELLT WERDEN [Fig. 4] UND [Fig. 5]
Wenn Sie die Uhr in einer anderen Zeitzone verwenden wollen [FIG. 6], müssen
Sie den Zeitzonenversatz verwenden. Wenn ein Stundenversatz eingestellt wurde
(z.B. +1), ist die angezeigte Zeit gleich Funkzeit plus 1 Stunde.
WIE DER ALARM EINGESTELLT UND
AKTIVIERT WIRD
Pour règler et activer l'alarme, voir [FIG.7]
When the alarm goes off at the preset time, the backlight will be turned on for 8
] flashing and the alarm sound will be
seconds. The ALARM ON icon [
turned on.
Suivre la même procédure pour règler et activer l'alarme simple et/ou de jour de
semaine.
The crescendo alarm function allows the alarm sound to start off gently with
step-up intensity. Without interruption, the alarm will go off for 2 minutes.
COMMENT DESACTIVER L'ALARME [FIG. 8]
Einstellen und Aktivieren des einmaligen und/oder Wochentagalarms erfolgt
nach dem gleichen Verfahren.
ALARME CRESCENDO ET REPETITION DE REVEIL
WIE DER ALARM DEAKTIVIERT WIRD [FIG. 8]
Quand l'alarme se déclenche à l'heure prévue, le rétro-éclairage s'allume pendant
8 secondes. L'icône d'alarme activée [ ] clignote et la sonnerie de l'alarme est
activée.
CRESCENDO ALARM UND SNOOZE-FUNKTION
In case of malfunction or abnormal display, take out and re-install the batteries
again. All settings will be cleared and reset to their default values.
Appuyer dessus pendant 3 secondes.
4.
HAUPTMERKMAL [FIG. 1]
CRESCENDO ALARM AND SNOOZE FUNCTION
RESETTING THE UNIT
Tenere premuto per 3 secondi
Ne pas exposer l’appareil aux chocs excessifs, ni aux excès de force,
poussière, chaleur, froid ou humidité qui pourraient résulter en un mauvais
fonctionnement, le raccourcissement de la vie de l’appareil,
l’endommagement des piles et la déformation des composants.
HOW TO DEACTIVATE THE ALARM [FIG. 8]
To stop the alarm, press ALARM or SNOOZE. If SNOOZE button is pressed,
the alarm sound will be turned off temporarily and the snooze function will be
activated. The alarm will go off again after approx. 8 minutes until other key is
pressed to turn off the alarm.
Pulse y sostenga 3 segundos
3.
Cet appareil est équipé de deux alarmes : alarme simple [ ] et alarme de jour
de semaine [ ]. L'alarme simple se déclenche une fois à l'heure programmée.
L'alarme hebdomadaire est activée du lundi au vendredi et désactivée
automatiquement pendant le week-end (samedi et dimanche).
Fig. 5
Press & Hold 3 seconds
CAUTION
- Due to printing limitation, the displays shown in this manual may differ
from the actual display.
This unit is equipped with 2 alarms: Single Alarm [ ] and Weekday Alarm
[ ]. For the Single Alarm, it will go off only once at the preset time. For the
Weekday Alarm, it will be enabled from Monday to Friday and disabled
automatically during weekend (i.e., Saturday and Sunday).
Ne pas nettoyer l’appareil à l’aide de produits abrasifs ou corrosifs. Ces
produits peuvent rayer les parties en plastique et attaquer les circuits
électroniques.
: Par signal radio DCF-77 généré depuis
l'Allemagne (MSF60 pour le Royaume-Uni)
Quand l'appareil reçoit le signal, le symbole de réception radio se met à clignoter.
Une réception complète prend généralement 2 à 10 minutes, en fonction de la
force du signal.
- The content of this manual is subject to change without further notice.
HOW TO SET AND ACTIVATE THE ALARM
2.
Electromagnetic compatibility (Article 3.1.b of the R&TTE Directive)
Reception can be affected by a number of factors. For best reception, place the
device away from metal objects and electrical appliances.
Please note that in order to use the clock in different time-zone [FIG. 6], 2nd
time-zone offset hour has to be set. When an offset hour has been set (e.g. +1),
the time displayed will be the RF clock time plus 1 hour.
Ne pas immerger l’appareil.
Radio pilotage
NOTE ON COMPLIANCE
Warning: Changes or modifications to this unit not expressly approved by the
party responsible for compliance could void the user’s authority to operate the
equipment.
1.
COMMANDES HAUT ET BAS
- Appuyer pour augmenter ou diminuer la valeur d'un réglage.
- Appuyer pour activer ou annuler l'alarme quand l'heure d'alarme respective
est affichée.
To set and activate the alarm, see [FIG. 7]
German
Allemand
Deutsch
Tedesco
Alemán
Alemão
Fig. 5
-
A.
Interference
HOW TO SET THE CLOCK AND CALENDAR
MANUALLY [Fig. 4] & [Fig. 5]
Fig. 6
Fig. 4
Funkgesteuerte Uhr und Kalender
Rétro-éclairage
Read this instruction manual thoroughly before operating the unit.
To disable the reception of RF signal manually, press and hold the DOWN button
for 3 seconds until the Radio Reception symbol disappear.
Imposta l'ora di offset del 2º fuso orario
-
-
R&TTE Compliance Note
Fig. 2b
Règle la compensation du deuxième fuseau horaire.
Merkmale des RM981/ RM981U:
Ce produit a été conçu pour assurer un bon fonctionnement pendant plusieurs
années à condition d’en prendre soin. Certaines précautions s’imposent:
6.
] is
AA
Set 2nd time-zone offset hour
PRECAUTIONS
Horloge et calendrier radio pilotée
CARACTÉRISTIQUE PRINCIPALE [FIG. 1]
:
Wir beglückwünschen Sie zum Kauf des funkgesteuerten RM981/ RM981U
Weckers.
-
Only use new batteries as specified in this instruction manual.
Accuracy
EINFÜHRUNG
Caractéristiques du RM981/ RM981U :
5.
Clock Time
En case de mauvais fonctionnement de l’affichage, enlever les piles et les
ré-installer. Tous les réglages seront effacés et remis à leur valeur par défaut.
Nous vous félicitons d’avoir fait l’acquisition de la pendule radio pilotée RM981/
RM981U.
Do not tamper with the unit’s internal components. Doing so will terminate
the unit’s warranty and may cause damage. The unit contains no userserviceable parts.
General Specification
BATTERY COMPARTMENT
-Uses 1 piece of UM-3 or "AA" alkaline battery
Remark: Replace with new batteries when the low battery indicator [
displayed [Fig. 2b]
INTRODUCTION
4.
Operating Temperature
DEUTSCH
RE-INITIALISATION DE L’APPAREIL
SPECIFICATIONS
BATTERY INSTALLATION [Fig. 2a]
Fig. 2a
Do not clean the unit with abrasive or corrosive materials. Abrasive cleaning
agents may scratch the plastic parts and corrode the electronic circuit.
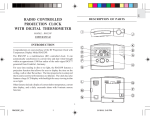
MAIN FEATURE [FIG. 1]
Fig. 3
Do not immerse the unit in water. If the unit comes in contact with water,
dry it immediately with a soft lint-free cloth.
2.
Features of RM981/ RM981U include:
-
C
D
1.
Congratulations on your purchase of the RM981/ RM981U Radio-controlled
Clock.
No Reception, Pas de réception, Kein Empfang,
Ricezione nulla, No Hay Recepcion, Sem sinal
USER MANUAL
FRENCH
When handled properly, this unit is engineered to give you years of satisfactory
service. Here are a few product care instructions:
Strong, Forte, Stark, Buona, Fuerte, Forte
La fonction de l'alarme crescendo permet à l'alarme de se déclencher doucement
avant d'augmenter en intensité. Si l'alarme n'est pas interrompue, elle sonne
pendant 2 minute.
Pour arrêter l'alarme, appuyer sur la touche ALARM ou SNOOZE. Si la
commande SNOOZE est enfoncée, l'alarme s'arrête momentanément et la
fonction de répétition de réveil est activée. L'alarme se redéclenche
approximativement 8 minutes plus tard, jusqu'à ce qu'on appuie sur une
commande pour l'éteindre.
Dieses Gerät ist mit 2 Alarmen ausgerüstet: Einmaliger Alarm [
Wochentagalarm [ ].
] und
Der einmalige Alarm ertönt nur einmal zur eingestellten Alarmzeit. Der
Wochentagalarm bleibt von Montag bis Freitag aktiviert, und die Alarmfunktion
wird automatisch während der Wochenenden (d.h. Samstag und Sonntag)
abgeschaltet.
Einstellen und Aktivieren des Alarms, siehe [FIG. 7]
Wenn der voreingestellte Alarmzeitpunkt erreicht ist, schaltet sich die
Hintergrundbeleuchtung für eine Dauer von 8 Sekunden ein. Das ALARM EIN
] blinkt und der Alarmton ist zu hören.
Symbol [
Die Crescendo Alarmfunktion bewirkt, dass zuerst nur ein leiser Ton ertönt, der
aber ständig an Lautstärke zunimmt. Ohne Unterbrechung ertönt der Alarm 2
Minute lang.
Drücken Sie eine beliebige Taste, um den Alarm abzustellen. Wenn Sie die
SNOOZE-Taste drücken, verstummt der Alarm vorübergehend, wobei die
Schlummerfunktion aktiviert wird. Nach ca. 8 Minuten schaltet sich der Alarm
wieder ein, bis er durch Drücken einer anderen Taste wieder abgestellt wird.
Per interrompere l’allarme, premere il tasto ALARM oppure SNOOZE. Se si
preme il pulsante SNOOZE, la suoneria viene interrotta momentaneamente e
viene attivata la funzione Snooze. L'allarme scatterà nuovamente dopo circa 8
minuti e si arresterà quando si preme un tasto qualsiasi.
ITALIANO
INTRODUZIONE
Complimenti per l’acquisto dell’orologio a radiocontrollato RM981/ RM981U
ZURÜCKSETZEN DES GERÄTES
Im Falle von Fehlfunktionen oder ungewöhnlichen Anzeigen, sollten Sie die
Batterien entnehmen und wieder einfügen. Hiernach werden alle Einstellungen
gelöscht und das Gerät auf seine voreingestellten Werte gesetzt.
VORSICHTSMASSNAHMEN
-
Nel caso il prodotto non funzioni nel modo corretto, si consiglia di rimuovere le
pile ed istallarle nuovamente. Tutte le impostazioni vengono cancellate e l’unità
ritorna automaticamente ai valori di default.
-
Reloj de radio frecuencia y calendario
-
Retroiluminación para ver de noche
-
Alarma doble (individual y semanal) con función de repetición
Retroilluminazione per la visualizzazione al buio
-
Doppio allarme (giornaliero e settimanale) con funzione Snooze
-
Funzione di off-set per l’utilizzo di un doppio fuso orario
CARATTERISTICHE PRINCIPALI [FIG. 1]
1.
Tauchen Sie das Gerät nicht in Wasser.
A.
2.
Reinigen Sie das Gerät niemals mit scheuernden oder scharfen Reinigern.
Diese könnten die Plastikteile beschädigen, und die elektronischen
Schaltkreise korrodieren.
4.
5.
Setzen Sie das Gerät nicht irgendwelcher Gewalteinwirkung,
Erschütterungen, Staub, extremen Temperaturen oder Feuchtigkeit aus,
da dadurch Funktionsstörungen, kürzere Lebensdauer und Batterieschäden
sowie Gehäuseverformungen verursacht werden können.
Nehmen Sie keine Änderungen an den inneren Komponenten des Gerätes
vor. Dadurch erlischt die Garantie für das Gerät und es können andere
Schäden verursacht werden. Im Inneren des Gerätes befinden sich keine
Teile, die vom Benutzer selbst gewartet werden müssen.
Temperaturmessbereich
OROLOGIO
-Visualizza l’ora corrente
C.
CALENDARIO / ALLARMI
-Premere il pulsante per visualizzare l’Allarme settimanale, l’Allarme
giornaliero ed il Calendario
-Tenere premuto per 3 secondi per accedere alla modalità di impostazione
dell’ora dell’allarme, quando è visualizzata la corrispondente modalità di
allarme
D.
E.
: -5°C bis 50°C
Funktionen der Uhr
Zeitsignal
Kalender
: Funksignalempfang von DCF-77 Deutschland
(MSF60 für GB)
: Wochentaganzeige in englischer, deutscher,
französischer, italienischer und spanischer
Sprache; Tag/ Monat
Uhrzeit
: 12 / 24-Stunden-Anzeigeformat
Genauigkeit
: ±0,5 Sekunden/Tag
(ohne Funksynchronisation)
Zeitzoneneinstellung
: +/- 9 Stunden
PULSANTE SNOOZE
-Premere per accendere la retroilluminazione per 5 secondi
-Premere per attivare la funzione Snooze di 8 minuti quando scatta l'allarme
B.
Verwenden Sie nur neue Batterien des in der Bedienungsanleitung
angegebenen Typs.
TECHNISCHE DATEN
F.
PULSANTE MODE
-Premere per visualizzare Orologio con Secondi , Orologio con Giorno
della settimana oppure secondo fuso orario
-Tenere premuto per 3 secondi per accedere alla modalità di impostazione
dell’orologio
PULSANTI SU & GIÙ
-Premere per aumentare o ridurre il valore di un'impostazione
-Premere per attivare o disattivare l'allarme quando appare la corrispondente
ora di allarme
VANO PILE
-Accoglie 1 pila UM-3 o “AA” alcalina
Quando appare l’indicatore [
pila [Fig. 2b]
] di bassa carica, si consiglia di sostituire la
USO DELLA RETROILLUMINAZIONE
Batterietyp
: 1 UM-3 Batterie oder "AA" 1,5V
Abmessungen
: 105 x 90 x 55 mm (HxBxT)
RICEZIONE DEI SEGNALI RADIO [FIG. 3]
: 138 g (ohne Batterien)
Il prodotto è in grado di sincronizzare automaticamente l’ora ed il calendario se
utilizzato entro il raggio d’azione del segnale radio di Francoforte DCF77 (MSF60
per la versione UK).
Gewicht
HINWEIS ZUR BETRIEBSSICHERHEIT
Warnung: Änderungen oder Modifikationen, die nicht ausdrücklich vom
Verantwortlichen für die Erlangung der Betriebserlaubnis genehmigt sind, können
zum Erlöschen der Betriebserlaubnis für das Gerät führen.
Quando l’RM981/ RM981U rientra in questo raggio d’azione, il meccanismo a
radiofrequenza annulla tutte le impostazioni manuali.
R&TTE - Konformitätserklärung
Quando l’unità riceve il segnale, il simbolo di Ricezione radio inizia a
lampeggiare. La ricezione completa richiede dai 2 ai 10 minuti, a seconda della
potenza del segnale radio.
Dieses Gerät entspricht bei bestimmungsmäßiger Anwendung den
Anforderungen des Artikels 3 der R&TTE 1999/5/EC Richtlinie:
In caso di mancata ricezione del segnale radio si consiglia di riorientare il
prodotto, spostandolo in altro luogo ed attendere 24 ore.
Elektromagnetische Kompatibilität: (Artikel 3.1.b der R&TTE Richtlinie)
Per disattivare manualmente la ricezione del segnale RF, tenere premuto il
pulsante DOWN per 3 secondi finché il simbolo di Ricezione radio non scompare.
Angewandte Standards: ETS 300 683 : 1997
Leistungsfähiger Gebrauch des Funkfrequenzspektrums (Artikel 3.2 der R&TTE
Richtlinie)
Angewandte Standards: EN 300 220-1 : 1997
BEABSICHTIGTER BETRIEB DES GERÄTES
VORSICHT
- Aufgrund von Einschränkungen der Druckmöglichkeiten kann die
Darstellung der Anzeige in dieser Bedienungsanleitung von der
tatsächlichen Anzeige abweichen.
- Der Inhalt dieser Bedienungsanleitung darf nicht ohne die Zustimmung
des Herstellers vervielfältigt werden.
- Änderungen vorbehalten
PRECAUZIONI
CARACTERÍSTICAS PRINCIPALES [FIG. 1]
Questo prodotto è studiato per un funzionamento ottimale e duraturo a condizione
che venga maneggiato con cura. Attenersi alle seguenti precauzioni:
A.
BOTON DE REPETICION
-Pulse para encender la retroiluminación durante 5 segundos
-Pulse para activar la función de repetición de 8 minutos al apagar la alarma
PANTALLA LCD
-Muestra el reloj
1.
Non immergere l’unità in acqua o liquidi.
2.
Non pulire l’unità con sostanze abrasive o corrosive, poiché possono scalfire
i componenti di plastica e corrodere il circuito elettronico.
B.
3.
Non sottoporre l’unità a forza eccessiva, urti, polvere, temperature eccessive
o umidità che possano provocare malfunzionamenti, ridurre la durata dei
circuiti elettronici, danneggiare le pile o i componenti.
C.
4.
Non manomettere i componenti interni dell’unità. Così facendo si rende
nulla la garanzia e si possono causare danni. L’unità non contiene
componenti che possono essere riparati dall’utente.
5.
Usare solo pile nuove, come specificato nelle istruzioni.
6.
Prima di mettere in funzione l’unità, leggere attentamente le istruzioni per
l’uso.
Per abilitare nuovamente la ricezione, tenere premuto il pulsante UP per 3 secondi.
Il simbolo di Ricezione radio lampeggia e l'unità avvia una ricerca automatica
del segnale RF.
Interferenze
La ricezione può essere condizionata da diversi fattori. Per ottenere una ricezione
ottimale, posizionare l’unità lontano da oggetti metallici e da apparecchiature
elettriche.
Nota: l’interferenza da sorgenti quali televisori può influire sulla ricezione del
segnale. Se anche dopo 10 minuti dall’aver inserito le pile il segnale DCF77 non
viene ricevuto, si consiglia di impostare l’ora manualmente (vedi sezione:
Regolazione manuale dell'orologio e del calendario).
DATI TECNICI
Temperatura di funzionamento : da -5°C a +50°C
F.
Funzioni dell'orologio
Radiocontrollo
: Tramite il segnale radio DCF77 generato
da Francoforte, Germania
(MSF60 per UK)
Calendario
: Giorno della settimana in 5 lingue (inglese,
tedesco, francese, italiano, spagnolo)
Data/mese
Va osservato che per poter utilizzare l'orologio in un fuso orario differente
[FIG. 6], si deve impostare un'ora di offset per il secondo fuso orario. Una volta
programmata l'ora di offset (es. +1), l'ora visualizzata corrisponderà all'ora locale
corrente + un'ora.
BOTON DE ALARMA
-Pulse para pasar de la alarma semanal, a la alarma individual y al calendario
-Pulse y sostenga durante 3 segundos para entrar al modo de ajuste de la
alarma, cuando aparezca el modo alarma
BOTON DE MODO
-Pulse para visualizar las siguientes pantallas:
Reloj con segundero, reloj con día de la semana, reloj con hora dual
-Pulse y sostenga durante 3 segundos para entrar al modo de ajuste de hora
del reloj
BOTONES HACIA ARRIBA Y HACIA ABAJO
-Pulse para aumentar o disminuir el valor de una definición
-Pulse para activar o desactivar la alarma, cuando aparece la hora de la
alarma deseada
COLOCACION DE LAS PILAS [Fig. 2a]
], deberá
: Formato a 12 / 24 ore
COMO USAR LA RETROILUMINACION
Precisione
: +/- 0,5 secondi/giorno
(con funzione di
disabilitata)
Pulse el botón SNOOZE para encender la retroiluminación durante 5 segundos
Ora Offset
radiocontrollo
: +/- 9 ore
Specifiche generali
Alimentazione
: 1 pila UM-3 o “AA” alcalina da 1,5V
Dimensioni unità
: 105 x 90 x 55 mm (A. x L. x P.)
Peso unità
: 138 g (pile escluse)
SOBRE LA RADIORRECEPCION [FIG. 3]
RM981/ RM981U se ha diseñado para la sincronización automática de su reloj
calendario una vez está dentro de los límites de la señal de radio de Francfort
DCF77 (MSF60 para la versión británica).
Questo prodotto è dotato di un Allarme giornaliero [ ] e di un Allarme
settimanale [ ]. L’Allarme giornaliero si attiva solamente in base agli orari ed
ai giorni impostati. L’Allarme settimanale si attiva da Lunedì a Venerdì, mentre
si disattiva automaticamente durante il fine settimana (Sabato e Domenica)
DISATTIVAZIONE DELL'ALLARME [FIG. 8]
ALLARME A VOLUME CRESCENTE E
FUNZIONE SNOOZE
Quando l'allarme scatta all'ora prestabilita, la retroilluminazione si accende per
] lampeggia e la suoneria si attiva.
8 secondi. L'icona ALARM ON [
La funzione di allarme a volume crescente fa sì che il segnale venga emesso
inizialmente ad un basso volume per poi crescere gradatamente di intensità. Se
non viene interrotta, la sveglia suonerà per 2 minuto
3.
No someta la unidad a fuerzas excesivas, sacudidas, polvo, temperatura o
humedad que puede causar un mal funcionamiento, acortar la duración
electrónica, dañar las pilas y distorsionar algunas partes.
4.
No toque los componentes internos de la unidad. El hacerlo invalidaría la
garantía en la unidad y podría causar daños innecesarios. La unidad no
contiene partes que puedan utilizarse por el usuario.
Interferencia
La recepción se puede ver afectada por varios factores. Para obtener la mejor
recepción, colocar el dispositivo lejos de objetos metálicos y aparatos eléctricos.
Nota: La interferencia de fuentes como los aparatos de televisión pueden afectar
la señal. Si, después de que las pilas llevan insertadas diez minutos, no se
recibe la señal DCF77, ajustar la hora manualmente (ver sección: Cómo poner
manualmente el reloj y el calendario).
CONFORME PER L'USO CONSENTITO
CÓMO PONER MANUALMENTE EL RELOJ Y EL
CALENDARIO [Fig. 4] Y [Fig. 5]
AVVERTENZA
Sírvase observar que con el fin de usar el reloj en una zona horaria diferente
[FIG. 6], deberá definirse la 2a hora/zona horaria. Cuando se defina una hora
adicional (por ejemplo +1), la hora que aparecerá será la hora del reloj de
radiofrecuencia más 1 hora.
- Per via delle limitazioni di stampa, i display mostrati in questo manuale
possono differire dai display effettivi.
- Le caratteratteristiche tecniche del prodotto sono soggette a modifiche
senza preavviso.
Alarme Dual (Simples e dos Dias de Semana) com função de Repetição
(Snooze)
COMO PONER Y ACTIVAR LA ALARMA
Esta unidad está equipada con 2 alarmas: Alarma individual [ ] y alarma
semanal [ ]. La Alarma Individual sonará sólo a la hora a la que se haya
ajustado. La Alarma Diaria sonará de Lunes a Viernes y quedará descapacitada
automáticamente durante el fín de semana (esto es, sábado y domingo).
Siga el mismo procedimiento para definir y activar la alarma individual y/o
semanal.
PARA DESACTIVAR LA ALARMA [FIG. 8]
PRECAUÇÕES
1.
Não mergulhe o aparelho na água.
2.
Não limpe o aparelho com materiais abrasivos ou corrosivos, pois pode
riscar os componentes em plástico e corroer o circuito elétrico.
3.
Não sujeite o aparelho a força excessiva, choque, pó, temperatura ou
umidade, pois pode avariar o aparelho, encurtar o tempo de vida, danificar
a pilha e deformar os componentes
4.
Não mexa nos componentes internos do aparelho. Perderá a garantia e
causará danos desnecessários. O aparelho não contém peças que o usuário
possa substituir.
Temperatura de servicio
BOTÃO DE REPETIÇÃO (SNOOZE)
- Prima para acender a luz de fundo durante 5 segundos
- Prima para ativar a função de repetição (Snooze) de oito minutos quando
o alarme dispara
: -5°C a 50°C
B.
VISOR DE CRISTAIS LÍQUIDOS (LCD)
- Exibe a função de Relógio
Radiocontrol
: Por señal de radio generada en Alemania DCF77 (MSF60 para el R.U.)
C.
Calendario
: Día de la semana en inglés, alemán, frances,
italiano, español
Fecha / Mes
BOTÃO DE ALARME
- Prima para escolher entre Alarme dos Dias de Semana, Alarme Simples e
Calendário.
- Prima durante 3 segundos para introduzir o modo de ajuste da hora do
alarme quando o modo do alarme está no visor.
5.
Use, apenas, pilhas novas, como indicado no manual.
D.
BOTÃO DE MODO (MODE)
- Prima para percorrer e selecionar os seguintes visores:
Relógio com Segundos, Relógio com Dia da Semana, Relógio diferença
horária
- Prima durante 3 segundos para introduzir o modo de ajuste do relógio.
6.
Leia este manual com muita atenção antes de utilizar o aparelho.
BOTÕES PARA CIMA E PARA BAIXO
- Prima para aumentar ou diminuir os valores do ajuste
- Prima para ativar ou desativar o alarme quando a hora do alarme aparece
indicada.
Funções do Relógio
Funciones del reloj
Hora del reloj
: Formato de 12 / 24 horas
Precisión
: +/- 0,5 segundos/día
(cuando RF está desactivado)
Compensación horaria
: +/- 9 horas
E.
Tipo de pila
: 1 pila UM-3 o alcalina "AA" 1,5V
Dimensiones
: 105 x 90 x 55m m (H x W x D)
Peso
: 138 g (sin pila)
F.
COMPARTIMENTO DA PILHA
- Usar uma pilha alcalina UM-3 ou "AA"
ESPECIFICAÇÕES
Temperatura de funcionamento :
-5°C até 50°C
Controle de Rádio
:
Sinal de rádio com origem na Alemanha
DCF77 (MSF60 para o reino Unido)
Calendário
:
Dias da semana em Inglês, Alemão, Francês,
Italiano e Espanhol
Data / Mês
NOTA SOBRE EL CUMPLIMIENTO
INSTALAÇÃO DA PILHA [Fig. 2a]
Hora do Relógio
:
1Formato 12 / 24 horas
Aviso: Los cambios o las modificaciones a esta unidad, no aprobados
expresamente por la parte responsable del cumplimiento, podrían anular la
autoridad del usuario para poner en funcionamiento este equipo.
Observação: Substitua por pilhas novas sempre que o indicador de pilhas fracas
[
] aparecer no visor. [Fig. 2b]
Precisão
:
+/-0.5 segundos/dia
(quando a freqüência rádio está desativada)
Nota de Conformidad R&TTE
Horária Diferença
:
+/- 9 horas
COMO USAR A LUZ DE FUNDO
Este aparato cumple con todos los requerimientos esenciales del Artículo 3 de la
Directiva R&TTE 1995 / 5/ EC si es utilizado para su uso previsto, y se le han
aplicado los siguientes estándares:
Prima o botão de Repetição (SNOOZE) para ligar a luz de fundo durante 5
segundos
Compatibilidad electromagnética (Artículo 3.1 de la Directiva R&TTE)
Para permitir nuevamente la recepción, pulse y sostenga el botón UP durante 3
segundos El símbolo de radiorrecepción parpadeará y la unidad buscará
automáticamente la señal de radiofrecuencia.
EN300 220-1 : 1997
Luz de Fundo para visualização noturna
-
Em caso de mau funcionamento ou indicação anormal das funções, retire e volte
a instalar as pilhas. Todos os ajustes serão limpos e restabelecidos os valores de
fábrica.
A.
Nota di Conformità R&TTE
Standard applicati
-
REINICIALIZAÇÃO DA UNIDADE
Lea siempre el manual del usuario por completo antes de usar la unidad.
Para anular manualmente la recepción de la señal de radiofrecuencia, pulse y
sostenga el botón DOWN durante 3 segundos hasta que el símbolo de
radiorrecepción desaparezca.
ETS 300 683 : 1997
Relógio e Calendário controlado por freqüência de rádio (RF)
6.
Avvertenza: Cambiamenti o modifiche non espressamente approvate dalla parte
responsabile per l’osservanza di queste norme, possono annullare l’autorizzazione
all’uso dell’apparecchiatura.
Uso corretto dello spettro delle radiofrequenze (Articolo 3.2 della Direttiva
R&TTE)
-
Se for manuseado com cuidado, este aparelho está concebido para lhe dar longos
anos de bons serviços. Eis algumas precauções:
OSSERVANZA DELLE NORME VIGENTI
Standard applicati
As características do RM981/ RM981U incluem:
PRINCIPAL CARACTERÍSTICA [FIG. 1]
Estándares aplicados
Compatibilità elettromagnetica ( Articolo 3.1.b della Direttiva R&TTE)
Parabéns pela aquisição do Relógio Rádio Sincronizado RM981/ RM981U
Use solo pilas nuevas como se especifica en el manual del usuario.
Cuando se esté recibiendo la señal, parpadeará el símbolo de radiorrecepción.
Generalmente, la recepción completa tarda unos 2 a 10 minutos dependiendo de
la potencia de la señal de radio.
Questo apparecchio è conforme ai requisiti essenziali dell’articolo 3 della
Direttiva 1999/5/CE di R&TTE, se utilizzato per l’uso previsto e se vengono
applicati i seguenti standard:
Para parar o alarme, pressione o bot ão ALARM ou SNOOZE, Se o botão de
repetição (SNOOZE) for pressionado, o som do alarme desliga temporariamente
e a função de repetição ficará ativada. O alarme dispara de novo , após 8 minutos
até que outro botão seja pressionado para desligar o alarme.
5.
Estándares aplicados
Per impostare ed attivare gli allarmi vedere [FIG. 7]
Seguire la stessa procedura per impostare ed attivare l’allarme giornaliero e/o
quello settimanale.
No limpie la unidad con materiales abrasivos o corrosivos. Se puede dañar
las partes de plástico y corroer el circuito eléctrico.
Cuando RM981/ RM981U está dentro de los límites, el mecanismo
radiocontrolado anulará todas las definiciones manuales.
Para definir y activar la alarma, vea [FIG. 7]
COME IMPOSTARE ED ATTIVARE GLI ALLARMI
No lo sumerja en agua
2.
Especificaciones generales
COMPARTIMENTO DE LAS PILAS
-Usa 1 pila UM-3 o alcalina "AA"
Comentario: Cuando aparezca el indicador de pila agotada [
cambiar las pilas [Fig. 2b]
INTRODUÇÃO
1.
ESPECIFICACIONES
Orologio
- Il contenuto di questo manuale è soggetto a modifiche senza preavviso.
REGOLAZIONE MANUALE DELL'OROLOGIO E
DEL CALENDARIO [Fig. 4] & [Fig. 5]
D.
E.
INSERIMENTO DELLA PILA [Fig. 2a]
Premere il pulsante SNOOZE per accendere la retroilluminazione per 5 secondi.
Allgemein
Felicitaciones por la compra de su reloj de radiocontrol RM981/ RM981U
Las características del RM981/ RM981U incluyen:
Dieses Gerät wird Ihnen bei schonender Behandlung viele Jahre nützlich sein.
Beachten Sie dennoch die wenigen nachfolgenden Vorsichtsmaßnahmen:
3.
INTRODUCCION
RICONFIGURAZIONE DELL’UNITA’
-
PORTGUÊS
Este producto está diseñado para ofrecerle años de servicio satisfactorio si lo
maneja cuidadosamente. Aquí hay unas pocas precauciones:
Il prodotto è dotato di:
Orologio radiocontrollato e Calendario
PRECAUCIONES
ESPAÑOL
ETS 300 683 : 1997
Uso eficaz del espectro de radio frecuencia (Artículo 3.2 de la Directiva R&TTE)
EN 300 220 – 1 : 1997
UTILIDAD DEL PRODUCTO
PRECAUCION
- El contenido de este manual está sujeto a cambio sin aviso previo.
- Debido a las limitaciones de impresión, las pantallas mostradas en este
manual podrían diferir de la pantalla real.
- Se prohibe reproducir el contenido de este manual sin el permiso del
fabricante.
Especificações Gerais
Tipo de Bateria
:
1 pilha alcalina UM-3 ou "AA" de 1,5V
Dimensões do aparelho
:
105 x 90 x 55 mm (A x L x P)
Peso do Aparelho
:
138 g. (sem pilhas)
SOBRE A RECEPÇÃO DE RÁDIO [FIG. 3]
O RM981/ RM981U foi concebido para sincronizar automaticamente o relógio
calendário quando entra no raio de ação do sinal de freqüência rádio de Frankfurt,
DCF-77 (MSF60 para a versão Reino Unido).
NOTA RELATIVA À CONFORMIDADE
Quando o aparelho está dentro destes limites, os mecanismos controlados por
rádio sobrepõem-se a todas as definições manuais.
AVISO: Qualquer alteração realizada neste aparelho, sem a autorização expressa
da parte responsável pela sua conformidade, pode anular o direito do utilizador
de usar este aparelho.
Quando o aparelho está a receber sinal de rádio, o símbolo de recepção começa
a piscar. A recepção completa demora geralmente entre 2 a 10 minutos,
dependendo da potência do sinal de rádio.
Esta divisa cumpre com os requesitos do Artigo 3 da Diretriz R&TT 1999/5/
EC, se usado conforme o
Se quiser desativar a recepção do sinal de radio (RF) manualmente, prima o
botão para baixo (DOWN) durante três segundos até o sinal de recepção de
rádio desaparecer.
Para ativar a função de novo, prima o botão para cima (UP) durante três segundos.
O símbolo de recepção de rádio começa a piscar e o aparelho inicia a recepção
do sinal RF automaticamente.
Interferência
R&TT Nota de Conformidade
modo intencional, este é o padrão aplicado que deve ser seguido:
Compatibilidade Eletromagnética (Artigo 3.1.b da Diretriz do R&TT)
Valores aplicados
ETS 300 683 : 1997
Uso eficiente da freqüência do rádio espectro (Artigo 3.2 da Diretriz R&TT)
Valores aplicados
EN300 220 -1 : 1997
USO CONSENTIDO DO PRODUTO
A recepção pode ser afetada por alguns fatores. Para uma melhor recepção,
coloque o aparelho afastado de objetos metálicos e material elétrico.
Nota: Interferências de fontes tais como aparelhos de televisão podem afetar o
sinal. Dez minutos após as baterias terem sido inseridas, se não receber nenhum
sinal, ajuste a hora manualmente. (ver a seção: Como Ajustar O Relógio e o
Calendário Manualmente).
ATENÇÃO
- O conteúdo deste manual está sujeito a alteração sem aviso prévio.
- Devido a limitações de impressão, as indicações presentes neste manual
podem diferir das indicações atuais.
COMO AJUSTAR O RELÓGIO E O
CALENDÁRIO MANUALMENTE [Fig. 4] E [Fig. 5]
- O conteúdo deste manual não pode ser reproduzido sem a autorização
do fabricante.
Tenha em atenção, por favor, de que para usar o relógio em diferentes fusos
horários [FIG.6], a diferença horária do 2o. Fuso horário deve ser introduzida.
Quando a diferença horária tiver sido introduzida (por ex. + 1), o tempo indicado
será a hora RF do relógio mais uma hora.
COMO AJUSTAR E ATIVAR O ALARME
Este aparelho está equipado com 2 alarmes: Alarme Simples [ ] e Alarme dos
Dias de Semana [ ]. O Alarme simples dispara, apenas uma vez à hora préfixada. O Alarme dos Dias de Semana, é ativado de Segunda a Sexta e desliga
automaticamente durante o fim de semana (ou seja, de Sábado a Domingo).
Para ajustar e ativar o alarme, ver [FIG. 7]
Siga os mesmos passos utilizados para fixar e ativar o Alarme Simples e/ou dos
Dias de Semana.
ALARMA CRECIENTE Y FUNCION DE REPETICION
Cuando la alarma suena a la hora definida, la retroiluminación se encenderá
] centelleará y
durante 8 segundos. El icono de ALARMA ENCENDIDA [
la alarma sonará.
COMO DESATIVAR O ALARME [FIG. 8]
Con la función de alarma creciente el sonido será suave al principio y aumentará
en intensidad al pasar el tiempo. Sin interrupción, la alarma sonará durante 2
minuto.
FUNÇÃO DE ALARME EM CRESCENDO E DE
REPETIÇÃO (SNOOZE)
Para detener la alarma, pulse ALARM o SNOOZE. Si se pulsa el botón
SNOOZE, el sonido de la alarma se apagará temporalmente y se activará la
función de repetición. La alarma sonará nuevamente después de unos 8 minutos
hasta que se pulse otro botón para apagar la alarma.
Quando o alarme dispara no tempo pré-ajustado, a luz de fundo acende durante
8 segundos. O ícone de alarme ligado (ALARM ON) [ ] começa a piscar e o
sinal sonoro liga.
A função de alarme em crescendo permite que o som do alarme comece a soar
de forma suave aumentando de intensidade. O alarme soará, sem interrupção
durante 2 minuto.
COUNTRIES RTTE APPROVAL COMPLIED:
Austria, Beligium, Denmark, Finland, France, Germany, Greece, Italy,
Luxembourg, Netherlands, Portugal, Spain, Sweden, UK and Ireland.
REAJUSTE DE LA UNIDAD
En caso de que la pantalla no funcione bien, quite las pilas y vuelva a ponerlas.
Todos los ajustes se borrarán y se reajustarán los valores por defecto.
086-002276-01