Transcript
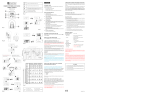
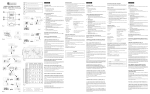
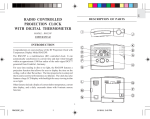
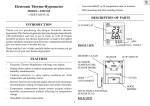
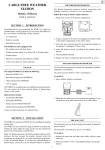
Use the [ up ] and [ down ] buttonto activate / deactivate the alarm in the respective
Alarm Display Mode.
ENGLISH
INTRODUCTION
AA
RADIO CONTROLLED
ALARM CLOCK WITH
THERMOMETER
MODEL : RM983A
CRESCENDO ALARM AND SNOOZE FUNCTION
Congratulations on your purchase of the RM983A Radio-controlled Clock with
thermometer.
Features of RM983A include:
Fig. 2a
Fig. 2b
USER MANUAL
-
RF controlled Clock and Calendar
-
Indoor temperature display
-
Backlight for night viewing
-
Dual Alarm (Single and Weekday Alarm) with Snooze function
When the alarm goes off at the preset time, the backlight will be turned on for 8
] flashing and the alarm sound will be
seconds. The ALARM ON icon [
turned on.
The crescendo alarm function allows the alarm sound to start off gently with
step-up intensity. Without interruption, the alarm will go off for 2 minutes.
To stop the alarm, press ALARM or SNOOZE. If SNOOZE button is pressed,
the alarm sound will be turned off temporarily and the snooze function will be
activated. The alarm will go off again after approx. 8 minutes until other key is
pressed to turn off the alarm.
Strong, Forte, Stark, Buona, Fuerte, Forte
MAIN FEATURE [FIG. 1]
A
Weak, Faible, Schwach, Debole, Devil, Fraco
A.
SNOOZE BUTTON
-Press to turn on the backlight for 5 seconds
-Press to activate the 8-minute Snooze function when alarm goes off
No Reception, Pas de réception, Kein Empfang,
Ricezione nulla, No Hay Recepcion, Sem sinal
B.
CLOCK WINDOW
-Displays clock function
C.
CALENDAR/ ALARM WINDOW
-Displays Calendar and Alarm functions
D.
TEMPERATURE WINDOW
-Displays indoor temperature
E.
ALARM BUTTON
-Press to toggle among Weekday Alarm, Single Alarm and Calendar mode
-Press and hold for 2 seconds to enter the alarm time setting mode when
the respective alarm mode is in display
F.
MODE BUTTON
-Press to toggle among the following displays:
Clock with Second ➝ Clock with Weekday ➝ Clock with offset hour ➝ …
-Press and hold for 2 seconds to enter the clock setting mode
B
Receiving, Recevant, Empfang,
Ricezione, Recibiendo, A receber
D
C
Fig. 3
E
G
F
H
G.
Fig. 1
H.
INDOOR TEMPERATURE DISPLAY
The indoor temperature is shown in degree Fahrenheit (˚F). RM983A is capable to measure temperature ranging from +32°F ( 0˚C ) to +122°F ( +50˚C ).
Display will show either "HHH" or "LLL" when the temperature measured is
out of range.
RESETTING THE UNIT
UP & DOWN BUTTONS
-Press to increase or decrease the value of a setting
-Press to activate or deactivate the alarm when the respective alarm time is
shown
BATTERY COMPARTMENT
-Uses 1 piece of UM-3 or "AA" battery
In case of malfunction or abnormal display, take out and re-install the batteries
again. All settings will be cleared and reset to their default values.
MAINTENANCE
When handled properly, this unit is engineered to give you years of satisfactory
service. Here are a few product care instructions:
1.
Do not immerse the unit in water. If the unit comes in contact with water,
dry it immediately with a soft lint-free cloth.
2.
Do not clean the unit with abrasive or corrosive materials. Abrasive cleaning agents may scratch the plastic parts and corrode the electronic circuit.
3.
Do not subject the unit to excessive: force, shock, dust, temperature, or
humidity. Such treatment may result in malfunction, a shorter electronic
life span, damaged batteries, or distorted parts.
4.
Do not tamper with the unit’s internal components. Doing so will terminate the unit’s warranty and may cause damage. The unit contains no userserviceable parts.
BATTERY INSTALLATION [Fig. 2a]
Fig. 7
Remark: Replace with new battery when the low battery indicator [
displayed [Fig. 2b]
] is
5.
Only use new batteries as specified in this instruction manual.
6.
Read this instruction manual thoroughly before operating the unit.
HOW TO USE THE BACKLIGHT
SPECIFICATIONS
Press the SNOOZE button to turn on the backlight for 5 seconds.
Operating Temperature
:
23°F to 122°F
Radio Control
:
By Radio signal generated from the
U.S. Atomic Clock
Calendar
:
Weekday in English, German, French,
Italian and Spanish
Month / Day
Clock Time
:
12 / 24 hour format
Accuracy
:
+/-0.5 second/day (when RF is disabled)
Hour Offset
:
+/- 9 hours
:
32°F to 122°F
Clock Functions
ABOUT RADIO RECEPTION [FIG. 3]
RM983A is designed to synchronize its calendar clock automatically once it is
brought within range of the radio signal from the U.S. Atomic Clock.When the
unit is new and just out of the box, synchronization with the U.S. Atomic Clock
can take up to 72 hours.
Set offset hour in 2nd time- zone
Imposta l'ora di offset del 2º fuso orario
Règle la compensation du deuxième fuseau horaire.
hora de compensación de 2a hora/zona horaria
Zeitzonenversatz einstellen
Ajustar a diferença horária da 2a. zona de fuso horário
When the unit is receiving signal, the Radio Reception symbol will start to blink.
Generally, complete reception takes around 2 to 10 minutes depending on the
strength of the radio signal.
Fig. 8
To disable the reception of RF signal manually, press and hold the DOWN
button for 2 seconds until the Radio Reception symbol disappear.
Temperature Measurement
To enable the reception again, press and hold the UP button for 2 seconds. The
Radio Reception symbol will blink and the unit will search for RF signal
automatically.
General Specification
Interference
Reception can be affected by a number of factors. For best reception, place the
device away from metal objects and electrical appliances. Other causes for signal
interference include electrical power transmission towers, steel reinforced
concrete construction, and/or metal siding.
Note: ( Radio Frequency appliances such as the Projection Alarm Clock
perform best when placed near a window. After receiving the initial signal,
updates are accomplished with greater ease. Even though there are areas
that may have more difficulty in receiving a signal, the Projection Alarm
Clock contains very accurate quartz movement and will retain precise time
even if a signal is missed on a rare occasion..)
HOW TO SET THE CLOCK AND CALENDAR
MANUALLY [Fig. 4] & [Fig. 5]
Fig. 6
Language
Langues
Sprache
Lingue
Idiomas
Lingua
English
Anglais
Englisch
Inglese
Inglés
Inglês
German
Allemand
Deutsch
Tedesco
Alemán
Alemão
French
Français
Französisch
Francese
Francés
Francês
Fig. 4
Italian
Italian
Italienisch
Italiano
Italiano
Italíano
Fig. 5
Press & Hold 2 seconds
Pulse y sostenga 2 segundos
Tenere premuto per 2 secondi
2 Sekunden lang drücken und festhalten
Appuyer dessus pendant 2 secondes.
Prima durante 2 segundos
Spanish
Espagnol
Spanisch
Spagnolo
Español
Espanhol
Fig. 5
Day-of-the-week
Affichage du jour
Giorno della settimana Día de la semana
Monday
Lundi
Montag
Lunedí
Lunes
Segunda
Tuesday
Mardi
Dienstag
Martedí
Martes
Terça
Wednesday
Mercredi
Mittwoch
Mercoledí
Miércoles
Quarta
Thursday
Jeudi
Donnerstag
Glovedí
Jueves
Quinta
Wochentaganzeige
Dia de Semana
Friday
Vendredi
Freitag
Venerdí
Viernes
Sexta
Saturday
Samedi
Samstag
Sabato
Sábado
Sábado
Sunday
Dimanche
Sonntag
Domenica
Domingo
Domingo
It is unlikely that you will want or need to manually set the Alarm Clock.
Should the need or desire to manually set the clock arise, please follow (Fig.
4) To set the calendar manually follow instructions in Fig. (5). The default
clock setting is 1st of January, 2001; 12:00pm (Pacific zone- time) with houroffset preset as -8 hours. Please note that upon successful reception of the
signal from the U.S. Atomic Clock, the time display will be adjusted to
Pacific zone-time automatically. You can set the offset-hour as follow in order
to display the other US time-zones:
- 7 — Mountain
- 6 — Central
- 5 — Eastern
Otherwise, you can change the offset-hour to display other zone-time outside
Indoor Measurement
Battery Type
:
1 piece of UM3 or "AA" size 1.5V battery
Unit Dimension
:
4.33x3.35x1.97 inches (H x W x D)
Unit Weight
:
5.57 ounces (without battery)
CUSTOMER ASSISTANCE
Should you require assistance regarding this product and its operation, please
contact our customer care department at 541-868-8205 or via email at
[email protected].
WARRANTY
This product is warranted to be free of manufacturing defects for a period of 90
days from date of retail purchase. Defective product should be directed to the
place of retail purchase for exchange. Should this not be possible, contact our
customer care department for assistance and a return material authorization. No
returns may be made without a return authorization. Please retain your retail
receipt as you may be asked to provide a copy of it for proof of date purchased.
This warranty does not cover product subjected to abuse, misuse, accidental
damage or tampering.
CAUTION
- The content of this manual is subject to change without further notice.
- Due to printing limitation, the displays shown in this manual may differ from the actual display.
- The contents of this manual may not be reproduced without the permission of the manufacturer.
the U.S. (Fig 6).
HOW TO SET AND ACTIVATE THE ALARM
This unit is equipped with 2 alarms: Single Alarm [ ] and Weekday Alarm
[ ]. For the Single Alarm, it will go off only once at the preset time. For the
Weekday Alarm, it will be enabled from Monday to Friday and disabled automatically during weekend (i.e., Saturday and Sunday).
To set and activate the alarm, see [FIG. 7]
Follow the same procedures to set and activate the Single and/or Weekday Alarm.
To deactivate the alarm, see [FIG. 8]
086-002278-05