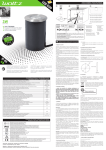
Transcript
Art. 1389/BE/70/AG Brick
APPARECCHIO PER BARRA TUBOLARE
Lampadina: 1x70 GX8,5 CDM R111 MH
1389/BE/A/AG
Art. 1389/BE/70/AG Brick
Design: Emiliana Martinelli 2007
ISTRUZIONI PER UNA CORRETTA INSTALLAZIONE, USO E MANUTENZIONE
L.15 h 13,5 —>30
AVVERTENZA
Le seguenti istruzioni devono essere seguite per una corretta installazione del prodotto, e servono a garantire la vostra sicurezza.
Queste istruzioni devono essere conservate per una successiva consultazione, e devono essere a disposizione anche di chi ne avrà la
manutenzione. in caso di dubbio interpellare un installatore qualificato.
DEVICE FOR TUBOLAR BAR
Bulb: 1x70 GX8,5 CDM R111 MH
1389/BE/A/AG
1x75W G53 AR111 HAL
1x75W G53 AR111 HAL
Design: Emiliana Martinelli 2007
INSTRUCTIONS FOR THE CORRECT INSTALLATION, USE AND MAINTENANCE
L.15 h 13,5 —>30
WARNING
The following instructions must be observed for correct product installation and aim to ensure user safety. These instructions should be
kept for future reference and must also be provided to individuals in charge of maintenance. If in doubt, please seek the advice of a
qualified installer.
Apparecchio in Classe I.
Class I appliance (earthed).
L’apparecchio é adatto al montaggio su superfici normalmente infiammabili.
Fitting suitable to be mounted on any surface (normally flammable and non combustible);
Distanza minima tra l’apparecchio e l’oggetto illuminato.
The minimum distance between the lamp and he illuminated object must be alwayes respected
Apparecchio per interni (non protetto all’acqua).
Interior device (not waterproof).
L’apparecchio è conforme alle direttive e alle normative vigenti.
The appliance complies with current standards and regulations;
Simbolo per lo smaltimento dell’apparecchio (vedere SMALTIMENTO DELL’APPARECCHIO - RAEE).
Symbol for product disposal (see DISPOSAL OF THE APPLIANCE - WEEE).
INSTALLAZIONE
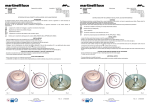
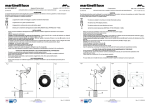
Estrarre l’anello portalampada (1) dall’anello esterno (2) premendo verso il centro in prossimità degli snodi (3). (Fig.1);
Alloggiare la lampadina (4) come indicato sui dati di targa dell’apparecchio. Per bloccare la lampadina sull’anello portalampada (1)
spingere sul bordo (5) della lampadina fino a far scattare le clip (6). (Fig.1);
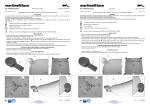
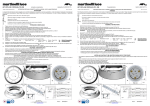
Collegare i cavi di alimentazione ai contatti della lampada (A) (per lampada 1x75W G53 AR111 HAL,Fig2) o inserire i contatti (B) e ruotare
la lampada (per lampada 1x70 GX8,5 CDM R111 MH .Fig.3 ).
Reinserire l’anello portalampada (1) nell’anello esterno (2). (Fig.1);
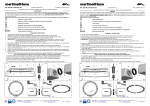
Svitare la ghiera (6) ed inserire al piastrina (7) all’interno del binario (8). (Fig.1-3-4);
Avvitare la ghiera (6) per bloccare lo snodo. (Fig.4);
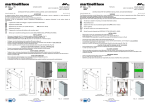
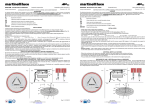
Girare l’interruttore (A) dell’adattatore elettrico (B) in posizione OFF e ruotare la leva (C) per sganciare il faretto dalla barra
elettrificata;
Inserire l’adattatore elettrico (B) nel binario della barra elettrificata (la leva (C) dovrà essere SEMPRE rivolta verso la stessa fiancata
della barra). Agganciare l’adattatore elettrico ruotando la leva (C) e girando l’interruttore (A) in posizione ON. E’ possibile scegliere
una delle tre possibili accensioni premendo l’interruttore (A);
NOTE
INSTALLATION
- Remove the lamp socket ring (1) from the external ring (2) by acting on the couplings (3). (Fig.1);
- Fix the bulb (4) to the type as indicated on the label. To block the bulb to the lamp socket ring (1) push the border (5) of bulb up to
make act the clips (6). (Fig.1);
- Connect the supply wires to the bulb contacts (A) (for lamp 1x75W G53 AR111 HAL,Fig2) or insert the bulb contact (B) and rotate (for
lamp 1x70 GX8,5 CDM R111 MH .Fig.3 ).
- Reinsert the lamp socket (1) into the external ring (2). (Fig.1);
- Unscrew the ring nut (6) and insert the plate (7) inside the electronic bar railway (8). (Fig.1-3-4);
- Screw the ring nut (6) to block the device. (Fig.4);
- Turn the switch (A) of the electrical adapter (B) to the OFF position and turn the lever (C) to unhook the spotlight attachment;
- Insert the appropriate bulb in the bulb holder (D) based on the type of light;
- Insert the electrical adapter in the electronic bar railway (the lever (C) must ALWAYS be turned to the same side of the bar). Attach
the electrical adapter (B) by turning the lever (C) and by turning the switch (A) to the ON position. You can choose one of the three
possible ignition types by pressing the switch (A);
NOTES
-
Prima della manutenzione (per sostituzione lampadina o pulizia) togliere tensione; lasciar raffreddare l’apparecchio;
Rispettare la potenza ed il tipo di lampada riportati sull’etichetta dell’apparecchio;
Per la pulizia usare solamente un panno asciutto;
Ogni uso improprio dell’apparecchio diverso da quanto illustrato non è consentito;
- Disconnect the voltage before maintenance operations (to replace the bulb or for cleaning purposes); let the appliance cool down;
- Comply with bulb power and bulb type as per the appliance label;
- Do not hang items on appliance;
-
Per la vostra sicurezza non modificate l’apparecchio; rivolgersi al fabbricante o al venditore per procurarsi eventuali pezzi di ricambio.
-
-
For safety reasons, do not make any changes to the appliance; contact the manufacturer or the retailer to get any spare parts needed;
8
8
8
7
A
5
4
8
7
A
5
4
A
A
Fig.2
6
8
1
6
6
8
B
C
3
7
1
6
B
6
C
B
6
B
2
Fig.3
Fig.3
3
6
Fig.1
3
7
2
6
Fig.2
3
Fig.1
A
A
Via T.Bandettini
55100 Lucca – Italia
tel. +39 0583 41.83.15 telefax +39 0583 41.90.03
e-mail [email protected]
Rev.2 05/11/20011
Via T.Bandettini
55100 Lucca – Italia
tel. +39 0583 41.83.15 telefax +39 0583 41.90.03
e-mail [email protected]
Rev.2 05/11/20011