1
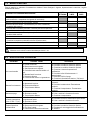
EN - ADSORPTION AIR DRYER
IT - ESSICCATORE AD ADSORBIMENTO
DE - ADSORPTIONSTROCKNER
EN -
Use and maintenance Manual
IT -
Manuale d’uso e manutenzione
DE -
Handbuch für Betrieb und Wartung
AF 250
AF 30
VKM - VKMT 600
CPL – OL 102 - 150 - 300
Codice
710.0054.02.00
Rev.03
I
GB
F
D
E
NL
N
S
DK
P
FI
DICHIARAZIONE DI CONFORMITÁ ALLA DIRETTIVA MACCHINE 2006/42/CE
DECLARATION OF CONFORMITY WITH THE MACHINERY DIRECTIVE 2006/42/EC
DECLARATION DE CONFORMITE AVEC LA DIRECTIVE MACHINES 2006/42/CE
KONFORMITÄTSERKLÄRUNG MIT DER MASCHINENRICHTLINIE 2006/42/EG
DECLARACION DE CONFORMIDAD A LA DIRECTIVA MAQUINAS 2006/42/CE
VERKLARING VAN OVEREENSTEMMING MET DE MACHINERICHTLIJN 2006/42/EG
ERKLÆRING OM OVERENSSTEMMELSE MED MASKINDIREKTIVET 2006/42/EC
FÖRSÄKRAN OM ÖVERENSSTÄMMELSE MED MASKINDIREKTIVET 2006/42/EG
ERKLÆRING OM OVERENSSTEMMELSE MED MASKINDIREKTIVET 2006/42/EC
DECLARAÇÃO DE CONFORMIDADE COM A DIRECTIVA MÁQUINAS 2006/42/CE
KONEDIREKTIIVIN 2006/42/EC VAATIMUSTENMUKAISUUSVAKUUTUS
GR DH/LWSH SUMMO/RFWSHS STHN ODHGI/A MHXANHMA/TWN 2006/42/EE
PL DEKLARACJA ZGODNOŚCI Z DYREKTYWĄ MASZYNOWĄ 2006/42/EC
CZ PROHLÁŠENÍ O SHODĚ SE SMĚRNICÍ O STROJÍCH 2006/42/ЕS
SK DEKLARÁCIA O ZHODE SO SMERNICOU O STROJOCH 2006/42/ЕS
H
TANÚSÍTVÁNY A GÉPEKRE VONATKOZÓ 2006/42/ЕС SZ. IRÁNYELVNEK VALÓ
MEGFELELÉSRİL
LT ATITIKIMO MAŠINŲ DIREKTYVAI 2006/42/ES DEKLARACIJA
LV DEKLARĀCIJA PAR ATBILSTĪBU MAŠINU DIREKTIVAI 2006/42/ЕС
EST DEKLARATSIOON VASTAVUSE DIREKTIIVILE AUTODELE 2006/42/CE
SLO DEKLARACIJA O SKLADNOSTI S PREDPISI, KI VELJAJO ZA STROJE 2006/42/EU
RO DECLARATIE DE CONFORMITATE CONFORMA CU DIRECTIVA MASINI 2006/42/CE
RU ДЕКЛАРАЦИЯ СООТВЕТСТВИЯ ДИРЕКТИВЕ ПО МАШИНАМ 2006/42/ЕС
Sede: Fini S.p.A. Via Toscana 21 40069 Zola Predosa – Bologna – ITALY
I - Dichiara sotto la sua esclusiva responsabilità,che il prodotto qui
di seguito descritto è conforme alle prescrizioni di sicurezza delle
direttive:
GB - Declares under its sole responsibility that the
product described below complies with the safety requirements
of directives:
F - Déclare sous son entière responsabilité que le produit décrit ciaprès est conforme aux prescriptions de sécurité des directives :
D - erklärt unter ihrer alleinigen Verantwortung, dass das in Folge
beschriebene Produkt den Sicherheitsvorschriften
der folgenden Richtlinien entspricht:
E - Declara bajo su exclusiva responsabilidad que el producto
descrito a continuación responde a las prescripciones de
seguridad de las directivas :
NL - Verklaart onder zijn eigen verantwoordelijkheid dat het
hieronder beschreven product in overeenstemming is met de
veiligheidsvoorschriften van de richtlijnen:
N - Erklærer under eget ansvar at produktet her beskrevet er i
overensstemmelse med sikkerhetsforskriftene i direktivene:
S - Försäkrar under eget ansvar att den produkt som beskrivs
följande är i överensstämmelse med säkerhetsföreskrifterna i EUdirektiv:
DK - Forsikrer på eget ansvar, at produktet, der beskrives
nedenfor, er i overensstemmelse med sikkerhedsforskrifterne i
direktiverne:
P - Declara sob a sua exclusiva responsabilidade que o produto
descrito a seguir está em conformidade com as prescrições de
segurança das directivas:
FI - vakuuttaa, että seuraavassa esitelty tuote vastaa alla
lueteltujen direktiivien turvallisuusvaatimuksia:
GR - ∆ηλώνει µε αποκλειστικά δική του ευθύνη ότι το προϊόν που
περιγράφεται παρακάτω ανταποκρίνεται στις προδιαγραφές
ασφαλείας των οδηγιών:
PL - oświadcza pod wyłączną własną odpowiedzialnością, Ŝe
opisany poniŜej wyrób odpowiada wymaganiom dotyczącym
bezpieczeństwa zawartym w Dyrektywach:
CZ - prohlašuje s plnou odpovědností, že uvedený výrobek
vyhovuje bezpečnostním požadavkům směrnic:
SK - Zodpovedne vyhlásuje, že uvedený výrobok zodpovedá
bezpečnostným požiadavkám smerníc:
H - teljes felelısségének tudatában tanúsítja, hogy az alábbiakban
jellemzett termék a sz. irányelvek biztonsági követelményeinek
megfelel.
LT - Su visa atsakomybe pareiškia, kad žemiau aprašytas gaminys
atitinka direktyvų saugumo reikalavimams.
LV - Apliecina, uzĦemoties pilnu atbildību, ka zemāk aprakstītais
produkts atbilst direktīvu drošības noteikumiem.
EST - Deklareerib omal vastutusel, et allpool kirjeldatud toode
vastab direktiivide ohutusnõuetele.
SLO - Na lastno odgovornost izjavlja, da je spodaj opisani izdelek
v skladu z varnostnimi predpisi, ki veljajo za stroje
2006/42/CE – 2006/95/CE : EN60204-1:2006
2004/108/CE : EN61000-6-2:2005, EN61000-6-4:2007
Roberto Rebuffo,Via Toscana 21 40069 Zola Predosa (Italy) persona autorizzata a costituire il fascicolo tecnico / person authorised to compile the technical file /
personne autorisée à constituer le dossier technique / die bevollmächtigt ist, die technischen Unterlagen zusammenzustellen / persona facultada para elaborar el
expediente técnico / van degene die gemachtigd is het technisch dossier samen te stellen / personen som er autorisert til å kompilere den tekniske arkiv / den person
som är behörig att ställa samman den tekniska dokumentationen / person, der har bemyndigelse til at udarbejde det tekniske dossier / pessoa autorizada a compilar o
processo técnico / sen henkilön joka on valtuutettu kokoamaan teknisen eritelmän / προσώπου του εξουσιοδοτηµένου να καταρτίσει τον τεχνικό φάκελο / osoby
upowaŜnionej do przygotowania dokumentacji technicznej / osoby pověřené sestavením technické dokumentace / osoby oprávnenej na zostavenie súboru technickej
dokumentáciev / felhatalmazott személy a mőszaki dokumentáció összeállítására / įgalioto sudaryti atitinkamą techninę bylą / kura pilnvarota sastādīt tehnisko lietu /
Vastutav koostada tehniline toimik / osebe pooblaščene za sestavljanje tehnične dokumentacije / persoanei autorizate pentru întocmirea cărții tehnice
Presidente/ Chairman/ Président / Vorsitzender /Presidente/ Voorzitter/
Formann / Ordförande/ Præsident/ Presidente/Presidentti/PrÒedroj/
Prezes społki / Předseda/ Prezident/ Elnök/ Pirmininkas / Priekšsēdētājs /
Juhataja/ Direktor /Presedinte/ Президент
Marco Fini
- EN - INDEX
1.0.
2.0.
3.0.
4.0.
4.1.
4.2.
5.0.
5.1.
5.2.
5.3.
5.4.
5.5.
6.0.
6.1.
6.2.
6.3.
7.0.
8.0.
---------
- IT - INDICE
PERFORMANCE AND SPECIFICATIONS
INTENDED USE
SYMBOLS
SAFETY INSTRUCTIONS
General precautions
Safety precautions for maintenance operations
1.0.
2.0.
3.0.
4.0.
HANDLING AND INSTALLATION
Handling instructions
Installation requirement
Pneumatic connection
Electrical connection
Filtering and accessories
MACHINE USE
Start up
Operation
Shut down
MAINTENANCE
TROUBLESHOOTING
ATTACHMENTS
Data sheet
Dimensions
Wiring diagrams
Spare parts and consummable material codes
5.0.
4.1.
4.2.
5.1.
5.2.
5.3.
5.4.
5.5.
6.0.
6.1.
6.2.
6.3.
7.0.
8.0.
---------
PRESTAZIONI E DATI TECNICI
USO PREVISTO
SIMBOLOGIA
NORME DI SICUREZZA
Norme generali
Norme di sicurezza per gli interventi di
manutenzione
MOVIMENTAZIONE ED INSTALLAZIONE
Istruzioni per la movimentazione
Requisiti per l'installazione
Collegamento pneumatico
Collegamento elettrico
Filtri ed accessori
IMPIEGO DELLA MACCHINA
Avvio
Funzionamento
Dismissione
MANUTENZIONE
RISOLUZIONE PROBLEMI
ALLEGATI
Scheda tecnica
Dimensioni
Schemi elettrici
Ricambi consigliati
- DE - INHALTSVERZEICHNIS
LEISTUNGEN UND TECHNISCHE DATEN
1.0.
2.0.
3.0.
4.0.
VORAUSGESEHENER GEBRAUCH
SYMBOLE
SICHERHEITSNORMEN
4.1.
4.2.
5.0.
5.1.
5.2.
5.3.
5.4.
5.5.
6.0.
6.1.
6.2.
6.3.
7.0.
8.0.
---------
Gesamtvorschiften
Sicherheitsvorschriften Zur Wartungmassnahme
UMGANG UND AUFSTELLUNG
Anweisungen zum sicheren Umgang
Aufstellungsbedingung
Pneumatischer Anschluss
Elektrischer Anschluss
Filtration und Zubehöre
VERWENDUNG DER MACHINE
Inbetriebnahme
Betrieb
Stilllegung
WARTUNG
STÖRUNGSSUCHE
BEILEGUNGEN
Technische Karte
Abmessungen
Schaltpläne
Ersatzteilliste
1 / 22
Cod. 710.0054.02.00 rev.03 – 11.2009
- EN All features of this machine, all information on safety, machine installation, operation, adjusting and maintenance are
described in this manual. It is integral part of this machine.
Should this machine be sold again, this manual should be given to the new machine owner.
Should this manual be lost, please ask for a new copy to your authorized dealer.
The information given in this handbook is for guidance purpose only and is not binding. The Manufacturer reserves the right to make
any product modifications its considers necessary without prior notice.
Before installing or operating the machine, read this handbook and always comply with the instructions provided. They explain the
correct use and routine maintenance of the dryer and the safety precautions necessary to ensure operator safety.
WARRANTY
Each product is delivered regularly tested, and covered by the warranty conditions specified on the sales list and/or on the supply
contract.
1.0 PERFORMANCE AND SPECIFICATIONS
This machine has been designed and realized in compliance with U.S.A. regulations. A plate indicating the specifications is applied to
the machine.
Models:
• Standard (“S” models)
• Refrigerated (“R” models with pre-cooling coil)
Drying units with “ Heat - Less “ working process use chemical-physics property of drying materials to adsorbing humidity from air and
expelling it during regeneration phase. The regeneration is performed with draining of a small part of dried air, collected from outlet,
which removes humidity from the exhausted adsorbing bed discharging it into atmosphere.
The plant (see scheme) mainly consists of two adsorbers which contain charge of drying material.
Inside the adsorbers stainless filter are provided to retain eventual solid impurities outcoming.
The valves forecast for the different automatic functions, are suitable for heavy continuous operation.
No particular maintenance or lubrification are necessary on the valves.
The controls are performed by solenoid valves which drive the valves.
The control logic is electronic and completely automatic.
The machine has a light switch for starting and stopping.
Performance and specifications shown in the following attachments:
• Data sheet
• Wiring diagram
2.0 INTENDED USE
These dryers have been developed to automatically eliminate the moisture contained in compressed air or an inert gas. Adsorbent
material dries the air passing through one of the two pressure vessels. Simultaneously, the other pressure vessel is regenerated by
purging a small volume of the dried air from the outlet of first pressure vessel.
The compressed air / gas supplied by the dryer cannot be used for breathing air, pharmaceutical or sanitary purposes or in production
plants where the output air comes into direct contact with foodstuff, unless an additional air treatment system is employed, which is
specifically designed for this purpose.
The dryer is not suitable for use in "explosion or hazardous" environments.
The Manufacturer is not responsible for any use other than the intended use, or for operation, which is not in compliance with the
instructions in this manual.
2 / 22
Cod. 710.0054.02.00 rev.03 – 11.2009
3.0 SYMBOLS
Air inlet
Air outlet
Electric shock
danger
4.0 SAFETY INSTRUCTIONS
4.1 GENERAL PRECAUTIONS
CAUTION : Use of the machine by unskilled personnel without adequate supervision is not allowed.
The machine is designed solely to dry compress ed air or inert gas and cannot be used for any other type of gas.
The compressed air inlet to the dryer must be absolutely free of dust, vapors, explosive or flammable gas, solvents and toxic fumes of
any kind. Use of compressed air or inert gas requires knowledge of, and compliance with the safety precautions to be adopted for the
individual applications.
WARNING : Before starting the machine, make sure that all guards are correctly fitted and that no-one can be directly or indirectly
injured by the sudden flow or compressed gas within the pipework system without notice.
Dryer operation is automatic.
Remember that compressor oil, condensate and the filter element are pollutants. Dispose of these products
in compliance with local legislation.
4.2 SAFETY PRECAUTIONS FOR MAINTENANCE OPERATIONS
Skilled operators must perform all maintenance.
• Disconnect the power supply and depressurize the dryer performing any service operation.
• After disconnecting the power, lock out the circuit breaker to prevent accidental start-up. Isolate the dryer from the compressed air
system closing the input valve.
• All compressed air has been discharged from the dryer only when pressure gauge shows zero pressure.
• No changes must be made to dryer’s internal electrical or pneumatic circuits and/or to the factory settings.
• Do not use solvents, flammable or toxic fluids to clean the dryer parts. Never use detergents to clean the electrical/electronics
component.
• Do not weld or carry out mechanical machining operations on the pressure vessels. If damaged or rusted, replace the parts, as they
subject to specific regulations.
• At the end of each operation, refit the guards carefully.
5.0 HANDLING AND ISTALLATIONS
Before installing the dryer:
• Check the dryer for shipping damage and inform immediately supplier.
• Verify that the nominal operating conditions are applicable to the installation.
5.1 HANDLING INSTRUCTIONS
Be careful at manual handling. Use a hand truck or the most suitable equipment
The weight of the dryer does not exceed 12 Kg (26 Lbs)
5.2 INSTALLATION REQUIREMENT
The dryer is supplied complete and ready for indoor installation. It must be protected against atmospheric conditions. Factoryapproved protection is required if the dryer is located outdoors. Outdoor use is not recommended.
3 / 22
Cod. 710.0054.02.00 rev.03 – 11.2009
The dryer operating limits are:
• Minimum ambient temperature
+ 5 °C
+ 40 °F
• Maximum ambient temperature
+ 45 °C
+ 113 °F
Space heating is required if the minimum above minimum temperature cannot be insured.
These dryers are designed for wall mounting.
Make sure there is sufficient service space around the dryer.
5.3 PNEUMATIC CONNECTION
Inlet / outlet connecting piping must not transmit vibrations or stress to the plant.
A 3-valve compressed air by-pass is recommended to semplify service.
If the dryer is installed between the compressor and the air receiver, a relief valve, set for 11 bar (160 psig) must be installed on the
inlet piping to the dryer.
5.4 ELECTRICAL CONNECTION
The electrical power system must include a main circuit breaker with fuses or ground circuit breaker which can be locked out.
The device must be suited to the machine specifications and set up to prevent accidental contacts in order to protect the personnel.
The electrical systems must be made according to best practice principles. A skilled electrician must check the efficiency of the earth
system.
Provide the earth connections as foreseen by the rules in force in the country of operating of the system.
5.5 FILTERING AND ACCESSORIES
If lubrificated air compressors are used, it is necessary to install a coalescing oli pre-filter before the dryer rated at a minimum
efficiency of 0,1 mg/m3 (0,1 PPM). All must be fitted with a particulate after-filter rated at minimum efficiency of 20 microns to prevent
the carry-over of dessiccant dust into the compressed air system.
6.0 DRYER USE
6.1 START - UP
The Customer is responsible for installing the dryer and making the required electrical and pneumatic connections.
Skilled personnel must carry out initial system start-up.
• Remove all packaging materials and tools.
• Slowly pressurize with intercepted outlet.
• Switch on the power supply.
During the first installation or after the replacement of desiccant charge, the dryer must be reconditioned by operating with
compressed air and closed outlet air for about one hour. This insures full performance.
6.2 OPERATION
The controls are calibrated for nominal working conditions.
In case of different conditions:
• Higher temperature of inlet compressed air.
• Lower pressure of inlet compressed air.
• Lower dew-point
• Faster drying rate.
Contact your Seller or a Service Centre.
6.3 SHUT DOWN
•
•
•
•
Close the by-pass valve
Completely depressurize the dryer.
Switch off the ON/OFF button (optional).
Disconnect and lock out the power supply
4 / 22
Cod. 710.0054.02.00 rev.03 – 11.2009
7.0 MAINTENANCE
Before proceeding with maintenance, depressurize dryer and turn disconnect power supply as explain above.
EVERY
WEEK
ROUTINE MAINTENANCE OPERATIONS
EVERY
3 MONTHS
EVERY
YEAR
Verify nominal working conditions
(pressure , inlet air temperature, etc.)
Verify the correct working of all drainers installed, if necessary manually drain
pre and after filter, receiver tank (if applicable), all condensate drains before dryer
Check oil coalescing pre filter condition (not supplied with the dryer):
A. Element condition.
B. Efficiency of filter coalesced liquid discharger (manual or automatic type).
C. Replace Element
Check dust after filter condition (not supplied with the dryer):
A. Element condition
B. Replace Element (presence of possible oil traces)
Check Dryer unit:
A. Check the proper operating sequence of the dryer
B. Check discharge mufflers (must be without any oil traces)
C. Replace dessicant charge of each dryer column
During the first installation or after the replacement of desiccant charge, the dryer must
be reconditioned by operating with intercepted outlet air for about one hour.
8.0 TROUBLESHOOTING
PROBLEM
Wet outlet air
Operation failure
Purge failure
Pressure in the
regeneration phase
(max. 0,5 bar – 7,3 psi)
Dryer pressure drop
POSSIBLE CAUSES
A. Higher air flow.
B. Low inlet air pressure.
C. High inlet air temperature.
D. Desiccant charge satured with moisture or oil.
E. Lower purge air.
F. Regeneration pressure in the vessel.
A. Power supply failure.
B. Electrovalve failure.
C. Timer failure.
A. Blocked purge air orifice.
B. Blocked muffler.
C. Timer failure.
A. Depressurization valve not completely
opened.
B. Blocked discharge muffler.
A. High air flow
B. Low inlet air pressure
C. Blocked internal screens
D. Desiccant deterioration
5 / 22
SOLUTION
A. Check operating conditions.
B. Check operating conditions.
C. Check operating conditions.
D. Check the separation and pre-filter before the dryer.
E. Check purge orifice.
F. Check (replace or clean) the purge muffler.
A. Check the voltage, the fuses and the main switch.
B. Check the presence of signals on the solenoid
valves – Replace if necessary.
C. Check the timer – Replace if necessary.
A. Clean or replace the orifice.
B. Clean or replace the muffler.
C. Check the timer. Replace if necessary.
A. Check valve and relative pilot valve.
B. Clean or replace mufflers.
A. Check operating conditions.
B. Check operating conditions.
C. Disassembe the dryer and clean screens.
D. Replace desiccant.
Cod. 710.0054.02.00 rev.03 – 11.2009
- IT Nel presente manuale vengono descritte le caratteristiche della macchina e tutte le operazioni che ne riguardano la
sicurezza, l'installazione, l'avviamento, il normale funzionamento, la regolazione, la manutenzione e la dismissione.
Il manuale è parte integrante della macchina. In caso di rivendita della macchina deve essere consegnato al nuovo
proprietario. In caso di smarrimento richiederne un duplicato al nostro rivenditore autorizzato.
Tutte le informazioni contenute in questo manuale sono da ritenersi fornite a titolo indicativo e non impegnativo. Il Costruttore si
riserva la facoltà di apportare ai prodotti le eventuali modifiche che ritiene opportune senza alcun preavviso.
Prima di procedere all'avvio della macchina leggere attentamente il manuale e seguire tutte le indicazioni in esso riportate allo scopo
di conoscere le modalità d'utilizzo e di manutenzione e le necessarie precauzioni da adottare.
GARANZIA
Ogni prodotto è fornito regolarmente collaudato, ed è garantito secondo le condizioni riportate sul listino di vendita e/o sul contratto di
fornitura.
1.0 PRESTAZIONI E DATI TECNICI
Questa macchina è stata progettata e realizzata in conformità alle norme e regolamentazioni Europee e/o degli U.S.A. E' dotata di
una targhetta riportante i dati peculiari e le regolamentazioni di riferimento.
Versioni della macchina:
• standard
• refrigereted (con serpentina di refrigerazione)
L'essiccatore realizza un "processo senza calore" (Heat-Less) utilizzando la proprietà chimico-fisica dei materiali essiccanti di
adsorbire l'umidità dell'aria per poi espellerla nella successiva fase di rigenerazione. Questa avviene mediante lo spurgo di una
piccola parte di aria secca prelevata dall'uscita, che attraversa il letto adsorbente esaurito per asportarne l'umidità e viene scaricata in
atmosfera.
L'impianto è costituito da due adsorbitori che contengono la carica di materiali essiccante.
All'interno sono collocati filtri inox per fermare eventuali impurità solide.
Le valvole che svolgono le varie funzioni automatiche sono realizzate per utilizzo gravoso continuativo.
Non sono richieste sulle valvole né particolari manutenzioni né lubrificazioni.
La logica di comando è completamente automatica.
La macchina ha un interruttore luminoso per lo START e lo STOP.
Le prestazioni ed i dati tecnici sono riportati nei seguenti allegati:
Dati tecnici / Data sheet
• Schema elettrico / Wiring diagram
•
2.0 USO PREVISTO
L'essiccatore è stato previsto unicamente per eliminare automaticamente tutta l'umidità contenuta nell'aria compressa o in un gas
inerte passando attraverso uno dei due serbatoi adsorbitori, contemporaneamente viene rigenerato l'altro serbatoio adsorbitore
prelevando una piccola quantità d'aria (o gas) trattata dal primo.
A meno di un trattamento addizionale adeguato, l'aria compressa in uscita dall'essiccatore non può essere utilizzata direttamente per
scopi respiratori, per usi farmaceutici o sanitari, per impianti produttivi in cui l'aria ha un contatto diretto con gli alimenti.
La macchina non è prevista per operare in ambienti classificabili "a rischio di esplosione".
In caso di utilizzazione diversa o non conforme a quanto riportato nel presente manuale, nessuna responsabilità potrà essere
addebitata alla Ditta costruttrice
6 / 22
Cod. 710.0054.02.00 rev.03 – 11.2009
3.0 SIMBOLI APPLICATI ALLA MACCHINA
Ingresso aria
Uscita aria
Pericolo!
Parti in tensione
4.0 NORME DI SICUREZZA
4.1 NORME GENERALI
Non permettere l'uso a persone inesperte senza adeguata sorveglianza.
La macchina è stata progettata esclusivamente per essiccare aria compressa o gas inerte e non può essere utilizzata per nessun
altro tipo di gas.
L'aria o il gas inerte deve essere priva di polveri, vapori di qualsiasi natura, gas esplosivi o infiammabili, solventi o vernici polverizzate,
fumi tossici di qualsiasi tipologia. L'utilizzo dell'aria compressa o gas inerte nei diversi usi previsti comporta la conoscenza ed il
rispetto delle norme previste nei singoli casi.
Avviare la macchina solo dopo aver verificato che le protezioni siano montate e che nessuna persona sia investita, direttamente o
indirettamente, da getti di aria/gas che fuoriescano da tubazioni messe in pressione senza preavviso.
Il funzionamento in esercizio della macchina è automatico.
Si ricorda che lo smaltimento delle condense, degli oli esausti e degli elementi filtranti deve avvenire nel rispetto
delle normative vigenti nel Paese di installazione, trattandosi di inquinanti.
4.2 NORME DI SICUREZZA PER GLI INTERVENTI DI MANUTENZIONE
Qualsiasi operazione di manutenzione o di pulizia che necessità di accesso alle parti interne dell'essiccatore deve essere eseguita da
personale qualificato.
•
•
•
•
•
•
•
Togliere l'alimentazione elettrica e scaricare l'aria / gas prima di eseguire qualsiasi intervento di manutenzione o togliere le
protezioni.
Dopo aver tolto l'alimentazione, bloccare il circuito per impedire riattivazioni accidentali. Chiudere le valvole in ingresso.
Tutta l'aria / gas deve essere scaricata dalla macchina.
Non è ammessa alcuna modifica dei circuiti elettrici, pneumatici e/o delle regolazioni.
Non pulire i vari componenti con solventi, liquidi infiammabili o tossici.
Su qualsiasi serbatoio non è consentito effettuare saldature o lavorazioni meccaniche. Per difetti o corrosione si deve effettuarne la
sostituzione in quanto soggetti a specifiche norme di sicurezza.
Al termine di ogni intervento rimontare con cura le protezioni.
5.0 MOVIMENTAZIONE ED INSTALLAZIONE
5.1 ISTRUZIONI PER LA MOVIMENTAZIONE
Prestare attenzione nella movimentazione manuale del carico.
Si consiglia di impiegare un carrello a mano o un mezzo conveniente.
Il peso della macchina non supera i 12 Kg ( 26,4 Lb)
5.2 REQUISITI PER L’INSTALLAZIONE
Prima di installare l'essiccatore:
• verificare che non vi siano danni dovuti al trasporto o imputabili ad altre cause (Nel caso informare subito il Fornitore);
• verificare che siano rispettate le condizioni nominali di esercizio.
La macchina viene fornita completa e pronta per l’installazione in locale chiuso, protetta dagli agenti atmosferici.
7 / 22
Cod. 710.0054.02.00 rev.03 – 11.2009
Per una collocazione in ambiente esterno occorre prevedere un' adeguata protezione approvata o fornita dal Costruttore. La
collocazione in ambiente esterno è comunque sconsigliata.
I limiti operativi della macchina sono:
• Minima temperatura ambiente
• Massima temperatura ambiente
+ 5 °C
+ 40 °C
+ 40 °F
+ 113 °F
Questi essiccatori sono progettati per il montaggio a muro
Nel caso non si riesca a garantire la temperatura minima richiesta si provveda a riscaldare l'ambiente.
Le dimensioni del locale di installazione ed i dispositivi per l'aerazione devono essere tali da permettere in condizioni di
funzionamento a regime il mantenimento della temperatura ambiente nei limiti indicati.
Lasciare lo spazio sopra ed intorno l'impianto per eventuali interventi di manutenzione.
5.3 COLLEGAMENTO PNEUMATICO
Le tubazioni di collegamento ingresso/uscita non devono trasmette vibrazioni o sforzi all'impianto.
Si consiglia l'installazione di un by-pass all'impianto per facilitare interventi di manutenzione.
Nel caso di installazione fra compressore e serbatoio prevedere una valvola di sicurezza tarata ad 11 bar (160 psi) in ingresso
all'essiccatore.
5.4 COLLEGAMENTO ELETTRICO
L'impianto elettrico di alimentazione deve prevedere un interruttore generale, possibilmente lucchettabile, con funzione di sezionatore
di linea con fusibili o protezione magnetotermica di capacità adeguata e dispositivo contro contatti accidentali per la protezione del
personale. Provvedere al collegamento all'impianto di terra come previsto dalle norme vigenti nel Paese di installazione.
L'impianto elettrico deve essere eseguito a regola d'arte da personale qualificato. Verificare l'efficienza dell'impianto di terra.
5.5 FILTRI E ACCESSORI
•
•
Se si utilizzano compressori d'aria lubrificati montare un filtro disoleatore di grado adeguato (0,1 mg/m3 – 0,1 PPM residuo) in
ingresso all'essiccatore. Il materiale adsorbente potrebbe venir contaminato dall'olio e perdere le sue proprietà.
Montare un filtro antipolvere (min. 20 micron) in uscita.
6.0 IMPIEGO DELLA MACCHINA
6.1 AVVIAMENTO
L'utilizzatore è responsabile per la corretta installazione della macchina e per gli allacciamenti elettrici e pneumatici.
Il primo avviamento deve essere effettuato da personale qualificato che deve procedere ai vari controlli secondo le relative istruzioni:
• Rimuovere tutti i materiali e le attrezzature impiegate per l'imballaggio della macchina
• Pressurizzare lentamente l'impianto con uscita intercettata
• Interruttore ON (dove presente)
• Prima dell'avviamento l'impianto deve essere ricondizionato con uscita intercettata per circa 1 ora
6.2 FUNZIONAMENTO
L'impianto è tarato per il funzionamento alle condizioni nominali.
Contattare il Rivenditore o il Centro di Assistenza in caso di :
• maggiore temperatura aria in ingresso rispetto al nominale;
• minore o maggiore pressione aria in ingresso rispetto al nominale;
• richiesta di grado di essiccazione più spinto.
6.3 DISMISSIONE
•
•
•
•
Chiudere la valvola di by-pass.
Depresurrizzare completamente la macchina.
Interruttore OFF (dove presente).
Disconnettere l'alimentazione elettrica e scaricare l'aria/gas.
8 / 22
Cod. 710.0054.02.00 rev.03 – 11.2009
7.0 MANUTENZIONE
Prima di eseguire un intervento di manutenzione chiudere il flusso d'aria/gas in ingresso, depressurizzare la macchina e togliere
l'alimentazione elettrica.
OGNI
SETTIMANA
INTERVENTO DI ORDINARIA MANUTENZIONE
OGNI
3 MESI
OGNI
ANNO
Verificare il rispetto delle condizioni nominali di esercizio
(pressione esercizio – temperatura aria ingresso all’ essiccatore)
Verificare il funzionamento dei vari scaricatori installati
Controllare l’efficienza del pre - filtro disoleatore (non fornito in dotazione):
A. Condizioni della cartuccia
B. Efficienza dello scaricatore (automatico o manuale) dei residui liquidi filtrati.
C. Sostituire la cartuccia
Controllare lo stato del post - filtro antipolvere (non fornito in dotazione):
A. condizioni della cartuccia.
B. Sostituire la cartuccia
Essiccatore:
A. Controllare la sequenza corretta delle varie fasi di funzionamento
B. Controllare il silenziatore di scarico (deve essere libero da impurità e tracce d'olio)
C. Sostituire il materiale essiccante di entrambe le colonne
Al primo avviamento o dopo la sostituzione della carica essiccante la macchina deve essere ricondizionata facendola
funzionare con la valvola in uscita intercettata per almeno 1 ora.
8.0 RISOLUZIONE PROBLEMI
PROBLEMA
POSSIBILI CAUSE
Aria in uscita umida
A. Portata aria elevata.
B. Bassa pressione aria ingresso.
C. Alta temperatura aria ingresso.
D. Carica essiccante satura di umidità o di
olio.
E. Mancata fase di inversione.
F. Scarsa aria di purga.
G. Pressione sulla colonna in rigenerazione.
Mancato funzionamento
A. Mancanza di tensione.
B. Elettrovalvole difettose.
C. Temporizzatore difettoso.
Mancanza spurgo
Pressione nella colonna
in fase di rigenerazione
(max. 0,5 bar – 7,3 psi )
Caduta di pressione
sull'essiccatore
A. Orifizio dell'aria di purga otturato.
B. Silenziatore otturato.
C. Temporizzatore difettoso.
A. Valvola di depressurizzazione non
completamente aperta.
B. Silenziatore otturato.
A. Portata aria troppo elevata.
B. Bassa pressione aria ingresso.
C. Filtri interni intasati.
D. Deterioramento della carica essiccante.
9 / 22
OPERAZIONI
A. Controllare le condizioni di esercizio previste
B. Controllare le condizioni di esercizio previste.
C. Controllare le condizioni di esercizio previste.
D. Controllare il sistema di separazione e
prefiltrazione.
E. Controllare le fasi di funzionamento e il
temporizzatore.
F. Controllare l'orifizio di purga.
G. Controllare il silenziatore di scarico o i filtri interni.
A. Controllare l'alimentazione elettrica, i fusibili e gli
interruttori.
B. Controllare le elettrovalvole. Eventualmente
sostituire.
C. Controllare il temporizzatore - Eventualmente
sostituire.
A. Pulire o sostituire l'orifizio.
B. Pulire o sostituire il silenziatore di scarico.
C. Controllare il temporizzatore.
A. Controllare la valvola e l'elettrovalvola pilota relativa.
B. Pulire o sostituire il silenziatore di scarico.
A. Controllare le condizioni di esercizio previste.
B. Controllare le condizioni di esercizio previste.
C. Procedere allo smontaggio ed alla manutenzione.
D. Sostituire.
Cod. 710.0054.02.00 rev.03 – 11.2009
- DE Im vorlegenden Handbuch werden die Merkmale der Maschine beschrieben und alle Informationen hinsichtlich ihrer
Sicherheit, ihrer Installation, ihres Betriebs, ihrer Einstellung und der Instandhaltung gegeben.
Dieses Handbuch muß als integrierter Bestandteil der Maschine angesehen werden. Bei einem Weiterverkauf der
Maschine muß es dem neuen Besitzer übergeben werden. Falls dieses Handbuch verlorengegangen ist, müssen Sie
eine Kopie bei Ihrem autorisierten Verkäufer anfordern
Alle in diesem Handbuch enthltenen Informationen sind als rein informativ und als unverbindlich anzusehen. Der Hersteller behält es
sich somit vor, eventuelle Produktänderungen, die er für notwending hält, ohne weiteren Hinweis vorzunehmen.
Bevor Sie die Maschine erstmals in Betrieb nehmen, lesen Sie bitte alla Kapitel dieses Handbuches gründlich durch und folgen
bitteallen in diesen wiedergegebenen Anweisungen, damit Sie die Benutzungs-metodik und die normalen Wartungsvoränge des
trokner und die notwendingen Sicherheitsvorkehrungen für lhre Arbeiter kennen lernen.
GARANTIE
Jedes gelieferte Produkt wird vor der Lieferung abgenommen und nach den auf der Preisliste und/oder auf dem Liefervertrag
angegebenen Bedingungen gewährleistet.
1.0 LEISTUNGEN UND TECHNISCHE DATEN
Diese Anlagen wurden den Europäischen und Amerikanischen Normen gemäß entworfen und realisiert.
Diesem Trockner wurde einen Klebezettel aufgelegt, wo die besondere Angaben der Maschine gezeigt sind.
Absorptionstrockner sind :
*standard
*refrigereted (mit Kühlschlange) erhältlich
Die “Wärmelose Vertriebsverfahren” (heatless) der Trocknungsanlagen benützen die physik-chemische Eigenschaft der
Trocknungsmitteln, die Luftfeuchtigkeit zu adsorbieren und sie in der folgenden Regenerierungsphase auszuwerfen.
Die Regeneration ereignet sich durch die Benutzung einer kleinen Menge von trockener Druckluft, die vom Ausgang des Trockners
entnommen wird und die Feuchtigkeit vom erschöpften Adsorptionsbett abnimmt, um sie danach in die Umgebung auszublasen.
Die Anlage (wie in Schema angezeigt) besteht aus zwei Türme (D/A – D/B), die die Trocknungsmittelbelastung enthalten.
In der Anlage werden Filter aus rostfreiem Stahl montiert (F), um eventuelle solide Fremdstoffen im Austritt zu halten.
Die Ventilen, die in automatischer Weise arbeiten, wurden für schwere Verwendungen entworfen.
Die Ventilen benötigen keine besondere Wartung oder Schmierung.
Die Steuerungslogik ist elektronisch und in vollständiger Weise automatisch.
Die Maschine hat einen hellen Schalter für das Beginnen und das Stoppen.
Die Leistungsfähigkeit und technische Daten sind in den folgenden Anhängen:
*Technische Daten
*Schaltpläne
2.0 VORAUSGESEHENER GEBRAUCH
Absorbtionstrockner wurde geplant zur automatischen Entfernung vom Feuchte in der Druckluft oder im Inertgas. Druckluft oder
Inertgas wird in einem Absorbtionsbehälter geleitet ,und gleichzeitig wird der zweite Behälter mit frischer Luft oder frischem Gas aus
dem ersten gereinigt.
Die von der Maschine produzierte Pressluft kann nicht zu Beatmungszwecken, für pharmazeutische oder sanitäre Zwecke oder für
Produktionsanlagen bei denen die Luft in direkten Kontakt mit lebensmitteln gelangt eingeetzt werden, es sei denn diese erfährt ein
angemessene nachfolgende Behandlung.
Bei einer anderweitgen oder nicht den in diesem Handbuch beschriebenen Betriebsanleitungen konformen Anwendung, kann der.
Hersteller keinerlei Verantwortung zugeschrieben werden.
10 / 22
Cod. 710.0054.02.00 rev.03 – 11.2009
3.0 SYMBOLE
Lufteintritt
Luftaustritt
Stromschlaggefahr!
4.0 SICHERHEITSNORMEN
4.1 GESAMTVORSCHIFTEN
Es ist keine Benutzung des Trockner vom nicht angelernten Arbeiter ohne Überwachung erlaubt.
Der Trockner wurde ausschließlich zur Trocknung von Druckluft oder Inertgas geplant : bitte keine anderen Gassorten benutzen.
Druckluft oder Inertgas müssen staubfrei sein , aller Dämpffrei, entflammbare oder Platzgas frei, Solvensfrei, Puderanstrich frei, aller
giftigen Rauche frei . Alle Benutzung der Druckluft oder des Inertgas bedingt der Einhaltung der vorgesehen Vorschiften für alle Fälle.
Bevor der Trockner in Betrieb gesetzt wird, prüfen Sie , dass die Schutzvorrichtungen montiert sind und , dass kein Arbeiter direkt
unter Gas oder Druckluftstrahl steht , der plötzlich aus den gespannten Rohren ausfließen kann.
Der Betrieb des Trockners ist automatisch.
Der Benützer muß sorgen, damit die Beseitigung des Filters- oder Abscheidersablaßwassers wie es die örtlich
gültigen Umweltschutzgesetze vorschreiben behandelt ist.
4.2 SICHEREITSVORSCHRIFTEN ZUR WARTUNGMASSNAHME
Alle Innerteile betreffende Reininungs -oder Wartungsmassnahmen sollen von angelernten Arbeiter vorgenommen werden.
*Bevor allen Wartungsmassnahmen , schalten Sie die Stromführung aus und lassen Sie Gas oder Luft abblasen .
Sichereitsvorrichtugen abnehmen.
*Nachdem Stromführung ausgeschaltet ist, sperren Sie den Kreislauf damit plötzliche Einschaltungen vermeiden werden.
Eingangsventile zumachen.
*Den Trockner total abblasen.
Es sind keine Änderungen am Stromkreis , Pneumatischen Kreis oder der angegebenen Einstellungen erlaubt
* Benutzen Sie Solvenfrei , entflammfrei und giftfrei Reinigungsmittel zur Wartung von allen Bauteilen.
*Keine Nahtstelle auf Behälter oder keine maschinelle Bearbeitungen vornehmen. Falls Defekt oder Korrosion erscheint, müssen die
betreffende Bauteile ersetzt werden , damit die vorgesehene Sichereitsvorschriften respektieren werden können.
*Alle Sichereitsvorrichtungen neu einstellen
5.0 UMGANG UND AUFSTELLUNG
5.1 ANWEISUNGEN ZUM SICHEREN UMGANG
Beachten Sie während des Transports des Trockners.
Verwenden Sie für die Bewegung der Maschine Vorrichtungen, die ihrem Gewicht angemessen sind.
Das Gewicht der Maschine ist kleiner als 12 Kg ( 26,4 Lb)
5.2 AUFSTELLUNGSBEDINGUNG
Bevor man die Installierungsarbeit anfängt, soll folgendes sichergestellt werden:
*Es gibt keine Versandschaden (informieren Sie sonst sofort die Transportfirma und den Lieferant);
*Die normale Betriebsbedingungen wurden eingehalten.
Der Trockner wird vollkommend geliefert, indem er zur Montage in inneren von Verwitterung geschützten Raumen fertig ist. Wenn
der Trockner unter freien Himmel ausgestellt wird, soll er mit betreffenden Sichereitsvorrichtung vom Hersteller ausgestatten werden.
Die Ausstellung unter freien Himmel ist jedoch nicht empfohlen.
11 / 22
Cod. 710.0054.02.00 rev.03 – 11.2009
Betriebsgrenze des Trockners sind:
*Minder Raumtemperatur
*Höchst Raumtemperatur
+ 5 °C
+ 40 °C
+ 40 °F
+ 113 °F
Diese Trockner sind für Wandmontage geplant worden.
Falls man Minderraumtemperatur nicht erreichen kann, soll den Raum beheizt werden.
Raumgrösse und Belüftung sollen den Betrieb und den obergenannten Raumtemperaturgrenze ermöglichen.
Es soll Platz frei oben und den Trockner herum sein, damit die Wartungsmassnahme vorgenommen werden .
5.3 PNEUMATISCHER ANSCHLUSS
Die Eingang- Ausgang Verbindungsrohre müssen keine Schwingung oder Anstrengung über die Anlage tragen.
Es wird eine Installation an eine Bypass-Struktur empfohlen, welche einen Anschluss des Trockners von der Druckluftleitung
ermöglicht.
Falls der Trockner zwischen dem Kompressor und dem Behälter hängt , dann soll er mit einem Eingang sichereitsventil auf 11 bar
(160 psi) ausgestattet werden.
5.4 ELEKTRISCHER ANSCHLUSS
Stromanlage soll mit einem Hauptschalter ausgerüstet werden , wenn möglich vorhängeschloss, der als Trennschalter mit
Schmelzeinsätzen dient, oder mit magnetermische Schutzung und mit Sichereitsvorrichtung zur Schützung der Arbeiter von
möglichen Unfällen. Der Trockner soll geerdt werden laut laufenden Vorschriften des Stellungsortes .
Stromanlage soll einwandfrei von Fachmänner gebaut werden. Schutzerdung soll geprüft werden.
5.5 FILTRATION UND ZUBEHÖRE
*Falls geschmierte Kompressoren installiert sind, soll ein entölendes Filter vor dem Trockner (0,1 mg/m3-0,1 PPm Rückstand)
ausgestellt werden. Absorptionsmittel konnte mit verseucht werden und damit Leistungsfähigkeit verlieren.
*Ein Staubfilter ( min 20 micron) am Ende einstellen.
6.0 VERWENDUNG DER MASCHINE
6.1 INBETRIEBNAHME
Der Benutzer ist für jede korrekte Einstellung und elektrische und pneumatische Anschlusse verantwortlich.
Der erste Anlauf soll von angelernten Arbeitern vorgenommen werden , die auf die vorgesehene Vorschiften sich halten sollen:
*Die Verpackung abnehmen
*Nachdem die Luftversorgung der Linie gesperrt wurde, die Luftverdichtung der Anlage langsam anfangen
*Schalter ON (wenn vorhanden)
*Während der ersten Inbetriebnahmephase muß die Anlage für ca. 1 Stunde regeneriert werden: die Zuführungsventile und die
Eintrittsluft müssen geschlossen werden
6.2 BETRIEB
Die Anlage ist für nominale Betriebsbedingungen geeicht.
In verschiedener Weise, wie zum Beispiel:
*Erhöhte Eintrittstemperatur der Luft;
*Kleiner oder höher Eintrittsdruck der Luft;
*Hochgezüchteter Trocknungsgrad verlangen.
Dem Verkäufer Erklärungen fragen.
6.3 STILLLEGUNG
*Die By-passventile schließen.
*Druck ablassen der Trockner.
*Schalter OFF (wenn vorhanden).
*Stromführung ausschalten und Inertgas oder Luft abblasen lassen.
12 / 22
Cod. 710.0054.02.00 rev.03 – 11.2009
7.0 WARTUNG
Vor der Wartungsarbeit sind die elektrische Stromzufuhr und den Druck des Trockners zu unterbrechen.
WOCHENTLICH
INSTANDHALTUNG
JEDE 3
MONATE
JÄHRLICH
Die Einhaltung der nominalen Betriebsbedingungen überprüfen (Druck - Temperatur)
Prüfen Sie die installierten Ableiter
Der Vorfilterwartungszustand kontrollieren Entölungsableiter (nicht installiert):
A. Filtereinsatzbedingung
B. Leistungsfähigkeit des Ableiters (automatisch oder manuell ).
C. der Filtereinsatz ersetzen
Der Nachfilterwartungszustand kontrollieren Staubsableiter (nicht installiert):
A. Filtereinsatzbedingung
B. der Filtereinsatz ersetzen
Trockner:
A. Eine Kontrolle hinsichtlich der korrekten Phasenfolge
B. Den Ablassschalldämpfer kontrollieren (muß von Unreinheiten oder Ölspuren frei
sein)
C. Das Trocknungsmittel in beiden Behälter ersetzen
Beim ersten Anlauf nach dem Trocknungsmittelersatz soll der Trockner neu einreguliert werden, indem er mit
Ausgangventil gesperrt mindestens eine Stunde lang laufen soll.
8.0 STÖRUNGSSUCHE
STÖRUNG
feuchte Austrittsluft
Der Trockner funktioniert
nicht
MÖGLICHE URSACHE
A. Erhöhter Luftdurchfluss.
B. Niedriger Druck der Eintrittsluft.
C. Hoche Temperatur der Eintrittsluft.
D. Das Trocknungsmittel ist
Feuchtigkeitsgesättigt oder Ölsgesättigt.
E. Die Umsteuerungsphase fehlt.
F. Die Ablassluft ist mangelhaft.
G. Druck auf dem Regenerationsturm.
A. Keine Spannung.
B. Elektroventil defekt
C. Schaltuhr defekt.
Kein Ablass
Druck im Turm während
der Regenerationsphase
(max. 0,5 bar – 7,3 psi )
Druckgefälle im Trockner
A. Das Luftablassloch ist verstopft.
B. Verstopfter Schalldämpfer.
C. Schaltuhr defekt
A. Das Entluftverdichtungsventil ist nicht in
vollständiger offen.
B. Schalldämpfer verstopt
A. Die Luftmenge ist zu hoch.
B. Niedriger Eingangsdruck.
C. Die innere Filter sind verstopft.
D. Verfall der Trocknungsladung.
13 / 22
LÖSUNGSVORSCHLAG
A. Die vorgesehene Betriebsbedingungen überprüfen
B. Die vorgesehene Betriebsbedingungen überprüfen.
C. Die vorgesehene Betriebsbedingungen überprüfen.
D. Prüfen Sie den Trennungskreis und des
Vorfilterungsystems.
E. Prüfen Sie die Betriebsphasen und die Schaltuhr.
F. Den Ablassschalldämpfer kontrollieren.
G. Prüfen Sie den Ableiter und die Filter.
A. Die Spannung der Linie, die Sicherungsdrahte und
den Hauptschalter überprüfen.
B. Die Anwesenheit von Signale auf dem Elektroventil
überprüfen. Eventuell ersetzen.
C. Prüfen Sie die Schaltuhr und eventuell ersetzen Sie
sie.
A. Reinigen Sie oder ersetzen Sie die Düse
B. Den Ablassschalldämpfer reinigen oder ersetzen.
C. Prüfen Sie die Schaltuhr.
A. Das Ventil und das betreffende Vorsteuerventil
kontrollieren.
B. Reinigen Sie oder ersetzen Sie den Schalldämpfter.
A. Die vorgesehene Betriebsbedingungen überprüfen.
B. Die vorgesehene Betriebsbedingungen überprüfen.
C. Den Trockner abmontieren und pflegen.
D. Ersetzung.
Cod. 710.0054.02.00 rev.03 – 11.2009
DATA SHEET – SCHEDA TECNICA – TECHNISCHE KARTE
AF 250
CPL - OL
VKM
VKMT
AF30
RIGENERAZ. A FREDDO
HEAT LESS REGENERAT.
WÄRMELOSE REGENERATION
RIGENERAZ. A FREDDO
HEAT LESS REGENERAT.
WÄRMELOSE REGENERATION
RIGENERAZ. A FREDDO
HEAT LESS REGENERAT.
WÄRMELOSE REGENERATION
ARIA – GAS INERTE
AIR - INERT GAS
LUFT - EDELGAS
ARIA – GAS INERTE
AIR - INERT GAS
LUFT - EDELGAS
ARIA – GAS INERTE
AIR - INERT GAS
LUFT - EDELGAS
STANDARD EUROPEO
EUROPEAN STANDARD &
REGULATIONS
EUROPÄISCHE VORSCHRIFTE
UND STANDARD
STANDARD EUROPEO
EUROPEAN STANDARD &
REGULATIONS
EUROPÄISCHE VORSCHRIFTE
UND STANDARD
STANDARD EUROPEO
EUROPEAN STANDARD &
REGULATIONS
EUROPÄISCHE VORSCHRIFTE
UND STANDARD
Nm3/h
7
7
30
Nl/min
120
120
300
Nm3/h
12
12
18
Nl/min
200
200
500
7 (Max. 10)
7 (Max. 10)
7 (Max. 10)
25
25
25
- 40 *
- 40 *
- 40 *
7 ÷ 15 % Nom. F.R.
7 ÷ 15 % Nom. F.R.
7 ÷ 15 % Nom. F.R.
+ 45
+ 45
+ 45
+ 5 / + 45
+ 5 / + 45
+ 5 / + 45
1/4"
ISO 7/1
1/4"
ISO 7/1
3/8"
ISO 7/1
230 / 1 / 50-60
230 / 1 / -60
230 / 1 / 50-60
50
50
50
1,4
1,4
3
IP 55
IP 55
IP 55
5,6
5,6
10,5
MODELLO
MODEL
MODELL
FUNZIONAMENTO
TYPE
BETRIEB
TIPO FLUIDO
APPLICATION FLUID
FLUIDTYP
RIFERIMENTI
SPECIFICATIONS
BEZUGNAHME
PORTATA NOMINALE
NOMINAL FLOW RATE
NOMINALE
LUFTFÖRDERUNG
PORTATA MASSIMA
MAX. FLOW RATE
MAX. LUFTFÖRDERUNG
PRESSIONE ESERCIZIO
WORKING PRESSURE
bar
NOMINALER DRUCKRATE
TEMPERATURA NOMIN.
NOM. WORKING TEMP.
°C
EINTRITTSLUFTTEMPER
ATUR
DEW POINT IN PRESS.
PRESSURE DEW-POINT
°C
DRUCKTAUPUNKT
CONSUMO ARIA RIGEN.
REGEN. AIR CONSUMP.
LUFTVERBRAUCH
MAX. TEMP. INGRESSO
MAX. WORKING TEMP.
°C
MAX.
BETRIEBSTEMPERATUR
TEMP. AMBIENTE
AMBIENT TEMPERATURE
°C
UMGEBUNGSTEMP.
CONNESSIONI IN / OUT
IN / OUT AIR FITTINGS
Rp
IN / OUT ANSCHLÜSSE
ALIMENTAZIONE
POWER SUPPLY
V/Ph/Hz
STROMVERSORGUNG
CONSUMO ELETTRICO
TOTAL POWER CONS.
W
GESAMTER VERBRAUCH
CARICA ALUMINA
ALUMINA CHARGE
Kg
BELADUNG
ISOLAMENTO ELETTRICO
ELECTRIC PROTECTION
ELEKTRISCHER SCHUTZ
PESO TOTALE
TOTAL WEIGHT
Kg
GESAMTES GEWICHT
* ALLE CONDIZIONI NOMINALI
* AT NOMINAL CONDITIONS
* FÜR NOMINALE BETRIEBSBEDINGUNGEN
14 / 22
Cod. 710.0054.02.00 rev.03 – 11.2009
DIMENSIONI – DIMENSIONS – ABMESSUNGEN
ON / OFF
OUT
IN
OUT
IN
Mod. AF 250
OUT
OUT
IN
Mod. AF 30
15 / 22
Cod. 710.0054.02.00 rev.03 – 11.2009
AIR OUT
AIR IN
Mod. VKM-VKMT 600
OUT
IN
Mod. CPL – OL 102 - 150 - 300
16 / 22
Cod. 710.0054.02.00 rev.03 – 11.2009
ELECTRICAL WIRING DIAGRAMS – SCHEMI ELETTRICI – SCHALTPLÄNE
Mod. AF 250 (230V / 50–60Hz)
Cod. 714.0132.05.00 Rev. 00
MARRONE
BLU
G/V
MARRONE
BLU
MR
G/V
EV1
BLU
F1
SE
G/V
EV2
MARRONE
L- N- PE
SC
230V/1/50Hz
Mod. AF30 (230V / 50–60Hz)
Cod. 714.0132.04.00 Rev. 00
MARRONE
BLU
G/V
G/V
MARRONE
G/V
MR
EV1
BLU
F1
SE
SC
L- N-PE
(230V/1/50Hz)
- I - DESCRIZIONE
Elettrovalvola 1
Elettrovalvola 2
Temporizzatore
Motore temporizzatore
Interruttore ON / OFF
- GB - DESCRIPTION
Solenoid Valve 1
Solenoid Valve 2
Timer
Timer motor
Main Switch
- DE - BESCHREIBUNG
POS.
Elektroventil 1
Elektroventil 2
Zeitgeber
Zeitgeber motor
Hauptschalter
1V1
1V2
1T1
1M1
1S1*
*= OPTIONAL
17 / 22
Cod. 710.0054.02.00 rev.03 – 11.2009
Mod. VKM600 230/1/50 Cod. 714.0006.02.00
Mod. VKMT 600 220 - 230/1/50-60 Cod. 714.0006.10.00
18 / 22
Cod. 710.0054.02.00 rev.03 – 11.2009
Mod. CPL 102-150-300 - 230/1/50-60 Cod. 714.0132.03.00 Rev00
19 / 22
Cod. 710.0054.02.00 rev.03 – 11.2009
SPARE PARTS – RICAMBI CONSIGLIATI – ERSATZTEILLISTE
The attachment table show the most commonly used spare parts. Contact the Authorized Service Centre or the Manufacturer for other
spare parts.
La tabella in allegato riporta i codici dei ricambi di impiego comune. Per gli altri ricambi rivolgersi ai Centri di Assistenza o al
Costruttore.
In der folgenden Tabelle finden Sie die Teilenummer von üblichen Ersatzteilen. Für weitere Info wenden Sie sich an zuständigen
Servicebüro oder direkt an den Hersteller.
Pos
1
2
3
4
5
6
7
8*
9
10
11
Descrizione
Description
Beschreibung
KIT GUARNIZIONE COLONNE
Columns O-Ring Kit
Dichtringsatz für Behälter
CARICA ADSORBENTE
Adsorbent charge Kit
Adsorbensfüllung
CABLAGGIO ELETTRICO COMPLETO
Electrical wiring
Verdrahtung
ELETTROVALVOLA COMPLETA DI BOBINE
Solenoid valve complete with coils
Steuerungselektroventil
BOBINA ELETTROVALVOLA (220V / 50-60Hz)
Solenoid valve coil
Elektronventilspule
FILTRO BRONZO SINTERIZZATO 1/2"
Sintered filter 1/2"
Sinterbronze Filter 1/2"
FILTRO INOX - PIASTRA INFERIORE
Stainless steel net filter 1/2"
Edelstahlfilter - Unterplatte
INTERRUTTORE LUMINOSO
Light switch
Leuchtschalter
FILTRO BRONZO SINTERIZZATO 3/8"
Sintered filter 3/8"
Sinterbronze Filter 3/8”
VALVOLA DI RITEGNO 3/8”
One way valve 3/8”
Rückschlagventil 3/8”
VALVOLA DI SICUREZZA 10 bar
Safety valve 10 bar
Sicherheitsventil 10 bar
Q.tà
Q.ty
Q.ät
AF 250
Q.tà
Q.ty
Q.ät
AF 30
2
620.0111.01.00
2
620.0120.01.00
1
630.0054.01.00
(Kg 1,44)
1
630.0054.02.00
(kg 3,2)
1
224.0024.03.00
1
224.0024.04.00
2
240.0069.00.00
1
240.0073.00.00
2
240.0059.00.00
1
240.0104.00.00
2
630.0053.00.00
2
630.0053.00.00
2
630.0052.00.00
2
630.0052.00.00
1
250.0003.00.00
1
250.0003.00.00
//
1
630.0056.00.00
//
1
140.0066.00.00
140.0107.00.00
1
140.0107.00.00
1
* = OPTIONAL - UNTER NACHFRAGE ERHÄLTLICH
20 / 22
Cod. 710.0054.02.00 rev.03 – 11.2009
IN
OUT
11
8
3
6
10
OUT
9
6
2
2
7
3
7
1
1
8
4 5
c
c
c
4
4 5
AF 250
c
IN
5
AF 30
C = SCARICO ARIA – AIR DISCHARGE – LUFTAUSGANG
21 / 22
Cod. 710.0054.02.00 rev.03 – 11.2009
Descrizione
Mod.
Description
Beschreibung
CPL 0L
102 - 150 - 300
Qtà
Pos
1 KIT GUARNIZIONE COLONNE
Columns O-Ring Kit
Dichtringsatz für Behälter
2 CARICA ADSORBENTE
Adsorbent charge Kit
Adsorbensfüllung
3 TEMPORIZZATORE ELETTROMECCANICO
Electric Timer
Elektromechanische Schaltuhr
4 ELETTROVALVOLA A BASETTA COMPLETA
Solenoid valve complete
Elektroventil mit komplett Klemmenbrett
5 BOBINA ELETTROVALVOLA
Solenoid coil
Elektronventilspule
6 FILTRO BRONZO SINTERIZZATO 1/2"
Sintered filter 1/2"
Sinterbronze Filter 1/2"
7 FILTRO INOX - PIASTRA INFERIORE
Stainless steel net filter 1/2"
Edelstahlfilter - Unterplatte 1/2"
8 INTERRUTTORE LUMINOSO
Lighning switch
Leuchtschalter
9 FILTRO BRONZO SINTERIZZATO 3/8"
Sintered filter 3/8"
Sinterbronze Filter 3/8"
VALVOLA DI SICUREZZA
Safety valve
Sicherheitsventil
SEPARATORE DI CONDENSA 3/8" COMPLETO
2
620.0111.01.00
1
630.0054.01.00
1
048133001
//
1
240.0069.00.00
2
048355002
240.0059.00.00
2
048355003
630.0053.00.00
2
630.0052.00.00
1
//
1
//
1
140.0093.00.00
1
11bar
140.0090.00.00
1
//
Condensate separator
Kondensabscheider
SCARICATORE INTERNO A GALLEGGIANTE
Automatic drain for separator
Schwimmerableiter
ADATTATORE FONDO TAZZA
Inner bowl adaptor
Filterbodenpassstück
OR PER ADATTATORE
1
136.0337.01.00
1
620.0167.00.00
Bowl adaptor OR GASKET
OR-Dichtring für Filterbodenpassstück
BATTERIA DI RAFFREDDAMENTO
1
921.0027.02.00
1
048355005
210.0082.00.00
1
224.0051.01.00
1
240.0085.00.00
Refrigeration finned coil
Batteriekühler
VENTILATORE COMPLETO
Ventilator complete for refrigerator
Ventilator komplett
CABLAGGIO ELETTRICO COMPLETO
Electrical wiring
Verdrahtung
ELETTROVALVOLA SCARICO RAPIDO
Depressurization solenoid valve
Druckminderungsventil
048360001
22 / 22
Cod. 710.0054.02.00 rev.03 – 11.2009