1
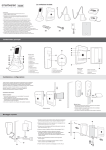
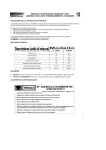
A7002 SOLAR LED 3x – lotto - batch 11/10
DICHIARAZIONE
DI CONFORMITÀ
DECLARATION OF CONFORMITY
Noi sottoscritti,
We, the undersigned,
LAMPADA - LAMP
C.I.E. DENTALFARM S.r.l.
Via Susa, 9/A
10138 TORINO - I
tel. (+39) 011 4346588
SOLAR LED 3x
dichiariamo sotto la nostra esclusiva responsabilità che il prodotto di ns. fabbricazione
declare under our own responsability that the product of our exclusive manufacturing
Codice - Code
A7002
Tipo - Type
LAMPADA da BANCO
BENCH LAMP
Modello - Model
SOLAR LED 3x
è conforme alle seguenti norme:
complies with the following regulations:
• 73/23/CEE - DIRETTIVA BASSA TENSIONE
73/23/EEC - DIRECTIVE ON LOW TENSION
• 89/336/CEE - DIRETTIVA SULLA COMPATIBILITÀ ELETTROMAGNETICA
89/336/EEC - DIRECTIVE ON ELECTROMAGNETIC COMPATIBILITY
in base a quanto previsto dalla Direttiva:
strictly in accordance with the requirements of the Directive:
• 89/392/CEE - DIRETTIVA COMUNITARIA SULLE MACCHINE
89/392/EEC - COUNCIL DIRECTIVE ON MACHINERY
Torino - Turin, 28/04/2011
Amm. Delegato - Managing Director
Alberto CATELLA
C.I.E. DENTALFARM s.r.l.
Via Susa, 9/a - 10138 TORINO - ITALY
SERVIZIO TECNICO COMMERCIALE - TECHNICAL COMMERCIAL SERVICE
(+39) 011/4346588
SERVIZIO ASSISTENZA TECNICA - AFTER-SALE TECHNICAL SERVICE
(+39) 011/4346632
FAX (+39) 011/ 4346366
E-mail: [email protected]
Website: www.dentalfarm.it
MANUALE D’USO E MANUTENZIONE
INSTRUCTION AND MAINTENANCE MANUAL
A7002 SOLAR LED 3x – lotto - batch 11/10
DESCRIZIONE – DESCRIPTION
SOLAR LED 3x è uno strumento di precisione costruito rispettando elevati standard ottici e
meccanici, per soddisfare le esigenze quotidiane del Laboratorio.
SOLAR LED 3x is a precision instrument which has been manufactured in compliance with
the highest optical and mechanical features in order to ideally satisfy the daily requirements
of the Dental Laboratory.
CARATTERISTICHE - MAIN FEATURES
Lente - Lens :
diottrie
diopters
3x
Ingrandimenti
Magnification
1,75
Dimensione
dimensions
∅127mm
distanza di funzionamento (focalità)
operating distance (focus)
200 mm
Plafoniera - Roof lamp :
lampade - lamps
48 LED su circuito stampato (5W ca.)
48 pcs. LED (5W approx.)
tensione - voltage
220 V – 240 V 50 Hz
A7002 SOLAR LED 3x – lotto - batch 11/10
DISEGNO ESPLOSO E LISTA RICAMBI LAMPADA SOLAR 3x LED
MESSA IN SERVIZIO DELL’APPARECCHIO - OPERATING PROCEDURE
POS.
1
2
3
4
5
6
7
8
9
10
11
12
13
14
Rimuovere con delicatezza la lampada dall’imballo e recuperare gli accessori.
L’apparecchio è fornito di supporto per il fissaggio a banco.
Gently remove the lamp from its packaging and take out the accessories. The appliance is
supplied with the support for bench fixing.
CODICE
7002024
7002014
7002023
7002013
7002019
7002011
7002012
7002015
7002021
7001005
7002010
7002022
7001007
7001006
DESCRIZIONE
PERNO SNODO
MANOPOLA SU SNODO PLAFONIERA
INTERRUTTORE
COPERCHIO PROTEZIONE LENTE
LENTE 3 DIOTTRIE
CORPO PLASTICA SUPERIORE
CORPO PLASTICA INFERIORE
RIPARO PER LAMPADA
ANELLO LED COMPLETO
MORSETTO – SUPPORTO DA BANCO
BRACCIO ESTENSIBILE COMPLETO
REATTORE ELETTRONICO
SUPPORTO DA PARETE (OPZIONALE)
BASE (OPZIONALE)
EXPLODED DRAWING AND SPARE PART LIST SOLAR 3x LED LAMP
POS.
1
2
3
4
5
6
7
8
9
10
11
12
13
14
CODE
7002024
7002014
7002023
7002013
7002019
7002011
7002012
7002015
7002021
7002005
7002010
7002022
7001007
7001006
DESCRIPTION
ARTICULATION PIVOT
ARTICULATION KNOB
SWITCH
LENS PROTECTION CAP
3X MAGNIFYING LENS
UPPER PLASTIC BODY
LOWER PLASTIC BODY
LAMP PROTECTION SHIELD
COMPLETE LED RING
BENCH TOP – SUPPORT
EXTENSIBLE ARM
ELECTRONIC BALLAST
WALL-MOUNTED SUPPORT (OPTIONAL)
BASE (OPTIONAL)
Fissaggio a banco: se è possibile, piazzare il morsetto su un
lato del banco, serrare a fondo, quindi inserire il perno di
rotazione montato sull’estremità inferiore del braccio.
In caso si preferisca un’installazione fissa sul piano di lavoro,
svitare le 4 viti che uniscono la parte superiore al morsetto
metallico, segnare la posizione dei fori e bloccare il basamento
in plastica.
Bench-top: whenever it is possible,
place the clamp beside the bench,
tighten firmly, then insert the rotating pin
assembled on the lower end of the arm.
Should you prefer to fix the unit on the
work bench, unloose the 4 screws
connecting the upper part to the metallic
clamp, mark the positions for the holes
and clamp the plastic block.
A richiesta è disponibile un supporto per l’applicazione fissa a parete.
A wall hanger is available on request.
Per l’installazione scegliere un luogo ventilato, pulito ed asciutto, con una temperatura
compresa tra 0°C e 40°C e umidità relativa non superiore a 90% (uso esclusivamente
interno).
As ideal place for the installation, choose a well ventilated, clean and dry location, with
temperature ranging between 0°C and 40°C and relative humidity not exceeding 90%
(indoor use only).
COLLEGAMENTO ELETTRICO - ELECTRICAL CONNECTION
Prima di effettuare il collegamento del cavo elettrico, accertarsi che la tensione di esercizio
indicata sulla targhetta corrisponda a quella della rete e che la presa sia provvista di filo di
terra. Il cavo di alimentazione fornito è di sezione adeguata alla massima corrente assorbita
(indicata nelle caratteristiche tecniche) ed è lungo un metro. Nel caso di utilizzo di
prolunghe, verificare che la sezione del cavo sia coordinata con la sua lunghezza e almeno
pari a quella del cavo originale.
Before connecting the electrical cable, be sure that the rated voltage stated on the label
corresponds to the mains voltage and that the socket is duly supplied with earthed wire. The
section of the feeding cable supplied with the unit suits to the highest absorbed current
(specified in the technical features) and it is one meter long. Should you use any extension,
be sure that the section of the cable matches to its length and that it is at least of the same
size as the original cable.
A7002 SOLAR LED 3x – lotto - batch 11/10
FUNZIONAMENTO - OPERATION
AVVERTENZE - WARNINGS
La plafoniera dispone di un coperchio per la salvaguardia e la pulizia della lente che deve
essere richiuso in condizioni di inattività.
Accendere l’interruttore generale e centrare la plafoniera sull’oggetto da ingrandire, quindi
registrare la messa a fuoco sollevando o abbassando delicatamente la lampada. Il braccio
estensibile della lampada è munito di snodi che possono essere bloccati con manopole per
fissare una specifica posizione. Non forzare in alcun modo i movimenti e non cercare di fare
assumere alla lampada posizioni estreme. Spegnere sempre la luce al termine dell’utilizzo.
Non utilizzare la lampada per scopi diversi da quelli per cui è stata progettata
e che sono esposti nel presente manuale.
In caso di demolizione attenersi scrupolosamente alle direttive vigenti nel
Paese dove questa operazione è effettuata, considerando che si tratta di un
apparecchio elettrico.
La C.I.E. Dentalfarm srl si riserva il diritto di modificare in qualsiasi momento e senza
preavviso le caratteristiche dei prodotti commercializzati.
The roof lamp is fitted with a protective cover ensuring that the lens is kept clean; the cover
must be closed in idle mode.
Switch on and true the lamp on the object to be enlarged, then adjust the focusing by gently
lifting or lowering softly the lamp. The extensible arm of the lamp is fitted with articulated
joints which can be locked by means of knobs in order to fix in place a certain position.
Never force the mechanisms and do not try to force the lamp in extreme positions. Do not
forget to switch off the lamp at the end of the work.
Never use the unit for any use differing from the operating purposes it has been designed
for and which are clearly illustrated in the present instruction manual.
In case of demolition, comply scrupulously with the regulations in force in the Country where
the operation takes place, always considering that you are handling an electrical device.
C.I.E. Dentalfarm Srl reserves the right to modify at any time and without prior notice any
features of its products.
SCHEMA ELETTRICO – WIRING DIAGRAM
PULIZIA - CLEANING OPERATION
Usare un tessuto morbido per pulire l'ottica, eventualmente servirsi di un detergente liquido,
antistatico e non abrasivo. Le altre parti della lampada possono essere pulite con un
qualsiasi detergente o disinfettante non aggressivi per la plastica e le superfici metalliche
verniciate.
Operazioni da evitare: pulire la superficie dell’ottica con le mani, maltrattare ed applicare
carichi inutili al braccio estensibile, pulire l'unità con solventi volatili o pulitori abrasivi,
tentare di assistere la lampada da soli.
Use a soft cloth to clean the lens, eventually use a liquid, antistatic and non-abrasive
cleansing agent. The other parts of the lamp can be cleaned with any non-aggressive
detergent or disinfectant agent specific for the plastic and the enameled metallic surfaces.
Operations to be avoided: to clean the lens surface with your hands, to misuse and apply
unnecessary loads to the extensible arm, to clean the appliance with volatile solvents or
abrasive cleansing agents, to try to recondition the lamp by yourselves.
MANUTENZIONE - MAINTENANCE
Sostituzione della lente – ruotare delicatamente la ghiera zigrinata che blocca la lente sul
corpo in plastica superiore e spingere dalla parte inferiore.
Replacement of the lens – gently rotate the knurled ring which is fixing the lens on the
upper plastic body and push up from the lower side.
Sostituzione dell’anello LED - prima di intervenire all’interno della plafoniera, scollegare la
corrente. Togliere le 6 viti che uniscono le due parti del corpo in plastica, togliere la
protezione trasparente e scollegare il circuito con i LED dal reattore elettronico.
Replacement of the complete LED ring – before any intervention inside the roof lamp,
disconnect the unit. Remove the 6 screws fixing the two parts of the plastic body, remove
the transparent protection and disconnect the LED circuit from the electronic ballast.
POS.
SW
BALLAST
CIRCUIT
DESCRIZIONE - DESCRIPTION
INTERRUTTORE – MAIN SWITCH
REATTORE ELETTRONICO – ELECTRONIC BALLAST
ANELLO LED COMPLETO – COMPLETE LED RING