1
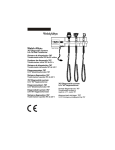
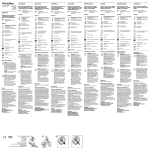
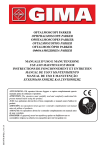
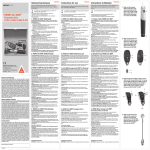
1300232D.qxd 11/29/2001 10:02 AM Page 1 PocketScopes™ Otoscope Ophthalmoscope Operating Instruction Manual Retinoscope Transilluminator 1300232D.qxd 11/29/2001 10:02 AM Page 2 Mode d'emploi des PocketScopes Thank you for purchasing the Welch Allyn Halogen PocketScope Set. The operating and maintenance instructions found in this manual are for both the Ophthalmic and Diagnostic model sets. They should be followed to ensure many years of accurate and reliable service. Please read these instructions thoroughly before using your PocketScope. Note: While the handles and instrument heads of the PocketScopes are interchangeable, different lamps are required for different instrument heads. For the retinoscope use lamp No. 08400, for the ophthalmoscope No. 03900 and for the otoscope/throat illuminator and transilluminator lamp No. 03400. For guaranteed performance, use genuine Welch Allyn lamps only. Merci d'avoir acheté un jeu de PocketScope™ WelchAllyn. A la différence des poignées et des têtes, qui sont interchangeables, les lampes à utiliser sont spécifiques à chaque tête d'instrument. Veuillez consulter les diagrammes pour savoir comment remplacer les différentes lampes. Otoscope : (p. 7) 21131 – Tête d'otoscope standard (lampe 03400) 21111 – Otoscope avec source lumineuse pour la gorge ( lampe 03400). Pour convertir l'otoscope en source lumineuse pour la gorge, il suffit de dévisser la tête de l'otoscope. Rétinoscope : (p. 6) Pour utiliser le rétinoscope, déployez l'appareil en tirant la tête vers l'extérieur. Le manchon de mise au point permet d'effectuer la mise au point et la rotation des stries. Ophtalmoscope : (p. 8) Instructions relatives aux lentilles – Dioptries ‘+’ - Faites pivoter le cadran de la lentille dans le sens horaire. A +6, faites de nouveau tourner le cadran de la lentille dans le sens horaire puis placez le ‘multiplier lever’ sur la position ‘+’. Faites de nouveau pivoter le cadran de la lentille dans le sens horaire si vous souhaitez atteindre les paramètres +7 à +22. Dioptries ‘–’ - Faites pivoter le cadran de la lentille dans le sens horaire inverse. A –9, faites de nouveau tourner le cadran de la lentille dans le sens horaire inverse. Placez ensuite le ‘multiplier lever’ sur la position ‘–’. Continuez à faire pivoter le cadran de la lentille dans le sens horaire inverse si vous souhaitez atteindre les paramètres –10 à –25. 1 1300232D.qxd 11/29/2001 10:02 AM Page 4 Bedienungsanleitung für PocketScopes Istruzioni d'uso del PocketScopes Wir bedanken uns für Ihren Kauf eines PocketScope™Satzes von WelchAllyn. Grazie per avere acquistato un set PocketScope™ WelchAllyn. Obwohl die Griffe und Instrumentenköpfe untereinander austauschbar sind, werden für die verschiedenen Instrumentenköpfe verschiedene Lampen benötigt. Der Lampenaustausch ist auf den diagrammatischen Abbildungen angezeigt. Le impugnature e le teste degli strumenti sono intercambiabili, tuttavia le teste degli strumenti richiedono l'uso di lampadine diverse. Per la sostituzione delle lampadine fare riferimento alle figure riportate qui di seguito. Otoskop: (p. 7) 21131 – standardmäßiger Otoskopkopf (Lampe 03400) 21111 – Otoskop mit Halsbeleuchter (Lampe 03400). Zur Konversion des Otoskops in einen Halsbeleuchter wird einfach der Otoskopkopf aufgeschraubt. Skiaskop: (p. 6) Zur Verwendung des Skiaskops dieses zunächst teleskopisch auseinander ziehen, indem der Kopf nach außen gezogen wird. Otoscopio (p. 7) 21131 – Testa standard per otoscopio (lampadina 03400) 21111 – Otoscopio con illuminatore laringeo (lampadina 03400). Per convertire l'otoscopio in illuminatore laringeo basta svitare la testa dell'otoscopio. Retinoscopio (p. 6) Per usare il retinoscopio estrarre la testa dello strumento. Un apposito cilindro di focalizzazione consente di ruotare il fascio luminoso e di regolarne l’ampiezza. Ein Brennpunktaufsatz ermöglicht die Scharfeinstellung und Rotation des Streifens. Oftalmoscopio (p. 8) Istruzioni per la regolazione della messa a fuoco. Ophthalmoskop: (p. 8) Linsenanleitung – Diottrie ‘+’ – Ruotare il selettore della lente in senso orario. A +6 ruotare nuovamente il selettore in senso orario, quindi portare la ‘multiplier lever’ sulla posizione ‘+’. Per le diottrie comprese tra +7 e +22, ruotare ancora il selettore in senso orario. ‘+’ Dioptrie – Die Linsenscheibe im Uhrzeigersinn drehen. Bei +6 die Linsenscheibe wiederum im Uhrzeigersinn drehen und dann den ‘Multiplier Lever’ in die Position ‘+’ stellen. Die Linsenscheibe dann wieder im Uhrzeigersinn für +7 bis +22 drehen. ‘-‘ Dioptrie – Die Linsenscheibe gegen den Uhrzeigersinn drehen. Bei +9 die Linsenscheibe wiederum gegen den Uhrzeigersinn drehen. Danach den ‘Multiplier Lever’ in die Position ‘-‘ stellen. Die Linsenscheibe dann weiter für –10 bis –25 gegen den Uhrzeigersinn drehen. 2 Diottrie ‘-‘ Ruotare il selettore della lente in senso antiorario. A -9 ruotare nuovamente il selettore in senso antiorario, quindi portare la ‘multiplier lever’ sulla posizione ‘-‘ . Per le diottrie comprese tra -10 e -25 continuare a ruotare il selettore in senso antiorario. 3 1300232D.qxd 11/29/2001 10:02 AM Page 6 Instrucciones de funcionamiento de PocketScopes Le agradecemos su compra del SET PocketScope™ de WelchAllyn. Aunque los mangos y las cabezas del instrumento son intercambiables, se necesitan bombillas diferentes para las DISTINTAS cabezas del instrumento. En los diagramas se indica cómo cambiar de bombilla. Otoscopio: (p. 7) 21131 – cabeza de otoscopio normal (bombilla 03400) 21111 – Otoscopio con iluminador de garganta (bombilla 03400). Para convertir el otoscopio en un iluminador de la garganta sólo hay que desenroscar la cabeza del otoscopio Retinoscopio: (p. 6) Para usar el retinoscopio, tire primero de la cabeza hacia fuera para que salga como un telescopio. El manguito de enfoque permite enfocar y hacer girar la FRANJA. Oftalmoscopio: (p. 8) Instrucciones para la lente – ‘+’ Dioptrías - Gire el dial de la lente en sentido horario. A +6 mueva otra vez el dial de la lente en sentido horario, luego mueva la ‘multiplier lever’ a la posición ‘+’. Vuelva a mover el dial de la lente en sentido horario para +7 a +22 PocketScope Retinoscope Retinoscope Features......................................6 PocketScope Otoscope Throat Illuminator.............................................7 PocketScope Ophthalmoscope Ophthalmoscope..............................................8 Ophthalmoscope Lens Instructions ..............8-9 PocketScope Transilluminator Transilluminator Features...............................10 Transilluminator Attachment ..........................10 Lamp Replacement Retinoscope Lamp Replacement .............10-11 Otoscope Lamp Replacement .......................11 Ophthalmoscope Lamp Replacement ......11-12 Transilluminator Lamp Replacement .............12 PocketScope Handles AA Battery Handle .........................................13 Convertible Handle (AA & Rechargeable) .....14 Batteries Recharging Batteries .....................................15 Changing Batteries ...................................15-16 Cleaning Recommendations .................16-17 Replacement Parts..................................17-18 ‘-‘Dioptrías – Gire el dial de la lente en sentido antihorario. A –9 mueva otra vez el dial de la lente en sentido antihorario. Luego mueva la ‘multiplier lever’ a la posición ‘-‘. Siga moviendo el dial de la lente en sentido antihorario para –10 a -25 4 5 1300232D.qxd 11/29/2001 10:02 AM Page 8 PocketScope Retinoscope PocketScope Otoscope Retinoscope Features • External focusing sleeve allows for easy adjustment regardless of what size hand or how instrument is held. Continuous 360Þ rotation. • Dust-free optics to keep instrument clean longer. • Fixation cards that easily attach for use during dynamic retinoscopy. • Collapsible head for compact size. Throat Illuminator (21111 only) To convert otoscope to throat illuminator, unscrew otoscope head in counterclockwise direction. NOTE: Illuminator section can become hot. Avoid more than momentary direct skin contact. To turn instruments on and off, and vary intensity rotate switch at base of instrument head. As intensity increases, green band gets thicker. Patents: US 5,189,449 and 5,459,535 NOTE: The retinoscope must be telescoped out by pulling in an outward direction. The retinoscope can only be used if this operation is performed. Practitioner Side Patient Side Rubber brow rest Dust-free optics Throat Illuminator Focusing sleeve 6 On/Off Rheostat Switch 7 1300232D.qxd 11/29/2001 10:02 AM Page 10 PocketScope Ophthalmoscope 1. Rubber Brow Rest. 2. Aperture selection dial with continuous rotation: Allows access to microspot, small, large, fixation, slit and cobalt blue. 3. Lens Selection Dial — When used with multiplier lever, allows single diopter steps through 48 lens combinations (from +22 to –25 diopters). 4. Multiplier Lever — Allows fast movement through the range via 16 diopter shifts. When used with lens selection dial, allows single diopter steps through 48 lens combinations. 5. Two-position filter switch: Engage either open or red-free filter. 6. Larger spot size for wider field of view. 7. Sealed optics. 8. Diopter Display Window — Displays direct reading of diopter values (positive values displayed in green; negative values displayed in red). To move through the range on the negative (–) side: Rotate lens selection dial in negative (counterclockwise) direction. At –9 diopters move lens dial counterclockwise again. Then move multiplier lever to “–” position. Continue moving lens dial in same counterclockwise direction to access –10 to –25 diopters. Practitioner Side Rubber brow rest Lens selection dial Lens multiplier Diopter display window Patient Side Filter Lens Instructions: To move through the range on the plus (+) side: Rotate lens selection dial in positive (clockwise) direction. At +6 diopters move lens dial clockwise again. Then move multiplier lever to “+” position. Continue moving lens dial in same clockwise direction to access +7 thru +22 diopters. 8 Red-Free Filter position Two-position Filter switch Open spot position Aperture selection dial 9 1300232D.qxd 11/29/2001 10:02 AM Page 12 PocketScope Transilluminator Transilluminator Features • Fiber Optic transmission for bright cool light transmission. • Curved design to fit into tight areas. Transilluminator Attachment Remove the retinoscope by turning the instrument in a counterclockwise direction. This will disconnect the retinoscope. Connect the transilluminator by turning the instrument in a clockwise direction. Light pipe can be rotated to locate optimum orientation. 3. Insert replacement lamp by carefully aligning pin on lamp shaft with slot in retinoscope. Push lamp in until firmly seated. Otoscope Lamp Replacement (21111 only) 1. Remove (unscrew) otoscope head. 2. Unscrew lamp holder in counterclockwise direction and remove from handle. 3. Grasp end of lamp and pull out of holder. 4. Insert new lamp by reversing above process. NOTE: If lamp surface is touched or becomes smudged, wipe clean with a soft cloth. This will assure longer lamp life and higher output. Instructions for attaching the transilluminator Lamp Replacement Retinoscope Lamp Replacement 1. Remove (unscrew) retinoscope head. 2. Grasp end of lamp and pull out (use nail file or similar object if necessary). 10 Ophthalmoscope Lamp Replacement 1. Unscrew ophthalmoscope head in counterclockwise direction. 2. Grasp end of lamp and pull out (use nail file or similar object if necessary). 11 1300232D.qxd 11/29/2001 10:02 AM Page 14 3. Insert replacement lamp by carefully aligning pin on lamp shaft with slot in ophthalmoscope head. Push lamp in until firmly seated. NOTE: If lamp surface is touched or becomes smudged, wipe clean with a soft cloth. This will assure longer lamp life and higher output. PocketScope Handles AA PocketScope Handles (72830) 1. This handle accepts any brand of AA batter ies. Use alkaline batteries for best perfmance. 2. The AA handle can be upgraded to a convertible handle, which allows the handle to be used with AA batteries, Welch Allyn rechargeable batteries and the Universal Charger or PocketScope Desk Charger (obsolete). The upgrade kit part number 72837 includes the rechargeable bottom cap (#72810) plus the rechargeable battery (#72600). Align pin to slot in ophthalmoscope head The upgrade kit part number 72860 or 72865 includes the rechargeable bottom cap, rechargeable battery and the 7114X Universal Charger with Pocketscope Adapters. Transilluminator Lamp Replacement 1. Place thumb on knurled ring at base of instrument. Unscrew transilluminator in a counterclockwise direction. 2. Grasp end of lamp and pull out (use nail file or similar object if needed). 3. Insert replacement lamp (No. 03400). Push lamp in firmly. 12 13 1300232D.qxd 11/29/2001 10:02 AM Page 16 Batteries Convertible PocketScope Handles (72800) For use with AA and Welch Allyn rechargeable batteries This handle can be used with either AA batteries or with Welch Allyn’s PocketScope rechargeable battery (#72600) and Desk Charger. NOTE: Only use the Welch Allyn Universal Charger or PocketScope Desk Charger (obsolete) with the Welch Allyn Convertible PocketScope handle and rechargeable battery (#72600). Do not use the Universal Charger or PocketScope Desk Charger when using AA batteries. Recharging Batteries (72800 only) 1. Plug charger into outlet: Product No. 71140 in the U.S. (120V, 50-60 Hz) Product No. 71145 outside the U.S. (specify country and voltage) 2. To insure full charge and long lamp life, turn instrument(s) to “off” position. 3. Insert handle(s) into charger. Green indicator lights will illuminate when handles are charging properly. NOTE: AA batteries will not charge and will not cause indicator lights to illuminate. NOTE: Only Welch Allyn rechargeable battery (#72600) is approved for use with these handles. #72600 Nickel Cadmium Rechargeable Battery Changing Batteries 1. Remove (unscrew) bottom cap. 2. Tap handles on palm of hand until battery slides out. 3. Insert new battery: Rechargeable: Insert in either direction. 14 15 1300232D.qxd 11/29/2001 10:02 AM Page 18 AA cells: Use alkaline cells for best performance. Insert positive (+) end first for both cells. + – – + “AA” Cells Recycling Batteries Welch Allyn now employs the services of an agency which can disassemble and recycle all components of nickel-cadmium batteries so that nothing gets land-filled or incinerated. Should you wish to dispose of your expended Welch Allyn rechargeable battery via recycling (in the U.S. and Canada only), please send to: Welch Allyn RECYCLE BATTERY 4341 State Street Road Skaneateles Falls, NY 13153-0220 Welch Allyn Canada RECYCLE BATTERY 160 Matheson Blvd. East Mississauga, Ontario CANADA L4Z 1V4 For locations outside the U.S. and Canada, consult your local recycling authority for correct disposal of batteries. Cleaning Recommendations Ophthalmoscopes – Cleaning (and repair) should be performed at Welch Allyn. DO NOT apply alcohol to mirror or lenses as this may degrade optical quality. Otoscope/Retinoscope/Transilluminator – Do not use abrasive cleaners, alcohol or other 16 chemicals. Lens may be cleaned with warm water and soap. Handle – The PocketScope handle wipes clean with a damp cloth. Desk/Wall Charger – DO NOT pour water or any cleaning solution into charging wells. DO NOT autoclave Desk/Wall Charger, instruments or handles. Replacement Parts To order replacement parts, use these numbers: No. 08400 Retinoscope Lamp No. 03900 Ophthalmoscope Lamp No. 03400 Otoscope/Transilluminator Lamp No. 13000 Ophthalmoscope without handle No. 16210 Retinoscope without handle No. 42000 Transilluminator without handle No. 21111 Otoscope/Throat Illuminator without handle No. 21130 Otoscope without handle No. 211024-501 Lamp and shroud assembly No. 211005 Otoscope Lens No. 21504 Insufflator No. 72800 PocketScope Convertible Handle with #72600 Rechargeable Battery No. 72801 PocketScope Convertible Handle (without battery) 17 1300232D.qxd 11/29/2001 No. 72830 No. 72831 No. 72837 No. 72860 (Domestic) No. 72865 (International, specify country) No. 72600 No. 24400 No. 24420 No. 52432 No. 52434 10:02 AM Page 20 PocketScope AA Handle with Alkaline Batteries PocketScope AA Handle (without batteries) Upgrade kit to convertible handle (bottom cap & rechargeable battery) Upgrade kit to convertible handle (bottom cap, rechargeable battery & Universal Charger) Upgrade kit to convertible handle (bottom cap, rechargeable battery & Universal Charger) Replacement nickel cadmium 2.5v rechargeable battery Set of 4 reusable polypropylene specula (2, 3, 4, 5mm) Set of 3 reusable SofSpec Specula (3, 5, 7mm) Disposable specula – box of 1000 – 2.5mm pediatric size Disposable specula – box of 1000 — 4mm regular size For repairs, send unit to: Welch Allyn, Inc. Service Department 4341 State Street Road Skaneateles Falls, NY 13153-0220 Printed in U.S.A. Part No. PM130023-4 D