1
06.04
- OPERATION AND MAINTENANCE
PICJET® GUNJET
BETRIEBS- UND WARTUNGSANLEITUNG
2
- UTILISATION ET ENTRETIEN
- USO E MANUTENZIONE
OL.3001-3002 M. 5
E) INSTALLATION
Unpack PICJET ® Hammer Blast
and carry out the installation following the procedure described.
E) INSTALLATION
Den Klopfer aus der Verpackung
herausnehmen und den Einbau
wie beschrieben vornehmen.
E) INSTALLATION
Enlever le percuteur de son
emballage et procéder à
l’installation comme décrit de
suite.
E) INSTALLAZIONE
Togliere il percussore dall’imballo ed eseguire l’installazione
come descritto in seguito.
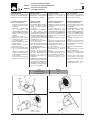
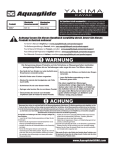
E1) PICJET® INSTALLATION
A) Area of installation
- Clean the surface to be welded removing any paint or other impurity
- Weld plate “1” with Rutil Basic
electrode
DIN
1913E5153B(R10)AVSE7016,
taking care NOT to ground the
welder to the stud bolts of
the plate.
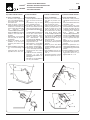
- Weld the chain bolt “5”
B) Make a bore in the container
corresponding with the bore
in the annular plate.
C) Line the contact surface with
silicone sealant
- Mount PICJET® “2” on the stud
bolts of the plate
D) Attach using vibration dampers “3” and self-locking nuts
“4”
- Tighten the self-locking nuts
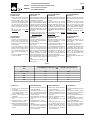
so that the dimension M corresponds with the values given in the table.
- Attach the chain “9” using the
appropriate nuts “8” and “10”
E1) PICJET® EINBAU
A) Einbaubereich
- Die Schweißfläche reinigen,
indem man Anstriche oder
Schmutz unterschiedlicher
Art entfernt.
- Die Platte „1" mit der Elektrode Rutil Basico DIN
1913E5153B(R10)AVSE7016
schweißen: Darauf achten,
dass das Massekabel des
Schweißgeräts NICHT an
die Stiftschrauben der Platte
angeschlossen wird.
- Die Verankerung für die Kette „5" anschweißen.
B) Ein Loch im Blech des Behälters auf der Höhe des Lochs
der Ringplatte bohren.
C) Die Kontaktfläche mit Silikon
bestreichen.
- PICJET ® „2" auf die Stiftschrauben der Platte setzen.
D) Mit den stoßdämpfenden
Buchsen „3" und den
selbstsichernden Muttern „4"
befestigen.
- Die selbstsichernden Muttern
anziehen, bis der Wert M auf
die Werte der nachfolgenden
Tabelle gebracht worden ist.
- Die Kette „9" mit den Muttern
„8" und „10" einhaken.
E1) INSTALLATION PICJET®
A) Zone d’installation
- Nettoyer la surface à souder
en enlevant les peintures ou les
impuretés.
- Souder l’enclume “1” avec
l’électrode Rutil Basico DIN
1913E5153B (R10) AVSE7016,
en prenant soin de NE PAS relier les fils de masse de la machine à souder aux goujons de
la plaque.
- Souder l’ancrage pour chaîne
“5”.
B) Percer un trou dans la tôle du
récipient à la hauteur de l’orifice de la plaque annulaire.
- Installer PICJET® “2” sur les goujons de la plaque.
D) Fixer avec des bagues
d’amortissement “3” et de sûreté “4”;.
- Serrer les écrous de sûreté jusqu’à placer la cote M aux valeurs du tableau ci-dessous.
- Accrocher la chaîne “9” avec
les écrous prévus “8” et “10”.
E1) INSTALLAZIONE PICJET®
A) Zona d’installazione
- Pulire la superficie da saldare asportando vernici o impurità varie.
- Saldare la piastra “1” con elettrodo Rutil Basico DIN
1913E5153B(R10)AVSE7016,
avendo cura di NON collegare il filo di massa della saldatrice ai prigionieri della piastra.
- Saldare ancoraggio per catena “5”.
B) Ricavare un foro nella lamiera del contenitore in corrispondenza del foro della piastra anulare.
C) Siliconare la superficie di contatto;
- installare PICJET® “2” sui prigionieri della piastra.
D) Fissare con boccole ammortizzatrici “3” e autobloccanti
“4” ;
- serrare i dadi autobloccanti
fino a portare la quota M ai
valori della tabella sottostante.
- Agganciare la catena “9” con
gli appositi dadi “8” e “10”.
Type
M (mm)
PICJET® 032-040
16
PICJET® 063-080
25
Silicone - Silikon
Silicone - Siliconare