1
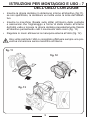
NIMAR3D
CUSTODIA NIMAR 3D PER FOTOCAMERE
MANUALE TECNICO
NIMAR 3D CAMERA HOUSING
MANUAL USER
INDICE
1INTRODUZIONE
1INTRODUCTION
4
12
2
2
CARATTERISTICHE TECNICHE
TECHNICAL FEATURES
4
12
3
3
IN DOTAZIONE
ACCESSORIES SUPPLIED
4
12
4
4
PREPARAZIONE DELLA FOTOCAMERA
PREPARING THE CAMERA
5
13
5
5
INSERIMENTO DELLA CUSTODIA
PUT THE CAMERA IN THE HOUSING
6
14
6
6
SOSTITUZIONE E MONTAGGIO OBLÒ
REPLACING AND FITTING THE PORTHOLE
8
16
7 7
ISTRUZIONI PER MONTAGGIO E USO DELL’OBLÒ CON ZOOM
ISTRUCTIONS FOR FITTING AND USING THE ZOOM PORTHOLE
9
17
8AVVERTENZE
8CAUTION
10
18
9MANUTENZIONE
9MAINTENANCE
10
18
10 CONDIZIONI DI GARANZIA
10 GUARANTEE CONDITIONS
11
19
3
1 - INTRODUZIONE
Grazie per aver scelto il nostro prodotto.
Vi consigliamo di leggere queste istruzioni per un corretto uso della
custodia.
2 - CARATTERISTICHE TECNICHE
• Profondità Massima di Utilizzo: -60m
• Dimensioni con Impugnature e Oblò standard: 31x17x22,5cm
• Dimensioni senza Impugnature e Oblò standard: 22,5x17x22,5cm
• Peso senza Impugnature: 2,7Kg
• Materiale Custodia: Policarbonato
• Materiale Impugnature: Abs
• Assetto in acqua: Leggermente Positivo (varia a seconda delle macchine e delle ottiche)
• Allarme Sonoro di Umidità
3 - IN DOTAZIONE
• O-Ring di tenuta del coperchio
• Barattolino di grasso al silicone
• Chiave a brugola piccola
• Chiave a brugola grande
• 2 impugnature laterali con brugole e viti
• Ghiera dentata per regolazione zoom obbiettivo
• Moschettone “Safe Housing”
• Basetta flash
• Inserto cacciavite
• Protezione oculare in gomma
• Busta silica gel
• Manuale d’istruzioni
• Tagliando garanzia
4
PREPARAZIONE DELLA FOTOCAMERA - 4
• Togliere dalla macchina fotografica le cinghie, i laccioli, il proteggi
obbiettivo, il proteggi oculare ed il riparo display; potrebbero dare
noia al momento dell’inserimento della macchina all’interno della custodia (fig. 1)
• Verificare che all’interno della macchina sia presente la batteria e la
scheda di memoria
• Accendere la macchina fotografica
fig. 1
5
5 - MONTAGGIO ED UTILIZZO
• Verificare che il contenuto degli accessori in dotazione precedentemente elencato sia completo
• Appoggiare la custodia sull’oblò per agevolare l’inserimento della fotocamera al suo interno
• Aprire la custodia, mediante pressione sulle clip dei 4 ganci (sganciare la sicura); estrarre la slitta di fissaggio e mediante l’apposita
vite e l’inserto a cacciavite (in dotazione) fissarla alla macchina fotografica (fig. 2-3)
• Prima di inserire la macchina all’interno della custodia assicurarsi
di averla ben fissata alla slitta e verificare che i comandi sulla parte
anteriore, il pomello zoom sull’oblò e la basetta flash siano sollevati
in modo da non ostacolare l’ingresso della macchina (fig. 4)
• Posizionare la ghiera zoom sull’obbiettivo (fig. 11 pag. 9)
• Alloggiare la macchina (inserita sulla slitta) all’interno della custodia,
assicurarsi che sia inserita nelle “corsie” predisposte per l’alloggiamento e portare a battuta (fig. 5)
• Prima di ogni utilizzo controllare la guarnizione del coperchio e verificare che la sede (ricavata nel coperchio) sia pulita; una volta inserita la guarnizione accertarsi che sia nella corretta posizione pulita,
ingrassata, quindi chiudere il coperchio (fig. 6)
• Allineare il coperchio all’altra parte della custodia (parte anteriore) in
posizione più allineata possibile rispetto ai comandi posti sul dorso
della macchina, chiudere poi i 4 ganci di chiusura spingendo le clip
fino a fine corsa in modo da agganciare la sicura (fig. 7)
• Se il coperchio è libero ma sforza, verificate attentamente che la
corsa della slitta nella corsia di inserimento arrivi a battuta
• Posizionate le due maniglie a destra e sinistra della custodia fissandole alla custodia tramite le viti e la chiave a brugola in dotazione
(fig. 8)
6
fig. 2
fig. 3
fig. 4
fig. 5
fig. 6
fig. 7
fig. 8
7
6 - SOSTITUZIONE E MONTAGGIO OBLÒ
• Togliere la macchina fotografica dalla custodia prima di iniziare la
procedura di estrazione oblò, l’acqua residua nella parte di tenuta
potrebbe danneggiarla (fig. 9)
• Tutti gli oblò hanno innesto a baionetta come gli obiettivi delle macchine fotografiche
• Ruotare l’oblò utilizzando “il pomello zoom” (che si trova sull’oblò)
facendo coincidere i due riferimenti rossi situati su l’oblò e l’interno
della custodia
• Estrarre delicatamente l’oblò, facendo attenzione a non danneggiarne le guarnizioni (fig. 10)
• Inserire il nuovo oblò e fare il procedimento contrario
Una volta sostituito l’oblò è consigliato effettuare sempre una preventiva immersione senza macchina all’interno.
fig. 9
fig. 10
8
ISTRUZIONI PER MONTAGGIO E USO - 7
DELL’OBLÒ CON ZOOM
• Inserire la ghiera dentata (in dotazione) intorno all’obiettivo (fig.11),
se non specificato, la dentatura va rivolta verso la lente dell’obbiettivo
• Inserire la macchina (fissata sulla slitta) all’interno della custodia
e assicurarsi che l’ingranaggio a forma di stella situato all’interno
dell’oblò vada a toccare la ghiera dentata precedentemente fissata
all’obiettivo permettendo così il movimento dello zoom (fig. 13)
• Regolare lo zoom attraverso la manopola esterna all’oblò (fig. 12)
Una volta sostituito l’oblò è consigliato effettuare sempre una preventiva immersione senza macchina all’interno.
fig. 11
fig. 12
fig. 13
9
8 - AVVERTENZE
Se la custodia è stata spedita o può aver subito urti, si consiglia come
precauzione un’immersione preventiva senza fotocamera al suo interno.
Non lasciare la custodia al sole per lungo tempo, specialmente prima
dell’immersione, lo sbalzo termico potrebbe provocare la formazione di
appannamento del vetro. Per diminuire la possibilità di condensa è consigliato applicare la busta di silica gel (in dotazione) all’interno dell’oblò.
Se avete in programma l’impiego del prodotto NIMAR per un’occasione importante fate prima qualche prova di perfetto funzionamento.
NIMAR declina ogni responsabilità per danni o mancati profitti che possano derivare da un imperfetto funzionamento di questo prodotto.
Consiglio:
Appena in acqua verificate il perfetto funzionamento della custodia, sia
come tenuta stagna che come comandi, eviterete in questo caso fastidiosi inconvenienti di allagamento o mancato funzionamento della fotocamera in immersione.
9 - MANUTENZIONE
La custodia è completamente prodotta in Policarbonato, materiale resistente ad urti, pressione e salsedine.
Evitare il contatto o la pulizia con solventi, benzine o altro ed usare
esclusivamente acqua dolce.
Verificate che l’O-ring di tenuta principale e la sua sede siano puliti da
sabbia o altro.
Non manomettete parti della custodia per sostituire l’O-ring o altro, una
non corretta operazione può provocare l’allagamento della custodia.
Si consiglia di fare revisionare la custodia dalla ditta ogni anno, dove
sarà testata, verificata in tutte le sue parti e rilasciata una nuova garanzia di 12 mesi
(contattare il centro assistenza all’indirizzo: [email protected])
Tutte le custodie NIMAR vengono sottoposte a collaudi preventivi ad
una pressione di 6 Bar.
Se prevedete di non utilizzare la custodia per lungo tempo consigliamo
di togliere l’O-ring di tenuta principale dalla sua sede o tenere i quattro
ganci di chiusura aperti.
10
CONDIZIONI DI GARANZIA - 10
I prodotti NIMAR sono garantiti due anni, con le modalità ed alle seguenti condizioni inderogabili.
La garanzia è strettamente nominativa e riguarda il primo acquirente.
I prodotti NIMAR sono garantiti esenti da difetti di materiale e di lavorazione.
I componenti che ad un serio ed accurato controllo tecnico risultassero
difettosi, verranno sostituiti gratuitamente.
Le spese di spedizione del reso sono a carico del cliente.
Si consiglia di contattare la ditta prima della spedizione; in caso di allagamenti, problemi sulla fotocamera dovuti alla custodia e richiesta di
ricambi, contattare il centro assistenza ([email protected]) e richiedere il modulo RMA.
La NIMAR declina ogni responsabilità per incidenti di qualsiasi natura
che si verificassero in seguito alla manomissione o all’uso non corretto
dei suoi prodotti.
I prodotti spediti per la revisione o la riparazione o per qualsiasi altro
motivo, viaggiano a rischio e carico dell’utente. In caso di controversia il
foro competente è Modena.
Nel caso in cui la custodia debba essere spedita, togliere le impugnature visto che potrebbero danneggiare l’alloggiamento della
custodia.
Alcune avvertenze semplici nell’uso, nel trasporto e nella manutenzione
vi assicurano una perfetta efficienza del prodotto ed un ottimo risultato
nelle vostre immagini.
Ringraziandovi nuovamente per l’ottimo acquisto vi comunichiamo la
nostra disponibilità per le vostre richieste e a contattarci per qualsiasi
problema.
Invitiamo i nostri clienti a visitare il nostro sito internet www.nimar.it, lo
shop on-line www.nimarshop.com e ad iscriversi alla nostra mailing list
per essere sempre aggiornati sulle novità.
11
1 - INTRODUCTION
Thank you for having chosen our product.
Please read these directions through carefully to ensure correct assembly and use of the housing.
2 - TECHNICAL FEATURES
• Maximum depth at which it can be used: -60m
• Dimensions with standard glass and handles: 31x17x22,5cm
• Dimensions with standard glass and without handles: 22,5x17x22,5cm
• Weight without handles: 2,7Kg
• Housing material: Polycarbonate
• Handle material: Abs
• Position in water: Slightly positive (varying with camera models)
• Humidity acoustic alarm
3 - ACCESSORIES SUPPLIED
• O-Ring for the cover
• Box silicon grease
• Small Allen wrench
• Big Allen wrench
• 2 allen wrench for the handles
• 2 handles
• Safe Housing Carbiner
• Flash hot shoe
• Box of silica gel
• Toothed Ring (zoom movement)
• View finder Rubber Cover
• Screewdriver Tool
• User Manual
• Warranty Card
12
PREPARING THE CAMERA - 4
• Remove belts, straps, the lens cap and viewfinder cover from the
camera; these could be a nuisance when putting the camera back in
the housing (img. 1)
• Make sure the battery and memory board are fitted in the camera
• Switch on the camera
img. 1
13
5 - PUT THE CAMERA IN THE HOUSING
• Make sure the previously listed standard accessories are all there
• Put the housing on the porthole, to help the camera inserting
• Open the housing by pressing on the 4-fastener clip (release the
safety catch), remove the retention slide and, by means of the screw
provided, fasten to the camera (img. 2-3)
• Before putting the camera inside the housing, make sure it is properly fastened to the slide and all controls on the front, zoom knob of
the porthole and the flash hot shoe are positioned so as not to hinder
camera entry (img. 4)
• Position the toothed ring on the lens (img. 11 pag. 17)
• Insert the camera (fitted on its slide) inside the housing. Make sure it
is fitted in the “lanes” provided for housing (img. 5)
• Before use, check the cover seal and make sure the seat (obtained
in the cover) is clean. Once the seal has been fitted, make sure it is
in the correct clean and greased position and then close the cover
(img. 6)
• Align the cover with the other part of the housing (front part). The
position should be as aligned as possible with respect to the controls
on the back of the camera. Now close the 4-fastener clips pushing
these to end of stroke so as to secure the safety catch (img. 7)
• If the cover is free but is under pressure, carefully check that the travel of the slide in the fitting lane reaches end of stroke
• Position the two handles to the right and left of the housing and fasten these to the housing using the screws and valve seat wrench
provided (img. 8)
14
img. 1
img. 2
img. 4
img. 5
img. 6
img. 7
img. 8
15
6 - REPLACING AND FITTING THE PORTHOLE
• First of all remove the camera from the housing before starting to
take off the porthole; the water remaining in the seal part could damage it(img. 9)
• All the portholes feature bayonet coupling just like the lenses of the
camera
• Turn the porthole so the zoom movement (on the porthole) corresponds with red index positioned on the porthole and inside the housing
• Delicately remove the porthole, being careful not to damage the seals (img. 10)
• Fit the new porthole and proceed in the reverse sequence
Once the porthole has been replaced, it is always best to try it
out first in the water without the camera inside
img. 9
img. 10
16
ISTRUCTIONS FOR FITTING AND USING - 7
THE ZOOM PORTHOLE
• Fit the toothed ring (provided) around the lens (img. 11); if not specify
the toothing should be facing the lens
• Insert the camera (fastened on the slide) inside the housing and
make sure the starshaped gear inside the glass touches the toothed
ring previously fastened on the glass thereby permitting zoom movement (img. 13)
• Adjust the zoom by means of the knob outside the glass (img. 12)
Once the porthole has been replaced, it is always best to try it
out first in the water without the camera inside
img. 11
img. 12
img. 13
17
8 - CAUTION
If the housing was transported some of its fragile parts could have been
knocked like the port lens and controls.
As a precaution we suggest dipping it in the water first without the camera.
Do not leave the housing in the sun for any length of time specially before going underwater as the glass could mist over.
If you are going to use your NIMAR housing for an important occasion you should test it first to make sure it’s working properly.
NIMAR is not liable for damages or the loss of profit should this product
fail to work properly.
A helpful tip:
As soon as you’re in the water check that the housing is working perfectly-watertightness and controls this will avoid any problems such as
flooding or failure to work under water.
9 - MAINTENANCE
The housing is made entirely in polycarbonate which is highly resistant
to knocks and bumps, pressures and salt.
AVOID CONTACT AND DO NOT CLEAN WITH SOLVENTS, PETROL,
ETC... USE FRESH WATER ONLY.
Check the main O-ring it should be free from sand, etc...
Do not tamper with housing parts to change the main O-ring or anything
else. If it is not done properly it could cause the housing to flood.
We recommend having the company overhaul the housing every year.
The company will test all the parts and issue a new guarantee for 12
months. (please NIMAR assistance at the following mail address:
[email protected])
All NIMAR housings are tested at a pressure of 6 Bar.
If you think to not utilize the housing for many time we suggest to take
out the main O-ring or make sure that housing is open.
18
GUARANTEE CONDITIONS - 10
NIMAR covers its products with two years guarantee at the following
conditions. The guarantee is strictly in the first purchaser’s name.
NIMAR products are guarantee from material and manufacturing defects. If, after a careful and accurate technical check, components are
found to be faulty, they will be replaced free of charge.
The shipping costs of returned goods are to costumer’s charge.
Please contact the company prior to shipment; in case of flooding, due
the problems on the camera housing and ordering spare parts, contact
the service center ([email protected]) request a RMA form.
NIMAR is not responsible for accidents of any kind that may occur as a
result of tampering with or using its product improperly.
Products sent for overhauling or repairs (covered by the guarantee) or
for any other reason, travel at the costumer’s risk and expense.
In case of disputes, the competent law court is that of Modena.
In case of shipping, remove handles.
By following a few simple rules when using, transporting and servicing
the product you will ensure 100% efficiency and excellent images.
Thanking you once again for your excellent choice, do not hesitate to
contact us for any problems you may have.
We suggest to our client to visit our web site www.nimar.it, our shop
on-line www.nimarshop.com and to subscribe to our mailing list to stay
updated on the NIMAR news.
19
Guldoni Davide Computer Graphics
NIMAR S.r.l. - Via I. Zambelli N°17
41043 Magreta di Formigine (MO) - ITALY
Tel. +39 0522 633026 - Fax +39 0522 732710
www.nimar.it - [email protected]