1
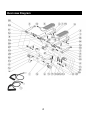
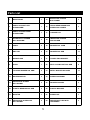
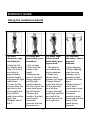
BCG
Assembly Instructions
MINI STEPPER
F1BC6059
Please keep this instruction manual for future reference
-Adult Assembly required:
Keep all parts out of the reach of children
Customer Service: (888) 922-2336, 8:00am to 5:00pm, Central Standard Time,
Monday thru Friday
(Made in China)
Table of Contents
• Warnings ………………………….page 3
• Overview Diagram ……………….page 4
• Parts List …………………………..page 5
• Assembly Instructions ……………page 6
• Monitor Operation Instructions ….page 7
• Care and Maintenance …………..page 8
• Workout Guide ……………………page 9
2
Warnings
•Read this manual before assembling or using this product.
Check product for loose or broken parts before each use.
•Discontinue use when any missing, broken, and loose parts are found.
•The maximum weight limit of this mini stepper is 220LB.
•Position the stepper on a clear leveled ground.
•Keep hands away from all moving parts.
•Keep Children and pet away from the machine at all times.
•Do not store your stepper outside or where exposed to moisture or
extreme temperatures.
•Only one person at a time should use this stepper.
•Consult your physician prior to starting any training. Warm up before
exercise.
•If the user experiences dizziness, nausea, chest pain, or any other
abnormal symptoms, STOP the workout at once. Consult a physician
immediately.
•For home use only.
3
Overview Diagram
4
Parts List
1
MAIN FRAME
1
15
HEXAGONAL SCREW
DIA. 8X30MM
4
2
PEDAL SUPPORT LEFT
50X25X350MM
1
16
CROSS HEAD MUSHROOM
SCREW DIA. 5X24MM
4
3
PEDAL SUPPORT RIGHT
50X25X350MM
1
17
U-SHAPE CLIP
1
4
HYDRAULIC CYLINDER
DIA. 38X220MM
2
18
HEXAGONAL SCREW
DIA.12X75MM
1
5
PEDAL
2
19
WASHER DIA. 16MM
2
6
END CAP
4
20
WASHER DIA. 9MM
12
7
RUBBER PAD
2
21
CONNECTING BRACKET
1
8
KNOB
1
22
SELF LOCKING NUT DIA. 8MM
8
9
LOCKING WASHER DIA. 8MM
2
23
METAL WASHER DIA. 8MM
16
10
REVERSING ROD
2
24
SCREW DIA.4X8MM
2
11
HEXAGONAL SCREW
DIA. 8X34MM
2
25
WASHER DIA.5MM
2
12
PLASTIC BEARING DIA. 8MM
2
26
PLASTIC BUSHING
2
13
MONITOR
1
27
SCREW CAP
1
14
HEXAGONAL SCREW DIA.
DIA. 8X40MM
4
28
RESISTANCE TUBE WITH
CARABINER
2
5
Assembly Instructions
Step 1 :
TENSION ADJUSTMENT
Insert the adjustment knob(8) into the hole
at the rear of the base. Slowly lifting one
foot pedal may make this easier to do.
Step 2:
MONITOR ASSEMBLY
a. Connect the monitor wire to the sensor
wire.
b. Turn the monitor(13) over so that the
underside is displayed. Insert AAA
1.5V alkaline batteries in the
compartment. Take care to observe
the correct polarity (+/-).
c. Replace the monitor into the base.
Step 3:
RESISTANCE TUBE WITH CARBINER
ATTACHMENT
If using the resistance bands, clip the
bands onto the eyelets as shown.
6
Monitor Operation Instructions
SPECIFICATIONS
TIME------------------------------------------------------------------------------00:00~99.59
STRIDES/ MIN-----------------------------------------------------------------15~3000RPM
COUNT---------------------------------------------------------------------------0~9999
CALORIES----------------------------------------------------------------------0~9999
SCAN
KEY FUNCTION
MODE/SELECT
1.To select the function you want. Hold the key for 2 second to have all functions value reset
<total reset>
2.To input the target value and also let the value reset.
OPERATION PROCEDURES
AUTO ON/OFF:
The monitor will be automatically shut off if there is no signal coming in for 256 seconds .
The monitor will be auto-powered when start exercise or press the key.
FUNCTION
<1>TIME----------------Auto-memorize the workout time while exercising
<2>STRIDES/MIN----Display the steps per minute while exercising.
<3>COUNT------------Accumulate the steps while exercising
<4>CALORIE-------- Auto-memorize calories amount consumed while exercising
<5>SCAN--------------Automatically scan through each functions between
1.TIME 2.REPS 3.CAL 4.TTR 5.SCAN
OPERATION
1.(Windows=1)When battery is installed, LCD will display all graphics for 1 second, and following with 1
second BEEP. Console will go into FUNCTION TEST mode, by displaying wheel size (for 1 second),
when display Cal value (for 1 second), then return to TIME FUNCTION.
2.(Windows=2)When battery is installed, LCD will display all graphics for 1 second, and then the console
will go into TIME FUNCTION mode.
3.If idle more than 256 Seconds, console will automatically go into HALT stage. Any input signal or key
in will release halt, and restore back to previous stage.
4. Press Mode key during exercise condition, enables selection of desired of functions.
4.1 Count function’s displaying order as follow(1 window)
TMR→REPS →CAL →TTR →SCAN
4.2 Count function’s displaying order as follow:(2 windows) RPM constantly displays, not included in
the mode.
TMR →REPS →CAL →TTR →SCAN
4.3 When press and hold this key for 2 seconds, it will reset all function values (expect TTL Count), and
return to default display.
4.4 If press and hold this key for 5 seconds, enters setting mode. Setting mode displays in following
order:
TIME →Count →Calories →Escape (out of setting mode); TMR →REPS →CAL
7
Care And Maintenance
•
•
•
•
•
•
Avoid dropping the mini stepper and monitor.
Do not use or store in wet or humid conditions.
Wipe clean with a soft dry cloth.
Use light sewing machine oil to lubricate the piston when they start to have
noise or screech.
Ensure batteries are inserted into the mini-stepper correctly, with + and –
terminals aligned correctly. Keep battery compartment clean each time
batteries are replaced.
Alkaline batteries can be safely disposed of with household waste. Do not
dispose of in a fire because they may explode. Rechargeable batteries should
be recycled.
Workout Guide
Using the stepper
•
Use of the mini stepper will help tone abs, legs, thighs, buttock muscles and
arms if using the resistance bands. The stepper also provides a cardiovascular
workout.
•
Select the desired step height by turning the adjustment knob.
•
Turn the knob clockwise to increase the step height and degree. Turn the knob
counterclockwise to lower the step height and degree.
•
Move one foot pedal to the lowest position, step onto this pedal and then step
onto the higher pedal with the other foot.
•
Push down on the raised leg and the back of the foot pedal will move in a
downward direction. Repeat with the second leg. Do not arch your back
when using the mini stepper, always keep your back straight.
•
When using stepper for the first time use the lowest step height. As fitness
improves the speed, duration and height of step can be increased. Exercise up
to three times per week for 10 – 15 minutes as personal fitness level permits.
Note
The depth of step and twist may be decreased as described above. However, if
the step height is below 4⅞”, the monitor will not register or display the
movement.
8
WORKOUT GUIDE
Using the resistance bands
For arms,
shoulders, legs
and buttocks
For arms and
particularly your
shoulders
1.Keep the left
arm slightly bent,
raise it in front of
your body to
approximately
shoulder height
and press the right
pedal down.
2.Lower the left
arm and raise the
right arm to the
same height and
press the left
pedal down at the
same time.
3.Repeat steps 1
and 2.
1.Do not step
2.Start with the
hands at hip
height.
3.Keeping the
back of the hand
facing upwards,
pull the right
handle towards
the chin and at the
same time lower
the left handle.
4.Return the
hands to the start
position and
repeat the
exercise with the
alternate arm.
9
For arms, legs,
buttocks and
particularly your
upper arms
For the back,
shoulders, chest,
legs and
buttocks
1.The palm of
your hands are
facing upwards.
2.Press your
elbows firmly
against your body.
3.Lower the left
pedal and pull up
on the rope with
your left arm.
4.Lower the right
pedal and your left
arm and at the
same time pull up
your right arm.
1.Start stepping
2.While stepping,
raise the arms
sideways up to
shoulder height.
3.Lower the arms
again.
4.Repeat steps 2
and 3 while
continuing to step.
5.A variation of
the above
exercise can be
performed with the
palms of the
hands facing
upwards.