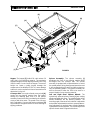
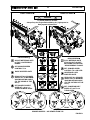
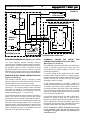
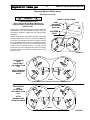
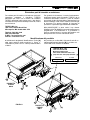
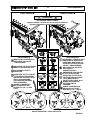
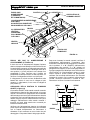
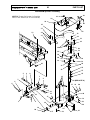
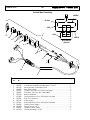
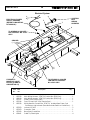
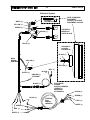
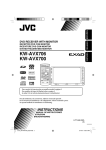
1
Truck Mount Top Dresser
MANUALE OPERATORE
MANUALE DI MANUTENZIONE
LISTA RICAMBI
TURFCO
®
WIDESPINt 1530 TM
Truck Mounted
Top dresser portato
con distribuzione a spaglio
Prodotto codice 85811 e 85812
N. serie iniziale E00101
Brevetti USA 6.149.079, 6.508.419 E 6.817.552
Manuale n. 662890 --IT
PERICOLO --
L’USO IMPROPRIO DELLA MACCHINA PUÒ CAUSARE GRAVI
LESIONI. GLI ADDETTI ALL’UTILIZZO E ALLA MANUTENZIONE DELLA MACCHINA
DEVONO ESSERE ISTRUITI SULL’USO APPROPRIATO, DEVONO ESSERE
INFORMATI DEI RISCHI E DEVONO AVER LETTO L’INTERO MANUALE PRIMA DI
ESEGUIRE QUALSIASI INTERVENTO DI REGOLAZIONE O MANUTENZIONE E PRIMA
DI FAR FUNZIONARE LA MACCHINA.
TURFCO MFG. INC.
1655 101st. Avenue NE • Minneapolis, MN 55449--4420 USA
Telefono (763) 785--1000 • FAX (763) 785--0556
Internet -- www.turfco.com • E--Mail -- [email protected]
2003 Turfco Mfg., Inc.
TABLE OF CONTENTS
2
All specifications, information, illustrations or photos in this manual are
based on the latest information at the time of printing. The right is reserved to make changes without notice.
Table of Contents
Registered Trademarks and Patents . . . . . . . . . . . . . . . . . . . . . . . . . . . . . . . . . . . . . . . . . . . . . . . . 2
Specifications and Product Records . . . . . . . . . . . . . . . . . . . . . . . . . . . . . . . . . . . . . . . . . . . . . . . . 3
Recognizing Safety Warnings and General Safety Practices . . . . . . . . . . . . . . . . . . . . . . . . . . . 4
How To Obtain Parts and Service . . . . . . . . . . . . . . . . . . . . . . . . . . . . . . . . . . . . . . . . . . . . . . . . . . 6
Product Identification . . . . . . . . . . . . . . . . . . . . . . . . . . . . . . . . . . . . . . . . . . . . . . . . . . . . . . . . . . . . . 6
Truck and Mounting Kit Requirements
Truck Requirements . . . . . . . . . . . . . . . . . . . . . . . . . . . . . . . . . . . . . . . . . . . . . . . . . . . . . . . . . . 7
WideSpin 1530 TM Mounting Kit Requirements . . . . . . . . . . . . . . . . . . . . . . . . . . . . . . . . . . . 7
Top Dresser and the Truck . . . . . . . . . . . . . . . . . . . . . . . . . . . . . . . . . . . . . . . . . . . . . . . . . . . . . 7
Removing the WideSpin 1530 TM from the Truck . . . . . . . . . . . . . . . . . . . . . . . . . . . . . . . . . 7
Description -WideSpin 1530 TM Broadcast Top Dresser . . . . . . . . . . . . . . . . . . . . . . . . . . . . . . . . . . . . . . 8
Intended Use and Function . . . . . . . . . . . . . . . . . . . . . . . . . . . . . . . . . . . . . . . . . . . . . . . . . . . . 8
Description of the WideSpin 1530 TM Lightspread and Heavyspread Settings . . . . . . . . 8
Location and Description of the WideSpin 1530 TM Major Components . . . . . . . . . . . . . . 8
Location and Description of the Operator Position . . . . . . . . . . . . . . . . . . . . . . . . . . . . . . . . 11
Location and Description of the Operator Controls . . . . . . . . . . . . . . . . . . . . . . . . . . . . . . . 11
Operation -WideSpin 1530 TM Operator Position . . . . . . . . . . . . . . . . . . . . . . . . . . . . . . . . . . . . . . . . . . 12
WideSpin 1530 TM Top Dresser Operating Speeds . . . . . . . . . . . . . . . . . . . . . . . . . . . . . . 12
WideSpin 1530 TM Maximum Angle of Operation . . . . . . . . . . . . . . . . . . . . . . . . . . . . . . . . 12
Loading of Hopper . . . . . . . . . . . . . . . . . . . . . . . . . . . . . . . . . . . . . . . . . . . . . . . . . . . . . . . . . . . 12
Pre-Operation Check List . . . . . . . . . . . . . . . . . . . . . . . . . . . . . . . . . . . . . . . . . . . . . . . . . . . . . 13
Hand Held Spinner and Conveyor Belt ON/OFF Switch . . . . . . . . . . . . . . . . . . . . . . . . . . . 13
Setting Controls For Lightspread or Heavyspread Operations . . . . . . . . . . . . . . . . . . . . . . 14
Setting of WideSpin 1530 TM Metering Gate . . . . . . . . . . . . . . . . . . . . . . . . . . . . . . . . . . 14
Setting of WideSpin 1530 TM Spinner Hydraulic Speed Control . . . . . . . . . . . . . . . . . 14
Setting of Heavyspread Diverter . . . . . . . . . . . . . . . . . . . . . . . . . . . . . . . . . . . . . . . . . . . . . 14
Adjusting Spinner Wheel Vanes . . . . . . . . . . . . . . . . . . . . . . . . . . . . . . . . . . . . . . . . . . . . . 16
Setting of WideSpin 1530 TM Conveyor Speed Control . . . . . . . . . . . . . . . . . . . . . . . . . 16
Top Dressing Operation . . . . . . . . . . . . . . . . . . . . . . . . . . . . . . . . . . . . . . . . . . . . . . . . . . . . . . 16
WideSpin 1530 TM Top Dresser Shutdown . . . . . . . . . . . . . . . . . . . . . . . . . . . . . . . . . . . . . 17
Operator Daily Inspection . . . . . . . . . . . . . . . . . . . . . . . . . . . . . . . . . . . . . . . . . . . . . . . . . . . . . . . . 18
Troubleshooting Table . . . . . . . . . . . . . . . . . . . . . . . . . . . . . . . . . . . . . . . . . . . . . . . . . . . . . . . . . . . 18
Storage . . . . . . . . . . . . . . . . . . . . . . . . . . . . . . . . . . . . . . . . . . . . . . . . . . . . . . . . . . . . . . . . . . . . . . . . 19
Operator Level Service and Adjustment -Hydraulic Fluid . . . . . . . . . . . . . . . . . . . . . . . . . . . . . . . . . . . . . . . . . . . . . . . . . . . . . . . . . . . . . . 19
Cleaning . . . . . . . . . . . . . . . . . . . . . . . . . . . . . . . . . . . . . . . . . . . . . . . . . . . . . . . . . . . . . . . . . . . 19
Inspection . . . . . . . . . . . . . . . . . . . . . . . . . . . . . . . . . . . . . . . . . . . . . . . . . . . . . . . . . . . . . . . . . . 19
European Lubricant, Fuel, and Parts Disposal Numbers . . . . . . . . . . . . . . . . . . . . . . . . . . 19
Decals . . . . . . . . . . . . . . . . . . . . . . . . . . . . . . . . . . . . . . . . . . . . . . . . . . . . . . . . . . . . . . . . . . . . . . . . . 20
Service Level Maintenance
Lubrication . . . . . . . . . . . . . . . . . . . . . . . . . . . . . . . . . . . . . . . . . . . . . . . . . . . . . . . . . . . . . . . . . 22
Inspection Panel . . . . . . . . . . . . . . . . . . . . . . . . . . . . . . . . . . . . . . . . . . . . . . . . . . . . . . . . . . . . 22
Conveyor Belt Care, Conveyor Belt Scraper . . . . . . . . . . . . . . . . . . . . . . . . . . . . . . . . . . . . . 22
Conveyor Belt Tension Adjustment . . . . . . . . . . . . . . . . . . . . . . . . . . . . . . . . . . . . . . . . . . . . . 22
Conveyor Belt Tracking and Centering Adjustments . . . . . . . . . . . . . . . . . . . . . . . . . . . . . . 23
Hydraulic System . . . . . . . . . . . . . . . . . . . . . . . . . . . . . . . . . . . . . . . . . . . . . . . . . . . . . . . . . . . . 24
Electrical System . . . . . . . . . . . . . . . . . . . . . . . . . . . . . . . . . . . . . . . . . . . . . . . . . . . . . . . . . . . . 28
Adjustment of Spinner Vanes . . . . . . . . . . . . . . . . . . . . . . . . . . . . . . . . . . . . . . . . . . . . . . . . . 31
Removing Spinner Assembly . . . . . . . . . . . . . . . . . . . . . . . . . . . . . . . . . . . . . . . . . . . . . . . . . 32
Conveyor Belt Replacement . . . . . . . . . . . . . . . . . . . . . . . . . . . . . . . . . . . . . . . . . . . . . . . . . . 33
Parts Lists . . . . . . . . . . . . . . . . . . . . . . . . . . . . . . . . . . . . . . . . . . . . . . . . . . . . . . . . . . . . . . . . . . . . . 34
Optional Trench Filling Attachment -- Product Number 86150 Parts List . . . . . . . . . . . . . . . . . 54
Registered Trademark and Patents
TURFCOR WIDESPINt 1530 TM is covered by US Patent 6,149,079, 6,508,419 and 6,817,552.
TURFCOR, WIDESPINt and Mete-R-MaticR are registered trademarks of Turfco Manufacturing, Inc.
HEAVYSPREADt and LIGHTSPREADt are trademarks of Turfco Manufacturing, Inc.
3
SPECIFICATIONS
Specifications
Intended Use: The WideSpin 1530 TM is intended to be used for the application of properly prepared
organic top dressing material. The WideSpin 1530 TM is NOT intended to be used for any purpose other than
the application of properly prepared organic top dressing material. Properly prepared top dressing is organic
material with a controlled moisture content that has been screened to remove debris, rocks, and excessive
sized top dressing material. Operation is intended to be at properly prepared worksites only. The WideSpin
1530 TM is intended only to be mounted to trucks having adequate weight, brakes, and horsepower to safely
control the top dresser. The proper Mounting Kit must be used to attach the WideSpin 1530 TM to the truck. The
WideSpin 1530 TM is intended to be used only when the operator is present at the drivers position on the truck.
The WideSpin 1530 TM is intended to be operated only when the truck and top dresser are moving. The
WideSpin 1530 TM is not intended to be operated unless it is properly attached to the truck. The WideSpin 1530
TM is NOT designed for or intended to accept riders.
Dimensions: (Spinner Assembly Attached, Without Mounting Kit Installed)
Width . . . . . . . . . . . . . . . . . . . . . . . . . . . . . . . . . . . . . . 1.29 Meter (50.75” Inches)
Height (Bottom of Spinner to Top of Hopper) . . . . . 1.07 Meter (42.25” Inches)
Length . . . . . . . . . . . . . . . . . . . . . . . . . . . . . . . . . . . . . 1.96 Meter (77.25” Inches)
Hopper Capacity . . . . . . . . . . . . . . . . . . . . . 0.54 Cubic Meter -- 816.5 Kg. (19 Cubic Feet -- 1,800 Pounds)
Minimum/Maximum Spread Width . . . . . 3.04 Meter to 9.14 Meter (10’ to 30’ Feet)
Operator Controls . . . . . . . . . . . . . . . . . . . . Hand Held Spinner and Conveyor Belt ON/OFF Control,
Spinner Speed Control, Conveyor Belt Speed Control,
Adjustable Metering Gate, Spinner Assembly Tilt Control,
and Heavy Spread Diverter
Operating Ground Speed . . . . . . . . . . . . . 8 Km/h (5 MPH)
Transport Speed . . . . . . . . . . . . . . . . . . . . . 8 Km/h (5 MPH)
Electrical Requirements . . . . . . . . . . . . . . 12 Volt DC, Negative Ground, 15 AMP
Electricity Supplied By Truck
Minimum Hydraulic Requirements . . . . . 26.5 Liters Per Minute at 10,342 kPa (7 GPM at 1,500 PSI)
Hydraulic Power and Fluid Supplied By Truck
Weight Empty . . . . . . . . . . . . . . . . . . . . . . . . 299 Kg (660 Pounds)
Weight Loaded . . . . . . . . . . . . . . . . . . . . . . . 1,115.5 Kg (2,460 Pounds)
Maximum Angle of Operation . . . . . . . . . 15_ Degrees
Noise Emission Level:
Operator Position
Sound Pressure (LpA) = 84.7 dBA
Sound Pressure Level (LwA) = 100.9 dBA
LpA 84.7 dBA
LwA 100.9 dBA
Operating Conditions:
Truck Engine Full Throttle, Spinner and Conveyor Belt
Operating, Hopper Empty, Unit Stationary
Product Records
IMPORTANT: Record the information from the serial number plate of your Turfco WideSpin 1530 TM Broadcast
Top Dresser. It will be necessary to furnish your Product Number and Serial Number when ordering parts.
Model Designation
WideSpin 1530 TM Broadcast Top Dresser
Product Number (Check One)
Serial Number
Purchased From
85811 (With Cooler)
85812 (Without Cooler)
Date Purchased
4
SAFETY
Recognizing Safety Warning Used in Manual
LOOK FOR THE SAFETY HAZARD WARNING SYMBOL
The symbol is used to alert the operator of safety hazards.
It is used in conjunction with the words DANGER, WARNING, and CAUTION.
DANGER
WARNING
CAUTION
”DANGER” identified immediate hazards which will result in serious injury or death.
”WARNING” identified potential hazards which could result in serious injury or death.
”CAUTION” identified hazardous situation which may result in minor to moderate injury and/ or could result
in damage or destruction of equipment.
General Safety Practices
Safety on the job should always be a top priority.
Training and experience are important factors in the
safe operation of equipment. Please consider the
following information and realize that safe operation is a
matter of using common sense as it relates to the
machine, its maintenance, the operator, the training,
and the operating conditions. These are general safety
instructions that apply to most turf maintenance
equipment.
This list includes many general safety
instructions as they relate to turf equipment.
This list does not encompass all hazards.
Common sense must always be used to
determine the safest way to operate a
machine under specific conditions.
TRAINING:
S Always read the manual before operating a machine
for the first time.
S Always read the warning decals before operating a
machine for the first time.
S Always check the location and use of each control
before operating a machine for the first time.
S Practice operating the machine in a safe area with no
obstructions until becoming familiar with the controls.
S If you have questions, ask your supervisor or call the
factory.
CLOTHING:
S Clothes should be snug fit. Loose fitting clothing is
hazardous because it may get caught in the
mechanism during service or operation.
S Remove jewelry before operation. Jewelry may get
caught in the mechanism.
S Wear shoes that will protect your feet. Sneakers do
not protect and do not provide the protection of leather
shoes or boots. Steel toed safety shoes should be
considered for many situations.
S Hard Hat: The use of a hard hat should be considered
when using equipment on a golf course. The danger
of being hit by a golf ball should be a major concern
as well as protection while operating under trees.
S Eye Protection: Safety glasses and/or face shields
should be considered when operating, as well as
working in close proximity to high speed rotary
equipment. Watch for rotary mowers, edgers, brush
and string trimmers. Rotary mowers can throw debris
at speeds up to 200 mph (320 Km/h).
S Hearing: If the noise level of the equipment is too loud,
consider the use of ear protection.
S Do not use stereo headsets during operation. This is
a distraction that may lead to an accident. Headsets
also make it difficult to hear other people and
equipment while operating the machine.
S Respirators: When operating in dusty, windy
conditions, wear a respirator. This is also an important
consideration if operating equipment while spraying
chemicals and fertilizers.
S Gloves: Use gloves when handling sharp or
hazardous objects.
THE OPERATOR:
S The operator should never use a machine while under
the influence of alcohol or drugs.
S The operator should be aware of the hazards of
working in the sun and should take proper precautions
to avoid heat stress and dehydration. Use sun screen
products when necessary.
S The operator should never attempt to ride a machine
that is not designed for that propose. Do not allow
others to ride a machine that is not designed for
passengers. If designed to carry passengers, do not
allow more passengers to ride a machine than the
machine was designed to carry.
S Care should always be taken when mounting and
dismounting a riding machine. Prevent injuries and
falls by making sure the operator does not slip.
Unless it is an emergency, do not jump off a machine.
Injury may result when an operator’s foot slips trying
to jump from a machine.
5
S Do not operate any equipment at unsafe speeds.
Speeds should be reduced when turning or operating
on slopes. The operator must use common sense to
determine a safe speed based on the equipment, the
load, the slope, the surface, and other conditions that
may affect safe operation.
S The operator must be aware of the conditions around
the area. Be aware of other people and machines.
S Beware of slippery conditions. Wet turf can be
encountered on slopes, when turning or stopping, or
at higher speeds.
S Keep hands and feet away from cutting devices and
drive components. Shut off the engine and remove
the key or ignition wire when servicing cutting devices
or drive components.
S If required to lift, an operator should ask for help if the
object is too heavy. The operator should lift with his or
her legs instead of the back. Care should be taken to
avoid twisting the back while lifting a heavy load.
S Never allow children to operate the machine.
THE MACHINE:
S Tow vehicles must have adequate tow hitches and
brakes to control any towed machine. Check the
weight and capacity of the machine that will be towed
by that vehicle. Trucks used to carry equipment
must have adequate load capacity and brakes.
Check the weight and capacity of the machine
that will be towed by that vehicle.
S Do not overload machinery. The components are
designed for certain weights and capacities.
Overloading the machine will cause unsafe
conditions.
S Make sure the brakes are operating properly.
S Check to assure that all controls are in good operating
condition.
S Inspect to insure that all guards are in place. Do not
operate a machine without all guards in place.
S Always check the machine to make sure it is in good
working order. Do not place hands or feet near moving
or rotating parts.
S Check the tire pressure.
S Check the condition of the hydraulic hoses. Leaks and
worn hoses should be fixed or replaced before the
machine is put into service. Do not use your fingers or
hands to check for hydraulic leaks. High pressure
leaks can puncture the skin and force oil into the body.
This can cause severe injury or death.
S Shut off the engine before servicing the machine. It is
best to check machines on a level area. Machines on
a slope may roll when the engine is off.
S Do not modify the machine in any manner. Refer
unfamiliar repairs and adjustments to mechanics that
have been trained to do them properly.
S Replace decals that are damaged or unreadable.
THE ENGINE:
S Prevent accidental starting by removing the spark
plug wire when servicing the engine or the equipment.
Disconnect the negative wire from the battery
terminal if the engine is equipped with an electric
starting system.
SAFETY
S Do not strike the flywheel with a hammer or any hard
object. This may cause the flywheel to shatter in
operation.
S Pull the starter cord slowly until resistance is felt. Then
pull the cord rapidly to avoid kickback and to prevent
hand or arm injury.
S Do not run the engine in an enclosed area. The
exhaust gases contain carbon monoxide, an
odorless and deadly poison. The engine exhaust
from this product contains chemicals known to
the State of California to cause cancer, birth
defects or other reproductive harm.
S Do not store, spill, or use gasoline near an open flame,
nor near an appliance like a stove, furnace, or water
heater that uses a pilot light or can create a spark.
S Do not refuel indoors or in an unventilated area.
Check the fuel level. Do not over fill. Do not add fuel
while the machine is hot because spilled fuel may
cause a fire. Allow the engine to cool before refueling.
S Do not transport the machine with fuel in the tank.
S Do not remove the fuel tank cap or fill the fuel tank
while the engine is hot or running.
S Do not operate the engine if gasoline is spilled, when
the smell of gasoline is present, or when other
explosive conditions exist. Move the equipment away
from the spill and avoid any ignition until the gasoline
has evaporated.
S Do not choke the carburetor to stop the engine.
Whenever possible, gradually reduce the engine
speed before stopping.
S Do not tamper with the governor springs, links or other
parts to increase the engine speed. Run the engine at
the speed set by the equipment manufacturer.
S Do not check for a spark with the spark plug removed.
Use an approved tester. Use the correct tools to
service the machine.
S Do not crank the engine with the spark plug removed.
If the engine is flooded, place the throttle in fast and
crank until the engine starts. Avoid damage to electric
starter by cranking intermittently until engine starts.
S Do not operate the machine without a muffler. Inspect
the muffler periodically and replace it if it is leaking or
worn. Replace it with correct muffler. Do not touch a
hot muffler, cylinder, or cooling fin.
S Do not operate the engine with an accumulation of
grass, leaves, or other combustible material in the
muffler area.
S Keep the cylinder cooing fins and the governor parts
free of dirt, grass, and other debris.
S Do not use the engine on any forest covered, brush
covered, or grass covered unimproved land unless a
spark arrester is installed in the muffler. In the State
of California, a spark arrester is required by law. Other
states may have similar laws. Federal laws apply on
federal lands.
S Do not start the engine with the air cleaner or the air
cleaner cover removed.
S Use fresh gasoline. Stale fuel can gum the carburetor
and can cause leakage. Check the fuel lines and
fittings frequently for cracks and leaks.
6
DESCRIPTION
How To Obtain Parts and Service
To order parts, or to arrange repair service, contact the
nearest authorized TURFCO dealer. For a list of
authorized TURFCO dealers in your area, or for
additional information regarding the WideSpin 1530 TM
Broadcast Top Dresser, direct inquiries to:
TURFCO Mfg. Inc.
1655 101st. Avenue North East
Minneapolis, MN. 55449--4420 USA
Telephone (763) 785--1000
FAX (763) 785--0556
E--Mail -- [email protected]
Internet -- www.turfco.com
To ensure safety and proper operation, always
purchase genuine TURFCO replacement parts from an
authorized TURFCO dealer. Replacement parts from
other sources may damage the WideSpin 1530 TM
Broadcast Top Dresser and/or create a safety hazard.
Always refer repairs to properly trained service
personnel.
DO NOT ALTER the WideSpin 1530 TM Broadcast Top
Dresser in any manner. Unauthorized alterations may
affect its operation, performance, and may result in
injury or death to the operator as well as other
individuals in the work area.
Product Identification
D Locate the Turfco serial tag [A] on the front of the
machine (refer to Figure 1). Check the first 5 numbers.
Product numbers will be 85811 or 85812.
D Product number 85811 has a factory installed
hydraulic cooler [B], product number 85812 does not
have the cooler.
TURFCO MFG., INC.
1655 101st Avenue NE
Minneapolis, Minnesota
USA 55449--4420 www.turfco.com
(763) 785--1000 FAX (763) 785--0556
PRODUCT
[A]
PRODUCT
NUMBER
85812
FIGURE 1
PRODUCT
NUMBER
85811
[B]
SERIAL
7
DESCRIPTION
Truck and Mounting Kit Requirements
TRUCK REQUIREMENTS
Before operating the top dresser, assure that the truck is
properly equipped and designed to carry, operate, and
control the weight of a fully loaded 1530 TM top dresser.
The truck must have enough payload capacity to handle
1,115.5 Kg (2,460 pounds) plus the weight of the
driver/operator. Truck must also have adequate and
functional brakes. Hydraulic and electrical power
supplied by the truck must meet the minimum
requirements. Refer to Specifications table on page 3 of
this manual.
WARNING
TO AVOID SERIOUS INJURY,
and Damage to the Truck and the WideSpin 1530
TM Top Dresser,
The Truck Must Be Rated for Proper Payload
Capacity, and Have Adequate Functional Brakes
and Provide Proper Hydraulic and Electrical
Power.
WIDESPIN 1530 TM MOUNTING KIT
REQUIREMENTS
Never attempt to mount or install the WideSpin 1530 TM
to any truck it was not designed to fit. The proper
mounting kit must be used to install the WideSpin 1530
TM to the truck. Never modify or alter any mounting kit.
Serious Injury and damage to the truck can result form
improper installation. Refer to the manual for the
mounting kit for more information.
Before operating the top dresser, assure that the
WideSpin 1530 TM is securely mounted to the truck.
Check the mounting brackets, the mounting bracket
hardware, and the mounting pins. Ensure that all
mounts and mounting hardware are tight and secure.
Refer to the manual for the mounting kit for more
information.
WARNING
TO AVOID SERIOUS INJURY,
and Damage to the Truck and the WideSpin 1530
TM Top Dresser,
Do Not Attempt to Mount the WideSpin 1530 TM
to any Truck that it was Not Designed To Fit.
Never Modify or Alter Any Components of the
Mounting Kits.
THE TOP DRESSER AND THE TRUCK
The operator must read and understand the entire
manual for the truck used to carry the WideSpin 1530
TM top dresser. The operator must be trained in the
operation of the truck and knowledgeable in its safe
operation. The operator must be aware of the extra
weight placed on the truck when combined with the
top dresser. The extra weight will effect the handling,
balance, and braking performance of the truck.
WARNING
TO AVOID SERIOUS INJURY,
Do Not Drive or Operate the Truck and Top
Dresser On Slopes Steeper Than 15_ Degrees.
The operator must operate the truck in a safe
manner and know the operating limits of the truck
in relation to the weight, performance,
center- of- gravity, and operating characteristics
of the top dresser.
WARNING
WARNING
TO AVOID SERIOUS INJURY,
Read and Understand the Entire
Operator’s Manual Before Operating
The WideSpin 1530 TM and the Truck.
REMOVING WIDESPIN 1530 TM FROM TRUCK
Always refer to the Installation Manual for the Mounting
Kit that was used to install the WideSpin 1530 TM top
dresser to the truck. Review the steps that were used to
install and connect the top dresser to the truck.
WARNING
To Avoid Serious Injury,
Never Attempt To Lift the Top Dresser Manually.
Serious Bodily Injury Could Result From Lifting
The Top Dresser By Hand.
The Weight And Balance Of The Machine
Requires Approved Hoists And Lifting Devices.
The Top Dresser weighs 299 Kg (660 lbs) when
empty. Ensure that the hoist or lifting device, and
its rigging are rated to safely lift and suspend the
weight of the top dresser. The hopper of the top
dresser must be empty when the machine is lifted.
Always use the lifting brace to pick up the top dresser.
The lifting brace was designed to protect the hopper and
is located to provide for even balance of the top dresser
when the spinner assembly is installed on the rear of the
top dresser.
Never attempt to install or remove a top dresser that is
filled with top dressing material. The hopper must
always be empty. Never attempt to pick up the top
dresser when top dressing is in the hopper.
Disconnect all electrical and hydraulic connections to
the truck before lifting the top dresser. Refer to the
Operators Manual for the truck to properly reattach any
hydraulic or electrical connections to that part of the
truck.
8
DESCRIPTION
Description
WIDESPIN 1530 TM BROADCAST TOP DRESSER
The Turfco WideSpin 1530 TM Broadcast Top Dresser
is a truck mounted broadcast top dresser. The WideSpin
1530 TM is designed to distribute a uniform application
of properly prepared top dressing material to the turf.
Top dressing is the introduction of new soils to existing
turf.
A conveyor belt carries the top dressing from the
hopper, through an adjustable metering gate, and into
rotating spinner wheels. Top dressing material is spread
at an adjustable width of 3.04 to 9.14 meters (10’ to 30’
feet) at an operating ground speed up to 8 Km/h (5
mph).
INTENDED USE AND FUNCTION
The WideSpin 1530 TM is intended to be used for the
application of properly prepared organic top dressing
material. The WideSpin 1530 TM is NOT intended to be
used for any purpose other than the application of
properly prepared organic top dressing material.
Properly prepared top dressing is organic material with
a controlled moisture content that has been screened to
remove debris, rocks, and excessive sized top dressing
material.
Operation is intended to be at properly prepared
worksites only. The WideSpin 1530 TM is intended only
to be mounted to trucks having adequate weight,
payload capacity, brakes, and horsepower, and
hydraulic power to safely control the top dresser. The
proper mounting kit must be used to mount the top
dresser to the truck.
The WideSpin 1530 TM is intended to be used only
when the operator is present at the drivers position on
the truck. The WideSpin 1530 TM is intended to be
operated only when the truck and top dresser are
moving. The WideSpin 1530 TM is not intended to be
used when the truck and top dresser are stationary. The
WideSpin 1530 TM is not intended to be operated
unless it is properly attached to the truck. The 1530 TM
is NOT designed for or intended to accept riders.
D Do Not Use With Unscreened Top Dressing
Material.
D Do Not Use With Non-Organic Top Dressing
Material.
D Do Not Use With Rocks.
D Do Not Allow Anyone To Stand Behind the 1530
TM When the Spinners Are Operating.
D Do Not Allow Riders On or In the 1530 TM.
D Do Not Operate On Slopes Over 15_ Degrees.
D Do Not Transport or Operate At Ground Speeds
Higher Than 8 Km/h (5 mph).
DESCRIPTION OF THE WIDESPIN 1530
LIGHTSPREAD AND HEAVYSPREAD SETTINGS
The WIDESPIN 1530 has two settings to control top
dressing material volume rates and the spread patterns.
The LIGHTSPREAD setting is used for frequent top
dressing applications and provides the widest
broadcast pattern with a “light” volume of top dressing
material. The HEAVYSPREAD setting is used for
narrower broadcast pattern with a “heavy” volume of top
dressing material. Changing between Lightspread and
Heavyspread requires repositioning the spread diverter,
changing spinner speed control setting, changing the
metering gate setting, and repositioning the spinner
wheel vane angles.
LOCATION AND DESCRIPTION OF THE
WIDESPIN 1530 TM BROADCAST TOP
DRESSERS MAJOR COMPONENTS
See Figure 2 and 3 for the location of the major
components of the top dresser. Do not modify the
WideSpin 1530 TM or its spinner assembly in any
manner. Do not operate the WideSpin 1530 TM with
damaged or inoperable components.
Manual Tube: The manual tube [C] is located on the
side panel of the hopper. The tube is used to store the
operators manual.
Front and Rear Mounting Points: The mounting
points [D] on the WideSpin 1530 TM frame are designed
to accept the proper mounting kit for the specific truck
being used to carry the top dresser. The mounting kit
must be installed to these points for proper installation.
Lifting Brace: The detachable lifting brace [E] is used
to pick up the WideSpin 1530 TM during mounting or
removal of the top dresser from the truck. The brace
should be removed during operation. The WideSpin
1530 TM hopper should always be empty before lifting
the top dresser. The spinner assembly should be
attached to the WideSpin 1530 TM during lifting to
provide proper balance of the machine.
9
DESCRIPTION
[E]
[H]
[G]
[F]
[I]
[D]
[C]
[D]
[J]
Hopper: The hopper [F] holds 0.54 cubic meters (19
cubic feet) of top dressing material. The maximum
allowable weight of the top dressing material is 816.5 Kg
(1800 Pounds). Do not over fill the hopper. The excess
weight can create a safety hazard, damage the
components of the WideSpin 1530 TM, cause damage
to the truck, and cause the truck tires to leave tracks and
depressions in the turf.
Conveyor Belt: The rough surfaced conveyor belt [G]
carries the top dressing material from the hopper,
through the metering gate, and in to the spinner
assembly. Power to the belt is provided by the hydraulic
conveyor belt drive motor. The speed of the conveyor
belt is adjustable. Conveyor belt tension adjusters [H]
are provided to change the tension to correct tracking or
slipping problems.
FIGURE 2
Spinner Assembly: The spinner assembly [I]
broadcasts the flow of top dressing material being
discharged from the conveyor belt. The spinner
assembly is equipped with a spread diverter to control
the spread pattern during Heavyspread operations and
is also equipped with a tilt control to further enhance or
vary the spreading pattern. The spinner assembly can
also be removed to allow the 1530 to be used as a
material handler for top dressing material.
Left and Right Hand Spinner Wheels: The
hydraulically powered spinner wheels [J] are rotating
wheels equipped with vanes. The rotating motion of the
wheels broadcasts the top dressing material. The
mounting angle of the vanes on the wheels is adjustable
and provides adjustment/correction to spread patterns.
Vane adjustment is required when changing between
Lightspread and Heavyspread. The left and right hand
spinner wheels rotate in opposite directions.
10
DESCRIPTION
[M]
[Q]
[P]
[M]
[L]
[K]
[N]
[O]
[R]
[I]
FIGURE 3
[J]
Hydraulic Fluid Cooler: The hydraulic cooler [K] is
located on the left side of the top dresser. The cooler is
standard equipment on product no. 85811 and optional
equipment on 85812. The cooler has an electric fan that
will blow air in an outward direction. The cooler fan will
start to operate as soon as the trucks hydraulic power to
the top dresser is activated and will continue to operate
until hydraulic power is turned off. The fan will always
operate regardless of the position of the Hand Held
ON/OFF Switch.
Electrical Power Supply Connection: The power
supply connection [L] is designed to be plugged into the
Electrical Power Supply Harness. The harness is part of
the mounting kit and is sized to fit the type of truck being
used to carry the WideSpin 1530 TM. Electrical
connection to the truck is at trucks battery. A 12 volt DC,
negative ground power source is needed to operate the
hydraulic solenoids in the WideSpin 1530 TM hydraulic
system and to operate the hydraulic cooler fan. A 15
AMP fuse is located in a holder on the positive (+) power
connection of the harness.
11
LOCATION AND DESCRIPTION OF THE
WIDESPIN 1530 TM OPERATOR POSITION
Operator Position: The proper location for the
operator of the WideSpin 1530 TM Top Dresser is
seated in the trucks seat. Always stop the trucks engine,
lock the brakes, and disengage the hydraulic power
before leaving the operator’s seat. Do not stand behind
or allow anyone to stand behind the WideSpin 1530 TM
top dresser when the spinner attachment is operating.
WARNING
TO AVOID SERIOUS INJURY,
Move To the Operator’s Position At The Truck
Before Engaging the Spinner Assembly.
LOCATION AND DESCRIPTION OF THE
WIDESPIN 1530 TM OPERATOR CONTROLS
Hand Held Spinner and Conveyor Belt ON/OFF
Switch: The hand held ON/OFF switch
[M] controls the ON/OFF operation of
the conveyor belt and the spinner
assembly. The switch has 3 positions:
1. Spinners ON, Conveyor Belt ON
2. Spinners ON, Conveyor Belt OFF
3. Spinners OFF, Conveyor Belt OFF
Always be at the operator’s position before engaging the
ON/OFF switch.
Always keep the hand held switch in a secure place.
When not in use, hang the control box on the front of the
hopper. If the control box drops to the ground, the wiring
harness can become tangled in the trucks axles and
wheels. DO NOT put the hand held switch in the hopper.
Severe damage to the switch, switch cable, conveyor
belt, and spinner wheels will result if the control box
becomes tangled in the conveyor belt and spinner
assembly.
Spinner Speed Hydraulic Flow Control: The
hydraulic speed control [N]
varies the speed of the spinner
wheels by regulating the amount
of hydraulic flow sent to the
hydraulic motors. Increasing or
decreasing the speed of the
spinners does not change the
volume of material being spread, it only effects the width
of the spreading pattern. The control has settings from 0
to 4 (settings above 4 are locked out). Heavyspread
control setting should be at 3 or less, Lightspread should
be at 4.
DESCRIPTION
Spinner Assembly Tilt Control Handle and Locking
Handle: [O] The tilt of the spinner assembly can be
changed by moving the tilt control handle. Total
movement is approximately 15_ degrees. The tilt angle
can changed up or down to vary or correct the width of
spread without changing the speed of the spinner
wheels. The tilt angle of the assembly can be also be
changed to correct for the difference in hitch heights of
different tow vehicles. The locking handle will keep the
spinner assembly locked into position. During
Heavyspread operations, the spinner assembly should
be adjusted to be level with the ground.
Heavyspread Diverter and Diverter Locking Knob:
The Heavyspread Diverter [P] changes the spread
pattern during Heavyspread operation. The diverter
should be in the lowered position and securely locked
with the diverter locking knob. During light application,
the diverter should be locked in the raised position.
Conveyor Belt Speed Control: The speed control [Q]
regulates the amount of
hydraulic flow to the conveyor
belt motor and regulates the
speed of the conveyor belt.
The speed of conveyor belt
controls the amount of top dressing material that is
moved and discharged thru the metering gate.
Changing the conveyor belt speed control does not
affect the operating speed of the spinner assembly
spinner wheels.
The normal conveyor belt speed control setting during
Heavyspread operation is 1--1/4 to 2--1/2 turns
(counterclockwise) of the knob from a fully closed
(clockwise) position. For Lightspread operation, set at
1--1/4 to 1--1/2 turns.
Metering Gate and Metering Gate Adjusting
Handle: The Metering gate regulates
the amount of top dressing
material released from the
hopper. The metering gate is
manually controlled by
moving the metering gate
handle [R]. The marks on
the decal are for reference
only, they do not represent any measured amounts of
top dressing material. The metering gate opening size is
controlled in two calibrations, Lightspread and
Heavyspread. The metering gate stop pull pin on the
side of the metering gate mount must be pulled out to
allow the metering gate to be moved into the larger
opening size for Heavyspread. If the amount of material
being deposited on the spinner assembly needs to be
corrected, adjust the metering gate opening.
12
OPERATION
Operation
WARNING
WARNING
WARNING
TO AVOID SERIOUS INJURY,
Read and Understand the Entire
Operator’s Manual Before Operating
The WideSpin 1530 TM and the Truck.
TO AVOID SERIOUS INJURY
and To Avoid Damage to the truck and 1530 TM
top dresser, DO NOT Drive or Operate the 1530
TM Top Dresser At Speeds Over 8 Km/h (5 MPH).
Read and Follow all Safety Decals and Warnings.
TO AVOID SERIOUS INJURY,
Always operate the WideSpin 1530 TM Top
Dresser Safely and Wear the Appropriate
Personal Safety Equipment.
TO AVOID SERIOUS INJURY,
Keep Hands, Feet, and Clothing Away From
Rotating Spinner Wheels
TO AVOID SERIOUS INJURY,
Do Not Allow Riders In or On The Top Dresser
The ground speed of the truck must be constant to
ensure an even and equal distribution of top dressing
material. The trucks engine speed must be maintained
to ensure a constant and even supply of hydraulic
power. Choose a gear and throttle/governor setting that
will give a maximum ground speed of 8 Km/h (5 MPH).
If top dressing speed exceeds 8 Km/h (5 MPH), poor
and uneven top dressing application will result as well as
unsafe operating conditions. For best results, the 1530
TM should be moving before the spinner assembly is
engaged.
WIDESPIN 1530 TM OPERATOR POSITION
WIDESPIN 1530 TM MAXIMUM ANGLES OF
OPERATION
The proper location for the WideSpin 1530 TM operator
is seated on the truck seat. Always stop the trucks
engine, set the trucks brakes, and disengage hydraulic
power to the conveyor belt and the spinner assembly
before leaving the trucks seat. Do not stand behind the
WideSpin 1530 TM when it is operating.
WARNING
TO AVOID SERIOUS INJURY,
Always Operate the WideSpin 1530 TM From the
Operators Position at the Trucks Seat.
Always Stop the Trucks Engine, Set the Trucks
Brakes, and Disengage Hydraulic Power to the
WideSpin 1530 TM Spinners and Conveyor Belt
Before Leaving the Trucks Seat.
DO NOT Allow Anyone To Stand Behind the 1530
TM Spinner Assembly When It Is Operating.
STAY CLEAR
WHILE
SPINNERS ARE
OPERATING
WIDESPIN 1530 TM OPERATING SPEEDS
When the 1530 TM top dresser is mounted to the truck,
the maximum ground speed of the truck should not
exceed 8 Km/h (5 MPH). Safety concerns and
excessive stress on the truck and the top dresser will
occur if speeds are in excess of 8 Km/h (5 MPH).
Do not drive or operate the truck and WideSpin 1530 TM
on side slopes over 15_ degrees. Do not drive or operate
the truck and WideSpin 1530 TM up or down slopes over
15_ degrees. Do not drive or operate the truck and
WideSpin 1530 TM with an overfilled or overloaded
hopper. Tipping or rolling over of the machine can occur.
WARNING
TO AVOID SERIOUS INJURY
and To Avoid Damage to the WideSpin 1530 TM
Top Dresser and the Truck,
Do Not Operate on Slopes Over 15_ Degrees.
LOADING OF HOPPER
The maximum hopper capacity is 0.54 cubic meters (19
cubic feet). Maximum weight of the load in the hopper is
816.5 Kg (1800 pounds). Kg). Never overfill or overload
the hopper. Overloading will create a safety hazard and
cause undue stress to the truck and top dresser
components. Overloading may also cause the trucks
tires to sink into the turf and leave tracks. Never modify
the hopper to hold extra top dressing. Do not add side
boards to the hopper. An overloaded hopper will cause
the top dresser to be top heavy or out-of-balance, and
will increase the possibility of the truck and top dresser
tipping or rolling over if operated on too steep of a slope.
The hopper can be loaded with a small front end loader,
however do not drop the load into the hopper from too
high of a height. Slowly load the hopper to avoid damage
to the hopper and conveyor belt.
13
PRE-OPERATION CHECK LIST
D Check Temperature - Refer to the Operators
Manual for the truck to determine if the
temperature is too cold or too hot to operate the
trucks hydraulic system. Determine if the trucks
hydraulic system requires a warm--up period
before operating the WideSpin 1530 TM.
D Check -- Level of hydraulic fluid in trucks reservoir
tank. Correct level to full if needed.
D Check -- Level of oil in trucks engine crankcase.
Correct level to full if needed.
D Check -- Check the hydraulic connections from the
top dresser to the truck. Connections must be
proper and secure. Refer to the manual for the
mounting kit for more information.
D Check -- Inspect for damage, wear, and missing
parts. Do not operate the 1530 TM top dresser with
a damaged or defective parts. Refer any needed
repairs to the proper service personnel.
D Check -- Visual check for hydraulic leaks.
DANGER
TO AVOID SERIOUS INJURY,
Do Not Use Your Fingers Or Hands To
Check For Hydraulic Leaks. High
Pressure Leaks Can Puncture The Skin
And Force Oil Into The Body. This Can
Cause Severe Injury Or Death.
WEAR EYE PROTECTION.
D Check -- The hand held ON/OFF switch is secure
at the operator position. DO NOT put hand held
switch inside of the hopper.
D Check -- The hand held ON/OFF switch is in the
OFF ( O ) position for both the conveyor belt and
the spinner assembly.
Spinners OFF
Conveyor OFF
OPERATION
D Check -- Power supply harness is plugged into the
1530 TM and is properly attached to the trucks
battery.
D Check -- All guards and deflectors are in place.
D Check -- All hardware on the mounting brackets.
Hardware must be tight, pins must be securely
inserted.
D Check -- Visually inspect the inside of the 1530 TM
hopper for tools, shovels, rocks or debris
remaining from earlier use. Hopper must be empty.
HAND HELD SPINNER AND CONVEYOR BELT
ON/OFF SWITCH (See Figure 4)
The switch controls the activation of
both the conveyor belt and the
spinner assembly. Refer to Figure 4
for switch positions. Before starting
the engine, place the switch in the
OFF ( O ) position for both the
conveyor belt and the spinners. If the
switches are in the ON ( I ) position,
the belt and the spinners will start to
operate as soon as the engine is started and the
hydraulic system is activated.
Start and stop operation will happen as soon as the
switch is placed on the ON ( I ) position, there is no time
delay in operation. The switch operates the same in
Lightspread or Heavyspread.
During operation, keep the switch box at the operator’s
position on the tow vehicle. When not is use, hang the
switch box on the top of the hopper. DO NOT place the
switch box in the hopper!! Damage will occur if the
switch box becomes tangled in the spinner wheels.
CENTER POSITION
Spinners ON
Conveyor OFF
Spinners ON
Conveyor ON
LEFT
POSITION
RIGHT
POSITION
HAND HELD SPINNER AND CONVEYOR BELT ON/OFF SWITCH
FIGURE 4
14
OPERATION
SETTING CONTROLS FOR LIGHTSPREAD OR
HEAVYSPREAD OPERATIONS
(See Figures 5, 6 and 7)
Changes to the settings of the spinner speed control,
the metering gate, spinner diverter, spinner wheel vane
mounting angles, and the conveyor belt speed control
are required when changing between Lightspread and
Heavyspread top dressing operations.
WARNING
WARNING
TO AVOID SERIOUS INJURY,
Always Disengage the Hydraulic Power and
Stop the Truck Engine Before Making Any
Lightspread/Heavyspread Adjustments.
Setting WIDESPIN 1530 TM Metering Gate
The metering gate opening
size is controlled in two
calibrations, Lightspread and
Heavyspread. The metering
gate stop pull pin on the side
of the metering gate mount
must be pulled out to allow
the metering gate to be moved into the larger opening
size for Heavyspread.
Use the following settings for Lightspread and
Heavyspread operations -LIGHTSPREAD -- Set metering gate in zones “A”
thru “D”.
HEAVYSPREAD -- Pull metering gate pull pin and
set gate in zones “E” thru “H”.
The marks on the decal are for reference only, they do
not represent any measured amounts of top dressing
material.
Because moisture content and varying weights of top
dressing can effect the flow of material thru the metering
gate, adjustments may be needed to maintain an equal
distribution and an even spread pattern.
If the amount of material being deposited on the spinner
assembly needs to be corrected, adjust the metering
gate opening. To increase the volume of top dressing
material, increasing the metering gate opening will have
better spreading results than increasing the conveyor
belt speed. For less volume of top dressing material,
decreasing the metering gate opening will have better
results than decreasing the speed of the conveyor belt.
Setting WIDESPIN 1530 TM Spinner Hydraulic
Speed Control
The speed control varies the
speed of the spinner wheels.
Increasing
the
speed
increases the spread width,
decreasing narrows the
width. Changing the speed
does not effect the volume of
material
being
spread,
however, the thickness of application will change as the
spread changes. Use the following speed settings for
Lightspread or Heavyspread operations -LIGHTSPREAD -- Set and lock the spinner speed
control at “4”.
HEAVYSPREAD -- Set and lock the spinner speed
control at “3 or less”.
In the Heavyspread setting, the speed control should be
at 3 or less. Do Not exceed 3 during Heavyspread
operation, limit any changes to setting the control to
under 3 along with changes to the conveyor speed
control or the metering gate setting.
Moisture content and the type of top dressing material
are variables that will affect the setting of the speed
control. Use a slower setting for dry top dressing
material that flows easily. Increase setting to handle
heavier types of top dressing or to increase the spread
range. Increasing the speed will broadcast the top
dressing over a larger area. Experimentation by the
operator will help to determine the proper setting. The
spinner speed control does not effect or change the
speed of the conveyor belt.
Setting HEAVYSPREAD Diverter
(See Figure 5 & 6)
The Heavyspread Diverter changes the spread pattern
during Heavyspread operation. For Heavyspread, the
diverter should be in the lowered position and securely
locked with the diverter locking knob. During light
application, the diverter should be locked in the raised
position.
LOCKING KNOB
LIGHT
UP FOR
LIGHTSPREAD
FIGURE 5
HEAVY
DIVERTER
DOWN FOR
HEAVYSPREAD
15
OPERATION
LIGHTSPREADt
HEAVYSPREADt
WARNING
WARNING
TO AVOID SERIOUS INJURY,
Always Stop the Engine Before Making Any Lightspread or
Heavyspread Adjustments.
LIGHTSPREADt
LIGHTSPREADt
4
HEAVYSPREADt
<3
HEAVYSPREADt
PULL METERING GATE
STOP PIN OUT. ADJUST
METERING GATE WITHIN
“HEAVYSPREAD” RANGE.
ADJUST METERING GATE
IN THE “LIGHTSPREAD”
RANGE.
SET SPINNER SPEED
CONTROL TO 4.
SET SPINNER SPEED
CONTROL TO 3 OR LESS.
RAISE DIVERTER GATE.
LOWER AND LOCK
DIVERTER GATE.
READJUST ALL SPINNER
VANES. SET AT MAXIMUM
VANE MOUNTING ANGLE
(TO THE INSIDE OF THE
SLOT).
READJUST ALL SPINNER
VANES. SET AT MINIMUM
VANE MOUNTING ANGLE
(TO THE OUTSIDE OF THE
SLOT).
SET CONVEYOR BELT
SPEED AT 1.25 to 1.5
TURNS OR MORE OPEN.
1.25 TO 1.5X
SET CONVEYOR BELT
SPEED AT 1.25 TO 2.5
TURNS OPEN.
1.25 TO 2.5X
LIGHT
LEFT
HEAVY
RIGHT
LEFT
SPINNER WHEELS -- AS VIEWED FROM TOP
RIGHT
FIGURE 6
16
OPERATION
Adjusting Spinner Wheel Vanes
(See Figures 6 and 7)
Changing the vane mounting angle is necessary during
the changeover between Lightspread and Heavyspread
operations.
WARNING
WARNING
Moisture content and the type of top dressing material
are variables that may require additional adjustments to
the setting of the speed control.
Changing the conveyor belt speed control does not
affect the operating speed of the spinner assembly
spinner wheels.
TOP DRESSING OPERATION
TO AVOID SERIOUS INJURY,
Always Stop the Engine Before Making
Adjustments to the Spinner Vanes.
LIGHTSPREAD -- Readjust spinner to maximum
mounting angle (to inside of slot).
HEAVYSPREAD -- Readjust spinner to minimum
mounting angle (to outside of slot).
INSIDE LOCKING SCREW
VANE
SLOT
(SHOWN IN
LIGHTSPREAD
POSITION)
MOUNTING
ANGLE
FIGURE 7
The mounting angle is adjusted by loosening the inside
locking screw on the vane (it is not necessary to loosen
the screw on the outside), sliding the vane to the other
end of the slot on the vane, and retightening the screw.
NOTE: Because the right and left spinner wheels rotate
in opposite direction, the right and left vanes are a mirror
image of each other. See Figure 6 for the location and
direction of adjustment for each individual vane.
Setting WIDESPIN 1530 Conveyor Belt Speed
Control
Turning the control knob
counterclockwise increases
the belt speed -- clockwise
slows the belt speed.
Use the following speed
settings for Lightspread or Heavyspread operations.
The settings are from a fully closed (clockwise) position.
LIGHTSPREAD -- Set the belt speed control at
“1--1/4 to 1--1/2” turns open.
HEAVYSPREAD -- Set the belt speed control at
“1--1/4 to 2--1/2” turns open.
Forward speed is an important part of top dressing.
Moderate and constant speed will provide the best top
dressing results. A varying ground speed will create an
unwanted varied thickness and pattern. Ground speed
during top dressing should not exceed 8 Km/h (5 MPH).
Undesired top dressing patterns and excessive stress
on the machine will occur if speeds are in excess of 8
Km/h (5 MPH). Maximum driving speed when empty is
8 Km/h (5 MPH).
WARNING
WARNING
TO AVOID SERIOUS INJURY,
and To Avoid Damage to the
Truck and the 1530 TM Top Dresser,
Do Not Drive or Operate At Speeds Over
8 Km/h (5 MPH).
Start and stop the top dressing operation using the
hand-held ON/OFF switch. The top dresser should be
moving before putting the switch in the ON ( I ) position.
Put the switch in the OFF ( O ) position before stopping
movement of the top dresser.
For best results, top dress in straight lines. A gradual
turn can be made without difficulty or undesired top
dressing results. On too sharp of a turn, uneven
distribution of top dressing material will occur. A sharp
turn will result in more top dressing being applied to the
inside ground surface of the turn than on the outside
surface.
To make a sharp turn without top dressing, the turn
should be taken very slowly. Too fast of a turn will
increase the possibility of damage to the turf caused by
the trucks wheels skidding or cutting into the turf. Also, if
a turf is too soft, the tires may sink into the turf and leave
tracks.
WARNING
WARNING
TO AVOID SERIOUS INJURY,
To Avoid Damage to the WideSpin 1530 TM Top
Dresser and the Truck, Do Not Operate the Top
Dresser On Side Slopes Over 15˚ Degrees, or Up
and Down Slopes Over 15˚ Degrees.
Do not operate the top dresser on side slopes over 15˚
degrees. Do not operate the top dresser up and down
side slopes over 15˚ degrees. Do not operate the top
dresser with an over filled or overloaded hopper. Tipping
or rolling over of the machine can occur.
17
WARNING
CAUTION
To Avoid Damage To The 1530 TM Top Dresser
Do Not Place the Hand Held ON/OFF Switch
Inside of the Hopper.
Do not place the hand-held ON/OFF switch in the
hopper. Severe damage to the hand held ON/OFF
switch, the conveyor belt, and the spinner assembly can
result if the switch box becomes tangled in the conveyor
belt or spinner wheels.
STAY CLEAR WHILE
SPINNERS ARE
OPERATING
DO NOT Allow Anyone To Stand Behind the 1530
Spinner Assembly When It Is Operating.
OPERATION
WIDESPIN 1530 TM TOP DRESSER SHUTDOWN
After operation, stop the hydraulic power to the
conveyor belt and the spinner assembly. To avoid
draining the trucks battery, the hand held switch must be
in the “OFF” ( O ) position. After shutdown, check the
following:
D Hopper is empty.
D Trucks hydraulic power supply control has been
placed in the OFF positions.
D Hand Held switch is in the OFF ( O ) position for both
the conveyor belt and the spinner assembly. Hand
held switch should be hung on side hopper panel.
D Set trucks brakes. Block tires to prevent uncontrolled
rolling.
D Disconnect the power supply harness to the truck.
If the WideSpin 1530 TM is going to be removed from
the truck, refer to the manual for the Mounting Kit
Manual.
OPERATOR LEVEL SERVICE
18
Operator Daily Inspection
WARNING
TO AVOID SERIOUS INJURY,
Do Not Attempt To Perform Any
Inspection, Adjustment, or
Service Procedure With Any Part
of the Top Dresser or Spinner
Assembly Operating.
Troubleshooting Table
PROBLEM
POSSIBLE CAUSE
Poor
Spreading
Results
Trucks Engine RPM Speed Too Slow To
Provide Hydraulic Power To Top Dresser.
Trucks Governor Setting Too Low To
Allow Engine To Provide Hydraulic Power
To Top Dresser.
Spinner Speed Control Setting Wrong.
Refer To Operation Section in This
Manual.
Work Safely and Wear the Appropriate Safety
Gear When Inspecting, Making Adjustments,
or Servicing The WideSpin 1530 TM Top
Dresser.
Conveyor Belt Speed Control Setting
Wrong. Refer To Operation Section In
This Manual.
Metering Gate Setting Wrong. Refer To
Operation Section In This Manual.
Follow All Safety Hazard Warnings and Decals.
Before and after each use, check the following items:
D Inspect for damaged or missing guards on the
WideSpin 1530 TM and the spinner assembly. Do
not operate any machine with missing or
damaged guards.
D Inspect entire WideSpin 1530 TM and the spinner
assembly
for
damaged
or
inoperable
components. Do not operate any machine with
damaged or inoperable components. Inspect the
entire machine for loose fasteners. Retighten as
required.
D Inspect all WideSpin 1530 TM operator controls
for proper operation.
D Inspect the spinner assembly spinner wheels.
Check for proper alignment, damage, wear, and
missing hardware.
D Check for a buildup of top dressing material on
spinner assembly components. Check for a
buildup on and under the spinner wheels. Check
for debris caught in spinner wheels.
D Check for a buildup of top dressing material on
components under the WideSpin 1530 TM rear
deflector, bottom dirt shield pan, hopper and
conveyor belt.
D Inspect the conveyor belt for adjustment and
tracking. If adjustment is required, refer to Service
Level Personnel. Check the conveyor belt
adjustment and tracking frequently during
operation.
D Check the level of hydraulic fluid in the trucks
reservoir. Refill as needed.
D Visually check for hydraulic leaks. NEVER USE
HANDS TO CHECK FOR LEAKS!!
D Maintain proper daily lubrication intervals on the
WideSpin 1530 TM top dresser.
D Visually inspect the inside of the hopper for tools,
shovels, rakes, rocks or debris remaining from
earlier use.
Moisture Level In Top Dressing Too High.
Vane Angle Adjustment Wrong For Top
Dressing Type Or Moisture Level. Refer
To Service Level Personnel.
Diverter in Wrong Position. Refer To
Operation Section In This Manual.
Unscreened Material In Hopper.
Debris or Rocks Blocking Metering Gate.
Unscreened Material In Spinner
Attachment Deflector. Debris or Rocks
Blocking Spinner Wheels.
Build-Up Of Top Dressing Material On
Spinner Wheels or 1530 Components.
Damaged Spinner Wheels or Damaged
Spinner Assembly Components. Refer
Repair to Service Personnel.
Spinner
Assembly or
Conveyor
Belt Not
Operating
No Electrical Power From Tow Vehicle To
Operate ON/OFF Switch or Hydraulic
Valve Block Solenoids. Check All
Connections and Grounds.
Check Fuse In Power Supply Cable.
Spinner Speed Control Set Too Low.
Trucks Engine RPM Speed Too Slow To
Provide Hydraulic Power To Top Dresser.
Trucks Governor Setting Too Low To
Allow Engine To Provide Hydraulic Power
To Top Dresser.
Trucks Hydraulic Flow Selector On Wrong
Setting
Spinner Assembly Hydraulic Hoses and
Quick Release Fittings Not Properly
Connected To the Spinner Assembly or
the WideSpin 1530 Valve Block.
Conveyor Belt Speed Control Set Too
Slow For Weight Of Top Dressing.
Defective Hydraulic Valve Block
Components. Refer To Service Level
Personnel.
Defective Spinner Assembly Hydraulic
Motors. Refer To Service Level
Personnel.
19
SERVICE LEVEL MAINTENANCE
Storage
TO STORE THE WIDESPIN 1530 TM OVER AN
EXTENDED PERIOD, perform a complete inspection.
Refer any needed service or repair to service level
personnel. Clean the hopper, both sides of the conveyor
belt and completely clean the spinner assembly. Use low
pressure wash on the top dresser, DO NOT use high
pressure wash. Apply a film of light machine oil to the
spinner wheels to control rust. Release the tension of the
conveyor belt. To protect the conveyor belt, rubber and
plastic parts, store the WideSpin 1530 TM out of direct
sunlight.
TO RETURN TO SERVICE AFTER EXTENDED
STORAGE, inspect the entire machine for any damage
that may have occurred during storage. Refer any
needed correction to service level personnel.
Reset the tension of the conveyor belt. Refer adjustment
to service level personnel.
Perform a complete lubrication procedure. Refer any
needed service or repair to service level personnel.
Operator Level Adjustment and Service
WARNING
TO AVOID SERIOUS INJURY,
Do Not Attempt To Adjust, Inspect, or
Service any Part of the WideSpin 1530
TM When It Is Operating.
Be Aware of High Hydraulic Oil Temperatures.
Serious Burns and Injuries Are Possible.
Properly Secure The WideSpin 1530 TM Before Starting
Any Inspection, Service or Adjustment Procedures.
Operator Level Adjustment and Service
is limited to:
D Cleaning
D Inspection
D Storage
Refer all other service, adjustments or
repairs to qualified service personnel.
HYDRAULIC FLUID
The hydraulic fluid in the WideSpin 1530 TM top dresser
is supplied by the truck. When refilling the truck, check
the type of fluid used (vegetable or petroleum based).
CLEANING
Wash the excess top dressing material from the
conveyor belt, hopper and spinner assembly. Wash
excess top dressing material from all components on the
bottom of the top dresser, especially the inside surface of
the conveyor belt and the conveyor belt rollers. Use only
low pressure wash to clean the top dresser.
After extended periods of use, the spinner wheels may
collect a buildup of top dressing material. This buildup
may cause excessive vibration or poor spreading
results. During operation, periodically inspect and
remove any buildup of top dressing material from the
spinner wheels, the spinner assembly deflectors, the
guards, and the shields.
INSPECTION
After the WideSpin 1530 TM has been cleaned, inspect
for damage. Look for loose or missing hardware. Inspect
the spinner wheels for loose or missing vanes. Visually
inspect for hydraulic leaks on the motors, hoses and the
hydraulic fittings. Refer any needed repair work to
qualified service personnel.
WARNING
DANGER
TO AVOID SERIOUS INJURY,
Do Not Use Your Fingers Or Hands To
Check For Hydraulic Leaks. High
Pressure Leaks Can Puncture The
Skin And Force Oil Into The Body. This
Can Cause Severe Injury Or Death.
WEAR SAFETY GLASSES!!
EUROPEAN LUBRICANTS, FUEL, AND PARTS
DISPOSAL NUMBERS
Motor Oil . . . . . . . . . . . . 54112
Gear Oil . . . . . . . . . . . . . 54112
Grease . . . . . . . . . . . . . . 54202
Plastic Parts . . . . . . . . . 57127
20
DECALS
Decals
STAY CLEAR
WHILE
SPINNERS ARE
OPERATING
A.
DOMESTIC
CE
B.
DOMESTIC
CE
WARNING
HIGH PRESSURE FLUID HAZARD
TO AVOID SERIOUS INJURY,
DO NOT USE HANDS TO CHECK
FOR HYDRAULIC LEAKS.
WEAR EYE PROTECTION.
C.
DOMESTIC
DOMESTIC
AND CE
D.
CE
415 mm
(16.3”)
0.54 Cubic Meter -- 816.5 Kg
(19 Cubic Feet -- 1,800 lbs)
15˚ MAX.
DOMESTIC
AND CE
E.
DOMESTIC
AND CE
F.
DOMESTIC
AND CE
G.
21
DECALS
Decals
WIDESPIN 1530 TM
8 Km/h
(5 MPH)
Truck Mounted Broadcast Top Dresser
DOMESTIC
AND CE
Product Number 85811
US Patent 6,149,079
and 6,508,419
Additional Patents Pending
LpA 84.7 dBA
LwA 100.9 dBA
DOMESTIC
AND CE
J.
299 Kg (660 lbs)
DOMESTIC AND CE
H.
I.
SP-1530 TM
Lifting Brace
Part No. 662250
LIGHTSPREADt
TURFCO MFG INC
Minneapolis, MN. 55449
<3 3
4
DOMESTIC
HEAVYSPREADt
DOMESTIC
AND CE
K.
L.
DOMESTIC AND CE
M.
1.25X TO 1.5X
1.25X TO 2.5X
DOMESTIC AND CE
P.
DOMESTIC AND CE
N.
A.
B.
C.
D.
E.
F.
G.
H.
I.
J.
K.
L.
M.
N.
O.
P.
DOMESTIC AND CE
O.
SPINNER “STAY CLEAR” THROWN OBJECT/BYSTANDER WARNING DECAL
SPINNER “KEEP HAND AND FEET AWAY” WARNING DECAL
HYDRAULIC PRESSURE HAZARD WARNING DECAL
CENTER--OF--GRAVITY DECAL
MAXIMUM ANGLE OF OPERATION WARNING DECAL
MAXIMUM HOPPER CAPACITY AND MAXIMUM LOAD WEIGHT WARNING DECAL
HIGH HEAT WARNING DECAL
READ MANUAL INSTRUCTION DECAL
WIDESPIN 1530 TM CE SPECIFICATION DECAL
LIGHTSPREAD/HEAVYSPREAD METERING GATE POSITION DECAL
PART IDENTIFICATION DECAL (LOCATED ON LIFTING BRACKET)
CONVEYOR BELT SPEED CONTROL DECAL
HAND HELD CONTROL BOX “ON/OFF” DECAL
SPINNER ASSEMBLY HYDRAULIC HOSE ROUTING DECAL
SPINNER SPEED CONTROL DECAL
LIGHTSPREAD/HEAVYSPREAD INSTRUCTION DECAL
SERVICE LEVEL MAINTENANCE
22
Service Level Maintenance
WARNING
WARNING
THE FOLLOWING SERVICE AND
ADJUSTMENT PROCEDURES ARE
FOR QUALIFIED SERVICE LEVEL
PERSONNEL ONLY.
TO AVOID SERIOUS INJURY,
Do Not Attempt To Service any Part of the
WideSpin 1530 TM Top Dresser When It Is
Operating.
TO AVOID SERIOUS INJURY,
Always Follow All Safety Hazard Warnings.
Work Safely And Wear The Appropriate Safety
Gear When Servicing The WideSpin 1530 TM.
Properly Secure The WideSpin 1530 TM Top
Dresser Before Starting Any Adjustment, Service
or Lubrication Procedures.
LUBRICATION
All the bearings on the WideSpin 1530 TM Top Dresser
are sealed and require no further lubrication. Periodically
inspect the bearings on the front and rear conveyor belt
rollers and the spinner wheels for wear, damage, or a
build up of dirt or debris. Clean as required. The tilting
swivel points on the spinner assembly should be
periodically cleaned, inspected for wear or damage, and
lightly coated with machine oil for rust and moisture
protection.
INSPECTION PANEL
Access to view the inside surface of the conveyor belt
can be gained by removing the inspection panel. The
inspection panel is located on the right side of the frame.
The inspection panel can also be used to aid in the
cleaning of the top of the dirt shield.
CONVEYOR BELT CARE
The conveyor belt is a PVC composition belt with a
splice. Check the condition of the belt surface, look for
wear, cuts, and deep scrapes. Check the splice, the
splice wire should be in good condition. The splice
should not be catching on the hopper seals or the
metering gate. Replacement of the conveyor belts may
be necessary if it has been damaged, is worn, or will no
longer stay in proper alignment or adjustment.
Top dressing material can pass through the splice
causing a build--up of top dressing material on the inside
of the conveyor belt, on the conveyor pan and on the
rollers. Inspect and clean any buildup of top dressing
material from the inside surfaces of the conveyor belt.
To prolong the life of the conveyor belt, store the
WideSpin 1530 TM with the hopper empty, belt cleaned,
and out of direct sunlight.
CONVEYOR BELT SCRAPER
The scraper should lightly rub on the belt. Check for a
buildup of top dressing material in and around the
springs. If the plastic conveyor belt scraper is worn and
no longer touches the belt, the plastic blade can be
removed, flipped over, and replaced to restore contact
with the belt.
CONVEYOR BELT TENSION ADJUSTMENTS
(See Figure 8)
The tension on the conveyor belt must be adequate to
assure that the conveyor belt moves at the same rate as
the rear drive roller. After extended use, top dressing
material may build up on the front and rear rollers
causing undue tension on the conveyor belt or off--center
tracking problems. Clean the rollers before adjusting the
conveyor belt tension.
Conveyor belt tension is adjustable by tightening or
loosening the conveyor belt adjusters. The adjusters are
located on both sides of the frame near the front of the
hopper.
Before adjusting the conveyor belt for tension or tracking
problems, check the following:
D Check for a buildup of top dressing material on the
inside of the conveyor belts.
D Check for a buildup of top dressing material on the
surfaces of the idler and drive conveyor belt rollers.
D Look for damaged, worn or loose bearings on the idler
and drive conveyor belt rollers.
D Look for broken or damaged conveyor belt tension
adjusters.
Initial adjustment is measured at the ends of the adjuster
screws. The initial setting should be 25 mm (1” inch).
25 mm (1” INCH)
FIGURE 8
If the belt still slips under load, tighten conveyor belt
adjusting screws equally at 1/2 turn intervals until
23
slippage stops. If belt still does not operate properly,
reset the screws to 25 mm (1” inch) and check for
problems elsewhere.
CONVEYOR BELT TRACKING AND CENTERING
ADJUSTMENTS (See Figure 9)
If tracking or centering problems occur, first check for
unequal tension measurement on the conveyor belt
tension adjusters. Also check for a buildup of top
dressing material under the belt or on the conveyor belt
rollers.
It is very important during the first 10--15 hours of
operation to frequently check the WideSpin 1530 TM
conveyor belt for misalignment. All conveyor belts have
break--in periods to train the conveyor belt to track
properly. During break--in, some irregular movement can
be expected. After the break--in period, only normal
inspection and adjustment will be necessary.
The conveyor belt scraper assembly should be
inspected to insure that the scraper blade is applying
uniform pressure across the belt.
Step 1. Set each conveyor belt tension adjuster screw so
that 25 mm (1”) of thread is visible behind the nut.
Operate the machine with the hopper empty. If the
belt is not tracking properly, make quarter (1/4) turn
adjustments to one tensioner until the belt tracks true.
It is very important to give the conveyor belt enough
time (minimum of 10 rotations) to move into its new
position after turning the adjuster screws. When the
conveyor belt starts to run true, continue running
(with empty hopper) for fifteen minutes.
IF THE
CONVEYOR BELT
TRACKS TO FAR
TOWARDS THIS
SIDE -TIGHTEN THIS
TENSION
ADJUSTER
SCREW OR
LOOSEN THE
OPPOSITE SIDE
ADJUSTER
TOP VIEW
(SHOWN WITHOUT
HOPPER)
SERVICE LEVEL MAINTENANCE
Step 2. Fully load the WideSpin 1530 hopper with top
dressing material and operate the conveyor belt. It is
normal for the conveyor belt to slightly move from
side to side when the hopper is loaded. Check
tracking and make small adjustments if needed. Both
ends of the rear roller should be visible when the
conveyor belt is running true. It is very important to
give the conveyor belt enough time (minimum of 10
rotations per adjustment) to move into its new
position before making any additional adjustments.
Step 3. After this initial conveyor belt break--in and
training period, use the top dresser as instructed in
the manual. Check the conveyor belt after every load
and make small corrective adjustments as needed
After 10 -- 15 hours of use the conveyor belt should be
broken--in and tracking correctly.
Step 4. After extended use, top dressing material may
build up on the front and rear conveyor belt rollers
causing undue tension on the conveyor belt or cause
tracking problems. Clean the rollers before adjusting
the conveyor belt tension. Before adjusting the belt,
check the following:
D Check for a buildup of top dressing material on the
inside of the conveyor belt.
D Check for a buildup of top dressing material on the
idler and drive conveyor belt rollers.
D Look for damaged, worn or loose bearings on the
idler and drive conveyor belt rollers.
D Look for loose, broken or damaged conveyor belt
tension adjusters.
IF THE
CONVEYOR BELT
TRACKS TO FAR
TOWARDS THIS
SIDE -TIGHTEN THIS
TENSION
ADJUSTER
SCREW OR
LOOSEN THE
OPPOSITE SIDE
ADJUSTER
FIGURE 9
24
SERVICE LEVEL MAINTENANCE
Hydraulic System
(See Figure 10)
INSPECTING HYDRAULIC HOSES AND FITTINGS
Do not attempt to inspect the hydraulic hoses or fittings
with the truck engine running, the truck hydraulic power
engaged, the spinner motors operating, or the conveyor
drive motor operating.
Check the condition of the hydraulic hoses. The hoses
have a protective covering to control leakage in the event
of a hose breaking. Leaks and worn hoses should be
fixed or replaced before the machine is put into service.
The hydraulic system has pipe thread fittings on some of
the components. If disassembled, reseal the pipe thread
fitting with TeflonR tape or pipe dope.
WARNING
DANGER
TO AVOID SERIOUS INJURY,
Never Service Any Part Of The
Hydraulic System With The Engine
and Pump Operating. High Hydraulic
Pressure And High Oil Temperatures
Can Cause Serious Injury Or Death.
Do Not Use Your Fingers Or Hands To Check
For Hydraulic Leaks. High Pressure Leaks Can
Puncture The Skin And Force Oil Into The Body.
This Can Cause Severe Injury Or Death.
Be Aware of High Hydraulic Oil Temperatures.
Serious Burns and Injuries Are Possible.
HYDRAULIC FLUID
The machine was factory tested using “vegetable” based
biodegradable hydraulic fluid. Approximately 1.9 liters
(1/2 gallon) of vegetable based fluid can remain in the
WideSpin 1530 TM hydraulic system after testing. This
fluid will mix well with mineral based fluids. However,
when vegetable fluid is mixed with mineral fluids, it can
have a minor effect on the overall fluid properties. If this
fluid is not compatible with the fluid in the truck, or if
concerns of contamination to the trucks system are
present, flush the hydraulic system in the WideSpin 1530
TM before attaching the hoses to the truck. See section
“Draining Hydraulic System”. This procedure is meant
for qualified service personnel only.
WARNING
CAUTION
TO AVOID CONTAMINATION OR DAMAGE TO
THE TRUCKS HYDRAULIC SYSTEM,
Properly Identify the Type of Hydraulic Fluid
Being Used Before Refilling the Trucks
Reservoir.
The trucks hydraulic system provides all of the hydraulic
power and fluid to operate the WideSpin 1530 TM. The
WideSpin 1530 TM does not have its own separate
hydraulic fluid reservoir. Check the trucks system for the
type of fluid to use (vegetable or mineral) before
replenishing the trucks hydraulic system.
Refer to the operators manual for the truck to determine
the proper type of hydraulic fluid to use and for the
maximum operating temperature range for the type of
fluids being used.
DRAINING HYDRAULIC SYSTEM
The hydraulic system is self-bleeding and does not
normally store or retain any pressure when the trucks
pump is not in operation. However, in the event of failure
of certain components, hydraulic pressure can be
trapped in the system. Before servicing any component,
check for any remaining hydraulic pressure.
D Allow time for the hydraulic oil in the system to cool.
D Disconnect the quick release fittings from the spinner
assembly.
D Do Not Start Engine To Use The Hydraulic Pump To
Pump The Hydraulic Oil Out Of The System.
WARNING
TO AVOID SERIOUS INJURY,
Be Aware of the Possibility of Trapped High
Pressure in the Hydraulic System.
DO NOT USE HANDS TO CHECK FOR LEAKS!!
WEAR SAFETY GLASSES!!
To drain the system, remove the quick release fitting
from the end of the “pressure out” hydraulic hose that
connects to the truck. Be prepared to safely catch and
contain approximately 1.9 liters (1/2 gallon) of hydraulic
oil. Do Not Use The Trucks Hydraulic Pump To Pump
The Hydraulic Oil Out Of The System.
Some hydraulic oil will always remain in the system and
in the components. Always be prepared to properly catch
and contain any remaining hydraulic oil when servicing
the hydraulic system components.
MANIFOLD VALVE BLOCK
The manifold valve block contains a relief valve, the
hydraulic cooler fan pressure switch (85811 only), the
conveyor belt speed control, and the S1 and S2 solenoid
valve bodies that control hydraulic flow to the conveyor
belt motor and the spinner assembly motors.
Relief Valve: Located in port “RV” in the block. The relief
valve is installed to prevent hydraulic pressure from
becoming too high in the system. The relief valve is a
25
the cooler fan motor. The switch will close, completing
the electrical circuit, as soon as hydraulic pressure is
sensed in the manifold valve block. Refer to the
“Electrical System” section in the maintenance section of
this manual for more information on the fan switch. Note:
Hydraulic Cooler Fan Switch is standard equipment on
85811, optional equipment on 85812.
non-adjustable type valve that routes excess pressure
back to the truck through the “Pressure Out” hose.
The relief valve does not have any user serviceable
parts. If the valve is malfunctioning, it will need
replacement.
Hydraulic Cooler Fan Switch: Located in port “G1” in
the valve block. The switch controls electrical power to
NOTE: HYDRAULIC COOLER
IS STANDARD EQUIPMENT
FOR 85811, OPTIONAL
EQUIPMENT FOR 85812
SERVICE LEVEL MAINTENANCE
PRESSURE
OUT TO
TRUCK
HYDRAULIC COOLER
COOLER
FAN
SWITCH
PRESSURE IN
FROM TRUCK
P
G1
T
RELIEF
VALVE
PF
QUICK
RELEASE
FITTING
S1
MANIFOLD
VALVE BLOCK
SR
EX
S2
EX
CF
G2
FC
IN
SPINNER
SPEED
CONTROL
M1
PRESSURE IN
CONVEYOR
BELT SPEED
CONTROL
QUICK
RELEASE
FITTING
MR
A
B
PRESSURE IN
LEFT
HYDRAULIC
MOTOR
A
SPINNER ASSEMBLY
B
RIGHT
HYDRAULIC
MOTOR
B
A
CONVEYOR
BELT
HYDRAULIC
MOTOR
WIDESPIN 1530 TM
HYDRAULIC SCHEMATIC
FIGURE 10
SERVICE LEVEL MAINTENANCE
Conveyor Belt Speed Control: Located in port “FC” in
the block. The conveyor belt speed control controls the
speed of the conveyor belt by regulating the amount of
hydraulic flow and pressure to the motor.
The conveyor belt speed control valve does not have any
user serviceable parts. If the valve is malfunctioning, it
will need replacement.
S1 and S2 Solenoid Valve Bodies: Located in ports
“S1” and “S2” in the block. These valves control the
hydraulic flow to the hydraulic conveyor belt motor (S2)
and the spinner wheel hydraulic motors (S1). Both S1
and S2 are electrically operated valves, controlled by the
switch on the hand held ON/OFF control box.
The valves are a “normally open” type valve allowing the
hydraulic flow to bypass the spinner wheel motors and
the conveyor belt motor. When the hand-held switch is in
the ON ( I ) position, the solenoid is activated. Electrical
activation closes the valves and directs the hydraulic
flow to the motors.
The solenoids are a replaceable service part. The valve
bodies do not have any user serviceable parts. If the
valves are malfunctioning, they will need replacement.
If the solenoids fails to operate, check the following:
D Trucks throttle and/or governor set too low to provide
adequate hydraulic flow or electrical power.
D Bad electrical connection with the truck. Insufficient
electrical power to activate solenoid. Bad ground
connections.
Refer to the “Electrical Systems” maintenance section in
this manual for information about servicing the electrical
connections or the hand--held ON/OFF control box.
CONVEYOR BELT MOTOR
The conveyor belt motor powers the conveyor belt. The
motor is mounted at the rear of the top dresser, on the
right side of the frame. ON/OFF operation of the motor is
controlled at the hand held ON/OFF control box.
Hydraulic power to the motor is controlled at the manifold
valve block by solenoid S2. The speed of the motor is
controlled by the conveyor belt speed control (FC) in the
manifold valve block.
The motor rotates only in a clockwise direction (as
viewed from the left side of the machine) If the motor is
operating in reverse, check the possibility of reversed
connections at the motor (ports A and B) or at the
manifold valve block (ports M1 and MR).
If the conveyor belt motor fails to operate, check the
following:
D Conveyor belt speed control turned down too far.
D Bad electrical connection with the truck.
D Trucks throttle and/or governor set too low to provide
adequate engine RPM and hydraulic flow.
D Trucks hydraulic flow selector on wrong setting.
26
D Non--operational hand held ON/OFF switch. Check
for electrical power at solenoid S2 on manifold valve
block.
D Non--operational S2 valve. Valve must close for
hydraulic flow to go to motor.
D Relief valve (RV) is bypassing all hydraulic power
back to the tank.
D Hydraulic fluid level in tank too low.
D Pump not operating.
D Damaged or non--functional motor.
D Pump drive coupling between engine and pump is
inoperable.
D Mechanical problems, check for loose or out--of--line
motor, sheared keys on coupler or broken chain on
coupler (between motor and drive roller shaft).
Hydraulic flow leaving the conveyor motor returns to the
manifold valve block, entering at port “MR”. Flow is
routed through the block, sent to the hydraulic cooler
assembly, and returned to the truck.
SPINNER SPEED CONTROL
The control regulates the amount of hydraulic power
going to the spinner motors. The dial of the control is
calibrated 0 through 4. The numbers on the dial are
calibrated to correspond to percentage of flow; 0 = 0%
flow, 1 = 10%, 2 = 20%, 3 = 30%, 4 = 40% flow. The
numbers 5 through 10 are blocked from use by a stop
plate. Do not remove the stop plate from the speed
control. The hydraulic flow above 4 is being used to
power the conveyor belt motor through the exhaust (EX)
port. Normal setting for operation is 3 to 4.
The hydraulic flow enters the speed control at the input
port (IN). Flow comes from the manifold valve block (port
PF).
The controlled flow going out of the speed control at the
controlled flow port (CF) goes to the spinner assembly to
power the spinner wheel hydraulic motors.
The hydraulic flow going out of the speed control at the
exhaust port (EX) is directed back to the manifold valve
block (port EX) and is used to power and control the
conveyor belt motor.
The spinner speed control does not have any user
serviceable parts. If the valve is malfunctioning, it will
need replacement.
LEFT AND RIGHT HAND SPINNER WHEEL
HYDRAULIC MOTORS
The spinner wheel hydraulic motors receive hydraulic
power from the manifold valve block solenoid valve S1.
Activation of the solenoid valve S1 is controlled at the
hand held ON/OFF switch. Hydraulic flow from the block
(port PF) is routed through the spinner speed control.
The controlled flow from the speed control (port CF) is
sent to the left hand motor port “A”. Flow leaves the left
27
hand motor through port “B” and enters the right hand
motor at port “B”. Flow out of the right hand motor joins
the case drain from the left hand motor and returns to the
the manifold valve block at port “SR”.
The direction of rotation is opposite from each other. The
right hand spinner wheel rotates counterclockwise, the
left hand spinner wheel rotates clockwise (as viewed
from above the WideSpin 1530 TM). The spinner wheels
are a direct drive from the hydraulic motors.
If the spinner or the spinner motors fail to operate, check
the following:
D Quick-disconnects not attached. Check one at port
“SR” on the manifold valve block and one on the
opposite end of the hose connected to port “CF” on
the spinner speed control valve.
D Spinner Speed Control set too low.
D Trucks throttle and/or governor set too low to provide
adequate engine RPM and hydraulic flow.
D Trucks hydraulic flow selector on wrong setting.
D Check for restricted operation with other
components. Check for a buildup of top dressing
material or obstructions caught under the spinner
wheels. Spinner wheels should not rub on the
directional shields.
D Check for loose hydraulic motors or out-of-position
hydraulic motors.
D Relief valve is bypassing all hydraulic power back to
the tank.
D Trucks Pump not operating.
D Damaged or non--functional motors.
D Mechanical problems with the motor and the spinner
wheel coupler. Check for sheared keys or damaged
coupling spider.
D Loose motor, check mounting screws and mounting
position.
Hydraulic flow leaving the spinner motors returns to the
manifold valve block, entering at port “SR”. Flow is
routed through the valve block and sent to the hydraulic
cooler assembly.
HYDRAULIC COOLER ASSEMBLY
The hydraulic cooler assembly is designed to help
maintain a low operating temperature of the hydraulic
fluid. Heat is removed by passing the fluid through a air
cooled finned radiator. All hydraulic flow in the WideSpin
1530 TM system is routed through the cooler. Note:
Hydraulic Cooler Assembly is standard equipment on
85811, optional equipment on 85812.
SERVICE LEVEL MAINTENANCE
The cooler fan is automatic and operates as long as
hydraulic pressure is present at the fan switch in the
valve block (G1). Air flow from the fan will blow out. Refer
to the “Electrical System” section in the maintenance
section of this manual for more information on the fan
and the fan switch.
Maintenance is limited to cleaning excess dirt, dust or
debris from the cooler fins. Clean as needed with low
pressure air. Do Not clean with high pressure air or water.
High pressure water may enter the electric fan motor and
cause damage. High pressure water or air may damage
the fins on the cooler radiator.
The hydraulic cooler radiator does not have any user
serviceable parts. If the cooler radiator is leaking or
blocking hydraulic flow, it will need replacement.
Hydraulic flow leaving the hydraulic cooler is returned to
the truck through the “Pressure Out” hydraulic hose and
quick disconnect fitting.
PRESSURE OUT HYDRAULIC HOSE
The pressure out hose is part of the mounting kit. Refer
to the mounting kit manual for proper hose routing and
connection.
The quick disconnect on the pressure out hose must be
properly and completely connected to the truck. If the
quick disconnect is not properly connected to the truck,
excessive pressure can build up in the WideSpin 1530
TM resulting in a safety hazard and causing serious
damage to the top dressers hydraulic system.
WARNING
TO AVOID SERIOUS BODILY INJURY and
To Avoid Serious Damage to the
WideSpin 1530 TM,
Both Hydraulic Hoses Must Be Properly and
Completely Connected To the Truck.
SECURELY CONNECT ALL
QUICK DISCONNECT FITTINGS!!
HOSES MUST BE PROPERLY CONNECTED TO
THE TRUCK. THE CONNECTION MUST BE
SECURE. IF THE PRESSURE OUT HOSE IS NOT
CONNECTED PROPERLY, EXCESSIVE
PRESSURE WILL DEVELOP IN THE WIDESPIN
1530 TM HYDRAULIC COOLER AND CAUSE
SERIOUS DAMAGE.
SERVICE LEVEL MAINTENANCE
28
Electrical System
Before servicing the electrical system, check the
following:
D Check the power supply at the truck. Ensure that the
truck is supplying the proper voltage. Power
requirement is 12 Volt DC negative (--) ground
service.
D Check the power supply harness connection to the
trucks battery for proper contact. Check the trucks
battery, the problem may be a weak battery.
D Check the polarity at the trucks battery. WideSpin
1530 TM power supply connections are red wire for
positive (+), black wire for ground (--).
B
WHITE (+)
B
A
GREEN (+)
WARNING
TO AVOID SERIOUS INJURY
And To Avoid Damage To The Electrical
Components, DISCONNECT THE POWER SUPPLY
CONNECTIONS FROM THE TRUCK
Before Servicing the Electrical System.
COOLER
FAN SWITCH
A
YELLOW (+)
D Check the in-line fuse in the WideSpin 1530 TM red
power supply connection wire. Proper fuse is a 15
AMP, type AGC--15.
NOTE; STANDARD
EQUIPMENT
ON 85811, OPTIONAL
EQUIPMENT ON 85812
G1
S1
HYDRAULIC
MANIFOLD
VALVE BLOCK
BLACK (--)
B
A
S2
HYDRAULIC
COOLER
FAN MOTOR
BLACK (+)
BLACK (--)
BLACK (+)
A
BLACK (--)
MAIN
WIRING
HARNESS
B
YELLOW (+)
YELLOW (--)
A
BLACK (--)
B
BLACK (--)
GROUND (--)
TO FRAME
WHITE (+)
BLACK (+)
RED (+)
GREEN (+)
RED (+)
ELECTRICAL POWER
SUPPLY HARNESS
(REFER TO MOUNTING KIT
MANUAL)
BLACK (+)
GREEN (+)
GREEN (+)
BLACK (+)
CONTROL
BOX
WIRING
HARNESS
WHITE (+)
RED (+)
RED (+)
WHITE (+)
FIGURE 11
29
POSITIVE (+)
ELECTRICAL POWER
SUPPLY HARNESS
(REFER TO MOUNTING
KIT MANUAL)
SERVICE LEVEL MAINTENANCE
NEGATIVE ( -- )
HAND HELD
ON/OFF
CONTROL BOX CABLE
POWER SUPPLY CONNECTION
TO HYDRAULIC COOLER FAN,
PRODUCT NO. 85811 ONLY
HYDRAULIC
COOLER FAN
SWITCH G1,
PRODUCT NO.
85811 ONLY
GROUND
( -- )
MANIFOLD
VALVE
BLOCK
MAIN WIRING
HARNESS
S2
FIGURE 12
S1
ELECTRICAL POWER SUPPLY HARNESS AND
CONNECTIONS (SEE FIGURE 12)
The electrical power supply harness supplies power to
the WideSpin 1530 TM top dressers electrical system.
The harness is part of the mounting kit and is sized to fit
the truck being used to carry the WideSpin 1530 TM.
The positive (+) wire (red) on the harness has an in-line
fuse holder. Check the holder for a fuse, the proper size
is 15 AMP, type AGC--15. Check the connection to the
main wiring harness.
Connection to the truck is made directly to the trucks
battery. The black wire is attached to the negative
battery (--) terminal, and the red wire is attached to the
positive (+) battery terminal.
the terminals are accidentally shorted out, damage to
the electrical components of the manifold valve block will
occur.
After reassembling the control box switch, check the
operation of the switch. The switch must operate
according to the decal. Check that the “I” and “O”
(ON/OFF) position of the switch matches the “I” and “O”
positions of the decal on the holder, and that the
WideSpin 1530 TM conveyor belt and spinner assembly
operate accordingly. If operation is in reverse of the
decal, check that the switch housing has not been
reinstalled up side down. If the housing is in the correct
position, remove the switch and rotate 180˚ degrees.
Reinstall and check for proper operation.
BLACK
GREEN
HAND HELD ON/OFF CONTROL BOX WIRING
(See Figure 13)
The hand--held ON/OFF switch controls the electrical
power to the manifold valve block solenoid valves.
ON/OFF switching is controlled by the switch
interrupting the power to the solenoids. All wires in the
switch are positive (+). Refer to Figure 13 for the proper
color coding to rewire the control box switch. The
terminals on the bottom of the switch are numbered for
identification.
Verify that the power supply connection is unplugged
before opening the switch box. Never disassemble the
switch box with electrical power present at the switch. If
RED
RED
1
2
4
5
3
6
BOTTOM OF
SWITCH
WHITE
FIGURE 13
SERVICE LEVEL MAINTENANCE
30
+
FUSE 15 AMP
TYPE AGC--15A
S2
--
+
--
FIGURE 14
WIDESPIN 1530 TM ELECTRICAL SCHEMATIC
HAND HELD CONTROL BOX
-S1
+
MANIFOLD
BLOCK
+
+
+
+
+
G1 p
WIDESPIN 1530 TM
+
1
4
2
5
3
6
-M
HYDRAULIC
COOLER FAN
PRODUCE NO. 85811 ONLY
MAIN WIRING HARNESS (See Figures 11, 12, and 14)
The main electrical harness provides electrical
connections for the electrical power supply connection,
chassis ground, manifold solenoid wiring connections,
the hydraulic cooler fan motor connection, and the
hand-held ON/OFF switch wiring harness. The main
electrical harness starts near the front of the WideSpin
1530 TM frame and ends at the hydraulic manifold block.
MANIFOLD BLOCK WIRING CONNECTIONS (See
Figures 11, 12 and 13)
The manifold solenoid wiring connections provide
electrical power to the solenoids (solenoids S1 and S2
and the hydraulic cooler fan pressure switch.
The connector with the black and green wires goes to
solenoid S1. The connector with the black and black
wires goes to solenoid S2. The black wires from both
connectors are attached to the WideSpin 1530 TM
frame to provide ground ( -- ) for the circuit.
The hand held control box switch must be in the ON ( I )
position (for both the conveyor belt and the spinner
assembly) to test for voltage at solenoids S1 and S2.
During operation, when the solenoids are activated, they
close the valves allowing hydraulic flow to power the
hydraulic motors. No electrical power is present at the
solenoids when the hand held switch is in the OFF ( O )
position. Hydraulic pressure is not needed to check the
solenoids or the electrical connections.
HYDRAULIC COOLER FAN CIRCUIT AND
CONNECTIONS, PRODUCT NO. 85811 ONLY
(See Figures 11, 12 and 14)
The hand held control box switch does not need to be in
an ON ( I ) position to check the fan motor circuit. For
safety reasons, the switch should be in the OFF ( O )
position during testing.
To test for voltage at the manifold block fan switch,
hydraulic power must be present. For safety reasons,
the hand held control box switch must be in the OFF ( O )
position (for both the conveyor belt and the spinner
assembly) to test for voltage.
At the wiring connection to the switch, positive (+)
voltage should always be present at the input side of the
connection (white wire). When hydraulic pressure is
sensed at the switch, the switch closes and completes
the circuit to the fan motor. When the switch is closed,
positive (+) voltage should be present on the other side
of the connection (yellow wire).
At the wiring connection to the fan motor (yellow wire),
positive (+) voltage should only be present when
positive (+) voltage is present at the hydraulic pressure
switch (yellow wire). The other connection at the fan is
the ground (--) wire (black wire). The housing for the fan
provides the ground to the WideSpin 1530 frame.
NOTE: On product no. 85812, the electrical connectors
for the hydraulic cooler fan and fan switch are left
unplugged. Unplugged connectors are protected by a
sealed blank plug.
31
SERVICE LEVEL MAINTENANCE
Adjusting Spinner Wheel Vanes
(See Figure 15 and 16)
WARNING
WARNING
INSIDE LOCKING SCREW
TO AVOID SERIOUS INJURY,
Always Stop the Engine Before Making Any
Lightspread/Heavyspread Adjustments to the
Spinner Vanes.
Changing the vane mounting angle varies the width and
pattern of the overall spread and is necessary during the
changeover between Lightspread and Heavyspread
operations.
SLOT
VANE
(SHOWN IN
LIGHTSPREAD
POSITION)
MOUNTING
ANGLE
The mounting angle is adjusted by loosening the inside
locking screw on each vane (it is not necessary to loosen
the screw on the outside of the vane), sliding the vane to
the other end of the slot on the vane, and retightening the
screw. NOTE: Because the right and left hand spinner
wheels rotate in opposite direction, the right and left
hand vanes are a mirror image of each other. See Figure
16 for the location and direction of adjustment for each
individual vane.
FIGURE 15
LIGHTSPREAD
VANE
ADJUSTMENT
(AS VIEWED FROM
TOP)
SET AT MAXIMUM
VANE MOUNTING
ANGLE
LIGHT
RIGHT
LEFT
HEAVYSPREAD
VANE
ADJUSTMENT
(AS VIEWED FROM
TOP)
SET AT
MINIMUM VANE
MOUNTING ANGLE
HEAVY
LEFT
RIGHT
FIGURE 16
SERVICE LEVEL MAINTENANCE
32
Removal Of The Spinner Assembly
If the spinner assembly is removed, the WideSpin 1530
TM can be used as a material handler for top dressing
material. With the spinner assembly removed, top
dressing material will drop out of the back of the unit and
not be spread. Material handling rates are adjustable by
using the metering gate and the conveyor belt speed
control.
Step 5. Lift the spinner assembly up and remove from
the rear member of the WideSpin 1530 TM frame.
Use caution not to bend or damage the small hopper
assembly located on the top of the spinner assembly.
The spinner assembly weights 68 Kg (150
pounds). Use proper lifting equipment and
techniques.
Use the following steps to remove the spinner assembly.
Refer to Figure 17:
Step 6. Pull the hydraulic hose that is hanging out of the
rear of the WideSpin 1530 TM back through the hole
in the frame. Connect the quick--release from that
hose to the manifold valve block. Connect to the
fitting on the block that was previous used by the
other spinner assembly hose. Refer to the decal on
the rear of the WideSpin 1530 TM frame.
Step 1. Turn the WideSpin 1530 TM spinner speed
control back to “Zero”.
Step 2. Remove the deflector from the rear of the
WideSpin 1530 TM.
Step 3. Disconnect the spinner assembly’s two
quick--disconnect hydraulic hoses. One hose is
connected to the spinner assembly’s left spinner
wheel motor, the other is connected to the WideSpin
1530 TM manifold valve block (located under the left
side of the frame, behind the conveyor belt speed
control knob).
Step 7. Replace the deflector to the rear of the WideSpin
1530 TM.
Step 4. Remove the 1/2” hex head bolts (quantity 4)
holding the spinner assembly to the WideSpin 1530
TM frame.
HOSE ROUTING
DECAL
(ON REAR OF
WIDESPIN 1530
TM FRAME)
SPINNER
ASSEMBLY
MOUNTED
SPINNER
ASSEMBLY
REMOVED
DISCONNECT
HOSE FROM
VALVE BLOCK
REMOVE
REAR
DEFLECTOR
SPINNER
SPEED
CONTROL
PULL HYDRAULIC HOSE BACK INTO
FRAME AND CONNECT TO MANIFOLD
VALVE BLOCK
SPINNER
ASSEMBLY
FIGURE 17
33
SERVICE LEVEL MAINTENANCE
Conveyor Belt Replacement
Replacement of the conveyor belt may be necessary if it
is worn, has been damaged, or will no longer stay in
proper alignment and adjustment. Refer to Figure 18.
WARNING
TO AVOID SERIOUS INJURY,
Work Safely!! Wear the Appropriate Safety Gear.
Do Not Attempt to Service or Adjust Any Part of
the Top Dresser When it is Operating.
REMOVAL OF OLD CONVEYOR BELT
Step 1. Operate the conveyor until the splice in the belt is
in line with the hole in the rear of the frame. Check
that the splice wire can be removed through the hole
without interference from the frame. For safety, stop
the trucks engine and disconnect the electrical
connections from the truck.
WARNING
TO AVOID SERIOUS INJURY,
Disconnect The Electrical Connection From
The Truck.
Step 2. Remove the rear deflector.
Step 3. Open the metering gate to the largest opening.
Step 4. Remove the conveyor belt scraper.
Step 5. Release the tension on the conveyor belt by
loosening both conveyor belt adjusting screws. Push
the front roller towards the back of the machine to
ensure that all tension is released.
Step 6. Locate the splice wire. Straighten the ends so
that it can be removed. Remove the splice wire
through the hole in the frame.
Step 7. Remove the belt by pulling it out from the top.
Step 8. Clean the pan and plastic pan cover. Inspect for
wear and sharp edges that may damage the new
conveyor belt. Clean and inspect the front conveyor
belt idler roller and the rear conveyor drive roller.
Check the bearings on the front and rear rollers.
INSTALLATION OF THE NEW CONVEYOR BELT
Step 9. The conveyor belt is directional and must be
inserted in the proper direction to ensure that the
splice does not catch on other components. Identify
the difference in the belt ends by looking for the end
without the 45 degree angle cut. This end (without
the 45˚ cut) will be inserted into the WideSpin 1530
TM first.
With the pattern up, insert the belt past the metering
gate, and into the hopper. Make sure that the
conveyor belt is under the hopper seals. Continue to
insert the belt over the pan and around the front idler
roller. Continue under the pan until the two ends meet
at the rear roller.
Step 10. Align the ends of the conveyor belt near the
splice removal hole in the frame. Join the ends of the
belt at the splice. NOTE: Both outside edges of the
belt must be perfectly alined with each other or
tracking and belt alignment problems will result.
Insert the splice wire and link the two ends of the
conveyor belt together. Slightly bend both ends of the
splice wire to secure it in the conveyor belt.
Step 11. Reset conveyor belt tension to both conveyor
belt adjuster screws. Refer to the “Conveyor Belt
Tension Adjustment” section in this manual.
Step 12. Replace and adjust the conveyor belt scraper.
Replace the rear deflector. Reinstall the electrical
connection to the tow vehicle.
Step 13. Operate the conveyor and check the belt. The
belt must not catch on the hopper seals, or rub on any
frame or drive component. Refer to the “Conveyor
Belt Tracking Adjustment” sections in this manual.
Follow instructions for tracking adjustments and
“Break--In” procedures.
BELT MOVEMENT
DURING OPERATION
45˚ DEGREE CUT END
SPLICE
REAR
DEFLECTOR
CONVEYOR
BELT SCRAPER
FIGURE 18
SOMMARIO
2
Tutte le specifiche, informazioni, illustrazioni e foto nel presente manuale sono basate sulle informazioni disponibili al
momento della stampa. Ci si riserva il diritto di apportare modifiche senza preavviso.
Sommario
Marchi registrati e brevetti . . . . . . . . . . . . . . . . . . . . . . . . . . . . . . . . . . . . . . . . . . . . . . . . . . . . . . . . . 2
Specifiche e dati di prodotto . . . . . . . . . . . . . . . . . . . . . . . . . . . . . . . . . . . . . . . . . . . . . . . . . . . . . . . 3
Riconoscere le avvertenze di sicurezza e le pratiche generali di sicurezza . . . . . . . . . . . . . . . 4
Richiedere parti di ricambio e assistenza . . . . . . . . . . . . . . . . . . . . . . . . . . . . . . . . . . . . . . . . . . . . 6
Identificazione del prodotto . . . . . . . . . . . . . . . . . . . . . . . . . . . . . . . . . . . . . . . . . . . . . . . . . . . . . . . . 6
Requisiti del veicolo e kit di montaggio
Requisiti del veicolo . . . . . . . . . . . . . . . . . . . . . . . . . . . . . . . . . . . . . . . . . . . . . . . . . . . . . . . . . . 7
Top Dresser and the Truck . . . . . . . . . . . . . . . . . . . . . . . . . . . . . . . . . . . . . . . . . . . . . . . . . . . . . 7
Il top dresser e il veicolo . . . . . . . . . . . . . . . . . . . . . . . . . . . . . . . . . . . . . . . . . . . . . . . . . . . . . . . 7
Rimozione del WideSpin 1530 TM dal veicolo . . . . . . . . . . . . . . . . . . . . . . . . . . . . . . . . . . . . 7
Descrizione -WideSpin 1530 TM Broadcast Top Dresser . . . . . . . . . . . . . . . . . . . . . . . . . . . . . . . . . . . . . . 8
Uso previsto e funzione . . . . . . . . . . . . . . . . . . . . . . . . . . . . . . . . . . . . . . . . . . . . . . . . . . . . . . . 8
Descrizione della modalità Lightspread e Heavyspread del WideSpin 1530 TM . . . . . . . 8
Localizzazione e descrizione dei principali componenti del WideSpin 1530 TM . . . . . . . 8
Localizzazione e descrizione della postazione operatore . . . . . . . . . . . . . . . . . . . . . . . . . . 11
Localizzazione e descrizione dei comandi dell’operatore . . . . . . . . . . . . . . . . . . . . . . . . . . 11
Funzionamento -Postazione operatore sul WIDESPIN 1530 TM . . . . . . . . . . . . . . . . . . . . . . . . . . . . . . . . . . 12
Velocità di esercizio del Top Dresser Widespin 1530 TM . . . . . . . . . . . . . . . . . . . . . . . . . . 12
Massima inclinazione di funzionamento WIDESPIN 1530 TM . . . . . . . . . . . . . . . . . . . . . 12
Carico della tramoggia . . . . . . . . . . . . . . . . . . . . . . . . . . . . . . . . . . . . . . . . . . . . . . . . . . . . . . . 12
Verifiche prima della messa in funzione . . . . . . . . . . . . . . . . . . . . . . . . . . . . . . . . . . . . . . . . . 13
Comando ON/OFF disco spargitore e nastro trasportatore . . . . . . . . . . . . . . . . . . . . . . . . 13
Impostazione del funzionamento in modalità Lightspread o Heavyspread . . . . . . . . . . . 14
Regolazione dello sportello dosatore del WIDESPIN 1530 TM . . . . . . . . . . . . . . . . . . . 14
Impostazione della velocità del disco spargitore del WideSpin 1530 TM . . . . . . . . . . 14
Regolazione piatto deviatore HEAVYSPREAD . . . . . . . . . . . . . . . . . . . . . . . . . . . . . . . . 14
Regolazione palette disco spargitore . . . . . . . . . . . . . . . . . . . . . . . . . . . . . . . . . . . . . . . . . 16
Impostazione della velocità del nastro trasportatore del WideSpin 1530 TM . . . . . . . 16
Operazione di top dressing . . . . . . . . . . . . . . . . . . . . . . . . . . . . . . . . . . . . . . . . . . . . . . . . . . . 16
Spegnimento del Top Dresser Widespin 1530 TM . . . . . . . . . . . . . . . . . . . . . . . . . . . . . . . . 17
Ispezioni quotidiane a cura dell’operatore . . . . . . . . . . . . . . . . . . . . . . . . . . . . . . . . . . . . . . . . . . . 18
Risoluzione problemi . . . . . . . . . . . . . . . . . . . . . . . . . . . . . . . . . . . . . . . . . . . . . . . . . . . . . . . . . . . . 18
Stoccaggio . . . . . . . . . . . . . . . . . . . . . . . . . . . . . . . . . . . . . . . . . . . . . . . . . . . . . . . . . . . . . . . . . . . . . 19
Regolazioni e manutenzione -- Livello operatore -Olio idraulico . . . . . . . . . . . . . . . . . . . . . . . . . . . . . . . . . . . . . . . . . . . . . . . . . . . . . . . . . . . . . . . . 19
Pulizia . . . . . . . . . . . . . . . . . . . . . . . . . . . . . . . . . . . . . . . . . . . . . . . . . . . . . . . . . . . . . . . . . . . . . 19
Ispezione . . . . . . . . . . . . . . . . . . . . . . . . . . . . . . . . . . . . . . . . . . . . . . . . . . . . . . . . . . . . . . . . . . . 19
Codici europei smaltimento lubrificanti, combustibili e componenti . . . . . . . . . . . . . . . . . . 19
Pittogrammi . . . . . . . . . . . . . . . . . . . . . . . . . . . . . . . . . . . . . . . . . . . . . . . . . . . . . . . . . . . . . . . . . . . . 20
Livello manutenzione
Lubrificazione . . . . . . . . . . . . . . . . . . . . . . . . . . . . . . . . . . . . . . . . . . . . . . . . . . . . . . . . . . . . . . . 22
Sportello di ispezione . . . . . . . . . . . . . . . . . . . . . . . . . . . . . . . . . . . . . . . . . . . . . . . . . . . . . . . . 22
Manutenzione nastro trasportatore, raschiatore . . . . . . . . . . . . . . . . . . . . . . . . . . . . . . . . . . 22
Regolazione tensione nastro trasportatore . . . . . . . . . . . . . . . . . . . . . . . . . . . . . . . . . . . . . . 22
Centratura e allineamento del nastro trasportatore . . . . . . . . . . . . . . . . . . . . . . . . . . . . . . . 23
Impianto idraulico . . . . . . . . . . . . . . . . . . . . . . . . . . . . . . . . . . . . . . . . . . . . . . . . . . . . . . . . . . . 24
Impianto elettrico . . . . . . . . . . . . . . . . . . . . . . . . . . . . . . . . . . . . . . . . . . . . . . . . . . . . . . . . . . . . 28
Regolazione palette . . . . . . . . . . . . . . . . . . . . . . . . . . . . . . . . . . . . . . . . . . . . . . . . . . . . . . . . . 31
Rimozione gruppo spargitore . . . . . . . . . . . . . . . . . . . . . . . . . . . . . . . . . . . . . . . . . . . . . . . . . . 32
Sostituzione nastro trasportatore . . . . . . . . . . . . . . . . . . . . . . . . . . . . . . . . . . . . . . . . . . . . . . 33
Lista ricambi . . . . . . . . . . . . . . . . . . . . . . . . . . . . . . . . . . . . . . . . . . . . . . . . . . . . . . . . . . . . . . . . . . . . 34
Accessorio opzionale riempimento solchi -- Prodotto cod. 86150 lista ricambi . . . . . . . . . . . . 54
Marchi registrati e brevetti
TURFCOR WIDESPINt 1530 TM è protetto dai brevetti USA n. 6.149.079, 6.508.419 e 6.817.552
TURFCOR, WIDESPINt e Mete-R-MaticR sono marchi registrati di Turfco Manufacturing, Inc.
HEAVYSPREADt e LIGHTSPREADt sono marchi registrati di Turfco Manufacturing, Inc.
3
SPECIFICHE TECNICHE
Specifiche Tecniche
Uso previsto: WideSpin 1530 TM è progettato per l’applicazione di terriccio organico per top
dressing adeguatamente preparato. Il WideSpin 1530 TM NON è progettato per altri usi diversi
dall’applicazione di terriccio organico per top dressing adeguatamente preparato. Per terriccio per top dressing
adeguatamente preparato si intende materiale organico con un contenuto di umidità controllato che è stato
filtrato per rimuovere detriti, rocce e materiale con granulometria eccessiva. L’azionamento dell’attrezzatura
deve avvenire solo in luoghi di lavoro adeguatamente preparati. Il WideSpin 1530 TM deve essere montato
esclusivamente su veicoli di peso, freni e potenza adeguato a controllare il top dresser in sicurezza. Per
montare il WideSpin 1530 TM al veicolo utilizzare il kit di montaggio adeguato. Il WideSpin 1530 TM deve
essere utilizzato soltanto quando l’operatore si trova nella posizione di guida a bordo del veicolo. Il WideSpin
1530 TM deve essere utilizzato solo con veicolo e top dresser in movimento. Il WideSpin 1530 TM non deve
essere utilizzato se non adeguatamente montato sul veicolo. Il WideSpin 1530 TM NON è progettato o pensato
per ospitare passeggeri.
Dimensioni: (gruppo spargitore collegato, kit di montaggio non installato)
Larghezza . . . . . . . . . . . . . . . . . . . . . . . . . . . . . . . . . . 1,29 metri (50.75” pollici)
Altezza (dalla parte inferiore del disco spargitore
alla parte sup. della tramoggia) . . . . . . . . . . . . . . . . 1,07 metri (42,25” pollici)
Lunghezza . . . . . . . . . . . . . . . . . . . . . . . . . . . . . . . . . . 1,96 metri (77,25” pollici)
Capacità tramoggia . . . . . . . . . . . . . . . . . . 0,54 metri cubi -- 816,5 kg (19 piedi cubi-- 1800 libbre)
Larghezza spargimento min/max . . . . . . da 3,04 metri a 9,14 metri (da 10’ a 30’ piedi)
Comandi operatore . . . . . . . . . . . . . . . . . . . Comando ON/OFF disco spargitore e nastro trasportatore,
Comando velocità gruppo spargitore, comando velocità nastro
trasportatore, sportello dosatore regolabile, leva controllo
inclinazione gruppo spargitore, piatto deviatore Heavyspread
Velocità di esercizio al suolo . . . . . . . . . . 8 km/h (5 MPH)
Velocità di trasporto . . . . . . . . . . . . . . . . . . 8 km/h (5 MPH)
Requisiti elettrici . . . . . . . . . . . . . . . . . . . . . 12 Volt CC, negativo a massa, 15 AMP
Alimentazione elettrica fornita dal veicolo
Requisiti minimi circuito idraulico . . . . . 26,5 litri/minuto a 10342 kPa (7 GPM a 1,500 PSI)
Potenza idraulica e olio forniti dal veicolo
Peso a vuoto . . . . . . . . . . . . . . . . . . . . . . . . . 299 kg (660 libbre)
Peso con carico . . . . . . . . . . . . . . . . . . . . . . 1.115,5 kg (2460 libbre)
Massima inclinazione di esercizio . . . . 15 gradi
Livello di emissione sonora:
Postazione operatore
Pressione sonora (LpA) = 84,7 dBA
Livello pressione sonora (LwA) = 100,9 dBA
LpA 84.7 dBA
LwA 100.9 dBA
Condizioni di esercizio:
Motore veicolo a pieno regime, gruppo spargitore e nastro trasportatore in
funzionamento, tramoggia vuota, unità in stazionamento
Dati prodotto
IMPORTANTE: Registrare e conservare i dati della targhetta di identificazione del WideSpin 1530 TM Broadcast
Top Dresser Turfco. È necessario indicare il codice prodotto e il numero di serie quando si ordinano parti di
ricambio.
Designazione modello
WideSpin 1530 TM Broadcast Top Dresser
Codice prodotto (indicare quale)
N. serie
Acquistato presso
85811 (con radiatore)
Data acquisto
85812 (senza radiatore)
4
SICUREZZA
Riconoscere le avvertenze di sicurezza presenti nel manuale
PRESTARE ATTENZIONE AL SIMBOLO INDICANTI RISCHI PER LA SICUREZZA
Il simbolo è usato per avvertire l’operatore di rischi per la sicurezza.
È utilizzato insieme alle parole PERICOLO, AVVERTENZA, ATTENZIONE.
PERICOLO
AVVERTENZA
ATTENZIONE
“PERICOLO“ identifica rischi imminenti che possono causare lesioni gravi o morte.
“AVVERTENZA“ identifica rischi potenziali che possono causare lesioni gravi o morte.
“ATTENZIONE“ indica situazioni di rischio che possono causare lesioni di lieve o modesta entità o danni alla
macchina o la distruzione della macchina.
Pratiche generali di sicurezza
La sicurezza sul lavoro dovrebbe essere sempre una
priorità assoluta. Addestramento ed esperienza sono
fattori importanti per operare con le apparecchiature in
sicurezza. Leggere le indicazioni fornite di seguito e
tenere presente che per operare in sicurezza è richiesto
l’uso del buon senso per quanto riguarda la macchina, la
sua manutenzione, l’operatore, l’addestramento e le
condizioni di esercizio. Queste sono indicazioni generali
di sicurezza che si applicano alla maggior parte delle
attrezzature per la manutenzione del manto erboso.
Questo elenco include numerose indicazioni
generali
di
sicurezza
riferite
alle
apparecchiature per la cura del manto erboso.
Questo elenco non contempla tutti i pericoli
possibili. Si deve sempre usare il buon senso
per determinare quale sia il modo più sicuro
per operare una macchina in determinate
condizioni.
ADDESTRAMENTO:
S Leggere sempre il manuale prima di utilizzare una
macchina per la prima volta.
S Leggere sempre i pittogrammi di avvertenza prima di
utilizzare una macchina per la prima volta.
S Verificare sempre l’ubicazione e l’uso di ogni
comando prima di utilizzare una macchina per la
prima volta.
S Fare pratica del funzionamento della macchina in
un’area sicura priva di ostacoli fino ad acquisire
familiarità con i comandi.
S Per chiarimenti rivolgersi al proprio superiore o
contattare il produttore.
ABBIGLIAMENTO:
S Indossare un abbigliamento comodo e aderente.
Indossare indumenti larghi è fonte di pericolo perché
gli indumenti potrebbero rimanere impigliati nella
macchina durante la manutenzione o il
funzionamento.
S Non indossare gioielli quando si opera con la
macchina. I gioielli possono rimanere impigliati nella
macchina.
S Indossare calzature protettive. Le scarpe da
ginnastica non proteggono il piede e non forniscono
la stessa protezione di calzature o stivali in cuoio. In
molte situazioni è opportuno utilizzare calzature di
sicurezza con punta rinforzata in acciaio.
S Casco di protezione: è opportuno l’utilizzo di un casco
di protezione quando si utilizza la macchina su un
campo da golf. Si deve considerare il pericolo di essere
colpiti da una pallina da golf e si devono adottare
adeguate precauzioni quando si lavora sotto gli alberi.
S Protezione della vista: si devono indossare occhiali di
protezione e/o visiere quando si opera con la
macchina e quando si lavora in prossimità di
apparecchiature che ruotano ad alta velocità.
Prestare attenzione a tosaerba rotanti, rifilatrici e
decespugliatori a filo e lama. I tosaerba con lame
rotanti possono scagliare detriti a velocità fino a
320 km/h (200 mph).
S Udito: se il livello di rumore delle apparecchiature è
troppo elevato è opportuno l’uso di dispositivi di
protezione dell’udito.
S Non utilizzare auricolari stereo mentre si opera con la
macchina. Ciò costituisce una fonte di distrazione che
può essere causa di incidenti. L’utilizzo di cuffie
impedisce anche di udire altre persone e attrezzature
mentre si opera con la macchina.
S Respiratori: indossare un respiratore quando si opera
in ambienti polverosi o in condizioni di vento. Questo
è importante anche se si opera con apparecchiature
che spruzzano prodotti chimici e fertilizzanti.
S Guanti: utilizzare guanti per manipolare oggetti
taglienti o pericolosi.
OPERATORE:
S L’operatore non deve mai usare una macchina sotto
l’effetto di alcool o droghe.
S L’operatore deve essere consapevole dei rischi
dell’esposizione al sole e deve prendere adeguate
precauzioni per proteggersi dal calore e dalla
disidratazione. Se necessario utilizzare prodotti per la
protezione dal sole.
S L’operatore non deve mai tentare di salire a bordo di
una macchina che non è progettata per tale uso. Non
consentire ad altri di salire a bordo di una macchina
che non è stata progettata per ospitare passeggeri.
Se una macchina è progettata per il trasporto di
persone, non far salire più passeggeri di quelli per cui
la macchina è stata progettata.
S Prestare sempre particolare attenzione nel salire e
nello scendere da una macchina. Prevenire infortuni
e cadute facendo in modo che l’operatore non scivoli.
Non saltare giù da una macchina se non in situazioni
di emergenza. Saltare giù da una macchina può
provocare scivolamenti con conseguenti lesioni.
5
S Non far funzionare le apparecchiature a velocità
pericolose. Ridurre la velocità nelle curve o quando si
opera su terreni in pendenza. L’operatore deve usare
il buon senso per determinare la velocità di sicurezza
sulla base dell’attrezzatura, del carico, della
pendenza, del terreno e di ogni altra condizione che
possa influenzare la sicurezza.
S L’operatore deve essere a conoscenza delle condizioni
dell’area in cui opera. Deve sapere se vi sono altre
persone o macchine nelle vicinanze.
S Prestare attenzione alle situazioni a rischio di
scivolamento: tappeto erboso umido su terreni in
pendenza, in curva o in fase di arresto o alle alte
velocità.
S Non avvicinare le mani o i piedi ai dispositivi di taglio
e ai componenti di azionamento. Spegnere il motore
e togliere la chiave o il cavo di accensione quando si
effettuano interventi di manutenzione sui dispositivi di
taglio e sui componenti di azionamento.
S Se è necessario sollevare un oggetto troppo pesante,
chiedere aiuto. Quando si solleva un oggetto pesante,
esercitare maggior sforzo sulle gambe che sulla
schiena e prestare attenzione a evitare torsioni della
schiena.
S Non consentire a bambini di operare con la macchina.
MACCHINA:
S I veicoli di traino devono essere dotati di adeguati
ganci di traino e freni adeguati per controllare
qualsiasi attrezzatura trainata. Verificare il peso e la
capacità di carico della macchina da trainare. I veicoli
utilizzati per portare attrezzature devono avere
un’adeguata portata utile e freni adeguati.
Verificare il peso e la capacità di carico della
macchina da trainare.
S Non sovraccaricare la macchina. I componenti
sono progettati per determinati pesi e carichi. Il
sovraccarico della macchina crea condizioni di
rischio.
S Assicurarsi che i freni funzionino correttamente.
S Assicurarsi che tutti i comandi siano in buone
condizioni di funzionamento.
S Verificare che tutte le protezioni siano correttamente
posizionate. Non far funzionare una macchina se
tutte le protezioni non sono correttamente
posizionate.
S Controllare sempre la macchina per assicurarsi che
sia in buone condizioni. Non avvicinare mani o piedi
a parti rotanti o in movimento.
S Controllare la pressione degli pneumatici.
S Controllare lo stato dei tubi idraulici. Riparare
eventuali perdite e sostituire i tubi usurati prima di
mettere in servizio la macchina. Non utilizzare le dita
o le mani per verificare la presenza di eventuali
perdite. Perdite ad alta pressione possono causare
lesioni alla pelle o far penetrare olio nel corpo. Ciò può
provocare gravi lesioni o la morte.
S Spegnere il motore prima di effettuare interventi di
manutenzione sulla macchina. Si consiglia di
ispezionare la macchina su una superficie
pianeggiante. Su un terreno in pendenza la macchina
a motore spento si può capovolgere.
S Non modificare in alcun modo la macchina. Far
eseguire le riparazioni e le regolazioni con cui non si ha
familiarità a tecnici che hanno ricevuto l’addestramento
adeguato per eseguire tali interventi in modo corretto.
S Sostituire i pittogrammi danneggiati o illeggibili.
MOTORE:
S Per evitare l’avvio accidentale del motore scollegare
il cavo di accensione prima di effettuare interventi di
manutenzione sul motore o sulle attrezzature.
Scollegare il cavo negativo dalla batteria se il motore
è dotato di un sistema di avviamento elettrico.
S Non colpire il volano con un martello o un qualsiasi
oggetto rigido. Ciò può causare la rottura del volano
durante il funzionamento.
SICUREZZA
S Tirare il cavo di avviamento lentamente fino a quando
oppone resistenza. Poi tirare il cavo rapidamente per
evitare il rinculo e per evitare lesioni alla mano o al
braccio.
S Non fare funzionare il motore in uno spazio
chiuso. I gas di scarico contengono monossido
di carbonio, un veleno inodore e letale. I fumi di
scarico di questa macchina contengono
sostanze chimiche note allo Stato della California
come causa di cancro, difetti congeniti o altri
danni all’apparato riproduttivo.
S Non conservare, versare o utilizzare benzina in
presenza di fiamme libere, né nei pressi di stufe, forni,
o bollitori che utilizzino una fiamma pilota o siano in
grado di generare scintille.
S Non fare rifornimento in un locale chiuso o in una zona
non aerata. Controllare il livello del carburante. Non
riempire oltre il livello massimo. Non aggiungere
carburante quando la macchina è ancora calda
perché la fuoriuscita di carburante può causare un
incendio. Attendere che il motore si raffreddi prima di
procedere al rifornimento di carburante.
S Svuotare il serbatoio del carburante prima di
procedere al trasporto della macchina.
S Non rimuovere il tappo del serbatoio o riempire il
serbatoio del carburante mentre il motore è caldo o in
funzione.
S Non far funzionare il motore se è stata versata della
benzina, se si avverte odore di benzina, o se
sussistono altre condizioni a rischio di esplosione.
Allontanare l’apparecchiatura dal punto in cui si è
verificata la fuoriuscita ed evitare l’accensione fino a
quando la benzina non sia evaporata.
S Non chiudere l’aria al carburatore per arrestare il
motore. Se possibile ridurre gradualmente la velocità
del motore prima di arrestare la macchina.
S Non manomettere i componenti del regolatore di regime
per aumentare la velocità del motore. Far funzionare il
motore alla velocità impostata dal fabbricante.
S Non verificare la scintilla se la candela è stata
rimossa. Usare un tester adeguato. Utilizzare gli
strumenti adeguati per eseguire gli interventi di
manutenzione.
S Non avviare il motore se la candela è stata rimossa. Se
il motore è ingolfato, mettere l’acceleratore al massimo
e insistere nella messa in moto fino a quando il motore
non si avvia. Evitare danni al motorino di avviamento
elettrico mettendo in moto in modo intermittente fino a
quando il motore non si avvia.
S Non far funzionare la macchina senza marmitta.
Controllare la marmitta periodicamente e sostituirla
se presenta perdite o se è usurata. Sostituirla con una
marmitta adeguata. Non toccare marmitta, cilindro, o
alette di raffreddamento quando sono surriscaldati.
S Non azionare il motore se vi è un accumulo di erba,
foglie, o altro materiale infiammabile nei pressi della
marmitta.
S Mantenere le alette di raffreddamento del cilindro e le
parti del regolatore di regime pulite e prive di erba e
altri detriti.
S Non utilizzare il motore in un terreno non bonificato
coperto da foresta, boscaglia, o erba se la marmitta
non è dotata di parascintille. Nello Stato della
California il parascintille è obbligatorio per legge. È
possibile che in altri stati siano in vigore disposizioni
analoghe. Nei territori federali americani si applicano
le vigenti leggi federali.
S Non avviare il motore se il filtro dell’aria o il coperchio
del filtro dell’aria è stato rimosso.
S Utilizzare benzina fresca. Il combustibile stantio può
otturare i componenti del carburatore e causare perdite.
Verificare frequentemente che i condotti del carburante
e i raccordi non presentino fessure e crepe.
6
DESCRIZIONE
Richiedere parti di ricambio e assistenza
Per ordinare parti di ricambio o richiedere un servizio di
riparazione contattare il rivenditore TURFCO
autorizzato più vicino. Per un elenco dei rivenditori
TURFCO autorizzati nella vostra zona, o per ulteriori
informazioni sul top dresser WideSpin 1530 TM, inviare
una richiesta a:
TURFCO Mfg. Inc.
1655 101st. Avenue North East
Minneapolis, MN. 55449--4420 USA
Telefono (763) 785--1000
FAX (763) 785--0556
E--Mail -- [email protected]
Internet -- www.turfco.com
Per garantire la sicurezza e il corretto funzionamento,
acquistare sempre parti di ricambio TURFCO da un
rivenditore autorizzato TURFCO. I pezzi di ricambio
provenienti da altre fonti potrebbero danneggiare il top
dresser WideSpin 1530 TM e/o costituire un rischio per
la sicurezza. Far sempre eseguire gli interventi di
riparazione a personale opportunamente addestrato.
NON MODIFICARE in alcun modo il top dresser
WideSpin 1530 TM. Modifiche non autorizzate possono
pregiudicarne il funzionamento e le prestazioni e
possono causare lesioni o la morte dell’operatore e di
altre persone che si trovino nell’area di lavoro.
Identificazione del prodotto
D Individuare la targhetta di identificazione Turfco [A]
sulla parte anteriore della macchina (v. figura 1).
Controllare le prime 5 cifre. Il codice prodotto è 85811
o 85812.
D Il prodotto con codice 85811 è dotato di serie di un
radiatore dell’impianto idraulico [B], il prodotto con
codice 85812 non è dotato di radiatore.
TURFCO MFG., INC.
1655 101st Avenue NE
Minneapolis, Minnesota
USA 55449--4420 www.turfco.com
(763) 785--1000 FAX (763) 785--0556
PRODOTTO
[A]
PRODOTTO
CODICE
85812
FIGURA 1
PRODOTTO
CODICE
85811
[B]
N. SERIE
7
DESCRIZIONE
Requisiti del veicolo e kit di montaggio
REQUISITI DEL VEICOLO
Prima di azionare il top dresser, assicurarsi che il veicolo
sia adeguatamente attrezzato e progettato per
trasportare, azionare e per sopportare il peso del top
dresser 1530 TM a pieno carico. Il veicolo deve avere
sufficiente portata utile per trasportare 1.115,5 kg
(2.460 libbre) più il peso del conducente/operatore. Il
veicolo deve essere provvisto di freni adeguati e
funzionanti. L’impianto idraulico ed elettrico del veicolo
devono soddisfare i requisiti minimi. Consultare la
tabella delle specifiche tecniche a pagina 3 di questo
manuale.
AVVERTENZA
PER EVITARE GRAVI LESIONI
non azionare il veicolo e il top dresser su terreni
con pendenza superiore ai 15 gradi.
L’operatore deve operare con il veicolo in modo
sicuro e conoscere i limiti di funzionamento del
veicolo in relazione al peso, alle prestazioni e al
baricentro e le caratteristiche di funzionamento
del top dresser.
WARNING
AVVERTENZA
AVVERTENZA
PER EVITARE GRAVI LESIONI,
leggere e comprendere l’intero
manuale dell’operatore prima di
azionare il WideSpin 1530 TM e il
veicolo.
PER EVITARE GRAVI LESIONI,
danni al veicolo e al top dresser WideSpin 1530
TM, il veicolo deve essere dotato di adeguata
portata utile, freni adeguati e funzionanti e
adeguati impianti idraulici ed elettrici.
WIDESPIN 1530 TM REQUISITI KIT DI
MONTAGGIO
Non tentare mai di montare o installare il WideSpin
1530 TM su un veicolo per il quale non è stato
progettato. Per montare il WideSpin 1530 TM sul
veicolo utilizzare l’adeguato kit di montaggio. Non
modificare o alterare alcun kit di montaggio. Un
montaggio eseguito in modo scorretto può causare
gravi lesioni e danni al veicolo. Consultare il manuale del
kit di montaggio per maggiori informazioni.
Prima di azionare il top dresser, assicurarsi che il
WideSpin 1530 TM sia assicurato saldamente al
veicolo. Controllare le staffe, le viti e i perni di fissaggio.
Assicurarsi che tutti i supporti e viti di fissaggio siano
fissati saldamente e sicuri. Consultare il manuale del kit
di montaggio per ulteriori informazioni.
AVVERTENZA
PER EVITARE GRAVI LESIONI,
danni al veicolo e al top dresser WideSpin
1530 TM, non tentare di montare il WideSpin
1530 TM su un veicolo per il quale non è stato
progettato. Non modificare o alterare mai alcun
componente dei kit di montaggio.
IL TOP DRESSER E IL VEICOLO
L’operatore deve leggere e comprendere l’intero
manuale del veicolo utilizzato per portare il top dresser
WideSpin 1530. L’operatore deve essere addestrato sul
funzionamento del veicolo e aggiornato sull’utilizzo in
sicurezza del veicolo. L’operatore deve essere
consapevole del peso supplementare caricato sul
veicolo quando viene montato il top dresser. Il peso
supplementare andrà a modificare la movimentazione,
l’equilibrio e le prestazioni di frenata del veicolo.
RIMOZIONE
VEICOLO
DEL
WIDESPIN
1530
TM
DAL
Consultare sempre Il manuale d’installazione del kit di
montaggio che è stato utilizzato per installare il
WideSpin 1530 TM sul veicolo. Rivedere i passaggi
seguiti per montare e collegare il top dresser al veicolo.
AVVERTENZA
PER EVITARE GRAVI LESIONI
non tentare mai di sollevare il top dresser
manualmente. Sollevare il Top Dresser
manualmente può causare gravi lesioni. Per il
peso e bilanciamento della macchina è
necessario l’utilizzo di adeguati dispositivi e
strumenti di sollevamento.
Il peso a vuoto del top dresser è pari a 299 kg
(660 libbre). Assicurarsi che le caratteristiche del
dispositivo di sollevamento e le sue funi siano
adeguati per sollevare e mantenere sospeso in
modo sicuro il top dresser. La tramoggia del top
dresser deve essere vuota quando la macchina
viene sollevata.
Utilizzare sempre la barra di sollevamento per
movimentare il top dresser. La barra di sollevamento è
stata progettata per evitare danni alla tramoggia ed è
posizionata in modo tale da garantire il corretto
bilanciamento del top dresser con il gruppo spargitore
installato sulla parte posteriore.
Non tentare mai di montare o rimuovere un top dresser
carico di terriccio. La tramoggia deve essere sempre
vuota. Non tentare mai di sollevare il top dresser quando
la tramoggia contiene del terriccio.
Scollegare tutti i collegamenti elettrici ed idraulici al
veicolo prima di sollevare il top dresser. Fare riferimento
al Manuale dell’operatore del veicolo per ricollegare
correttamente i collegamenti idraulici o elettrici al
veicolo.
8
DESCRIZIONE
Descrizione
WIDESPIN 1530 TM BROADCAST TOP DRESSER
Il WideSpin 1530 TM Broadcast Top Dresser Turfco è un
top dresser portato con distribuzione a spaglio. Il
WideSpin 1530 TM è progettato per distribuire sul
manto erboso uno strato uniforme di terriccio da top
dressing adeguatamente preparato. Il top dressing
consiste nel cospargere il manto erboso esistente con
nuovo terriccio.
Un nastro trasportatore convoglia il terriccio dalla
tramoggia a dei dischi spargitori rotanti attraverso uno
sportello dosatore regolabile. La larghezza di
spargimento del terriccio può essere regolata da 3,04 a
9,14 metri (da 10’ a 30’ piedi) ad una velocità di esercizio
al suolo fino a 8 km/h (5 mph).
USO PREVISTO E FUNZIONE
Il WideSpin 1530 TM è progettato per l’applicazione di
materiale organico adeguatamente preparato per il top
dressing. Il WideSpin 1530 TM NON è progettato per
altri usi diversi dall’applicazione di terriccio organico
adeguatamente preparato. Per materiale per top
dressing adeguatamente preparato si intende materiale
organico con un contenuto di umidità controllato che è
stato filtrato per rimuovere detriti, rocce e materiale con
granulometria eccessiva.
L’azionamento dell’attrezzatura deve avvenire solo in
luoghi di lavoro adeguatamente preparati. Il WideSpin
1530 TM deve essere montato esclusivamente su
veicoli di peso, portata utile, freni e potenza idraulica
adeguati a controllare il top dresser in sicurezza. Il top
dresser deve essere montato sul veicolo per mezzo
dell’adeguato kit di montaggio.
Il WideSpin 1530 TM deve essere utilizzato soltanto
quando l’operatore si trova nella posizione di guida a
bordo del veicolo. Il WideSpin 1530 TM deve essere
utilizzato solo con veicolo e top dresser in movimento. Il
WideSpin 1530 TM non deve essere utilizzato quando
veicolo e top dresser sono fermi. Il WideSpin 1530 TM
non deve essere utilizzato se non adeguatamente
montato sul veicolo. Il WideSpin 1530 TM NON è
progettato o pensato per ospitare passeggeri.
D Non utilizzare con top dressing non filtrato.
D Non utilizzare con top dressing non organico.
D Non utilizzare con materiale roccioso.
D Non permettere a nessuno di sostare dietro al
1530 TM con i dischi spargitori in movimento.
D Non permettere a passeggeri di salire all’interno
o sopra al 1530 TM.
D Non utilizzare su terreni con pendenza superiore
ai 15 gradi.
D Non trasportare o utilizzare a velocità superiori a
8 km/h (5 mph).
DESCRIZIONE DELLE MODALITÀ LIGHTSPREAD
E HEAVYSPREAD DEL WIDESPIN 1530
Il WIDESPIN 1530 dispone di due impostazioni per
regolare la quantità di top dressing sparso e la
configurazione
di spargimento.
La modalità
LIGHTSPREAD è utilizzata per applicazioni di top
dressing frequenti e prevede una maggiore ampiezza di
spargimento con una bassa quantità di materiale. La
modalità HEAVYSPREAD prevede un’ampiezza di
spargimento minore e una maggiore quantità di
materiale. Per il passaggio da una modalità all’altra è
necessario riposizionare il piatto deviatore, modificare
l’impostazione della velocità dei dischi spargitori,
regolare lo sportello dosatore e variare l’inclinazione
delle palette dei dischi spargitori.
LOCALIZZAZIONE E DESCRIZIONE DEI
PRINCIPALI COMPONENTI DEL TOP DRESSER A
SPAGLIO WIDESPIN 1530 TM
Si vedano le figure 2 e 3 per individuare i principali
componenti del top dresser. Non modificare in alcun
modo il WideSpin 1530 TM o il gruppo spargitore. Non
utilizzare il WideSpin 1530 TM se i suoi componenti
risultano danneggiati o non funzionanti.
Tubo per manuale: Il tubo per il manuale [C] si trova sul
pannello laterale della tramoggia. Serve a conservare il
manuale dell’operatore.
Punti di fissaggio anteriori e posteriori: I punti di
fissaggio [D] sul telaio del WideSpin 1530 TM sono
progettati per accogliere il kit di montaggio specifico per
il veicolo utilizzato per portare il top dresser. Per
un’installazione corretta il kit deve essere fissato in
questi punti.
Barra di sollevamento: La barra di sollevamento
rimovibile [E] è utilizzata per sollevare il WideSpin
1530 TM durante la movimentazione o rimozione del
top dresser dal veicolo. La barra deve essere rimossa
durante il funzionamento. Assicurarsi che la tramoggia
del WideSpin 1530 TM sia vuota prima di sollevare il top
dresser. Il gruppo spargitore deve essere montato sul
WideSpin 1530 TM durante il sollevamento per
garantire un adeguato bilanciamento della macchina.
9
DESCRIZIONE
[E]
[H]
[G]
[F]
[I]
[D]
[C]
[D]
[J]
Tramoggia: La tramoggia [F] può contenere 0,54 metri
cubi (19 piedi cubi) di top dressing. Il carico massimo di
top dressing consentito è di 816,5 kg (1800 libbre). Non
sovraccaricare la tramoggia. Un carico eccessivo può
costituire un rischio per la sicurezza, danneggiare i
componenti del WideSpin 1530 TM, causare danni al
veicolo e far sì che le ruote del veicolo lascino tracce e
solchi nel manto erboso.
Nastro trasportatore: Il nastro trasportatore con
superficie rugosa [G] convoglia il terriccio dalla
tramoggia attraverso lo sportello dosatore al gruppo
spargitore. Il nastro trasportatore è ad azionamento
idraulico. La velocità del nastro trasportatore è
regolabile. Il nastro trasportatore è provvisto di
tensionatori [H] per regolare la tensione al fine di
regolare la centratura o correggere problemi di
slittamento.
FIGURA 2
Gruppo spargitore: Il gruppo spargitore [I] distribuisce
il flusso di terriccio proveniente dal nastro trasportatore.
Il gruppo spargitore è dotato di un piatto deviatore per
regolare la configurazione di spargimento nella modalità
Heavyspread ed è dotato inoltre di un meccanismo di
controllo dell’inclinazione per poter ulteriormente
aumentare o variare la configurazione di spargimento. Il
gruppo spargitore può essere rimosso per utilizzare il
1530 per il trattamento del terriccio.
Disco spargitore destro e sinistro: i dischi spargitori
[J] ad azionamento idraulico sono dischi rotanti dotati di
palette. Il movimento rotatorio dei dischi serve a
distribuire il terriccio. È possibile regolare l’inclinazione
delle palette sui dischi per variare/correggere la
configurazione di spargimento. È necessario regolare le
palette quando si passa dalla modalità Lightspread a
Heavyspread e viceversa. I dischi spargitori destro e
sinistro ruotano in versi opposti.
10
DESCRIZIONE
[M]
[Q]
[P]
[M]
[L]
[K]
[N]
[O]
[R]
[I]
FIGURA 3
[J]
Radiatore olio idraulico: Il radiatore per l’olio idraulico
[K] è posizionato sul lato sinistro del top dresser. Il
radiatore è di serie nel modello n. 85811 e opzionale nel
modello n. 85812. Il radiatore è dotato di una ventola
elettrica che genera un getto d’aria. La ventola del
radiatore si attiva appena l’impianto idraulico del veicolo
viene collegato al top dresser e continua a funzionare
fino a che la potenza idraulica viene a mancare. La
ventola funziona sempre indipendentemente dalla
posizione dell’interruttore ON/OFF sulla scatola
comandi.
Collegamento per alimentazione elettrica: Il
collegamento per l’alimentazione di elettrica [L] è
progettato per essere collegato al fascio cavi. Il fascio cavi
è parte del kit di montaggio ed è dimensionato per il tipo di
veicolo utilizzato per portare il WideSpin 1530 TM. Il
collegamento elettrico al veicolo avviene sulla batteria del
veicolo. È richiesta una fonte di energia elettrica a 12 volt
CC con negativo a massa per il funzionamento delle
elettrovalvole dell’impianto idraulico del WideSpin 1530
TM e della ventola del radiatore. Un fusibile da 15 AMP è
posizionato in un portafusibile sul collegamento positivo
(+) del fascio cavi.
11
LOCALIZZAZIONE E DESCRIZIONE DELLA
POSTAZIONE OPERATORE NEL WIDESPIN
1530 TM
Postazione dell’operatore: La posizione corretta per
l’operatore del top dresser WideSpin 1530 TM è sul
sedile di guida del veicolo. Prima di lasciare il sedile di
guida l’operatore deve sempre spegnere il motore del
veicolo, innestare e bloccare i freni e scollegare la
potenza idraulica. Non sostare e non permettere a
nessuno di sostare dietro il top dresser WideSpin 1530
TM quando il disco spargitore è in funzione.
AVVERTENZA
PER EVITARE GRAVI LESIONI,
portarsi alla postazione operatore sul veicolo
prima di azionare il gruppo spargitore.
LOCALIZZAZIONE E DESCRIZIONE DEI
COMANDI OPERATORE DEL WIDESPIN 1530 TM
Scatola comandi con interruttori ON/OFF per
gruppo
spargitore
e
nastro
trasportatore: La scatola comandi con
interruttori ON/OFF [M] controlla l’avvio
e l’arresto del nastro trasportatore e del
gruppo spargitore. L’interruttore ha
3 posizioni:
1. Gruppo spargitore ON, nastro
trasportatore ON
2. Gruppo spargitore ON, nastro trasportatore OFF
3. Gruppo spargitore OFF, nastro trasportatore OFF
Portarsi sempre alla postazione operatore prima di
azionare l’interruttore ON/OFF
Tenere sempre la scatola comandi in una posizione
sicura. Appendere la scatola comandi, quando non
utilizzata, sul lato anteriore della tramoggia. Se la
scatola comandi cade il fascio cavi può impigliarsi negli
assali o nelle ruote del veicolo. NON mettere la scatola
comandi nella tramoggia. Se la scatola comandi rimane
impigliata nel nastro trasportatore o nel gruppo
spargitore si possono verificare gravi danni
all’interruttore, al cavo dell’ interruttore, al nastro
trasportatore e al gruppo spargitore.
Controllo idraulico velocità del disco spargitore: Il
controllo idraulico della velocità
[N] permette di variare la velocità
dei dischi spargitori regolando il
flusso idraulico inviato ai motori.
Aumentando o diminuendo la
velocità del disco spargitore non
varia il volume del materiale
sparso, varia solo la larghezza di spargimento. La
velocità può essere impostata su valori da 0 a 4 (i valori
superiori a 4 sono bloccati). Nella modalità
Heavyspread la velocità deve essere impostata a 3 o ad
un valore inferiore, per la modalità Lightspread la
velocità deve essere impostata a 4.
DESCRIZIONE
Leva controllo inclinazione e blocco gruppo
spargitore: [O] È possibile variare l’inclinazione del
gruppo spargitore tramite la leva di controllo
inclinazione. L’ampiezza totale del movimento è di circa
15 gradi. L’angolo di inclinazione può essere aumentato
o diminuito per variare o aggiustare la larghezza di
spargimento senza modificare la velocità del gruppo
spargitore. L’angolo di inclinazione del gruppo può
essere anche variato per correggere la differenza di
altezza fra diversi veicoli di traino. La leva di blocco
blocca in posizione il gruppo spargitore. Durante il
funzionamento in modalità Heavyspread il gruppo
spargitore deve essere regolato in posizione parallela al
suolo.
Piatto deviatore Heavyspread e manopola di blocco
del piatto deviatore: Il piatto deviatore Heavyspread
[P] modifica la configurazione di spargimento durante il
funzionamento in modalità Heavyspread. Il piatto
deviatore deve trovarsi in posizione abbassata e
bloccato in sicurezza con la manopola di blocco. Nella
modalità light il piatto deviatore deve essere bloccato in
posizione rialzata.
Comando velocità nastro trasportatore:
Il comando della velocità [Q]
regola il flusso di olio idraulico
al
motore
del
nastro
trasportatore e regola la
velocità
del
nastro
trasportatore. Dalla velocità del nastro trasportatore
dipende la quantità di terriccio movimentato e
convogliato attraverso lo sportello dosatore. La
variazione della velocità del nastro trasportatore non fa
variare la velocità di funzionamento dei dischi spargitori.
Nel funzionamento in modalità Heavyspread la velocità
del nastro trasportatore si imposta normalmente
effettuando da 1--1/4 a 2--1/2 giri (in senso antiorario)
della manopola a partire dalla posizione completamente
chiusa (in senso orario). Per il funzionamento in
modalità Lightspread girare la manopola di un giro e un
quarto/un giro e mezzo.
Sportello dosatore e leva di regolazione dello
sportello dosatore: lo sportello
dosatore regola la quantità di
terriccio in uscita dalla
tramoggia. Lo sportello
dosatore
è
regolato
manualmente tramite la leva
di regolazione [R]. Le tacche
sul pittogramma sono solo
indicative e non rappresentano una quantità esatta di
terriccio. L’apertura dello sportello dosatore è regolata
in due gamme di valori, Lightspread e Heavyspread.
Estrarre il perno di sicurezza sul lato dello sportello
dosatore per permettere il movimento dello sportello
dosatore e aumentarne l’apertura per la modalità
Heavyspread. Regolare l’apertura dello sportello
dosatore se è necessario variare la quantità di materiale
convogliato al gruppo spargitore.
12
FUNZIONAMENTO
Funzionamento
WARNING
AVVERTENZA
PER EVITARE GRAVI LESIONI
leggere e comprendere l’intero
manuale dell’operatore prima di
mettere in funzione il WideSpin 1530
TM e il veicolo.
AVVERTENZA
Leggere e seguire tutti i pittogrammi di sicurezza
e le avvertenze.
PER EVITARE GRAVI LESIONI,
far funzionare sempre il top dresser WideSpin
1530 TM in sicurezza e indossare gli adeguati
dispositivi di protezione individuale.
PER EVITARE GRAVI LESIONI,
non avvicinare mani, piedi e abbigliamento ai
dischi spargitori rotanti.
PER EVITARE GRAVI LESIONI
non far salire passeggeri sul top dresser
PER EVITARE GRAVI LESIONI
e per evitare danni al veicolo e al top dresser
1530 TM NON far avanzare o funzionare il top
dresser 1530 TM Velocità superiori a 8 km/h
(5 MPH).
La velocità al suolo del veicolo deve essere costante per
assicurare una distribuzione uniforme del terriccio. Il
motore del veicolo deve essere mantenuta ad un regime
costante per assicurare una costante e uniforme
fornitura di potenza idraulica. Scegliere una marcia e
un’impostazione del regolatore di regime che permetta
di non superare la velocità al suolo di 8 km/h (5 MPH).
Se la velocità supera gli 8 km/h (5 MPH), si otterrà
un’applicazione di top dressing non uniforme e di scarsa
qualità e condizioni di esercizio non sicure. Per ottenere
un risultato migliore mettere in movimento il 1530 TM
prima di azionare il gruppo spargitore.
POSTAZIONE OPERATORE DEL WIDESPIN
1530 TM
La posizione corretta per l’operatore del top dresser
WideSpin 1530 TM è sul sedile di guida del veicolo.
Prima di lasciare il sedile di guida l’operatore deve
sempre spegnere il motore del veicolo, azionare i freni e
scollegare la potenza idraulica dal nastro trasportatore
e dal gruppo spargitore. Non sostare dietro al WideSpin
1530 TM quando è in funzione.
MASSIMA INCLINAZIONE DI FUNZIONAMENTO
WIDESPIN 1530 TM
Non far avanzare o funzionare il veicolo e il WideSpin
1530 TM in direzione trasversale su terreni con
pendenza superiore ai 15 gradi. Non far avanzare o
funzionare il veicolo e il WideSpin 1530 TM in salita o
discesa su terreni con pendenza superiore ai 15 gradi.
Non far avanzare o funzionare il veicolo e il WideSpin
1530 TM con tramoggia sovraccarica. La macchina si
potrebbe ribaltare.
AVVERTENZA
AVVERTENZA
PER EVITARE GRAVI LESIONI,
far sempre funzionare il WideSpin 1530 TM dalla
postazione operatore sul sedile di guida del
veicolo.
Prima di lasciare il sedile dell’operatore spegnere
sempre il motore del veicolo, azionare i freni e
scollegare la potenza idraulica dal nastro
trasportatore e dal gruppo spargitore del
WideSpin 1530 TM.
NON permettere a nessuno di sostare dietro al
disco spargitore del 1530 TM quando è in
funzione.
PER EVITARE GRAVI LESIONI
e per evitare danni al veicolo e al top
dresser WideSpin 1530 TM NON operare su
terreni con pendenza superiore a 15 gradi.
NON
AVVICINARSI AI
DISCHI IN
FUNZIONE
VELOCITÀ DI ESERCIZIO DEL WIDESPIN 1530 TM
Quando il top dresser 1530 TM è montato sul veicolo la
massima velocità al suolo del veicolo non deve
superare gli 8 km/h (5 MPH). Velocità superiori a 8
km/h (5 MPH) mettono a rischio la sicurezza e causano
una sollecitazione eccessiva del veicolo e del top
dresser.
CARICO DELLA TRAMOGGIA
La capacità massima della tramoggia è di 0,54 metri
cubi (19 piedi cubi). Il carico massimo consentito nella
tramoggia è di 816,5 kg (1800 libbre). Non
sovraccaricare o riempire eccessivamente la
tramoggia. Il sovraccarico può costituire un rischio per la
sicurezza e causare una sollecitazione eccessiva dei
componenti del veicolo e del top dresser. Un carico
eccessivo potrebbe far affondare le ruote del veicolo nel
manto erboso lasciandovi tracce e solchi. Non
apportare mai modifiche alla tramoggia perché possa
contenere una maggiore quantità di terriccio. Non
aggiungere pannelli laterali alla tramoggia. Il
sovraccarico della tramoggia rende la parte superiore
troppo pesante causando uno sbilanciamento del top
dresser e aumenta il rischio di ribaltamento del veicolo e
del top dresser su un terreno eccessivamente inclinato.
Per caricare la tramoggia si può utilizzare una piccola
pala caricatrice, tuttavia è importante non versare il
carico nella tramoggia da un’altezza eccessiva.
Caricare la tramoggia lentamente per evitare danni alla
tramoggia e al nastro trasportatore.
13
VERIFICHE PRIMA DELLA MESSA IN FUNZIONE
D Verificare la temperatura. Consultare il manuale
dell’operatore del veicolo per stabilire se la
temperatura è troppo bassa o troppo elevata per il
funzionamento del circuito idraulico del veicolo.
Verificare se il circuito idraulico del veicolo
necessita di una fase di riscaldamento prima di
mettere in funzione il WideSpin 1530 TM.
D Verificare il livello dell’olio idraulico nel serbatoio
del veicolo. Rabboccare se necessario.
D Verificare il livello dell’olio del motore del veicolo.
Rabboccare se necessario.
D Verificare i collegamenti idraulici tra il top dresser
e il veicolo. I collegamenti devono essere eseguiti
in modo appropriato e sicuro. Consultare il
manuale del kit di montaggio per ulteriori
informazioni.
D Verificare per rilevare danni, parti usurate o parti
mancanti. Non utilizzare il WideSpin 1530 TM se i
suoi componenti risultano danneggiati o difettosi.
Far eseguire tutti le riparazioni necessarie al
personale incaricato della manutenzione.
D Verificare con un controllo visivo la presenza di
eventuali perdite.
PERICOLO
PER EVITARE GRAVI LESIONI
non utilizzare le dita o le mani per
verificare la presenza di eventuali
perdite. Perdite ad alta pressione
possono causare lesioni alla pelle o far
penetrare olio nel corpo. Ciò può
provocare gravi lesioni o la morte.
INDOSSARE OCCHIALI DI
PROTEZIONE
D Verificare che la scatola comandi con interruttore
ON/OFF sia riposta in modo sicuro nella
postazione dell’operatore. NON mettere la scatola
comandi nella tramoggia.
INTERRUTTORE A
SINISTRA
FUNZIONAMENTO
D Verificare che l’interruttore ON/OFF sulla scatola
comandi sia posizionato su OFF ( O ) sia per il
nastro trasportatore che per il gruppo spargitore.
D Verificare che il fascio cavi di alimentazione sia
collegato al 1530 TM e sia collegato correttamente
alla batteria del veicolo.
D Verificare tutte le protezioni e i deflettori siano
correttamente posizionati.
D Verificare tutte i fissaggi sulle staffe di montaggio.
Tutti i fissaggi devono essere serrati, le spine di
sicurezza devono essere inserite in modo sicuro.
D Verificare con un controllo visivo l’interno della
tramoggia del 1530 TM per accertarsi che non vi
siano attrezzi, pale, rocce o detriti rimasti dopo il
precedente utilizzo. La tramoggia deve essere vuota.
INTERRUTTORE
ON/OFF
DEL
DISCO
SPARGITORE E DEL NASTRO TRASPORTATORE
(v. figura 4)
L’interruttore comanda l’attivazione
del nastro trasportatore e del gruppo
spargitore. Vedere la figura 4 per le
posizioni dell’interruttore. Prima di
avviare il motore, posizionare
l’interruttore su OFF ( O ) sia per il
nastro trasportatore che per il disco
spargitore. Se gli interruttori sono
nella posizione ON ( I ) il nastro e
idischi spargitori cominceranno a
funzionare non appena vengono
avviati il motore e l’impianto idraulico.
L’avvio e l’arresto avvengono non appena l’interruttore
viene posizionato su ON ( I ), non sono previsti ritardi di
intervento. Il funzionamento dell’interruttore è lo stesso
sia in modalità Lightspread che Heavyspread.
Durante il funzionamento tenere la scatola comandi alla
postazione dell’operatore a bordo del veicolo.
Appendere la scatola comandi, quando non utilizzata,
sulla parte superiore della tramoggia. NON mettere la
scatola comandi nella tramoggia!! Si possono verificare
dei danni se la scatola comandi rimane impigliata nei
dischi spargitori.
INTERRUTTORE AL CENTRO
Gr. spargitore OFF
Gr. spargitore ON
Gr. spargitore ON
Nastro OFF
Nastro OFF
Nastro ON
INTERRUTTORE
A DESTRA
INTERRUTTORE ON/OFF GRUPPO SPARGITORE E NASTRO TRASPORTATORE
FIGURA 4
FUNZIONAMENTO
IMPOSTAZIONE DEL
FUNZIONAMENTO IN
MODALITÀ LIGHTSPREAD O HEAVYSPREAD
(v. figure 5, 6 e 7)
Per il passaggio dalla modalità Lightspread a
Heavyspread è necessario modificare la velocità dei
dischi spargitori, l’apertura dello sportello dosatore, la
posizione del piatto deviatore, l’inclinazione delle
palette dei dischi spargitori e la velocità del nastro
trasportatore.
WARNING
AVVERTENZA
PER EVITARE GRAVI LESIONI,
scollegare sempre la potenza idraulica e
spegnere il motore del veicolo prima di effettuare
qualsiasi regolazione Lightspread/Heavyspread.
Regolazione dello sportello dosatore del
WIDESPIN 1530 TM
L’apertura dello sportello
dosatore è regolata in due
gamme di valori, Lightspread
e Heavyspread. Estrarre il
perno di sicurezza sul lato
dello sportello dosatore per
permettere il movimento dello
sportello
dosatore
e
aumentarne l’apertura per la
modalità Heavyspread.
Utilizzare le impostazioni seguenti per il funzionamento
in modalità Lightspread e Heavyspread:
LIGHTSPREAD -- Impostare lo sportello dosatore
nelle posizioni dalla “A“ alla “D“.
HEAVYSPREAD -- Estrarre il perno di sicurezza
dello sportello dosatore e
impostarlo nelle posizioni dalla
“E“ alla “H“.
Le tacche sul pittogramma sono solo indicative e non
rappresentano una quantità esatta di terriccio.
Il contenuto di umidità e il del peso del terriccio sono
variabili che influenzano lo scorrimento del materiale
attraverso lo sportello dosatore: per questo può essere
necessario variare le impostazioni per mantenere
uniforme la quantità e la configurazione di spaglio del
materiale.
Regolare l’apertura dello sportello dosatore se è
necessario variare la quantità di materiale convogliato
al gruppo spargitore. Per aumentare il volume di
terriccio scaricato, si ottengono migliori risultati
aumentando l’apertura dello sportello dosatore anziché
aumentando la velocità del nastro trasportatore. Per
diminuire il volume di terriccio scaricato, si ottengono
migliori risultati diminuendo l’apertura dello sportello
dosatore anziché diminuendo la velocità del nastro
trasportatore.
14
Impostazione della velocità del disco
spargitore del WIDESPIN 1530 TM:
Il controllo idraulico della
velocità varia la velocità dei
dischi spargitori. Aumentando la velocità si fa aumentare
la larghezza di spargimento,
diminuendo la velocità la
larghezza di spargimento
diminuisce. La variazione
della velocità non influenza il volume di terriccio
scaricato, tuttavia varierà lo spessore dello strato
depositato. Effettuare le impostazioni seguenti per il
funzionamento in modalità Lightspread e Heavyspread:
LIGHTSPREAD -- Impostare e bloccare il comando
della velocità del gruppo
spargitore su “4“.
HEAVYSPREAD -- Impostare e bloccare il
comando della velocità del
gruppo spargitore su “3“ o un
valore inferiore.
Nella modalità Heavyspread la velocità deve essere
impostata a 3 o ad un valore inferiore. Non superare il
valore 3 nella modalità Heavyspread, limitarsi ad
aggiustare la velocità a valori inferiori a 3 e a regolare la
velocità del nastro trasportatore e l’apertura dello
sportello dosatore.
Il contenuto di umidità e le caratteristiche del terriccio
sono variabili di cui tenere conto nell’impostazione della
velocità. Impostare una velocità inferiore per terriccio
asciutto che scorre più facilmente. Aumentare la
velocità per tipi di terriccio più pesanti o per aumentare
la larghezza di spargimento. Aumentando la velocità il
terriccio verrà sparso su un’area più ampia. Effettuare
delle prove per determinare le impostazioni ottimali. Il
comando della velocità del disco spargitore non fa
variare la velocità del nastro trasportatore.
Regolazione del piatto deviatore
HEAVYSPREAD (v. figure 5 e 6)
Il piatto deviatore Heavyspread modifica la
configurazione di spargimento durante il funzionamento
in modalità Heavyspread. Nella modalità Heavyspread
il piatto deviatore deve trovarsi in posizione abbassata
ed essere bloccato in sicurezza con la manopola di
blocco. Nella modalità light il piatto deviatore deve
essere bloccato in posizione rialzata.
MANOPOLA DI BLOCCO
LIGHT
HEAVY
ALTO PER
LIGHTSPREAD
FIGURA 5
PIATTO
BASSO PER
DEVIATORE HEAVYSPREAD
15
FUNZIONAMENTO
LIGHTSPREADt
HEAVYSPREADt
WARNING
AVVERTENZA
PER EVITARE GRAVI LESIONI,
spegnere sempre il motore del veicolo prima di effettuare
qualsiasi regolazione Lightspread o Heavyspread.
LIGHTSPREADt
LIGHTSPREADt
REGOLARE LO SPORTELLO
DOSATORE SUI VALORI
“LIGHTSPREAD”
4
HEAVYSPREADt
HEAVYSPREADt
ESTRARRE IL PERNO DI SICUREZZA DELLO SPORTELLO
DOSATORE. REGOLARE LO
SPORTELLO DOSATORE SUI
VALORI “HEAVYSPREAD“.
IMPOSTARE LA VELOCITÀ
DEL GRUPPO
SPARGITORE SU 3.
ABBASSARE E BLOCCARE
IL PIATTO DEVIATORE.
REGOLARE TUTTE LE PALETTE DEI DISCHI SPARGITORI. IMPOSTARE LE
PALETTE DEL DISCO ALLA
MINIMA INCLINAZIONE
(ESTERNO DELLA
FESSURA)
APRIRE LA MANOPOLA
DELLA VELOCITÀ DEL
NASTRO DI 1,25 / 2,5 GIRI
<3
IMPOSTARE LA VELOCITÀ DEL
GRUPPO SPARGITORE SU 4.
SOLLEVARE IL PIATTO
DEVIATORE
REGOLARE TUTTE LE PALETTE DEI DISCHI SPARGITORI.
IMPOSTARE LE PALETTE DEL
DISCO ALLA MASSIMA
INCLINAZIONE (INTERNO
DELLA FESSURA)
APRIRE LA MANOPOLA
DELLA VELOCITÀ DEL
NASTRO DI 1;25 / 1;5 GIRI
O PIÙ
1.25 TO 1.5X
1.25 TO 2.5X
LIGHT
SINISTRO
HEAVY
DESTRO
SINISTRO
DISCHI SPARGITORI -- VISTA DALL’ALTO
DESTRO
FIGURA 6
16
FUNZIONAMENTO
Regolazione palette disco spargitore
(v. figure 6 e 7)
La variazione dell’inclinazione delle palette è
necessaria nel passare dalla modalità Lightspread a
Heavyspread e viceversa.
Il contenuto di umidità e le caratteristiche del terriccio
sono variabili che possono richiedere ulteriori
aggiustamenti della velocità.
La variazione della velocità del nastro trasportatore non
fa variare la velocità dei dischi spargitori.
WARNING
AVVERTENZA
OPERAZIONE DI TOP DRESSING
La velocità di avanzamento è un fattore importante
nell’operazione di top dressing. I risultati migliori si
ottengono con una velocità moderata e costante.
Variando la velocità al suolo si otterrà uno spessore del
terriccio e una configurazione di spargimento irregolare
e non uniforme. Durante le operazioni di top dressing la
velocità al suolo non deve superare gli 8 km/h (5 MPH).
Con velocità superiori a 8 km/h (5 MPH) si ottengono
configurazioni di spargimento indesiderate e una
sollecitazione eccessiva del veicolo. La massima
velocità di avanzamento a vuoto non deve superare gli
8 km/h (5 MPH).
PER EVITARE GRAVI LESIONI,
spegnere sempre il motore prima di effettuare
qualsiasi regolazione delle palette del disco
spargitore.
LIGHTSPREAD -- Regolare le palette del disco alla
massima inclinazione (estremità
interna della fessura).
HEAVYSPREAD -- Regolare le palette del disco
alla minima inclinazione (estremità
esterna della fessura).
VITE DI FISSAGGIO INTERNA
PALETTA
FESSURA
(IN POSIZIONE
LIGHTSPREAD)
ANGOLO
DI
INCLINAZIONE
FIGURA 7
Per regolare l’inclinazione allentare la vite di fissaggio
interna su ogni paletta (non è necessario allentare le viti
esterne), far scorrere la paletta fino all’estremità
opposta della fessura presente sulla paletta e fissare
nuovamente la vite. NOTA: Poiché i dischi spargitori
destro e sinistro ruotano in versi opposti, le palette di
destra e di sinistra sono posizionate in modo speculare.
Vedere la figura 6 per individuare la posizione e la
direzione di regolazione di ciascuna paletta.
Impostazione della velocità del nastro
trasportatore del WIDESPIN 1530
Ruotando la manopola della
velocità in senso antiorario si
aumenta la velocità del
nastro -- ruotando in senso
orario la velocità diminuisce.
Utilizzare le impostazioni seguenti per il funzionamento
in modalità Lightspread o Heavyspread. Partire dalla
posizione della manopola completamente chiusa
(in senso orario).
LIGHTSPREAD -- Aprire la manopola della velocità
di un giro e un quarto/un giro e mezzo.
HEAVYSPREAD -- Aprire la manopola della
velocità di un giro e un quarto/due giri
e mezzo.
WARNING
AVVERTENZA
PER EVITARE GRAVI LESIONI
e per evitare danni al veicolo e al top dresser
1530 TM non far avanzare o funzionare il top
dresser 1530 TM a velocità superiori a
8 km/h (5 MPH).
Avviare e arrestare l’operazione di top dressing tramite
l’interruttore ON/OFF sulla scatola comandi. Il top dresser
deve essere in movimento prima di posizionare
l’interruttore su ON ( I ). Posizionare l’interruttore su OFF
( O ) prima di arrestare il movimento del top dresser.
Per un risultato migliore effettuare il top dressing lungo
linee diritte. Una curva graduale può essere eseguita
senza difficoltà e senza inficiare il risultato del top
dressing. Una curva troppo stretta causa la
distribuzione irregolare del terriccio. Una curva stretta
farà depositare più terriccio all’interno della curva e
meno sul lato esterno.
Per fare una curva stretta interrompendo il top dressing,
affrontare la curva molto lentamente. Affrontare una
curva troppo rapidamente aumenta la possibilità di
danneggiare il manto erboso con le ruote del veicolo che
potrebbero spellare o incidere il manto erboso. Se il
manto erboso è molto soffice le ruote potrebbero
sprofondare nel terreno e lasciare una traccia.
WARNING
AVVERTENZA
PER EVITARE GRAVI LESIONI
e per evitare danni al veicolo e al top dresser
1530 TM non far avanzare o funzionare il top
dresser 1530 TM a velocità superiori a 8 km/h
(5 MPH).
Non far funzionare il top dresser su terreni con pendenza
superiore ai 15 gradi. Non far funzionare il top dresser in
salita e discesa su terreni con pendenza superiore ai
15 gradi. Non far funzionare il top dresser con la tramoggia
sovraccarica. La macchina si potrebbe ribaltare.
17
WARNING
ATTENZIONE
Per evitare danni al top dresser 1530 TM non
mettere la scatola comandi ON/OFF all’interno
della tramoggia
Non mettere la scatola comandi ON/OFF nella
tramoggia. Se la scatola comandi rimane impigliata nel
nastro trasportatore o nei dischi spargitori si possono
verificare gravi danni alla scatola comandi, al nastro
trasportatore e al gruppo spargitore.
NON
AVVICINARSI
AI DISCHI IN
FUNZIONE
NON permettere a nessuno di sostare dietro al
gruppo spargitore del 1530 quando è in funzione.
FUNZIONAMENTO
SPEGNIMENTO DEL TOP DRESSER WIDESPIN
1530 TM
Terminata l’operazione, scollegare la potenza idraulica
dal nastro trasportatore e dal gruppo spargitore. Per non
scaricare la batteria del veicolo l’interruttore sulla
scatola comandi deve essere posizionato su “OFF“
( O ). Dopo lo spegnimento verificare che:
D la tramoggia sia vuota.
D il comando della potenza idraulica del veicolo sia
posizionato su OFF.
D l’interruttore ON/OFF sulla scatola comandi sia
posizionato su OFF ( O ) sia per il nastro
trasportatore che per il gruppo spargitore. La scatola
comandi deve essere appesa sul pannello laterale
della tramoggia.
D i freni del veicolo siano innestati. Bloccare le ruote
per evitare movimenti indesiderati.
D Scollegare il fascio cavi di alimentazione elettrica dal
veicolo.
Per rimuovere il WideSpin 1530 TM dal veicolo
consultare il manuale del kit di montaggio.
LIVELLO OPERATORE
18
Ispezioni quotidiane a cura dell’operatore
AVVERTENZA
PER EVITARE GRAVI LESIONI
Non tentare di effettuare
ispezioni, regolazioni o interventi
di manutenzione mentre un
componente del top dresser o del
gruppo spargitore è in funzione.
Risoluzione problemi
PROBLEMA
POSSIBILE CAUSA
Cattivi
risultati di
spargimento
I giri del motore del veicolo sono troppo bassi
per fornire adeguata potenza idraulica al top
dresser. Il regolatore di regime del veicolo è
impostato ad un livello troppo basso per fornire
adeguata potenza idraulica al top dresser.
Impostazione della velocità del gruppo
spargitore non corretta. Consultare la sezione
”Funzionamento” in questo manuale.
Operare in sicurezza e indossare gli opportuni
dispositivi di protezione quando si effettuano
ispezioni, regolazioni o interventi di
manutenzione sul Top Dresser Wide Spin
1530 TM.
Rispettare le avvertenze sulla sicurezza e le
indicazioni dei pittogrammi.
Prima e dopo ciascun utilizzo è necessario:
D Verificare che le protezioni del WideSpin 1530 TM
e del gruppo spargitore non siano mancanti o
usurate. Non far funzionare alcuna macchina con
parti mancanti o danneggiate.
D Ispezionare l’intero WideSpin 1530 TM e gruppo
spargitore per verificare la presenza di parti
danneggiate o non funzionanti. Non far funzionare
alcuna macchina con parti danneggiate o non
funzionanti. Verificare che in tutta la macchina
raccordi e fissaggi non siano allentati. Serrare se
necessario.
D Verificare che tutti i comandi dell’operatore sul
WideSpin 1530 TM funzionino correttamente.
D Ispezionare i dischi del gruppo spargitore.
Verificare il corretto allineamento ed eventuali
danni, parti danneggiate, usurate o mancanti.
D Verificare l’eventuale accumulo di terriccio sui
componenti del gruppo spargitore. Verificare
l’eventuale accumulo di terriccio sopra e sotto i
dischi del disco spargitore. Verificare l’eventuale
presenza di detriti nei dischi spargitori.
D Verificare la presenza di eventuali accumuli di
terriccio sui componenti al di sotto del deflettore
posteriore del WideSpin 1530 TM, sulla bavetta
inferiore di protezione dallo sporco, sulla
tramoggia e sul nastro trasportatore.
D Verificare la centratura e l’allineamento del nastro
trasportatore. Se è necessario effettuare una
regolazione, rivolgersi al personale incaricato
della manutenzione. Verificare frequentemente la
centratura
e
l’allineamento
del
nastro
trasportatore durante il funzionamento.
D Controllare il livello dell’olio idraulico nel serbatoio
del veicolo. Rabboccare se necessario.
D Eseguire un controllo visivo per accertare
eventuali perdite. NON VERIFICARE MAI
EVENTUALI PERDITE CON LE MANI!!
D Rispettare gli intervalli quotidiani di ingrassaggio
previsti per il WideSpin 1530 TM.
D Esaminare con un controllo visivo l’interno della
tramoggia per verificare che non vi siano attrezzi,
pale, rastrelli, rocce o detriti rimasti dopo il
precedente utilizzo.
Impostazione della velocità del nastro
trasportatore non corretta. Consultare la
sezione ”Funzionamento” in questo manuale.
Regolazione non corretta dello sportello
dosatore. Consultare la sezione
”Funzionamento” in questo manuale.
Terriccio troppo umido.
Inclinazione delle palette non corretta per il tipo
o l’umidità del terriccio. Rivolgersi al personale
incaricato della manutenzione.
Il piatto deviatore non è nella posizione
corretta. Consultare la sezione
”Funzionamento” in questo manuale.
Materiale non filtrato nella tramoggia. Sportello
dosatore bloccato da detriti o rocce.
Presenza di materiale non filtrato nel deflettore
del gruppo spargitore. Detriti o rocce bloccano i
dischi spargitori.
Accumulo di terriccio sui dischi spargitori o sui
componenti del 1530.
Dischi spargitori o componenti del gruppo
spargitore danneggiati. Rivolgersi al personale
incaricato della manutenzione.
Mancato
funzionamento
gruppo
spargitore o
nastro
trasportatore
Manca alimentazione elettrica dal veicolo per il
funzionamento dell’interruttore ON/OFF o dei
solenoidi dell’impianto idraulico. Controllare tutti
i collegamenti e le masse.
Controllare il fusibile nel cavo di alimentazione.
Velocità del gruppo spargitore troppo bassa.
I giri del motore del veicolo sono troppo bassi
per fornire adeguata potenza idraulica al top
dresser. Il regolatore di regime del veicolo è
impostato ad un livello troppo basso per fornire
adeguata potenza idraulica al top dresser.
Impostazione non corretta del selettore del
flusso idraulico del veicolo.
I tubi idraulici del gruppo spargitore e i raccordi
ad innesto rapido non sono correttamente
collegati al gruppo spargitore o al gruppo
valvole del WideSpin 1530.
Velocità del nastro trasportatore troppo bassa
per al peso del terriccio.
Componenti difettosi nel gruppo valvole.
Rivolgersi al personale incaricato della
manutenzione.
Motori idraulici del gruppo spargitore difettosi.
Rivolgersi al personale incaricato della
manutenzione.
19
LIVELLO MANUTENZIONE
Stoccaggio
PRIMA DELLO STOCCAGGIO DEL WIDESPIN 1530
TM PER UN PERIODO PROLUNGATO eseguire
un’ispezione completa. Far eseguire tutti gli interventi di
manutenzione e riparazione necessari al personale
incaricato della manutenzione. Pulire la tramoggia,
entrambi i lati del nastro trasportatore e pulire
completamente il gruppo spargitore. Per la pulizia del top
dresser utilizzare solo acqua a bassa pressione, NON
utilizzare acqua ad alta pressione. Applicare un sottile
strato di olio sui dischi spargitori per proteggerli dalla
ruggine. Allentare la tensione del nastro trasportatore.
Proteggere il nastro trasportatore e le parti in plastica e
gomma del WideSpin 1530 TM dalla luce solare diretta.
PRIMA DI RIMETTERE IN SERVIZIO LA MACCHINA
DOPO UN PERIODO PROLUNGATO DI INATTIVITÀ,
ispezionare l’intera macchina per rilevare eventuali
danni verificatisi durante lo stoccaggio. Far eseguire tutti
gli interventi necessari al personale incaricato della
manutenzione.
Ripristinare la tensione del nastro trasportatore. Far
eseguire la regolazione al personale incaricato della
manutenzione.
Eseguire una procedura completa di lubrificazione. Far
eseguire tutti gli interventi di manutenzione e riparazione
necessari al personale incaricato della manutenzione.
Regolazioni e manutenzione a cura dell’operatore
AVVERTENZA
PER EVITARE GRAVI LESIONI
Non tentare di eseguire regolazioni,
ispezioni o interventi di manutenzione
quando il WideSpin 1530 TM è in funzione.
Fare attenzione all’elevata temperatura dell’olio.
Rischio di gravi ustioni e lesioni.
Assicurare in modo adeguato il WideSpin 1530 TM
prima di eseguire regolazioni, ispezioni o interventi di
manutenzione.
Le regolazioni e la manutenzione a cura
dell’operatore si limitano a:
D Pulizia
D Ispezione
D Stoccaggio
Far eseguire tutte gli altri interventi di
manutenzione, regolazione o riparazione al
personale qualificato incaricato della
manutenzione.
OLIO IDRAULICO
L’olio idraulico nel WideSpin 1530 TM proviene dal
veicolo. Prima di riempire l’impianto idraulico del veicolo
verificare il tipo di olio da utilizzare (a base vegetale o
minerale).
PULIZIA
Rimuovere con lavaggio il terriccio in eccesso rimasto
sul nastro trasportatore, nella tramoggia e nel gruppo
spargitore. Rimuovere con lavaggio il terriccio in
eccesso rimasto sui componenti della parte inferiore del
top dresser, in particolare la superficie interna del nastro
trasportatore e dei rulli. Per la pulizia del top dresser
utilizzare solo acqua a bassa pressione.
Dopo un uso prolungato si può verificare un accumulo di
terriccio sui dischi spargitori, che può causare vibrazioni
eccessive o cattivi risultati di spargimento. Durante il
funzionamento ispezionare periodicamente e rimuovere
gli accumuli di terriccio dai dischi spargitori, dai deflettori
del gruppo spargitore, dalle protezioni di sicurezza e anti
sporco.
ISPEZIONI
Dopo la pulizia del WideSpin 1530 TM verificare la
presenza di eventuali danni. Verificare che i componenti
non siano allentati o mancanti. Esaminare i dischi
spargitori per verificare che le palette non siano allentate
o mancanti. Eseguire un controllo visivo per accertare
eventuali perdite nei motori, nei tubi e nei raccordi
idraulici. Far eseguire tutte le riparazioni necessarie al
personale incaricato della manutenzione.
WARNING
PERICOLO
PER EVITARE GRAVI LESIONI
Non utilizzare le dita o le mani per
verificare la presenza di eventuali
perdite. Perdite ad alta pressione
possono causare lesioni alla pelle o
far penetrare olio nel corpo. Ciò può
provocare gravi lesioni o la morte.
INDOSSARE OCCHIALI DI
PROTEZIONE!!
CODICI EUROPEI SMALTIMENTO LUBRIFICANTI,
COMBUSTIBILI E COMPONENTI
Olio motore . . . . . . . . . . 54112
Olio ingranaggi . . . . . . . 54112
Grasso . . . . . . . . . . . . . . 54202
Componenti plastici . . . 57127
20
PITTOGRAMMI
Pittogrammi
NON
AVVICINARSI AI
DISCHI IN
FUNZIONE
A.
USA
CE
B.
USA
CE
WARNING
HIGH PRESSURE FLUID HAZARD
TO AVOID SERIOUS INJURY,
DO NOT USE HANDS TO CHECK
FOR HYDRAULIC LEAKS.
WEAR EYE PROTECTION.
C.
USA
CE
USA E CE
D.
415 mm
(16.3”)
0.54 Cubic Meter -- 816.5 Kg
(19 Cubic Feet -- 1,800 lbs)
15˚ MAX.
USA E CE
E.
USA E CE
F.
USA E CE
G.
21
PITTOGRAMMI
Pittogrammi
WIDESPIN 1530 TM
Truck Mounted Broadcast Top Dresser
8 Km/h
(5 MPH)
USA E CE
Product Number 85811
US Patent 6,149,079
and 6,508,419
Additional Patents Pending
LpA 84.7 dBA
LwA 100.9 dBA
USA E CE
J.
299 Kg (660 lbs)
USA E CE
H.
I.
SP-1530 TM
Lifting Brace
Part No. 662250
LIGHTSPREADt
TURFCO MFG INC
Minneapolis, MN. 55449
HEAVYSPREADt
<3 3
4
USA
USA E CE
K.
L.
USA E CE
M.
1.25X TO 1.5X
1.25X TO 2.5X
USA E CE
P.
USA E CE
N.
A.
USA E CE
O.
AVVERTENZA DISCO SPARGITORE “NON AVVICINARSI“ -LANCIO DI OGGETTI/NON SOSTARE ACCANTO AL DISCO IN FUNZIONE
B. AVVERTENZA DISCO SPARGITORE “NON AVVICINARE MANI E PIEDI“
C. AVVERTENZA RISCHIO OLIO AD ALTA PRESSIONE
D. BARICENTRO
E. AVVERTENZA MASSIMA INCLINAZIONE
F. AVVERTENZA CAPACITÀ MASSIMA TRAMOGGIA E CARICO MASSIMO
G. AVVERTENZA CALORE ELEVATO
H. ISTRUZIONE LEGGERE IL MANUALE
I. SPECIFICHE CE WIDESPIN 1530 TM
J. POSIZIONE SPORTELLO DOSATORE LIGHTSPREAD/HEAVYSPREAD
K. IDENTIFICAZIONE PARTE (BARRA DI SOLLEVAMENTO)
L. COMANDO VELOCITÀ DEL NASTRO TRASPORTATORE
M. SCATOLA DI COMANDO ON/OFF
N. PITTOGRAMMA POSIZIONAMENTO TUBO IDRAULICO GRUPPO SPARGITORE
O. COMANDO VELOCITÀ DISCHI SPARGITORI
P. ISTRUZIONE LIGHTSPREAD/HEAVYSPREAD
22
LIVELLO MANUTENZIONE
Livello manutenzione
WARNING
AVVERTENZA
GLI INTERVENTI DI MANUTENZIONE E
LE PROCEDURE DI REGOLAZIONE DESCRITTE DI SEGUITO SONO DESTINATI ESCLUSIVAMENTE AL PERSONALE
ADDETTO ALLA MANUTENZIONE.
PER EVITARE GRAVI LESIONI, non tentare di
eseguire interventi di manutenzione quando il
top dresser WideSpin 1530 TM è in funzione.
PER EVITARE GRAVI LESIONI,
rispettare sempre le avvertenze sulla sicurezza.
Operare in sicurezza e indossare gli opportuni
dispositivi di protezione quando si effettuano
interventi di manutenzione sul Top Dresser Wide
Spin 1530 TM.
Assicurare in modo adeguato il WideSpin 1530
TM prima di eseguire regolazioni, ingrassaggi o
interventi di manutenzione.
LUBRIFICAZIONE
Tutti i cuscinetti del Top Dresser WideSpin 1530 TM
sono sigillati e non richiedono ulteriore lubrificazione.
Ispezionare periodicamente i cuscinetti sul rullo
anteriore e posteriore del nastro trasportatore e sui
dischi spargitori per individuare usura, danni, o
accumulo di sporco o detriti. Pulire se necessario. Gli
snodi del gruppo spargitore devono essere
periodicamente puliti, ispezionati per rilevarne lo stato di
usura ed eventuali danni e ricoperti di uno strato sottile di
olio lubrificante per proteggerli dalla ruggine e
dall’umidità.
SPORTELLO DI ISPEZIONE
Rimuovendo lo sportello di ispezione si può ispezionare
la superficie interna del nastro trasportatore. Lo sportello
di ispezione si trova sul lato destro del telaio. L’utilizzo
dello sportello di ispezione può essere utile anche per la
pulizia della parte superiore della protezione antisporco.
MANUTENZIONE NASTRO TRASPORTATORE
Il nastro trasportatore è un nastro composito in PVC con
un filo di giunzione. Controllare lo stato della superficie
del nastro, verificare la presenza di eventuali segni di
usura, tagli e graffi profondi. Controllare il filo di
giunzione che deve essere in buono stato. Il filo non si
deve impigliare nelle guarnizioni della tramoggia o nello
sportello dosatore. Può essere necessario sostituire il
nastro trasportatore se esso è usurato, se è stato
danneggiato o se non mantiene il corretto allineamento e
regolazione.
È possibile che il terriccio passi attraverso il filo di
giunzione e si accumuli all’interno del nastro
trasportatore, sulla bavetta e sui rulli. Ispezionare le
superfici interne del nastro trasportatore ed
eventualmente rimuovere gli accumuli di terriccio.
Per prolungare la durata del nastro trasportatore lo
stoccaggio del WideSpin 1530 TM deve avvenire con
tramoggia vuota e nastro trasportatore pulito e al riparo
dalla luce solare diretta.
RASCHIATORE DEL NASTRO TRASPORTATORE
Il raschiatore dovrebbe sfregare leggermente contro il
nastro. Verificare che non si sia accumulato terriccio
all’interno e intorno alle molle. Se il raschiatore in
materiale plastico del nastro trasportatore è usurato e
non tocca più il nastro, la lama di plastica può essere
rimossa, rovesciata e riposizionata per ripristinare il
contatto con il nastro.
REGOLAZIONE DELLA TENSIONE DEL NASTRO
TRASPORTATORE (v. figura 8)
La tensione del nastro trasportatore deve essere
adeguata per garantire che il nastro si muova alla stessa
velocità del rullo di traino posteriore. Dopo un uso
prolungato si può verificare un accumulo di terriccio sul
rullo anteriore e posteriore che aumenta la tensione del
nastro o causa problemi di centratura. Pulire i rulli prima
di regolare la tensione del nastro.
Per regolare la tensione del nastro serrare o allentare i
tensionatori del nastro trasportatore. I tensionatori si
trovano su entrambi i lati del telaio sulla parte anteriore
della tramoggia.
Prima di registrare la tensione del nastro trasportatore o
regolare la centratura è importante:
D Verificare che non si sia accumulato terriccio sul lato
interno del nastro
D Verificare che non si sia accumulato terriccio sulla
superficie del rullo di rinvio e del rullo di traino.
D Verificare che i cuscinetti del rullo di rinvio e del rullo di
traino non siano danneggiati, usurati o laschi.
D Verificare che i tensionatori del nastro trasportatore
non siano rotti o danneggiati.
La regolazione iniziale è misurata all’estremità delle viti
dei tensionatori. La regolazione iniziale deve essere di
25 mm (1” pollici).
25 mm (1” POLLICI)
FIGURA 8
Se lo slittamento del nastro persiste anche con il carico,
serrare le viti tensionatrici in egual misura di mezzo giro
alla volta fino ad eliminare lo scivolamento. Se il nastro
23
continua a non funzionare correttamente, riportare le viti
al serraggio iniziale di 25 mm (1” pollici) e verificare la
presenza di altri problemi.
ALLINEAMENTO E CENTRATURA DEL NASTRO
TRASPORTATORE (v. figura 9)
Se si verificano problemi di centratura o allineamento
verificare prima di tutto se i tensionatori sono serrati in
egual misura. Verificare che non si sia accumulato
terriccio sotto il nastro o sui rulli.
È molto importante verificare frequentemente il corretto
allineamento del WideSpin 1530 TM nelle prime
10--15 ore di funzionamento. Tutti i nastri trasportatori
necessitano di una fase di rodaggio per raggiungere la
corretta centratura del nastro. Durante la fase di
rodaggio è normale che si verifichino dei movimenti
irregolari. Dopo la fase di rodaggio sono necessarie solo
le normali ispezioni e registrazioni.
È necessario ispezionare il gruppo del nastro
trasportatore per verificare che la lama del raschiatore
eserciti una pressione uniforme su tutto il nastro.
Passo 1. Impostare le viti dei tensionatori in modo tale
che siano visibili circa 25 mm (1”) di filettatura dopo il
dado. Avviare la macchina a tramoggia vuota. Se la
centratura del nastro non è corretta, regolare uno dei
tensionatori di un quarto (1/4) di giro fino a che il
nastro si centra. È molto importante dare al nastro il
tempo (almeno 10 giri) per assestarsi nella nuova
posizione prima di procedere ad una nuova
regolazione. Quando il nastro trasportatore è
correttamente centrato, continuare a farlo funzionare
(a tramoggia vuota) per quindici minuti.
SE IL NASTRO
TRASPORTATORE
SBANDA
VERSO QUESTO
LATO, SERRARE
QUESTO
TENSIONATORE
O ALLENTARE IL
TENSIONATORE
SUL LATO
OPPOSTO
VISTA DALL’ALTO
(SENZA TRAMOGGIA)
LIVELLO MANUTENZIONE
Passo 2. Caricare completamente di terriccio la
tramoggia del WideSpin 1530 e azionare il nastro
trasportatore. È normale notare un leggero
sbandamento del nastro trasportatore durante il
carico. Controllare la centratura ed effettuare lievi
registrazioni se necessario. Entrambe le estremità
del rullo posteriore devono essere visibili quando il
nastro ruota correttamente. È molto importante dare
al nastro il tempo (almeno 10 giri dopo ciascuna
regolazione) per assestarsi nella nuova posizione
prima di procedere ad una nuova regolazione.
Passo 3. Conclusa la fase iniziale di rodaggio del nastro
trasportatore utilizzare il top dresser come descritto
nel manuale. Controllare il nastro trasportatore dopo
ogni carico ed effettuare lievi regolazioni correttive se
necessario. Dopo 10--15 ore di funzionamento il
nastro dovrebbe essere rodato e centrato
correttamente.
Passo 4. Dopo un uso prolungato si può accumulare del
terriccio sul rullo anteriore e posteriore aumentando
la tensione del nastro o causando problemi di
centratura. Pulire i rulli prima di registrare la tensione
del nastro. Prima di registrare la tensione del nastro è
importante:
D Verificare che non si sia accumulato terriccio sul
lato interno del nastro.
D Verificare che non si sia accumulato terriccio sul
rullo di rinvio e sul rullo di traino.
D Verificare che i cuscinetti del rullo di rinvio e del
rullo di traino non siano danneggiati, usurati o laschi.
D Verificare che i tensionatori del nastro
trasportatore non siano allentati, rotti o danneggiati.
SE IL NASTRO
TRASPORTATORE
SBANDA VERSO
QUESTO LATO,
SERRARE
QUESTO
TENSIONATORE
O ALLENTARE IL
TENSIONATORE
SUL LATO
OPPOSTO
FIGURA 9
24
LIVELLO MANUTENZIONE
Impianto idraulico
(v. figura 10)
ISPEZIONE TUBI IDRAULICI E RACCORDI
Non tentare di ispezionare i tubi idraulici e i raccordi con il
motore del veicolo in funzione, la presa di potenza
innestata, i motori del disco spargitore in funzione, o il
motore di azionamento del nastro trasportatore in
funzione.
Controllare lo stato dei tubi idraulici. I tubi idraulici sono
provvisti di una guaina di protezione per frenare le
perdite in caso di rottura dei tubi. Riparare eventuali
perdite e sostituire i tubi usurati prima di mettere in
servizio la macchina. Alcuni componenti dell’impianto
idraulico sono provvisti di raccordi filettati. Se tali
raccordi vengono scollegati, sigillare nuovamente il
raccordo filettato con nastro TeflonR o un prodotto
sigillante.
WARNING
PERICOLO
PER EVITARE GRAVI LESIONI,
non eseguire mai interventi di manutenzione su alcun componente
dell’impianto idraulico con il motore e
la pompa in funzione. L’alta pressione
e l’elevata temperatura dell’olio possono causare gravi lesioni o la morte.
Non utilizzare le dita o le mani per verificare la
presenza di eventuali perdite. Perdite ad alta
pressione possono causare lesioni alla pelle o
far penetrare olio nel corpo. Ciò può provocare
gravi lesioni o la morte.
Fare attenzione all’elevata temperatura dell’ olio.
Sono possibili gravi ustioni e lesioni.
OLIO IDRAULICO
La macchina è stata testata in fabbrica utilizzando olio
idraulico biodegradabile a base vegetale. Dopo i test
possono rimanere nell’impianto idraulico del WideSpin
1530 TM circa 1,9 litri (1/2 galloni) di olio a base vegetale.
Questo tipo di olio si miscela bene con fluidi a base
minerale. Tuttavia la miscela di olio vegetale con oli
minerali può leggermente influenzare le caratteristiche
del fluido. Se questo fluido non è compatibile con l’olio
del veicolo o se sussiste il pericolo di contaminazione
dell’impianto del veicolo, effettuare un lavaggio
dell’impianto idraulico del WideSpin 1530 TM prima di
collegare i tubi idraulici al veicolo. Vedere la sezione
“Lavaggio dell’impianto idraulico”. Questa procedura
deve essere eseguita esclusivamente da personale
qualificato.
WARNING
ATTENZIONE
PER EVITARE DANNI O LA CONTAMINAZIONE
DELL’IMPIANTO IDRAULICO DEL VEICOLO,
identificare il tipo di olio idraulico utilizzato
prima di rabboccare il serbatoio del veicolo.
Tutta la potenza idraulica e l’olio necessario al
funzionamento del WideSpin 1530 TM provengono
dall’impianto idraulico del veicolo. Il WideSpin 1530 TM
non è provvisto di un proprio serbatoio dell’olio idraulico
indipendente. Verificare il tipo di olio da utilizzare per
l’impianto del veicolo (vegetale o minerale) prima di
riempire l’impianto idraulico del veicolo.
Consultare il manuale dell’operatore del veicolo per
individuare la tipologia adatta di olio idraulico da
utilizzare e le temperature massime di esercizio per il
tipo di olio utilizzato.
SVUOTARE L’IMPIANTO IDRAULICO
L’impianto idraulico è a sfiato automatico e normalmente
non accumula pressione quando la pompa del veicolo
non è in funzione. Tuttavia in caso di guasto di
determinati componenti può rimanere della pressione
nell’impianto. Prima di effettuare qualsiasi intervento di
manutenzione su uno dei componenti, verificare la
presenza di eventuale pressione residua.
D Attendere che l’olio idraulico nell’impianto si raffreddi.
D Scollegare i raccordi ad innesto rapido dal gruppo
spargitore.
D Non avviare il motore per utilizzare la pompe idraulica
per pompare fuori l’olio idraulico dall’impianto.
AVVERTENZA
PER EVITARE GRAVI LESIONI,
fare attenzione all’eventuale pressione residua
nell’impianto idraulico.
NON VERIFICARE EVENTUALI PERDITE CON LE
MANI!! INDOSSARE OCCHIALI DI PROTEZIONE!!
Per svuotare l’impianto scollegare i raccordi ad innesto
rapido all’estremità del tubo “uscita pressione“ collegato
al veicolo. Essere pronti a raccogliere in sicurezza circa
1,9 litri (1/2 galloni) di olio idraulico. Non utilizzare la
pompa idraulica del veicolo per pompare fuori l’olio
idraulico dall’impianto.
Una parte di olio idraulico rimarrà sempre nell’impianto e
nei componenti dell’impianto. Essere pronti a raccogliere
l’olio idraulico residuo quando si effettuano interventi di
manutenzione sui componenti dell’impianto idraulico.
GRUPPO VALVOLE
Il gruppo valvole contiene una valvola di massima
pressione, il pressostato della ventola del radiatore (solo
modello 85811), la valvola di controllo della velocità del
nastro trasportatore e i corpi delle elettrovalvole S1 e S2
che controllano il flusso idraulico al motore del nastro
trasportatore e del gruppo spargitore.
Valvola di massima pressione: Posta nell’entrata “RV“
del gruppo valvole. La funzione della valvola di massima
pressione è di evitare innalzamenti eccessivi della
pressione nell’impianto. La valvola di massima
pressione è un tipo di valvola non regolabile che rimanda
25
l’alimentazione elettrica al motore della ventola del
radiatore. L’interruttore si chiude, completando il circuito
elettrico, non appena viene percepita pressione idraulica
nel gruppo valvole. Consultare la sezione “Impianto
elettrico“ nella parte dedicata alla manutenzione in
questo
manuale
per
maggiori
informazioni
sull’interruttore della ventola. Nota: l’interruttore della
ventola del radiatore è di serie nel modello n. 85811 e
opzionale nel modello n. 85812.
al veicolo la pressione in eccesso attraverso il tubo
“uscita pressione“.
La valvola di massima pressione non è suscettibile di
interventi di manutenzione da parte dell’utente. Se la
valvola non funziona correttamente deve essere
sostituita.
Interruttore della ventola del radiatore: Posto
all’uscita “G1“ del gruppo valvole. L’interruttore comanda
NOTA: IL RADIATORE È DI
SERIE NEL MODELLO
N. 85811 E OPZIONALE NEL
MODELLO N. 85812
LIVELLO MANUTENZIONE
PRESSIONE
IN USCITA
AL VEICOLO
RADIATORE
PRESSOSTATO
VENTOLA
PRESSIONE IN
ENTRATA DAL
VEICOLO
P
RADIATORE
G1
T
VALVOLA DI
MASSIMA
PRESSIONE
PF
RACCORDO AD
INNESTO
RAPIDO
S1
GRUPPO
VALVOLE
SR
EX
S2
EX
CF
G2
FC
IN
CONTROLLO
VELOCITÀ
DISCHI
SPARGITORI
PRESSIONE
IN ENTRATA
CONTROLLO
VELOCITÀ
NASTRO
TRASPORTATORE
RACCORDO
AD INNESTO
RAPIDO
M1
MR
A
PRESSIONE IN ENTRATA
MOTORE
IDRAULICO
SINISTRO
A
SPINNER ASSEMBLY
B
MOTORE
IDRAULICO
DESTRO
B
A
B
MOTORE
IDRAULICO DEL
NASTRO
TRASPORTATORE
SCHEMA IDRAULICO
WIDESPIN 1530 TM
FIGURA 10
LIVELLO MANUTENZIONE
Controllo di velocità del nastro trasportatore: Posto
nell’entrata “FC” del gruppo valvole. La valvola di
controllo di velocità del nastro trasportatore ha la
funzione di regolare la velocità del nastro trasportatore
regolando il flusso dell’olio idraulico e la pressione sul
motore.
La valvola di controllo velocità del nastro trasportatore
non è suscettibile di interventi di manutenzione da parte
dell’utente. Se la valvola non funziona correttamente
deve essere sostituita.
Corpi valvole elettromagnetiche S1 e S2: Posti nelle
entrate “S1” ed “S2” del gruppo valvole. Queste valvole
regolano il flusso idraulico al motore del nastro
trasportatore (S2) e ai motori del disco spargitore (S1).
Le valvole S1 e S2 sono azionate elettricamente e
comandate dall’interruttore sulla scatola comandi
ON/OFF.
Queste valvole sono valvole di tipo “normalmente
aperto” che permettono al flusso idraulico di bypassare il
motore del disco spargitore e del nastro trasportatore.
Quando l’interruttore della scatola comandi è
posizionato su ON ( I ) il solenoide viene attivato da un
segnale elettrico che fa chiudere le valvole e dirigere il
flusso idraulico ai motori.
I solenoidi possono essere sostituti in fase di
manutenzione. I corpi valvola non sono suscettibili di
interventi di manutenzione da parte dell’utente. Se le
valvole non funzionano correttamente devono essere
sostituite.
Se i solenoidi non si attivano, eseguire le seguenti
verifiche:
D Il comando gas o regolatore di regime del motore del
veicolo è impostato su un valore troppo basso per
fornire adeguata potenza idraulica o elettrica.
D Collegamento elettrico con il veicolo non ottimale.
Potenza elettrica insufficiente per attivare il
solenoide. Cattivi collegamenti di massa.
Consultare il capitolo “Impianto elettrico” nella sezione
dedicata alla manutenzione in questo manuale per
maggiori informazioni sulla manutenzione dei
collegamenti elettrici o sulla scatola comandi ON/OFF.
MOTORE DEL NASTRO TRASPORTATORE
Il motore del nastro trasportatore aziona il nastro
trasportatore. Il motore è montato sulla parte posteriore
del top dresser, sul lato destro del telaio. L’avvio e
l’arresto del motore è comandato dalla scatola comandi
ON/OFF. La potenza idraulica al motore è regolata dal
solenoide S2 nel gruppo valvole. La velocità del motore è
regolata dalla valvola di controllo della velocità del nastro
trasportatore (FC) nel gruppo valvole.
Il motore ruota solo in senso orario (visto dal lato sinistro
della macchina). Se il motore ruota in senso inverso
verificare se sono stati invertiti i collegamenti al motore
(ingressi A e B) o al gruppo valvole (ingressi M1 e MR).
Se il motore del nastro trasportatore non si attiva,
eseguire le seguenti verifiche:
26
D Regolatore di velocità del nastro abbassato troppo in
fretta.
D Collegamento elettrico con il veicolo non ottimale.
D Il comando gas o il regolatore di regime del motore
del veicolo è impostato su un valore troppo basso per
fornire adeguati giri al motore e potenza idraulica.
D Impostazione non corretta del selettore del flusso
idraulico del veicolo.
D Interruttore ON/OFF non funzionante. Controllare
l’alimentazione elettrica al solenoide S2 nel gruppo
valvole.
D Valvola S2 non funzionante. La valvola si deve
chiudere perché il flusso idraulico vada al motore.
D La valvola di massima pressione (RV) devia tutta la
potenza idraulica al serbatoio.
D Livello dell’olio idraulico nel serbatoio troppo basso.
D La pompa non funziona.
D Motore guasto o non funzionante.
D Accoppiamento tra motore e pompa non funzionante.
D Problemi meccanici, verificare se il motore è lasco o
disallineato, eventuale rottura della chiavetta del
volano o della cinghia di accoppiamento tra il motore
e albero del rullo di traino.
Il flusso idraulico in uscita dal motore del nastro
trasportatore ritorna al gruppo valvole, all’entrata “MR”. Il
flusso è inviato attraverso il gruppo valvole al gruppo
radiatore e ritorna al veicolo.
CONTROLLO
DI
VELOCITÀ
DEI
DISCHI
SPARGITORI
Il controllo di velocità regola l’alimentazione di potenza
idraulica ai motori dei dischi spargitori. Il controllo varia
su una scala da 0 a 4. I numeri sulla scala sono tarati per
corrispondere alla percentuale di flusso: 0 = 0% flusso,
1 = 10%, 2 = 20%, 3 = 30%, 4 = 40% flusso. I valori da 5 a
10 sono bloccati tramite una placchetta. Non rimuovere
la placchetta di blocco dal controllo della velocità. Il
flusso idraulico oltre il 4 è utilizzato per alimentare il
motore del nastro trasportatore tramite l’uscita di scarico
(EX). L’impostazione normale per il funzionamento è sui
valori da 3 a 4.
Il flusso idraulico proveniente dal gruppo valvole (uscita
PF) entra nella valvola di controllo della velocità (entrata
IN).
Il flusso regolato proveniente dall’uscita del flusso
regolato (CF) della valvola di controllo della velocità va
ad alimentare i motori idraulici del gruppo spargitore.
Il flusso idraulico che esce dall’uscita di scarico (EX)
ritorna al gruppo valvole (entrata EX) ed è utilizzato per
alimentare e regolare il motore del nastro trasportatore.
La valvola di controllo della velocità non è suscettibile di
interventi di manutenzione da parte dell’utente. Se la
valvola non funziona correttamente deve essere
sostituita.
MOTORI IDRAULICI DEL DISCO SPARGITORE
DESTRO E SINISTRO
I motori dei dischi spargitori ricevono potenza idraulica
dall’elettrovalvola S1 del gruppo valvole. L’elettrovalvola S1
27
è attivata tramite l’interruttore ON/OFF sulla scatola
comandi. Il flusso idraulico proveniente dal gruppo valvole
(uscita PF) è inviato alla valvola di controllo della velocità. Il
flusso regolato proveniente dall’uscita del flusso regolato
(CF) della valvola di controllo della velocità è inviato
all’entrata “A” del motore di sinistra. Il flusso lascia il motore
di sinistra dall’uscita “B” ed entra nel motore di destra
all’entrata “B”. Il flusso in uscita dal motore di destra si
unisce flusso in uscita dal motore di sinistra e ritorna al
gruppo valvole attraverso l’entrata “SR”.
I dischi ruotano in versi di rotazione opposti. Il disco
spargitore destro ruota in senso antiorario, il disco
spargitore sinistro ruota in senso orario (visto dall’alto). I
dischi spargitori sono azionati dai motori idraulici a
trazione diretta.
Se il gruppo spargitore o i motori dei dischi spargitori non
si attivano, verificare:
D Raccordi a disinnesco rapido non collegati.
Controllare il raccordo all’uscita “SR” sul gruppo
valvole e il raccordo all’estremità opposta del tubo
idraulico, collegato all’uscita “CF” della valvola di
controllo della velocità del disco spargitore.
D Controllo della velocità del gruppo spargitore
impostata ad un valore troppo basso.
D Il comando gas o il regolatore di regime del motore
del veicolo è impostato su un valore troppo basso per
fornire adeguati giri al motore e potenza idraulica.
D Impostazione non corretta del selettore del flusso
idraulico del veicolo.
D Verificare se è limitato il funzionamento di altri
componenti. Verificare che non si sia accumulato del
terriccio o non si sia impigliato del materiale sotto i
dischi spargitori. I dischi spargitori non devono
sfregare contro gli schermi deviatori.
D Verificare se i motori sono laschi o disallineati.
D La valvola di massima pressione devia tutta la
potenza idraulica al serbatoio.
D La pompa del veicolo non funziona.
D Motori guasti o non funzionanti.
D Problemi meccanici nell’accoppiamento fra il motore
e il disco spargitore. Verificare l’eventuale rottura
della chiavetta del volano o danni alla stella del
giunto.
D Motore lasco, verificare viti e posizione di montaggio.
Il flusso idraulico in uscita dai motori del gruppo
spargitore ritorna al gruppo valvole all’entrata “SR”. Il
flusso è inviato attraverso il gruppo valvole al gruppo
radiatore.
GRUPPO RADIATORE DELL’IMPIANTO IDRAULICO
Il gruppo radiatore dell’impianto idraulico è stato
progettato per mantenere bassa la temperatura di
esercizio dell’olio idraulico. Il calore viene disperso
facendo passare l’olio attraverso un radiatore con alette
raffreddate ad aria. Tutto l’olio idraulico del WideSpin
LIVELLO MANUTENZIONE
1530 TM passa attraverso il radiatore. Nota: il gruppo
radiatore è di serie nel modello n. 85811 e opzionale nel
modello n. 85812.
Il funzionamento della ventola del radiatore è automatico
e continua finché il pressostato nel gruppo valvole (G1)
rileva pressione idraulica. La ventola genera un getto
d’aria. Consultare la sezione “Impianto elettrico” nella
parte dedicata alla manutenzione in questo manuale per
maggiori informazioni sulla ventola e sul pressostato.
La manutenzione si limita alla rimozione di sporcizia,
polvere e detriti dalle alette del radiatore. Pulire per
quanto necessario con aria compressa a bassa
pressione. Non pulire con aria compressa o acqua ad
alta pressione. L’acqua ad alta pressione può entrare nel
motore elettrico della ventola e danneggiarlo. Aria o
acqua ad alta pressione possono danneggiare le alette
del radiatore.
Il radiatore dell’impianto idraulico non è suscettibile di
interventi di manutenzione da parte dell’utente. Se il
radiatore presenta delle perdite o blocca il passaggio
dell’olio deve essere sostituito.
L’olio in uscita dal radiatore torna al veicolo attraverso il
tubo “uscita pressione” e i raccordi ad innesto rapido.
TUBO USCITA PRESSIONE
Il tubo “uscita pressione” è parte del kit di montaggio.
Consultare il manuale del kit di montaggio per il corretto
posizionamento e collegamento dei tubi idraulici.
Il raccordo ad innesto rapido sul tubo di pressione in
uscita deve essere adeguatamente e completamente
collegato al veicolo. Se il raccordo ad innesto rapido non
è adeguatamente collegato al veicolo, si può sviluppare
una pressione eccessiva nel WideSpin 1530 TM che può
causare gravi danni al circuito oleodinamico del top
dresser.
AVVERTENZA
PER EVITARE GRAVI LESIONI
e gravi danni al WideSpin 1530 TM entrambi i
tubi idraulici devono essere adeguatamente e
completamente collegati al veicolo.
COLLEGARE IN MODO SICURO TUTTI I
RACCORDI AD INNESTO RAPIDO
I TUBI IDRAULICI DEVONO ESSERE
ADEGUATAMENTE CONNESSI AL VEICOLO. LA
CONNESSIONE DEVE ESSERE SICURA. SE IL
TUBO DI USCITA PRESSIONE NON È
COLLEGATO ADEGUATAMENTE SI PUÒ
SVILUPPARE UNA PRESSIONE ECCESSIVA NEL
RADIATORE IDRAULICO DEL WIDESPIN 1530
TM CHE PUÒ ESSERE CAUSA DI GRAVI DANNI.
LIVELLO MANUTENZIONE
28
Impianto elettrico
Prima di qualsiasi intervento di manutenzione
sull’impianto elettrico è necessario:
D Controllare l’alimentazione dal veicolo. Assicurarsi
che il veicolo fornisca il voltaggio adeguato.
È necessaria una batteria da 12 Volt CC con
negativo (--) a massa.
D Verificare che il fascio dei cavi di alimentazione sia
collegato correttamente alla batteria del veicolo.
Controllare la batteria del veicolo, il problema
potrebbe essere la batteria scarica.
D Controllare la polarità sulla batteria del veicolo. I colori
dei cavi di alimentazione del WideSpin 1530 TM sono
rosso per il positivo (+), nero per la massa (--).
B
BIANCO (+)
B
A
VERDE (+)
AVVERTENZA
PER EVITARE GRAVI LESIONI
e per evitare danni ai componenti dell’impianto
elettrico, INTERROMPERE L’ALIMENTAZIONE
ELETTRICA DAL VEICOLO prima di effettuare
interventi di manutenzione sull’impianto elettrico.
PRESSOSTATO
RADIATORE
A
GIALLO (+)
D Controllare il fusibile in linea del WideSpin 1530 TM
sul cavo di alimentazione rosso. Il fusibile adeguato è
un fusibile da 15 AMP, tipo AGC--15.
G1
S1
NERO (--)
B
A
MOTORE
IDRAULICO
VENTOLA
RADIATORE
NERO (--)
NERO (+)
A
NERO (--)
B
GIALLO (+)
GIALLO (--)
A
NERO (--)
GRUPPO
VALVOLE
S2
NERO (+)
FASCIO
CAVI
PRINCIPALE
NOTA: DI SERIE NEL
MODELLO N. 85811 E
OPZIONALE NEL
MODELLO N. 85812
B
NERO (--)
MASSA (--)
TELAIO
BIANCO (+)
NERO (+)
ROSSO (+)
VERDE (+)
ROSSO (+)
FASCIO CAVI ALIMENTAZIONE
(V. MANUALE KIT DI
NERO (+)
MONTAGGIO)
VERDE (+)
VERDE (+)
NERO (+)
FASCIO
CAVI
SCATOLA
COMANDI
BIANCO (+)
ROSSO (+)
ROSSO (+)
BIANCO (+)
FIGURA 11
29
NEGATIVO ( -- )
POSITIVO (+)
FASCIO CAVI
ALIMENTAZIONE
(V. MANUALE
KIT DI MONTAGGIO)
LIVELLO MANUTENZIONE
CAVI SCATOLA DI
COMANDO ON/OFF
COLLEGAMENTO ALIMENTAZIONE
ELETTRICA
ALLA VENTOLA RADIATORE,
SOLO MODELLO COD. 85811
AL PRESSOSTATO
VENTOLA
RADIATORE,
SOLO MODELLO
COD. 85811
MASSA
( -- )
GRUPPO
VALVOLE
FASCIO CAVI
PRINCIPALE
S2
FIGURA 12
S1
FASCIO DEI CAVI DI ALIMENTAZIONE
COLLEGAMENTI (V. FIGURA 12)
E
Il fascio dei cavi di alimentazione alimenta l’impianto
elettrico del top dresser WideSpin 1530 TM. Il fascio cavi
è parte del kit di montaggio ed è dimensionato per il tipo
di veicolo utilizzato per portare il WideSpin 1530 TM. Il
cavo positivo (+) (rosso) nel fascio cavi è dotato di un
portafusibile in linea. Verificare che il fusibile nel
portafusibile sia del tipo corretto, 15 AMP, tipo AGC--15.
Verificare il collegamento al fascio cavi principale.
Il collegamento al veicolo avviene direttamente sulla
batteria del veicolo. Il cavo nero è collegato al polo
negativo (--) della batteria, il cavo rosso è collegato al
polo positivo (+).
Dopo aver rimontato la scatola comandi, verificare il
funzionamento dell’interruttore. L’interruttore deve
funzionare come illustrato nel pittogramma. Controllare
che le posizioni “I” e “O” (ON/OFF) dell’interruttore
corrispondano alle posizioni “I” e “O” indicate nel
pittogramma sul supporto, e che il nastro trasportatore e
il gruppo spargitore del WideSpin 1530 TM funzionino
come indicato. Se il funzionamento avviene in modo
inverso rispetto a quanto indicato nel pittogramma,
verificare che la scatola dell’interruttore non sia stata
rimontata al contrario. Se la scatola è nella posizione
corretta, rimuovere l’interruttore e ruotarlo di 180_.
Rimontare e verificare il corretto funzionamento.
NERO
CABLAGGIO DELLA SCATOLA DI COMANDO
ON/OFF (v. figura 13)
L’interruttore ON/OFF sulla scatola comandi comanda
l’alimentazione elettrica alle elettrovalvole nel gruppo
valvole. L’accensione e lo spegnimento sono comandati
dall’interruttore che interrompe l’alimentazione elettrica
ai solenoidi. Tutti i cavi nell’interruttore sono positivi (+).
Vedere la figura 13 per la codificazione dei colori per il
cablaggio dell’interruttore della scatola comandi. I
terminali sul fondo della scatola sono numerati per
facilitarne l’identificazione.
Verificare che l’alimentazione elettrica sia scollegata
prima di aprire la scatola dell’interruttore. Non smontare
mai la scatola dell’interruttore se l’interruttore è
alimentato. Si può verificare un corto circuito che può
danneggiare i componenti elettrici del gruppo valvole.
ROSSO
ROSSO
VERDE
1
2
4
5
3
6
FONDO DELLA
SCATOLA
BIANCO
FIGURA 13
LIVELLO MANUTENZIONE
30
+
FUSIBILE 15 AMP,
TIPO AGC--15
S2
--
+
--
FIGURA 14
SCHEMA ELETTRICO WIDESPIN 1530 TM
SCATOLA DI COMANDO
-S1
+
GRUPPO
VALVOLE
+
+
+
+
+
G1 p
WIDESPIN 1530 TM
+
1
4
2
5
3
6
-M
VENTOLA
RADIATORE
SOLO MODELLO N. 85811
FASCIO CAVI PRINCIPALE (v. figure 11, 12, e 14)
Il fascio cavi principale fornisce i collegamenti elettrici
per l’alimentazione elettrica, il collegamento di massa al
telaio,
l’alimentazione
delle
elettrovalvole,
l’alimentazione del motore della ventola del radiatore, e i
cavi della scatola comandi con interruttore ON/OFF. Il
fascio cavi principale parte accanto alla parte anteriore
del telaio del WideSpin 1530 TM e termina al gruppo
valvole.
CABLAGGIO GRUPPO VALVOLE (v. figure 11, 12 e 13)
I cavi di collegamento ai solenoidi forniscono
l’alimentazione elettrica ai solenoidi (solenoide S1 e S2)
e al pressostato della ventola del radiatore.
Il connettore con i cavi nero e verde va al solenoide S1. Il
connettore con i cavi nero e nero va al solenoide S2. I
cavi neri dai due connettori sono collegati al telaio del
WideSpin 1530 TM per fornire la massa ( -- ) al circuito.
L’interruttore ON/OFF sulla scatola comandi deve
essere posizionato su ON ( I ) (sia per il nastro
trasportatore che per il gruppo spargitore) per testare la
presenza di tensione ai solenoidi S1 e S2. Durante il
funzionamento i solenoidi, quando attivati, chiudono le
valvole che permettono al flusso idraulico di alimentare i
motori idraulici. Quando l’interruttore sulla scatola
comandi è in posizione OFF ( O ) i solenoidi non sono
alimentati. Non è necessaria pressione idraulica per
verificare i solenoidi o i collegamenti elettrici.
CIRCUITO
E
COLLEGAMENTI
VENTOLA
RADIATORE, SOLO MODELLO COD. N. 85811
(V. FIGURE 11, 12 E 14)
Non è necessario che l’interruttore ON/OFF sulla
scatola comandi sia posizionato su ON ( I ) per
controllare il circuito del motore della ventola. Per
ragioni di sicurezza l’interruttore deve essere
posizionato su OFF ( O ) durante i test.
Per verificare la presenza di tensione all’interruttore
della ventola nel gruppo valvole deve essere presente
potenza idraulica. Per ragioni di sicurezza l’interruttore
sulla scatola comandi deve essere posizionato su OFF
( O ) (sia per il nastro trasportatore che per il gruppo
spargitore) per testare la tensione.
Al cavo di collegamento all’interruttore dovrebbe
sempre essere presente tensione positiva (+) dal lato di
ingresso del collegamento (cavo bianco). Quando il
pressostato rileva la presenza di pressione, l’interruttore
si chiude e completa il circuito del motore della ventola.
Quando l’interruttore è chiuso, si dovrebbe rilevare
tensione positivo (+) all’altra estremità del collegamento
(cavo giallo).
Al cavo di collegamento con il motore della ventola (cavo
giallo), dovrebbe essere rilevata tensione positiva (+)
solo quando è rilevata tensione positiva (+)
all’interruttore della pressione idraulica (cavo giallo).
L’altro collegamento alla ventola è il cavo di massa (--)
(cavo nero). L’alloggiamento della ventola fornisce il
collegamento di massa al telaio del WideSpin 1530.
NOTA: Nel nodello cod. n. 85812 i connettori per la
ventola del radiatore e l’interruttore della ventola
rimangono inutilizzati. I connettori inutilizzati sono
protetti da un cappuccio isolante.
31
LIVELLO MANUTENZIONE
Regolazione palette disco spargitore
(v. figure 15 e 16)
WARNING
AVVERTENZA
PER EVITARE GRAVI LESIONI,
spegnere sempre il motore del veicolo prima di
effettuare qualsiasi regolazione
Lightspread/Heavyspread delle palette
del disco spargitore.
La variazione dell’inclinazione delle palette permette di
modificare la larghezza e configurazione dello
spargimento ed è necessaria nel passare dalla modalità
Lightspread a Heavyspread e viceversa.
VITE DI FISSAGGIO INTERNA
FESSURA
PALETTA
(VISTA IN
POSIZIONE
LIGHTSPREAD)
ANGOLO DI
INCLINAZIONE
Per regolare l’inclinazione allentare la vite di fissaggio
interna su ogni paletta (non è necessario allentare le viti
esterne), far scorrere la paletta fino all’estremità
opposta della fessura presente sulla paletta e fissare
nuovamente la vite. NOTA: Poiché i dischi spargitori
destro e sinistro ruotano in versi opposti, le palette di
destra e di sinistra sono posizionate in modo speculare.
Vedere la figura 16 per individuare la posizione e la
direzione di regolazione di ciascuna paletta.
FIGURA 15
REGOLAZIONE
PALETTA
LIGHTSPREAD
(VISTA
DALL’ALTO)
MASSIMA
INCLINAZIONE
LIGHT
DESTRA
SINISTRA
REGOLAZIONE
PALETTA
HEAVYSPREAD
(VISTA
DALL’ALTO)
MINIMA
INCLINAZIONE
HEAVY
SINISTRA
DESTRA
FIGURA 16
LIVELLO MANUTENZIONE
32
Rimozione del gruppo spargitore
Rimuovendo il gruppo spargitore, il WideSpin 1530 TM
può essere utilizzato per il trattamento del terriccio da
top dressing. Quando il gruppo spargitore viene rimosso
il terriccio esce dalla parte posteriore dell’unità e non
viene distribuito. La velocità di trattamento del materiale
può essere regolata per mezzo dello sportello dosatore
e del comando di velocità del nastro trasportatore.
Procedere come segue per rimuovere il gruppo
spargitore. Vedere figura 17.
Passo 1. Posizionare il comando di velocità del gruppo
spargitore WideSpin 1530 TM su “Zero”.
Passo 2. Rimuovere il deflettore dalla parte posteriore
del WideSpin 1530 TM.
Passo 3. Scollegare i due tubi idraulici a disinnesco
rapido del gruppo spargitore. Uno dei tubi è collegato
al motore del disco spargitore sinistro, l’altro è
collegato al gruppo valvole del WideSpin 1530 TM
(posizionato sotto la parte sinistra del telaio, dietro la
manopola della velocità del nastro trasportatore).
Passo 5. Sollevare il gruppo spargitore e rimuoverlo
dalla parte posteriore del telaio del WideSpin
1530 TM. Prestare attenzione a non piegare o
danneggiare il piccolo gruppo tramoggia posizionato
sulla sommità del gruppo spargitore. Il peso del
gruppo spargitore è di 68 kg (150 libbre).
Utilizzare adeguate attrezzature e tecniche di
sollevamento.
Passo 6. Riaccompagnare il tubo idraulico che sporge
dalla parte posteriore del WideSpin 1530 TM nel foro
del telaio. Collegare il disinnesco rapido da questo
tubo al gruppo valvole. Collegare al raccordo sul
gruppo valvole precedentemente occupato dal tubo
idraulico del gruppo spargitore. Vedere il
pittogramma sulla parte posteriore del WideSpin
1530 TM.
Passo 7. Riposizionare il deflettore sulla parte
posteriore del WideSpin 1530 TM.
Passo 4. Rimuovere i 4 bulloni a testa esagonale da 1/2”
che fissano il gruppo spargitore al telaio del
WideSpin 1530 TM.
PITTOGRAMMA
POSIZIONAMENTO
TUBO (SULLA
PARTE POSTERIORE
DEL TELAIO DEL
WIDESPIN 1530 TM)
GRUPPO
SPARGITORE
COLLEGATO
GRUPPO
SPARGITORE
RIMOSSO
SCOLLEGARE IL
TUBO DAL GRUPPO
VALVOLE
RIMUOVERE IL
DEFLETTORE
POSTERIORE
COMANDO
VELOCITÀ
DISCHI
SPARGITORI
REINSERIRE IL TUBO IDRAULICO NEL
TELAIO E COLLEGARLO AL GRUPPO
VALVOLE
GRUPPO
SPARGITORE
FIGURA 17
33
LIVELLO MANUTENZIONE
Sostituzione del nastro trasportatore
Può essere necessario sostituire il nastro trasportatore
se è usurato, se è stato danneggiato o se non mantiene
l’allineamento e la regolazione. V. figura 18.
AVVERTENZA
PER EVITARE GRAVI LESIONI
lavorare in sicurezza! Indossare gli appropriati
dispositivi di protezione. Non tentare di eseguire
interventi di manutenzione o regolazione quando
il top dresser è in funzione.
RIMOZIONE
DEL
VECCHIO
NASTRO
TRASPORTATORE
Passo 1. Far avanzare il nastro trasportatore fino a che il
punto di giunzione si trova in corrispondenza
dell’apertura sulla parte posteriore del telaio.
Verificare che il filo di giunzione possa essere
rimosso attraverso l’apertura senza che il telaio
ostacoli l’operazione. Per operare in sicurezza,
arrestare il motore del veicolo e scollegare i
collegamenti elettrici dal veicolo.
AVVERTENZA
PER EVITARE GRAVI LESIONI
Scollegare i collegamenti elettrici dal veicolo.
Passo 2. Rimuovere il deflettore posteriore.
Passo 3. Aprire lo sportello dosatore fino alla massima
apertura.
Passo 4. Rimuovere il raschiatore del nastro
trasportatore.
Passo 5. Diminuire la tensione del nastro trasportatore
allentando entrambe le viti dei tensionatori del nastro
trasportatore. Spingere il rullo di traino verso la parte
posteriore della macchina per assicurarsi che la
tensione sia allentata.
Passo 6. Individuare il filo di giunzione. Raddrizzarne le
estremità in modo da poterlo rimuovere. Rimuovere il
filo di giunzione attraverso l’apertura nel telaio.
Passo 7. Rimuovere il nastro estraendolo dall’alto.
Passo 8. Pulire la bavetta e la copertura in plastica.
Verificare lo stato di usura e la presenza di oggetti
appuntiti che potrebbero danneggiare il nuovo
nastro trasportatore. Pulire e ispezionare il rullo di
rinvio anteriore del nastro trasportatore e il rullo di
traino posteriore. Controllare i cuscinetti sul rullo
anteriore e posteriore.
INSTALLAZIONE
DEL
NUOVO
NASTRO
TRASPORTATORE
Passo 9. Il nastro trasportatore è unidirezionale e deve
essere inserito con il corretto orientamento per
garantire che il filo di giunzione non si impigli in altri
componenti. Le due estremità del nastro sono
diverse: identificare l’estremità priva del taglio a
45 gradi. L’estremità priva del taglio a 45 gradi va
inserita per prima nel WideSpin 1530 TM.
Tenendo il disegno rivolto verso l’alto, inserire il
nastro oltre lo sportello dosatore e nella tramoggia.
Assicurarsi che il nastro trasportatore si trovi al di
sotto delle guarnizioni della tramoggia. Continuare
ad inserire il nastro sopra la bavetta e attorno al rullo
di rinvio anteriore. Continuare al di sotto della bavetta
fino a far incontrare le due estremità sul rullo
posteriore.
Passo 10. Allineare le estremità del nastro trasportatore
accanto all’apertura del telaio utilizzata per
rimuovere il filo di giunzione. Unire le due estremità
nel punto di giunzione. NOTA: Entrambi i bordi
esterni del nastro devono essere perfettamente
allineati l’uno rispetto all’altro per evitare problemi di
centratura e allineamento. Inserire il filo di giunzione
e unire le due estremità del nastro trasportatore.
Piegare leggermente le due estremità del filo di
giunzione per assicurarlo al nastro trasportatore.
Passo 11.
Registrare la tensione del nastro
trasportatore su entrambi i tensionatori. Consultare
la sezione “Regolazione della tensione del nastro
trasportatore” in questo manuale.
Passo 12. Riposizionare e regolare il raschiatore del
nastro trasportatore. Riposizionare il deflettore
posteriore. Ripristinare il collegamento elettrico al
veicolo di traino.
Passo 13. Azionare il nastro trasportatore e controllare il
nastro. Il nastro non si deve impigliare nelle guarnizioni
della tramoggia o sfregare contro componenti del telaio
o del motore. Consultare la sezione “Centratura e
allineamento del nastro trasportatore” in questo
manuale. Seguire le istruzioni per regolare la
centratura e le procedure di rodaggio.ٛ
DIREZIONE MOVIMENTO NASTRO IN FUNZIONAMENTO
ESTREMITÀ CON
TAGLIO A 45˚
GIUNZIONE
DEFLETTORE
POSTERIORE
RASCHIATORE
FIGURA 18
PARTS LISTS
34
Conveyor Belt, Pan and Rollers
25
24
19
18
21
17
20
7
5
7
9
10
17
23
22
8
13
3
3
2
4
16
14
4
15
3
12
14
11
12
15
4
3
6
1
2
4
6
35
PARTS LISTS
Conveyor Belt, Pan and Rollers
Item
No.
1
2
3
4
5
6
7
8
9
10
11
12
13
14
15
16
17
18
19
20
21
22
23
24
25
Part
No.
661422
653393
655174
499051
400444
444816
658073
660048
660049
499432
661433
657998
440194
446154
443118
463031
661421
661298
499025
499413
657766
446142
443110
661370
655363
Description
Qty.
Roller, Idler, 1530 . . . . . . . . . . . . . . . . . . . . . . . . . . . . . . . . . . . . . . . . . . . . . . 1
Spacer, Idler Roller . . . . . . . . . . . . . . . . . . . . . . . . . . . . . . . . . . . . . . . . . . . . 2
Bearing, Pillow Block . . . . . . . . . . . . . . . . . . . . . . . . . . . . . . . . . . . . . . . . . . . 4
Set Screw, 1/4”--28 x 1/4” . . . . . . . . . . . . . . . . . . . . . . . . . . . . . . . . . . . . . . 8
Screw, Hex Head, 1/2”--20 x 1--3/4” . . . . . . . . . . . . . . . . . . . . . . . . . . . . . . 4
Nut, Hex, 1/2”--20 Flexloc . . . . . . . . . . . . . . . . . . . . . . . . . . . . . . . . . . . . . . . 4
Plate, Sliding . . . . . . . . . . . . . . . . . . . . . . . . . . . . . . . . . . . . . . . . . . . . . . . . . . 2
Bolt, Tap, 5/8”--11 x 6”, Conveyor Belt Tension Adjuster . . . . . . . . . . . . . 2
Spacer, Tension Adjuster . . . . . . . . . . . . . . . . . . . . . . . . . . . . . . . . . . . . . . . 2
Nut, Hex, 5/8”--11 Flexloc . . . . . . . . . . . . . . . . . . . . . . . . . . . . . . . . . . . . . . . 2
Roller, Drive, 1530 . . . . . . . . . . . . . . . . . . . . . . . . . . . . . . . . . . . . . . . . . . . . . 1
Spacer, Flared . . . . . . . . . . . . . . . . . . . . . . . . . . . . . . . . . . . . . . . . . . . . . . . . 2
Bolt, Carriage, 1/2”--13 x 1--1/2” . . . . . . . . . . . . . . . . . . . . . . . . . . . . . . . . . 4
Washer, Lock, 1/2” . . . . . . . . . . . . . . . . . . . . . . . . . . . . . . . . . . . . . . . . . . . . . 4
Nut, Hex, 1/2”--13 . . . . . . . . . . . . . . . . . . . . . . . . . . . . . . . . . . . . . . . . . . . . . . 4
Key, Woodruff, 1/4” x 1” . . . . . . . . . . . . . . . . . . . . . . . . . . . . . . . . . . . . . . . . 1
Pan, 1530 . . . . . . . . . . . . . . . . . . . . . . . . . . . . . . . . . . . . . . . . . . . . . . . . . . . . 2
Cover, Pan . . . . . . . . . . . . . . . . . . . . . . . . . . . . . . . . . . . . . . . . . . . . . . . . . . . 2
Screw, Machine, Pan Head, 1/4”--20 x 5/8” (Service Part) . . . . . . . . . . 8
Nut, Hex, 1/4”--20 KEPS (Service Part) . . . . . . . . . . . . . . . . . . . . . . . . . . . 8
Bolt, Carriage, 3/8”--16 x 3/4” . . . . . . . . . . . . . . . . . . . . . . . . . . . . . . . . . . . . 8
Washer, Lock, 3/8” . . . . . . . . . . . . . . . . . . . . . . . . . . . . . . . . . . . . . . . . . . . . . 8
Nut, Hex, 3/8”--16 . . . . . . . . . . . . . . . . . . . . . . . . . . . . . . . . . . . . . . . . . . . . . . 8
Belt, Spinner Conveyor . . . . . . . . . . . . . . . . . . . . . . . . . . . . . . . . . . . . . . . . . 1
Splice, Conveyor Belt . . . . . . . . . . . . . . . . . . . . . . . . . . . . . . . . . . . . . . . . . . 1
36
PARTS LIST
Conveyor Belt Hydraulic Motor, Conveyor Belt Scraper,
Rear Deflector, and Inspection Panel
19
33
18
31
32
16
11
30
2
29
26
16
8
30
25
15
10
17
3
12
2
30
27
1
9
7
4
28
20
23
17
24
13
14
21
22
16
15
5
6
37
PARTS LIST
Conveyor Belt Hydraulic Motor, Conveyor Belt Scraper,
Rear Deflector, Dirt Shield and Inspection Panel
Item
No.
1
2
3
4
5
6
7
8
9
10
11
12
13
14
15
16
17
18
19
20
21
22
23
24
25
26
27
28
29
30
31
32
33
Part
No.
659388
463031
661439
400444
446154
443120
661372
415519
661371
415509
661373
400262
446142
443110
661430
661619
659276
662789
661620
661579
661582
400108
446128
443102
661463
657671
452006
443110
444810
661406
661032
661056
499410
Description
Qty.
Motor Hydraulic, Conveyor Belt Drive . . . . . . . . . . . . . . . . . . . . . . . . . . . . 1
Key, Woodruff, 1/4” x 1” . . . . . . . . . . . . . . . . . . . . . . . . . . . . . . . . . . . . . . . . 2
Brace, Belt Motor . . . . . . . . . . . . . . . . . . . . . . . . . . . . . . . . . . . . . . . . . . . . . . 1
Screw, Hex Head, 1/2”--20 x 1--3/4” . . . . . . . . . . . . . . . . . . . . . . . . . . . . . . 2
Washer, Lock, 1/2” . . . . . . . . . . . . . . . . . . . . . . . . . . . . . . . . . . . . . . . . . . . . . 2
Nut, Hex, 1/2”--20 . . . . . . . . . . . . . . . . . . . . . . . . . . . . . . . . . . . . . . . . . . . . . . 2
Coupling Half, Sprocket, 1” Bore . . . . . . . . . . . . . . . . . . . . . . . . . . . . . . . . . 1
Screw, Set, 5/16”--18 x 3/8” . . . . . . . . . . . . . . . . . . . . . . . . . . . . . . . . . . . . . 2
Coupling Half, Sprocket, 1--1/4” Bore . . . . . . . . . . . . . . . . . . . . . . . . . . . . . 1
Screw, Set, 1/4”--20 x 1/4” . . . . . . . . . . . . . . . . . . . . . . . . . . . . . . . . . . . . . . 2
Chain, Coupling, Includes Link Pin . . . . . . . . . . . . . . . . . . . . . . . . . . . . . . . 1
Screw, Hex Head, 3/8”--16 x 1” . . . . . . . . . . . . . . . . . . . . . . . . . . . . . . . . . . 4
Washer, Lock, 3/8” . . . . . . . . . . . . . . . . . . . . . . . . . . . . . . . . . . . . . . . . . . . . . 4
Nut, Hex, 3/8”--16 . . . . . . . . . . . . . . . . . . . . . . . . . . . . . . . . . . . . . . . . . . . . . . 4
Guard, Motor Mount . . . . . . . . . . . . . . . . . . . . . . . . . . . . . . . . . . . . . . . . . . . 2
Screw, Hex Head, 1/4”--20 x 5/8” Whiz-Lock . . . . . . . . . . . . . . . . . . . . . . 8
Nut, Clip, 1/4”--20 . . . . . . . . . . . . . . . . . . . . . . . . . . . . . . . . . . . . . . . . . . . . . . 4
Shield, Spinner (Rear Deflector) . . . . . . . . . . . . . . . . . . . . . . . . . . . . . . . . . 1
Nut, Hex, 1/4”--20 Whiz-Lock . . . . . . . . . . . . . . . . . . . . . . . . . . . . . . . . . . . 4
Bracket, Scraper . . . . . . . . . . . . . . . . . . . . . . . . . . . . . . . . . . . . . . . . . . . . . . 1
Scraper, Plastic . . . . . . . . . . . . . . . . . . . . . . . . . . . . . . . . . . . . . . . . . . . . . . . 1
Screw, Hex Head, 1/4”--20 x 3/4” . . . . . . . . . . . . . . . . . . . . . . . . . . . . . . . . 5
Washer, Lock, 1/4” . . . . . . . . . . . . . . . . . . . . . . . . . . . . . . . . . . . . . . . . . . . . . 5
Nut, Hex, 1/4”--20 . . . . . . . . . . . . . . . . . . . . . . . . . . . . . . . . . . . . . . . . . . . . . . 5
Spring, Scraper Tension . . . . . . . . . . . . . . . . . . . . . . . . . . . . . . . . . . . . . . . . 2
Screw, Hex Head, 3/8”--16 x 4” . . . . . . . . . . . . . . . . . . . . . . . . . . . . . . . . . . 2
Washer, Flat, 3/8” ID x 7/8” OD x 5/64” Thick . . . . . . . . . . . . . . . . . . . . . . 2
Nut, Hex, 3/8”--16 . . . . . . . . . . . . . . . . . . . . . . . . . . . . . . . . . . . . . . . . . . . . . . 2
Nut, Hex, 3/8”--16 Flexloc . . . . . . . . . . . . . . . . . . . . . . . . . . . . . . . . . . . . . . . 2
Grommet, Rubber . . . . . . . . . . . . . . . . . . . . . . . . . . . . . . . . . . . . . . . . . . . . . 3
Panel, Inspection . . . . . . . . . . . . . . . . . . . . . . . . . . . . . . . . . . . . . . . . . . . . . . 1
Screw, Thread Cutting, 10--32 x 1/2” . . . . . . . . . . . . . . . . . . . . . . . . . . . . . 4
Nut, Clip, 1/4”--20 . . . . . . . . . . . . . . . . . . . . . . . . . . . . . . . . . . . . . . . . . . . . . . 8
PARTS LISTS
38
Spinner Speed Control and Manifold Valve Block
15
10
5
6
9
7
8
10
9
2
7
11
14
13
12
1
3
12
4
Item
No.
1
2
3
4
5
6
7
8
9
10
11
12
13
14
15
Part
No.
661368
657671
446142
443110
662728
662729
452002
660164
446128
443102
658172
662196
661406
662657
444804
Description
Qty.
Manifold Valve Block Assembly . . . . . . . . . . . . . . . . . . . . . . . . . . . . . . . . . . 1
Screw, Hex Head, 3/8”--16 x 4” . . . . . . . . . . . . . . . . . . . . . . . . . . . . . . . . . . 2
Washer, Lock 3/8” . . . . . . . . . . . . . . . . . . . . . . . . . . . . . . . . . . . . . . . . . . . . . 2
Nut, Hex, 3/8”--16 . . . . . . . . . . . . . . . . . . . . . . . . . . . . . . . . . . . . . . . . . . . . . . 2
Control, Flow, Spinner Speed . . . . . . . . . . . . . . . . . . . . . . . . . . . . . . . . . . . 1
Stop, Flow Control Lever . . . . . . . . . . . . . . . . . . . . . . . . . . . . . . . . . . . . . . . 1
Washer, Flat, 1/4” ID x 9/16” OD x 3/64” Thick . . . . . . . . . . . . . . . . . . . . . 2
Screw, Hex Head, 1/4”--20 x 3” . . . . . . . . . . . . . . . . . . . . . . . . . . . . . . . . . . 1
Washer, Lock, 1/4” . . . . . . . . . . . . . . . . . . . . . . . . . . . . . . . . . . . . . . . . . . . . . 2
Nut, Hex, 1/4”--20 . . . . . . . . . . . . . . . . . . . . . . . . . . . . . . . . . . . . . . . . . . . . . . 2
Screw, Hex Head, 1/4”--20 x 2--1/2” . . . . . . . . . . . . . . . . . . . . . . . . . . . . . . 1
Grommet, Rubber, 1” ID . . . . . . . . . . . . . . . . . . . . . . . . . . . . . . . . . . . . . . . . 2
Grommet, Rubber, 1--45/64” . . . . . . . . . . . . . . . . . . . . . . . . . . . . . . . . . . . . 1
Knob, Locking, Flow Control . . . . . . . . . . . . . . . . . . . . . . . . . . . . . . . . . . . . 1
Nut, Hex, #10--32 Flexloc . . . . . . . . . . . . . . . . . . . . . . . . . . . . . . . . . . . . . . . 1
LA4 TOP DRESSER
2
PARTS LIST
Hydraulic Fluid Cooler
Standard Equipment 85811 -- Optional Equipment 85812
6
5
2
4
1
11
16
15
14
8
10
9
3
12
13
7
8
Item
No.
1
2
3
4
5
6
7
8
9
10
11
12
13
14
15
16
Part
No.
662247
662225
662222
400184
446134
443106
662206
661619
661620
659276
661397
660680
660679
662194
662220
662367
Description
Qty.
Cooler, Hydraulic Fluid . . . . . . . . . . . . . . . . . . . . . . . . . . . . . . . . . . . . . . . . . 1
Bracket, Mounting, Hydraulic Cooler, Left Hand . . . . . . . . . . . . . . . . . . . . 1
Bracket, Mounting, Hydraulic Cooler, Right Hand . . . . . . . . . . . . . . . . . . 1
Screw, Hex Head, 5/16”--18 x 3/4” . . . . . . . . . . . . . . . . . . . . . . . . . . . . . . . 4
Washer, Lock, 5/16” . . . . . . . . . . . . . . . . . . . . . . . . . . . . . . . . . . . . . . . . . . . 4
Nut, Hex, 5/16”--18 . . . . . . . . . . . . . . . . . . . . . . . . . . . . . . . . . . . . . . . . . . . . 4
Guard, Hydraulic Cooler . . . . . . . . . . . . . . . . . . . . . . . . . . . . . . . . . . . . . . . . 1
Screw, Hex Head, 1/4”--20 x 5/8” Whiz--Lock . . . . . . . . . . . . . . . . . . . . . . 5
Nut, Hex, 1/4”--20 Whiz--Lock . . . . . . . . . . . . . . . . . . . . . . . . . . . . . . . . . . . 3
Nut, Clip, 1/4”--20 . . . . . . . . . . . . . . . . . . . . . . . . . . . . . . . . . . . . . . . . . . . . . . 2
Hose Assembly, . . . . . . . . . . . . . . . . . . . . . . . . . . . . . . . . . . . . . . . . . . . . . . 1
Adapter, 1--1/16”--12 Male O--Ring to 3/4”--16 Male 37 Degree Flare . . 1
Elbow, 1--1/16”--12 Male O--Ring to 3/4”--16 Male 37 Degree Flare . . . 1
Switch, Pressure . . . . . . . . . . . . . . . . . . . . . . . . . . . . . . . . . . . . . . . . . . . . . . 1
Elbow, 9/16”18 Male O--Ring to 1/4” Pipe . . . . . . . . . . . . . . . . . . . . . . . . . 1
O--Ring (For Elbow in G1) . . . . . . . . . . . . . . . . . . . . . . . . . . . . . . . . . . . . . . 1
PARTS LISTS
40
Hopper, Lifting Bracket, Conveyor Belt Scraper, and Metering Gate Assembly
15
8
11
7
13
14
12
4
10
7
5
12
13
7
2
9
1
7
7
8
7
3
14
11
6
5
8
8
8
16
17
8
8
8
41
PARTS LISTS
Hopper, Lifting Bracket, Conveyor Belt Scraper, and Metering Gate Assembly
Item
No.
1
2
3
4
5
6
7
8
9
10
11
12
13
14
15
16
17
18
19
20
21
22
23
24
25
26
27
28
29
30
31
32
Part
No.
Description
662203
662202
662201
662882
662205
662204
661619
661620
662046
499410
661610
662318
662317
460310
662250
662885
662901
662797
662781
400258
446142
443110
661418
657208
660962
659984
661020
400106
444830
662777
662776
662752
Qty.
Panel, Hopper, Left Hand Side, 1530 TM . . . . . . . . . . . . . . . . . . . . . . . . . 1
Panel, Hopper, Right Hand Side, 1530 TM . . . . . . . . . . . . . . . . . . . . . . . . 1
Panel, Hopper, Front, 1530 TM . . . . . . . . . . . . . . . . . . . . . . . . . . . . . . . . . . 1
Panel, Hopper, Rear, 1530 . . . . . . . . . . . . . . . . . . . . . . . . . . . . . . . . . . . . . . 1
Seal, Hopper, Side . . . . . . . . . . . . . . . . . . . . . . . . . . . . . . . . . . . . . . . . . . . . . 2
Seal, Hopper, Front . . . . . . . . . . . . . . . . . . . . . . . . . . . . . . . . . . . . . . . . . . . . 1
Screw, Hex Head, 1/4”--20 x 5/8” Whizloc . . . . . . . . . . . . . . . . . . . . . . . . 75
Nut, Hex, 1/4--20 Whizlock . . . . . . . . . . . . . . . . . . . . . . . . . . . . . . . . . . . . . 73
Screw, Hex Head, 1/4”--20 x 3/4” Whiz-Lock . . . . . . . . . . . . . . . . . . . . . . 2
Nut, Clip, 1/4”--20 Tinnerman . . . . . . . . . . . . . . . . . . . . . . . . . . . . . . . . . . . . 4
Retainer, Seal Strip . . . . . . . . . . . . . . . . . . . . . . . . . . . . . . . . . . . . . . . . . . . . 2
Plate, Tube . . . . . . . . . . . . . . . . . . . . . . . . . . . . . . . . . . . . . . . . . . . . . . . . . . . 2
Pin, Hinge . . . . . . . . . . . . . . . . . . . . . . . . . . . . . . . . . . . . . . . . . . . . . . . . . . . . 2
Hairpin, Cotter, 1/8” . . . . . . . . . . . . . . . . . . . . . . . . . . . . . . . . . . . . . . . . . . . . 2
Lifting Brace . . . . . . . . . . . . . . . . . . . . . . . . . . . . . . . . . . . . . . . . . . . . . . . . . . 1
Tube, Manual . . . . . . . . . . . . . . . . . . . . . . . . . . . . . . . . . . . . . . . . . . . . . . . . . 1
Clamp, Manual Tube . . . . . . . . . . . . . . . . . . . . . . . . . . . . . . . . . . . . . . . . . . . 2
Bracket, Metering Gate, Left Hand . . . . . . . . . . . . . . . . . . . . . . . . . . . . . . . 1
Bracket, Metering gate, Right Hand . . . . . . . . . . . . . . . . . . . . . . . . . . . . . . 1
Screw, Hex Head, 3/8”--16 x 3/4” . . . . . . . . . . . . . . . . . . . . . . . . . . . . . . . . 4
Washer, Lock, 3/8” . . . . . . . . . . . . . . . . . . . . . . . . . . . . . . . . . . . . . . . . . . . . . 4
Nut, Hex, 3/8”--16 . . . . . . . . . . . . . . . . . . . . . . . . . . . . . . . . . . . . . . . . . . . . . . 4
Gate, Metering . . . . . . . . . . . . . . . . . . . . . . . . . . . . . . . . . . . . . . . . . . . . . . . . 1
Grip, Handle, Metering Gate . . . . . . . . . . . . . . . . . . . . . . . . . . . . . . . . . . . . 1
Screw, Hex Head, 3/4”--16 x 1--1/4” . . . . . . . . . . . . . . . . . . . . . . . . . . . . . . 2
Nut, Hex, 3/4”--16, Nylock Thin . . . . . . . . . . . . . . . . . . . . . . . . . . . . . . . . . . 2
Washer, Special, Metering Gate, 1/4” Wide Plastic . . . . . . . . . . . . . . . . . 2
Screw, Hex Head, 1/4”--20 x 5/8” . . . . . . . . . . . . . . . . . . . . . . . . . . . . . . . . 3
Nut, Hex, 1/4”--20 Flexloc . . . . . . . . . . . . . . . . . . . . . . . . . . . . . . . . . . . . . . . 3
Seal, Metering Gate . . . . . . . . . . . . . . . . . . . . . . . . . . . . . . . . . . . . . . . . . . . 1
Strip, Metering Gate . . . . . . . . . . . . . . . . . . . . . . . . . . . . . . . . . . . . . . . . . . . 1
Plunger, Metering Gate . . . . . . . . . . . . . . . . . . . . . . . . . . . . . . . . . . . . . . . . . 1
AR = As Required
29 31 30
28
7
8
21
26
22
19
27
20
32
25
18
24
7
26
7
8
27
23
25
METERING
GATE
ASSEMBLY
43
PARTS LIST
WIDESPIN Spinner Assembly
NOTE A: Torque Set Screws On Coupling
Halfs To 8.8--9.8 NM (78--87 Inch Pounds)
43
38
39
36
11
45
35
37
42
38
13
12
37
44
12
34
34
20
32
19
10
30
10
18
41
18
29
31
25
28
5
8
27
9
25
33
1
2
7
26 (SEE NOTE A)
6
4
17
14
15
19
20
16
40
12
10
11
18
3
3
2
23
36
24
22
20
19
19
17
18
20
21
42
PARTS LIST
WIDESPIN Spinner Assembly
Item
No.
1
2
3
4
5
6
7
8
9
10
11
12
13
14
15
16
17
18
19
20
21
22
23
24
25
26
27
28
29
30
31
32
33
34
35
36
37
38
39
40
41
42
43
44
45
Part
No.
661722
661400
661507
659126
657208
661687
661020
661686
661698
658240
452006
444808
400406
499052
446154
443118
661515
400186
446134
443106
661460
499101
400146
446128
661378
415505
661379
661513
661374
661514
499496
661512
661510
661509
661526
400258
446142
443110
662735
661521
661406
662747
662516
452004
658529
LEFT HAND
SPINNER WHEEL
ROTATION
Description
Qty.
Support, Spinner, Includes Plastic Bearings . . . . . . . . . . . . . . . . . . . . . . . 1
Bearing, Flange, Plastic, . . . . . . . . . . . . . . . . . . . . . . . . . . . . . . . . . . . . . . . 2
Insert, Cap, Rectangular . . . . . . . . . . . . . . . . . . . . . . . . . . . . . . . . . . . . . . . . 4
Handle, Blade Locking . . . . . . . . . . . . . . . . . . . . . . . . . . . . . . . . . . . . . . . . . 1
Grip, Handle . . . . . . . . . . . . . . . . . . . . . . . . . . . . . . . . . . . . . . . . . . . . . . . . . . 1
Spacer, Handle . . . . . . . . . . . . . . . . . . . . . . . . . . . . . . . . . . . . . . . . . . . . . . . 1
Washer, Special, Metering Gate . . . . . . . . . . . . . . . . . . . . . . . . . . . . . . . . . 1
Handle, Spinner Pivot . . . . . . . . . . . . . . . . . . . . . . . . . . . . . . . . . . . . . . . . . . 1
Bolt, Carriage, 5/8”--11 x 2--1/2” . . . . . . . . . . . . . . . . . . . . . . . . . . . . . . . . . . 1
Bolt, Carriage, 5/16”--18 x 3/4” . . . . . . . . . . . . . . . . . . . . . . . . . . . . . . . . . 14
Washer, Flat, 3/8” ID x 7/8” OD x 5/64” Thick . . . . . . . . . . . . . . . . . . . . . . 4
Nut, Hex, 5/16”--18 Flexloc . . . . . . . . . . . . . . . . . . . . . . . . . . . . . . . . . . . . . 14
Screw, Hex Head, 1/2”--13 x 1--1/4” . . . . . . . . . . . . . . . . . . . . . . . . . . . . . . 4
Washer, Flat, 33/64” ID x 7/8” OD x 1/16” Thick . . . . . . . . . . . . . . . . . . . . 4
Washer, Lock, 1/2” . . . . . . . . . . . . . . . . . . . . . . . . . . . . . . . . . . . . . . . . . . . . . 4
Nut, Hex, 1/2”--13 . . . . . . . . . . . . . . . . . . . . . . . . . . . . . . . . . . . . . . . . . . . . . . 4
Pivot . . . . . . . . . . . . . . . . . . . . . . . . . . . . . . . . . . . . . . . . . . . . . . . . . . . . . . . . . 2
Screw, Hex Head, 5/16”--18 x 7/8” . . . . . . . . . . . . . . . . . . . . . . . . . . . . . . 20
Washer, Lock, 5/16” . . . . . . . . . . . . . . . . . . . . . . . . . . . . . . . . . . . . . . . . . . 20
Nut, Hex, 5/16”--18 . . . . . . . . . . . . . . . . . . . . . . . . . . . . . . . . . . . . . . . . . . . 20
Motor, Hydraulic, Spinner, 1530 . . . . . . . . . . . . . . . . . . . . . . . . . . . . . . . . . 2
Key, Square, 3/16” x 11/16” . . . . . . . . . . . . . . . . . . . . . . . . . . . . . . . . . . . . . 2
Screw, Hex Head, 1/4”--28 x 3/4” . . . . . . . . . . . . . . . . . . . . . . . . . . . . . . . 10
Washer, Lock, 1/4” . . . . . . . . . . . . . . . . . . . . . . . . . . . . . . . . . . . . . . . . . . . . 10
Coupling, Half, 5/8” Bore SEE NOTE A . . . . . . . . . . . . . . . . . . . . . . . . . . 4
Screw, Set, 1/4”--20 x 3/4” SEE NOTE A . . . . . . . . . . . . . . . . . . . . . . . . . 8
Coupling, Spider . . . . . . . . . . . . . . . . . . . . . . . . . . . . . . . . . . . . . . . . . . . . . . 2
Coupler, Spinner . . . . . . . . . . . . . . . . . . . . . . . . . . . . . . . . . . . . . . . . . . . . . . 2
Bearing . . . . . . . . . . . . . . . . . . . . . . . . . . . . . . . . . . . . . . . . . . . . . . . . . . . . . . 4
Shaft, Drive . . . . . . . . . . . . . . . . . . . . . . . . . . . . . . . . . . . . . . . . . . . . . . . . . . . 2
Key, Square, 3/16” x 3/4” . . . . . . . . . . . . . . . . . . . . . . . . . . . . . . . . . . . . . . . 2
Plate, Spinner . . . . . . . . . . . . . . . . . . . . . . . . . . . . . . . . . . . . . . . . . . . . . . . . . 2
Vane, Spinner, Left Hand . . . . . . . . . . . . . . . . . . . . . . . . . . . . . . . . . . . . . . . 3
Vane, Spinner, Right Hand . . . . . . . . . . . . . . . . . . . . . . . . . . . . . . . . . . . . . . 3
Guide, Spinner . . . . . . . . . . . . . . . . . . . . . . . . . . . . . . . . . . . . . . . . . . . . . . . . 1
Screw, Hex Head, 3/8”--16 x 3/4” . . . . . . . . . . . . . . . . . . . . . . . . . . . . . . . . 8
Washer, Lock, 3/8” . . . . . . . . . . . . . . . . . . . . . . . . . . . . . . . . . . . . . . . . . . . . . 8
Nut, Hex, 3/8”--16 . . . . . . . . . . . . . . . . . . . . . . . . . . . . . . . . . . . . . . . . . . . . . . 9
Spinner Hopper Assembly, WideSpin . . . . . . . . . . . . . . . . . . . . . . . . . . . . . 1
Frame, Spinner . . . . . . . . . . . . . . . . . . . . . . . . . . . . . . . . . . . . . . . . . . . . . . . 1
Grommet, Rubber . . . . . . . . . . . . . . . . . . . . . . . . . . . . . . . . . . . . . . . . . . . . . 2
Diverter, Heavy Spread . . . . . . . . . . . . . . . . . . . . . . . . . . . . . . . . . . . . . . . . . 1
Knob, Locking . . . . . . . . . . . . . . . . . . . . . . . . . . . . . . . . . . . . . . . . . . . . . . . . 1
Washer, Flat, 5/16” ID x 3/4” OD x 1/16” Thick . . . . . . . . . . . . . . . . . . . . . 6
Screw, Hex Head, 3/8”--16 x 2--1/2” . . . . . . . . . . . . . . . . . . . . . . . . . . . . . . 1
RIGHT HAND
SPINNER WHEEL
ROTATION
PARTS LIST
44
Main Hydraulic System
SPINNER SPEED
FLOW CONTROL
SEE NOTE A
HYDRAULIC
COOLER
CF
EX
SEE MOUNTING
KIT MANUAL
16
11
10
11
17
2
18
15
SEE NOTE B
SEE MOUNTING
KIT MANUAL
3
12
4
9
1
PRESSURE
OUT TO
SPINNERS
2
T
P G1
20
PF
MANIFOLD
VALVE
BLOCK
2
SR
PRESSURE RETURN
FROM SPINNERS
EX
MR
19
14
M1
13
21
5
5
6
6
7
7
B
A
8
CONVEYOR BELT
HYDRAULIC MOTOR
NOTE A: HYDRAULIC COOLER
IS STANDARD EQUIPMENT ON
85811 -- OPTIONAL EQUIPMENT
ON 85812
NOTE B: HYDRAULIC COOLER
SWITCH IS STANDARD EQUIPMENT
ON 85811 -- OPTIONAL EQUIPMENT
ON 85812
PARTS LIST
46
METE--R--MATIC LA4
Main Hydraulic System
Item
No.
Part
No.
1
2
3
4
5
6
7
8
9
10
11
12
658641
657250
662220
662194
657538
661401
661403
659388
661399
662728
661396
661404
13
14
15
662221
657539
661397
16
17
18
19
20
21
660680
662247
660679
658642
661395
661368
Description
Qty.
Coupling, Quick Disconnect, Female, 3/8” . . . . . . . . . . . . . . . . . . . . . . . . 1
Adapter, 7/8”--14 Male O--Ring / 3/4”--16 Male 37 Degree Flare . . . . . . 4
Elbow, 9/16”--18 Male O--Ring / 1/4” Female Pipe . . . . . . . . . . . . . . . . . . 1
Switch, Pressure (Hydraulic Cooler Fan) . . . . . . . . . . . . . . . . . . . . . . . . . . 1
Elbow, 3/4”--16 Male O--Ring / 9/16”--18 Male 37 Degree Flare . . . . . . . 2
Hose Assembly, Manifold Valve Block to Conveyor Motor . . . . . . . . . . . 2
Adapter, 7/8”--14 SAE O--Ring / 9/16”--18 37 Degree Flare . . . . . . . . . . 2
Motor, Hydraulic, Conveyor Belt Drive . . . . . . . . . . . . . . . . . . . . . . . . . . . . 1
Hose Assembly, Manifold Valve Block to Flow Control . . . . . . . . . . . . . . 1
Flow Control (Spinner Speed Control) . . . . . . . . . . . . . . . . . . . . . . . . . . . . 1
Elbow, 7/8”--14 SAE O--Ring / 9/16”--18 Male 37 Degree Flare . . . . . . . 2
Hose Assembly, Hydraulic,
Flow Control to Spinner Quick Disconnect . . . . . . . . . . . . . . . . . . . . . . . 1
Hose Assembly, Manifold Valve Block to Flow Control . . . . . . . . . . . . . . 1
Adapter, 3/4”--16 Male O--Ring / 9/16”--18 Male 37 Degree Flare . . . . . 1
Hose Assembly, Hydraulic Filter to Tank
(Manifold Valve Block to Hydraulic Cooler) . . . . . . . . . . . . . . . . . . . . . . . 1
Adapter, 1--1/16”--12 Male O--Ring / 3/4”--16 Male 37 Flare . . . . . . . . . . 1
Cooler, Hydraulic Fluid . . . . . . . . . . . . . . . . . . . . . . . . . . . . . . . . . . . . . . . . . 1
Elbow, 1--1/16--12 Male O--Ring / 3/4”--16 Male 37 Degree . . . . . . . . . . 1
Coupling, Quick Release, Male, 3/8” . . . . . . . . . . . . . . . . . . . . . . . . . . . . . 1
Adapter, 3/4”--16 SAE O--Ring / 3/8”--18 Male NPT . . . . . . . . . . . . . . . . . 1
Manifold, Hydraulic Valve Block, SP--1530 . . . . . . . . . . . . . . . . . . . . . . . . 1
47
PARTS LIST
Spinner Assembly Hydraulics
PRESSURE
OUT TO
HYDRAULIC
BLOCK
PORT SR
4
PRESSURE IN
FROM
SPEED
CONTROL
2
5
10
11
8
7
3
1
LEFT
SPINNER
MOTOR
9
1
RIGHT SPINNER MOTOR
6
AS VIEWED FROM TOP
Item
No.
1
2
3
4
5
6
7
8
9
10
11
Part
No.
661460
657536
657660
658641
658642
661389
661390
661391
661392
661393
661394
Description
Qty.
Motor, Hydraulic, Spinner, 1530 . . . . . . . . . . . . . . . . . . . . . . . . . . . . . . . . .
Elbow, 9/16”--18 Male to 9/16”--18 Male 37 Degree Flare . . . . . . . . . . . .
Adapter, 9/16”--18 Male O--Ring to 9/16”--18 Male 37 Degree Flare . . .
Coupling, Quick Disconnect, Female, 3/8” . . . . . . . . . . . . . . . . . . . . . . . .
Coupling, Quick Disconnect, Male, 3/8” . . . . . . . . . . . . . . . . . . . . . . . . . . .
Adapter, 3/8”--24 SAE O--Ring to 7/16”--20 Male 37 Degree Flare . . . .
Adapter, 9/16”--18 SAE O--Ring to 3/8”--18 Male NPT . . . . . . . . . . . . . . .
Tee, 9/16”--18 SAE O--Ring to 9/16”--18 Male 37 Degree Flare . . . . . . .
Hose Assembly, Hydraulic Motor Drain . . . . . . . . . . . . . . . . . . . . . . . . . . .
Hose Assembly, Hydraulic Motor to Hydraulic Motor . . . . . . . . . . . . . . . .
Hose Assembly, Hydraulic Motor to Quick Disconnect . . . . . . . . . . . . . .
2
1
1
1
1
1
1
1
1
1
1
46
PARTS LIST
Control Box Assembly
GREEN
BLACK
RED
1
13
RED
1
2
4
5
3
6
12
11
WHITE
10
BOTTOM OF
SWITCH
9
6
8
5
3
4
7
14
2
Item
No.
1
2
3
4
5
6
7
8
9
10
11
12
13
14
Part
No.
662229
662230
658265
657637
658022
657970
657956
657951
661776
657957
658156
661493
658155
657603
Description
Qty.
Control Box Assembly, Includes Items 2 Thru 13 . . . . . . . . . . . . . . . . . . . 1
Wiring harness, Control Box, 1530 . . . . . . . . . . . . . . . . . . . . . . . . . . . . . . . 1
Wire, Red, Jumper . . . . . . . . . . . . . . . . . . . . . . . . . . . . . . . . . . . . . . . . . . . . . 1
Terminal, 1/4” Push--On, Female, Insulated . . . . . . . . . . . . . . . . . . . . . . . 2
Connector, 1/4” Push--On, Double Male . . . . . . . . . . . . . . . . . . . . . . . . . . 2
Body, Control Box . . . . . . . . . . . . . . . . . . . . . . . . . . . . . . . . . . . . . . . . . . . . . 1
Screw, Machine, 8--32 x 3/8” Phillips Pan Head . . . . . . . . . . . . . . . . . . . . 2
Rod, Tie, Control Box . . . . . . . . . . . . . . . . . . . . . . . . . . . . . . . . . . . . . . . . . . 2
Plate, Switch . . . . . . . . . . . . . . . . . . . . . . . . . . . . . . . . . . . . . . . . . . . . . . . . . . 1
Screw, Machine, 8--32 x 3/8” Phillips Flat Head . . . . . . . . . . . . . . . . . . . . 2
Gasket, Rocker Switch . . . . . . . . . . . . . . . . . . . . . . . . . . . . . . . . . . . . . . . . . 1
Switch, Rocker, SPTT . . . . . . . . . . . . . . . . . . . . . . . . . . . . . . . . . . . . . . . . . . 1
Actuator, Rocker Switch . . . . . . . . . . . . . . . . . . . . . . . . . . . . . . . . . . . . . . . . 1
Locknut, Bonding, 1/2” NPT . . . . . . . . . . . . . . . . . . . . . . . . . . . . . . . . . . . . . 1
PARTS LISTS
48
Manifold Valve Block
11
G2
10
11
G1
SEE NOTE B
10
6
5
11
7
8
FC
9
3
G1
1
3
SEE NOTE A
2
4
3
RV
NOTE A: SWITCH IS STANDARD
EQUIPMENT ON PRODUCT NO.
85811, OPTIONAL EQUIPMENT ON
PRODUCT NO. 85812.
1
S2
2
NOTE B: PLUG IS USED ON
PRODUCT NO. 85812 ONLY.
TORQUE 5 FT--LB (6.8 Nm) MAXIMUM
S1
Item
No.
1
2
3
4
5
6
7
8
9
10
11
Part
No.
661565
660606
661566
661567
661568
661569
661606
662220
662194
661570
662367
Description
Qty.
Cartridge, Solenoid Valve (S1 and S2)
S1 -- Spinner “Start and Stop”
S2 -- Conveyor Belt “Start and Stop” . . . . . . . . . . . . . . . . . . . . . . . . . . .
Coil, Solenoid Valve (S1 and S2) . . . . . . . . . . . . . . . . . . . . . . . . . . . . . . . .
Seal Kit, Solenoid Valve (S1, S2, and RV) . . . . . . . . . . . . . . . . . . . . . . . . .
Cartridge, Relief Valve (RV) . . . . . . . . . . . . . . . . . . . . . . . . . . . . . . . . . . . . .
Cartridge, Flow Control Regulator (FC) . . . . . . . . . . . . . . . . . . . . . . . . . . .
Seal Kit, Flow Control Regulator (FC) . . . . . . . . . . . . . . . . . . . . . . . . . . . .
Knob, Flow Control Regulator (FC) . . . . . . . . . . . . . . . . . . . . . . . . . . . . . .
Elbow, 9/16”--18 Male O--Ring / 1/4” Female Pipe (G1) . . . . . . . . . . . . .
Switch, Pressure (Hydraulic Cooler Fan) . . . . . . . . . . . . . . . . . . . . . . . . . .
Plug, 9/16”--18 SAE (G1 and G2) . . . . . . . . . . . . . . . . . . . . . . . . . . . . . . . .
O--Ring (For Plug in G1 and G2 or Elbow in G1) . . . . . . . . . . . . . . . . . . .
2
2
3
1
1
1
1
1
1
2
2
49
PARTS LISTS
1530 TM Hydraulic Schematic
NOTE: HYDRAULIC COOLER IS
STANDARD EQUIPMENT FOR 85811,
OPTIONAL EQUIPMENT FOR 85812
PRESSURE
OUT TO TRUCK
HYDRAULIC COOLER
FAN
SWITCH
PRESSURE IN
FROM TRUCK
COOLER
P
G1
T
RELIEF
VALVE
PF
QUICK
RELEASE
FITTING
S1
SR
EX
EX
CF
S2
G2
FC
IN
SPINNER
SPEED
CONTROL
MANIFOLD
VALVE BLOCK
PRESSURE IN
QUICK
RELEASE
FITTING
MR
M1
CONVEYOR
BELT
SPEED
CONTROL
PRESSURE IN
LEFT
HYDRAULIC
MOTOR
A
SPINNER ASSEMBLY
B
RIGHT
HYDRAULIC
MOTOR
B
A
A
B
CONVEYOR
BELT
HYDRAULIC
MOTOR
PARTS LISTS
50
Electrical System
ELECTRICAL POWER
SUPPLY HARNESS
(REFER TO MOUNTING
KIT MANUAL)
3
4
8
5
7
CONTROL
BOX
WIRING
HARNESS
6
TO HYDRAULIC COOLER
FAN, PRODUCT NO. 85811
ONLY
GROUND
( -- )
1
2
TO HYDRAULIC COOLER
FAN SWITCH, PRODUCT
NO. 85811 ONLY
HYDRAULIC
MANIFOLD VALVE
BLOCK (S1 AND S2
AND SWITCH G1)
Item
No.
1
2
3
4
5
6
7
8
9
Part
No.
662228
662919
657917
657640
662230
657603
657953
657950
658101
9
Description
Qty.
Main Wiring Harness, 1530 TM, Product No. 85811 Only . . . . . . . . . . . . .
Main Wiring Harness, 1530 TM, Product No. 85812 Only . . . . . . . . . . . . .
Holder, Fuse (Service Part) . . . . . . . . . . . . . . . . . . . . . . . . . . . . . . . . . . . . . . .
Fuse, 15 Amp, AGC--15A (Service Part) . . . . . . . . . . . . . . . . . . . . . . . . . . . .
Wiring Harness, Control Box, 1530 TM, Includes Base Plate, Cord
Connectors, and Locknuts (Does Not Include Switch or Control Box) . .
Locknut, 1/2” NPT . . . . . . . . . . . . . . . . . . . . . . . . . . . . . . . . . . . . . . . . . . . . . . .
Connector, Cord . . . . . . . . . . . . . . . . . . . . . . . . . . . . . . . . . . . . . . . . . . . . . . . . .
Base Plate, Control Box . . . . . . . . . . . . . . . . . . . . . . . . . . . . . . . . . . . . . . . . . .
Cable Tie, Black Nylon . . . . . . . . . . . . . . . . . . . . . . . . . . . . . . . . . . . . . . . . . . .
1
1
1
1
1
2
1
1
4
51
PARTS LISTS
Electrical System
A
YELLOW (+)
G1
COOLER
FAN SWITCH
B
WHITE (+)
B
A
GREEN (+)
NOTE; STANDARD
EQUIPMENT
ON 85811, OPTIONAL
EQUIPMENT ON 85812
S1
HYDRAULIC
MANIFOLD
VALVE BLOCK
BLACK (--)
B
A
S2
BLACK (+)
HYDRAULIC
COOLER
FAN MOTOR
BLACK (+)
A
MAIN
WIRING
HARNESS
YELLOW (+)
B
YELLOW (--)
A
B
RED (+)
BLACK (--)
GROUND (--)
TO FRAME
BLACK
(--)
ELECTRICAL
POWER
SUPPLY HARNESS
(REFER TO
MOUNTING
KIT MANUAL)
BLACK (--)
RED (+)
BLACK (+)
GREEN (+)
BLACK (+)
GREEN (+)
RED (+)
WHITE (+)
CONTROL
BOX
WIRING
HARNESS
RED (+)
WHITE (+)
52
PARTS LISTS
Decals
1
5
10
6
14
21
25
17
24
15
3
4
21
20
12
19
11
16
7
8
13
22
3
23
53
PARTS LISTS
Decals
Item
No.
1
2
3
4
5
6
7
8
9
10
11
12
13
14
15
16
17
18
19
20
21
22
23
24
25
Part
No.
661555
662914
662226
662755
662890
Description
Qty.
Decal, “ON/OFF”, Hand Held Control Box . . . . . . . . . . . . . . . . . . . . . . . . . 1
Decal Sheet, WideSpin1530 TM, Includes Items 3 thru 8 . . . . . . . . . . . 1
Decal, WideSpin 1530 TM Logo . . . . . . . . . . . . . . . . . . . . . . . . . . . . . . 2
Decal, WideSpin Logo, Diverter . . . . . . . . . . . . . . . . . . . . . . . . . . . . . . 1
Decal, Turfco Logo, 7--1/2” . . . . . . . . . . . . . . . . . . . . . . . . . . . . . . . . . . 1
Decal, Turfco Logo, 10” . . . . . . . . . . . . . . . . . . . . . . . . . . . . . . . . . . . . . 1
Decal, Product Identification, Product No. 85811 . . . . . . . . . . . . . . . 1
Decal, Product Identification, Product No. 85812 . . . . . . . . . . . . . . . 1
Decal Sheet, WideSpin TM, Revision A, Includes Items 10 thru 17
Decal, Lifting Bracket Identification . . . . . . . . . . . . . . . . . . . . . . . . . . . 1
Decal, Read Manual . . . . . . . . . . . . . . . . . . . . . . . . . . . . . . . . . . . . . . . . 1
Decal, High Heat Warning (85811 only) . . . . . . . . . . . . . . . . . . . . . . . 1
Decal, Hydraulic Pressure Hazard Warning . . . . . . . . . . . . . . . . . . . . 1
Decal, Spinner “STAY CLEAR” Thrown
Objects Danger Warning . . . . . . . . . . . . . . . . . . . . . . . . . . . . . . . . . . . 1
Decal, Center--Of--Gravity . . . . . . . . . . . . . . . . . . . . . . . . . . . . . . . . . . . 1
Decal, Maximum Angle of Operation Warning . . . . . . . . . . . . . . . . . . 1
Decal, Maximum Hopper Capacity and Load Weight Warning . . . . 1
Decal Sheet, WideSpin, Includes Items 19 thru 24 . . . . . . . . . . . . . . . . . 1
Decal, Metering Gate Position . . . . . . . . . . . . . . . . . . . . . . . . . . . . . . . 1
Decal, Lightspread/Heavyspread Instruction . . . . . . . . . . . . . . . . . . . 1
Decal, “KEEP HANDS AND FEET AWAY” Warning . . . . . . . . . . . . . 2
Decal, Spinner Speed Control . . . . . . . . . . . . . . . . . . . . . . . . . . . . . . . 1
Decal, Conveyor Belt Speed Control . . . . . . . . . . . . . . . . . . . . . . . . . . 1
Decal, Spinner Assembly Hydraulic Hose Routing . . . SEE NOTE A
Manual, Operator’s and Parts List, WideSpin 1530 TM . . . . . . . . . . . . . 1
NOTE A: This Decal Shows The Proper Re--routing Of The Hydraulic Hoses If The
Spinner Assembly Has Been Removed. The Decal Is Located On The Rear Of
The Frame And Is Only Visible When The Spinner Assembly Is Removed.
54
PARTS LISTS
Optional Trench Filling Attachment - Product Number 86150
2
3
1
7
6
5
Item
No.
1
2
3
4
5
6
7
8
9
Part
No.
661755
661756
658240
446134
443106
659259
660076
661757
661758
4
9
8 -- Installation Manual and Parts List
Description
Qty.
Mounting Bracket, Trench Filling Attachment . . . . . . . . . . . . . . . . . . . . . .
Chute, Trench Filling Attachment . . . . . . . . . . . . . . . . . . . . . . . . . . . . . . . .
Bolt, Carriage, 5/16”--18 x 3/4” . . . . . . . . . . . . . . . . . . . . . . . . . . . . . . . . . .
Washer, Lock, 5/16” . . . . . . . . . . . . . . . . . . . . . . . . . . . . . . . . . . . . . . . . . . .
Nut, Hex, 5/16”--18 . . . . . . . . . . . . . . . . . . . . . . . . . . . . . . . . . . . . . . . . . . . .
Pin, Hitch, 5/8”, Includes Hairpin . . . . . . . . . . . . . . . . . . . . . . . . . . . . . . . . .
Hairpin, Cotter, 0.148” Wire x 2--3/4” Long . . . . . . . . . . . . . . . . . . . . . . . .
Installation Manual and Parts List . . . . . . . . . . . . . . . . . . . . . . . . . . . . . . . .
Decal, Product Identification . . . . . . . . . . . . . . . . . . . . . . . . . . . . . . . . . . . .
1
1
4
4
4
1
1
1
1
TURFCO MFG. INC.
1655 101st. Avenue NE, Minneapolis, MN 55449-4420 USA
Telefono (763) 785-1000 • FAX (763) 785-0556
E--Mail [email protected] • www.turfco.com
WideSpin 1530 TM Broadcast Top Dresser
Prodotto codice 85811 e 85812
Manuale n. 662890
Printed in USA 0303