1
INSTRUCTION MANUAL
MANUALE D’ISTRUZIONI
DM 93/42/CEE (MODIFIED BY DIRECTIVE 2007/47/CE)
MEDICAL DEVICE IN CLASS 1 WITH MEASUREMENT FUNCTIONS
COMPLIANCE WITH UNI EN ISO 1041:1998
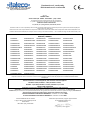
MODELS
FEDMED11
FEDMEDM1500
FEDMED700U1
FEDMED100
FEDMEDM1500LD FEDMED700U2
FEDMED100M
FEDMEDM1500P FEDMED700IR
FEDMED100LD
FEDMED100LD40 FEDMED700UW
FEDMED100UWLD FEDMED600
FEDMEDM700
FEDMED100P
FEDMED100IR
FEDMED100U1
FEDMED100U2
FEDMED100UW
FEDMED100N
FEDMED1500
FEDMED1500P
FEDMED21
FEDMED200
FEDMED300
FEDMEDM700PLD
FEDMED600P
FEDMED600LD
FEDMED600U1
FEDMED600U2
FEDMED600IR
FEDMED600UW
FEDMEDM600
FEDMEDM600P
FEDMEDM600LD
FEDMEDM600U1
FEDMEDM600U2
FEDMED1500IRU
FEDMEDM700P
FEDMEDM700LD
FEDMEDM700U1
FEDMEDM700U2
FEDMEDM700IR
FEDMEDM700UW
FEDMED100P4
FEDMEDM100P
FEDMEDM100UW
FEDMEDM100P4
FEDMED2500
FEDMEDM7500PLD
FEDMED100PLD
FEDMED1500PLD
FEDMEDM100PLD
FEDMEDM1500PLD
FEDMED1500LD
FEDMEDM100
FEDMEDM100M
FEDMEDM100LD
FEDMEDM100UWLD
FEDMED1500UW
FEDMEDM1500UW
FEDMED1500U2
FEDMEDM1500U2
FEDMED1500U1
FEDMEDM1500U1
FEDMED100UW2
FEDMED1500UW2
FEDMEDM100UW2
FEDMEDM1500UW2
FEDMED1500N
FEDMEDM600IR
FEDMEDM600UW
FEDMED700
FEDMED700P
FEDMED700LD
FEDMED2500P
FEDMEDM7500
FEDMEDM7500P
FEDMEDM7500LD
FEDMEDM1500N
FEDMEDM100N
0068
Copyright 2008, ITALECO S.R.L. All rights reserved.
Copies, whole or partial duplication, in any form, of this manual is forbidden without the written authorisation by ITALECO S.R.L.
S/N: 0001 Rev. 3 printed in 2011
WARNING! THE USERS SHOULD READ
CAREFULLY BEFORE USING THE DEVICE
THIS
MANUAL
VERY
ITALECO S.R.L. will not be held responsible in case of damages or injuries due to an
illegal or improper use of the product resulting from failure to follow instructions, warnings,
notices or indications for use published in this book.
DinoCapture © software provided with this device is under Anmo Electonics Corporation
Copyright or its suppliers.
All rights are reserved. The software is protected by copyright law and the provisions of
applicable international treaties. In accordance with these laws, the licensee is permitted to
use a copy of the software embedded in it in the manner provided for the operation of the
product in which it is incorporated. The software can not be copied, decompiled, reversed,
disassembled or reduced in any form.
The software or copies of the software are not for sale, all right, title and ownership of the
software belongs to Anmo Electonics Corporation or its suppliers.
For further information about the device, please contact:
MANUFACTURER:
ANMO ELECTRONICS CORPORATION
5F-1, No.76, Sec. 2, Dung-Da Road, Hsinchu 300, Taiwan
Tel:+886-3-5357868
Fax:+886-3-5358098
http://www.anmo.com.tw
OFFICIAL AND AUTHORISED DISTRIBUTOR:
ITALECO SRL
Via Giulio Pastore 8, 10024, Moncalieri (To), Italy
Tel: +39-011-5690297
Fax: +39-011-5690298
http://www.dinolitemedical.com
Manufactured in: 2011
2
Summary
1.
UNPACKING...................................................................................................................................... 4
2.
PACKAGE CONTENTS.................................................................................................................... 4
3.
SYMBOLS .......................................................................................................................................... 5
4.
WARNINGS ....................................................................................................................................... 7
5.
INTRODUCTION ............................................................................................................................... 9
6.
DESTINATION OF USE ..................................................................................................................10
7.
GENERAL GUIDELINES FOR HANDLING ...................................................................................11
8.
GENERAL MAINTENANCE ............................................................................................................12
9.
INSTRUCTION FOR THE THREE CONFIGURATIONS OF USE ..............................................13
9.1
COMMON PROCEDURES FOR THE THREE CONFIGURATIONS ......................................13
9.2
HOW TO USE THE DERMATOSCOPE.....................................................................................14
9.3
HOW TO USE EARSCOPE ........................................................................................................15
9.4
HOW TO USE THE MICROSCOPE WITH DENTAL MIRROR HOLDER ..............................16
10
MEASUREMENT FUNCTION .....................................................................................................18
11
CALIBRATION FUNCTION .........................................................................................................20
12
FREQUENCY OF CALIBRATION...............................................................................................22
13
INSTALLATION ............................................................................................................................23
13.1
MINIMUM SYSTEM REQUIREMENTS......................................................................................23
13.2
DINO CAPTURE SOFTWARE INSTALLATION........................................................................23
14
ACCESSORIES ............................................................................................................................27
15
CLEANING THE MICROSCOPE ................................................................................................28
16
CLEANING SPECULUM..............................................................................................................28
17
CLEANING CONTACT CAPS .....................................................................................................28
18
CLEANING THE DENTAL MIRROR HOLDER..........................................................................28
19
DISPOSAL ....................................................................................................................................29
20
WARRANTY..................................................................................................................................30
3
1. UNPACKING
Please handle with care, to avoid risk of injury.
It is the owners responsibility to ensure that all the necessary components are present.
2. PACKAGE CONTENTS
A Dino-Lite digital microscope
DinoCapture software on CD
A protective soft case
An Instruction Manual
Depending on the intended use of the digital microscope the package will also contain:
•
•
•
•
•
Contact transparent caps (Small and Large) for dermatological surveys
A “speculum“ pack for otoscopical surveys
A dental mirror holder
A stand on which you can put the device after its use
A rack with P/N “Amita”
4
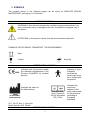
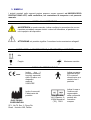
3. SYMBOLS
The symbols shown in the following pages can be found on DINO-LITE DIGITAL
MICROSCOPE packaging, or in this book
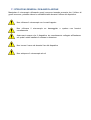
WARNING SYMBOLS
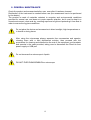
WARNING in this manual indicates the conditions and procedures that if not
met could cause injury or damage to the user, the patient or improper use of
the device
ATTENTION on the product means "see the documentation attached"
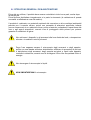
SYMBOLS FOR STORAGE, TRANSPORT, THE ENVIRONMENT
High
Keep dry
Fragile
CERTIFICATION SYMBOLS
0068
Indicates that the product meets
the essential requirements of the
Directive 93/42/EEC on medical
devices
Indicates a Type
B applied,
because the
microscope must
be in contact with
the patient
Indicates the name of
the Manufacturer
ITALECO SRL
Via G. Pastore,8
10024 Moncalieri
(TO), ITALY
ANMO
ELECTRONIC
CORPORATION
5F-1, No.76, Sec. 2, Dung-Da
Road, Hsinchu 300, Taiwan
IDENTIFICATION SYMBOLS
5
Indicates the
name and
address of the
entity responsible
for the products
according to
European
standards
Followed by an
alphanumeric code is
the lot code
Followed by an
alphanumeric
code and a date
indicates the
serial number
and year of
manufacture
FURTHER SYMBOLS
Indicates that the product complies with Directive 2002/95/EC on the
reduction of hazardous substances in electrical and electronic
equipment
Indicates that the product at the end of its useful life must be collected
separately from other waste
It must be disposed of in accordance with local WEEE regulations
Federal Telecommunications Commission (FCC, Federal
Communications Commission)
An U.S. commission, indicates that the product does not cause
interference with other devices commonly found in the office or at
home
6
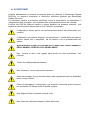
4. WARNINGS
Read these instructions carefully before using the Digital Microscope Dino-Lite
The following warnings are related to the use of generic Digital Microscope Dino-Lite.
The warnings for specific procedures, such as measurement, calibration, connecting
accessories are included in the relevant sections of the manual.
A different use of the Dino-Lite than as described in this manual, can endanger the health
of the patient and the person using the microscope.
The device is suitable for external use only and non-invasive measurements
The device does not make diagnoses, but only measurements. The results of
the measurements must be read and interpreted by a doctor
.
Do not put Dino-Lite microscope in human or animal apertures. RISK OF
SERIOUS INJURY!
Do not put your fingers or other objects in the cavity containing the LED light
Keep out of reach of children
Do not use the microscope without accessories
Always make sure that the accessories have been regularly cleaned and
disinfected before and after use
Before handling the microscope and accessories wear disposable gloves to
maintain a high level of cleanliness and hygiene
Do not direct the beam of light toward the eyes
Not to be used to capture images of or to video the eye
Do not use the device in contact with areas of the body that have injuries or
wounds that are inflamed, swollen or painful
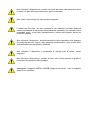
7
Do not use the microscope on wet skin or sweat
Using Dino-Lite, its accessories and devices associated with it without the
presence of properly trained personnel can cause irreparable damage such as
(just an example) the eardrum injury, injuries and skin irritation
Do not use the device simultaneously with other transactions that could
penetrate to dust, water or other substances into the device such as (just an
example) cleaning teeth, descaling
Do not use the device in close proximity to high heat, magnetic fields
Do not use the device in contact with lenses, glasses or other surfaces that can
change the perceptions of the images
Place the Amita stand only on a flat surface
8
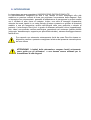
5. INTRODUCTION
Thank you for purchasing a DINO-LITE DIGITAL MICROSCOPE.
This product is designed to assist in improving the accuracy of diagnosis.
Only a well-documented image allows the examiners to compare their analysis with the
result of other forms of investigation. In addition, a series of images derived from
comparative tests repeated in a certain period of time allows an assessment of possible
diseases and a more timely verification of the effectiveness of treatment prescribed or
implemented to the patient. The Dino-Lite microscope is capable of attaching to the visual
image (magnification, photos, video) a detailed metrology verification.
.
Dino-lite despite being extremely easy to use is a medical device, and we
therefore recommend reading this book before using the equipment
WARNING! The measurement results are provided only as a guide for users
and should not be used for the formulation of a diagnosis
9
6. DESTINATION OF USE
The DINO-LITE DIGITAL MICROSCOPE is a medical device that is used in conjunction
with supplied accessories in three different configurations and can allow you to observe
the skin, the hearing canal and the oral cavity.
The DINO-LITE DIGITAL MICROSCOPE allows you to make measurements through the
analysis of digital images captured using the software DinoCapture.
The technology also allows the device to display in real time on a PC monitor video
captured during the operation.
The device has a LED embedded light source used to illuminate the skin, the inside of the
hearing canal, or the oral cavity.
The LED lights are switchable (ON/OFF) by software (except the model AM311H).
A PC is required for the DinoCapture software to run (please see minimum requirements).
The device is powered via the USB connection to the PC.
The image can be captured by using the mouse or Microtouch placed on the handle of the
microscope.
The device can be used in three specific configurations based on the type of accessories
used:
A – DERMATOSCOPE CONFIGURATION
B – OTOSCOPE CONFIGURATION
C – MICROSCOPE CONFIGURATION WITH DENTAL MIRROR HOLDER
Before being used, and accordingly to the specific purpose, the microscope must have the
relevant attachment fitted to it:
•
•
•
The contact caps for using the device as a dermatoscope
The hearing speculum (measurements 3mm, 4mm, 5mm) for using the device as an
otoscope
The dental mirror holder for mouth and teeth inspection
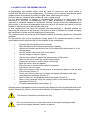
WARNING! THE DEVICE IS NOT INTENDED FOR CLINICAL
INVESTIGATIONS
10
7. GENERAL GUIDELINES FOR HANDLING
We would always recommend wearing disposable gloves when using the microscope,
however this can reduce the sensitivity of touch when operating the device.
Do not use the microscope with wet hands
Do not use the microscope if damaged or if it does not work correctly
Always ensure that the device is properly connected to the hardware on which
you installed the software supplied
Do not twist the usb cable when using the device
Do not subject the microscope to sudden shocks
11
8. GENERAL MAINTENANCE
Check the product and accessories before use, even after it has been cleaned.
Disinfection of the instrument is needed before use (the assessment has to be performed
by the doctor).
The product is made of materials resistant to corrosion and environmental conditions
provided for normal use, and does not require specific attention, but it must be kept in a
closed environment, clean and dry, avoiding exposure to light and protecting it from dust in
order to ensure the hygiene conditions.
Do not place the device and accessories in direct sunlight, high temperatures or
in humid or dusty places
After using the microscope always separate from accessories and specula,
cleaning them with a mild disinfectant solution, then proceed with the
procedures for cleaning and disinfection the rest of the equipment, put headsets
and specula in the case provided, taking care to disconnect the Dino-Lite from
power supply or USB port
Do not immerse the microscope in liquids
DO NOT EVER DISASSEMBLE the microscope
12
9. INSTRUCTION FOR THE THREE CONFIGURATIONS OF USE
9.1 COMMON PROCEDURES FOR THE THREE CONFIGURATIONS
a) Put the part to be observed below and in the center of the illuminated area of your
Dino-Lite microscope
b) It is advisable to start working at minimum magnification (turn the wheel of the
microscope until the arrow matches 20x). Place the microscope at a distance
greater than 3cm from the subject to enlarge
c) Slide under the cover/optic the subject you wish to see in order to visualise the area
d) Turn the wheel of focus to maximise viewing and have a sharper image
e) To use the microscope at a magnification between 20x and 50x, move progressively
the cover closer to the surface of the subject and proceed to enlarge the focus as in
the preceding paragraph
f) To use the microscope at a magnification of 200x it is necessary to bring the cover
of the microscope in contact with the subject, then using the wheel to focus on the
object
g) Always use the procedures described above, being careful that the lenses are not in
direct contact with the part to be observed
h) Click on "capture" and then on "image" or "video" from DinoCapture software to
take the picture that interests you or to start recording video
N.B. For optimal use of the microscope without support grip the device between thumb
and index accommodating it in the palm of the hand and using your thumb to rotate the
wheel of focus. The tool can be rotated on its axis in order to achieve the rotation of the
image on the screen.
Find below the instructions for the use of the three configurations:
•
•
•
DERMATOSCOPE (in combination with contact caps)
EARSCOPE (in combination with hearing speculums)
MICROSCOPE WITH DENTAL MIRROR HOLDER
The user is reminded that for each configuration, the appropriate accessories
have to be used.
The device can’t be used for different applications from its purpose!
Do not use the microscope without the accessories!
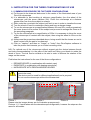
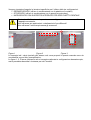
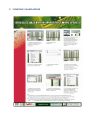
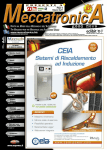
Picture 1
Picture 2
Picture 3
Please note the images shown are for illustration purposes only.
Pictures 1, 2, 3 were taken with the dermatoscope configuration, however the steps are the
same for all models.
13
9.2 HOW TO USE THE DERMATOSCOPE
In dermatology this medical device must be used in conjunction with small plates in
contact with the skin (for this configuration). This allows you to observe the skin and make
measurements by analysis of photos or digital video captured by the device.
Contact caps are designed and suitable for use in digital photos.
For the documentation of images in dermatological practice, you must have some
experience in the field of dermatology and a basic knowledge of photography. It is
important to establish a pattern of systematic workflow to ensure the best management of
the pictures, in the event of subsequent tests and visits of the patient the search of the file
related to the picture has to be very fast and easy.
In this configuration the Dino-Lite provides the dermatologist a valuable method for
improving the accuracy of the analysis. The device is able to measure the length (including
the calculation of areas) and the amplitude of plane angle.
The measurements are made by DinoCapture software previously installed on a personal
computer.
Put the contact cap on the microscope (simply push to fit) request the patient to take a
comfortable position and hold still for the duration of the examination:
•
•
•
•
•
•
•
•
•
•
•
•
•
•
•
•
Connect the microscope to the computer
Start the software DinoCapture (previously installed)
moisten the contact cap and the skin of the patient with disinfectant or oil for
dermatoscopy
Put the contact cap on the skin of the patient
Choose image or video to capture
Use the focus wheel to obtain the required size of the picture
Verify on the focus wheel the current magnification
Capture the pictures or videos using microtouch
Move the device from the patient
Place the device on the Amita support (if present)
The patient can now relax
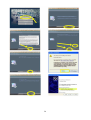
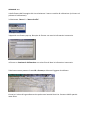
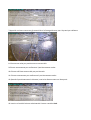
Move your mouse cursor on the picture to preview the photo on the left side
of the screen (Picture 1)
On the top of the screen you can enter the patient information and other
notes deemed necessary (Picture 2)
Click on Save as choosing the desired resolution (Picture 3)
Save in your computer using the coding system of the patient deemed
necessary (Picture 2)
To make measurements see Chapter 10
Dermatoscope investigations must be achieved by keeping the device perpendicular to the
surface inspected in order to minimize the distortion of perspective of the captured image.
The device is intended for external use only
Do not use the device in contact with areas of the body showing wounds,
injuries, body parts inflamed, swollen or painful
14
9.3 HOW TO USE EARSCOPE
This medical device is used in conjunction with a speculum (sizes 3, 4, 5mm) which allows
you to perform visual examinations of the hearing canal outside of the walls of the eardrum
through direct analysis of otoscopic photos or digital video caught by the device.
The speculum is made of reusable polypropylene.
In this configuration the device offers doctors a valuable method for improving the
accuracy of the visual analysis.
The measurements are made by DinoCapture software previously installed on a personal
computer.
To be used as otoscope the Dino-Lite requires the deployment of a speculum CE marked
made of reusable polypropylene. The speculum requires a special procedure for cleaning
and disinfection as described in the special paragraph.
Put the speculum on the device before capturing pictures or video (simple joint) and ask
the patient to take a comfortable position and to remain immobile for the duration of the
visit.
•
•
•
•
•
•
•
•
•
•
•
•
•
•
•
•
Connect the microscope to the computer
Start the software DinoCapture (previously installed)
Moisten the contact cap and the skin of the patient with disinfectant or oil for
dermatoscopy
Put the contact cap on the skin of the patient
Choose image or video to capture
Zoom acting on the wheel to obtain the required size of the picture see
previous page amendments
Verify on the focus wheel the current magnification
Captures pictures or videos using microtouch
Move the device from the patient
Place the device on the Amita support (if present)
Tell the patient is able to move again
Move your mouse cursor on the picture preview just took the photo on the left
side of the screen (Picture 1)
On the top of the screen you can enter patient information and other notes
deemed necessary (Picture 2)
Click on Save as choosing the desired resolution (Picture 3)
Save in your computer using the coding system of the patient deemed
necessary (Picture 2)
To make measurements see Chapter 10
Earscopic investigations must be achieved by keeping the device parallel to the
floor of the room in order to minimize the risk of eardrum perforation caused by
the fall of the microscope or speculum
The device is intended for external use only.
Measurement or visual surveys of the ear and the hearing canal must be
conducted exclusively by using a speculum (CE marked)
Make sure that the Dino-lite has been regularly connected to the PC prior to the
application of the speculum on the body of the device
15
9.4 HOW TO USE THE MICROSCOPE WITH DENTAL MIRROR HOLDER
In the dental field the device with the appropriate accessories holder for dental mirror may
be used to perform visual examinations of the oral cavity, through direct analysis in real
time on the monitor or later through the analysis of the video and images captured and
stored via software.
In this configuration the microscope facilitates the dentist during the inspection of the oral
cavity allowing a better view and a better working posture and ergonomics.
Put the mirror into the holder microscope as described in Figures 4, 5, 6, ask the patient to
take a comfortable position and to remain immobile for the duration of the visit
•
•
•
•
•
•
•
•
•
•
•
•
•
•
Connect the microscope to the computer
Start the software DinoCapture (previously installed)
Choose image or video to capture
Zoom acting on the wheel to obtain the required size of the picture
Verify on the focus wheel the current magnification
Captures pictures or videos using microtouch
Move the device from the patient
Place the device on the support Amita (if present)
Tell the patient is able to move again
Move your mouse cursor on the picture preview just took the photo on the left
side of the screen (Picture 1)
On the top of the screen you can enter patient information and other notes
deemed necessary (Picture 2)
Click on Save as choosing the desired resolution (Picture 3)
Save in your computer using the coding system of the patient deemed
necessary (Picture 2)
To make measurements see Chapter 10
The device is intended for external use only
Do not enter the microscope in the oral cavity
Make sure that the holder has been regularly cleaned and disinfected before use
Do not to use the microscope simultaneously with the cleaning and dental
descaling
Do not make measurements in configuration with the support of the holder of
dental mirror as the reflection in the mirror is a projection of the real image.
Therefore, the measurements made on reflected images will be inaccurate
16
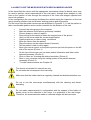
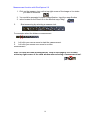
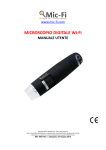
Picture 4
Fill the dental mirror
in the proper support
(holder)
Picture 5
Position the mirror in
line with the lens of
the microscope
Picture 6
Screw closely
17
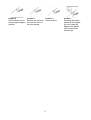
Picture 7
Pressing the button
placed on the holder
you can rotate 90
degrees the dental
mirror around the
microscope
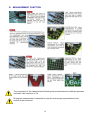
10 MEASUREMENT FUNCTION
The uncertainty of the measurements following the procedures and conditions operation
outlined in this manual is ± 3%
During the measurement is essential to keep the microscope perpendicular to the
surface to be examined
18
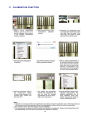
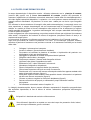
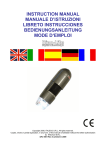
Measurement function with DinoCapture 2.0
1. Click on the measure icon on the top right corner of the image or live video
you want to measure.
2. You would be prompted to input a magnification. Input the magnification
3. value located on the Dino-Lite in the box that says “Mag”.
3.
Start measuring by selecting a measure tool.
For example select the distance measurement.
4.
Left click your mouse once to start the measurement.
5.
Left click you mouse once more to end the
measurement.
Hint: For more accurate measurements, click on the magnify icon located
at the top right corner of the child window after selecting a measurement tool.
19
11 CALIBRATION FUNCTION
20
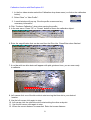
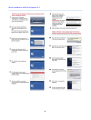
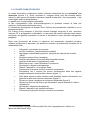
Calibration function with DinoCapture 2.0
1. In the live video window select the Calibration drop down menu (or click on the calibration
button).
2. Select “New” or “New Profile”.
3. A small window will pop up. Give the profile a name and any
necessary information.
4. Click “Continue Calibration” when done naming the profile.
5. In the new menu. Press “F8” or “Freeze” button to freeze the calibration object.
6. Enter the magnification that can be read from the Dino-Lite. Press Enter when finished.
7. A red bar with two blue dotes will appear with pink guidance lines, you are now ready
to calibrate.
8. Left mouse click one of the blue dots to start moving the blue dot to your desired
location.
9. Use the left mouse click again to stop.
10. Left mouse click the other blue dot to start setting the other end point.
11. Use the left mouse click again to stop.
12. When the correct distance is measured. Enter the known distance.
21
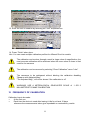
13. Enter the unit of measure by selecting the “Unit” dropdown box.
14. Press “Finish” when done.
Hint: You can create multiple calibration profiles for different Dino-lite models.
The calibration can be done through a small or large value of magnification, the
most accurate calibration will be achieved when the zoom value is closer to that
used for the measure
The calibration can be removed by selecting "Clear Calibration" menu "ruler"
The measures to be addressed without deleting the calibration disabling
"Measure with Adjusted Mag."
"The Adjusted Mag.”, will not be shown if the calibration is off
WARNING! USE A METROLOGICAL GRADUATED SCALE of 1 OR 2
MILLIMETERS TO MAKE CALIBRATION
12 FREQUENCY OF CALIBRATION
Calibration has to be made:
•
At the first use
•
Each time the device is used after leaving it idle for at least 10 days
whenever the measurements taken give improbable or contradictory results
22
13 INSTALLATION
13.1
MINIMUM SYSTEM REQUIREMENTS
Windows Os
1. Windows 98SE, ME, 2000, XP, Vista, 7
2. CPU Pentium 1.5GHZ, Celeron, AMD Athlon or equivalent
3. RAM of 128MB (256MB recommended)
4. At least 150 MB HD free
5. VGA card: 16bit
6. CD-ROM drive
7. USB 2.0 recommended, free port
Mac Os X
10.4 or later
13.2
DINO CAPTURE SOFTWARE INSTALLATION
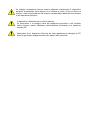
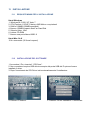
1. Turn on your PC and insert the “CD-Driver”.
2. Do not connect the USB plug of the microscope to the USB port on your PC before you
install the driver.
3. After inserting the CD-Driver automatically the installation starts.
23
24
When using the DinoCapture software, make sure there are no cameras or other
related webcam that could go in conflict with the Dino-Lite.
.
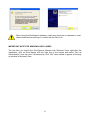
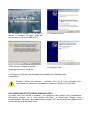
IMPORTANT NOTE FOR WINDOWS VISTA USERS
The first time you launch the DinoCapture software with Windows Vista, right after the
installation, click on DinoCapture with the right key of the mouse and select "Run as
Administrator" from the menu. Subsequently, click "OK" when asked to appear at the pop
up window in Microsoft Vista.
25
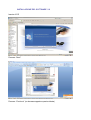
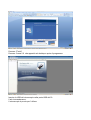
Quick installation with DinoCapture 2.0
26
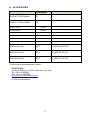
14 ACCESSORIES
ITEM DESCRIPTION
PART NUMBER
(FOR ORDERS)
QUANTITY
CONTACT CAP (SMALL)
P1
---
CONTACT CAP (LARGE)
P2
---
AD Open Cover
FC-CO1
1
AD Closed cover
FC-CC1
1
ADZ Open Cover
FC-Z-OC2
1
ADZ Polarized Open Cover
FC-Z-OZ1
1
ADZ Closed cover
FC-Z-CC3
1
FC-MA1
1
Cover with the mirror
SPECULUM 3mm
SP3
1 PACK OF 50 PCS
SPECULUM 4mm
SP4
1 PACK OF 50 PCS
SPECULUM 5mm
SP5
1 PACK OF 50 PCS
To order the listed accessories, contact:
ITALECO SRL
Via Giulio Pastore 8, 10024, Moncalieri (To), Italy
Tel: +39-011-5690297
Fax: +39-011-5690298
http://www.dinolitemaedical.com
or your local distributor.
27
15 CLEANING THE MICROSCOPE
It is very important to avoid touching the lens of the microscope because it is very delicate.
The lenses should be cleaned regularly, as particles of dust on them could have a
negative impact on image quality.
For this reason, it is recommended to protect the microscope with its protective casing
when not in use.
Avoid using any other objects or liquids that could easily scratch or damage the surface of
the lens or the sensor.
To clean the body of the microscope use a slightly dampened soft cloth.
The product is designed to last a lifetime, and is resistant to most chemicals products
except ketones MEK, solvents and substances used to remove the smalt.
The cleaning and disinfection operations should take place after each use. DO
NOT USE the microscope for at least 15 minutes after its cleaning operation
Avoid touching the surface of the lenses
When cleaning the lens, if necessary, use dry compressed air to remove dirt
Do not use abrasive materials to clean the lens, it could cause permanent
damage to it
16 CLEANING SPECULUM
•
•
•
Rinse the reusable speculum with hot tap water for one minute
Immerse the reusable specula in isopropyl alcohol 70% for 20 minutes
Rinse the reusable speculum with tap water and air dry
17 CLEANING CONTACT CAPS
The contact cap of the cover can be cleaned with standard disinfectant solutions whenever
the doctor deems it necessary and at least once a day
18 CLEANING THE DENTAL MIRROR HOLDER
Use a cloth soaked in liquid disinfectant to clean the holder
28
19 DISPOSAL
The crossed waste bin indicates that the product at the end of its useful life must be
collected separately from other waste.
It must be disposed of in accordance with local WEEE regulations
29
20 WARRANTY
Congratulations for purchasing our product. This product HAS BEEN MANUFACTURED TO
THE HIGHEST QUALITY AND STANDARDS. Italeco guarantees this product against any
defects due to materials or workmanship for a period of 2 years from the date of original
purchase. To take advantage of the guarantee, you must retain your purchase invoice.
If the product is found to be defective within the warranty period it should be returned to the
selling agent with proof of purchase.
The warranty is null and void if the damage is resulting from carelessness or misuse.
No compensation will be given by Italeco and its distributors if the product is returned during
the warranty period.
In addition, any replacement or repair carried out during the warranty period, will not
prolong the duration of the guarantee.
The warranty lapses in the following cases:
• The product has been tampered with or the label placed on the usb cable bearing
the serial number has been removed, damaged or rendered unreadable
• The product has been damaged or has been misused
• The product has been opened or repaired by unauthorised personnel
• The product has been damaged due to non compliance with the instructions in the
booklet
Products considered to be defective should be returned only to the dealer from which it
was purchased accompanied by the invoice.
The product will be repaired or replaced, under our sole discretion.
ITALECO SRL
Via Giulio Pastore 8, 10024, Moncalieri (To), Italy
Tel: +39-011-5690297
Fax: +39-011-5690298
http://www.dinolitemedical.com
30
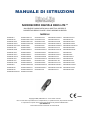
MANUALE DI ISTRUZIONI
MICROSCOPIO DIGITALE DINO-LITE ®
DM 93/42/CEE (MODIFICATA DALLA DIRETTIVA 2007/47/CE)
DISPOSITIVO MEDICO CLASSE I CON FUNZIONE DI MISURA
MODELLI
FEDMED11
FEDMED100
FEDMED100M
FEDMED100LD
FEDMEDM1500
FEDMEDM1500LD
FEDMEDM1500P
FEDMED100LD40
FEDMED700U1
FEDMED700U2
FEDMED700IR
FEDMED700UW
FEDMEDM7500PLD
FEDMED100PLD
FEDMED1500PLD
FEDMEDM100PLD
FEDMED1500LD
FEDMEDM100
FEDMEDM100M
FEDMEDM100LD
FEDMED100UWLD
FEDMED100P
FEDMED100IR
FEDMED100U1
FEDMED100U2
FEDMED100UW
FEDMED100N
FEDMED1500
FEDMED1500P
FEDMED21
FEDMED200
FEDMED300
FEDMEDM700PLD
FEDMED600
FEDMED600P
FEDMED600LD
FEDMED600U1
FEDMED600U2
FEDMED600IR
FEDMED600UW
FEDMEDM600
FEDMEDM600P
FEDMEDM600LD
FEDMEDM600U1
FEDMEDM600U2
FEDMED1500IRU
FEDMEDM700
FEDMEDM700P
FEDMEDM700LD
FEDMEDM700U1
FEDMEDM700U2
FEDMEDM700IR
FEDMEDM700UW
FEDMED100P4
FEDMEDM100P
FEDMEDM100UW
FEDMEDM100P4
FEDMED2500
FEDMEDM1500PLD
FEDMED1500UW
FEDMEDM1500UW
FEDMED1500U2
FEDMEDM1500U2
FEDMED1500U1
FEDMEDM1500U1
FEDMED100UW2
FEDMED1500UW2
FEDMEDM100UW2
FEDMEDM1500UW2
FEDMED1500N
FEDMEDM100UWLD
FEDMEDM600IR
FEDMEDM600UW
FEDMED700
FEDMED700P
FEDMED700LD
FEDMED2500P
FEDMEDM7500
FEDMEDM7500P
FEDMEDM7500LD
FEDMEDM1500N
FEDMEDM100N
0068
Copyright 2008, ITALECO S.R.L. Tutti i diritti riservati.
Non è consentita la riproduzione o la duplicazione, in qualsiasi forma, del presente manuale
o di qualsiasi sua parte senza previa autorizzazione da parte di ITALECO S.R.L.
S/N: 0001 Rev. 3
Data ultima revisione manuale: 10 marzo 2011
ATTENZIONE! GLI UTILIZZATORI DEVONO LEGGERE ATTENTAMENTE IL
PRESENTE MANUALE PRIMA DELL'UTILIZZO DEL DISPOSITIVO.
ITALECO S.R.L. non si assume alcuna responsabilità in caso di lesioni o di utilizzo illegale
ed improprio del prodotto derivanti da una mancata osservanza delle istruzioni,
avvertenze, avvisi o indicazioni per l'uso pubblicati nel presente manuale.
Il software Dino Capture © incluso in questo prodotto è soggetto al Copyright di Anmo
Electonics Corporation o dei suoi fornitori.
Tutti i diritti sono riservati. Il software è protetto dalle leggi sul copyright e dalle disposizioni
dei trattati internazionali applicabili. Nel rispetto di tali leggi, il titolare della licenza è
autorizzato ad utilizzare copia del software incorporato in questo strumento secondo le
modalità previste per il funzionamento del prodotto in cui è integrato. Il software non può
essere copiato, decompilato, retroanalizzato, disassemblato o ridotto in qualunque altro
modo in forma umanamente percepibile. Il software o copie del software non sono in
vendita; tutti i diritti, titoli e proprietà del software appartengono ad Anmo Electonics
Corporation o ai suoi fornitori.
Per informazioni sui prodotti, contattare:
FABBRICANTE:
ANMO ELECTRONICS CORPORATION
5F-1, No.76, Sec. 2, Dung-Da Road, Hsinchu 300, Taiwan
Tel:+886-3-5357868
Fax:+886-3-5358098
http://www.anmo.com.tw
RAPPRESENTANTE AUTORIZZATO ED IMPORTATORE:
ITALECO SRL
Via Giulio Pastore 8, 10024, Moncalieri (To), Italy
Tel: +39-011-5690297
Fax: +39-011-5690298
http://www.dinolitemedical.com
Anno di fabbricazione: 2011
Sommario
1.
DISIMBALLO ..................................................................................................................................... 4
2.
CONTENUTO DELLA CONFEZIONE ............................................................................................. 4
3.
SIMBOLI ............................................................................................................................................. 5
4.
AVVERTENZE................................................................................................................................... 7
5.
INTRODUZIONE ............................................................................................................................... 9
6.
DESTINAZIONE D’USO ..................................................................................................................10
7.
ISTRUZIONI GENERALI DI MANIPOLAZIONE ............................................................................11
8.
ISTRUZIONI GENERALI DI MANUTENZIONE .............................................................................12
9.
ISTRUZIONI PER LE TRE CONFIGURAZIONI D’UTILIZZO ......................................................13
9.1
PROCEDURA DI UTILIZZO COMUNE PER LE TRE CONFIGURAZIONI ............................13
9.2
UTILIZZO COME DERMATOSCOPIO .......................................................................................15
9.3
UTILIZZO COME OTOSCOPIO..................................................................................................16
9.4
UTILIZZO COME MICROSCOPIO CON SUPPORTO PER SPECCHIETTO DENTALE .....18
10
FUNZIONE MISURAZIONE ........................................................................................................20
11
FUNZIONE CALIBRAZIONE .......................................................................................................22
12
FREQUENZA DELLA CALIBRAZIONE......................................................................................26
13
INSTALLAZIONE..........................................................................................................................27
13.1
REQUISITI MINIMI PER L’INSTALLAZIONE ............................................................................27
13.2
INSTALLAZIONE DEL SOFTWARE .........................................................................................27
14
ACCESSORI .................................................................................................................................32
15
PULIZIA DEL MICROSCOPIO ....................................................................................................33
16
PULIZIA DEGLI SPECULUM ......................................................................................................33
17
PULIZIA DELLE PIASTRINE E DELLE COVER DI CONTATTO ............................................33
18
PULIZIA DELL’ACCESSORIO INTEGRATO PER SUPORTO SPECCHIETTO DENTALE
(HOLDER) ................................................................................................................................................33
19
SMALTIMENTO ............................................................................................................................34
20
GARANZIA ....................................................................................................................................35
1. DISIMBALLO
Rammentiamo che gli elementi dell'imballo (carta, cellophan, punti metallici, nastro
adesivo, ecc..) possono tagliare e/o ferire se non maneggiati con cura. Essi vanno rimossi
con opportuni mezzi e non lasciati in balia di persone non responsabili; lo stesso dicasi per
gli attrezzi utilizzati per la rimozione degli imballi (forbici, coltelli, ecc...).
La prima operazione da fare una volta aperti gli imballi, è un controllo generale dei pezzi e
delle parti che compongono il prodotto; verificare che siano presenti tutti i componenti
necessari e le loro perfette condizioni.
2. CONTENUTO DELLA CONFEZIONE
La confezione del Microscopio Digitale Dino-Lite che avete acquistato contiene:
Un microscopio digitale Dino-Lite
Un CD contenente il software
Un astuccio morbido
Un libretto o CD di istruzioni
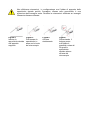
A seconda della destinazione d'uso del microscopio digitale la confezione potrà contenere
inoltre:
•
•
•
•
•
•
Due piastrine di contatto per le rilevazioni in campo dermatologico
Cover per uso dermatologico
Una confezione di “speculum“ per rilevazioni otoscopiche
Un holder integrato col microscopio a cui collegare uno specchietto dentale per
l’ispezione del cavo orale
Un sostegno ove posizionare il microscopio digitale quando non in uso
Un sostegno da tavolo per misurazioni a distanza “Amita” o “AM35B” (presenti solo
in alcuni modelli)
3. SIMBOLI
I simboli mostrati nelle seguenti pagine possono essere presenti sul MICROSCOPIO
DIGITALE DINO-LITE, sulla confezione, sul contenitore di trasporto o nel presente
manuale.
SIMBOLI DI AVVERTIMENTO
AVVERTENZA in questo manuale, indica condizioni e procedure che se non
rispettate potrebbero causare lesioni o danni all’utilizzatore, al paziente o un
uso improprio del dispositivo
ATTENZIONE sul prodotto significa "consultare la documentazione allegata"
SIMBOLI PER LA CONSERVAZIONE, IL TRASPORTO, L’AMBIENTE
Alto
Fragile
Mantenere asciutto
SIMBOLI DI CERTIFICAZIONE
0068
Indica
che
il
prodotto soddisfa i
requisiti essenziali
della Direttiva sui
dispositivi
medicali
93/42/CEE
Indica il nome del
Fabbricante del
prodotto
ANMO
ELECTRONIC
CORPORATION
5F-1, No.76, Sec. 2, Dung-Da
Road, Hsinchu 300, Taiwan
Indica una parte
applicata di tipo
B, in quanto il
microscopio va a
contatto con il
paziente
ITALECO SRL
VIA G.Pastore 8,
10024 Moncalieri
(TO), ITALY
Indica il nome e
l’indirizzo del
responsabile
della conformità
prodotti alle
normative
europee
SIMBOLI DI IDENTIFICAZIONE
Seguito da un codice
alfanumerico indica il
codice lotto
Seguito da un
codice
alfanumerico ed
una data indica il
numero di serie
e l’anno di
fabbricazione
ALTRI SIMBOLI
Indica che il prodotto è conforme alla Direttiva 2002/95/CE relativa
alla riduzione dell'uso di sostanze pericolose nelle apparecchiature
elettriche ed elettroniche
Indica che il prodotto alla fine della propria vita utile deve essere
raccolto separatamente dagli altri rifiuti.
L’utente dovrà, pertanto, conferire l’apparecchiatura giunta a fine vita
agli idonei centri di raccolta differenziata dei rifiuti elettronici ed
elettrotecnici, oppure riconsegnarla al rivenditore al momento
dell’acquisto di una nuova apparecchiatura di tipo equivalente, in
ragione di uno a uno.
L’adeguata
raccolta
differenziata
per
l’avvio
successivo
dell’apparecchiatura dismessa al riciclaggio, al trattamento e allo
smaltimento ambientalmente compatibile contribuisce ad evitare
possibili effetti negativi sull’ambiente e sulla salute e favorisce il
reimpiego e/o riciclo dei materiali di cui è composta l’apparecchiatura.
Lo smaltimento abusivo del prodotto da parte dell’utente comporta
l’applicazione delle sanzioni amministrative previste dalla normativa
vigente
Commissione federale delle telecomunicazioni (FCC, Federal
Communications Commission)
È una commissione statunitense; il simbolo indica che il prodotto non
provoca interferenze con altri dispositivi comunemente presenti in
ufficio o a casa
4. AVVERTENZE
Leggete attentamente le presenti avvertenze prima di utilizzare il Microscopio Digitale
Dino-Lite. Le seguenti avvertenze si riferiscono all'utilizzo generico del Microscopio
Digitale Dino-Lite.
Le avvertenze relative a procedure specifiche, come la misurazione, la calibrazione, il
collegamento degli accessori sono riportate nelle corrispondenti sezioni del manuale.
L'utilizzo del Dino-lite difforme rispetto a quanto descritto nel presente manuale, può
mettere a rischio la salute del paziente e di chi utilizza il microscopio.
Il dispositivo è idoneo per un uso esclusivamente esterno ed a misurazioni non
invasive
Il dispositivo non effettua diagnosi, ma misurazioni. I risultati delle misurazioni
devono essere letti e interpretati da un medico o da un professionista del
settore
NON INSERIRE IL DINO-LITE IN ORIFIZI O CANALI DEL CORPO UMANO O
DEGLI ANIMALI. PERICOLO DI LESIONI GRAVI!
Non inserire le dita o altri oggetti nella cavità ove sono posizionati i led
luminosi
Tenere fuori dalla portata dei bambini
Non utilizzare il microscopio senza accessori
Assicurarsi sempre che gli accessori siano stati regolarmente puliti e disinfettati
prima e dopo l’utilizzo
Prima di maneggiare il microscopio e gli accessori indossare guanti monouso
per mantenere un elevato livello di pulizia e igiene
Non dirigere il fascio luminoso verso gli occhi
Non usare per catturare immagini o video dell’occhio
Non utilizzare il dispositivo a contatto con zone del corpo che presentino ferite
o lesioni, su parti del corpo infiammate, gonfie o doloranti
Non usare il microscopio su pelle sudata o bagnata
L'utilizzo del Dino-Lite, dei suoi accessori e dei dispositivi ad esso associati
senza la presenza di personale adeguatamente preparato può causare danni
irreparabili quali ( a solo titolo esemplificativo ) lesione del timpano, lesioni ed
irritazioni cutanee
Non utilizzare il dispositivo simultaneamente ad altre operazioni che possano
far penetrare polvere, acqua o altre sostanze nel dispositivo quali (a solo titolo
esemplificativo) pulizia dentale, detartrasi
Non utilizzare il dispositivo in prossimità di elevate fonti di calore, campi
magnetici
Non utilizzare il dispositivo a contatto di lenti, vetri o altre superfici in grado di
modificare le percezioni delle immagini
Appoggiare il supporto AMITA o AM35B (supporto da tavolo) solo su superfici
piane e non scivolose
5. INTRODUZIONE
La ringraziamo per aver acquistato il MICROSCOPIO DIGITALE DINO-LITE.
La documentazione fotografica da sola o con l'ausilio di rilievi metrologici offre alla
medicina un prezioso metodo di base per migliorare l’accuratezza delle diagnosi. Solo
un’immagine ben documentata permette all’esaminatore di paragonare le proprie analisi
con il risultato di altre forme di indagine. Inoltre, una serie di immagini comparative
ottenute da esami ripetuti in un certo periodo di tempo consente un giudizio di eventuali
malattie e una più tempestiva verifica dell'efficacia delle cure prescritte o attuate al
paziente. Il microscopio Dino-Lite è in grado di affiancare all’analisi visiva (ingrandimenti,
foto, video) una puntuale verifica metrologica, garantendo nel contempo grande duttilità
(otoscopio, dermatoscopio, supporto per specchietto dentale), estrema maneggevolezza e
facilità d'uso.
Pur essendo uno strumento estremamente facile da usare Dino-lite rimane un
dispositivo medico e pertanto consigliamo la lettura del presente manuale prima
del suo utilizzo
ATTENZIONE! I risultati della misurazione vengono forniti unicamente
come guida per gli utilizzatori e non devono essere utilizzati per la
formulazione di una diagnosi
6. DESTINAZIONE D’USO
Il MICROSCOPIO DIGITALE DINO-LITE è un dispositivo medico che utilizzato unitamente
agli accessori in dotazione permette di osservare in tre configurazioni differenti
l’epidermide, il condotto uditivo, il cavo orale.
Il MICROSCOPIO DIGITALE DINO-LITE permette inoltre di effettuare misurazioni
attraverso l’analisi delle foto digitali catturate utilizzando il software in dotazione Dino
Capture.
La tecnologia del dispositivo permette anche la visualizzazione in tempo reale su di un
comune monitor PC dei video catturati durante l'utilizzo.
Il dispositivo medico è dotato di una fonte di luce a led incorporata utilizzata per illuminare
l’epidermide, l’interno del condotto uditivo, la cavità orale. I led sono controllabili (ON/OFF)
via software (tranne che per il modello AM311H).
Il dispositivo necessita per il funzionamento dell'installazione del software Dino Capture
su di un comune PC (vedere capitolo requisiti minimi per l’installazione).
Il dispositivo è alimentato attraverso il cavo USB di connessione al PC.
La cattura dell’immagine può avvenire via mouse o utilizzando il Microtouch posto
sull’impugnatura del microscopio.
Il dispositivo medico può essere impiegato in tre configurazioni specifiche in base al tipo di
accessori utilizzati:
A - CONFIGURAZIONE DERMATOSCOPIO
B - CONFIGURAZIONE OTOSCOPIO
C - CONFIGURAZIONE MICROSCOPIO CON SUPPORTO PER SPECCHIETTO
DENTALE
Prima di essere utilizzato ed a seconda dell'impiego previsto, il microscopio deve essere
assemblato agli accessori indispensabili per il suo utilizzo e più precisamente:
•
Alle piastrine di contatto per l'utilizzo come dermatoscopio o cover a seconda del
modello
•
Ad uno speculum auricolare (misure 3mm, 4mm, 5mm) per l'utilizzo come
otoscopio
•
All’holder di supporto integrato con il microscopio per specchietto dentale per le
indagini della cavità orale.
ATTENZIONE! IL DISPOSITIVO NON È’ DESTINATO AD INDAGINI
CLINICHE
7. ISTRUZIONI GENERALI DI MANIPOLAZIONE
Manipolare il microscopio utilizzando guanti monouso tenendo presente che, l'utilizzo di
guanti monouso, potrebbe ridurre la sensibilità tattile durante l'utilizzo del dispositivo.
Non utilizzare il microscopio con le mani bagnate
Non utilizzare il microscopio se danneggiato o qualora non funzioni
correttamente
Assicurarsi sempre che il dispositivo sia correttamente collegato all'hardware
sul quale è stato installato il software in dotazione
Non torcere il cavo usb durante l'uso del dispositivo
Non sottoporre il microscopio ad urti
8. ISTRUZIONI GENERALI DI MANUTENZIONE
Prima del suo utilizzo, il prodotto deve essere controllato in tutte le sue parti, anche dopo
la sua pulizia.
Prima dell’uso disinfettare integralmente o in parte lo strumento (la valutazione di questa
necessità va effettuata a cura del medico).
Il prodotto è realizzato con materiali resistenti alla corrosione e alle condizioni ambientali
previste per il normale utilizzo, quindi non necessita di attenzioni specifiche; tuttavia
occorre conservarlo in un ambiente chiuso, pulito ed asciutto, evitandone l’esposizione alla
luce e agli agenti atmosferici, avendo cura di proteggerlo dalla polvere per poterne
garantire le condizioni di igiene.
Non collocare i dispositivi e gli accessori alla luce diretta del sole, a temperature
elevate o in ambienti umidi o polverosi
Dopo l'uso separare sempre il microscopio dagli accessori e dagli specula,
pulirlo con una blanda soluzione disinfettante, effettuare le procedure di pulitura
e disinfezione degli accessori, degli specula auricolari e riporli nelle apposite
custodie in dotazione, avendo cura di scollegare il Dino-Lite da qualsiasi fonte di
energia
Non immergere il microscopio in liquidi
NON SMONTARE MAI il microscopio
9. ISTRUZIONI PER LE TRE CONFIGURAZIONI D’UTILIZZO
9.1 PROCEDURA DI UTILIZZO COMUNE PER LE TRE CONFIGURAZIONI
a) Sistemare la parte da osservare al di sotto ed al centro della zona illuminata del
vostro DinoLite
b) Si consiglia di iniziare a lavorare con il minore ingrandimento (girare la rotella del
microscopio fino a quando la freccia combacia con 20x). Posizionare il microscopio
ad una distanza superiore di 3cm dal soggetto da ingrandire
c) Far scorrere sotto l’ottica (cover) il soggetto da ingrandire al fine di visualizzare la
zona interessata
d) Agire e ruotare la rotella della messa a fuoco per ottimizzare la visualizzazione e
avere una immagine nitida
e) Per utilizzare il microscopio ad un ingrandimento fra il 20x e il 50x, avvicinare
progressivamente il cover alla superficie del soggetto da ingrandire e procedere con
la messa a fuoco come al punto precedente
f) Per utilizzare il microscopio ad ingrandimento di 200x è necessario avvicinare fino
al contatto con il soggetto, il cover del microscopio. Agire sulla rotella per cercare il
fuoco corretto
g) Usare sempre le procedure sopra descritte, stando attenti che le lenti non vadano a
contatto diretto con la parte da osservare
h) Cliccare su “cattura” e successivamente su “immagine” o “video” dal software per
scattare la foto che vi interessa o per avviare la registrazione video
N.B. Per un utilizzo ottimale del microscopio senza supporto si consiglia di impugnare il
manipolo fra pollice ed indice facendolo accomodare nel palmo della mano ed utilizzando
il pollice per le rotazioni della rotella di messa a fuoco. Lo strumento può essere ruotato
sul suo asse al fine di ottenere la rotazione dell’immagine a video a piacimento dell’utente.
Vengono riportate di seguito le istruzioni specifiche per l’utilizzo delle tre configurazioni:
• DERMATOSCOPIO (utilizzo in combinazione con le piastrine di contatto)
• OTOSCOPIO (utilizzo in combinazione con lo speculum auricolare)
• MICROSCOPIO CON SUPPORTO INTEGRATO PER SPECCHIETTO DENTALE
Si ricorda all’utilizzatore che per ciascuna configurazione deve essere utilizzato
l’apposito accessorio.
Non utilizzare per applicazioni o destinazioni d’uso differenti!
Non utilizzare il microscopio senza gli accessori!
Figura 1
Figura 2
Figura 3
Le immagini ed i valori riportati sulle stesse così come proposti in questo manuale sono da
considerarsi a puro titolo esemplificativo.
Le figure 1, 2, 3 fanno riferimento ad un immagine catturata in configurazione dermatoscopio,
ma la procedura descritta è la stessa per tutti i modelli.
9.2 UTILIZZO COME DERMATOSCOPIO
In campo dermatologico il dispositivo medico utilizzato unitamente con le piastrine di contatto
(versioni AM) oppure con le Cover intercambiabili di contatto (versioni AD) permette di
osservare l’epidermide e di effettuare misurazioni attraverso l’analisi delle foto dermatoscopiche o
dei video digitali catturati dal dispositivo. Le piastrine e le cover possono essere sterilizzate con le
normali soluzioni disinfettanti. Le piastrine e le cover sono adatte per uso visivo e per fotografie
digitali.
Per utilizzare la documentazione di immagini nella pratica dermatologica, è necessario avere una
certa esperienza in campo dermatologico ed una conoscenza base di fotografia. È importante
stabilire un modello di flusso di lavoro sistematico nella pratica al fine di assicurare la migliore
qualità possibile dell’immagine, la gestione dell’immagine ed il recupero attendibile dell’immagine
in caso di esami successivi.
In tale configurazione offre al dermatologo un prezioso metodo di base per migliorare l’accuratezza
delle analisi. Il dispositivo ha funzione di misura di lunghezza (compreso calcolo di aree) e di
ampiezza di angolo piano.
Le misurazioni avvengono via software preventivamente installato su di un Personal computer.
Dopo aver provveduto ad inserire la piastrina o la cover sul microscopio (semplice incastro)
chiedere al paziente di assumere una posizione comoda e di mantenersi immobile per la durata
della visita.
•
•
•
•
•
•
•
•
•
•
•
•
•
•
•
•
Collegare il microscopio al computer
Avviare il software (preventivamente installato)
Provvedere ad umettare la piastrina di contatto e l’epidermide del paziente con
disinfettante od olio per dermatoscopia
Appoggiare la piastrina di contatto sull’epidermide del paziente
Scegliere cattura video o immagine
Zoomare per ottenere il formato della fotografia richiesto
Verificare sulla ghiera l’ingrandimento usato
Effettuare le foto, i video utilizzando il microtouch
Allontanare il dispositivo dal paziente
Riporre il dispositivo sul supporto Amita (se presente)
Comunicare al paziente che può muoversi nuovamente.
Posizionarsi con il cursore del mouse sull’anteprima della foto appena scattata nella
parte sinistra dello schermo (figura 1)
Sulla parte superiore dello schermo sarà possibile inserire informazioni sul paziente
ed altre note ritenute necessarie (figura 2)
Cliccare su salva e scegliere la risoluzione desiderata (figura 3)
Salvare nell’archivio del proprio pc utilizzando il proprio sistema di codifica
del paziente
Per effettuare misurazioni vedere il capitolo 10
Le indagini dermatoscopiche devono essere effettuate mantenendo il dispositivo perpendicolare
alla superficie ispezionata, al fine di ridurre al minimo l’alterazione prospettica dell’immagine
catturata.
Il dispositivo è destinato ad esclusivo utilizzo esterno
Non utilizzare il dispositivo a contatto con zone del corpo che presentino ferite, lesioni,
parti del corpo infiammate, gonfie o doloranti
9.3 UTILIZZO COME OTOSCOPIO
In campo otoscopico il dispositivo medico utilizzato unitamente ad uno speculum1 per
otoscopio (misure 3, 4, 5mm), permette di svolgere esami visivi del condotto uditivo
esterno e delle pareti del timpano attraverso l’analisi diretta delle foto otoscopiche o dei
video digitali catturati dal dispositivo.
Lo speculum è in polipropilene riutilizzabile.
In tale configurazione offre all’otorinolaringoiatra un prezioso metodo di base per
migliorare l’accuratezza dell’analisi visiva.
Le misurazioni avvengono via software Dino Capture preventivamente installato su di un
personal computer.
Per l'utilizzo come otoscopio il Dino-Lite richiede l'impiego congiunto di uno speculum
marcato CE in polipropilene riutilizzabile. Lo speculum per essere utilizzato deve essere
sottoposto ad apposita procedura di pulizia e disinfezione come illustrato nell'apposito
paragrafo.
Dopo aver provveduto ad inserire lo speculum sul microscopio (semplice incastro)
chiedere al paziente di assumere una posizione comoda e di mantenersi immobile per la
durata della visita.
•
•
•
•
•
•
•
•
•
•
•
•
•
•
•
•
•
1
Collegare il microscopio al computer
Avviare il software (preventivamente istallato)
Appoggiare la punta dello speculum alla parte più esterna del condotto
uditivo
Scegliere cattura video o immagine
Zoomare per ottenere il formato della fotografia richiesto
Verificare sulla ghiera l’ingrandimento usato
Effettuare le foto, i video utilizzando il microtouch
Allontanare il dispositivo dal paziente
Riporre il dispositivo sul supporto Amita
Comunicare al paziente che può muoversi nuovamente
Posizionarsi con il cursore del mouse sull’anteprima della foto appena
scattata nella parte sinistra dello schermo (figura 1)
Sulla parte superiore dello schermo sarà possibile inserire informazioni sul
paziente ed altre note ritenute necessarie (figura 2)
Cliccare su salva e scegliere la risoluzione desiderata (figura 3)
Salvare nell’archivio del proprio pc utilizzando il proprio sistema di codifica
del paziente
Allontanare il dispositivo dal paziente
Riporre il dispositivo sul supporto da banco
Comunicare al paziente che può muoversi nuovamente
In configurazione otoscopio il Microscopio Dino-Lite è progettato per l’utilizzo con
Speculum della Welch Allyn.
Le indagini otoscopiche devono essere effettuate mantenendo il dispositivo
parallelo al pavimento della stanza ove si effettua la visita, al fine di ridurre al
minimo i rischi di perforazione del timpano causata dalla caduta del microscopio
o del dispositivo speculum
Il dispositivo è destinato ad un utilizzo esterno
Le misurazioni o le indagini visive del padiglione auricolare e del condotto
uditivo devono essere effettuate esclusivamente utilizzando uno speculum
marcato CE
Assicurarsi che il dispositivo Dino-lite sia stato regolarmente collegato al PC
prima di procedere all'applicazione sullo stesso dello speculum
9.4
UTILIZZO COME MICROSCOPIO CON SUPPORTO PER SPECCHIETTO
DENTALE
In campo odontoiatrico il dispositivo utilizzato con l’apposito accessorio holder integrato
per specchietto dentale può essere utilizzato per svolgere esami visivi del cavo orale,
attraverso l’analisi diretta in tempo reale sul monitor o successivamente attraverso l’analisi
dei video o delle immagini catturate ed archiviate via software.
In tale configurazione il microscopio facilita il dentista durante l’ispezione del cavo orale
consentendo una miglior visuale ed una postura di lavoro più ergonomica.
Inserire lo specchietto nell’holder del microscopio come descritto nelle figure 4, 5, 6;
chiedere al paziente di assumere una posizione comoda e di mantenersi immobile per la
durata della visita.
•
•
•
•
•
•
•
•
•
•
•
•
•
•
•
•
Collegare il microscopio al computer
Avviare il software (preventivamente istallato)
E’ possibile ruotare lo specchietto attorno all’asse del microscopio (Figura 7)
Scegliere cattura video o immagine
Zoomare per ottenere il formato della fotografia richiesto
Verificare sulla ghiera l’ingrandimento usato
Effettuare le foto, i video utilizzando il microtouch
Allontanare il dispositivo dal paziente
Comunicare al paziente che può muoversi nuovamente
Posizionarsi con il cursore del mouse sull’anteprima della foto appena
scattata nella parte sinistra dello schermo (figura 1)
Sulla parte superiore dello schermo sarà possibile inserire informazioni sul
paziente ed altre note ritenute necessarie (figura 2)
Cliccare su salva e scegliere la risoluzione desiderata (figura 3)
Salvare nell’archivio del proprio pc utilizzando il proprio sistema di codifica
del paziente
Allontanare il dispositivo dal paziente
Riporre il dispositivo sul banco di lavoro con gli altri attrezzi usati
Comunicare al paziente che può muoversi nuovamente
Il dispositivo è destinato ad un utilizzo esterno
Non inserire il microscopio nella cavità orale
Assicurarsi che l’holder integrato al microscopio sia stato regolarmente pulito e
disinfettato prima dell’utilizzo
Non utilizzare il microscopio simultaneamente ad operazioni di pulizia dentale e
detartrasi
Non effettuare misurazioni in configurazione con l’holder di supporto dello
specchietto dentale poiché l’immagine riflessa nello specchietto è una
proiezione dell’immagine reale. Pertanto le misurazioni effettuate su immagini
riflesse risulteranno alterate
Figura 4
Inserire lo
specchietto dentale
nell’apposito
supporto
Figura 5
Posizionare lo
specchietto in
asse con la lente
del microscopio
Figura 6
Avvitare
strettamente
Figura 7
Schiacciando il
bottone posto
sull’Holder è
possibile ruotare di
90 gradi lo
specchietto
dentale attorno
all’asse del
microscopio
10 FUNZIONE MISURAZIONE
VERSIONE 2.0
1.Cliccare sull’icona misurazioni in alto a destra dell’immagine di cui si desidera ottenere misure.
2.A questo punto il software richiede un valore di ingrandimento che si può inserire nella casella
“Mag”.
3.Avviare la misurazione selezionando uno strumento di misura.
Per esempio, selezionare lo strumento linea per misurare la distanza tra due punti.
4.Cliccare una volta per avviare la misurazione.
5.Trascinare fino al punto desiderato e cliccare nuovamente per terminare la misurazione.
Suggerimento: Per misurazioni ulteriormente precise, cliccare sull’icona Ingrandimento in alto a
destra dopo aver selezionato uno strumento di misurazione.
L’incertezza delle misurazioni effettuate rispettando le procedure e le condizioni
ambientali di esercizio indicate nel presente manuale è di ± 3%
Durante la misurazione è indispensabile tenere il microscopio perpendicolare
alla superficie da esaminare
11 FUNZIONE CALIBRAZIONE
VERSIONE 2.0
1.Nella finestra dell’immagine dal vivo selezionare il menu a tendina di calibrazione (o cliccare sul
pulsante di calibrazione).
2.Selezionare “Nuovo” o “Nuovo Profilo”.
3.Apparirà una finestra pop-up. Riempire la finestra con tutte le informazioni necessarie.
4.Cliccare su Continua la Calibrazione una volta finito di dare le informazioni necessarie.
5.Nel nuovo menu premere il tasto F8 o Freeze per bloccare l’oggetto da calibrare.
6.Inserire il valore di ingrandimento che può essere letta da Dino-Lite. Premere INVIO quando
avete finito.
7.Apparirà una barra rossa con gli estremi blu e le linee guida rosa, ora si è pronti per calibrare.
8. Cliccare una volta per posizionare un estremo blu.
9.Cliccare nuovamente per confermare il posizionamento scelto.
10.Cliccare sull’altro estremo blu per posizionarlo.
11.Cliccare nuovamente per confermare il posizionamento scelto.
12.Quando il posizionamento è ultimato, inserire la distanza nota tra i due punti.
13.Inserire un’unità di misura selezionando il menu a tendina Unit.
14.Premere Finish quando avete finito.
Suggerimento: È possibile creare più profili di calibrazione per i diversi modelli Dino-Lite.
La calibrazione può essere effettuata attraverso un piccolo o grande valore
d'ingrandimento; la più accurata calibrazione si otterrà quando il valore di
ingrandimento è più vicino a quello usato per la misura
La calibrazione può essere cancellata selezionando "Clear Calibration" dal
menù "Righello"
Le misure possono essere ignorate senza cancellare la calibrazione
disabilitando "Measure with AdjustedMag".
" The Adjusted Mag", non sarà mostrato sull'immagine se la calibrazione è
disattivata
ATTENZIONE! UTILIZZARE UN VETRINO METROLOGICO GRADUATO
CON UNA SCALA GRADUATA DI 1 O 2 MILLIMETRI PER EFFETTUARE LA
CALIBRAZIONE
12 FREQUENZA DELLA CALIBRAZIONE
Le operazioni di calibrazione devono avvenire:
•
•
•
Al primo utilizzo
Ogni volta che il dispositivo viene utilizzato dopo averlo lasciato inattivo per almeno
10 giorni
Ogni volta che le misurazioni eseguite diano risultati improbabili o contrastanti
13 INSTALLAZIONE
13.1
REQUISITI MINIMI PER L’INSTALLAZIONE
Utenti Windows
1. Windows 98, 2000, XP, Vista, 7
2. CPU Pentium 1.5GHZ, Celeron, AMD Athlon o equivalenti
3. RAM of 128MB (256MB consigliati)
4. Almeno 150MB di spazio libero su Hard Disk
5. Scheda Video: 16bit
6. Lettore CD-ROM
7. Almeno una porta libera USB 2.0
Utenti Mac Os X
10.4 e successivi (Si Snow Leopard)
13.2
INSTALLAZIONE DEL SOFTWARE
1. Accendere il Pc e inserire il “CD-Driver”.
2. Non connettere la spina USB del microscopio alla porta USB del Pc prima di avere
installato il driver.
3. Dopo l’inserimento del CD-Driver inizia automaticamente l’installazione
4. Premere "Continue"
5. Premere “Driver Installation” e continuare
6. Premere "Avanti"
7. Leggere le condizioni di licenza e
premere "Si" per accettazione.
8. Premere "Avanti"
9. Premere "Installa"
10. Premere "Fine"
11. Premere "Exit"
12. Chiudere la finestra ("X" in alto a
destra) e collegare la spina USB del
microscopio a una porta USB del PC
13. Premere "Avanti
14.Se dovesse comparire questo
messaggio premere “Continua”
15.Premere "Fine
16. Eseguire il software selezionando l'icona apparsa sul Desktop dopo
l'nstallazione
Durante l'utilizzo del software , verificare che non vi siano collegate altre
videocamere o webcam che potrebbero andare in conflitto con il Dino-Lite.
NOTA IMPORTANTE PER UTENTI WINDOWS VISTA
La prima volta che avviate il software con Windows Vista, subito dopo l’installazione
dell’update, cliccate con il tasto destro sull’icona
e selezionate “Esegui come
Amministratore” dal menù. Successivamente cliccare “OK” alla richiesta che appare nella
finestra di pop up di Microsoft Vista.
INSTALLAZIONE DEL SOFTWARE 2.0
Inserire il CD
Premere “Next”
Premere “Continua” (se dovesse apparire questa videata)
Premere “Finish”
Premere l’icona 2.0 che apparirà sul desktop e aprire il programma
Inserire la USB del microscopio nella porta USB del Pc
I led si accenderanno.
Il microscopio è pronto per l’utilizzo
14 ACCESSORI
ARTICOLO
PIASTRINA CONTATTO PICCOLA
CODICE ORDINE CLIENTE
QUANTITÀ
P1
2
P2
2
Cover Aperta AD
FC-CO1
1
Cover Chiusa AD
FC-CC1
1
Cover aperta ADZ
FC-Z-OC2
1
Cover aperta ADZ polarizzata
FC-Z-OZ1
1
Cover Chiusa ADZ
FC-Z-CC3
1
FC-MA1
1
SP3
1 CONFEZIONE DA 50
SP4
1 CONFEZIONE DA 50
SP5
1 CONFEZIONEDA 50
PIASTRINA CONTATTO GRANDE
Cover a becco
SPECULUM 3mm
SPECULUM 4mm
SPECULUM 5mm
Per ordinare gli accessori, contattare:
ITALECO SRL
Via Giulio Pastore 8, 10024, Moncalieri (To), Italy
Tel: +39-011-5690297
Fax: +39-011-5690298
http://www.dinolitemedical.com
15 PULIZIA DEL MICROSCOPIO
E' importante evitare di toccare con le mani o con qualsiasi altro oggetto la lente del
microscopio perché è molto delicata.
Le lenti devono essere pulite il più possibile. Particelle di polvere sulle lenti potrebbero
influire in modo negativo sulla qualità delle immagini.
Per questo motivo, si raccomanda di proteggere sempre il microscopio con il suo involucro
protettivo quando non è in uso.
Evitate assolutamente di utilizzare altri oggetti o liquidi che potrebbero facilmente graffiare
o danneggiare la superficie della lente o del sensore.
Per la pulizia del corpo del microscopio usate un panno morbido leggermente inumidito.
Il prodotto è stato progettato per durare tutta la vita, è resistente alla maggior parte dei
prodotti chimici ad eccezione dei chetoni M.E.K., dei diluenti e delle sostanze per
rimuovere lo smalto.
Le operazioni di pulitura e disinfezione devono avvenire al termine di ogni
singolo utilizzo
NON USARE il microscopio per almeno 15 minuti dopo la sua pulizia
Evitare di toccare la superficie delle lenti.
Quando la pulizia delle lenti dovesse rendersi necessaria, usare aria
compressa secca per rimuovere lo sporco
Non usare materiali abrasivi per pulire la lente, si potrebbero arrecare danni
permanenti alla stessa
16 PULIZIA DEGLI SPECULUM
•
•
•
Sciacquare gli specula riutilizzabili con acqua calda di rubinetto per un minuto.
Immergere gli specula riutilizzabili in alcool isopropilico al 70% per 20 minuti.
Sciacquare gli specula riutilizzabili con acqua di rubinetto e asciugare all'aria.
17 PULIZIA DELLE PIASTRINE E DELLE COVER DI CONTATTO
Le piastrine di contatto le cover possono essere pulite con le normali soluzioni disinfettanti
ogni volta che il medico lo ritenga necessario e comunque almeno una volta al giorno
18 PULIZIA DELL’ACCESSORIO INTEGRATO
SPECCHIETTO DENTALE (HOLDER)
Usare un panno imbevuto di liquido disinfettante per
microscopio
PER
pulire l’holder
SUPORTO
integrato al
19 SMALTIMENTO
Il cassonetto barrato indica che il prodotto alla fine della propria vita utile deve essere
raccolto separatamente dagli altri rifiuti.
L’utente dovrà, pertanto, conferire l’apparecchiatura giunta a fine vita agli idonei centri di
raccolta differenziata dei rifiuti elettronici ed elettrotecnici, oppure riconsegnarla al
rivenditore al momento dell’acquisto di una nuova apparecchiatura di tipo equivalente, in
ragione di uno a uno.
L’adeguata raccolta differenziata per l’avvio successivo dell’apparecchiatura dismessa al
riciclaggio, al trattamento e allo smaltimento ambientalmente compatibile contribuisce ad
evitare possibili effetti negativi sull’ambiente e sulla salute e favorisce il reimpiego e/o
riciclo dei materiali di cui è composta l’apparecchiatura.
Lo smaltimento abusivo del prodotto da parte dell’utente comporta l’applicazione delle
sanzioni amministrative previste dalla normativa vigente.
20 GARANZIA
Ci congratuliamo con Voi per aver acquistato un nostro prodotto.
Questo prodotto risponde ai criteri più esigenti di selezione dei materiali di qualità di
fabbricazione e di controllo finale.
ITALECO SRL garantisce questo prodotto contro eventuali difetti dovuti a materiali o
lavorazioni per la durata di 2 anni dalla data di acquisto originale. Per usufruire della
garanzia è necessario conservare la fattura di acquisto.
In caso di necessità di intervento, spedire insieme al prodotto, anche una copia della
fattura comprovante la data di acquisto. Dalla presente garanzia sono esclusi i danni
procurati da eventuali danneggiamenti dovuti all'incuria o cattivo uso.
Nessun risarcimento potrà essere richiesto per il fermo dell’apparecchiatura.
Inoltre, la sostituzione o riparazione effettuata durante il periodo della garanzia, non
prolungano la durata della garanzia.
La garanzia decade nei seguenti casi:
• Il prodotto è stato manomesso o l'etichetta posta sul cavo usb riportante il numero
di serie è stata asportata, danneggiata o resa illeggibile.
• Il prodotto è stato danneggiato od è stato usato impropriamente.
• Il prodotto è stato aperto o riparato da personale non autorizzato.
• Il prodotto ha subito danni dovuti alla non osservanza delle istruzioni presenti
nell'apposito libretto.
I prodotti ritenuti difettosi devono essere resi solo e soltanto al rivenditore presso il quale è
avvenuto l’acquisto accompagnato dalla fattura di acquisto.
Il prodotto verrà riparato o sostituito a nostro insindacabile giudizio.
ITALECO SRL
Via Giulio Pastore 8, 10024, Moncalieri (To), Italy
Tel: +39-011-5690297
Fax: +39-011-5690298
http://www.dinolitemedical.com
Via G. Pastore,8 10024 - Moncalieri (TO) – ITALY
Tel: +39-011-5690297 Fax: +39-011-5690298
http:// www.dinolitemedical.com
Declaration of conformity
Dichiarazione di conformità
0068
We / Noi
ITALECO S.R.L.
Via G. Pastore,8 - 10024 - Moncalieri - (TO) - ITALY
As authorised importers and distributors by the manufacturer :
In qualità di importatori e distributori autorizzati dal fabbricante:
ANMO ELECTRONICS CORPORATION
5F-1, No.76, Sec. 2, Dung-Da Road, Hsinchu 300, Taiwan
We declare under our own responsability that the under mentioned medical devices meet all the provisions of the Council Directive 93/42/CEE
modify of Directive 2007/47/CE
Dichiariamo sotto nostra responsabilità che il dispositivo medico sotto menzionato soddisfa tutte le disposizioni della direttiva 93/42/CEE come
modificata dalla Direttiva 2007/47/CE e recepita in Italia con D.Lgs. del 25 Gennaio 2010, n. 37 di modifica del D.Lgs. del 24 Febbraio 1997, n.46
DIGITAL MICROSCOPE DINO-LITE / MICROSCOPIO DIGITALE DINO-LITE
MODELS / MODELLI
FEDMED11
FEDMEDM1500
FEDMED100
FEDMED700U1
FEDMEDM7500PLD
FEDMED1500LD
FEDMEDM1500LD FEDMED700U2
FEDMED100PLD
FEDMEDM100
FEDMED100M
FEDMEDM1500P
FEDMED700IR
FEDMED1500PLD
FEDMEDM100M
FEDMED100LD
FEDMED100LD40
FEDMED700UW
FEDMEDM100PLD
FEDMEDM100LD
FEDMED100UWLD
FEDMED600
FEDMEDM700
FEDMEDM1500PLD
FEDMEDM100UWLD
FEDMED100P
FEDMED600P
FEDMEDM700P
FEDMED1500UW
FEDMEDM600IR
FEDMED100IR
FEDMED600LD
FEDMEDM700LD
FEDMEDM1500UW
FEDMEDM600UW
FEDMED100U1
FEDMED600U1
FEDMEDM700U1
FEDMED1500U2
FEDMED700
FEDMED100U2
FEDMED600U2
FEDMEDM700U2
FEDMEDM1500U2
FEDMED700P
FEDMED100UW
FEDMED600IR
FEDMEDM700IR
FEDMED1500U1
FEDMED700LD
FEDMED100N
FEDMED600UW
FEDMEDM700UW FEDMEDM1500U1
FEDMED2500P
FEDMED1500
FEDMEDM600
FEDMED100P4
FEDMED100UW2
FEDMEDM7500
FEDMED1500P
FEDMEDM600P
FEDMEDM100P
FEDMED1500UW2
FEDMEDM7500P
FEDMED21
FEDMEDM600LD
FEDMEDM100UW FEDMEDM100UW2
FEDMEDM7500LD
FEDMED200
FEDMEDM600U1
FEDMEDM100P4
FEDMEDM1500UW2
FEDMEDM1500N
FEDMED300
FEDMEDM600U2
FEDMED2500
FEDMED1500N
FEDMEDM100N
FEDMEDM700PLD
FEDMED1500IRU
Medical device Class 1 with measurement functions – Council Directive 93/42/CEE modify of Directive 2007/47/CE - allegato IX
Dispositivo medico di classe I con funzione di misura secondo l'allegato IX della direttiva 93/42/CEE come modificata dalla Direttiva
2007/47/CE
Armonised and National regulations, further related documents applied
Norme armonizzate o nazionali applicate, altri documenti normativi applicati
EN 60601-1:2006; EN 60601-1-1:2001; EN 60601-1-2:2007;
EN 60601-1-2/A1:2006; EN 60601-1-6:2007; EN 60601-1-4/A1: 1999
EN 1041:1998; EN 980:2008
Conformity procedures of evaluation / Procedura di valutazione della conformità
ALLEGATO VI ( with limitation to the sole aspects related to metrology requirements in manufacturing ) and ALLEGATO VII
ALLEGATO VI (con limitazione ai soli aspetti della fabbricazione che riguardano la conformità dei prodotti ai requisiti metrologici) e ALLEGATO VII
Approved body releasing the authorisation / Organismo notificato intervenuto
ISTITUTO DI RICERCHE E COLLAUDI M. MASINI S.R.L. notificato con numero 0068
ISTITUTO DI RICERCHE E COLLAUDI M. MASINI S.R.L. notified at number 0068
PLACE AND DATE OF ISSUE
Luogo e data di inizio validità presente
dichiarazione
Moncalieri (TO), 31.05.2010
Authorized representative / Legale rappresentante
For and behalf of Italeco S.r.l.
Federico Pastore
Signature / Firma leggibile