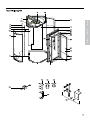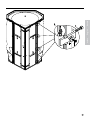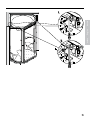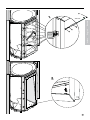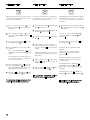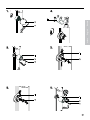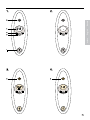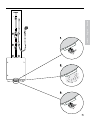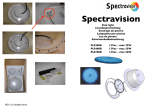
1
Pharo® Dampfdusche
WellSpring
Pharo® WellSpring 130
29620XXX
Montageanleitung
Installation Instructions
Istruzioni di montaggio
Inhaltsverzeichnis
Contents
Masse
3
Bestandteile
4
Technische Daten
10
Vorwort
15
In der Anleitung Verwendete
Symbole
16
Sicherheitsvorschriften
18
Benötigtes Werkzeug
20
Montage Acrylelemente
22
Sichtdichtungen Montage
42
Trägerplatten Montage -Optional- 44
TürMontage
48
Montage Eckschrank
56
Montage Eckpaneel
58
Funktionsprüfung K IV Steam Plus 66
Endmontage
68
Safety Function
70
Thermostat justieren K IV Steam Plus72
Verkleiden der Kabine
74
Steuerung K IV Steam Plus
76
Dimensions
Components
Technical Data
Foreword
Symbols Used in the Instructions
Safety Precautions
Required Tools
Installation Of Acrylic Elements Visible seals Installation Mounting Plates
Installation (optional)
Door Installation
Corner Cabinet Installation
Corner Panel Installation
Functional Check K IV Steam Plus
Final Work
Safety Function
Thermostat Adjustment
K IV Steam Plus
covering the cabin
3
4
10
15
16
18
20
22
42
Bedienung (ML/Steam)
Bedienung
Reinigung/ Wartung
Entkalken
K IV Steam Plus Control
Operation (ML/Steam)
Operation
Cleaning/ Maintenance
Decalcifying
76
88
90
94
96
88
90
94
96
Indice
44
48
56
58
66
68
70
72
74
Ingombri
3
Componenti
4
Parti di ricambio
6
Introduzione
15
Simboli utilizzati nel manuale
16
Prescrizioni di sicurezza
18
Utensili richiesti
20
Montaggio degli Elementi Acrilici 22
Inserire le guarnizioni a vista
42
montaggio piastra di
supporto (opzionale)
44
Montaggio della Porta
48
Montaggio dell'armadietto angolare56
Montaggio del pannello angolare 58
Controllo del funzionamento K IV
Steam Plus
66
Montaggio finale
68
Safety Function
70
Taratura del termostato
K IV Steam Plus
72
Riverstimento della Cabina
74
Controllo K IV Steam Plus
76
Uso (ML/Steam)
88
Uso
90
Pulizia/ Manutenzione
94
Per togliere il calcare
96
Ingombri
Deutsch
29620xxx
English
Pharo® WellSpring 130
Dimensions
Italiano
Masse
Bestandteile
WellSpring 130
Components
WellSpring 130
Componenti
WellSpring 130
Karton 1 (2170x650x620 mm / 30 kg)
Sitzelement 1
Carton 1 (2170x650x620 mm / 30 kg)
seat element 1
Imballo 1 (2170x650x620 mm / 30 kg)
elemento sedile 1
Karton 2 (2170x800x150 mm / 28 kg)
Seitenelement 1
Carton 2 (2170x800x150 mm / 28 kg)
side element 1
Imballo 2 (2170x800x150 mm / 28 kg)
elemento laterale 1
Karton 3 (2170x800x150 mm / 28 kg)
Seitenelement 2
Carton 3 (2170x800x150 mm / 28 kg)
side element 2
Imballo 3 (2170x800x150 mm / 28 kg)
elemento laterale 2
Karton 4 (1350x1350x250 mm / 20 kg)
Dachelement
Carton 4 (1350x1350x250 mm / 20 kg)
roof element
Imballo 4(1350x1350x250 mm / 20 kg)
elemento porta
Karton 5 (2170x650x620 mm / 30 kg)
Sitzelement 2
Carton 5 (2170x650x620 mm / 30 kg)
seat element 2
Imballo 5 (2170x650x620 mm / 30 kg)
elemento sedile 2
Karton 6 (2170x1350x240 mm / 36 kg)
Türelement
Tür
Carton 6 (2170x1350x240 mm / 36 kg)
door element
door
Imballo 6 (2170x1350x240 mm / 36
kg)
piastre di supporto
opzione
Karton 7 (2170x500x420mm / 45,5 kg)
Eckpaneel
Eckschrank
Zubehör (Befestigungsteile)
Carton 7 (2170x500x420mm / 45,5 kg)
corner panel
corner cabinet
accessories (mounting parts)
Karton 8 *(2170x800x150 mm / 35 kg)
Trägerplatten
Carton 8 * (2170x800x150 mm / 35 kg)
mounting plate
Karton9 *(1350x1350x250 mm / 30 kg)
Duschwanne/ Rahmen
Carton 9* (1350x1350x250 mm / 30
kg)
shower tray/ frame
* Option
* Option
Imballo 7(2170x500x420mm / 45,5 kg)
pannello angolare
armadietto angolare
accessori opzionali (elementi di montaggio)
Imballo 8 * (2170x800x150 mm / 35
kg)
superfici
Imballo9*(1350x1350x250 mm / 30 kg)
piatto doccia
* Opzionale
Italiano
3
2
8*
5
English
1
Deutsch
4
7
9*
6
Serviceteile
Spare parts
Pos.
1
2
3
4
5
6
7
8
9
10
11
12
13
14
15
16
17
18
Description
Descrizione
cursore completa
support, assy
pannello angolare completo
corner panel cpl.
pannello angolare completo
corner panel cpl.
unità riempimento di sostanze aromatiche
fragrance device cpl.
coperchio
cover
filtro
sieve
limitatore sostanza aromatica
fragrance adjusting
recipiente per sostanza aromatica
fragrance reservoir
valvola elettromagnetica
solenoid valve
sensore livello
level sensor
generatore di vapore
steam generator cpl.
spirale di riscaldamento
heating element
ugello di fuoriuscita vapore
Steam Outlet
set di viti
screw set
cassetta di contenimento
switching Box
lastra di vetro
glass plate
set di fissaggio
mounting kit
diffusore (getto normale)
body spray jet (normal jet)
diffusore (getto a spruzzo)
body spray jet (fine spray jet)
body spray jet (massage spray jet) diffusore (getto massaggio)
copertura
escutcheon
doccia laterale
body shower
guarnizione angoliera / pannello
seal corner cabinet/panel
manopola termostatico
handle for thermostat
cappuccio
sleeve
elemento termostatico
thermostat cartridge
manopola
handle
cappuccio
sleeve
valvola d'arresto
isolating valve
deviatore
handle
cappuccio
sleeve
cartuccia rubinetto / deviatore
cartridge on/off control
scatola di comando K IV LITE STEAM
control K IV LITE STEAM
scatola di comandoK IV STEAM PLUS
control K IV STEAM PLUS
flessibile
shower hose
doccetta AX Carlton
handshower AX Carlton
doccetta AX Starck
handshower AX Starck
doccetta HG Aktiva A8
handshower HG Aktiva A8
doccetta AX Uno
handshower AX Uno
getto d’acqua
surge shower
valvola d'arresto
isolating valve
tubo di raccordo per flessibile
hose connection angel
termosensore
temperature sensor
recipiente per essenza aromatica
tank for 'aromatics'
valvola elettromagnetica
solenoid valve
copertura
escutcheon
valvola elettromagnetica
solenoid valve
wall holder for hand shower (Porter'C)supporto per HB (Porter'C)
ripiano in vetro
shelf
anello di tenuta
support element
coperchio (essenza aromatica
cover (fluid aromatics)
liquida)
19
20
21
22
23
24
25
26
27
28
29
30
31
32
33
34
35
36
37
38
39
40
41
42
43
44
Bezeichnung
Schieber kpl.
Eckpaneel kpl.
Eckpaneel kpl.
Duftbefülleinheit kpl.
Deckel
Sieb
Duftbegrenzer
Duftbehälter
Magnetventil
Levelsensor
Dampfgenerator kpl.
Heizspirale
Dampfaustrittsdüse
Schrauben Set
Schaltkasten
Glasplatte
Befestigungssatz
Strahlkörper (Normalstrahl)
Strahlkörper (Nebelstrahl)
Strahlkörper (Massagestrahl)
Rosette
Seitenbrause
Dichtung Eckschrank/Paneel
Thermostatgriff
Hülse
Temperatur Regeleinheit
Griff
Hülse
Absperrventil
Griff
Hülse
Einsatz Ab-/Umstellung
Steuerung K IV LITE STEAM
Steuerung K IV STEAM PLUS
Brauseschlauch
Handbrause AX Carlton
Handbrause AX Starck
Handbrause HG Aktiva A8
Handbrause AX Uno
Schwallbrause
Absperrventil
Schlauchanschlußwinkel
Temperaturfühler
Duftstoffbehälter
Magnetventil
Rosette
Magnetventil
Wandhalter für HB (Porter'C)
Glasablage
Halteelement
Deckel (flüssig Duftstoff)
xxx
000
090
320
410
420
Oberflächen
chrom
chrom/gold
weiß (alpin)
pergamon
platin
Colors
chromeplated
chromeplated/goldplated
white (alpin)
pergamon
platin
Parti di ricambio
Nr./Nr./No.
97024xxx
97071980
97071980
97079000
97080000
97081000
97082000
97083000
97084000
97085000
97086000
97087000
97458000
21880xxx
97088000
21881000
97044000
28406xxx
28409xxx
28408xxx
97095xxx
25944000
97098000
36391xxx
95032xxx
94282000
36991xxx
97099xxx
94142000
97056xxx
97057xxx
96645000
97110000
97920000
25941xxx
17850xxx
28530xxx
28547xxx
38850xxx
96928000
97103000
25948000
97922000
97484000
97485000
97541000
96646000
27521xxx
25933000
25958xxx
98602000
Couleures
cromato
cromato/oro
bianco (alpino)
pergamon
platino
450
460
800
810
880
weiß
grau
steel
satinox
edelmatt
white
grey
steel
satinox
satin chrome
bianco
grigio
steel
satinox
satinato
VE
1
1
1
1
1
1
1
1
1
1
1
1
1
1
1
1
1
1
1
1
1
1
1
1
1
1
1
1
1
1
1
1
1
1
1
1
1
1
1
1
1
1
1
1
1
1
1
1
1
1
1
32
32
36
1
Deutsch
33
1
31
25
24
29
2
English
31
40
30
23
3
Italiano
22
21
20
28
27
18
18
26
43
42
10
41
9
44
6
5
6
19
11
4
7
39
8
37
12
38
34
35
15
16
13
17
14
Serviceteile
Spare parts
Parti di ricambio
Pharo® Wellspring 130
Pos.
Bezeichnung
1 Dach kpl.
2 Sitzelement
3 Seitenwand links
Seitenwand für Trägerpl. links
4 Seitenwand rechts
Seitenwand für Trägerpl. rechts
5 Trägerplatte
6 Rahmen
7 Türelement
8 Dichtung (5,5 m)
9 Beleuchtungsmodul
10 Lautsprecher
11 Trafo (Beleuchtungsmodul)
12 Trafo (Halogenlicht)
13 Dichtung 3 Rippen (7,5 m)
14 Dichtung 2 Rippen (5 m)
15 Dichtung Türelement (5,5 m)
16 Klemmwinkel- Set
17 Abstandhalter
18 Befestigungsblech
19 Durchführung Wasseranschluss
20 Anschlagleisten-Set
21 Türgriff-Satz
22 Türscharnier kpl.
23 Türrahmen rechts
Türrahmen links
Description
roof cpl.
seat element
left side panel
left side panel for mounting plate
right side panel
right side panel for mounting plate
mounting plate
frame
door element
seal (5,5 m)
lighting module
speaker
transformer (lighting module)
transformer (halogen lighting)
seal (3 ribs / 7,5 m)
seal (2 ribs / 5 m)
seal for door element (5,5 m)
clamping angle kit
spacer
mounting sheet
water supply duct
Anschlagleisten-Set
door handle set
side door hinge
door frame right
door frame left
Descrizione
tetto compl.
elemento sedile
parete sinistra
Parete (piastra di supp.) sinistra
parete destra
parete (piastra di supp.) destra
piastra di supporto
telaio
elemento porta
guarnizione elemento porta (5,5 m)
modulo d‘illuminazione
altoparlante
trasformatore (modulo d‘illuminazione)
trasformatore (luce alogena)
guarnizione 3 alette (7,5 m)
guarnizione 2 alette (5 m)
guarnizione elemento porta (5,5 m)
set di Angolari di fissaggio
distanziatore
lamiera di fissaggio
passante per l‘allacciam. dell’ acqua
listello d’arresto
maniglie per porte
cerniera porta compl.
telaio della porta destra
telaio della porta sinistra
Nr./Nr./No.
97613980
97633xXX
97634xxx
98634xxx
97635xxx
98635xxx
97614000
29621180
97636xxx
97616000
97652000
97102xxx
97068000
25925000
97619000
97620000
97621000
97822000
97625000
97626000
97627000
98572xxx
29922xxx
98567xxx
98568xxx
98569xxx
25 Magnetleisten-Set
26 Dichtprofil horizontal
27 Echtglastür rechts
Echtglastür links
-- Kopfbrause Ø 180 mm
-- Kopfbrause Ø 240 mm
-- Halogenlicht
-- Wandbefestigungs-Set
-- Befestigungs-Set Trägerplatte
magnetic strip set
horizontal door seal
glass door right
glass door left
over head shower
over head shower
halogen lighting
wall fixing kit
fixing kit for mounting plate
98571xxx
98570000
98565xxx
98566xxx
97632xxx
97618XXX
97617XXX
97623000
97624000
-- Befestigungs-Set Tür
fixing kit for door
set listelli magnetici
guarnizione orizzontale
porta di vetro destra
porta di vetro sinistra
soffione doccia Ø 180 mm
soffione doccia Ø 240 mm
luce alogena
set di fissaggio alla parete
set di fissaggio per la piastra di
supporto
set di fissaggio per la porta
xxx
000
090
320
410
420
Oberflächen
chrom
chrom/gold
weiß (alpin)
pergamon
platin
Colors
chromeplated
chromeplated/goldplated
white (alpin)
pergamon
platin
98573000
Couleures
cromato
cromato/oro
bianco (alpino)
pergamon
platino
450
460
800
810
880
weiß
grau
steel
satinox
edelmatt
white
grey
steel
satinox
satin chrome
bianco
grigio
steel
satinox
satinato
VE
1
1
1
1
1
1
1
1
1
1
1
1
1
1
1
4
10
1
1
1
1
1
1
1
1
1
1
1
1
1
1
1
1
1
Pharo® Wellspring 130
9
10
1
3
5
4
Deutsch
2
11
5
18
Italiano
2
English
7
22
23
20
19
26
21
27
6
25
20
8
15
13
14
12
17
16
Technische Daten
Technical Data
Dati tecnici
Mindestfließdruck: 2 bar
Betriebsdruck
2 – 5 bar
Prüfdruck: 16 bar
Heißwassertemperatur: max. 70 °C
Empfohlene Heißwassertemp.: 60 °C
Sicherheitssperre: 38 °C
Minimum flow pressure: 2 bar
Operating pressure: 2 – 5 bar
Test pressure: 16 bar
Hot water temperature: max. 70° C
Recommended hot water temp.: 60° C
Safety stop: 38° C
Pressione minima: 2 bar
Pressione di servizio:
2 – 5 bar
Pressione di prova: 16 bar
Temperatura acqua calda: max. 70° C
Temp. acqua calda consigliata: 60° C
Blocco di sicurezza: 38° C
Durchflussleistung bei 3 bar:
Handbrause (1): 13,6 l/min
6 Seitenbrausen (2): 17,8 l/min
Handbrause + 6 Seitenbrausen (3):
20,6 l/min
Kopfbrause:
14,0 l/min
Schwallbrause: 20,4 l/min
Dampferzeuger: 4,1 l/h (Dampfbetrieb)
Dampferzeuger: 7,7 l/h (Dampfbetrieb + Drainage)
Flow capacity at 3 bar:
Hand shower (1): 13,6 l/min
6 body showers (2): 17,8 l/min
Hand shower + 6 body showers (3):
20,6 l/min
Over head shower:
14,0 l/min
Surge shower: 20,4 l/min
Steam generator: 4.1 l/h (steam operation)
Steam generator: 7.7 l/h (steam operation+ drain)
Portata con 3 bar:
Doccetta (1): 12,9 l/min
6 Getti laterali (2): 17,8 l/min
Doccetta + 6 Getti laterali (3):
20,6 l/min
Soffione doccia:
14,0 l/min
Doccia ad onda piena: 20,4 l/min
Generatore di vapore: 4,1 l/h (esercizio con vapore)
Generatore di vapore:
7,7 l/h (esercizio con vapore +
drenaggio)
Fu n k t i o n s t ü c h t i g a b 2 b a r. E s
d ü r f e n m a x i m a l 2 Ve r b r a u c h e r
zusammengeschaltet werden.
Functions as from 2 bar. Only 2 consumers
can be switched simultaneously.
Die Dampfdusche kann nicht
i n Ve r b i n d u n g m i t h y d r a u l i s c h ,
elektronisch und thermisch gesteuerten
Durchlauferhitzern eingesetzt werden.
Druckunterschiede zwischen den Kaltund Warmwasseranschlüssen müssen
ausgeglichen werden.
Ab 14 °d (2,5 mmol/l) Ihres Wassers
ist zum Schutz des Dampfgenerators
eine Wasserenthärtungsanlage in die
Wasserzufuhr einzubauen.
Die Dampfdusche bestehet aus
folgenden Werkstoffen:
- Kabine aus Acryl
- Kabinenrahmen aus verzinktem Stahl
- Eckschrank mit Dampftechnik aus
Acryl
- E c k p r o f i l u n d R a h m e n a u s
Aluminium
Mindestraumhöhe von 2250 mm notwendig und erforderliche Höchstbelastung des Fußbodens ist 200 Kg/m²,
daher muss der Raum, in den das Produkt eingebaut wird, dem obigen entsprechen.
Legende
A Leerrohr 1 für Lautsprecheranschlusskabel.
B Leerrohr 2 mit Innen-Ø 25 mm für
Stromversorgung:
Stromversorgung 230V/N/PE/50Hz
(Länge: 3 m) vorinstallieren.
Die Absicherung muss über eine
Fehlerstrom-Schutzeinrichtung (RCD)
mit einem Bemessungsdifferenzstrom ≤ 30 mA. erfolgen.
C Leerrohr 3 mit Innen-Ø 25 mm für
Trafokabel:
Das Leerrohr 3 für den externen
10
The Steam shower cannot be used
in combination with hydraulically,
electronically and thermally controlled
flow heaters.
The pressures of the cold and hot water
connections must be balanced.
Install water softening equipment in
the water inlet to protect the steam
generator as from water hardness level
14°d (2,5 mmol/l) (German Standard).
The steam shower consist of the
following materials:
- corner cabinet with steam system
made of acrylic material
- cabin made of acrylic material
- frame for cabin made of steal
profiles
- corner cabinet with steam system
made of acrylic material
- corner profile and frame montages
made of aluminium.
A minimum room height of 2250 mm is
necessary and the required maximum
floor load is 200 Kg/m², therefore the
room where the product is to be installed has to meet the requirements
mentioned above.
Legend
A Wiring conduit 1 for loudspeaker
connction cable.
B Wiring conduit 2 with internal
diameter 25 mm for power supply
cable:
pre-assemble power supply cable
230V/N/PE/50Hz (length: 3 m)
The connection must be fused via a
2-pole RCCB with a residual current
of ≤ 30 mA
C Wiring conduit 3 with internal
diameter 25 mm for transformer
Funzionante a partire da 2 bar. Al massimo possono essere collegate 2 utenze
contemporaneamente.
La doccia a vapore non può essere
impiegata in combinazione con scaldabagni istantanei idraulici, elettronici e
termostatici.
È necessario compensare le differenze
di pressione esistenti tra gli attacchi
dell'acqua fredda e quelli dell'acqua
calda.
A partire da 14°d (2,5 mmol/l) dell'acqua,
a protezione del generatore di vapore è
indispensabile montare un impianto
per la addolcificazione dell'acqua
nell'alimentazione dell'acqua.
La doccia a vapore è composta dai seguenti materiali:
- cabina in materiale acrilico
- telaio della cabina di profilati in acciaio
- parete angolare con tecnologia del vapore in materiale acrilico
- parete angolare con tecnologia del
vapore in materiale acrilico
- profilato angolare in alluminio
Altezza minima necessaria della stanza
pari a 2250 mm ed il carico massimo
richiesto per il pavimento è di 200 Kg/
m², pertanto il locale in cui si intende
installare il prodotto deve corrispondere
a quello di cui sopra.
Legenda
A Tubo vuoto 1 per il cavo di collegamento
dell’altoparlante.
B Tubo vuoto 2 con Ø interno di 25 mm
per l’alimentazione elettrica:
Il cavo d’alimentazione di corrente
elettrica in dotazione con spina per
l’allacciamento del generatore di vapore
alla rete (Lunghezza Max 3 m).
Deutsch
English
Italiano
Pharo® WellSpring 130
29620xxx
F
11
Technische Daten
Technical Data
Dati tecnici
Trafoanschluss ist nur bei Kabinen
ohne Farblicht notwendig!
Der mitgelieferte Trafo muss im
Trockenbereich (Schutzzone 3)
installiert werden. Das Trafokabel
ermöglicht die Installation des
Trafos bis zu max. ca. 6 m entfernt
vom Eckschrankmodul. Der Trafo
muss jederzeit zugänglich sein. Ein
beschädigter Anschluss kann nicht
ersetzt werden. Der Trafo darf dann
nicht mehr betrieben werden.
Der Trafo wird an eine Steckdose
230V/50Hz angeschlossen und
m u s s ü b e r e i n e Fe h l e r s t ro m Schutzeinrichtung (RCD) mit einem
Bemessungsdifferenzstrom von
≤ 30 mA abgesichert werden.
D Leerrohr 4 für Potentialausgleich:
Potentialausgleich (Kabel mit 4 mm²
/ Länge: 3 m) vorinstallieren.
E idealer Bereich für Bodenablauf
(Ablaufleistung > 0,7 l/s)
F idealer Bereich für Wasserzulauf aus
der Wand (nur festes- oder flexibles
Rohrmaterial verwenden).
cable:
The Wiring conduit 3 for the external
transformer connection is necessary
only for cabins without colour light!
The transformer must be installed
in the dry area (protection zone
3). The cable provided allows the
transformer to be installed max.
approx. 6 m from the corner cabinet.
The transformer must be accessible
at all times. A damaged connection
cable cannot be replaced, and the
transformer must not be operated in
this case.
The transformer will be connected
to a socket for electrical supply (230
V/50 Hz AC) and must be fused via a
2-pole RCCB with a residual current
of ≤ 30 mA.
D Wiring conduit 4 for cross-section:
pre-assemble cross section (cable
with 4 mm² / length: 3 m)
E ideal area for waste. The waste must
be able to pass 0,7 l/s.
TWW hot water (left) DN15 ½“
TWK cold water (right) DN15 ½“
TWW Trinkwasser warm DN15 ½“ +
bauseitig vorbereitetes Installationssystem zwischen TWW-Anschluss
und Kabine.
TWK Trinkwasser kalt DN15 ½“ +
bauseitig vorbereitetes Installationssystem zwischen TWK-Anschluss und
Kabine.
Anschluss für Wasserzulauf und der
Wasserablauf sind nach den derzeit
gültigen DIN 1988/EN 1717 / DIN 1986/
EN 12056 und den örtlichen Vorschriften
zu installieren (Anschlußmuffe DN15 ½“,
bündig Fliesen).
12
Connections for water inlet and drain
have to be installed according to the
currently valid DIN 1988/EN 1717 /
DIN 1986/EN 12056 as well as local
regulations (connection sleeve DN15
½“, flush with tiles).
Prevedere una scatola di collegamento
con il collegamento elettrico 230V/N/
PE/50Hz per il cavo d’alimentazione di
corrente elettrica. La protezione deve
essere eseguita attraverso un interruttore
automatico a corrente residua (RCD) con
una taratura della corrente differenziale
pari a ≤ 30 mA.
Il tubo vuota di posa 3 per la connessione
del trasformatore esterno è necessario
solamente con cabine prive di
Cromoterapia.
C Tubo vuoto di posa 3 con Ø interno 25
mm per cavo del trasformatore:
Il trasformatore in dotazione deve
essere installato in zona asciutta (zona di
protezione 3). Il cavo del trasformatore
consente di installare il trasformatore
fino ad una distanza massima di ca.
6m dal modulo armadietto angolare. Il
trasformatore deve essere accessibile
in qualsiasi momento. Non è possibile
sostituire un collegamento danneggiato.
In tal caso non è più permesso utilizzare
il trasformatore.
Il trasformatore viene collegato ad una
presa di alimentazione 230V/50Hz e deve
essere protetto attraverso un interruttore
automatico a corrente residua (RCD) con
una taratura della corrente differenziale
pari a ≤ 30 mA.
DTubo vuoto di posa 4 per la compensazione
del potenziale: preinstallare la
compensazione del potenziale (cavo
con 4 mm² / lunghezza: 3 m).
E Zona ideale per lo scarico a pavimento
(velocità di scarico > 0,7 l/s)
TWW acqua potabile calda (lato
sinistro) DN15 ½“
TWK acqua potabile fredda (lato
destro) DN15 ½“
La connessione dell‘acqua e dello scarico
devono essere predisposte seguendo le
norme valide DIN 1988/EN 1717 / DIN 1986
/ EN 12056 e in conformità alla normativa
vigente nel paese d‘installazione (connettere
con manicotto DN 15 1/2“ a livello delle
piastrelle)
Die vorliegende Anleitung ist für den
Installateur gedacht, sie beschreibt die für
einen korrekten Einbau anzuwendenden
Systeme und Methoden.
These instructions are intended for
the installer, they describe the systems
and methods to be used for correct
installation.
Il presente manuale è destinato agli
installatori. In esso si descrivono i sistemi
ed i metodi da seguire per una corretta
installazione.
Die Dampfduschen entsprechen den
Richtlinien und weissen daher keine
Gefahren für den Benutzer auf, falls sie
nach den vom Hersteller gelieferten
Anweisungen eingebaut, benutzt
und gepflegt werden und unter der
Bedingung, dass die elektrischen und
mechanischen Teile voll leistungstüchtig
gehalten werden.
Aus diesem Grund sind die in der
vorliegenden Anleitung verzeichneten
Anweisungen genauestens zu
befolgen.
The steam showers complies with the
regulations and therefore presents
no hazards for the user, providing it is
installed, used and serviced according
to the instructions provided by the
manufacturer and with the condition
that the electrical and mechanical parts
are maintained fully operational.
For this reason, the instructions contained
here in are to be followed exactly.
L’idrocabina rispondendo alle direttive
non rappresenta pericoli per l’operatore
se, installata, usata, mantenuta secondo
le istruzioni fornite dal costruttore e
a condizione che le parti elettriche
e quelle meccaniche siano tenute in
perfetta efficienza.
Per questa ragione occorre attenersi
scrupolosamente alle istruzioni indicate
in questo manuale.
Die Dampfduschen sind in Konformität
mit den Niederspannungsrichtlinien 73/
23/EWG, 93/68/EWG und der Norm CEI
64-8 (IEC 60364) hergestellt.
Die Schutzart ist IPX5, die Nennspannung
ist 230 V/50 Hz, die Nennleistung ist 3,5
kW.
Die von der Europarichtlinie für
elektromagnetische Verträglichkeit
auferlegten Sicherheitsanforderungen
(Richtlinien 89/336/EWG, 92/31/EWG,
93/68/EWG) und die Konformität mit
der letzteren wird durch die Anwendung
folgender europäischer Normen
gewährleistet:
EN 55014-1
EN 55014-2
EN 61000-3-2
EN 61000-3-3
EN 61000-4-2
EN 61000-4-3
EN 61000-4-4
EN 61000-4-5
EN 61000-4-11
The steam showers are manufactured
in conformity with the low voltage
directives 73/23/EEC, 93/68/EEC and
the CEI 64-8 (IEC 60364) standard.
The protection type is IPX5, the rated
voltage is 230 V/50 Hz, the rated power
is 3.5 KW.
The safety requirements imposed by the
European directive for electromagnetic
compatibility (directives 89/336/EEC,
9 2 / 3 1 / E EC, 93/ 68/E EC) and the
conformity with the last are ensured
by the application of the following
European standards:
EN 55014-1
EN 55014-2
EN 61000-3-2
EN 61000-3-3
EN 61000-4-2
EN 61000-4-3
EN 61000-4-4
EN 61000-4-5
EN 61000-4-11
Le docce a vapore sono prodotte in
conformità con le direttive relative alla
bassa tensione 73/23/CEE, 93/68/CEE
ed alla norma CEI 64-8 (IEC 60364).
La classe di protezione è IPX5, la
tensione nominale
è 230 V/50 Hz, la potenza nominale è
di 3,5 kW.
Il rispetto delle disposizioni di sicurezza
emesse dalla direttiva europea relativa
alla tollerabilità elettromagnetica
(direttive 89/336/CEE, 92/31/CEE, 93/
68/CEE) e la conformità con quest'ultima
viene garantita attraverso l'applicazione
delle seguenti norme europee:
EN 55014-1
EN 55014-2
EN 61000-3-2
EN 61000-3-3
EN 61000-4-2
EN 61000-4-3
EN 61000-4-4
EN 61000-4-5
EN 61000-4-11
13
Deutsch
Introduzione
English
Foreword
Italiano
Vorwort
In der Anleitung Verwendete Symbole
Symbols Used in the Instructions
Simboli utilizzati nel manuale
In der vorliegenden Einbauanleitung
und an einigen Stellen auf dem Produkt
selbst befinden sich Symbole, die hier
unten beschrieben werden.
The symbols described below appear
in these Installation Instructions and in
some locations on the product itself.
Nel presente manuale di istruzioni di
montaggio si trovano dei simboli alcuni
dei quali si trovano applicati in alcuni punti
del prodotto stesso. In questa parte della
documentazione si procede alla descrizione
del significato di questi simboli.
Ü BL I CHE S Y M BOLE UND I HRE
BESCHREIBUNG.
S Y M BOL S U S ED AND THE I R
DESCRIPTION.
ACHTUNG STROMSCHLAGGEFAHR
Meldet dem betreffenden Personal,
dass der beschriebene Vorgang,
falls nicht unter Einhaltung der
Sicherheitsvorschriften ausgeführt, das
Risiko eines elektrischen Schlags birgt.
ATTENT I ON R I S K O F ELECTR I C
SHOCK
Informs the personnel concerned that
the process described, unless performed
in compliance with the safety rules, bears
the risk of electric shock.
ACHTUNG ALLGEMEINE GEFAHR
Meldet dem betreffenden Personal,
dass der beschriebene Vorgang,
falls nicht unter Einhaltung der
Sicherheitsvorschriften ausgeführt, das
Risiko von Körperverletzungen birgt.
ATTENTION GENERAL HAZARD
Informs the personnel concerned that
the process described, unless performed
in compliance with the safety rules, bears
the risk of injury.
Achtung,
zwei Personen notwendig!
Bezeichnet eine bestimmte Vorgehensweise. Wenn diese nicht eingehalten
wird kann das Produkt oder etwas in
seiner Umgebung beschädigt werden.
(Die Montage muss von zwei Personen
durchgeführt werden)!
ANMERKUNG
We i s t d a s b e t re ff e n d e Pe r s o n a l
auf Informationen hin, deren
Nichtbeachtung zu leichten Personenoder Produktschäden führen kann.
HINWEIS
Weist das betreffende Personal auf
Informationen hin, deren Inhalt wichtig
ist und berücksichtigt werden soll.
HYDRAULISCHER INSTALLATEUR
Fachtechniker, der imstande ist, das
Produkt unter normalen Bedingungen
einzubauen und Eingriffe wie
E i n s t e l l u n g e n , Wa rt u n g s - u n d
notwendige Reparaturarbeiten an
mechanischen Teilen auszuführen. Er ist
nicht befähigt, Eingriffe an elektrischen
Anlagen auszuführen, wenn diese unter
Spannung stehen.
14
Attention,
two persons required!
Describes a specific procedure. If this
procedure is not observed, the product or objects within its environment
may be damaged. (The steam shower's
installation must be carried out by two
persons)!
COMMENT
Informs the personnel concerned of
information which, if not observed, can
cause minor injuries or damage.
NOTE
Informs the personnel concerned of
information with important contents to
be observed.
INSTALLER
Specialist technician capable of
installing the product under normal
conditions and performing settings,
maintenance and necessary repair work
on mechanical parts. He is not authorised
to make interventions on live electrical
equipment.
SIMBOLI CORRENTI E DESCRIZIONE DEL
LORO SIGNIFICATO.
ATTENZIONE PERICOLO DI SCOSSA
ELETTRICA
Segnala al personale interessato che
l'operazione descritta può comportare
il rischio di una scossa elettrica se non
eseguita nel pieno rispetto delle norme
di sicurezza.
ATTENZIONE PERICOLO GENERALE
Segnala al personale interessato che
l'operazione descritta può comportare il
rischio di seri incidenti se non eseguita nel
pieno rispetto delle norme di sicurezza.
Attenzione:
sono necessarie due persone!
Indica un determinato procedimento.
Se non viene rispettato, il prodotto o
oggetti nelle sue vicinanze possono
essere danneggiati (il montaggio della
doccia a vapore deve essere eseguito
da due persone)!
AVVERTENZA
Richiama l'attenzione del personale
interessato su informazioni che in caso di
inosservanza possono comportare leggeri
danni a persone ed al prodotto.
NOTA BENE
Segnala al personale interessato
informazioni con un contenuto importante
che deve essere tento in considerazione.
CAUTION HANDINJURY
Hands away by sites, which are marked
with this symbol!Caution! Hands can be:
squash in, retract or otherwise injured.
INSTALLATORE ELETTRICO
Tecnico specializzato in grado di installare
il prodotto in normali condizioni di lavoro.
Tra le sue competenze rientrano tutti gli
interventi di tipo elettrico come registrazioni,
manutenzione e riparazioni. Egli è in grado
di intervenire in quadri elettrici ad armadio
oppure su prese per la corrente che si
trovino sotto tensione.
FARE ATTENZIONE A NON FERIRSI
ALLA MANO
Non mettete le mani in posti sui quali si
trova questo segnale di pericolo! C’è il
rischio che le mani vengano schiacciate, tirate dentro oppure o che possano
essere ferite in altro modo.
15
Deutsch
INSTALLATORE IDRAULICO
Tecnico specializzato in grado di installare il
prodotto in normali situazioni ed ad eseguire
interventi di registrazione, di manutenzione
e di necessari lavori di riparazione su parti
meccaniche. Egli non è autorizzato ad
eseguire interventi su impianti elettrici che
si trovino sotto tensione.
English
ACHTUNG VOR HANDVERLETZUNG
Hände weg von Stellen, die dieses
Warnzeichen tragen! Es besteht die
Gefahr, daß die Hände eingequetscht,
eingezogen oder anderweitig verletzt
werden können.
ELECTRICIAN
Specialist technician capable of installing
the product under normal conditions. He
is responsible for all electrical work, such
as setting, maintenance and repairs. He is
capable of working in energized control
cabinets or on electrical sockets.
Italiano
ELEKTRISCHER INSTALLATEUR
Fachtechniker, der imstande ist, das
Produkt unter normalen Bedingungen
einzubauen. Er ist für alle Eingriffe
elektrischer Art wie Einstellungen,
Wartung und Reparaturen zuständig.
Er ist imstande, unter Spannung in
Schaltschränken oder elektrischen
Dosen zu arbeiten.
Sicherheitsvorschriften
Safety Precautions
Prescrizioni di sicurezza
Vor dem Einbau des Produktes muss
geprüft werden, ob der Fußboden,
auf dem die Dampfkabine installiert
wird, ausreichend nivelliert ist, ob
er das Gewicht tragen kann, und ob
alle technologischen Ausrüstungen
vorhanden sind.
Before installing the product check
whether the floor on which the steam
shower cabin is to be installed has
been levelled sufficiently and whether
it can carry the weight and whether all
technological equipment is available.
Prima di procedere all‘installazione
del prodotto ci si deve accertare se il
pavimento di posa sia sufficientemente
livellato, se è adatto a sostenere il peso
previsto e se sono disponibili tutte le
previste apparecchiature tecnologiche.
Set the product to the zero energy state
prior to any cleaning and repair work, i.e.
trigger the RCCB protective switch.
Prima di procedere ad interventi di pulizia
e di manutenzione è necessario mettere
il prodotto allo stato energetico zero,
cioè, aprire l'interruttore di massima.
Vor der Ausführung von Reinigungsund Wartungsarbeiten muss das
Produkt auf den Energiezustand Null
gebracht werden, d. h. FehlerstromSchutzeinrichtung (RCD) auslösen.
Der Einbau von elektrischen
Vorrichtungen (Steckdosen, Schalter,
Lampen, usw.) im Badezimmer bzw. im
Installationsraum des Geräts muss nach
den diesbezüglich gültigen Vorschriften
erfolgen.
ACHTUNG:
Ke i n e s s i g s ä u re h a l t i g e s S i l i ko n
verwenden.
Durch den Gebrauch von essigsäurehaltigem Silikon könnten die Acryl- bzw.
Metallteile der Duschkabine beschädigt
werden.
Für das Verfugen zwischen den Elementen
e m p f e h l e n w i r d i e Ve r w e n d u n g
von pilzhemmendem Sanitärsilikon.
Dennoch kann es unter Umständen zu
Verfärbungen des Silikondichtstoffes
kommen.
Falls durch Reinigung der Fugen die
Verfärbung nicht zu entfernen ist, müssen
die Silikonfugen ausgetauscht werden.
Silikonfugen sind Wartungsfugen und
unterliegen nicht der Gewährleistung.
ACHTUNG (nur für wannenlos Version):
Ausschliesslich chemikalienfeste Bodenfliesen oder Duschwanne einsetzen (z.B.
Stahlemail).
Durch austretenden Duftstoff wird ein
nicht chemikalienfester Untergrund
beschädigt.
D i e D a m p f d u s c h e d a r f i n i h re r
Bauart nicht verändert werden. Nur
Originalersatzteile verwenden.
Stromversorgung:
Der Elektroanschluss darf ausschließlich
vom Elektrofachmann, Ihrem ElektroInstallateur durchgeführt werden.
Die gesamte Stromversorgung
erfolgt über einen 230V/N/PE/
50Hz Wechselstromanschluss und
m u s s ü b e r e i n e Fe h l e r s t ro m Schutzeinrichtung (RCD) mit einem
Bemessungsdifferenzstrom von ≤ 30 mA
abgesichert werden.
16
Install electrical devices (sockets,
switches, lamps, etc.) in the bathroom
or in the equipment installation room
according to the relevant regulations.
ATTENTION:
Do not use silicone containing acetic
acid!
Acrylic or metal parts of the shower cabin
can be damaged by the use of silicone
containing acetic acid.
Seals
For the flexible seals between the elements
we advise to use schimmelwerende
silicone kit. Despite this, and dependant
on circumstances, colorchanges in the kit
can happen. If cleaning does not bring
the wanted result, the seals have to be
exchanged. Renewing is not within our
warranty
Caution (nur für wannenlos-Version):
Use only chemical-resistant floor tiles or
a shower tub (e.g. steel enamel).
A non chemical-resistant base is damaged by emitted scents.
The steam shower’s construction must
not be changed. Only original components may be used.
Power supply:
The electrical connection may only be
carried out by an electrician, i.e. your
electrical installer. The entire power
supply is realized via a 230V/N/PE/50Hz
AC connection and must be fused via a
2-pole RCCB with a residual current of
≤ 30 mA.
For electrical installation, all applicable
VDE,
country-specific
and
EVU
regulations in their respectively
valid versions must be observed.
All installation and inspection works
must be carried out by an approved
electrician and in accordance with VDE
0100 Part 701. All works at the steam
shower may only be carried out in a deenergized state!
L'installazione di dispositivi elettrici (presa
per la corrente, interruttori, lampadine,
ecc.) nel bagno oppure nel locale da
installazione dell'apparecchiatura deve
essere eseguita in conformità con le
relative prescrizioni in vigore.
ATTENZIONE:
Non utilizzare silicone contenente acido
acetico.
Utilizzando silicone contenente acido
acetico vi è il pericolo di danneggiare
parti in materiale acrilico oppure parti
metalliche della cabina doccia.
Per la sigillatura tra gli elementi
raccomandiamo l’uso di silicone
antimuffa per sanitari. Ciò nonostante
si possono verificare macchie o
scolorimenti del silicone sigillante. Nel
caso in cui gli scolorimenti o macchie
non si lasciano eliminare pulendo
semplicemente i giunti, è necessario
sostituirli. I giunti di silicone sono giunti
soggetti a manutenzione e non fanno
parte della garanzia concessa.
Attenzione (nur für wannenlos-Version):
Impiegare esclusivamente piastrelle da
pavimento resistenti a prodotti chimici
oppure vasca per doccia (p. es. smalto
d'acciaio).
Un fondo base non resistente a prodotti
chimici viene danneggiato da sostanze
odoranti fuoriuscenti.
La struttura della doccia con vapore
non deve essere modificata. Usare solo
ricambi originali.
Alimentazione elettrica:
L’allacciamento elettrico deve essere
eseguito solo da un tecnico (elettricista
esperto). L’intero
sistema
viene
alimentato a tensione alternata a 230V/
N/PE/50Hz e l’impianto deve possedere
un interruttore di sicurezza per correnti
di guasto (salvavita) bipolare con
corrente di apertura di ≤ 30 mA.
Hinweise zur Verwendung
•
In ihrer Bewegung eingeschränkte
ältere und behinderte Personen
sollten bei der Nutzung der
Dampfdusche besondere Sorgfalt
walten lassen.
• Falls Sie gesundheitliche Bedenken haben, setzen Sie sich mit
Ihrem Arzt in Verbindung.
Beispiele zur Nichtverwendung
•
•
Die Dampfduschen dürfen nicht
im öffentlichen Bereich eingesetzt
werden.
Kinder dürfen nicht unbeaufsichtigt die Dampfdusche benutzen.
Tip for using
•
People who are constricted in
their action should be use the
steam cabine special diligence
• Please contact your doctor if you
have health concerns.
Examples for non-using
•
•
the steam cabines may not be
used in public areas.
Children must not be left unattended in the steam cabine.
Con Altoparlante
In caso di collegamento con un impianto
stereofonico esterno è necessario
tenere presente quanto segue:
Il sistema di altoparlante incorporato
può essere collegato solo ad un
amplificatore audio che risponda sia
ai requisiti della direttiva EG relativa
al basso voltaggio 2006/95/EG che ai
requisiti di sicurezza DIN EN 60065.
L’uscita massima dell’amplificatore deve
essere inferiore ai 25 Watt per canale.
Esempi di uso
•
persone che hanno limitazioni
motorie dovrebbero usare la vasca con molta attenzione.
• consultate il vostro medico se
avete qualche malattia.
Esempi di uso improprio
•
•
la vasca idromassaggio non può
essere usata in luoghi pubblici.
I bambini non devono essere
lasciati incustoditi nella vasca.
17
Deutsch
Per l’impianto elettrico si devono
rispettare le norme CEI e dell’azienda
elettrica vigenti.
I lavori di installazione e di collaudo
devono essere svolti da un tecnico
autorizzato. Qualsiasi intervento sulla
doccia a vapore va eseguito solo dopo
aver staccato la tensione elettrica!
English
Lautsprecher
Beim Anschluss an eine externe
Stereoanlage ist folgendes zu
beachten:
Die Lautsprecher dürfen nur an HifiAnlagen angeschlossen werden, die
die
EG
Niederspannungsrichtlinie
2006/95/EG sowie die Vorgaben der
DIN EN 60065 erfüllen. Die maximale
Ausgangsspannung der Hifi-Anlage
muss unter 25 V pro Kanal liegen. Die
maximale Leistung der Lautsprecher
beträgt 30 W pro Kanal.
Speaker
Observe the following when connecting
to external stereo equipment:
The built in loudspeaker system should
be connected only to an audio amplifier
which meets with the request of the EG
low voltage guideline 2006/95/EG as
well as the security request of DIN EN
60065. The max. peak voltage ouput of
the amplifier must be below 25 V. The
maximum peak power output of the
amplifier must be under 30 W.
Italiano
Bei der Elektro-Installation sind die
entsprechenden VDE-, Landes- und
EVU-Vorschriften in der jeweils gültigen
Fassung einzuhalten. Die Installationsund Prüfungsarbeiten sind von einem
zugelassenen Elektrofachmann
auszuführen, unter Berücksichtigung von
VDE 0100 Teil 701. Sämtliche Arbeiten
an der Dampfdusche dürfen nur im
spannungsfreien Zustand vorgenommen
werden!
Benötigtes Werkzeug
Required Tools
Utensili richiesti
Sich vor dem Einbau mit folgendem
Werkzeug ausrüsten:
Make sure the following tools are
available before installation:
Prima di procedere al montaggio,
procurarsi i seguenti attrezzi:
A
B
C
D
E
F
G
H
I
J
K
L
M
N
O
P
Q
R
A
B
C
D
E
F
G
H
I
J
K
L
M
N
O
P
Q
R
A
B
C
D
E
F
G
H
I
J
K
L
M
N
O
P
Q
R
Schlagbohrmaschine
Bohrer Ø 8 mm
Inbusschlüssel SW 2,5mm
Inbusschlüssel SW 4 mm
Inbusschlüssel SW 5 mm
Maulschlüssel SW 13 mm
Maulschlüssel SW 17 mm
Maulschlüssel SW 19 mm
Maulschlüssel SW 20 mm
Maulschlüssel SW 24 mm
Schlitzschraubendreher
kleiner Schlitzschraubendreher
Wasserwaage
Messer
Bleistift
Meterstab
Bockleiter
Silikon
ANMERKUNG
Ausschließlich essigsäurefreies Silikon
verwenden
18
Hammer drill
Drill 8 mm diameter
Allen wrench SW 2,5 mm
Allen wrench SW 4 mm
Allen wrench SW 5 mm
Spanner SW 13 mm
Spanner SW 17 mm
Spanner SW 19 mm
Spanner SW 20 mm
Spanner SW 24 mm
Slotted screwdriver
Small slotted screwdriver
Spirit level
Knife
Pencil
Metre rule
Steps
Silicone
COMMENT
Only use silicone free from acetic acid
trapano battente
punta Ø 8 mm
chiave a brugola misura 2,5 mm
chiave a brugola misura 4 mm
chiave a brugola misura 5 mm
chiave fissa misura 13 mm
chiave fissa misura 17 mm
chiave fissa misura 19 mm
chiave fissa misura 20 mm
chiave fissa misura 24 mm
cacciavite a taglio
piccolo cacciavite a taglio
livella
taglierino
matita
metro
scala doppia
silicone
AVVERTENZA
Utilizzare esclusivamente silicone privo
da acido acetico
K
O
D
I
English
C
J
Italiano
F
G
E
Deutsch
A
B
H
M
L
N
R
Q
P
19
Montage Acrylelemente
Wellspring 130
Installation Of Acrylic
Elements Wellspring 130
Montaggio degli Elementi
Acrilici wellspring 130
Das Seitenelement 1 an den Einbauort
bringen.
Bring the side panel 1 to the installation
site
Portare l‘elemento angolare sul luogo
di montaggio e posarlo sul bordo del
piatto doccia.
1. Die Abstandshalter A auf die
seitlichen Klemmbügel schieben.
1. Push on spacer A to the clamping
yokes on side.
Die Abstandhalter müssen zwischen
den beiden Elementen positioniert
werden!
The spacers must be positioned between
both elements!
2. Die Zylinderschraube B (M5x20)
in das Gewinde am Klemmbügel
eindrehen und anziehen.
Die Blechschraube C (Ø4,2x13)
und Unt erlegscheibe D (5,3) in den
Rahmen eindrehen und anziehen.
2. Screw in cylinder head screw B
(M5x20) into the worm of clamping
yoke and tighten it.
Screw in self-tapping screw C
(Ø4,2x13) and washer D (5,3) into
the frame. Tighten it.
20
1. Inserire i distanziatori A sui morsetti
laterali.
I distanziatori devono essere
posizionati tra i due elementi!
3. Avvitare la vite a testa cilindrica E
(M5x20) nella filettatura del morsetto
e stringerla.
Avvitare la vite autofilettante C
(Ø4,2x13) e la rondella D (5,3) nel
telaio e stringere.
2.
B
Italiano
English
Deutsch
1.
A
D
C
21
Montage Acrylelemente
Wellspring 130
Installation Of Acrylic
Elements Wellspring 130
MONTAGGIO DEGLI ELEMENTI
ACRILICI WELLSPRING 130
Das Seitenelement 2 an den Einbauort
bringen.
Bring the side panel 2 to the installation
site.
Portare l‘elemento laterale sul luogo di
montaggio.
1. + 2. D e n K l e m m b ü g e l D m i t
Zylinderschraube E (M6x16) am
Rahmen der Seitenelemente
befestigen.
1. + 2. Screw clamping yoke D with
cylinder head screw E (M6x16) to
the frame of the side panel.
1. + 2 Fissare il morsetto D tramite
la vite a testa cilindrica E (M6x16) al
telaio del parete.
Die Abstandshalter F auf die
seitlichen Klemmbügel schieben.
Push on spacer F to the clamping
yokes on side.
Um Beschädigungen am Acryl und an
den Abstandhalter zu vermeiden die
Schraube nicht zu fest anziehen!
To avoid damages to the acrylic and
at the spacer, the screws must not be
secured too tightly!
Die Abstandhalter müssen zwischen
den beiden Elementen positioniert
werden!
The spacers must be positioned between
both elements!
3. + 4. Die Zylinderschraube G (M5x20)
in das Gewinde am Klemmbügel
eindrehen und anziehen.
Die Blechschraube H (Ø4,2x13)
und Unterlegscheibe I (5,3) in den
Rahmen eindrehen und anziehen.
3. + 4. Screw in cylinder head screw G
(M5x20) into the worm of clamping
yoke and tighten it.
Screw in self-tapping screw H
(Ø4,2x13) and washer I (5,3) into
the frame. Tighten it.
22
Inserire i distanziatori F sui morsetti
laterali.
Non stringere troppo la vite per evitare
di danneggiare il materiale acrilico ed i
distanziatori!
I distanziatori devono essere
posizionati tra i due elementi!
3.+4 . Avvitare la vite a testa cilindrica
G (M5x20) nella filettatura del
morsetto e stringerla. Avvitare
la vite autofilettante H (Ø4,2x13)
e la rondella I (5,3) nel telaio e
stringere.
3.
Deutsch
G
English
I
H
Italiano
4.
G
I
H
1.
F
E
D
2.
F
E
D
23
Montage Acrylelemente
Wellspring 130
Installation Of Acrylic
Elements Wellspring 130
MONTAGGIO DEGLI ELEMENTI
ACRILICI WELLSPRING 130
1. S i l i k o n s c h n u r a n d e n
Elementübergängen anbringen.
1. Fit a silicone bead to the transition of
the elements.
1. Applicare il cordoncino di silicone
nelle giunzioni tra gli elementi.
Das Dachelement an den Einbauort
bringen und auf den Seitenelementen
positionieren.
Bring the roof element to the installation
site and position it on the side panels.
Portare l’elemento tetto sul luogo di
montaggio e posizionarlo sugli elementi
angolari.
2. D e n K l e m m b ü g e l A m i t
Zylinderschraube B (M6x25) am
Rahmen des Daches befestigen.
Zwischen Rahmen und Klemmbügel
Distanzhülse C anbringen.
2. Screw clamping yoke A with cylinder
head screw B (M6x25) to the frame
of the roof element.
Attaching between frame and
clamping yoke the spacer C.
2. Fissare il morsetto A tramite la vite
a testa cilindrica B (M6x25) al telaio
del tetto.Inserire un distanziale C tra
il telaio ed il morsetto.
Die Zylinderschraube D (M5x20)
in das Gewinde am Klemmbügel
eindrehen und anziehen.
Screw in cylinder head screw D
(M5x20) into the worm of clamping
yoke.
Die Blechschraube E (Ø4,2x13)
und Unterlegscheibe F (5,3) in den
Rahmen eindrehen und anziehen.
Screw in self-tapping screw E
(Ø4,2x13) and washer F (5,3) into
the frame. Tighten it.
3. Die Abstandshalter G auf die
seitlichen Klemmbügel schieben.
3. Push on spacer G to the clamping
yokes on side.
4. S i l i k o n s c h n u r i m E c k b e r e i c h
anbringen.
4. Fit a silicone bead to the corner.
24
Avvitare la vite a testa cilindrica D
(M5x20) nella filettatura del morsetto
e stringerla.
Avvitare la vite autofilettante E
(Ø4,2x13) e la rondella F (5,3) nel
telaio e stringere.
3. Inserire i distanziatori G sui morsetti
laterali.
4. Applicare il cordoncino di silicone
nella zona angolare (sopra e sotto)
4.
Italiano
English
Deutsch
1.
2.
C
B
A
E
F
D
3.
G
25
Montage Acrylelemente
Wellspring 130
Installation Of Acrylic
Elements Wellspring 130
MONTAGGIO DEGLI ELEMENTI
ACRILICI WELLSPRING 130
Das Sitzelement 2 an den Einbauort
bringen.
Auf dem Element ist eine Schutzfolie
aufgeklebt. Diese
muss vor
Montagebeginn entfernt werden.
Bring the seat element to the installation
site
A protection foil is stuck on the element.
This foil must be removed before
beginning with the assembly.
Portare l‘elemento sedile sul luogo di
montaggio.
Sul telaio della porta vi è applicata una
pellicola protettiva. Rimuoverla prima
d’iniziare con l’installazione.
1. Die Zylinderschraube D (M5x20)
in das Gewinde am Klemmbügel
eindrehen und anziehen.
1. Screw in cylinder head screw D
(M5x20) into the worm of clamping
yoke.
1. Avvitare la vite a testa cilindrica
D(M5x20) nella filettatura del
morsetto e stringerla.
26
Die Blechschraube E (Ø4,2x13)
und Unterlegscheibe F (5,3) in den
Rahmen eindrehen und anziehen.
Screw in self-tapping screw E
(Ø4,2x13) and washer F (5,3) into
the frame. Tighten it.
Avvitare la vite autofilettante E
(Ø4,2x13) e la rondella F (5,3) nel
telaio e stringere.
F
Italiano
English
1.
Deutsch
D
E
27
Montage Acrylelemente
Wellspring 130
Installation Of Acrylic
Elements Wellspring 130
MONTAGGIO DEGLI ELEMENTI
ACRILICI WELLSPRING 130
Ka b i n e i n N ä h e d e s E i n b a u o rt s
abstelllen.
Putting cubicle into proximity of the
installation place down.
Portare la cabina vicino al luogo di
montaggio.
1. Install the lead-throughs for water
connection (SW 36mm). The connection brackets must point upwards.
1. Montare i passanti per l‘allacciamento
dell’ acqua (SW 36mm). I gomiti di
alimentazione vanno posizionati
verso l’alto.
TWW = acqua potabile calda (sinistra)
DN15 1⁄2”
TWK = acqua potabile fredda (destra)
DN15 1⁄2”
2. M o n t a r e i l p a s s a n t e p e r
l‘allacciamento dell’ acqua (SW
36mm). La valvola angolare va
posizionata verso l’alto.
TWW = acqua potabile calda DN15 1⁄2”
1. Durchführungen für Wasseranschluss
montieren (SW 36mm). Die
Anschlusswinkel müssen nach oben
zeigen.
TWW = Trinkwasser warm (links) DN15 ½“
TWK = Trinkwasser kalt (rechts) DN15 ½“
2. Durchführung für Wasseranschluss
montieren (SW 36mm). Das Eckventil
muss nach oben zeigen.
TWW = Trinkwasser warm DN15 ½“
TWW = hot water (left) DN15 ½“
TWK = cold water (right) DN15 ½“
2. Install the lead-through for water
connection (SW 36mm). The corner
valve must point upwards.
TWW = hot water DN15 ½“
3. Wasseranschlüsse in Nähe der Wandanschlüsse vorbereiten.
3. Preparing water connections into
proximity of the wall connections.
3. Preparare gli attacchi dell’acqua
vicino agli attacchi a muro.
Stromanschluß in die Kabine einführen.
Connection into the cubicle.
Far entrare l’allacciamento elettrico
nella cabina.
4. Tragegriff A mit Zylinderschrauben B
(M5x20) montieren.
4. Assembling carrying handle A with
top-hat screws B (M5x20).
4. Montare la maniglia di trasporto
A con le viti a testa cilindrica B
(M5x20).
Position der Acrylelemente zueinander
ausrichten. Gegebenenfalls Schrauben
an den Klemmwinkeln öffnen und die
Position der Elemente korrigieren.
a.) Seitenelemente fest miteinander
verklemmen.
b.) Seitenelemente fest mit dem Dach
verklemmen.
Adjust the position of the acrylic
elements to each other. If necessary,
opening screws at the sticking angles
and correcting the position of the
elements .
a.) Seize side elements with each other
tightly.
b.) Seize side elements with the roof
tightly.
28
Allineare le posizioni degli elementi
acrilici. All’occorrenza, svitare le
viti sugli angolari di fissaggio e
correggere la posizione degli
elementi.
a.) Incastrare bene tra di loro gli elementi
laterali.
b.) Incastrare bene gli elementi laterali
con il tetto.
2.
TWW
Italiano
TWW
English
TWK
Deutsch
1.
3.
4.
29
Montage Acrylelemente
Wellspring 115
Montage Acrylelemente
Wellspring 115
Montage Acrylelemente
Wellspring 115
1. Kabine auf Rahmen positionieren.
1. Placing cubicle on frames.
1. Posizionare la cabina sul telaio.
2. K a b i n e a n h e b e n . A n d e n
Acrylelementübergängen (5x)
zwischen Fliesen und Kabine (nicht
sichtbar) Silikon anbringen.
2. Raising cubicle. Attaching silicone
at the acryl element transitions
(5x) between tile and cubicle (not
visible).
2. Sollevare la cabina. Applicare
del silicone sulle giunzioni degli
elementi acrilici (5x) tra le piastrelle
e la cabina (non visibile).
Kabine auf Rahmen absetzen
Selling cubicle on frames.
Posare la cabina sul telaio.
Der vorbereitete Wasseranschluß mit
den Anschlußleitungen verbinden.
The prepared water connection with the
connection lines connecting.
Collegare gli attacchi dell’acqua preparati con le condutture d’allacciamento.
30
Italiano
English
Deutsch
1.
2.
31
Montage Acrylelemente
Wellspring 130
Installation Of Acrylic
Elements Wellspring 130
MONTAGGIO DEGLI ELEMENTI
ACRILICI WELLSPRING 130
Das Türelement an den Einbauort
bringen.
Bring the door element to the installation
site.
Portare l‘elemento porta sul luogo di
montaggio e posarlo sul bordo del
piatto doccia.
1. S i l i k o n s c h n u r i m E c k b e r e i c h
anbringen (oben und unten).
1. Fit a silicone bead to the corner.
2. Die Abstandshalter A auf die
seitlichen Klemmbügel schieben.
2. Push on spacer A to the clamping
yokes on side.
Um Beschädigungen am Acryl und an
den Abstandhalter zu vermeiden die
Schraube nicht zu fest anziehen!
To avoid damages to the acrylic and
at the spacer, the screws must not be
secured too tightly!
Die Abstandhalter müssen zwischen
den beiden Elementen positioniert
werden!
The spacers must be positioned between
both elements!
Türelement einbauen.
Installing door element.
3. Die Zylinderschraube B (M5x20)
in das Gewinde am Klemmbügel
eindrehen und anziehen.
3. Screw in cylinder head screw B
(M5x20) into the worm of clamping
yoke.
32
Die Blechschraube C (Ø4,2x13)
und Unterlegscheibe D (5,3) in den
Rahmen eindrehen und anziehen.
1. Applicare il cordoncino di silicone
nella zona angolare (sopra e sotto)
Screw in self-tapping screw C
(Ø4,2x13) and washer D (5,3) into
the frame. Tighten it.
2. Inserire i distanziatori A sui morsetti
laterali.
Non stringere troppo la vite per evitare
di danneggiare il materiale acrilico ed i
distanziatori!
I distanziatori devono essere
posizionati tra i due elementi!
Montare l’elemento porta
3. Avvitare la vite a testa cilindrica B
(M5x20) nella filettatura del morsetto
e stringerla.
Avvitare la vite autofilettante C
(Ø4,2x13) e la rondella D (5,3) nel
telaio e stringere.
Italiano
English
Deutsch
1.
2.
A
3.
B
D
C
33
Montage Acrylelemente
Wellspring 130
Installation Of Acrylic
Elements Wellspring 130
MONTAGGIO DEGLI ELEMENTI
ACRILICI WELLSPRING 130
1. D e n K l e m m b ü g e l E m i t
Zylinderschraube F (M6x25) am Rahmen
des Daches befestigen. Zwischen
Rahmen und Klemmbügel Distanzhülse
G anbringen.
1. Screw clamping yoke E with cylinder
head screw F (M6x25) to the frame of
the roof element.
Attaching between frame and
clamping yoke the spacer G.
1. Fissare il morsetto E tramite la vite a
testa cilindrica F (M6x25) al telaio del
tetto.
Inserire un distanziale G tra il telaio
ed il morsetto.
Die Zylinderschraube H (M5x20) in
das Gewinde am Klemmbügel eindrehen
und anziehen.
Screw in cylinder head screw H
(M5x20) into the worm of clamping
yoke.
Avvitare la vite a testa cilindrica H
(M5x20) nella filettatura del morsetto
e stringerla.
Die Blechschraube I (Ø4,2x13) und
Unterlegscheibe K (5,3) in den Rahmen
eindrehen und anziehen.
Screw in self-tapping screw I
(Ø4,2x13) and washer K (5,3) into
the frame. Tighten it.
Avvitare la vite autofilettante I
(Ø4,2x13) e la rondella K (5,3) nel
telaio e stringere.
2. D e n K l e m m b ü g e l E m i t d e r
Ringschraube L (M6x16) und Mutter M
(M6) am Rahmen des Daches befestigen.
Zwischen Rahmen und Klemmbügel
Distanzhülse G anbringen.
2. Screw clamping yoke E with ring
bolt L (M6x16) und nut M (M6) to
the frame of the roof element.
Attaching between frame and
clamping yoke the spacer G.
Die Zylinderschraube H (M5x20) in
das Gewinde am Klemmbügel eindrehen
und anziehen.
Screw in cylinder head screw H
(M5x20) into the worm of clamping
yoke.
Avvitare la vite a testa cilindrica H
(M5x20) nella filettatura del morsetto
e stringerla.
Die Blechschraube I (Ø4,2x13) und
Unterlegscheibe K (5,3) in den Rahmen
eindrehen und anziehen.
Screw in self-tapping screw I
(Ø4,2x13) and washer K (5,3) into
the frame. Tighten it.
Avvitare la vite autofilettante
I(Ø4,2x13) e la rondella K (5,3) nel
telaio e stringere.
34
2. Fissare il morsetto E tramite la vite
ad anello L (M6 x16) con il dado
M (M6) al telaio del tetto. Inserire
un distanziale G, tra il telaio e il
morsetto.
I
I
K
2.
G
K
Italiano
H
English
E
Deutsch
1.
G
F
L
M
E
H
35
Montage Acrylelemente
Wellspring 130
Installation Of Acrylic
Elements Wellspring 130
MONTAGGIO DEGLI ELEMENTI
ACRILICI WELLSPRING 130
1. Gegebenenfalls Lautsprecherkabel
A durch das Leerrohr zur Kabine
führen.
1. Possibly, put the loudspeaker connection cable A through wiring
conduit.
1. All‘occorrenza, far passare il cavo
dell‘altoparlante A attraverso il tubo
vuoto di posa fino alla cabina.
Kabine ohne Farblicht:
Trafokabel B durch das Leerrohr zur
Kabine führen.
Cabin without colour lighting:
Put the transformer cable B through
wiring conduit.
Vorinstalliertes Stromkabel 230V/N/
PE/50Hz C auf das Dach legen.
Put on the pre-assemb led power supply cable
230V/N/PE/50Hz on the roof.
2. Gegebenenfalls Lautsprecher anschließen.
3.a Kabine ohne Farblicht:
Trafokabel an Verlängerungskabel
auf dem Dach anschließen.
3.b Kabine mit Farblicht:
Schutzfolie von Klebestreifen auf Unterseite vom Trafo abziehen und diesen
dann auf die vorgegene Position auf
das Dach setzen (links vorne).
Kurzes Trafokabel an Farblicht, langes Kabel an Verlängerungskabel auf
dem Dach anschließen.
2. Possibly, connecting the loudspeakers.
3.a Cabin without colour lighting:
Connect the transformer cable with
the extension cable on the roof.
3.bCabin with colour lighting:
Pull protective foil from adhesive tape
on the underside of transformer and
position the transformer on the top
as specified (left side, in the front).
Connect the short transformer cable
with the colour light and the long cable with the extension cable on the
roof.
Cabina senza luce colorata:
Far passare il cavo del trasformatore
B attraverso il tubo vuoto di posa fino
alla cabina.
Posare il cavo della corrente
preinstallato 230V/N/PE/50Hz C sul
tetto.
2. C o l l e g a r e l ‘ a l t o p a r l a n t e
all‘occorrenza.
3.aCabina senza luce colorata:
Collegare il cavo del trasformatore
con il cavo di prolunga sul tetto.
3.bCabina con luce colorata:
Togliere la pellicola protettiva dalla
striscia adesiva sulla parte inferiore
del trasformatore e montarlo poi
nella posizione stabilita sul tetto
(davanti a sinistra).
Collegare il cavo del trasformatore
corto con la luce colorata ed il cavo
lungo con il cavo di prolunga sul
tetto.
Die Verdrahtung darf nur von einem
Fachmann durchgeführt werden!
4. Anschlussdose mit einem Schraubendreher öffnen und die Verdrahtung vornehmen.
D = Zuleitung (230V/N/PE/50Hz)
E = Potentialausgleichkabel
F = Zuleitung Dampfgenerator
Kabine mit Farblicht:
G = Stromversorgung Trafo
Die Anschlussdose schließen und mit
den Klettverschlüssen auf dem Dach
befestigen.
5. Vorinstalliertes Potentialausgleichskabel H mit Mutter I (M5) und
Fächerscheibe K an den Rahmen
der Kabine montieren.
Das Potentialausgleichskabel H muss
mit einer einwandfreien elektrischen
Verbindung zum Rahmen der Kabine
montiert werden.
The wiring may only be carried out by
a specialist!
4. Open socket with a screwdriver and
wire as follows.
D = supply line (230V/N/PE/50Hz)
E = potential earth bonding cable
F = steam generator supply line
Cabin with colour lighting:
G = transformer power supply
Close socket and fix it on the velcro
fasteners again.
5. Put on to the frame of the seat
element the pre-assembled potential
earth bonding cable H with nut I (M5)
and toothed washer K.
The potential earth bonding H must be
installed to the frame of the cabin with
a perfect electrical connection!
Il cablaggio deve essere eseguito
esclusivamente da un installatore
specializzato!
4. Aprire la scatola di collegamento
con un cacciavite ed eseguire il
cablaggio.
D = linea di alimentazione (230V/N/
PE/50Hz)
E = cavo di compensazione
del potenziale
F = linea di alimentazione del
generatore di vapore
Cabina con luce colorata:
G = alimentazione elettrica del
trasformatore
Chiudere la scatola di collegamento
e fissarla sul tetto tramite le chiusure
col velcro.
5. Installare il cavo di compensazione
del potenziale preinstallato H tramite
il dado I (M5) e la rosetta di sicurezza
dentata a ventaglio K al telaio
della cabina.
Il cavo di compensazione del potenziale
H deve essere montato al telaio della
cabina con un collegamento elettrico
perfetto.
36
English
Deutsch
2.
Italiano
4.
D
F
G
E
3.b
1.
A
C
B
3.a
5.
H
K
I
37
Montage Acrylelemente
Wellspring 130
Installation Of Acrylic
Elements Wellspring 130
Montage Acrylelemente
Wellspring 130
1. Bohrungen mit essigsäurefreiem
Silikon abdichten.
1. Seal drill holes with silicone free from
acetic acid.
1. Sigillare le forature con del silicone
non acetico.
2. Mit der Sechskantschrauben B
(M5x12) die Klemmwinkel A am
Rahmen C festschrauben.
2. With the cylinder head screw B
(M5x12) the clamping corner A at
the framework C solid-screws.
2. Fissare gli angolari di fissaggio A
al telaio C usando le viti a testa
esagonale B (M5x12).
38
Die Zylinderschraube D (M6x24) in
den Klemmwinkel eindrehen und
die Kabine durch Festziehen der
Zylinderschrauben fixieren.
Screw in cylinder head screw D
(M6x24) into the worm of clamping
corner and Cabin through tightening
the cylinder screws fixes.
Avvitare la vite a testa cilindrica D
(M6x24) nell’angolare di fissaggio
e fissare la cabina serrando le viti a
testa esagonale.
Italiano
English
Deutsch
1.
2.
A
D
B
C
39
Sichtdichtungen Montage
Visible seals Installation
Inserire le guarnizioni a
vista
1. Zum Ausrichten der Kabine werden
im Dachbereich Verankerungen zur
Wand angebracht.
Gewindestange D mit Muttern E und
Unterlegscheiben F an Ringschraube
lose anbringen.
1. To align the cabin some bracings
must be installed.
Install loosley mounting stud D with
nuts E and washers F to the ring
bolts.
1. Per regolare ulteriormente la cabina
vengono fissati degli ancoraggi alla
parete nella zona del tetto. Montare
la barra filettata D con i dadi E e le
rondelle F alla vite ad anello senza
fissarla ancora del tutto.
2. Zum markieren der Bohrlöcher
Gewindestange F parallel zum Dach
ausrichten und an die Wand halten.
Bohrlöcher anzeichnen.
2. Align the mounting stud F parallel to
the roof. Draw drill hole marks to the
wall.
2. Per contrassegnare i fori allineare
la barra filettata F parallelamente
al tetto e reggere contro la parete.
Segnare i fori.
Löcher bohren und Dübel setzen.
G = Ø 8 mm
Drill holes, insert dowels.
G = Ø 10 mm
Eseguire le forature ed applicare i
tasselli.
G = Ø 8 mm
Stockschraube H (M8) eindrehen.
Screw in mounting stud (M8)
Avvitare la vite prigioniera H (M8).
Mit Mutter I (M8, SW 13) die
Gewindestange F und die
Stockschraube H verbinden.
Connect the thread rod F and the
mounting stud H with nut I (M8, SW
13).
Collegare la barra filettata F con
il dado I (M8, SW 13) e con la vite
prigioniera H .
Kabine ausrichten.
Position durch Kontern der Muttern
E (M8, SW 13) sichern.
Adjust the cabin.
Save the position by looking the nut
E (M8, SW 13).
Regolare il livellamento della cabina.
Bloccare la posizione fissando i
controdadi E (M8, SW 13).
3. + 4. Sichtdichtungen anbringen
Dichtung mit 2 Rippen
Die Dichtung wird vertikal
zwischen:
Seitenwand 1 und Sitzelement 1,
Seitenwand 2 und Sitzelement 2
angebracht.
Dichtung mit 3 Rippen
Die Dichtung wird vertikal
zwischen:
Türelement und Sitzelement 1,
Türelement und Sitzelement 2,
Seitenwand 1 und Seitenwand 2
angebracht.
40
Die Dichtung leicht anfeuchten und
jeweils in den Spalt zwischen Dach
und Seitenelementen mit einem
stumpfen Gegenstand eindrücken.
Beginnend beim kleinsten Spalt
zwischen den Acylelementen.
Die Dichtung am Ende bündig mit
den Elementen ablängen.
3. + 4. Install the visible seals
Seal with 2 rips
Install the seal vertical between:
side panel 1 and seat element 1,
side panel 2 and seat element 2.
Seal with 3 rips
Install the seal vertical between:
door element and seat element 1,
door element and seat element 2
side panel 1 and side panel 2.
Moisten the seal and put it to
the gap between roof and side
elements. Pushing the seal with a
blunt object into the gap. Starting at
the smallest opening between the
Acylic elements.
Cut the seal flush to the elements.
3. + 4.Inserire le guarnizioni a vista.
Guarnizione con 2 alette.
La guarnizione va applicata
verticalmente tra la parete laterale1
e l’elemento sedile, e tra la parete.
Guarnizione con 3 alette.
La guarnizione va applicata
verticalmente tra l’elemento porta e
l’elemento angolare, tra l’elemento
angolare e l’elemento sedile e tra
l’elemento porta e l’elemento laterale
2.
laterale 1 e la parete laterale 2.
Inumidire leggermente la
guarnizione e spingere verso l’alto
nella rispettiva fessura tra il tetto
e l’elemento laterale. Iniziando
dall’alto premere la guarnizione con
un oggetto smussato nella fessura.
Tagliare la guarnizione sotto a filo
con gli elementi laterali.
2.
G
H
Italiano
D
English
F
Deutsch
1.
E
H
I
F
3.
4.
41
Trägerplatten Montage
-Optional-
Mounting Plates
Installation (optional)
montaggio piastra di
supporto (opzionale)
Optionale Trägerplatten montieren
Zum anbringen der optional erhältlichen
Trägerplatten muss zunächst der
Türrahmen demontiert werden.
Installation of the optional mounting
plates
To install the optinal mounting plates the
door frame must be dismounted.
Montare le piastre di supporto in opzione.
Per poter montare le piastre di supporto
disponibili come optional bisogna prima
smontare il telaio porta.
1. Zylinderkopfschrauben A (M5x10)
e n t f e r n e n u n d Tü r r a h m e n
ausbauen.
1. Remove cylinder head screw A
(M5x10) and dismount the door
frame.
1. Togliere le viti a testa cilindrica A
(M5x10) e smontare il telaio della
porta.
Die Trägerplatten an den Einbauort
bringen.
Bring the mounting plates to the
installation site.
Portare le piastre di supporto sul luogo
di montaggio.
2. + 3. + 4.
Zum Anbringen
der Trägerplatten, zum Schutz
der Gewinde und zum markieren
der Befestigungspunkte beim
fliesen für die Ablage (1.), den
Handbrausenhalter (2.) und den
Eckschrank mit Dampftechnik
(3.) Schrauben A (M6x35) und
Schutzhülsen B (Ø12 x 25) anbringen.
Nach dem fliesen der Trägerplatten
Schrauben und Schutzhülsen wieder
entfernen.
2. + 3. + 4.
To i n s t a l l t h e
mounting plates, to avoid damages
to the worms and to marking the
attachment points when tiling screw
in nuts A (M6x35) with sleeves B
(Ø12 x 25) for shelf (1.), wall holder
for hand shower (2.) and corner
cabinet (3.).
42
2. + 3. + 4.
Per montare le piastre
di supporto, per proteggere le
filettature e per contrassegnare i
punti di fissaggio durante la posa
delle piastrelle per la mensola (1.),
bisogna fissare il supporto della
doccetta a mano (2.) e l’armadietto
angolare con tecnologia del vapore
(3.) tramite le viti A (M6x35) e le
boccole di protezione B (Ø 12 x
25). Dopo la posa delle piastrelle
sulle piastre di supporto togliere
nuovamente le viti e le boccole di
protezione.
Italiano
3.
B
English
Deutsch
2.
B
A
A
4.
B
A
4x !
43
Trägerplatten-Montage
(optional)
Mounting Plates
Installation (optional)
montaggio piastra di
supporto (opzionale)
Optionale Trägerplatten montieren
Installation of the optional mounting
plates
Montare le piastre di supporto in opzione.
1. + 2. Die Trägerplatten mit den
Senkschrauben C (M5x25) und den
Montagetellern D an die Seitenwand
schrauben.
Zum Sitzelement einen Abstand von
4 mm einhalten!
1. + 2. Screw the mounting plates to
the side panels with counter sunk
screw C (M5x25) and disc D.
Keep a distance of 4 mm to the seat
element!
1. + 2. Fissare le piastre di supporto
con le viti a testa svasata C (M5x25)
e le piastre per il montaggio D alla
parete laterale. Mantenere una
distanza di 4 mm dall’elemento
sedile.
Türrahmen wieder einbauen!
Install door frame again!
Rimontare nuovamente il telaio della porta!
Tiling the mounting plates
Eseguire infine i lavori di rivestimento
con piastrelle.
Fließenarbeiten durchführen
D u r c h d i e h o h e n Te m p e r a t u r schwankungen im Innern der Kabine
muss ein geeigneter Fliesenkleber und
geeignetes Fugenmaterial verwendet
werden.
Because of the high temperature
fluctuations inside the cabin a suitable
tile adhesive and suitable joint material
have to be used.
Tile adhesive:
Rapid hardening flexible floor tile
bedding mortar according to DIN
18156, part 3
Joint material:
Flexible and free of cracks tile grout
with built-in admix
A causa delle variazioni di temperatura
all’interno della cabina è importante
usare una colla per piastrelle e del
materiale per giunzioni appropriati.
Colla per piastrelle:
Malta collante altamente flessibile per la
posa di piastrelle conforme alle norme
DIN 18156, Parte 3.
Materiale per giunti:
Sigillante flessibile per piastrelle
per giunti fini e stretti con proprietà
antiritiro
Standard Fliesenkleber und
Fugenmaterial sind nicht geeignet!
Standard tile adhesive and standard
joint materials are not suitable!
Colle per piastrelle e materiali per
giunzioni standard non sono adatti!
Nach dem fliesen der Trägerplatten
Schrauben und Schutzhülsen aus 2. 3.
und 4. wieder entfernen.
After tiling remove screws and sleeves
from 2., 3. and 4.
Dopo aver applicato le piastrelle,
rimuovere le viti e i manicotti come Fig.
2, 3 e 4.
Fliesenkleber:
Hochflexibler Dünnbettmörtel nach DIN
18156, Teil 3
Fugenmaterial:
Flexible und rissefreie Fein - und
Schmalfugmasse
44
2.
Italiano
English
D
C
Deutsch
1.
45
TürMontage
Door Installation
Montaggio della Porta
Wir liefern Türen mit Links- oder
Rechtsanschlag. Achten Sie darauf,
welche Tür Sie bestellen. Die Tür kann
nicht umgedreht werden.
We deliver doors with left and right
hinges. Make sure you order the
correct door. The door only fits in one
direction.
Forniamo porte con cerniere sia a sinistra
che a destra non reversibili. Assicurarsi
quindi di ordinare la versione giusta.
Die Tür an den Einbauort bringen.
Bring the door to the installation site.
Posizionare la porta sul luogo di
montaggio.
1. Türgriff montieren.
1. Assemble the door handle.
1. Montare la maniglia per la porta.
2. Nehmen Sie nun den kompletten
Türrahmen und setzen Sie diesen
vorsichtig in die noch verbleibende
Öffnung, dabei die voraussichtliche
Fliesenstärke berücksichtigen
(max.15 mm).
Abstandsholz mittig einspannen.
2. Take hold of the complete door
frame and push it carefully into the
remaining opening. Take care of
thickness of tiles (max. 15 mm). The
door frame must be aligned.
2. Prendete adesso il telaio porta
completo ed inseritelo nell‘apertura
rimanente considerando lo spessore
della piastrella (max. 15mm).
3. Kontrollieren Sie die Diagonalen von links nach rechts und von rechts
nach links - der Türöffnung. Das Mass
der Aussenkannten muss auf beiden
Diagonalen gleich sein.
46
3. Control diagonal maesure , from left
to right and from right to left- this
measurements must be equal.
3. Controllate le diagonali del telaio
porta - da sinistra a destra e da destra
a sinistra. La misura tra i bordi esterni
deve essere identica per tutte e due
le diagonali.
Italiano
English
Deutsch
1.
2.
3.
47
TürMontage
Door Installation
MONTAGGIO DELLA PORTA
Türrahmen mittels Wasserwaage winkelrecht und senkrecht ausrichten.
Ist eine Nachjustierung notwendig,
dann:
- Rahmenbefestigungen E lösen.
- Türrahmen ausrichten.
- R a h m e n b e f e s t i g u n g e n E
festschrauben.
Align the door frame horizontally and
vertically with the aid of the spirit level.
If a readjustment is necessary, then:
Con la livella a bolla d'aria posizionare
orizzontalmente e verticalmente il telaio
della porta. Se occorre riregolare:
- Staccare i fissaggi del telaio E.
- Posizionare il telaio della porta.
- Avvitare i fissaggi del telaio E
serrando a fondo le viti.
1. S c h r a u b e A ( M 4 x 2 0 ) ,
Unterlegscheibe B (Ø 4,3) mit Hilfe
des Montageröhrchen C andrehen.
- Türrahmen über Schraube A und
Wandbefestigung F fein justieren.
- Schraubenköpfe mit Santopren
Stopfen D verschliessen.
- Abstandsholz entfernen.
2. Die Glastür unten in das vormontierte
Scharnier stellen.
48
- Release frame fasteners E.
- Align door frame.
- Tighten frame fasteners E.
1. Fasten screw A ( M 4 x 2 0 ), washer
B (Ø 4,3) with the aid of the small
assembly pipe C.
- Carry out fine adjustment via screw
A and wall fastener F.
Seal screw heads with Santopren
plug D.
- Remove wooden distance piece.
2. Place the bottom of the glass door
into the premounted hinge.
1. Avvitare la vite A (M4x20) con
la rondella B (Ø 4,3) mediante il
tubolare di montaggio C.
- Eseguire la regolazione di precisione
del telaio della porta mediante la vite
A ed il fissaggio a parete F.
Tappare le teste delle viti con tappi
Santopren D.
- Rimuovere il distanziale di legno.
2. Collocare la porta di vetro nella
cerniera premontata in basso.
Italiano
C
Deutsch
1.
A
B
English
D
SW 3mm
2.
49
TürMontage
Door Installation
MONTAGGIO DELLA PORTA
1. Glastür schräg nach hinten in die
Kabine kippen.
1. Glass door tip over into the cabine at
an angle behind.
1. Spingete la porta in cristallo in
posizione obliqua verso l’interno
della cabina.
Bild 2, 3 und 5:
Darstellung in der Kabine
Figure 2, 3 and 5:
Exposition of the Cabine-inside
2. Oberes Scharnier auf TürglasScharnier aufsetzen.
2. Putting on an upper hinge on door
glass hinge.
3. Tür nach aussen gegen Anschlag
drehen und mit den Schrauben A (3,5x 35mm) von der Innenseite
fixieren, noch nicht festziehen.
3. Turning door to outside against stop.
and fix it with screws A (3,5x 35mm)
from inside of the steam shower
cabin. Don’t tighten the screws.
4. Die Glastür von innen schliessen.
4. Close the glass door from inside the
cabine.
5. Über das Scharnier B muss diese so
einjustiert werden, dass sie überall
gleichmässig und parallel anliegt
und dicht schliesst.
Optimaler Abstand zwischen
Magnetleiste und Türrahmen beträgt
15 mm.
Jetzt die Schrauben C (3,5x12 mm)
festziehen.
5. Over the hinge B the door must be
close completely. Adjust it parallel!
An optimal distance between
magnetic strip and doorframes
amounts to 15 mm.
Now you can tighten the screws C
(3,5x12 mm).
50
Figura 2, 3 e 5
Rappresentazione della cabina
2. Posate la cerniera superiore sulla
cerniera della porta in cristallo.
3. Girate la porta verso fuori contro
l’arresto e fissatela con le viti A (3,5x
35mm) dall’interno senza stringere
ancora completamente le viti.
4. Chiuder e la porta in cristallo
dall’interno.
5. La porta deve essere regolata tramite
la cerniera B in modo che appoggi
ovunque in modo uniforme e
parallelo e che si possa chiudere
ermeticamente.
La distanza optimale tra la
improntatore magnetico ed il telaio
della porta è di 15 mm.
Adesso potete fissare completamente
le viti C (3,5x12 mm).
1.
Deutsch
2.
Italiano
English
B
3.
A
4.
5.
1.
C
6mm
B
2.
15mm
51
TürMontage
Door Installation
MONTAGGIO DELLA PORTA
1. Beim Anbringen der vertikalen
Zierleisten ist von ob en nach unten
zu arbeiten. Die Leisten werden nur
aufgeklippst und können bei Bedarf
demontiert werden.
1. Mount the verticaly decorative strip
from top to bottom. If it is necessary,
the clicked strip can be removed.
1. Durante l‘applicazione dei listelli
decorativi verticali, bisogna lavorare
dall’alto in basso. I listelli vengono
solamente incastrati e possono
essere smontati all’occorrenza.
Hier besteht Verletzungsgefahr, an den
gekennzeichneten VA-Laschen. Bitte Handschuhe tragen!!!
There is risk of injury, at identified Clip.
Please wear gloves!!!
Attenzione, c’è pericolo di lesioni nelle
clip di fissaggio contrassegnate.
Portate guanti di protezione !!!
2. Sichtdichtung mit 3 Rippen
Die Dichtung wird innen seitlich und
oben zwischen:
Türelement und Türrahmen
angebracht.
2. Visible seal with 3 rips
Mounting the seal on the side and at
the top between:
door element and door frame
2. Guarnizione a vista con 3 alette.
Inserire la guarnizione all’interno,
lateralmente e sopra tra l’elemento
porta ed il telaio della porta.
52
Italiano
English
Deutsch
1.
2.
53
Montage Eckschrank
Corner Cabinet Installation
Montaggio dell'armadietto
angolare
1. Montage Eckmontagewinkel
1. Corner bracket installation
1. Montare l’angolare
Löcher mit Silikon versiegeln.
a. Montage ohne Trägerplatten
Schraube A M6 x 16 und
Unterlegscheibe B (6,4x12) in
Eckmontagewinkel
stecken.
Distanzbolzen C aufschrauben.
Eckmontagewinkel mit Schraube D
(M5 x 16) und Unterlegscheibe E
(5,3x15) montieren.
b. Montage mit Trägerplatten
Schraube A M6 x 16 und
Unterlegscheibe B (6,4x12) in
Eckmontagewinkel
stecken.
Distanzbolzen C aufschrauben.
Eckmontagewinkel mit Schraube
D (M5 x 35), Unterlegscheibe E
(5,3x15) und Distanzhülse F (Ø
28mm) montieren.
54
Seal holes with silicone.
a. Mounting without mounting plates
Insert screw A (M6 x 16) and washer
B (6,4x12) in corner bracket.
Screw on distance bolt C.
Install corner bracket with screw D
(M5 x 16) and washer E (5,3x15).
b. Mounting with mounting plates
Insert screw A (M6 x 16) and washer
B (6,4x12) in corner bracket.
Screw on distance bolt C.
Install corner bracket with screw D
(M5 x 35), washer E (5,3x15) and
sleeve F (Ø 28mm).
Sigillare i fori con silicone.
a. Montaggio senza piastre di supporto
Inserire la vite A M6 x 16 e la rondella
B (6,4x12) nell’angolare. Avvitare il
bullone distanziale C . Montare
l’angolare con la vite D (M5 x 16) e
la rondella E (5,3x15).
b. Montaggio con piastre di supporto
Inserire la vite A M6 x 16 e la rondella
B (6,4x12) nell’angolare.
Avvitare il bullone distanziale C .
Montare l’angolare con la vite D (M5
x 35), la rondella E (5,3x15) e con il
distanziale F (Ø 28mm).
1. a
A
Deutsch
B
E
D
Italiano
English
C
1. b
F
A
B
F
E
D
C
55
Montage Eckpaneel
Corner Panel Installation
Montaggio del pannello
angolare
1. Die Löcher der Befestigungspunkte
für die Eckschrankmontage mit Silikon versiegeln.
1. Seal holes for corner cabinet with
silicone.
1. Sigillare i tasselli per il montaggio
dell'armadietto angolare utilizzando
del silicone.
Den Eckschrank mit integriertem
Dampfgenerator mit den Schrauben A (M6) und Unterlegscheiben
B (A A 6.4 x 18) anschrauben, die
vier Schrauben dabei nicht zu fest
anziehen um Beschädigungen zu
vermeiden.
2. Den Druckschlauch C für den
Dampfgenerator ans Eckventil D
anschließen.
Eckventil D öffnen.
3. Das Stromkabel E (230 V / 50 Hz) in
den Eckschrank führen und anschließen.
4. Graue Gummidichtung F unten auf
das Eckpaneel drücken.
Screw corner cabinet with integrated steam generator on with screws
A (M6) and washers B (A 6.4 x 18),
only tighten the four screws lightly.
2. Connect pressure hose C for the
steam generator to corner valve D.
Open corner valve D.
3. Route power supply cable E (230
V / 50 Hz) into corner cabinet and
connect it.
4. Press grey rubber seal F at the bottom onto the corner panel.
5. Connect supply hose G to surge
shower.
Press grey rubber seals H at the top
onto the corner panel.
5. Versorgungsschlauch G mit Schwallbrause verbinden.
Graue Gummidichtungen H oben
auf das Eckpaneel drücken.
Remove transport retainers (nylon
straps) from cables and hoses at the
panel and in the corner cabinet!
Transportsicherungen (Kabelbinder) von
Kabeln und Schläuchen am Paneel und
im Eckschrank lösen!
56
Avvitare l'armadietto angolare con
il generatore di vapore integrato
utilizzando le viti A (M6) e rondelle
piatte B (A 6,4 x 18) avendo cura
di stringere le quattro viti solo
leggermente.
2. Collegare il tubo flessibile di
pressione C per il generatore di
vapore alla valvola angolare D.
Aprire la valvola angolare D.
3. Far passare il cavo della corrente
E (230 V / 50 Hz) nell’armadietto
angolare
ed
eseguire
il
collegamento.
4. Premere la guarnizione in gomma
grigia F sotto sul pannello
angolare.
5. Collegare il tubo di alimentazione G
con la doccia a cascata.
Premere le guarnizioni in gomma
grigi H sopra sul pannello angolare.
Rimuovere i dispositivi di sicurezza
per il trasporto (serracavi) dai cavi e
dai tubi sul pannello e nell’armadietto
angolare!
Italiano
1.
4.
F
English
D
Deutsch
2.
C
B
A
3.
E
5.
G
H
57
Montage Eckpaneel
Corner Panel Installation
Montaggio del pannello
angolare
Damit das Paneel nicht beschädigt wird,
muß eine Decke oder Folie über die Rosette am Eckschrank gelegt werden.
Lay a blanket or foil on the escutcheon
to avoid damaging the panel.
Per evitare che il pannello possa subire
dei danni è indispensabile posare una
coperta oppure un foglio di plastica
sopra la copertura dell’armadietto
angolare.
1. Paneel in Befestigungswinkel A auf
Eckschrank setzen und durch Ihre
Schulter abstützen.
1. Position panels in attachment bracket
A on corner cabinet and support
with your shoulder.
1. Applicare il pannello nell'angolo di
fissaggio A sull'armadietto angolare
e tenerlo in posizione poggiandolo
sulla Vostra spalla.
2. Potentialausgleichskabel B mit
Schraube C (vormontiert) und
Zahnscheibe D an Thermostatgrundkörper E befestigen.
2. Attach potential earth bonding cable
B with screw C (pre-fitted) and toothed washer D to thermostat body
E.
2. Fissare il cavo di compensazione
del potenziale B con la vite C (già
montato) e rosetta dentellata D al
corpo di base del termostato E.
3. Zulaufleitungen F mit Wandanschlusswinkeln G verbinden - warm
links und kalt rechts. Die Wandanschlusswinkel mit einem Schraubendreher öffnen und Dichtheitsprüfung
durchführen.
3. Connect inlet circuits F with wall connection angles G - hot on the left and
cold on the right. Open wall connection angles with a screwdriver and
perform leakage test.
3. Collegare le linee di ingresso F
con gli angolari per applicazione
a parete G - acqua calda a sinistra,
acqua fredda a destra. Aprire
l'angolare per applicazione a parete
utilizzando un cacciavite ed eseguire
la prova di tenuta.
4. Stromversorgungskabel H der Steuerung im Paneel (Adern grau und
schwarz) mit Kabel I des Trafos auf
dem Dach verbinden. Lichtkabel
K der Steuerung im Paneel (Adern
rosa und lila) mit Kabel L des Halogenlichts auf dem Dach verbinden.
Kurzes Steuerkabel für Farblicht M
(Adern blau, grün, gelb, rot) mit
Kabel N verbinden.
4. Connect power supply cable H of
control unit in the panel (grey and
black wires) with cable I of transformer on the roof. Connect light cable
K of control unit in the panel (pink
and lilac wires) with cable L of halogen light on the roof. Connect short
control cable for coloured light M
(blue, green, yellow, red wires) with
cable N.
4. Collegare il cavo d’alimentazione
elettrica H della scatola di comando
del pannello (filo grigio e nero) con
il cavo I del trasformatore sul tetto.
Collegare il cavo della luce K della
scatola di comando del pannello (filo
rosa e lilla) con il cavo M della luce
alogena nel tetto. Collegare il cavo
di controllo corto per le luci colorate
M (filo blu, verde, giallo, rosso) con il
cavo N.
5. Sensorkabel O (graue Ummanlung,
Adern braun und blau) und langes
Steuerkabel für Dampfgenerator P
(Adern blau, grün, gelb, rot) in Eckschrank führen und nach erfolgter
Eckpaneelmontage dort verbinden.
5. Route sensor cable O (grey sheathing, brown and blue wires) and
long control cable for steam generator P (blue, green, yellow, red
wires) into corner cabinet and connect them there after corner panel
installation.
5. Inserire nell'armadietto angolare il
cavo sensore O (rivestimento grigia,
fili marrone e blu) ed il lungo cavo di
controllo per generatore di vapore
P (fili blu, verde, giallo, rosso) e
collegarli una volta eseguito il
montaggio del pannello angolare.
6. Die farbig gekennzeichneten Schläuche miteinander verbinden.
6. Connect the colour marked hoses
with each other.
7. Eckpaneel vorsichtig ins Eck drücken
und darauf achten, dass alle Leitungen gut hinter dem Paneel verstaut
sind. Das Eckpaneel mit Schraube
R (Zylinderschraube M5 x 12) und
Unterlagscheibe S (A 5,3) sichern,
nicht festziehen.
58
7. Thoroughly press corner panel into
corner, make sure that all leads are
well stowed behind the panel. Secure corner panel with screw R (allen
key screw M5 x 12) and washer S (A
5.3), do not tighten.
6. Collegare reciprocamente i tubi
contrassegnati dai rispettivi colori.
7. Premere il pannello angolare con
attenzione nell'angolo ed accertarsi
che tutte le linee si trovino posate
correttamente dietro il pannello.
Assicurare il pannello angolare con
la vite R (vite a testa cilindrica M5
x 12) e la rondella piatta S (A 5,3)
senza stringere forte.
6.
7.
R
English
Deutsch
S
Italiano
2.
D
E
C
B
3.
F
G
4.
5.
P
O
1.
N
I
L
H
M
A
K
59
Montage Eckpaneel
Corner Panel Installation
Montaggio del pannello
angolare
1. Schrauben von Befestigungswinkel
A lösen, Eckpaneel ins Eck drücken,
Befestigungswinkel nachschieben
und sichern
1. Loosen screws from attachment bracket A, press corner panel into corner, push in and secure attachment
bracket.
1. Allentare le viti dall’angolo di
fissaggio A, premere il pannello
angolare verso l’angolo, spingervi
quindi l’angolo di fissaggio e
bloccare.
2. Löcher für den Handbrausenhalter
mit Silikon versiegeln. Halteelement
B des Handbrausenhalters mit
Schrauben C (M5 x 45) festschrauben. Handbrausenhalter D über
Halteelement B schieben und einrasten.
2. Seal holes for hand shower holder
with silicone. Screw down retaining
element B of hand shower holder
with screws C (M5 x 45). Push hand
shower holder D over retaining element B and lock in.
3. Löcher für die Ablage mit Silikon
versiegeln. Halterung E und Unterlage F der Ablage mit Schrauben G
(M5 x 45) festschrauben. Glasablage
H in die Halterung schieben und sichern.
60
3. Seal holes for shelf with silicone.
Screw down retaining element E
and washer F of shelf with screws G
(M5 x 45). Push shelf H into retaining
element and lock it.
2. Sigillare i fori per il supporto della
doccetta a mano, con del silicone.
Avvitare forte l'anello di tenuta B
del supporto doccetta utilizzando le
viti C (M5 x 45). Spingere il supporto
doccetta D sull'elemento di tenuta B
e far scattare in posizione.
3. Sigillare i fori per la mensola con
silicone. Fissare il supporto E e la
piastrina F della mensola con le viti
G (M5 x 45). Inserire il ripiano in vetro
H nel supporto e fissare.
Italiano
English
H
G
2.
Deutsch
3.
F
E
B
C
D
1.
A
61
Montage Eckpaneel
Corner Panel Installation
Montaggio del pannello
angolare
1. Das Duftsieb A und den Deckel B
montieren.
1. Fit fragrance sieve A and cover B.
1. Montare il filtro delle essenze A e
montare il coperchio B.
2. Insert panel C.
2. Blende C einsetzen.
3. Dichtung D zwischen Brauseschlauch
und Anschlusswinkel und zwischen
Brauseschlauch und Handbrause
montieren.
2. Applicare la copertura C.
3. Fit seal D between shower hose and
connection angle and between shower hose and hand shower.
3. Montare la guarnizione D tra tubo
doccia e la presa acqua e tra tubo
doccia e doccetta a mano.
4. Fit Staro 90 E complete set.
4. Montare il kit di montaggio Staro 90
E.
4. Fertigset Staro 90 E montieren.
5. Install over head shower F.
5. Kopfbrause F montieren.
62
5. Montare il soffione doccia F.
1.
B
3.
Italiano
English
F
Deutsch
5.
A
4.
E
2.
D
C
63
Funktionsprüfung
K IV Steam Plus
Functional Check
K IV Steam Plus
Controllo del funzionamento
K IV Steam Plus
1. Die Handbrause aus dem Halter
nehmen, den Ab-/Umstellhebel A
auf Handbrausenbetrieb umstellen,
öffnen und Funktion prüfen.
Wasserzufuhr wieder schließen.
1. Take handshower out of holder,
select „hand shower“ with shutoff/selection handle A, open water
supply and check the function.
Close water supply.
1. Togliere la doccetta dal supporto,
girare la leva del rubinetto / deviatore
A verso uso doccetta, aprirla e
verificarne la funzionalità. Chiudere
nuovamante
l’alimentazione
dell’acqua.
Den Handbrausestrahl nicht in den
geöffneten Eckschrank richten!
2. Durch Drücken der Dampftaste C
wird der Dampfgenerator aktiviert.
Das Licht schaltet ein und im
Display wird die Dampfdauer von
30 min angezeigt. Die Dampftaste
C und die Lichttaste B sind stark
hinterleuchtet. Nach ca. 5 min sollte
eine Dampfbildung zu erkennen
sein.
2. Pressing steam push-button C
activates the steam generator. The
light goes on and the steam period
of 30 min is displayed. Steam pushbutton C and light push-button B are
strongly backlit. Steam should be
noticeable after about 5 minutes.
Nun kann durch nochmaliges
Drücken der Dampftaste C der
Dampfgenerator
deaktiviert
werden.
Sollte etwas nicht funktionieren, alle
elektrischen Zuleitungen und die
Wasserversorgung überprüfen.
64
Do not direct the hand shower jet
into the open corner cabinet!
The steam generator can now be
deactivated by pressing steam pushbutton C again.
If anything does not operate properly,
check all electrical supply lines and the
water supply.
Non dirigere il getto della doccetta
a mano verso l‘armadietto angolare
ancora aperto!
2. Premendo il tasto "bagno di vapore"
C si attiva il generatore di vapore.
La luce si accende e sul display si
visualizza la durata funzionamento
del vapore pari a 30 min. Il tasto
bagno di vapore C e quello del
pulsante per l'illuminazione B sono
illuminati. Dopo circa 5 minuti inizia
l‘erogazione del vapore.
A questo
punto è possibile
disattivare il generatore di vapore
premendo nuovamente il .tasto
bagno di vapore C.
Qualora qualcosa non dovesse
funzionare correttamente, controllare
tutte le linee elettriche e l'alimentazione
dell'acqua.
Italiano
English
A
Deutsch
1.
2.
B
C
65
Endmontage
Final Work
Montaggio finale
Nach erfolgreicher Funktionsprüfung die
Glasscheibe der Revisionsöffnung mit
Glasschutzhülse A, mit Flachdichtung
B (11x6x1) und Schraube C (SW 4 mm)
montieren.
After the performed functional check,
install the glass panel of the inspection
opening with glass protection sleeve A,
flat seal B (11x6x1) and screw C (SW 4
mm).
Una volta eseguito con successo il
controllo del funzionamento, montare
il pannello di vetro dell‘apertura
d'ispezione utilizzando la bussola di
protezione per vetro A, la guarnizione
piatta B (11x6x1) e la vite C (misura 4
mm).
Die Schrauben nicht über Kreuz
festziehen sondern im Uhrzeigersinn.
Stopfen D in Schraubenkopf einsetzen.
Do not tighten the screws cross wise.
Insert plug D in screw head.
66
Non avvitare le viti in maniera incrociata
ma in senso orario. Applicare il tappo D
nella testa della vite.
English
D
Deutsch
A
Italiano
B
C
67
Safety Function
Safety Function
Safety Function
Dank der Safety Function lässt sich die
gewünschte Höchsttemperatur von z. B.
max. 42° C voreinstellen.
The desired maximum temperature
for example max. 42° C can be pre-set
thanks to the safety function.
Grazie alla funzione antiscottature Safety
la temperatura massima, per esempio
max. 42° C desiderata, è facilmente
regolabile.
1. D i e S c h l i t z s c h r a u b e B d e s
Thermostatgriffs A lösen und diesen
abziehen.
1. Loosen slotted screw B of thermostat
grip A and pull it off.
1. Allentare la vite ad intaglio (radiale)
B della manopola del termostato A
e toglierla.
2. Loosen allen key screw C and pull off
adapter D and sleeve E.
2. Die Zylinderschraube C lösen
und Griff-adapter D und Hülse E
abziehen.
3. Pull off locking washer F and washer
disc G.
3. Die Sicherungsscheibe F und die
Anschlagscheibe G abziehen.
4. Die Handbrause aus dem Halter
nehmen.
Den Ab-/Umstellhebel H auf
Handbrausenbetrieb umstellen und
öffnen.
Durch Drehen die Temperatur auf
die gewünscht max. Temperatur
(z.B. 42 °C) einstellen.
5. Die Anschlagscheibe F und die
Sicherungsscheibe G aufstecken.
Die Anschlagscheibe muss wie
abgebildet positioniert werden.
4. Take handshower out of holder.
Select “hand shower” with shut-off/
selection handle H and open water
supply.
Set the temperature to the required
maximum temperature (e.g. 42 °C)
by turning.
5. Pull on washer disc G and locking
washer F. Position washer disc as
shown in picture.
6. Pull on sleeve E and adapter D and
tighten allen key screw C.
2. Svitare la vite a testa cilindrica C e
togliere l’adattatore maniglia D e la
boccola E .
3. Estrarre la rondella di arresto F ed il
disco di battuta G .
4. Togliere la doccetta a mano dal
supporto.
Posizionare la leva del rubinetto/
deviatore H su “doccetta a mano” e
aprire l‘acqua.
Ruotando, regolare la temperatura
sul valore massimo desiderato (per
esempio 42° C).
5. Applicare il disco di battuta F e
la rosetta di sicurezza G. Il disco di
battuta deve essere posizionata come
da figura.
6. Montare la boccola E, l’adattatore
maniglia D e la vite a testa cilindrica C.
6. Die Hülse E, den Griffadapter D und
die Zylinderschraube C montieren.
The thermostat adjustment will be
described on the following pages!
Die Justierung des Thermostats wird auf
den folgenden Seiten beschrieben!
68
La regolazione del termostato viene
descritta nelle seguenti pagine!
1.
4.
Deutsch
H
A
Italiano
English
B
2.
5.
F
E
D
G
C
3.
6.
F
E
G
D
C
69
Thermostat justieren
K IV Steam Plus
Thermostat Adjustment
K IV Steam Plus
Taratura del termostato
K IV Steam Plus
Nach erfolgter Montage muss die
Auslauftemperatur des Thermostaten
überprüft werden. Eine Korrektur
ist erforderlich, wenn die am
Temperaturmessgerät angezeigte
Temperatur von der am Thermostat
eingestellten Temperatur abweicht.
After finishing installation, check
the thermostat outlet temperature.
Correction is necessary when the
temperature shown on the display
differs from the temperature set on the
thermostat.
Una volta eseguito il montaggio è
necessario controllare la temperatura
d e l l ‘a c q u a d e l t e r m o s t a t i c o. L a
taratura diventa necessaria quando
la temperatura indicata sul display è
differente dalla temperatura impostata
sul termostato.
1. Die Handbrause aus dem Halter
nehmen, den Ab-/Umstellhebel A
auf Handbrausenbetrieb umstellen
und öffnen.
2. Die Temperatur mit einem Messgerät
kontrollieren.
3. Durch Drehen des Thermostatgriffs B
die Temperatur auf 38 °C einstellen.
4. Ab-/Umstellhebel A schließen.
Die
Schlitzschraube
C
des
Thermostatgriffs B lösen und diesen
abziehen.
5. Den Thermostatgriff B senkrecht
ausrichten, sodass der rote Knopf D
nach oben zeigt, und aufstecken.
6. Die
Schlitzschraube
C
Thermostatgriffs B festziehen.
des
1. Take handshower out of holder,
select “hand shower” with shut-off/
selection handle A and open water
supply.
2. Check the temperature.
3. Set the temperature to 38 °C by
turning thermostat grip B.
4. Close water supply. Loosen slotted
screw C of thermostat grip B and pull
it off.
1. Togliere la doccetta dal supporto,
girare la leva del rubinetto /
deviatore A verso uso doccetta ed
aprire l‘acqua.
2. Controllare la temperatura con uno
strumento di misura.
3. Ruotando
la
manopola
del
termostato B, regolare la temperatura
su 38 °C
4. Chiudere la leva del rubinetto /
deviatore A. Allentare la vite ad
intaglio (radiale) C della manopola
del termostato B e toglierla.
5. Align thermostat grip B vertically so
that red button D points upwards
and push it on.
6. Tighten slotted screw C of thermostat
grip B.
5. Mettere la manopola del termostato
B in posizione verticale, in modo
che il pulsante rosso D sia in alto e
mantenere la posizione.
6. Avvitare forte la vite ad intaglio
(radiale) C della manopola del
termostato B.
70
1.
4.
B
A
Deutsch
C
Italiano
English
A
2.
5.
D
B
3.
6.
B
B
C
71
Verkleiden der Kabine
covering the cabin
Riverstimento della Cabina
- The cabin can be covered with
standard hollow wall installation
systems A (GIS, Knauf, WEDI-plates)
- The facing can be done with
standard materials B(tiles, plaster,
wood e.g.).
- La cabina può essere rivestita
soluzioni con per la costruzione
a secco di pareti normalmente
in commercio (GIS, Knauf, lastre
WEDI).
- Il rivestimento della parete può
essere di materiali comuni (piastrelle,
intonaco, legno ecc.).
Die Kabine kann mit handelsüblichen
Trockenbauwandsystemen
A
verkleidet werden (GIS, Knauf, WEDIPlatten).
Der Wandbelag kann aus gängigen
Materialien B (Fliesen, Putz, Holz
usw.) bestehen.
-
- Die
Wandstärke
der
Kabinenverkleidung muss beim
Platzbedarf
der
Kabine
mit
berücksichtigt werden.
-
- Bei
ungünstigen
baulichen
Gegebenheiten z.B. diffusionsdichten
Wänden und Decken, Außenwänden
oder Wänden/Decken und Böden
zu nicht beheizten Räumen, wird
empfohlen Hinterlüftungen diagonal
(oben/unten) einzusetzen (C und
D).
72
The thickness of the wall facing must
be keep in mind when planning the
required space of the cabin!
We recommend installing diagonally
after-ventilations (C and D /
diagonal), if there are unfavourable
structural conditions e.g. diffusion
densities walls and blankets, outer
walls or walls/blankets and grounds
to not heated rooms.
- Bisogna considerare uno spazio
supplementare per la cabina a
causa dello spessore della parete e
del rivestimento.
- Con condizioni di costruzione
sfavorevoli, come p.es. pareti e tetti
a tenuta di condensa, pareti esterne
o pareti/tetti e pavimenti che sono a
contatto con stanze non riscaldate,
si consiglia di applicare le griglie di
ventilazione diagonalmente sopra e
sotto (A e B).
Italiano
B
English
Deutsch
A
C
D
73
Steuerung K IV Steam Plus
K IV Steam Plus Control
Controllo K IV Steam Plus
A
B
A
B
A = pulsante per l'illuminazione
(illuminazione / luci colorate acceso /
spento)
B = display
(visualizzazione della temperatura /
tempo di vaporizzazione / prestazione
vapore / Aggiunta Aroma / programma
illuminazione colorata / tempo
illuminazione colorata)
C = + / - Pulsante di selezione
(impostazione tempo di vaporizzazione
/ prestazione vapore / Aggiunta Euca
/ programma illuminazione colorata /
tempo illuminazione colorata)
D = pulsante Mode
(commutare nei diversi livelli di
programma)
E = pulsante vapore
(funzione vapore acceso / spento)
= Lichttaste
(Licht / Farblicht ein / aus)
= Display
(Anzeige von Temperatur / Dampfzeit
/ Dampfleistung /Euca-Zugabe /
Farblichtprogramm / -zeit)
C = + / - Wahltasten
(Einstellung
Dampfzeit
/
Dampfleistung / Euca-Zugabe /
Farblichtprogramm / -zeit)
D = Mode-Taste
(Umschalten in Programmebenen)
E = Dampftaste
(Dampffunktion an / aus)
1.Displayanzeige
bei
Inbetriebnahme
Wird die Anlage mit Strom
versorgt, erscheint im Display
eine Zahlenkombination. Dahinter
verbirgt sich der Softwarestand.
Nach kurzer Zeit erlischt die LCDHinterleuchtung und im Display
erscheint ein blinkender Punkt.
2.Displayanzeige
bei
Zustand
„Sleep“
Im Display erscheint ein blinkender
Punkt, d. h., die Anlage befindet
sich jetzt im Zustand „Sleep“
(AUS).
Tastenbeleuchtung,
Displaybeleuchtung
und
die
gesamte Anlage sind abgeschaltet.
Das Gerät kann jetzt durch
Betätigung irgend einer Taste
wieder in den Zustand „Stand-by“
(Bereitschaft) gebracht werden. Nach
einem Dusch- bzw. Dampfvorgang
und ausgeschaltetem Licht dauert
es ca. 15 min bis der Zustand „Sleep“
(AUS) erreicht ist.
3. Weißlicht ein / aus
Durch kurzes Drücken der Lichttaste
A wird die Duschbeleuchtung einbzw. ausgeschaltet. Im Display wird
die aktuelle Kabineninnentemperatur
(z. B. 44 °C) angezeigt. Die
Beleuchtung schaltet automatisch
nach ca. 60 min ab. Dieser Wert kann
nicht verändert werden.
4. Farblicht ein / aus
Durch Drücken der Lichttaste A > 1
sec wird das Farblicht eingeschaltet
und über einen weiteren kurzen
Tastendruck ausgeschaltet. Im
Display wird der zuletzt eingestellte
Wert angezeigt z. B. C10. Das
Farblicht schaltet automatisch nach
ca. 60 min ab. Dieser Wert kann nicht
verändert werden.
74
= light push-button
(Light / coloured light on / off)
= display
(Display of temperature / steam
period / steam performance /
essentila oils addition / coloured
light program / time)
C = + / - selector switches
(Setting of steam period / steam
performance / essentila oils addition
/ coloured light program / time)
D = Mode button
(Switching over to program levels)
E = steam push-button
(Steam function on / off)
1.Display
when
putting
into
operation
A number combination appears
on the display when the power is
switched on. This is the software
version. After a short time, the
LCD backlighting disappears and
a flashing dot is shown on the
display.
2.Display in "Sleep" mode
A flashing dot is shown on the
display, i.e. the equipment is now
in "Sleep" mode (OFF). Button
lights, display lights and the whole
system is switched off. Pressing any
button returns the system to "standby" mode (ready for use). "Sleep"
mode (OFF) is switched to about 15
minutes after finishing showering or
using steam and switching off the
light.
3. White light on / off
Briefly pressing light push-button
A switches the shower lighting
on or off. The display shows the
current inside temperature of the
cabin(e.g.44 °C). The lighting is
automatically switched off after
about 60 minutes. This value cannot
be changed.
4. Coloured light on / off
Pressing the light push-button
A longer than 1 sec switches the
coloured light on. Press the button
again shortly to switch it off again.
The display shows the value set
last, e.g. C10. The coloured light
is automatically switched off after
about 60 minutes. This value cannot
be changed.
1.Visualizzazione display in caso di messa
in esercizio
Alimentando l'impianto con la corrente
elettrica, sul display appare una
combinazione di cifre, che indica la
versione di software disponibile. Dopo
alcuni istanti si spegne l'illuminazione di
fondo LCD e sul display appare un punto
che si illumina ad intermittenza.
2.Visualizzazione display in caso di stato
"Sleep“
Sul display di visualizzazione appare un
punto ad intermittenza, cioè, l'impianto
si trova adesso allo stato "Sleep“ (OFF).
L'illuminazione tasti ed il completo
impianto sono spenti. Premendo un
tasto qualunque, l'apparecchiatura può
essere messa di nuovo allo stato "Standby“ (stato di pronto). Dopo una doccia
oppure dopo un "bagno di vapore“
ed illuminazione spenta, ci vuole ca. 15
h fino a quando si raggiunge lo stato
"Sleep“ (OFF).
3.Luce bianca acceso / spento
Premendo brevemente il pulsante
per l'illuminazione A si accende e si
spegne l'illuminazione della cabina
doccia. Sul display si visualizza la
temperatura interna della cabina
attuale (p.es. 44 °C). L'illuminazione
si spegne automaticamente dopo ca.
60 min. Questo valore non può essere
modificato.
4. Luci colorate acceso / spento
Premendo più a lungo di 1 sec il pulsante
per l'illuminazione A si accendono le
luci colorate che possono essere spente
premendo di nuovo brevemente sul
tasto. Sul display si visualizza il valore
impostato per ultimo p.es. C10. Le luci
colorate si spengono automaticamente
dopo ca. 60 min. Questo valore non può
essere modificato.
Italiano
C
D
English
A
Deutsch
1.
2.
B
E
3.
4.
A
A
75
Steuerung K IV Steam Plus
K IV Steam Plus Control
Controllo K IV Steam Plus
4.1 Farbwahl Farblicht
Es stehen 8 Farben sowie 5 Farbprogramme
zur Verfügung:
C00 = Benutzerdefinierte Einstellung
C01 = rot
C02 = orange
C03 = gelb
C04 = grün
C05 = blau
C06 = lila
C07 = violett
C08 = warme Farbtöne
C09 = kalte Farbtöne
C10 = grüne Farbtöne
C11 = gesamtes Farbspektrum, langsame Farbwechsel
C12 = gesamtes Farbspektrum, schnelle Farbwechsel
Durch Drücken der Wahltasten C kann in
einen anderen Farbmodus gewechselt
werden. Nach 30 sec ohne weitere
Tastenbedienung wird im Display beim
Duschbetrieb wieder standardmäßig
die Mischwassertemperatur und beim
Dampfbetrieb die Dampfzeit angezeigt.
4.1Coloured light colour selection
Eight colours as well as five colour
programs are available:
C00= user-defined setting
C01= red
C02= orange
C03= yellow
C04= green
C05= blue
C06= lilac
C07= violet
C08= warm colour shades
C09= cold colour shades
C10= green colour shades
C11= complete colour spectrum,
slow colour changes
C12= complete colour spectrum, fast colour changes
Press selector buttons C to change
the colour mode. The display
switches back to mixed water
temperature in shower operation
and steam period in steam operation
when no button is pushed for 30
seconds.
4.1Selezione dei colori della luci colorate
Sono disponibili 8 colori nonché 5
programmi cromatici:
C00 = impostazione personalizzata
C01 = rosso
C02 = arancione
C03 = giallo
C04 = verde
C05 = blu
C06 = lilla
C07 = viola
C08 = tonalità cromatica calda
C09 = tonalità cromatica fredda
C10 = tonalità cromatica verde
C11 = completo spettro cromatico,
cambiamento lento dei colori
C12 = completo spettro cromatico,
ambiamento rapido dei colori
Premendo i pulsanti di selezione C è
possibile passare ad un'altra modalità
cromatica. Dopo 30 sec. in cui non si
esegue nessuna attivazione di funzione,
nel display si visualizza la temperatura
dell‘acqua miscelata, se si stà usando
la doccia, oppure si visualizza il tempo
di vaporizzazione, se si stà utilizzando il
„bagno di vapore“.
4.2 Geschwindigkeit Farbwechsel
Bei Anwahl von C08 bis C12 kann die
Geschwindigkeit des Farbwechsels im
Farbprogramm beeinflusst werden. Nach
Drücken der Mode-Taste D erscheint
im Display z. B. die Anzeige Ct4 (Ct0 =
langsamster Farbwechsel, Ct9 = schnellster
Farbwechsel).
4.3 Benutzerdefinierte Einstellung C00
Der Benutzer wählt zuerst sein
Farbprogramm (C08 - C12) aus. Bei
der gefundenen Lieblingsfarbe drückt
der Benutzer die Lichttaste A > 1sec.
Das Farbprogramm wird angehalten
(Pausefunktion) und die Lichttaste A blinkt.
Wird dieser Funktionszustand mindestens
30 sec gehalten, so wird die eingestellte
Farbe auf C00 abgespeichert. Ab diesem
Zeitpunkt kann der Benutzer diese Farbe
jederzeit unter C00 auswählen.
5.Dampffunktion
Durch Drücken der Dampftaste E wird
der Dampfgenerator aktiviert (Taste hell
hinterleuchtet) bzw. deaktiviert (Taste
schwach hinterleuchtet). Im Display wird
die ablaufende Dampfzeit angezeigt. Das
Licht schaltet sich an.
Eucafunktion
Nach dem aktivieren der Dampffunktion
und der Bildung von Dampf in der Kabine
kann die Eucafunktion durch Drücken der
Dampftaste E > 1 sec hinzugeschaltet
werden (Taste blinkt kurz und ist hell
dann hinterleuchtet). Im Display wird
die ablaufende Dampfzeit angezeigt.
Durch kurzes Drücken schaltet sich die
Eucafunktion und die Dampffunktion ab.
Die Dampffunktion kann durch Drücken
der Dampftaste E wieder aufgenommen
werden.
76
4.2Colour change speed
Select C08 to C12 to adjust the
colour change speed in the colour
program. After pressing Mode
button D, the display shows,
for example, Ct4 (Ct0 = slowest
colour change, Ct9 = fastest colour
change).
4.3User-defined setting C00
Select your colour program (C08
- C12). Press light push-button A >
1 second when you have found the
best colour. The colour program
stops (pause function) and light
push-button A blinks. Leave this
for at least 30 seconds to save your
setting under C00. You can now
select your colour at any time with
C00.
5. Steam function
Press steam push-button E to activate
the steam generator (button with
bright backlighting) or deactivate
the steam generator (button with
weak backlighting). The display
shows the expiring steam period.The
light is switching on.
4.2Velocità del cambiamento dei colori
Selezionando C08 fino a C12 è possibile
modificare la velocità della sequenza
dei colori nel programma cromatico.
Una volta premuto il pulsante Mode D
sul display appare p. es. la indicazione
Ct4 (Ct0 = la sequenza più lenta dei
colori, Ct9 = la sequenza più veloce
dei colori).
4.3Impostazione personalizzata C00
L'Utente seleziona prima il proprio
programma cromatico (C08 - C12). Una
volta trovato il colore preferito, l'Utente
pigia sul pulsante per l'illuminazione
A > 1sec. Il programma cromatico
si interrompe (funzione pausa) ed il
pulsante per l'illuminazione A inizia a
lampeggiare. Mantenendo questo stato
di funzionamento per almeno 30 sec il
colore impostato si salva in memoria
su C00. A partire da questo momento
l'Utente potrà selezionare alla voce C00
questo colore ogniqualvolta lo voglia.
5. Funzione vapore
Premendo il tasto vapore E si attiva
il generatore di vapore (pulsante
illuminato) oppure la si disattiva
(pulsante debolmente illuminato). Il
tempo di vaporizzazione attualmente
in corso viene visualizzata sul display.
L‘illuminazione si mette in funzione.
4.2.
C
C
D
4.3
5.
Italiano
English
Deutsch
4.1.
A
C
D
C
D
E
77
Steuerung K IV Steam Plus
K IV Steam Plus Control
Controllo K IV Steam Plus
5.1Dampfzeit einstellen
Durch Drücken der Wahltasten C
kann ein anderer Wert zwischen
2 und 60 Minuten eingegeben
werden.
Essential oil function (Eucafunction)
After activating the steam function
and steam will form in the cabin, the
essential oil function can be activated
by pressing button E > 1 sec. (button
is blinking for a short time then it is
bright backlighting)
The display shows the expiring
steam period. Short pressing steam
push-button deactivate the steam
generator and the essential oil
function. Press steam push-button E
to activate the steam generator once
more again.
5.2Dampfleistung einstellen
Durch einmaliges Drücken der
Mode-Taste D erscheint im Display
die Dampfleistung, z. B. 70 %. Durch
Drücken der Wahltasten C kann ein
anderer Wert zwischen 30 und 100
% eingegeben werden.
5.3Euca-Zugabe einstellen
Durch zweimaliges Drücken der
Mode-Taste D erscheint im Display
die Euca-Zugabe, z. B. 60 %. Durch
Drücken der Wahltasten C kann ein
anderer Wert zwischen 30 und 100 %
eingegeben werden.
6. Kabineninnentemperatur
Durch mehrmaliges Drücken der
Mode-Taste D erscheint im Display
die Kabineninnentemperatur. Nach
10 sec wird automatisch wieder die
Dampfzeit im Display angezeigt.
Alle Programmfunktionen können durch
Drücken der Mode-Taste D aufgerufen
und verändert werden.
78
5.1Adjustment of steam period
Press selector switches C to enter
a different value between 2 and 60
minutes.
Funzione Euca (Aroma)
Dopo l‘attivazione della funzione
vapore e la formazione di vapore
nella cabina è possibile attivare anche
la Funzione Euca premendo il tasto
vapore E > 1 sec (il tasto s’illumina
brevemente ad intermittenza e
resta illuminato a pieno).Il tempo
di vaporizzazione attualmente in
corso viene visualizzata sul display.
Premendo brevemente si disattiva la
Funzione Euca e la funzione vapore.
La funzione vapore può essere di
nuovo attivata premendo il tasto
vapore E.
5.1Impostazione del tempo di
vaporizzazione
Premendo i pulsanti di selezione C
è possibile impostare un altro valore
tra 2 e 60 minuti.
5.2Adjustment of steam performance
Press Mode button D once to display
the steam performance, e.g. 70%.
Press selector switches C to enter
a different value between 30 and
100%.
5.2Impostazione della prestazione
vapore
Premendo una sola volta il pulsante
Mode D sul display appare la
prestazione vapore, p. es. 70 %.
Pigiando i pulsanti di selezione C è
possibile impostare un altro valore
tra 30 e 100 %.
5.3Adjustment of essential oils
addition
Press Mode button D twice to display
the essentila oils addition, e.g. 60%.
Press selector switches C to enter
a different value between 30 and
100%.
5.3Regolare l‘aggiunta Euca (Aroma).
Premendo due volte il pulsante Mode
D sul display appare l’aggiunta Euca,
per es. 60 %., p. es. 60 %. Pigiando
i pulsanti di selezione C è possibile
impostare un altro valore tra 30 e
100 %.
6.Temperature in cabin
Press Mode button D several times
to display the temperature in the
cabin. The display switches back to
the steam period automatically after
10 seconds.
6. Temperatura interna della cabina
Premendo ripetutamente il pulsante
Mode D sul display appare la
temperatura interna della cabina.
Dopo 10 sec sul display si visualizza
di nuovo automaticamente il tempo
di vaporizzazione.
All program functions can be selected
and changed by pressing the Mode
button D.
Tutte le funzioni del programma
possono essere richiamate e modificate
premendo il pulsante Mode D.
5.2
C
D
C
D
E
E
5.3
6.
Italiano
English
Deutsch
5.1
C
D
D
E
79
Steuerung K IV Steam Plus
K IV Steam Plus Control
Controllo K IV Steam Plus
Parameterwerte - Umstellung
parameter value - change-over
Valori parametrici - modifica
1. Durch gleichzeitiges Drücken der
Lichttaste A und der "+"Taste C > 5
sec. erscheint im Display P 00.
1. By simultaneously pushing the light
button A and "+" button C > 5 sec.,
on the display is shown P00.
1. Premendo contemporaneamente il
pulsante per l’illuminazione A ed il
pulsante di selezione C “+” per più di
5 secondi sul display appare P 00.
Mit den "+" und "-" Tasten C kann
zwischen den Parametern P00.... P06
gewählt werden (Vor- und Rückwärts
blättern ist dabei möglich).
2. Öffnen
eines
gewählten
Menüpunktes erfolgt über das
Drücken der Lichttaste A. Es
erscheint der Inhalt des geöffneten
Menüpunktes z.B. 0,1 oder 2.
Verstellen des Inhalts erfolgt mit
den "+" und "-" Tasten C auf den
gewünschten Wert des Parameters.
Bestätigen des Inhalts und Schließen
des Menüpunktes erfolgt mit der
Lichttaste A.
3. Parameterliste
With "+" and "-" button C you can
vote between parameter P00....
P06 (it's possible to scroll up and
down).
2. Opening a chosen menu item is
raised by pushing the light button
A. The contents of the open menu
item appear e.g. 0,1 or 2.
Choosing desired value with pushing
the"+" and "-" button C.
supporting the content and closing
the menu item is raised by lightbutton A.
3. Parameterlist
Con i pulsanti di selezione “+” e “-”
è possibile scegliere tra i parametri
P00…. P06 (si può sfogliare sia in
avanti sia indietro).
2. Premendo
il
pulsante
per
l’illuminazione A si apre la voce del
menu scelta. Appare il contenuto
della voce di menu appena aperto
p.es. 0,1 oppure 2. La regolazione
del contenuto avviene tramite i
pulsanti C “+” e “-” impostando
i valori parametrici desiderati.
La conferma del contenuto e la
chiusura della voce del menu
avviene tramite il pulsante per
l’illuminazione A.
3. Tabella dei parametri
80
A
Deutsch
A
C
Italiano
English
C
Funktion
EUCA
Parameter
programm
P01
Temperaturanzeige
P02
Dampfgenerator
Entleerung
P04
function
EUCA
temperature
display
steam generator
draining
funzione
EUCA
indicazione della
temperatura
svuotamento del
generatore
di vapore
parameter
program
P01
P02
P04
programma
dei parametri
P01
P02
P04
eingestellter
Parameter
0
1 (DD 500)
2 (Wellspring/
DT New Line)
0 oder
1
0 (DD500)
1 ((Wellspring/
DT New Line)
adjusted
parameter
0
1 (DD 500)
2 (Wellspring/
DT New Line)
0 or
1
0 (DD500)
1 (Wellspring/
DT New Line)
parametro
impostato
0
1 (DD 500)
2 (Wellspring/
DT New Line)
0/
1
0 (DD500)
1 (Wellspring/
DT New Line)
Beschreibung
= für Steuerung mit
Aromadispenser (Feststoff)
= für Steuerung mit Dosierung
(Duftstofftank)
= °Celsius
= ° Fahrenheit
= DG wird über Pumpe entleert
= DG wird über Magnetventil
entleert
description
= for control with fragrance
reservoir (solid scent)
= for control with dosing (fluid
scent)
= °Celsius
= ° Fahrenheit
= draining of steam generator
about pump
= draining of steam generator
about solenoid valve
descrizione
= per il controllo del dispenser di
aroma (solido)
= per il controllo con dosaggio
(serbatoio di essenze)
= °Celsius
= ° Fahrenheit
= il generatore di vapore viene
svuotato tramite la pompa
= il generatore di vapore viene
svuotato tramite la valvola
elettromagnetica
81
Steuerung K IV Steam Plus
Warnung
A13
Art der Störung /
Ursache
- Befüllung bei Beginn
des Dampfens in den
ersten 3 min
misslungen, d.h.
unterer und oberer
Wasserlevel nicht
erreicht (z.B. bei
Erstinbetriebnahme)
- Fehler Magnetventil
- Fehler Levelsensor
(Erkennung: Wasser
tritt bei Dampfbetrieb
am Drainagerohr aus)
- Fehler Dampfmodul
A14
A16
Mögliche Ursache
Mögliche Abhilfe
- Kugelventil vor dem
Dampfgenerator
geschlossen
- Sieb im Anschlußwinkel
des DG verstopft
- bauseits unzureichende
Wasserversorgung
- kein/ geringer Zulauf zum
DG/ Zulauf d.h.
Schmutzfangsieb im
Eckventil, RV oder
Durchflußbegrenzer zum
DG verschmutzt
- Schlauch zwischen DG +
Eckventil und/oder RV
falsch montiert
- Magnetventil defekt oder
ausgesteckt
- Levelsensor defekt oder
ausgesteckt
- Dampfmodul defekt oder
Spannungsversorgung
nicht vorhanden
- Kugelventil öffnen
- Befüllung bei Beginn oder - Kugelventil vor dem
während des Dampfens
Dampfgenerator
innerhalb von 3 min nicht
geschlossen
ausreichend, d. h. unterer - Sieb im Anschlußwinkel
Wasserlevel erreicht,
des DG verstopft
jedoch nicht oberer
- bauseits unzureichende
Wasserversorgung
- Magnetventil defekt oder
ausgesteckt
- Sieb im Anschlußwinkel
reinigen
- Wasserversorgung
sicherstellen
- Schmutzfangsiebe, RV und
Duchflussbegrenzer reinigen.
- Schlauch mit RV richtig
montieren
- Magnetventil-Membrane
austauschen oder Kabel
einstecken (Kabel am
Dampfmodul mit Aufdruck
„Fill“)
- Levelsensor tauschen oder
Kabel einstecken (Kabel am
Dampfmodul mit Aufdruck
„Level“)
- Dampfmodul austauschen
oder einstecken (Kabel am
Dampfmodul mit Aufdruck
„Mains 230V“)
- Kugelventil öffnen
- Sieb im Anschlußwinkel
reinigen
- Wasserversorgung
sicherstellen
- Magnetventil-Membrane
austauschen oder Kabel
einstecken (Kabel am
Dampfmodul mit Aufdruck
„Fill“)
- Kabine abkühlen lassen
- Max.
- Sicherheitsabschaltung bei
Kabinentemperatur
Überschreitung der max.
von 55 °C
zulässigen
überschritten
Kabinentemperatur.
A17
- Drainage-Vorgang des - Generator verkalkt, d. h.
- Generator ausbauen und
Dampfgenerators
Drainageausgang und /
inklusive Drainagerohr,
abgebrochen.
oder -rohr verstopft.
Schmutzfansieb im Eckventil
Schmutzfangsieb im
und Durchflussbegrenzer zum
Eckventil und/ oder
DG reinigen/tauschen
Durchflussbegrenzer zum
DG verschmutzt.
A18
- Meßwerte
- Kabinentemperatur-Sensor - Kabinentemperatur-Sensor
Kabinentemperaturdefekt oder ausgesteckt
austauschen oder einstecken
Sensor außer Toleranz
A19
- Dampfgenerator ist
- Magnetventil defekt
- Magnetventil-Membrane
bei Inbetriebnahme
(undicht)
reinigen oder austauschen
teilweise oder ganz
Sobald eine Warnung mit
im Display
Wassererscheint
befüllt ist ein weiteres Nutzen der Steam-Funktion nicht mehr möglich!
Warnungen sind nicht löschbar, durch Drücken der Lichttaste wird die Warnung ignoriert. Ändert sich der Funktionszustand
nicht, tritt nach weiterem Aufruf der entsprechenden Funktion die Warnung erneut auf.
Bei der Fehlermeldung A19 wird nach dem Drücken der Lichttaste ein automatischer Drainagevorgang durchgeführt.
Durch einen Netzreset (FI-Schalter ausschalten, nach 10 sec wieder einschalten) können Fehlermeldungen ohne Datenverlust
eliminiert werden.
82
K IV Steam Plus Control
Type of Malfunction / Cause
- Filling failure at the start of
steaming in the first 3
minutes, i.e. lower and
upper water levels not
reached (e.g. during initial
start-up)
- Solenoid valve error
Possible Cause
- Ball valve before steam
generator closed
- Filter in connection bracket
of steam generator clogged
- Insufficient on-site water
supply
- Solenoid valve defective or
disconnected
Possible Clearance
- Open ball valve
-
Level sensor error
(Symptom: Water emerges
from the drain pipe during
steam operation)
Steam module error
-
Level sensor defective or
disconnected
-
-
Steam module defective or
no voltage supply
-
Filling at the start of
steaming in the first 3
minutes insufficient, i.e.
lower water level reached,
but not upper water level
-
Ball valve before steam
generator closed
Filter in connection bracket
of steam generator clogged
Insufficient on-site water
supply
Solenoid valve defective or
disconnected
-
A14
-
-
A16
-
A17
-
A18
-
A19
-
Maximum cabin
temperature of 55°C
exceeded
Drain process of steam
generator defective
-
Measured values from
cabin temperature sensor
out of tolerance
Steam generator is filled up or is filled particular when
starting
-
-
Safety cut-out when
maximum allowed cabin
temperature exceeded
Generator calcified, i.e. drain outlet and / or pipe clogged
Cabin temperature sensor
defective or disconnected
-
Solenoid valve defective
(untight)
-
Deutsch
-
Clean filter in connection
bracket
Ensure sufficient water
supply
Replace solenoid valve
membrane or connect
cable (cable on steam
module with “Fill” marking)
Replace level sensor or
connect cable (cable on
steam module with “Level”
marking)
Replace steam module or
connect cable (cable on
steam module with “Mains
230V” marking)
Open ball valve
English
-
-
Italiano
Warning
A13
Clean filter in connection
bracket
Ensure sufficient water
supply
Replace solenoid valve
membrane or connect
cable (cable on steam
module with “Fill” marking)
Allow cabin to cool down
Remove generator and
clean generator including
drain pipe
Replace or connect cabin
temperature sensor
Clean solenoid valve
membrane or replace it
As soon as a warning is displayed, the steam function can no longer be used!
Warnings can be not deleted; press the light push-button to ignore a warning. If the functional state does not change, the
warning is displayed again when the respective function is selected again.
After pressing the light push-buttom at warning A19, an automatic drain process of steam generator will be starting.
Error messages can be eliminated without loss of data with a mains reset (switching the FI switch off and on again after 10
seconds).
83
Controllo K IV Steam Plus
Allarme
A13 -
Tipo Anomalie / causa
Riempimento fallito
all'inizio della
vaporizzazione primi 3
min, ovvero non si è
raggiunto il livello
inferiore e superiore
dell'acqua (p.es. in caso
di prima messa in
esercizio)
-
-
-
-
A14
-
Malfunzionamento
valvola magnetica
Malfunzionamento del
sensore di livello
(fuoriuscita di acqua in
caso di esercizio con
vapore al tubo di
drenaggio)
Malfunzionamento del
modulo vapore
Possibili cause
Valvola a sfera chiusa prima
del generatore di vapore
Filtro otturato all'angolare di
attacco del generatore di
vapore
Insufficiente alimentazione
dell'acqua sul luogo di posa
Valvola magnetica difettosa
oppure staccata
-
-
Sensore di livello difettoso
oppure staccato
Possibili rimedi
Aprire la valvola a sfera
-
Pulire il filtro nell'angolare
di attacco
-
Assicurare l'alimentazione
dell'acqua
-
Sostituire la membrana
della valvola magnetica
oppure inserire il cavo (cavo
al modulo vapore con
dicitura "Fill“)
Sostituire il sensore di livello
oppure inserire il cavo (cavo
al modulo vapore con
dicitura "Level“)
-
-
Modulo di vapore difettoso
oppure l’alimentazione di
rete è non disponibile
Riempimento
insufficiente all'inizio
oppure durante la
vaporizzazione primi 3
min, cioè si è raggiunto
il livello inferiore
dell'acqua ma non
quello superiore
-
Valvola a sfera chiusa prima
del generatore di vapore
Filtro otturato all'angolare di
attacco del generatore di
vapore
Insufficiente alimentazione
dell'acqua sul luogo di posa
Valvola magnetica difettosa
oppure staccata
-
Le predisposizioni di
sicurezza non funzionano in
caso di superamento della
temperatura ammessa
all'interno della cabina.
Generatore calcificato, cioè
otturazione dell'uscita del
drenaggio e/o del tubo di
drenaggio
Sensore della temperatura
della cabina difettosa
oppure staccato dalla presa
-
La valvola elettromagnetica
è difettosa (non tiene)
-
-
A16
-
La temperatura max. 55°
C dell'ambiente interno
della cabina è stata
superata!
-
A17
-
-
A18
-
A19
-
Anomalia
nell'operazione di
drenaggio del
generatore di vapore
Valori di misurazione
Sensore temperatura
della cabina fuori della
tolleranza
Durante la messa in
funzione il generatore di
vapore è riempito in
parte oppure del tutto
con dell’acqua
-
-
-
Sostituire il modulo di
vapore oppure inserire il
cavo (cavo al modulo
vapore con dicitura "Mains
230V“)
Aprire la valvola a sfera
Pulire il filtro nell'angolare
di attacco
Assicurare l'alimentazione
dell'acqua
Sostituire la membrana
della valvola magnetica
oppure inserire il cavo (cavo
al modulo vapore con
dicitura "Fill“)
Aspettare che si raffreddi la
cabina
-
Smontare il generatore e
pulire anche il tubo di
drenaggio
-
Sostituire il sensore della
temperatura della cabina
oppure innestare
-
Pulire oppure sostituire le
membrane della valvola
elettromagnetica
Non appena sul display appare un messaggio di avvertenza non sarà più possibile continuare ad utilizzare la funzione
Vapore!
I messaggi di avvertenza possono essere cancellati; premendo il pulsante per l’illuminazione si ignora l’avviso.
Se lo stato di funzionamento non si modifica, in seguito ad un’ulteriore attivazione della rispettiva funzione si ripresenta
nuovamente l’avviso.
Se appare la segnalazione d’errore A19 e premendo poi il tasto per l’illuminazione, viene effettuato un drenaggio
automatico.
Attraverso un resettaggio della rete (spegnere l’interruttore a corrente di guasto FI, riaccenderlo dopo 10 sec) è possibile
eliminare i messaggi di anomalia senza nessuna perdita di dati.
84
85
Italiano
English
Deutsch
Bedienung (ML/Steam)
Operation (ML/Steam)
Uso (ML/Steam)
1. Die
Gleiteigenschaft
des
höhenverstellbaren
Handbrausenhalters kann über
die Inbusschraube A (SW 2,5 mm)
eingestellt werden.
1. Use Allen screw A (SW 2.5 mm) to
adjust the slide resistance of the
height-adjustable
hand-shower
holder.
1. Utilizzare la vite ad esagono ( misura
2.5 mm) per regolare in altezza il
supporto scorrevole della doccetta
a mano.
2. Im Lieferumfang befinden sich zwei
Seitenbrausen mit Nebelstrahl B, zwei
Seienbrausen mit Normalstrahl C und
vier Seitenbrausen mit Massagestrahl
D. Diese können gegeneinander
ausgetauscht werden. Befestigt
sind die Seitenbrausen durch einen
Bajonettverschluss. Durch Drehen
der Seitenbrause um 90° nach links
kann diese entfernt werden und die
andere eingesetzt werden.
2. The scope of delivery contains 2
side showers with fine spray B, 2
side showers with normal spray C
and 4 side showers with massage
spray D. These can be exchanged
for each other. The body showers
are fastened with a bayonet catch.
Turn the body shower 90° to the
left to remove it and then attach the
other shower.
3. Die Aktiva A8 Handbrause hat vier
verschiedene Strahlarten:
Normal
Massage
Mono
Soft
Durch Drehen der Strahlscheibe E
wird die Strahlart ausgewählt.
Über die Waterdim-Funktion F kann
die Durchflussmenge reguliert
werden.
3. The Aktiva A8 hand shower has four
different jet types:
Normal
Massage
Mono
Soft
Turn spray disk E to select a jet
type.
Use waterdim function F to adjust the
flow volume.
4. Durch Drehen am Thermostatgriff
wird
die
Wassertemperatur
eingestellt. Durch Drücken des
roten Sicherheitsknopfes G kann
eine Temperatur von > 38 °C erreicht
werden.
4. Turn the thermostat grip to adjust the
water temperature. Press red safety
button G for temperatures > 38 °C.
5. Durch Drehen des Ab-/Umstellgriffes
können die verschiedenen Brausen
angesteuert werden:
Handbrause
Handbrause + Seitenbrausen
Seitenbrausen
Seitenbrausen + Kopfbrause
Kopfbrause
Schwallbrause
5. Turning
the
shut-off/selection
handle the different showers can be
selected:
hand shower
hand shower + body shower
body shower
body shower + head shower
head shower
surge shower
86
Durch Heben und Senken des Griffes
kann die Wasserzufuhr reguliert
werden..
Lifting and lowering the handle the
water supply can be adjusted.
2. La fornitura include due doccette
laterali con accurati getti a spruzzo
del tipo B, due doccette laterali
con getti normali di tipo C e
quattro doccette laterali con getto
massaggio del tipo D. Queste
possono essere intercambiate
l’una con l’altra. Le doccette laterali
sono fissate attraverso un innesto
a baionetta. Ruotando la doccia
laterale di 90° verso sinistra è
possibile rimuoverla ed applicarvi
l'altra.
3. La doccetta a mano Aktiva A8 ha
quattro diversi tipi di getti:
Normale
Massaggio
Mono
Soft
Ruotando il disco di selezione del
getto E si seleziona il tipo di getto.
Attraverso la funzione Waterdim F è
possibile regolare la quantità della
portata.
4. La temperatura dell'acqua si
regola ruotando la manopola del
termostatico. Premendo il pulsante
di sicurezza rosso G è possibile
raggiungere una temperatura di >
38 °C.
5. Ruotando la leva di chiusura /
deviatore si possono azionare le
diverse doccette:
doccia manuale
doccia manuale + docce laterali
docce laterali
docce laterali + soffione doccia
soffione doccia
doccia a cascata
Si può regolare l’alimentazione
dell’acqua alzando e abbassando la
leva.
Italiano
2.
4.
English
A
F
Deutsch
3.
1.
E
D
C
B
G
5.
87
Bedienung
Operation
Uso
Dampfmodul mit Aromadispenser:
1.1In den umgedrehten Deckel A des
Aromadispenser kann flüssiger
Duftstoff eingefüllt werden. Die
Duftintensität kann über den Hebel
B gesteuert werden. Zeigt der Hebel
B nach hinten, wird eine maximale
Duftintensität erreicht.
Steam modul with aroma dispenser:
1.1Liquid essential oils can be filled
into turned over cover A of the
aroma dispenser. Lever B controls
the fragrance intensity. Maximum
fragrance intensity is achieved when
lever B points to the rear.
Modulo vapore con Aromadispenser:
1.1Capovolgendo il coperchio A del
Aromadispenser è possibile inserire
dell'essenza aromatica liquida. L'intensità
dell'aroma può essere regolata attraverso
la levetta B. La massima intensità
aromatica si raggiunge quando la leva B
è posizionata all'indietro.
Der Deckel A wird während der
Dampfphase sehr heiss, vor dem
Berühren den Deckel A erst
auskühlen lassen.
Nach dem Dampfbad den Deckel A
sorgfälltig ausspülen. Er kann auch
zur Reinigung in die Spülmaschine
gegeben werden.
1.2In den Siebeinsatz C des
Aromadispenser kann fester Duftstoff
eingefüllt werden, z. B. getrocknete
Blätter oder auch ein mit Duftstoff
getränkter
Wattebausch.
Die
Duftintensität kann über den Hebel
B gesteuert werden. Zeigt der Hebel
B nach hinten, wird eine maximale
Duftintensität erreicht. Der Deckel A
muss während des Dampfvorgangs
die Duftanlage verschliessen.
Der Deckel A wird während der
Dampfphase sehr heiss, vor dem
Berühren den Deckel A erst
auskühlen lassen.
Nach
dem
Dampfbad
den
Siebeinsatz C, den Deckel A und
den Einsatz des Aromadispenser
sorgfältig
ausspülen.
Zum
Herausnehmen des Aromadispens
ereinsatzes muss der Hebel auf das
Symbol D zeigen. Alle Teile können
zur Reinigung in die Spülmaschine
gegeben werden.
Dampfmodul
mit
automatische
Duftstoffdossierung:
2. Der Duftstofftank E kann mit
flüssigem Duftstoff befüllt werden.
Duftstoffe von Pharo:
Eucalyptus
Best.-Nr: 21453000
Eucaminze
Best.-Nr: 21454000
Tannenduft
Best.-Nr: 21455000
Zitrone
Best.-Nr: 21456000
Die Duftstoff-Zugabe wird über die
Steuerung K4 reguliert.
88
Cover A becomes very hot during the
steam phase, therefore allow cover A
to cool down before touching.
Carefully rinse cover A after the
steam bath. It can also be put into
the dishwasher for cleaning.
1.2Solid fragrances can be filled into
the sieve insert C of the aroma
dispenser, e.g. dried leaves or also
cotton wool soaked in essential
oils. Lever B controls the fragrance
intensity. Maximum
fragrance
intensity is achieved when lever B
points to the rear. Cover A has to
lock the fragrance equipment during
the steam process.
1.2Nell'inserto filtro C dell'Aromadispenser
è possibile inserire anche essenza
aromatica di tipo solido come, p. es.
foglie secche oppure anche un tampone
di ovatta impregnato di essenza
aromatica. L'intensità dell'aroma può
essere regolata attraverso la levetta B. La
massima intensità aromatica si raggiunge
quando la leva B è posizionata all'indietro.
Durante il bagno di vapore, il coperchio
A deve chiudere l'impianto aromatico.
Cover A becomes very hot during the
steam phase, therefore allow cover A
to cool down before touching.
After the steam bath, carefully rinse
sieve insert C, cover A and the insert
of the aroma dispenser. To remove
the aroma dispenser, the lever
must point to symbol D. All parts
can be put into the dishwasher for
cleaning.
Steam modul with automatically
essential oils addition
2. The essential oil tank E can be filled
with liquid essential oils.
Essential oils from Pharo:
Eucalyptus Order.-No: 21453000
Eucaminze Order.-No: 21454000
Fir fragrance Order.-No: 21455000
Lemon Order.-No: 21456000
The essential oil addition is controled
by the K4 control.
Durante la funzione di vapore il coperchio
A diventa molto caldo. Prima di toccarlo,
aspettare che il coperchio A si sia
raffreddato.
In seguito ad una doccia con vapore,
sciacquare accuratamente il coperchio
A. Per pulirlo è anche possibile metterlo
nella lavastoviglie.
Durante la funzione di vapore il coperchio
A diventa molto caldo. Prima di toccare
il coperchio A, aspettare che si sia
raffreddato.
In seguito alla doccia con vapore,
sciacquare accuratamente l'inserto
filtro C, il coperchio A e l'inserto
dell'Aromadispenser. Per estrarre l'inserto
dell'Aromadispenser è necessario che la
levetta sia posizionata sul simbolo D.
Tutte le parti possono essere messe nella
lavastoviglie per essere ripulite.
Modulo vapore con dosaggio
automatico di sostanza aromatica:
2. Il serbatoio essenza E può essere
riempito con essenza aromatica
liquida.
Essenze aromatiche Pharo:
Eucalipto
Cod. ordin.: 21453000
Eucamenta Cod. ordin.: 21454000
Essenza di abeteCod. ordin.: 21455000
Limone
Cod. ordin.: 21456000
La regolazione dell’aggiunta di
essenza aromatica avviene attraverso
il sistema di controllo K4.
English
Deutsch
A
1.2
A
D
Italiano
1.1
B
B
C
2.
E
89
Bedienung
Operation
Uso
1. Die
Lamellen
in
der
Dampfaustrittsdüse
können
verstellt werden, so dass die
Ausströmrichtung des Dampfes
beeinflusst wird.
1. The lamellae in steam nozzle can be
adjusted. With this adjustment the
exhaust way can be enhanced.
1. Le lamelle della griglia di uscita del
vapore, si possono regolare per
direzionare il flusso di vapore.
Danger of scald!
The adjustment of the lamellae
must be done only by switched off
steam generator and by cold steam
nozzle.
2. The steam outlet nozzle becomes
very hot during a steam process!
2. L'ugello di spruzzo del vapore diventa
molto caldo nel corso della funzione di
vapore!
3. The steam generator is automatically
drained 15 minutes after the light
goes out or after the last button
activation. Hot water emerges below
the corner cabinet.
Danger of scald!
Nobody is allowed to remain
between the corner cabinet and the
drain during this operation!
Use the hand shower to flush out any
rinsed out dirt/lime particles.
3. Dopo 15 min. che la luce si è spenta,
oppure dopo l‘ultima attivazione
di uno dei tasti, il generatore di
vapore si svuota automaticamente.
Così facendo, nella parte inferiore
dell‘armadietto angolare si ha una
fuoriuscita di acqua bollente.
Pericolo di scottatura!
Durante
questa
operazione
è
assolutamente vietato rimanere nella
doccia cabina Duschtempel.
Eventuali particelle di sporcizia o di
calce scaturite insieme all’acqua in
uscita possono essere sciacquate via
con la doccetta una volta terminata
l’operazione.
Verbrühungsgefahr!
Das Ausrichten der Lamellen darf
ausschließlich im ausgeschalteten
Zustand des Dampfgeneratores und
bei erkalteter Dampfdüse erfolgen.
2. Die
Dampfaustrittsdüse
wird
während eines Dampfvorgangs sehr
heiss!
3. 15 min nachdem das Licht
ausgegangen ist bzw. nach
letzter Tastenbedienung findet
eine automatische Drainage des
Dampfgenerators statt. Dabei tritt
unterhalb des Eckschranks heisses
Wasser aus.
Verbrühungsgefahr!
Während dieses Vorgangs darf
sich niemand im Bereich zwischen
Eckschrank und Wasserablauf
aufhalten! Eventuell herausgespülte
Schmutz- / Kalkpartikel können
anschließend mit der Handbrause
weggespült werden.
90
Avvertenza: rischio di scottature!
La regolazione della posizione delle
lamelle può avvenire esclusivamente
quando il generatore di vapore
è spento e l‘ugello per vapore è
freddo.
Italiano
1.
2.
3.
91
English
Deutsch
Reinigung/ Wartung
Cleaning/ Maintenance
Pulizia/ Manutenzione
1. Mit
„rubit®“,
der
manuellen
Reinigungsfunktion, können die
Strahlformer
durch
einfaches
Rubbeln vom Kalk befreit werden.
1. With "Rubit®", the manual cleaning
function, lime can be removed
from the spray former by simple
rubbing.
1. Tramite "rubit®“, la funzione manuale
di pulizia è possibile liberare del
calcare gli ugelli dei getti di acqua
con semplici movimenti di frizione.
2. Handbrause mit „Quiclean“, der
Reinigungsfunktion gegen Kalk.
Beim Umstellen der Strahlarten
entfernen kleine Reinigungsstifte
die Kalkablagerungen.
2. Hand shower with "Quiclean", the
cleaning function against lime.
When changing the jet types, small
cleaning pins remove calcification.
2. La doccetta a mano con „Quiclean“,
(la funzione di pulizia contro il
calcare), mentre si cambiano i tipi
di getti, piccoli perni di pulizia
eliminano i depositi di calcare.
3.
a
b
c
d
e
Reinigung des Filters der Handbrause
Verschluss öffnen
Brausekopf abziehen
Filter durchspülen
Brausekopf aufstecken
Verschluss schliessen
3.Cleaning Filters of Handbrause
a Open clamp
b Pull off shower head
c Rinse filter
d Fit shower head back on
e Close clamp
4.Entkalken der Brausen
a Die
Handbrause
mit
handelsüblichem Schnellentkalker
auf Zitronensäurebasis entkalken.
Hierfür die Herstellerangaben für
Mischungsverhältnis und Einwirkzeit
beachten (Füllstand A ca. 20 mm).
b Brausekopf sorgfälltig abspülen.
4.Decalcifying the showers
a Delime the hand shower with
standard rapid deliming agent on
citric acid basis. For mixture ratio and
application time, please observe the
manufacturer specifications.
5. Wartung Rückflussverhinderer
Rückflussverhinderer
müssen
gemäß DIN EN 1717 regelmäßig
in Übereinstimmung mit nationalen
oder regionalen Bestimmungen
auf ihre Funktion geprüft werden
(mindestens einmal jährlich).
a Rückflussverhinderer (RV DN15) und
Schmutzfangsieb in absperrbaren
Schlauchanschlusswinkeln.
b Rückflussverhinderer (RV DN10) in
Seitenbrausen.
5. Maintenance of non return valve
The non return valves must be
checked regularly according to DIN
EN 1717 in accordance with national
or regional regulations (at least once
a year).
a non return valve (RV DN15) and filter
inside angled hose connecton (with
isolation valve)
b non return valve (RV DN10) in body
showers
.
92
b Thoroughly rinse shower head.
3. Pulizia del filtro della doccetta a
mano
a Aprire il tappo
b Rimuovere la testa della doccia
c Sciacquare il filtro facendovi
scorrere l'acqua sopra
d Applicarvi sopra la testa della
doccia
e Chiudere il tappo
4.Eliminazione di depositi di calcare
dalle docce
a Decalcificare la doccetta manuale
con decalcificante rapido a base
di acido citrico normalmente in
commercio. Osservare a ciò le
indicazioni del produttore per il
rapporto di miscelazione e tempo
d'efficacia. (livello di riempimento A
ca. 20 mm).
b Sciacquare la testa della doccia
accuratamente con acqua pulita.
5. Manutenzione della valvola di non
ritorno
La valvola di non ritorno deve essere
controllata regolarmente come da
DIN EN 1717, secondo le normative
nazionali e regionali (almeno una
volta all‘anno).
a Valvola di non ritorno(RV DN15) e
filtro nei gomiti per tubi flessibili con
valvole di intercettazione.
b Rückflussverhinderer (RV DN10) in
Seitenbrausen.
2.
b.
c.
e.
Italiano
3.
a.
English
Deutsch
1.
d.
4.
a.
b.
A
5.
a.
b.
93
Entkalken
Decalcifying
Per togliere il calcare
Um die Entkalkungsintervalle zu verlängern, bzw. Ihre Hausinstallation vor
Schäden zu bewahren, muss ab 14° dH
(~2,5 mmol/l) eine zentrale Enthärtungsanlage eingebaut werden.
If your water has a hardness degree of
14 (~2,5 mmol/l) or higher, a water softening system must be integrated in the
water supply to extend the decalcifying
intervals resp. to save your domestic installation!
Decalcifying the steam generator:
• if the steam power gets weaker
• if it takes longer to achieve the chosen
cabin temperauture like until now
• if hot water comes out of the steam
nozzle during the operating time
In caso di acqua dura (14° o più), è necessario
dotarsi di un apparecchio di dolcificazione
dell‘acqua, da inserire in prossimità delle condutture idrauliche, per evitare danni alle installazioni!
Togliere il calcare dal generatore di vapore:
• se l‘intensità del diffusore di vapore è ridotta
al minimo.
• se per raggiungere una determinata temperatura all‘interno della cabina si deve attendere
a lungo.
• se dal diffusore di vapore esce acqua calda
durante la funzione del bagno di vapore.
Decalcifying (Fig. A)
Per togliere il calcare (fig. A):
Assemble and disassemble from electrical components is only allowed by
electrican specialists.
L’installazione e la sostituzione di parti elettriche
devono essere eseguite solamente da uno specialista con concessione a norma VDE 0100.
Scalding danger!
Please note - The decalcifying must be
done only when the generator is cold.
Pericolo di scottatura!
Attenzione - la decalcificazione deve essere
fatta solo quando il generatore e’ freddo.
1. + 2. Turn off the electrical supply,lay a
dustsheet/blanket in the shower tray and
then remove the glass inspection opening
panel,
3. Disconnect electrical cables from the
steam generator,
4. + 5. Turn the water supply off to the
steam generator (corner valve) and
disconnect the chrome pressure hose,
6. Disassemble the steam pipe from the
steam generator,
7. Loosen the screws for the steam
generator, and then push the generator
up and remove from the corner cabinet.
Drain any remaining water from the steam
generator,
8. Fill the steam generator with standard
rapid deliming agent on citric acid
basis. For mixture ratio and application
time, please observe the manufacturer
specifications. NB-Store steam generator
in a horizontal position.
9. Drain steam generator and disassemble
drainage pipe from steam generator.
10. After decalcifying thoroughly rinse
steam generator and drainage pipe.
Remove any remaining calc particles and
dirt particles from steam generator and
drainage pipe.
1. + 2. Togliere la corrente elettrica, mettere
un telo /una coperta sul piatto doccia e
rimuovere il pannello ispezionabile.
3. Disconnettere i cavi elettrici dal generatore
di vapore.
4. + 5. Chiudere l’erogazione d’acqua al
generatore di vapore ( valvola angolare) e
scollegare il tubo flessibile cromato della
pressione.
6. Smontare il tubo dal generatore di vapore.
7. Allentare le viti del generatore di vapore,
sollevarlo e rimuoverlo dall’angolo della
cabina. Far defluire l’acqua rimasta dal
generatore di vapore.
8... Riempire il generatore di vapore con
decalcificante rapido a base di acido citrico
normalmente in commercio. Osservare a ciò
le indicazioni del produttore per il rapporto
di miscelazione e tempo d'efficacia.
ATTN : Posizionare il generatore di vapore
orizzontalmente.
9. Dopo un’ora, togliere l’agente decalcificante
e smontare il tubo di drenaggio dal generatore
di vapore
10. Dopo la decalcificazione, risciacquare
accuratamente il generatore di vapore ed
il tubo di drenaggio. Rimuovere eventuali
particelle calcaree e polvere residue
dal generatore di vapore e dal tubo di
drenaggio.
Per l’installazione procedere in ordine
contrario.
Wann sollte entkalkt werden:
• die Dampfleistung lässt nach
• das Erreichen der ausgewählten Kabinentemperatur dauert länger wie bisher
• während des Dampfbetriebs kommt
heißes Wasser aus der Düse
Entkalken (siehe Abb. A)
Der Aus- und Einbau el. Komponenten
darf nur von einer konzessionierten Elektrofachkraft nach VDE 0100 vorgenommen werden.
Verbrühungsgefahr!
Das Entkalken darf nur im abgekühlten
Zustand des Dampfgenerator durchgeführt werden.
1. + 2. Energiezufuhr abschalten und
Glasscheibe der Revisionsöffnung entfernen.
3. Die Stecker zum Dampfgenerator
lösen.
4. + 5. Das Eckventil für den Wasseranschluss des Dampfgenerators schließen
und den Druckschlauch lösen.
6. Die Dampfleitung vom Dampfgenerator schrauben.
7. Die Schrauben am Dampfgenerator
lösen, den Dampfgenerator anheben und
aus dem Eckschrank nehmen. Restwasser
aus dem Dampfgenerator leeren.
8. Den Dampfgenerator mit handelsüblichem Schnellentkalker auf Zitronensäurebasis füllen. Hierfür die Herstellerangaben
für Mischungsverhältnis und Einwirkzeit
beachten. Dampfgenerator in waagerechter Position lagern!
9. Dampfgenerator entleeren und das
Drainagerohr entfernen.
10.
Den Dampfgenerator und das
Drainagerohr mit klarem Wasser ausspülen. Restliche Kalk- und Schmutzpartikel aus dem Dampfgenerator und dem
Drainagerohr entfernen.
Der Einbau erfolgt in umgekehrter Reihenfolge.
Nach dem Entkalken einen Dampfdurchgang ohne Benutzer durchführen!
94
Mounting will happen in the opposite
order.
Execute one steam passageway without
users executes after decalcifying!
Dopo la decalcificazione fare un bagno di vapore senza alcuna persona all’interno della
cabina doccia!
A
1.
2.
3.
1.
2.
Deutsch
4.
4.
5.
6.
7.
8.
9.
Italiano
English
3.
10.
95
07/2010
9.05781.03
Hansgrohe · Postfach 1145 · D-77761 Schiltach · Telefon +49 (0) 78 36/51-1282 · Telefax +49 (0) 7836/511440
E-Mail: [email protected] · Internet: www.hansgrohe.com