1
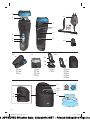
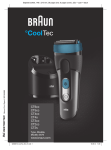
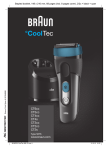
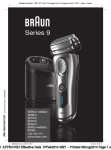
Models CT4s/CT2s must not be used with the
Clean&Charge station.
Charging shell (see fig. B)
• Click the charging shell (12a) onto the stand (12c
- models CT4s/CT2s only). Using the special cord
set (10), connect the shell power socket (12b) to
an electrical outlet.
• Place the shaver into the charging shell. The
contacts (7) on the back of the shaver need to
align with the contacts (12d) in the charging shell.
A beep sound confirms that the shaver sits properly in the station.
• The shaver will be automatically charged.
Charging and basic operating information
• A full charge provides the following operating
times according to your beard growth and
environmental temperatures:
– ca. 45 minutes without activated cooling
function
– ca. 15 minutes with activated cooling function;
afterwards 20 minutes operating time without
cooling function.
• Recommended ambient temperature for charging
is 5 °C to 35 °C. The battery may not charge properly
or at all under extreme low or high temperatures.
Recommended ambient temperature for shaving
is 15 °C to 35 °C.
• Do not expose the appliance to temperatures
higher than 50 °C for extended periods of time.
• When the shaver is connected to an electrical
outlet, it may take some minutes until the display
illuminates.
Shaver display
Charge status
During charging the symbol in the on/off switch (5)
blinks green. When fully charged, it will light up for a
few seconds, provided the shaver is connected to an
electrical outlet.
Travel lock
The lock symbol lights up when the shaver has
been locked to avoid unintended starting of the
motor (e.g. for storing it in a suitcase).
Using the shaver (see fig. A)
Press the on/off switch (5) to operate the shaver.
Tips for a perfect dry shave
For best results, Braun recommends you to follow
3 simple steps:
1. Always shave before washing your face.
2. At all times, hold the shaver at right angles
(90°) to your skin.
3. Stretch your skin and shave against the
direction of your beard growth.
Cooling
Note: The cooling sensation experienced may differ
from person to person. It is influenced by personal
and environmental factors (e.g. skin, environmental
temperature).
Activation: To activate the cooling function, press
the cooling switch (3) during shaving. The symbol
in the cooling switch shines blue. For best cooling
performance, we recommend to wait a few seconds
after the cooling function has been activated.
Then continue shaving as usual.
Low battery: The symbol
in the cooling switch (3)
starts blinking when the battery is running low and
there is not enough energy left for the cooling function. You should be able to finish your shave with
activated cooling function. We recommend to
charge the appliance afterwards to have the cooling
function available for the next shave.
You can deactivate the cooling function by pressing
the cooling switch again.
Long hair trimmer
To trim sideburns, moustache or beard, press the
release button (8) and slide the long hair trimmer (6)
upwards.
Low charge
The symbol in the on/off switch (5) shines red when
the battery is running low. You should be able to
finish your shave. When switching off the shaver a
beep sound reminds you of the low charge status.
Cooling Status
The symbol in the on/off switch (5) shines blue with
activated cooling function. When the battery is
running low it starts blinking.
Cleaning Status (only models CT6cc/CT5cc/
CT4cc/CT3cc/CT2cc)
The cleaning indicator lights up, when the shaver
needs to be cleaned in the Clean&Charge station.
Travel lock
• Activation: By pressing the on/off switch (5) for
3 seconds the shaver is locked. This is confirmed
by a beep sound and the lock symbol in the
display. Afterwards the display turns off.
• Deactivation: By pressing the on/off switch for
3 seconds the shaver is unlocked again.
Manual cleaning of the shaver
(see fig. C/D)
The shaver is suitable for cleaning under running tap
water. Detach the shaver from the power supply
before cleaning it in water.
12
96612122_CoolTec_MN_S6-76.indd 12
22.01.14 16:43
S APPROVED Effective Date 23Jan2014 GMT - Printed 29Sep2015 Page 12 o