1
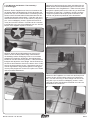
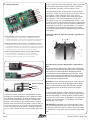
Schließen Sie die Servos am Empfänger an. Da das Modell mit dem 3X Kreiselsystem ausgestattet ist, werden die
Servos direkt an der Kreiselplatine angeschlossen. Vom
Kreisel kommen vier Servokabel, die am Empfänger angeschlossen werden. Nähere Informationen finden Sie in
Kapitel 2.1. Befestigen Sie den Empfänger mit Klettband
und verlegen Sie anschließend die Empfängerantenne(n).
Beachten Sie hierzu auch die Herstelleranweisungen der
RC-Anlage! / Connect the servos to the receiver. As this
model is equipped with the 3X gyro system, the servos are
connected to the gyro. From the gyro there are coming 4
wires that have to be connected to the receiver. Please
check chapter 2.1 for more information. Install the receiver
and the antenna(s) in the model. Please note the manual
from the radio manufacturer accordingly. / Collegare i servocomandi alla ricevente. Poiché il modello è dotato del
giroscopio di stabilizzazione 3X, i servi vengono collegati
direttamente al circuito del giroscopio. Dal giroscopio vengono 4 cavi servo, che vegnono collegati alla ricevente.
Ulteriore info trovate nel capitolo 2.1. Fissare la ricevente
con del velcro e ora distendere l'antenna (le antenne)
ricevente. A questo proposito fate riferimento al manuale
del vostro impianto radio!
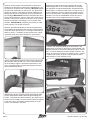
Prüfen Sie nun, ob sich alle Ruder korrekt bewegen.
Zuerst(!) den Sender einschalten, danach den geladenen
Antriebsakku im Modell anschließen. Warten Sie, bis der
3X Kreisel sich initialisiert hat! Betätigen Sie der Reihe
nach alle Funktionen am Sender. Vorsicht im Umgang
mit dem drehenden Propeller! / Check the function of
all rudders. Switch on the transmitter first(!) and connect then the LiPo-Battery to the speed controller in the
model. Wait for the initilization of the 3X gyro system!
Move all rudders one by one. Attention! Be careful with
the rotating Propeller! / Controllare ora che tutte le parti
mobili si muovano in maniera corretta. Per prima (!) cosa
accendere la trasmittente, poi collegare la batteria caricata nel modello. Attendere che il giroscopio X3 faccia
l'inizializzazione! Ora far funzionare una dopo l'altra
tutte le funzioni della trasmittente. Attenzione all'elica in
rotazione!
Beim Ausschalten stets zuerst das Modell und dann den
Sender ausschalten. / Always switch off the model first,
then switch off the transmitter. / Per spegnere spegnete
sempre prima il modello e poi la trasmittente!
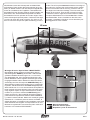
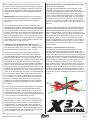
Stellen Sie die maximalen Ruderausschläge gemäß der
nachfolgenden Werte ein. / Adjust the maximum travel of
the control flaps according to the sketch below. / regolare
le escursioni massime dei piani mobili come segue:
HÖHENruder
ELEVATOR
PIANO DI QUOTA
6mm
6mm
Setzen Sie nun den Antriebsakku (3s LiPo 11,1V /
1.000mAh) vorne in das Akkufach ein. Akku jetzt noch
nicht am Regler anschließen! / Install the battery (3s LiPo
11,1V / 1.000mAh) in the front area of the fuselage. Do not
connect the battery with the speed controller now! / Ora
inserire la batteria (3s LiPo 11,1V / 1.000mAh) nella parte
anteriore della fusoliera, ma non collegarla ancora con il
regolatore!
Seite 6
SEITENruder
RUDDER
direzionale
15mm
15mm
QUERruder
AILERON
ALETTONI
7mm
7mm
Die Werte werden an der Hinterkante der Ruder gemessen. Geben Sie auf alle Funktionen 40% ExponentialAnteil. / The values are measured at the rear edge of the
flaps. Set 40% Exponential on all functions. / si misura al
bordo posteriore delle parti mobili. Date 40% di esponenziale su entrambi funzioni.
Setzen Sie abschließend die Kabinenhaube auf den
Rumpf auf. Die Kabinenhaube dient gleichzeitig als
Befestigung des LiPo-Akkus. / As the last step put the
canopy on the fuselage. The canopy is fixing the battery
at the same time. / Infine montare la cabina di pilotaggio.
La cabina funge contemporaneamente da fissaggio delle
batterie LIPO.
Best.-Nr. / Item-No. / art. 027-1140