1
3
Tool use
Bedienung
Modo de uso
Impiego
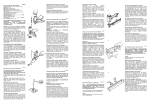
E Be sure that the tool is not pointed at yourself or
any one else when connecting it to the compressed air line.
ES No apuntes contra ti ésta herramienta-neumática
ó contra otras personas, cuando estas apretando el
gatillo, o
conectando a la red del aire
comprimido.
D Beim anschließen des Gerätes an die Druckluftleitung darauf achten, daß die Austrittsöffnung
nie auf Sie oder andere Personen zielt.
I
E Adjust the air pressure to the lowest one that will
drive the staples to the desired depth. Start at
approx. 5.5 bar and raise this by 0.5 bar increments until the correct operating pressure for the
job in hand is found. Never exceed 7 bar.
A low air pressure will give low maintenance
costs!
D Stellen sie keinen höheren Luftdruck ein als für
das richtige Eintreiben der Klammern nötig ist.
Beginnen Sie dabei mit ca. 5.5 bar und erhöhen
Sie den Druck in 0,5 bar Stufen bis der richtige
Arbeitsdruck gefunden ist. Gehen Sie aber niemals über 7 bar hinaus.
3
4
bar
ES Se recomienda empezar con la presión mínima
para el trabajo deseado. Apartir de 5.5 bar hasta
conseguir la presión establecida. Nunca
sobrepases de 7 bar.
5
2
6
ma
1
0
Al trabajar con aire de presión relativamente baja,
ayuda a bajar el costo de mantenimiento.
7
8
I
E Place the tool firmly on the work surface. Never
drive staples in extremely hard or brittle material.
Do not drive staples at too steep an angle or too
close to the edge of the work: the fastener might
fly free and hurt someone.
ES Coloca la embocadora con precisión contra el
material a fijar. Nunca se debe clavar en
superficies muy duras ó en material muy poroso.
Si clavas muy a la orilla ó en vínculos muy
inclinados hay riegos de que las grapas reboten
cayendo en el local.
D Setzen Sie das Gerät immer fest auf das Werkstück an. Niemals versuchen Klammern in sehr
harte oder spröde Materialien einzutreiben.
Achten Sie darauf, daß das Gerät niemals zu dicht
an die Kante oder schräg aufgesetzt wird, um das
Abprallen von Klammern zu vermeiden.
I
E The correct type of staples for the tool is marked
on the right hand side of the magazine. Load the
magazine as follows:
Posizionare saldamente l’utensile sulla superficie
di lavoro. Non usare mai i punti su materiali
estremamente duri o friabili, mai in posizioni
troppo inclinate, molto vicino ad angoli o al
bordo del lavoro. Il punto metallico potrebbe
volare via e ferire qualcuno.
ES El modelo de grapas (grampas) a utilizar está
indicado en una etiqueta a la derecha de la
máquina-engrampadora La carga de grampas se
realiza de la siguiente forma:
1. Pull the magazine lid all the way out.
3. Push the lid all the way forward again until it
clicks in.
Regolate l’aria compressa al minimo necessario
per portare i punti alla profondità desiderata.
Iniziare a circa 5.5 bar e incrementare di 0.5 bar
fino a un risultato soddisfacente. Non superare
mai i 7 bar.
Una pressione moderata vi darà bassi costi di
manutenzione!
Ein niedriger Luftdruck führt auch zu niedrigen
Wartungskosten!
2. Place the staple strip into the staple rail from
the left hand side.
Assicuretevi che l’utensile non sia diretto verso di
voi o nessun altro mentre lo collegate all’aria
compressa.
1. Desliza hacia afuera la corredera
2. Coloca una espiga de grampas por el lado
izquierdo de la engrampadora en el canal
cargador.
1
3. Cierra la corredera completamente hasta
asegurarla de nuevo en el cargador.
D Der für das Gerät richtige Klammertyp ist auf der
rechten Seite des Magazines angegeben. Die
Klammern werden folgendermaßen geladen:
I
2
Le misure esatte dei punti destinate all’utensile
sono marcate sulla destra del caricatore. Inserire
la stecca di punti nel modo seguente :
1. Den Magasindeckel ganz ausziehen.
1. Tirare indietro il coperchio del caricatore.
2. Den Klammerstreifen von links in den
Klammerträger hineinlegen.
2. Posizionare la stecca di punti nel caricatore
da sinistra.
3. Den Deckel ganz noch vorn drücken bis er
einrastet.
3
3. Richiudere il coperchio in avanti fino a
riagganciarlo.