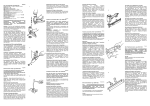
1
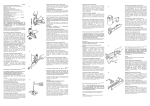
119409
Pneumatic tacker
Engrapadora neumática
Druckluft-Klammerungsgerät
Fissatrici pneumatiche
JK20/20A-690
Operating Instructions
Instrucciones de uso
Betriebsanleitung
Istruzioni d’uso
118848
Feb -2010
Josef Kihlberg AB
Box 126, S-544 22 Hjo, Sweden
Telephone: +46 (0)503 328 00 Telefax: +46 (0)503 328 01
www.kihlberg.se
e-mail: [email protected]
E
ES
D
I
The employer is responsible for:
El responsable de personal debe conocer y
hacer cumplir las instrucciones de uso:
enforcement of compliance with safety warnings and all
other directions presented in these Operating Instructions and its appended documents;
ensuring that the instructions and its appendixes are
distributed to the personnel concerned;
familiarizing himself with these instructions in the
interest of personnel safety and proper use of this tool;
enforcement of all rules and regulations issued by local
Safety Authorities for the use of this tool.
Se recomienda leer atentamente estas instrucciones de
uso y tenerlas siempre a mano para su consulta.
El personal que trabaja con esta máquina-neumática
debe tener conocimientos y entrenamiento necesario y
conocer los riesgos de accidentes y usar un adecuado
metodo de trabajo y mantenimiento de la misma.
Reglas en gral. Acompañan, en especial para jovenes
menores de edad que trabajan con ésta máquinaclavadora.
El personal debe tener siempre a mano las instrucciones
a seguir, equipos y tiempo necesario para su diario
control y funcionamiento de ésta herramientaneumática.
Der Arbeitgeber verantwortet dafür daß:
L’Operatore deve assicurarsi che:
allen Personen, die mit dem Gerät zu tun haben, diese
Betriebsanleitung und die dazu hörende Beilagen
jederzeit zugänglich sind;
queste istruzioni d’uso e le indicazioni annesse vengano
messe a disposizione di tutte le persone che utilizzano
l’utensile;
alle betroffene Beschäftigten die Sicherheitshinweise
und alle Anleitungen in diesem Heft und seinen Beilagen kennen und befolgen;
tutti gli addetti all’utilizzo siano al corrente di queste
istruzioni e delle appendici nell’interesse della sicurezza
personale e dell’utilizzo corretto di questo attrezzo;
die einschlägigen Sicherheitsvorschriften der Behörden
und Berufsgenossenschaften eingehalten werden.
vengano rispettate le norme dettate dai Regolamenti di
Sicurezza locali per l’uso dell’attrezzo.
When studying these Operating Instructions, consult also the tool’s spare parts list and technical data sheet
Al estudiar éstas instrucciones de uso, debe también ver la lísta de piezas de reservas y los datos-técnicos
Beim Studieren dieser Betriebsanleitung sind auch die Ersatzteil- und Technische Daten-Listen zu benutzen
Studiando queste istruzioni d’uso, consultate anche la lista delle parti di ricambio e il foglio dei dati tecnici
Table of Contents
Safety Warnings and Tool Installation
Tool use
Maintenance
Elimination of malfunctions
Parts list
Contiene notas de
1
3
5
6
Inhaltsverzeichnis
Sicherheitshinweise und Inbetriebnahme
Bedienung
Wartung
Beseitigung von Störungen
Ersatzteilliste
Seguridad, Precaución é Instalación
Instrucciones de uso
Mantenimiento
Eliminación del mal funcionamiento
Lista de piezas de recambio ó repuestos
1
3
5
6
Tavola dei contenuti
1
3
5
6
Disposizioni di sicurezza e messa in opera
Impiego
Manutenzione
Eliminazione dei difetti di funzionamento
Lista delle parti di ricambio
1
3
5
6
1
Safety warnings and tool installation
Sicherheitshinweise und Inbetriebnahme
Instr. de seguridad, precaución e instalación
Disposizioni di sicurezza e messa in opera
E Read these warnings to prevent injuries to yourself and to bystanders.
ES Lea éstas Instrucciones de seguridad, para evitar
daños personales o a terseros.
Para más información estudie los rubricos de Uso
Mantenimiento y errores.
Refer to the sections Tool use, Maintenance and
Elimination of malfunctions for additional information.
I
D Bitte diese Sicherheitswarnungen lesen um Unfälle für Sie und Zuschauer zu vermeiden.
Per ulteriori informazioni fare riferimento alle
sezioni : Impiego, Manutenzione, ed Eliminazione
dei difetti di funzionamento.
Weitere Information finden Sie in den Abschnitten Bedienung, Wartung und Beseitigung von
Störungen.
E Never use oxygen, combustible gases, CO2,
steam or high pressure gas tanks as power sources
for this tool; the tool may explode and cause
serious injury.
Use only dry, clean, pressure regulated compressed air to drive the tool.
Leggere queste istruzioni per prevenire incidenti
a se stessi e ad altri.
ES No use nunca gas oxigenado, gas de fuego, Co2,
vapor ó gas de tuvo de alta presión para manejar
ésta herramienta-neumática puede explotar y
causar daños graves.
Use solamente aire comprimido limpio, seco
y regulado.
Oxy
CO2
D Niemals Sauerstoff, Brenngase, CO2 oder
Hochdruckgase als Energiequelle für dieses Gerät
benutzen; dies kann zu Explosionsverletzungen
führen.
I
Non utilizzare mai ossigeno, gas combustibile,
CO2, vapore o gas ad alta pressione come fonti di
energia per l’attrezzo. L’utensile potrebbe
esplodere e causare gravi incidenti.
Benutzen Sie ausschließlich trockene, reine,
geregelte Druckluft
Utilizzare esclusivamente aria compressa pura,
secca, con pressione regolata.
E To prevent eye injuries, eye protection must always be worn by the operator and others in the
work area. Always use other personal protection
equipment as required, such as ear protection,
hard hats, etc.
ES Para evitar daños oculares debe usar gafas de
protección mientras trabaja. Asi mismo en caso
necesario protectores para oidos y eventualmente
otro equipo para protección corporal.
I
D Achten Sie darauf, daß Sie und die anderen Personen in der Nähe Ihres Arbeitsplatzes während
der Benutzung des Gerätes Sicherheitsbrillen und
anderen Sicherheitseinrichtungen tragen.
E Never use a defective tool. Make sure that the
trigger operates properly and that all screws and
nuts are securely tightened at all times.
ES No use nunca esta máquina-neumática en estado
de defecto. Controle diariamente que el gatillo
funcione correctamente, así mismo los tornillos y
tuercas esten bien ajustados.
Do not modify the tool.
Está prohibido modificar ésta máquina.
D Benutzen Sie niemals ein defektes Gerät. Achten
Sie darauf, daß der Abzug richtig funktioniert und
daß alle Schrauben und Muttern fest angezogen
sind.
Nehmen Sie niemals Änderungen am Gerät vor.
E Always disconnect the tool from the air supply
and empty the magazine when making a break or
ending work, when servicing the tool or eliminating malfunctions.
Never leave a loaded tool unattended.
D Kuppeln Sie immer die Druckluftzufuhr ab und
entleeren Sie das Magazin bei Arbeitspausen,
Arbeitende, beim Beheben von Störungen und bei
Wartung und Reparaturen.
Niemals ein geladenes Gerät unbeaufsichtigt
lassen.
Per prevenire incidenti agli occhi, devono sempre
essere utilizzati gli occhiali di protezione
dall’operatore e dai presenti. Utilizzare sempre
altre
protezioni
richieste
come
cuffie
otoprotettive, caschi ecc.
I
?
Non utilizzare mai un utensile difettoso. Prestare
attenzione che il grilletto operi regolrmente e che
tutte le viti e i dadi siano ben serrati.
Non apportare alcuna modifica all’utensile.
ES Desconecta siempre la máquina-engrampadora
de la red de aire comprimido en las pausas y al
finalizar cada trabajo, así mismo vacia
el
cargador antes de realizar cualquier operacion de
mantenimiento o reparación.
Nunca déjes ésta máquina-neumática cargada
fuera de control.
I
Disinnestare
sempre
l’utensile
dall’aria
supplementare, svuotare il caricatore quando si fa
una pausa o si termina il lavoro, quando si
revisiona l’utensile o lo si ripara.
Non lasciare
incustodito.
mai
un
utensile
caricato
2
Safety warnings and tool installation
Sicherheitshinweise und Inbetriebnahme
Cuidados de seguridad e instalación
Disposizioni di sicurezza e messa in opera
E Always assume that the tool is loaded. No
horseplay! Respect the tool as a working implement.
ES Considere siempre ésta herramienta cargada,
recuerda que es un instrumento de trabajo y no un
juguete.
Never point the tool at yourself or anyone else,
whether it contains staples or not. Always remove
finger from trigger when not driving staples.
Nunca apunte contra Ud ó contra otras personas
ésta máquina así esté cargada ó no podría
provoca accidente. Retira el dedo del gatillo de
inmediato si es qué no seguiras trabajando.
D Gehen Sie immer davon aus, daß das Gerät geladen ist. Spielen Sie deshalb niemals damit herum.
I
Richten Sie das Gerät niemals auf sich oder
andere Personen. Wenn keine Klammern ein zu
treiben sind, den Abzugshebel nicht berühren um
unbeabsichtigtes Auslösen zu vermeiden.
Non dirigere mai l’utensile verso se stessi o verso
altri, sia che contenga graffe o meno. Togliere
sempre le dita dal grilletto anche quando non
state utilizzando punti.
E Connect the tool to the compressed air line
before loading staples. The max. allowable air
pressure is 7 bar.
Ensure that the air hose has the right dimension to
avoid pressure drops which might cause
malfunctioning – min. ¼". An installation instruction may be obtained from the manufacturer
3
4
bar
ES Conecta a la máquina la red del aire comprimido,
antes de cargar con grapas (grampas) la presión
máxima permitida es de 7 bar.
5
2
6
ma
1
0
Controla qué la manguera de aire éste
correctamente dimensionada, para evitar errores
de funcionamiento y causar perdida de aire - min
6 mm. Instruciones de instalacion puede obtener
del fabricador.
7
8
The tool and the hose must have a coupling which
automatically bleeds all air pressure from the tool
when it is disconnected.
D Schließen Sie immer das Gerät an die Luftleitung
an bevor das Magazin zu laden. Gestattete
Höchstdruck: 7 bar.
Presupporre sempre che l’utensile sia carico. Non
usarlo come fosse un giocattolo. L’utensile è uno
strumento di lavoro.
Tanto la máq.engrapadora como la manguera
están provistas de valvulas de conexión para su
acoplamiento, que al desconectarse ésta descarga
el aire automáticamente.
I
∅ 6 mm (1/4")
Collegare l’utensile all’aria compressa prima di
caricarlo di punti. La massima pressione d’aria
ammissibile è 7 bar.
Achten Sie darauf, daß der Schlauch die richtige
Größe hat um Betriebsfehler durch zu großen
Druckabfall zu vermeiden – min. 6 mm. Eine
Installationsanweisung ist vom Hersteller zu erhalten.
Assicurarsi che il tubo flessibile abbia la giusta
dimensione per evitare cali di pressione che
potrebbero causare problemi – min. 6 mm. Altre
istruzioni per l’installazione potranno essere
fornite dal fabbricante.
Das Gerät und der Schlauch sollen mit einer
Kupplung versehen sein, die das Gerät bei Entkupplung automatisch entlüftet.
L’utensile e il tubo dovranno essere raccordati e
automaticamente spurgati del tutto dall’aria
compressa quando l’utensile viene disinnestato.
E Avoid personal injury. Never hold your hand or
another part of your body under the tool.
ES Evita daños personales. Nunca pongas la mano ó
otra parte de tu cuerpo bajo ésta herramienta .
Do not load the tool with the trigger depressed.
Use only original Josef Kihlberg staples, type
670/680/689/690.
Nunca cargues el cargador cuando el gatillo está
activado. Use solamente Josef Kihlberg grampas
originales tipo mod JK 670/680/689/690.
D Um Unfälle zu vermeiden, niemals die Hand oder
einen anderen Teil des Körpers unter dem Gerät
halten.
Laden Sie das Gerät niemals wenn der Abzug betätigt ist. Nur Josef Kihlberg Originalklammern
verwenden, Typ 670/680/689/690.
I
Evitare gli incidenti corporali. Non tenere mai le
mani o altre parti del corpo sotto l’utensile.
Non caricare l’utensile con il grilletto premuto.
Utilizzare solo punti originali Josef Kihlberg, tipo
670/680/689/690.
+
E Always place yourself in a firmly balanced position when using or handling the tool.
ES Al usar ésta herramienta -neumática debes tener
una posición corporal bien equilibrada y estable.
D Stellen Sie sich immer in eine stabile, wohl
ausgeglichene Position bei dem Gebrauch des
Gerätes.
I
Tenete sempre una posizione ferma e bilanciata
quando utilizzate o maneggiate l’utensile.
3
Tool use
Bedienung
Modo de uso
Impiego
E Be sure that the tool is not pointed at yourself or
any one else when connecting it to the compressed air line.
ES No apuntes contra ti ésta herramienta-neumática
ó contra otras personas, cuando estas apretando el
gatillo, o
conectando a la red del aire
comprimido.
D Beim anschließen des Gerätes an die Druckluftleitung darauf achten, daß die Austrittsöffnung
nie auf Sie oder andere Personen zielt.
I
E Adjust the air pressure to the lowest one that will
drive the staples to the desired depth. Start at
approx. 5.5 bar and raise this by 0.5 bar increments until the correct operating pressure for the
job in hand is found. Never exceed 7 bar.
A low air pressure will give low maintenance
costs!
D Stellen sie keinen höheren Luftdruck ein als für
das richtige Eintreiben der Klammern nötig ist.
Beginnen Sie dabei mit ca. 5.5 bar und erhöhen
Sie den Druck in 0,5 bar Stufen bis der richtige
Arbeitsdruck gefunden ist. Gehen Sie aber niemals über 7 bar hinaus.
3
4
bar
ES Se recomienda empezar con la presión mínima
para el trabajo deseado. Apartir de 5.5 bar hasta
conseguir la presión establecida. Nunca
sobrepases de 7 bar.
5
2
6
ma
1
0
Al trabajar con aire de presión relativamente baja,
ayuda a bajar el costo de mantenimiento.
7
8
I
E Place the tool firmly on the work surface. Never
drive staples in extremely hard or brittle material.
Do not drive staples at too steep an angle or too
close to the edge of the work: the fastener might
fly free and hurt someone.
ES Coloca la embocadora con precisión contra el
material a fijar. Nunca se debe clavar en
superficies muy duras ó en material muy poroso.
Si clavas muy a la orilla ó en vínculos muy
inclinados hay riegos de que las grapas reboten
cayendo en el local.
D Setzen Sie das Gerät immer fest auf das Werkstück an. Niemals versuchen Klammern in sehr
harte oder spröde Materialien einzutreiben.
Achten Sie darauf, daß das Gerät niemals zu dicht
an die Kante oder schräg aufgesetzt wird, um das
Abprallen von Klammern zu vermeiden.
I
E The correct type of staples for the tool is marked
on the right hand side of the magazine. Load the
magazine as follows:
Posizionare saldamente l’utensile sulla superficie
di lavoro. Non usare mai i punti su materiali
estremamente duri o friabili, mai in posizioni
troppo inclinate, molto vicino ad angoli o al
bordo del lavoro. Il punto metallico potrebbe
volare via e ferire qualcuno.
ES El modelo de grapas (grampas) a utilizar está
indicado en una etiqueta a la derecha de la
máquina-engrampadora La carga de grampas se
realiza de la siguiente forma:
1. Pull the magazine lid all the way out.
3. Push the lid all the way forward again until it
clicks in.
Regolate l’aria compressa al minimo necessario
per portare i punti alla profondità desiderata.
Iniziare a circa 5.5 bar e incrementare di 0.5 bar
fino a un risultato soddisfacente. Non superare
mai i 7 bar.
Una pressione moderata vi darà bassi costi di
manutenzione!
Ein niedriger Luftdruck führt auch zu niedrigen
Wartungskosten!
2. Place the staple strip into the staple rail from
the left hand side.
Assicuretevi che l’utensile non sia diretto verso di
voi o nessun altro mentre lo collegate all’aria
compressa.
1. Desliza hacia afuera la corredera
2. Coloca una espiga de grampas por el lado
izquierdo de la engrampadora en el canal
cargador.
1
3. Cierra la corredera completamente hasta
asegurarla de nuevo en el cargador.
D Der für das Gerät richtige Klammertyp ist auf der
rechten Seite des Magazines angegeben. Die
Klammern werden folgendermaßen geladen:
I
2
Le misure esatte dei punti destinate all’utensile
sono marcate sulla destra del caricatore. Inserire
la stecca di punti nel modo seguente :
1. Den Magasindeckel ganz ausziehen.
1. Tirare indietro il coperchio del caricatore.
2. Den Klammerstreifen von links in den
Klammerträger hineinlegen.
2. Posizionare la stecca di punti nel caricatore
da sinistra.
3. Den Deckel ganz noch vorn drücken bis er
einrastet.
3
3. Richiudere il coperchio in avanti fino a
riagganciarlo.
4
Tool use
Bedienung
Modo de uso
Impiego
E Tacker JK 20 has only single shot firing without 1)
safety yoke. Never fire it into the air.
ES La Engrampadora JK20 tiene disparo simple
sin seguro. Nunca dispares en el aire!
1) Coloca la embocadora de la máquina en la
parte exacta a clavar,
1) First place the tool against the work piece,
2) then pull the trigger.
2) A continuación apretar el gatillo.
D Das Gerät JK 20 hat nur Einzelfeuerung, ohne
Sicherheitsbügel und soll niemals ins Freie
abgefeuert werden.
I
1) Das Gerät zuerst auf das Werkstuck setzen,
La JK 20 ha solo lo sparo a colpo singolo senza
sicura. Non sparare mai in aria.
1) Primo, posizionare l’utensile contro il pezzo
da lavorare,
2)
2) dann den Abzug betätigen.
2) in seguito premere il grilletto.
E Tacker JK 20A has both single shot and continuous firing without safety yoke. Never fire it into
the air.
ES La Máquina JK-20 A construída y equipada
para disparos simples y automático (multiriro de
disparos), sin construccion automática de
seguridad.
No dispares al aire!
1. Single shot firing
Press the button on the left side above the
trigger and a single shot will be fired when
the trigger is activated.
Continuous firing
Release the button on the left hand side and
continuous firing will occur for as long as the
trigger is activated.
1. Tiro sencillo de disparos
Apreta el botón del lado izquierdo, arriba del
gatillo y un tiro sencillo acompaña al apretarel
gatillo.
Disparo automático (multitiro)
Suelta de botón del lado izquierdo y al apretar
el gatillo le seguirán disparos automáticos.
2. Velocidad de disparos
La velocidad se regula con un botón a la
derecha gira el botón hacia la izquierda para
acelerar la velocidad (max 30 tiros/segundo);
gira hacia la derecha para bajar la velocidad.
1
2. Speed of continuous firing
The firing speed is regulated by a knob on
the right side. Turning it anti-clockwise will
increase the speed (max. 30 shots/sec); turning it clockwise reduces the speed.
D Das Gerät JK 20A hat sowohl Einzel- als auch
Dauerfeuerung, ohne Sicherheitsbügel und
soll niemals ins Freie abgefeuert werden.
1. Einzelfeuerung
Brei Drücken des Knopfes auf der linken
Seite oberhalb des Abzuges ergibt Abzugbetätigung eine Einzelfeuerung.
Dauerfeuerung
Wird der Knopf losgelassen, erfolgt Dauerfeuerung bei Abzugbetätigung.
2. Dauerfeuergeschwindigkeit
Die Geschwindigkeit wird mit einem Knopf
auf der rechten Seite geregelt. Drehen im Gegen-Uhrzeigersinn erhöht die Geschwindigkeit (max. 30 Schläge/sek); drehen im Uhrzeigersinn verringert sie.
2
+
I
L’utensile JK 20A ha sia lo sparo colpo singolo
che lo sparo automatico senza sicurezza.
Non sparare mai in aria.
1. Sparo colpo singolo
Premere il pulsante sul lato sinistro sopra il
grilletto e il colpo singolo sarà sparato quando
il grilletto sarà attivato.
Sparo automatico
Lasciare il pulsante sul lato sinistro, avrete lo
sparo automatico finché il grilletto sarà
attivato.
2. Velocità dello sparo automatico
La velocità degli spari viene regolata da un
pomello sul lato destro. Girandolo in senso
antiorario aumenteremo la velocità (max. 30
colpi al secondo) ; girandolo in senso orario
la ridurremo.
5
Maintenance
Wartung
E Always disconnect the tool from the air supply,
empty the magazine and read the section Safety
warnings before starting maintenance.
D Trennen Sie immer erst das Gerät von der
Druckluftleitung, entleeren Sie das Magazin und
lesen Sie die Sicherheitshinweise bevor Sie mit der
Wartung beginnen.
Instr. de uso y mantenimiento
Manutenzione
ES Antes de iniciar cualquier trabajo de mantenimiento
o reparación de la máquina debe desconectarse
siempre de la red de aire comprimido, vacia el
cargador y lee las normas de seguridad.
I
Prima di iniziare la manutenzione disinnestare
sempre l’utensile dall’aria compressa svuotare il
caricatore e leggere la sezione Disposizioni di
sicurezza.
E Check the proper functioning of all safety devices
daily. Make especially sure that
the trigger moves freely without binding or
sticking;
all screws and nuts are securely tightened.
ES Controla a diario que todas las funciones de
seguridad funcionen. Verificar en especial que:
qué el gatillo funcione libre sin problema
qué todos los tornillos y tuercas estén bien
ajustados.
D Prüfen Sie täglich ob alle Sicherheitseinrichtungen
richtig funktionieren. Achten Sie besonders darauf,
daß
der Abzugshebel sich frei bewegt;
alle Schrauben und Muttern fest angezogen
sind.
I
E This tool does not require special servicing. It only
needs regular cleaning with a non-aggressive
(corrosive) cleaning agent.
ES La herramienta no necesita de servicio especial.
Solo necesita hacer limpieza regularmente, sin usar
sustancias de limpiezas agresivas.
Do not remove any parts for cleaning purposes!
No demontar la herramienta al hacer la limpieza.
D Eine spezielle Pflege ist nicht erforderlich für das
Gerät. Es soll nur regelmäßig mit einem nichtaggressiven Reinigungsmittel gesäubert werden.
I
Bauen Sie dazu keine Teile ab!
Controllare
giornalmente
l’appropriato
funzionamento di tutti i dispositivi di sicurezza.
Verificare particolarmente che :
il grilletto si muova liberamente senza legarsi o
incastrarsi;
tutte le viti e i dadi siano ben serrati.
L’utensile non necessita di speciale manutenzione.
Necessita solo di una pulizia regolare con un
detergente non-aggressivo (corrosivo).
Pulendolo non rimuovere nessuna parte!
E The tool must be lubricated by an oil mist.
Oil specification for mist oiler:
- Non acid, resin free
- Viscosity at 20 ºC: 2 - 4 E
- Pour point: 0 ºC (winter time: - 20 ºC)
- Oiler adjustment: 1 drop/300 blows
(Adjust the oiler for lowest possible delivery)
Sliding parts are greased with Kluber Spezial Fett
Synthese Proba 270 or Dow Corning grease MS 4
Silicon Compound at the factory. These greases
therefore are also recommended for moving parts if
they have been cleaned or replaced. Order nr:
184943
ES Para ésta herramienta debe usar lubricante -aceite
especial medio, recomendado para aparatos:
- libre de oxigeno, libre de resina
- viscosidad de 20 ºC: 2 - 4 E
- punto densidad: 0 ºC (invierno: - 20 ºC)
- el aparato aceitador debe ser regurlado:
1 gota/300 golpe ó disparos.
(Regula la mínima cantidad posible)
Las piezas de frición deben ser tratadas con grasa
kluber specialfett synthese Proba 270 ó con grasa
Corning MS4 Silicón Compound. Que se usa de
fabricación. Por eso se recomienda usar la misma
grasa al hacer limpieza ó al cambiar una pieza de
recambio. No. de producto 184943.
D Das Gerät ist mittels eines Ölnebels zu schmieren.
Ölspezifikation:
- Säurefrei, harzfrei
- Viskosität bei 20 ºC: 2 - 4 E
- Stockpunkt: 0 ºC (im Winter: - 20 ºC)
- Ölerjustierung: 1 Tropfen/300 Schläge
(Öler auf kleinstmögliche Menge einstellen)
Herstellerseitig sind die Gleitstellen mit Kluber
Spezialfett Synthese Proba 270 oder mit Gleittfett
Dow Corning MS 4 Silicon Compound versehen.
Diese Fette sind daher auch für die bewegliche
Teile bei Reinigung oder Ersatz zu empfehlen.
Bestellungs-Nr: 184943
I
L’utensile dovrà essere lubrificato da un olio misto.
Caratteristiche dell’olio:
- Senza acidi, senza resine
- Viscosità a 20 ºC: 2 - 4 E
- Punto di colatura: 0 ºC (in inverno: - 20 ºC)
- Regolazione olio: 1 goccia/300 colpi
(Regolare l’oleatore al minimo)
Le parti ingrassate sono trattate con grasso Kluber
Spezialfett Synthese Proba 270 o con il grasso Dow
Corning MS 4 Silicon Compound usato per la
fabbricazione. Questi grassi sono comunque
raccomandati per rimuovere delle parti se verranno
pulite o sostituite. No. di ordine: 184943
6
Elimination of malfunctions
Beseitigung von Störungen
Eliminación de mal funcionamiento
Eliminazione dei difetti di funzionamento
E You may obtain a trouble shooting chart and repair
instructions from your local dealer or order them
from the manufacturer.
ES Un esquema de instrucciones de mantenimiento y
reparación puede obtener del fabricante o
distribuidor.
D Sie können ein Fehlersuche-Schema und Reparaturanweisungen von Ihrem Händler bekommen
oder bei dem Hersteller bestellen.
I
E Always disconnect the tool from the air supply,
empty the magazine and read the section Safety
warnings before starting trouble shooting.
ES Antes de hacer cualquier reparación, debes
desconectar la red de aire comprimido de la
engrampadora vacia el cargador y leer bien las
normas de seguridad.
To remove a staple which may have got stuck:
Para retirar grapas que se han quedado pegada:
a) Pry the door open with a screw driver from the
left hand side.
a) Abra la ventanilla de la izquierda con un
destornillador.
b) Remove any staple remnants inside the tool
nozzle and close the door again until it clicks
shut.
D Trennen Sie immer erst das Gerät von der
Druckluftleitung, entleeren sie das Magazin und
lesen Sie die Sicherheitshinweise bevor Sie
Störungen beseitigen.
b) Eventuelle Klammerresten von der Klammerführung entfernen und die Vorderplatte wieder
schließen bis sie einrastet.
b) Retire eventuala
grapas atorada en la
enbocadora y cierre la ventanilla, asegurando
ésta correctamente.
a)
I
Um steckengebliebene Klammern zu entfernen
wird Folgendes gemacht:
a) Die Vorderplatte mit einem Schraubenzieher
von links öffnen.
Potrete ottenere uno schema problemi sparo e
istruzioni per la riparazione dal vostro rivenditore
oppure ordinandolo al fabbricante.
Prima di cominciare la manutenzione, disinnestare
l’utensile dall’aria svuotare il magazzino e leggere
la sezione Disposizioni di sicurezza.
Per rimuovere un punto che potrebbe essersi
incastrato:
b)
a) Aprire lo sportello con un cacciavite dal lato
sinistro.
b) Rimuovere il punto all’interno del beccuccio
dell’utensile e richiudere lo sportello fino
all’arresto.
7
Spare parts drawing
Ersatzteilzeichnung
Reservdelsritning
Dessin piéces de rechange
118539
A
Oring Kit
JK20-690, JK20A690
In case the warning text is unreadable
please replace the lable (art no 110175)
immediately.
It is not allowed to use the tool without a
readable warning text.
83 B
När varningstexten blir svårläst ersätt
omedelbart med ny klisteretikett ( art no
110175)
D ä i
illå
ä d
k
E To achieve optimal function and safety use only original spare parts. All repairs shall
S För bästa funktion och säkerhet använd endast original reservdelar.
Eventuella reparationer skall utföras av JK auktoriserad reparatör
be done by an authorised JK representative
D Um optimale Funktion und Sicherheit zu erzielen benutzen Sie nur
ursprüngliche Ersatzteile. Alle Reparaturen sind von einem JK Reparaturmann
erfolgt.
F Pour réaliser la fonction et la sûreté optimales employez seulement les
pièces de rechange originales. Toutes les réparations seront faites d'un
homme de réparation de JK.
Spare parts list JK20/JK20A-690
Drawing 118539
Pos Detalj
Benämning
Ref Part
Ref Référence
No. No.
A
A
1
2
3
5
6
7
8
9
10
11
12
13
14
15
16
17
18
19
20
21
22
23
24
25
26
27
30
31
32
33
34
35
37
38
39
40
41
42
44
45
46
47
50
51
52
53
54
55
56
57
58
59
60
61
62
63
65
66
67
70
71
72
74
75
76
77
79
80
81
82
83
84
143114
143115
132349
1972177
134104
145099
164041
150102
190066
972007
150409
972071
149055
972023
135530
162357
946662
945045
135531
162237
945040
147057
160050
175002
946512
150157
146097
946619
946608
165040
945039
132232
132233
132690
132691
150139
160051
173052
173053
173054
161123
170042
170070
987023
148015
972028
148047
139460
972021
146102
972040
191082
972057
173065
191081
972039
972030
972020
191079
972076
191083
972070
191053
972034
945041
972124
972084
146106
146086
136074
971004
947008
173066
972031
191085
191084
110287
035292
O-ringsats
O-ringsats
Lock för cyl.f. kpl
O-ring
Kolv kpl m driv.
Drivarhållarpinne
Drivare lång
Cylindertoppring
Cylinderfoder
O-ring
Hylsa
O-ring
Kolvdämpare
O-ring
Bakre drivarstyrning
Främre driv.styrning
Skruv
Cylinderpinne
Dörr kompl.
Dörr
Spännstift
Bricka
Låskolv
Dörrfjäder
Skruv
Distansklots
Skruv
-"Skruv
Avtryckare
Spännstift
Magasin
-"Klammerbana kpl
-"Spärrhylsa
Låskolv
Låsfjäder
Frammat.fjäder kort
-"lång
Frammatare
Magasinlock kort
-"lång
Insticksnippel
Tätn.ring backvent
O-ring
Kompressionsbricka
Lock
O-ring
Mutter
O-ring
Ventilspindel
O-ring
Fjäder
Ventilhylsa övre
O-ring
O-ring
O-ring
Ventilhylsa nedre
O-ring
Luftstyrd spindel
O-ring
Avstängningsknapp
O-ring
Spännstift
Kolvringssats
O-ring
Strypskruv
-"kpl
Cyl.foder m.tätn.ring
Ljuddämpare
Låsbricka
Fjäder
O-ring
Ventilspindel
Ventilhylsa
Varningsskylt
Gummigrepp
Printed June 2004
Antal
Qty
Discription
Bezeichnung
Designation
O-ring kit
O-ring kit
Cylinder cap
O-ring
Piston with driv.
Driver pin
Driver blade long
Cylinder top ring
Cylinder
O-ring
Cage
O-ring
Piston stop
O-ring
Rear nozzle plate
Front nozzle plate
Screw
Pivot pin
Door assembly
Door
Tension pin
Washer
Lock piston
Door spring
Screw
Spacer
Screw
-"Screw
Trigger
Tension pin
Magazine
-"Rail
-"Lock cage
Lock piston
Lock spring
Feeder spring short
-"long
Pusher
Magazine lid short
-"long
Nipple
Seal for back valve
O-ring
Compression washer
Top cap
O-ring
Nut
O-ring
Valve stem
O-ring
Valve spring
Upper valve cage
O-ring
O-ring
O-ring
Lower valve cage
O-ring
Air stem
O-ring
Push botton
O-ring
Tension pin
Set of piston rings
O-ring
Regulator screw
-"assy
Cylinder with seal
Sound absorber
Lock washer
Valve spring
O-ring
Valve stem
Valve cage
Warning Label
Handle sleeve
O-ringsatz
O-ringsatz
Zylinderdeckel
O-ring
Kolben mit stösselb.
Stösselstift
Stösselblech lang
Zylinderring
Zylinder
O-ring
Zylinderhülse
O-ring
Bodenplatte
O-ring
Führungsplatte
Abdeckplatte
Schraube
Stift
Vorderplatte
-"Stift
Scheibe
Verschlussbolzen
Feder
Schraube
Distanzblech
Schraube
-"Schraube
Ventilhebel
Stift
Magazin
-"Klammerträger
-"Verschlusshülse
Bolzen
Spring
Zugfeder kurz
-"- lang
Kloben
Magazinschieber kurz
-"lang
Stecknippel
Dichtring
O-ring
Druckkolben
Deckel
O-ring
Mutter
O-ring
Ventilkolben
O-ring
Feder
Ventilführung
O-ring
O-ring
O-ring
Ventilführung
O-ring
Steuerkolben
O-ring
Schaltstift
O-ring
Spannstift
Kolbenring Set
O-ring
Steuerschraube
-"kpl
Zylinder
Schalldämpfer
Sicherungsscheibe
Feder
O-ring
Ventilkolben
Ventilführung
Sicherheitsschild
Griffhuelse
Jeu d’Orings
Jeu d’Orings
Chapeau du cylindre
Joint torique
Pist.-enfonc. compl
Axe d'enfonceur
Enfonceur
Anneau sup. du cyl.
Cylindre
Joint torique
Cage
Joint torique
Butée de pist.
Joint torique
Plaque de nez arr.
Plaque avant
Vis
Axe-Pivot
Porte compl.
Porte
Goupille de tension
Rondelle
Piston de blocage
Ressort de porte
Vis
Entretoise
Vis
-"Vis
Détente
Goupille de tension
Magasin
-"Rail
-"Cage de blocage
Piston de blocage
Ressort de blocage
-"poussoir
-"Poussoir
Courvercle de mag.
-"Raccord
Garnit. inf. de valve
Joint torique
Rondelle de compr.
Chapeau supérieur
Joint torique
Écrou
Joint torique
Tige de valve auto
Joint torique auto
Ressort auto
Cage de valve auto
Joint torique
-"-"Cage de valve infer.
Joint torique
Tige de valve
Joint torique
Bouton-poussoir
Joint torique
Goupinne de tension
Bagues de piston
Joint torique
Vis de réglage
-"compl
Cylindre compl.
Silencieux
Rondelle grower
Ressort
Joint torique
Tige de valve
Cage de valve
Plaque de signalisation
Gainée en caoutchouc
Anm.
Notes
AutoMan
1
1
1
1
1
1
1
1
1
1
1
1
1
2
1
1
2
1
1
1
1
1
1
2
2
1
2
1
5
1
1
1
1
1
1
1
1
1
1
1
1
1
1
1
1
3
1
1
1
1
2
1
1
1
1
1
1
2
1
1
1
2
1
1
1
1
1
1
1
1
1
2
1
1
1
1
1
1
1
1
1
1
1
1
1
1
2
1
1
2
1
1
1
1
1
1
2
2
1
2
1
5
1
1
1
1
1
1
1
1
1
1
1
1
1
1
1
1
3
1
1
1
1
1
1
1
1
1
1
2
1
1
1
1
1
JK20-690
JK20A-690
short
long
short
long
PNEUMATIC FASTENER DRIVING TOOL
MÁQUINA ENGRAPADORA NEUMÁTICA
DRUCKLUFT-BEFESTIGUNGSGERÄTE
CLOUEUSE-AGRAFEUSE PNEUMATIQUE
118733
JK20
TECHNICAL DATA, SPECIAL
REQUIREMENTS AND SERVICE
INSTRUCTIONS
DATOS TÉCNICOS ESPECIALES,
RESQUISITOS PARTICULARES E
INSTRUCCIONES DE USO Y SERVICIO
This sheet is a supplement to the booklet TOOL USE
AND SAFETY INSTRUCTIONS. Read the SAFETY
WARNINGS AND TOOL INSTALLATION carefully
before connecting the tool to the compressed air supply,
and before carring out repairs and maintenance.
Este es un suplemento de guía para las
INSTRUCCIONES DE USO. Lea atentamente las
normas de SEGURIDAD E INSTALACION antes de
conectar la red de aire comprimido a la clavadoraneumática y antes de realizar trabajos de
mantenimiemto y reparación de la misma.
TECHNISCHE DATEN, SONDERANFORDERUNGEN UND WARTUNGSANWEISUNGEN.
CARATTERISTICHE TECNICHE,
REQUISITI PARTICOLARI E
ISTRUZIONI PER L’USO
Das vorliegende Blatt ist eine Ergänzung zu der
Broschüre BETRIEBSANLEITUNG. Vor dem
Anschlissen des Werkzeuges an die Druckluftversorgung und bei der Durchfürung von Reparatur und Wartungsarbeiten den Teil SICHERHEITSHINWEISE UND INBETRIEBNAHME
sorgfältig durchlesen.
Questo foglio è supplementare all’opuscolo
NOTIZIE D’USO. Leggere attentamente
la parte DISPOSIZIONI DI SICUREZZA
E INSTALLAZIONE prima di collegare
l’utensile all’alimentazione d’aria compressa,
e prima di apportare riparazioni o manutenzione.
Technical data
Datos técnicos
Technische daten
Caratt. tecniche
JK20- JK20A
670
670
670L
670L
680
680
680L
680L
689
689
689L
689L
779
779
779L
779L
690
690
690L
690L
680FN
680FNL
690G
Height
Altura
Höhe
Altezza
Length
Largo
Länge
Lungh.
Width
Ancho
Breite
Largh.
*Weight
*Peso
*Gewicht
*Peso
Staple
Grapa
Klammern
Punti
Length
Largo
Länge
Lungh.
150 mm
150
150
150
150
150
150
150
150
150
203
203
180
230 mm
365
230
365
230
365
230
365
230
365
230
365
230
43mm
43
43
43
43
43
43
43
43
43
43
43
43
0,97 kg
1,15
0,97
1,15
0,97
1,15
0,97
1,15
0,97
1,15
1,05
1,20
1,10
670
670
680
680
689
689
779
779
690
690
680
680
690
6-16 mm
6-16
6-16
6-16
10-16
10-16
8-16
8-16
6-16
6-16
6-16
6-16
6-16
Magazine capacity
Capasidad del cargador
Magazinkapazität
Capacità magazzino
* without fasteners
* sin grapas
* ohne klammern
* senza punti
Air pressure:
Presión de aire:
Luftdruck:
Pressione d'aria:
Working pressure approx 5-6 bar. Max air pressure 7 bar.
Presión de trabajo apte. 5-6 bar. Max presión 7 bar.
Arbeitsdruck ca. 5-6 bar. Max Luftdruck 7 bar.
Pressione di lavoro, circa 5-6 bar. Pressione massima 7 bar.
The tool is designed for use of original Josef Kihlberg staples only.
Esta herramienta está diseñada y fabricada para el uso exclusivo de grapas (grampas) originales. JK:S
Das Werkzeug darf nur mit Josef Kihlberg-Orginalklammern benutzt werden.
L’utensile è destinato esclusivamente all’utilizzo di punti Josef Kihlberg.
179
358
143
286
143
286
84
168
125
250
143
286
125
Magazine loading:
El Magasin cargador:
Magazinbeladung:
Caricamento del magazzino:
The magazine is loaded from above.
Esta herramienta se carga por la parte superior izq.
Das Werkzeug wird von oben beladen.
Il magazzino viene caricato dal di sopra
JK20:
The tool has single shot firing without safety-yoke.
La engrampadora tiene disparos simples sin seguro.
Das Werkzeug hat Einzelschussbetätigung ohne Auslösesicherung.
L’avviamento dell’utensile a colpo singolo avviene senza sicurezza.
The tool has single and automatic shot firing without safety-yoke.
La engrampadora tiene disparos automáticos (multitiros) sin seguro.
Das Werkzeug hat Einzelschuss- und Automatikbetätigung ohne Auslösesicherung.
L’avviamento dell’utensile in automatico avviene senza sicurezza.
Firing of the tool:
Disparos:
Betätigung des Werkzeugs:
Avviamento dell’utensile:
JK20A: Firing the tool:
Disparos:
Betätigung des Werkzeugs:
Avviamento dell’utensile:
Air consumption per driving operating:
Consumo de aire por disparos:
Druckluftverbrauch pro Schuss:
Consumo d’aria per colpo:
:0,2 l at 6 bar operating pressure
0,2 l vid 6 bars atmosferas
:0,2 l bei 6 bar Betriebsdruck
:0,2 l alla pressione di 6 bar
Noise characteristic levels according to
El nivel de ruído caracteristico es
Diese Werte sind ermittelt und angegeben nach
Livello di rumorosità conforme a
:prEN792-13L(CEN/TC255/WG1/N 45,3)
A-weighted single-event emission sound pressure level at work station
Nivel de presión acustica a disparos simples en el puesto de trabajo
Maximaler A-Messflächen-Impulsschalldruckpegel
Livello di pressione acustica a colpo singolo sul posto di lavoro
:LPAd,1s=85dB
A-weighted single-event sound power level
Nivel de potencia acustica a disparos simples
Maximaler A-Impulsschalleistungspegel
Livello di potenza acustica a colpo singolo
:LWAd,1sd=91dB
C-weighted peak emission sound pressure level at work station
Máxima emisión acustica en el lugar de trabajo
Emissionsschalldruckpegel am Arbeitsplatz
Livello di picco acustico sul posto di lavoro
:LpCpeakd=116dB
Vibrationrate below the limit of declaration according to EN 292-2 measured according to ISO 8662/1
and supplementary document ISO TC118/SC 3/WG 3 N 139 D.
Nivel de vibración bajo declaración segunEN292-2 segun medidor. ISO 8662/1
y documento complementario ISO TC 118/SC 3/WG 3 N 139 D.
Vibrationswert unter der Deklarationsgrenze nach EN 292-2 gemessen nach ISO 8662/1
und Ergänzung Dokument ISO TC 118/SC 3/WG 3 N 139D.
I valori delle vibrazioni emesse sono nei limiti di norma EN 292-2 misurati in accordo con ISO 8662/1
e completati per decreto ISO TC118/SC 3/WG 3 N 139D.
110203
DEKLARATION OM ÖVERENSSTÄMMELSE
Firma Josef Kihlberg
Box 126
544 22 Hjo
Sverige
försäkrar härmed att alla varianter av följande verktygstyper
JK10, JK20, JK24, JK32, JK35, JK45
är tillverkade enligt följande harmoniserande standarder:
EN ISO 12100 del 1 + 2
EN 792-13
Samt följer bestämmelserna enligt rådets direktiv.
2006/42/EG
Hjo den 29.12.2009
Anders Pettersson
Produktionsansvarig och behörig att ställa samman den tekniska dokumentation
Telefon +46 503 32800
Konformitätserklärung
Declaration of Conformity
Déclaration de conformité
_______________________________________________________________________
Die Firma/
The Company/
La societé:
Josef Kihlberg AB
Box 126
S-544 22 Hjo
erklärt hiermit in alleiniger
Verantwortung, dass alle
Varianten der Baureihen:
declare under our sole
responsibility that all
versions of the toollines:
déclarons sous notre seule
responsabilité que toutes
les variantes du series:
JK10, JK20, JK24, JK32, JK35, JK45
auf die sich diese Erklärung
bezieht, übereinstimmt mit
der Norm:
to which this declaration
relates on is in conformity
with the following
standard:
auquel se réfère cette déclaration est conforme à
la norme:
EN ISO 12100 Teile/parts/parties 1+2
EN792-13
gemäss den Bestimmungen der Richtlinie:
following the provisions
of directive:
conformément aux
dispositions de Directive:
2006/42/EG
Hjo 29.12.2009
Anders Pettersson
Produktionsleiter und berechtigt die technischen Unterlagen zusammenzustellen. +46 503 32800
Production Manager and authorized to compile the technical documentation. +46 503 32800
Chef de Production et autorisé à constituer le dossier technique. +46 503 32800