1
–
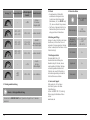
< 40%
– Dry –
Ambient air too dry
20°C – 22°C
26°C – 28°C
40% – 54%
– Relative comfort –
20°C – 28°C
22°C – 26°C
55% – 65%
40% – 75%
– Comfort –
Ideal temperature
and humidity
T
WE
20°C – 22°C
26°C – 28°C
66% – 74%
– Relative comfort –
T
WE
–
> 75%
– Moist –
Humidity too high
T
WE
< 20°C
> 28°C
40% – 74%
– No indicator –
COMFORT
COMFORT
DRY
6
Comfort range
T
WE
DRY
COMFORT
DRY
COMFORT
DRY
COMFORT
COMFORT
DRY
5.5 Alarm
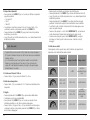
• Repeatedly press the MODE button (10) to access alarm mode.
• AL displayed accordingly in the seconds display.
• Press and hold the MODE button (10) for approx. 3 seconds to set the signal time of
the alarm displayed. The hours display begins to flash.
• Press the + button (12) or the – button (13) to select the hour for the alarm time
and confirm your selection by pressing the MODE button (10). The minutes display
begins to flash.
• Repeat the process to set the minutes for the alarm time.
• Press the MODE button (10) repeatedly to go back to the time display (7).
• If you do not make an entry for 20 seconds, you automatically exit setup mode.
Humidity range
Display (1)
5.3 Selecting 12 or 24-hour format
• Press the + button (12) to switch between the 12 and 24-hour formats.
5.4 Celsius / Fahrenheit
• Press the – button (13) to switch between °C and °F for the temperature display.
Temperature
range
T
WE
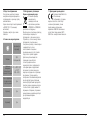
• The DCF signal can be received over long distances, but always transmits the
current Central European Time in Germany. Make sure you account for the time
difference in countries with another time zone.
• If you are in Moscow, the time is 3 hours later than in Germany. This means that
you should set +3 for the time zone. The clock then automatically sets the time to
3 hours after the DCF signal received or relative to the manually set time.
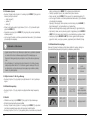
5.6. Comfort display
The thermometer/hygrometer displays the following comfort ranges based on the ratio
between the current room temperature and room humidity:
T
WE
Note – Time zone
• Press the ALARM (11) button repeatedly to activate or deactivate the daily alarm.
The alarm symbol (8) will appear/not appear.
• If the alarm is triggered, the alarm symbol (8) will begin to flash and an alarm signal
will sound.
• Press any button (except the SNOOZE/LIGHT button (9) to stop the alarm.
Otherwise, it will stop automatically after 2 minutes.
• If you press the SNOOZE/LIGHT button (9) during the alarm, the alarm is interrupted
for 5 minutes and then goes off again. The Snooze symbol (6) will flash.
DRY
5.2 (Manual) settings
• Press and hold the MODE button (10) for approx. 3 seconds to make the following
settings one after the other:
• Time zone (7)
• Hours (7)
• Minutes (7)
• To select the individual values, press the + button (12) or the – button (13) and
confirm each selection by pressing the MODE button (10).
• Press the MODE button (10) immediately to adopt the set value displayed and skip
ahead.
• If you do not make an entry for 20 seconds, you automatically exit setup mode.
7