1
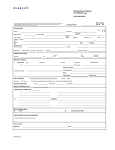
dental
and
medical
Istruzioni per l’uso
Instructions for use
Mode d’emploi
Bedienungsanleitung
Istrucciones para el uso
R400
RIDUTTORE DI PRESSIONE
PER OSSIGENO
PRESSURE REDUCER
FOR OXYGEN
equipment
PAR. 1
DICHIARAZIONE DI CONFORMITÀ
CONFORMITY STATEMENT
La sottoscritta – The company:
TECNO-GAZ S.p.A. - Strada Cavalli n.4 - 43038 Sala Baganza - Parma - Italia.
Dichiara sotto la propria responsabilità, che il Dispositivo Medico RIDUTTORE PER OSSIGENO MEDICALE
SERIE R400:
Declares under its own responsibility that the Medical Device MEDICAL OXYGEN REDUCER SERIES R400:
TARGHETTA
PLATE
costruito da TECNO-GAZ S.p.A., è conforme alle disposizioni legislative che traspongono la Direttiva Dispositivi
Medici 93/42/CEE del 14 Giugno 1993, applicata in Italia dal Decreto Legislativo N.46 del 24 Febbraio 1997.
Manufactured by TECNO-GAZ S.p.A. complies with Medical Equipment Directive 93/42/EEC of 14 June 1993,
which corresponds to the Italian Decreto Legislativo N.46 of 24 February 1997.
Classificazione in riferimento all’articolo 9,11 e allegato IX della Direttiva 93/42/CEE
Classification referred to the article 9,11 and annex IX of the Directive 93/42/EEC
Durata :
Temporanea (art.1, comma 1.1, allegato IX)
Period:
Temporary (art.1, § 1.1, annex IX)
Descrizione:
Dispositivo Medico non invasivo (art.1, comma 1.2, allegato IX)
Description:
Non-invasive Medical Device (art.1, § 1.2, annex IX)
Dispositivo Medico attivo (art.1, comma 1.4, allegato IX)
Active Medical Device (art.1, § 1.4, annex IX)
Classe IIB (Par.3 “CLASSIFICAZIONE” Regola 2-11, allegato IX)
Classe:
Class IIB (Par.3 “CLASSIFICATION” Rule 2-11, annex IX)
Class:
Nome - Name: Paolo BERTOZZI
Posizione - Position: Presidente – Chairman
0051
2
DRPF001 - Rev. 10
PAR. 2
MARCATURA
E RINTRACCIABILITÀ
MARKING AND TRACEABILITY
Il Riduttore per Ossigeno “R400” è progettato e costruito, secondo quanto previsto dalla direttiva
93/42/CEE, in adempiendo ai requisiti richiesti dalla Norma tecnica UNI EN ISO 10524-1.
L’avvenuto esame è documentato dall’apposizione della targhetta con marcatura CE e dalla
dichiarazione di conformità inserita nel presente Manuale istruzioni.
Sul corpo del riduttore è punzonato il lotto di produzione,vedi FIG. 2.
Nella fascetta adesiva che avvolge il corpo del riduttore sono indicati: il nome del fabbricante,
Pressione nominale di uscita (p2) Pressione nominale di ingresso (p1), Portata di riferimento (q1),
Pressione a cui apre la valvola di sicurezza (pRV), la marcatura CE seguita dal numero
dell’Organismo notificato al rilascio del certificato di conformità del prodotto alla direttiva
93/42/EEC, vedi FIG. 2.
The “R400” oxygen reducer has been designed and constructed under the 93/42/EC directive in
full compliance with the UNI EN ISO 10524-1 technical standard requirements.
The test performance is evidenced by the application of the CE marking plate, and by the
declaration of conformity enclosed to this Instructions Manual.
On the reducer body the production parcel is punched, see PICT. 2.
The adhesive tape wrapping the reducer reads: the manufacturer’s name, the outlet rated
Pressure (p2) the inlet rated Pressure (p1), the Reference flow (q1), the Safety valve opening
pressure (pRV), the CE marking followed by the number of the Body certified to the release of the
product declaration of conformity under the 93/42/EC directive, see PICT. 2.
PAR. 3
ASSISTENZA
SERVICE
Tutti gli interventi di assistenza tecnica e riparazione sono eseguiti direttamente dalla ditta
Tecno-Gaz nel proprio laboratorio prove e riparazioni.
Technical service and repair interventions are carried out by Tecno-Gaz at its own test and repair
laboratory.
TECNO-GAZ S.p.A.
Strada Cavalli n°4 – 43038 Sala Baganza – Parma – Italia
Tel. +39 0521-833926 – Telefax +39 0521-833391
e-mail: [email protected]
http://www.tecnogaz.com
3
DRPF001 - Rev. 10
PAR. 4
GARANZIA
Il riduttore di pressione per ossigeno R400 è coperto da garanzia, per un periodo di dodici mesi ad
esclusione delle parti di normale usura (guarnizioni).
Detta garanzia ha inizio dalla data di consegna del riduttore al cliente, comprovata dalla restituzione del
tagliando di garanzia debitamente compilato, timbrato e firmato dal rivenditore.
In caso di contestazione, viene ritenuta valida la data indicata sulla bolla di vendita.
La riparazione o la sostituzione in garanzia di un particolare, viene effettuata ad insindacabile giudizio della
casa e non comprende la trasferta del personale e le spese di imballaggio e trasporto.
Sono escluse dalla garanzia i guasti o danni derivati da una cattiva manutenzione, negligenza, imperizia o
altre cause non imputabili al costruttore, e di conseguenza sono esclusi risarcimenti di qualsiasi natura
verso persone o cose.
Non è riconosciuto il diritto alla sostituzione del riduttore completo.
Non viene riconosciuto nessun risarcimento per fermo del riduttore.
La garanzia decade automaticamente qualora il riduttore venga manomesso, riparato o modificato
dall’acquirente o da terzi non autorizzati.
Per gli interventi, l’acquirente deve rivolgersi unicamente al rivenditore oppure ai centri di assistenza indicati
dal costruttore.
WARRANTY
The oxygen pressure reducer R400 is covered by a 12-month warranty, except for wear parts (fittings).
This warranty is valid starting from the date the reducer is delivered to the customer, evidenced by the
return of the warranty coupon duly filled-in, stamped and signed by the retailer.
In case of controversy, the date indicated on the delivery note will be considered that valid.
Repairing and replacement under warranty conditions of any components will be carried out exclusively at
the manufacturer discretion; the warranty does not cover travel expenses of personnel, neither packaging
nor transportation costs.
The warranty does not cover damages caused by wrong maintenance, negligence, unskilfulness or any
other cause the constructor is not to be held responsible for, and consequently no kind of compensation is
acknowledged to people or property.
The right to have the whole reducer replaced is not acknowledged.
No compensation for the reducer stop is acknowledged.
The warranty will void automatically in case the reducer is tampered with, repaired or modified by the
customer or by unauthorised third parties.
For interventions, the customer has to apply exclusively to the retailer or to the service centres of the
manufacturer.
INDICE - INDEX
ITALIANO ........................................................................................................................................5 - 10
ENGLISH.......................................................................................................................................11 - 16
4
DRPF001 - Rev. 10
ITALIANO
INDICE
PAR TITOLO ................................................................................................................................. PAG
1
DICHIARAZIONE DI CONFORMITÀ CE .........................................................................................2
2
MARCATURA CE............................................................................................................................3
3
ASSISTENZA..................................................................................................................................3
4
GARANZIA......................................................................................................................................4
5
CARATTERISTICHE TECNICHE ....................................................................................................6
6
IMPORTANTE.................................................................................................................................7
7
IMBALLO TRASPORTO E STOCCAGGIO .....................................................................................8
8
IMPIEGO DEL RIDUTTORE ...........................................................................................................8
9
MANUTENZIONE ...........................................................................................................................8
10
PULIZIA ..........................................................................................................................................9
11
CONTROLLO PERDITE RIDUTTORE ............................................................................................9
12
CONNESSIONE CON ALTRI DISPOSITIVI ..................................................................................10
13
CONTROLLO PRESSIONE DI USCITA........................................................................................10
14
FIGURE ........................................................................................................................................17
5
DRPF001 - Rev. 10
PAR. 5
CARATTERISTICHE TECNICHE
RACCORDI DI INGRESSO:
ATTACCO BOMBOLA:
W 21.7 UNI 4406
RACCORDO DI USCITA:
Vedi figura 6
PESO:
Con uscita ¼”G femmina: ...........................0.885 kg
Con diaframma:...........................................0.910 kg
LUNGHEZZA - DIAMETRO:................... Vedi FIG.(3)
MATERIALI COSTRUTTIVI: Ottone- Viton - Tecaflon
p1: ............................................ 200 bar (20.000 kPa)
p2: ..................................................... 4 bar (400 kPa)
p3: ..................................................... 9 bar (900 kPa)
p4: .................................................. 4,6 bar (460 kPa)
p4MAX: ................................................ 5 bar (500 kPa)
p5: .................................................. 4,6 bar (460 kPa)
q1: ...............................................................40 Nl/min
pRV: ................................................... 6 bar (600 kPa)
p1: Pressione nominale di ingresso
p2: Pressione nominale di uscita riferita a p3 e q1
p3: Pressione minima d’ingresso
p4: Pressione massima di uscita riferita a p3 e q=0
p4MAX: Pressione massima di uscita riferita a p1 e q=0
p5: Pressione massima di uscita riferita a p1 e q1
q1: Portata nominale
qd: Portata erogata dal riduttore con diaframma
pRV: Pressione a cui apre la valvola di sicurezza
PRESSIONE DI USCITA IN FUNZIONE DELLA PRESSIONE D’INGRESSO CON q1 = 40 Nl/min
6
DRPF001 - Rev. 10
PAR. 6
IMPORTANTE
Pericolo di esplosione !!!!! Non lubrificare nessuna parte o accessorio del riduttore.
Il riduttore R400 deve essere utilizzato da personale adeguatamente istruito.
Leggere attentamente le istruzioni scritte in questo Manuale, per un corretto utilizzo del
RIDUTTORE DI PRESSIONE.
Non allacciare il riduttore a bombole che contengono gas diversi da Ossigeno.
Verificare l’integrità del dispositivo dopo averlo disimballato.
La temperatura di utilizzo, imballo, trasporto e stoccaggio è compresa tra (– 20°c) e (+60°c).
Prima di usare il riduttore e dopo ogni montaggio od operazione svolta sul riduttore,
verificarne il corretto funzionamento seguendo le istruzioni di controllo descritte nel PAR.11.
Verificare ogni 2 mesi l’efficienza e la funzionalità del RIDUTTORE, come descritto nel PAR.11.
Ogni 6 mesi controllare la pressione di uscita, come descritto nel PAR.13.
Non sollecitare meccanicamente in alcun modo il riduttore quando è applicato alla bombola
(es: non appoggiarsi, appendere oggetti, non impugnare per sollevare la bombola ecc…) onde
evitare rottura del dispositivo.
Assicurarsi che la bombola sia ben fissata e stabile.
Utilizzare il riduttore sotto stretta sorveglianza visiva.
Posizionare i manometri in modo che siano ben visibili all’utilizzatore.
#
Gli attacchi per le connessione alle bombole con guarnizioni O-RING possono essere serrati
senza l’ausilio di chiavi.
#
I dadi di connessione del riduttore alla bombole con guarnizioni rigide devono essere serrati
con chiavi di misura idonea per non rovinare l’esagono.
TECNO-GAZ non risponde d’uso improprio del Dispositivo.
Chiudere sempre la valvola sulla bombola quando il dispositivo non è in uso.
Scaricare il gas interno al riduttore in zone sicure lontano da fiamme, materiali infiammabili o
sorgenti di calore.
#
Non svitare il dado del riduttore dalla valvola bombola quando il riduttore è in pressione.
Scaricare il riduttore prima di svitarlo dalla bombola.
Aprire lentamente la valvola della bombola.
Non inserire corpi estranei nel foro della valvola di scarico.
Non svitare o allentare particolari del riduttore, che non siano citati nelle istruzioni.
Dopo l ‘uso, mettere la bombola con il riduttore in luogo sicuro, in posizione sicura e stabile,
lontano da fonti di calore e circuiti elettrici.
Controllare visivamente (senza smontare) prima di collegare il riduttore alla bombola, che non
vi siano impurità trattenute dal filtro (Fig.5). Se vi sono residui, rivolgersi al centro assistenza
Tecno-Gaz.
Ogni tre anni è obbligo sottoporre il riduttore a revisione completa.
Non toccare con le mani unte e non introdurre liquidi nel foro di ingresso del codolo.
7
DRPF001 - Rev. 10
PAR. 7
IMBALLO, TRASPORTO E STOCCAGGIO
La temperatura di utilizzo, imballo, trasporto e stoccaggio è compresa tra (–20°C) e (+60°C)
Il riduttore è chiuso in un sacchetto di cellophane, inserito in una sagoma e chiuso in una scatola di
cartone ondulato.
Nella scatola vi è il Manuale d’uso. Per le versioni dotate di flussometro e gorgogliatore vedere i
rispettivi manuali istruzioni allegati.
Nel caso di fermo prolungato imballare il riduttore con il suo imballo originale e posizionare in luogo
asciutto, al riparo da intemperie a temperatura (-20 ÷ +60)°C e in condizioni di umidità relativa
compresa tra 40 e 70%.
PAR. 8
IMPIEGO DEL RIDUTTORE
Il riduttore R400 deve essere utilizzato da personale adeguatamente istruito.
Il riduttore deve essere utilizzato per la somministrazione di Ossigeno ad uso medicale.
Il riduttore R400 è progettato e costruito per la connessione diretta alla bombola.
Il dado e il codolo d’ingresso variano secondo il paese d’utilizzo.
1. Collegare il riduttore avvitando il dado alla valvola della bombola, Vedi FIG.4. Serrare a mano senza
utilizzare nessuna chiave.
2. Aprire molto lentamente ruotando in senso antiorario la valvola della bombola. Controllando a vista il
riduttore.
3. Controllare che non vi siano perdite seguendo le istruzioni descritte nel PAR.11.
4. Iniziare l’erogazione.
5. Finito l’utilizzo chiudere la bombola.
6. Scaricare il gas rimasto interno al riduttore in sicurezza come indicato al PAR.6.
7. Dopo l‘uso, mettere la bombola con il riduttore in luogo sicuro, in posizione sicura e stabile, lontano
da fonti di calore e circuiti elettrici.
PAR. 9
MANUTENZIONE
Per mantenere efficiente e sicuro il RIDUTTORE l’utilizzatore deve eseguire delle verifiche periodiche.
Quando queste verifiche documentano la necessita di riparazioni contattare il Centro assistenza
TECNO-GAZ più vicino.
1. Pulire accuratamente le superfici del riduttore seguendo le indicazioni del PAR.10 “PULIZIA”.
2. Controllare visivamente l’usura dell’O-ring (anello di tenuta), se risulta usurato o danneggiato sostituirlo
seguendo le indicazioni che seguono:
a)
Rimuovere l’O-ring usurato o danneggiato, con utensile facendo molta cura a non scalfire la
sede dell’O-ring ricavata nel codolo, vedi FIG.5.
b)
Calzare con cura l’O-ring nuovo inserendolo bene nella sede dell’O-ring ricavata nel codolo
facendo molta attenzione.
c)
Controllare che l’O-ring sia calzato bene.
d)
Procedere all’utilizzo del RIDUTTORE.
8
DRPF001 - Rev. 10
PAR. 10
PULIZIA
1 - Pulire il dispositivo 1 volta a settimana utilizzando un panno morbido inumidito con alcool.
2 - Non toccare con mani unte e non introdurre liquidi nel foro di ingresso del codolo.
PAR. 11
CONTROLLO PERDITE RIDUTTORE
Verificare ogni 2 mesi l’efficienza e la funzionalità del RIDUTTORE.
1. CONTROLLO PERDITE RIDUTTORE: (Fare riferimento alla FIG.4)
a) Chiudere l’erogazione gas (chiudere il rubinetto del flussimetro o altro dispositivo montato a valle).
b) Aprire la valvola della bombola ruotando la manopola in senso antiorario.
c) Annotare la pressione indicata dal manometro.
d) Chiudere la valvola della bombola ruotando la manopola in senso orario.
e) Far trascorre 5 minuti.
f)
Verificare la pressione indicata dal manometro.
g) Se la pressione indicata al punto f) è uguale alla pressione indicata al punto c), utilizzare
tranquillamente il riduttore.
h) Se la pressione indicata al punto f) è minore alla pressione indicata al punto c), seguire le
indicazioni sottostanti.
-
Aprire lentamente la valvola della bombola ruotando la manopola (A) in senso antiorario.
-
Verificare eventuali fughe di gas impiegando un prodotto millebolle.
Le bolle si formano sul codolo/dado.
-
Chiudere la valvola della bombola ruotando la manopola in senso orario.
-
Asciugare con cura il riduttore.
-
Scaricare il riduttore.
-
Smontare il riduttore dalla valvola della bombola svitando il dado.
-
Controllare che l’O-ring di tenuta non sia usurato o danneggiato, nel caso fosse usurato o
danneggia seguire le indicazione descritte nel PAR.9 per la sostituzione.
-
Montare il riduttore sulla valvola bombola avvitando il dado , come descritto nel PAR.8.
-
Riprendere dal punto a).
SE LE BOLLE SI FORMANO SUL CORPO RIDUTTORE NON UTILIZZARE IL
RIDUTTORE,
Chiamare il centro assistenza TECNO-GAZ
SE LA PERDITA È IN CORRISPONDENZA DELLA VALVOLA DI SOVRAPRESSIONE,
FIG 4 NON UTILIZZARE IL RIDUTTORE,
Chiamare il centro assistenza TECNO-GAZ
9
DRPF001 - Rev. 10
PAR. 12
CONNESSIONE AD ALTRI DISPOSITIVI MEDICI
(rif. UNI EN 738-1 § 5.5.3.2 - 5.5.3.4 - 5.5.3.5)
Il RIDUTTORE DI PRESSIONE può essere collegato ad altri dispostivi medici per controllare la
somministrazione d’ossigeno, quali:
• Flussimetro,Portagomma, Portagomma con Diaframma 6Nl/min, Portagomma con Diaframma
10Nl/min, Portagomma con Diaframma 15Nl/min, Flussimetro con umidificatore, Indicatori di
flusso, Raccordi, Unità terminali, Ecc…
L’utilizzatore che esegue la connessione del riduttore ad altri dispositivi medici deve seguire le seguenti
istruzioni:
a) Connettere il riduttore di pressione solo a dispositivi medici a loro volta marcati CE (93/42/CEE).
b) Utilizzare chiave dinamometrica per il serraggio.
Il momento torcente richiesto per serrare un raccordo, un portagomma o un diaframma al corpo
del riduttore deve essere maggiore o uguale a 20 Nm.
Il momento torcente richiesto per connettere manometri o indicatori di flusso al corpo del
riduttore deve essere maggiore o uguale a 20 Nm.
c) Eseguire i controlli indicati dal costruttore, su ogni dispositivo, prima della connessione al
riduttore.
d) Eseguire il controllo funzionale dopo la connessione.
PAR. 13
CONTROLLO PRESSIONE IN USCITA
Ogni 6 mesi controllare la pressione di uscita, collegando alla connessione di’uscita un
manometro campione con grandezza di fondo scala 12 bar (1.200 kPa).
Il manometro deve indicare una pressione di chiusura stabile per 5 minuti compresa tra
(4 ÷ 5)bar =(400 ÷ 500)kPa.
SE LA PRESSIONE INDICATA DAL MANOMETRO É MAGGIORE, NON UTILIZZARE IL
RIDUTTORE
Chiamare il centro assistenza TECNO-GAZ
10
DRPF001 - Rev. 10
ENGLISH
INDEX
PAR TITLE..................................................................................................................................... PAG
1
CE DECLARATION OF CONFORMITY ..........................................................................................2
2
CE MARKING .................................................................................................................................3
3
SERVICE ........................................................................................................................................3
4
WARRANTY....................................................................................................................................4
5
TECHNICAL FEATURES ..............................................................................................................12
6
IMPORTANT. ................................................................................................................................13
7
PACKAGING TRANSPORT AND STORAGE................................................................................14
8
USE OF THE REDUCER ..............................................................................................................14
9
MAINTENANCE............................................................................................................................14
10
CLEANING ...................................................................................................................................15
11
LEAK TEST...................................................................................................................................15
12
CONNECTION TO OTHER DEVICES ..........................................................................................16
13
OUTLET PRESSURE CHECK ......................................................................................................16
14
PICTURES ....................................................................................................................................17
11
DRPF001 - Rev. 10
PAR. 5
TECHNICAL FEATURES
INLET CONNECTION:
BOTTLE FITTING:
W 21.7 UNI 4406
OUTLET CONNECTION:
See PICT. 6
WEIGHT:
With female ¼”G outlet: ................................... 0.885 kg
With diaphragm: ............................................... 0.910 kg
LENGTH - DIAMETER: .............................. See PICT.(3)
CONSTRUCTION MATERIALS: Brass - Viton - Tecaflon
p1:.........................................200 bar (20.000 kPa)
p2:..................................................4 bar (400 kPa)
p3:..................................................9 bar (900 kPa)
p4:...............................................4,6 bar (460 kPa)
p4MAX: .............................................5 bar (500 kPa)
p5:...............................................4,6 bar (460 kPa)
q1:........................................................... 40 Nl/min
pRV: ................................................6 bar (600 kPa)
p1: Infeed rated pressure
p2: Outfeed rated pressure referring to p3 and q1
p3: Minimum infeed pressure
p4: Outfeed maximum pressure referring to p3 and q=0
p4MAX: Outfeed maximum pressure referring to p1 and q=0
p5: Outfeed maximum pressure referring to p1 and q1
q1: Rated flow
qd: Flow delivered by the diaphragm reducer
pRV: Safety valve opening pressure
OUTFEED PRESSURE ACCORDING TO INFEED PRESSURE IF q1 = 40 Nl/min
12
DRPF001 - Rev. 10
PAR. 6
IMPORTANT
Explosion risk !!!!! Do not lubricate any part or accessory of the reducer.
The R400 reducer must be used by duly trained staff.
Carefully read this Manual instructions for a correct use of the PRESSURE REDUCER.
Do not attach the reducer to a bottle containing gases other than Oxygen.
Check for the device integrity after unpacking.
Use, packaging, transport, and storage temperature ranges between (– 20°c) and (+60°c).
Before using the reducer and after every mounting or intervention on the reducer check its
correct operation following control instructions described in PAR.11.
Every 2 months check for the efficiency and the correct operation of the REDUCER as per
PAR.11.
Every 6 months check the outlet pressure, as per PAR.13.
Do not stress mechanically the reducer when applied to the bottle (ex.: do not lean on it, do
not hang objects, do not seize to lift the bottle etc..) to avoid breaking the device.
Be sure the bottle is secured correctly and steady.
Use the reducer under strict visual control.
Position the manometers so that the user can easily see them.
#
Fittings for the connection to bottles with O-rings seals can be clamped without wrench.
#
Nuts connecting the reducer to the bottle with rigid seals have to be clamped with suitable
wrench not to damage the hexagon.
TECNO-GAZ is not responsible for a wrong use of the device.
Always close the bottle valve when the device is not used.
Vent the gas inside the reducer in safe areas keeping at a distance from flames, flammable
materials or heat sources.
#
Do not unscrew the reducer nut from the bottle valve when the reducer is under pressure.
Vent the reducer before unscrewing from bottle.
Slowly open the bottle valve.
Do not fit foreign bodies into the vent valve.
Do not unscrew or loosen parts of the reducer that are not mentioned in the instructions.
After use, store the bottle and the reducer in a safe and steady place, far from heat sources
and electric circuits.
Before connecting the reducer to the bottle visually check (without disassembling) for the
absence of impurities held by the filter (Pict.5). If residues are present apply to the Tecno-Gaz
service centre.
Every three years the reducer must undergo a thorough overhaul.
Do not touch with greasy hands and do not pour liquids into the connection inlet hole
13
DRPF001 - Rev. 10
PAR. 7
PACKAGING, TRANSPORT AND STORAGE
The use, packaging, transport, and storage temperature ranges between (–20°C) and (+60°C).
The reducer is bagged into a cellophane fitted into shaped protection housed in a corrugated
cardboard box.
The box also contains the Use Manual. If the reducer is equipped with flowmeter and humidifier see
the respective user manuals enclosed.
In case of long stop put the reducer in its original packaging and store it in a dry place, protected
against bad weather at a temperature of (-20 to +60)°C, relative humidity 40 - 70%
PAR. 8
USE OF THE REDUCER
The R400 reducer must be used by duly trained staff
The reducer has to be used for delivering medical oxygen.
The R400 reducer is designed and manufactured for direct connection to the bottle.
The nut and the inlet connection vary according to the use country.
1. Connect the reducer by screwing the nut to the bottle valve, See PICT.4. Tighten only with hands,
without any spanner.
2. Open the bottle valve very slowly by rotating it counterclockwise. Visually check the reducer.
3. Carry out a leak test as per instructions of PAR.11.
4. Start delivering.
5. After use close the bottle.
6. Safely vent the gas inside the reducer under PAR.6.
7. After use store the bottle with the reducer in a safe and steady place, far from heat sources and
electric circuits.
PAR. 9
MAINTENANCE
For an effective and safe operation of the REDUCER the user has to carry out some periodical
checks.
Should these checks indicate the need of repair interventions apply to the closer TECNO-GAZ service
centre.
1. Carefully clean the reducer surfaces following instructions of PAR.10 “CLEANING”.
2. Visually check the O-ring wear, if the seal is worn or damaged replace it as follows:
a)
Remove the worn or damaged O-ring using a tool and be careful not to scratch the O-ring
housing in the inlet connection, see PICT.5.
b)
Carefully fit the new O-ring into its housing.
c)
Be sure the O-ring is correctly fitted.
d)
You can now use the REDUCER.
14
DRPF001 - Rev. 10
PAR. 10
CLEANING
1 - Clean the device 1 per week using a soft cloth slightly soaked in alcohol.
2 - Do not touch with greasy hands and do not pour liquids into the connection inlet hole.
PAR. 11
LEAK TEST
Every 2 months check for the REDUCER efficiency and correct operation.
1. LEAK TEST: (See PICT.4)
a) Close gas delivery (close the valve of the flow meter or of any other downstream device).
b) Open the bottle valve rotating the knob counterclockwise.
c) Write down the pressure value on the manometer.
d) Close the bottle valve rotating the knob clockwise.
e) Wait for 5 minutes.
f)
Check pressure on the manometer.
g) If pressure at point f) equals pressure at point c) you can use the reducer.
h) If pressure at point f) is lower than pressure at point c), follow instructions below.
-
Slowly open the bottle valve rotating the knob (A) counterclockwise.
-
Check for gas leak using a bubble promoter.
Bubbles form on the inlet connection/nut
-
Close the bottle valve rotating the knob clockwise.
-
Carefully dry the reducer
-
Vent the reducer
-
Dismount the reducer from the bottle valve unscrewing the nut.
- Be sure the O-ring is not worn or damaged, in case of worn or damaged seal replace it
following instructions in PAR.9.
-
Mount the reducer on the bottle valve as described in PAR.8.
-
Restart from point a).
IF BUBBLES FORM ON THE REDUCER BODY DO NOT USE THE REDUCER,
Apply to the TECNO-GAZ service centre
IF THE LEAK IS DETECTED ON THE OVERPRESSURE VALVE, PICT 4, DO NOT USE
THE REDUCER,
Apply to the TECNO-GAZ service centre
15
DRPF001 - Rev. 10
PAR. 12
CONNECTION TO OTHER MEDICAL DEVICES
(ref. UNI EN 738-1 § 5.5.3.2 - 5.5.3.4 - 5.5.3.5)
The PRESSURE REDUCER can be connected to other medical devices to check oxygen delivery,
such as:
• Flow meter, Hose connection, Hose connection with diaphragm 6Nl/min, Hose connection
with diaphragm 10Nl/min, Hose connection with diaphragm 15Nl/min, Flow meter with
humidifier, Flow meter, Couplers, Terminal units, etc...
For the connection of the reducer to other medical devices the user has to comply with the following
instructions:
a) Connect the pressure reducer only to medical devices with the CE marking (93/42/EC).
b) Use a dynamometric wrench for clamping.
The torque value to clamp a coupler, hose connection or diaphragm to the reducer body must
be higher than or equal to 20 Nm.
The torque value to connect manometers or flow meters to the reducer body must be higher
than or equal to 20 Nm.
c) Carry out checks suggested by the manufacturer on every device before connecting to the
reducer.
d) Check correct operation after connection.
PAR. 13
OUTLET PRESSURE CHECK
Every 6 months check the outlet pressure using a sample manometer with a 12 bar (1.200 kPa)
full scale to be connected to the reducer outlet.
The manometer has to show a steady closing pressure of (4 to 5)bar =(400 to 500)kPa for 5
minutes.
IF PRESSURE INDICATED ON THE MANOMETER IS HIGHER, DO NOT USE THE REDUCER
Apply to the TECNO-GAZ service centre
16
DRPF001 - Rev. 10
PAR. 14
FIGURE
PICTURES
FIG.-PICT. 1
a)
b)
a) Articolo di Vendita
b) Lotto di Produzione
a) Sold item
b) Production lot
FIG.-PICT. 2
YRPM020
LOTTO DI
PRODUZIONE
PUNZONATO
PUNCHED
PRODUCTION
LOT
17
DRPF001 - Rev. 10
FIG.-PICT. 3
YRPM020
FIG.-PICT. 4
YRPM033
MANOPOLA VALVOLA
VALVE KNOB
DADO
NUT
MANOMETRO
MANOMETER
VALVOLA
VALVE
R400
BOMBOLA OSSIGENO
OXYGEN BOTTLE
VALVOLA SOVRAPRESSIONE
OVERPRESSURE VALVE
EROGAZIONE
OUTPUT
FIG.-PICT. 5
YRPM036
DADO
NUT
CODOLO LUNGO
LONG INLET CONNECTION
FILTRO
FILTER
VITE
SCREW
DADO
NUT
O-ring
FILTRO
FILTER
O-ring
CODOLO CORTO
SHORT INLET CONNECTION
VITE
SCREW
18
DRPF001 - Rev. 10
FIG.-PICT. 6
YRPM042
19
DRPF001 - Rev. 10
dental
and
medical
equipment
TECNO-GAZ S.p.A.
Strada Cavalli N°4 • 43038 • Sala Baganza • Parma • ITALIA
Tel. +39 0521 83.39.26 r.a.
Fax. +39 0521 83.33.91
www.tecnogaz.com
Il presente manuale deve
sempre accompagnare il
prodotto, in adempimento
alle Direttive Comunitarie
Europee.
TECNO-GAZ, si riserva il
diritto
di
apporre
modifiche al presente
documento senza dare
alcun pre-avviso.
La ditta TECNO-GAZ si
riserva la proprietà del
presente documento e ne
vieta
l’utilizzo
o
la
divulgazione a terzi senza
il proprio benestare
This manual must always
be kept with the product,
in complying with the
Directives of European
Community.
TECNO-GAZ reserves the
right
to
modify
the
enclosed
document
without notice.
TECNO-GAZ reserves the
property of the document
and forbids others to use
it or spread it without its
approval.
Ce manual doit être gardé
avec
le
produit,
conformément
aux
Directives
de
la
Communauté
Européenne.
TECNO-GAZ se réserve
la faculté de faires des
changements
à
ce
document sans aucun
préavis.
TECNO-GAZ se réserve
la
propriété
de
ce
document et en empêche
l’utilisation
ou
la
divulgation
sans
son
consentement.
Dieses Handbuch ist nach
den CEE Normen immer
mit
dem
Produkt
auszuliefern.
TECNO-GAZ behält sich
Änderungen
an
dem
Dokument vor.
Der
Inhalt
dieses
Dokumentes
ist
urheberrechtlich
geschützt.
Jede
weitergehende
Verwendung,
insbesondere jede Form
der gewerblichen Nutzung
sowie die Weitergabe an
Dritte - auch in Teilen
oder in überarbeiteter
Form
ist
ohne
Zustimmung der Firma
TECNO-GAZ untersagt.
Este
manual
debe
siempre acompañar el
producto, en cuplimiento
a
las
Directivas
Europeas.TECNO-GAZ,
se reserva de derechi de
aportar modificaciónes a
este
documento
sin
ningum aviso.
La impresa TECNO-GAZ
se reserva la propiedad
de este documento y
veda el utilizzo o la
divulgación a terceros sin
su aprobación.