1
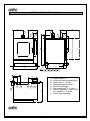
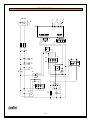
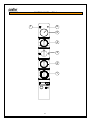
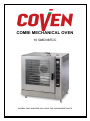
COMBI MECHANICAL OVEN 10 GMD MECC INSTRUCTION FOR INSTALLATION USE AND MAINTENANCE CONTENTS DIRECTIONS FOR INSTALLERS Place of installation .............................................................................. p. Installation............................................................................................ p. Positioning of the equipment................................................................ p. Type of gas .......................................................................................... p. Connection to the supply system ......................................................... p. Water connection ................................................................................. p. Power connection ................................................................................ p. First starting of the oven ...................................................................... p. Controlling the functions ...................................................................... p. Working of the oven ............................................................................. p. Unlocking of the equipment ................................................................. p. Conversion to different types of gas ................................................... p. Annual maintenance ............................................................................ p. Calibration, burner nozzles (Fig.2)……………...……………………….. p. Gas valve (fig. 3) .................................................................................. p. Exhaust of combustion……………………………………………………. P. 2 2 2 3 3 3 3 4 4 4 4 5 5 5 6 7 SPECIFICATIONS(table1) Oven 10GMD MECC .......................................................................... p. 8 Installation diagram (fig.1).................................................................... p. 9 WIRING DIAGRAM Wiring diagram ..................................................................................... p. 10 Wiring diagram key .............................................................................. p. 11 MAINTENANCE Replacement of gas components ........................................................ Burner(fig.5) ......................................................................................... Gas safety valve(fig.6) ......................................................................... Replacement of electric components ................................................... p. 12 p. 13 p. 14 p. 15 DIRECTIONS FOR USERS Oven front with control panel (fig. 8) .................................................... Maintenance advice ............................................................................. Operational advice ............................................................................... Cooking advice .................................................................................... Directions ............................................................................................ Control panel ...................................................................................... Super steam cooking .......................................................................... Mixed cooking (convection + steam) ................................................... Dry convection cooking ....................................................................... Fast cooling ........................................................................................ Core probe (on request)....................................................................... p. 16 p. 17 p. 18 p. 19 p. 20 p. 21 p. 22 p. 22 p. 23 p. 23 p. 24 1 WARNING Users are recommended to check that the installation of the equipment has been properly performed; the manufacturer cannot be held responsible for damages due to wrong installation, incorrect maintenance, user unskilfulness. Before starting the oven, carefully read the instructions for use. The manufacturer cannot be held responsible for non-compliance with the regulations laid out in this instruction manual. All maintenance or repair interventions must be carried out exclusively by authorized and qualified personnel. The equipment is to be controlled at least every six months, so we recommend the drawing up of a maintenance contract. DIRECTIONS FOR INSTALLERS The manufacturer states that the equipments are in line with the requirements of the following CEE directives: 90/396 CEE (gas equipments); 73/23 CEE (low tension electrical equipments); 89/336 CEE (electromagnetic compatibility); 89/392 CEE (machinery). The register tag is on the right side of the equipment and reports all necessary data for installation: class, power, consumption, type of gas and so on. PLACE OF INSTALLATION The equipment must be installed into a well ventilated room, for either gas combustion and change of air, as provided for by the regulations UNI-CIG 8723, act 46 (5/3/90). INSTALLATION Installation of the equipment, adjustments of safety valve and repair interventions can be carried out exclusively by a qualified installer, by means of suited tools and in compliance with rules and requirements for the safety in fuel gas use, act 1083/6.12.71; safety regulations for gas cookers; prevention of accidents regulations; moreover, regulations in force by fire department are to be observed. POSITIONING OF THE EQUIPMENT Position the equipment on a horizontal, level, plane. The distance of the oven’s sides from the wall of the room must be at least 50 cm. 2 DIRECTIONS FOR INSTALLERS TYPE OF GAS The type of gas the equipment has been originally pre-arranged and tested for is marked on the tag stuck on the right side of the equipment. If such type of gas is not available, you have to adapt the equipment according to the instructions “Conversion to different types of gas”. CONNECTION TO THE SUPPLY SYSTEM Connection to the fitting ¾” G ISO R7 of the equipment can be either fixed or in a way such that it can be disconnected by means of a type-approved supply cut tap. Pipe section must be in proportion to its length and to the gas flow of the equipments it has to supply. In any case, it must be inserted according to the regulations UNI-CIG 8723. As to liquefied gas, you have to insert on the supply pipe a pressure regulator proportionate to gas flow. If you use flexible pipes, these ones must be made of stainless steel and type-approved. When the connection is done, you have to test the tightness of the pipes by means of a gas leak detector. WATER CONNECTION (Fig. 1) Connect the oven to water grid at point C, and when the connection is done check that there are no leaks. Use only materials (pipes, fittings etc.) in keeping with the regulations in force and that in any case don’t leave rust build-up. Warning: upstream of the equipment the installation of an effective decalcifying device is of the utmost importance; water hardness has to be lower than 3°F. The non-installation of such device causes in a short time the formation of limescale and an abnormal working of the equipment. POWER CONNECTION The equipment is pre-arranged to work at the voltage shown on the features tag. To reach the connection terminal board (A fig. 1), remove the right side of the equipment by unscrewing the fixing screws. The features of flexible cable for connection to power line must not be lower than those of the kind with rubber insulation model H07RN – F and the cable section has to be equivalent to the one shown in TABLE 1. Connection to power line must be made by inserting an automatic switch with a sufficient current-carrying capacity (see TABLE 1) and in which the span between contacts is at least 3 mm. In order to correctly run the oven, it’s very important to observe the polarity of supply cables; a wrong positioning of supply cables may cause the valve to fail (F = BROWN – N = BLUE). Moreover, during the working of the equipment the supply voltage must not differ from the value of voltage rating ±10%. The oven must be connected to a ground outlet. Inside the oven, in the connection terminal board, there is a terminal with the symbol : connect the ground cable here. The equipment must be inserted in an equipotential system, whose effectiveness must be checked according to the regulations in force. Connection must be made using a screw with the symbol positioned in the rear of the equipment. (EQUIPOTENTIAL); such screw is The manufacturer cannot be held responsible if this accident-prevention regulation is not observed. 3 DIRECTIONS FOR INSTALLERS FIRST STARTING OF THE OVEN (Fig. 9) Turn on the gas Turn timer 1 to the right. Turn cooking-program selector 3 to the left, on the position "convection". Set a cooking temperature by means of thermostat 4. Check the ignition and the blowing out of the burner’s flame when the set temperature is reached with the thermometer 5, by means of the attendant warning light. A flashing sound signal indicates that the set time is over. N.B. If at the first attempt the burner does not start, check that: gas is on ignition indicator is on ignition and flame detection electrodes are in the right position. At the first ignition the gas valve may have an arrest (warning light of button RESET). Wait 10 seconds, then push the button RESET. CONTROLLING THE FUNCTIONS Start the oven as explained in the section “First starting of the oven”. Control ignition and blowing out of the flame when the desired temperature is reached. WORKING OF THE OVEN At starting the equipment runs a self-assessment of its own effectiveness. During waiting time (or pre-ventilation time) (TW = 1.5 sec.), the internal logic checks the booster of the flame signal. A parasitic flame signal or a booster failure corresponding to conditions of flame “present” prevent the starting of the equipment. At the end of waiting or pre-ventilation time, gas solenoid valve is powered and the ignition device is started, thus beginning safety time (TS = 10 sec.). The ignition device is disconnected if the equipment, during safety time, detects the presence of flame. If the equipment, during safety time, detects no flame signal, when safety time is up there i san arrest, and therefore the gas solenoid valve is closed, the ignition device is disconnected and the arrest signalling (RESET) is put into operation. If during safety time there is a flame extinguishing, the ignition device is reactivated within 1 second. UNLOCKING OF THE EQUIPMENT When the equipment makes an arrest, you need to wait at least 10 seconds before unlocking it pushing the button RESET (6); if you don’t observe such waiting time, the system doesn’t start again. 4 DIRECTIONS FOR INSTALLERS CONVERSION TO DIFFERENT TYPES OF GAS If the equipment has to work with a gas different from the preset one (see the register tag on the right side of the equipment), you need to convert it by carefully paying attention to the following instructions: a) REPLACE BURNER NOZZLES (Fig. 2) The nozzles are in the lower part – back right. Access the nozzles from under the frame. Replace the nozzles U on the collector. b) FEATURES OF THE BURNER’S FLAME After adjusting the burner’s air, the flame should have the following characteristics: Fig. A Fig. B Fig. C Too much air on flame (Fig. A). Light blue flare. The flame tends to move away (blow) or return (return of flame) with possibility of lighting up at nozzle. Too little air on flame (Fig. B). Flare with yellow tips. Formation of harmful carbon monoxide, which causes black smoke that sticks to the combustion chamber. The burner’s yield is very negative. Regular flame (Fig. C). Dark blue flare, maximum yield of burner. ATTENTION: BAD COMBUSTION Bad combustion may be dangerous for the people around the oven. CASES OF BAD COMBUSTION - bad draft (difficult release of exhaust fumes) - nozzles with wrong holes (bigger) for the gas used (see TABLE 1) - volume of air under the oven insufficient (see point 3). 1. ANNUAL MAINTENANCE Verify that the stainless steel structure between the burner and the combustion chamber is integral. Verify the conditions of the various gaskets (door, lamp holder, etc.) CALIBRATIONS AND ADJUSTMENTS (Fig.3) Verify at inlet 8, that the inlet pressure is correct: gas G20 = 20mbar, gas G30 = 30 mbar After completing the control tightly fasten the screw 10. Fig. 2 5 GAS VALVE Fig. 3 KEY 2. Pressure control screw cap 3. Control screw of pressure to main burner 4. Control screw of gas flow to pilot burner 5. Thermo-couple joint 6. Thermo-couple alternative joint 7. Pilot outlet 8. Gas pressure outlet entering duct 9. Gas pressure outlet coming out from burner 10. Inlet pressure outlet cap screw 11. Outlet pressure outlet cap screw 12. Driving solenoid 13. Main gas outlet to burner 6 EXHAUST OF COMBUSTION SUBSTANCES The equipment is fitted with a steam exhaust to release the combustion products that must be connected in one of the following ways, as laid out by the regulations in force. EQUIPMENT TYPE B11 (SEE FEATURE LABEL) 1) Natural exhaust. Connection to a natural draught exhaust, perfectly efficient thanks to an anti-wind connection. The combustion products are directly released outside (see Fig. C) 2) Direct forced exhaust. Connection to a forced draught exhaust, through anti-wind connection (see Fig. B). The delivery of gas to the equipment must be directly connected to the forced exhaust system and must be interrupted if the gas flow falls below the values indicated in 4.3 of the UNI-CIG 8723 standard. Only manual redelivery of gas to the oven must be possible. 3) Forced exhaust under hood. In the case of under hood installation, the terminal part of the oven’s exhaust duct must be at least 1.8 m. from the surface where the equipment is installed on (floor), the outlet section of the combustion product exhaust ducts must be installed within the external area of the base of the hood itself (Fig. A). The gas delivery system to the equipment must be directly connected to the forced exhaust system and must be interrupted if the gas flow falls below the values indicated in the installation rules. Only manual redelivery of gas to the oven must be possible. Fig. A Fig. B Fig. C 7 SPECIFICATIONS FOR OVEN 10GMD MECC – TABLE 1 Gas joint ¾” G Power rating 17 kW Category II2H3+ Type of installation B11 Air need for combustion 34 m³/h Connection pressure Gas consumption - G20 (Methane) 20 mbar - G30/31 (LPG) 28/37 mbar - G20 (Methane) 1,74 m³/h - G30/31 (LPG) 1,34 kg/h Gas consumption calculated as regards calorific value lower than (Hi+) 15°C and 1012 mbar Main nozzles Ø 1/100 Primary air (Fig. 5) - G20 (Methane) Hi = 34,02 MJ/m³ - G30/31 (LPG) Hi = 45,65 MJ/kg - G20 (Methane) 2x220 - G30/31 (LPG) 2x150 - G20 (Methane) 4 mm - G30/31 (LPG) 5 mm Power 0,350 kW Voltage 230 VAC Connection cable (H07RN – F) 3x1 mm² Water inlet pressure 2 bar min 6 bar max Multigas burner cod. 103.1980.00 8 INSTALLATION DIAGRAM – FIG. 1 384 343 261 E Ø115 158 B G B 70 80 1100 1256 760 178 156 G 245 852 44 Ø42 46 629 74 120 942 A 284 184 C A. B. C. D. E. F. H. H L Mains lead inlet Cooking fumes discharge pipe Water inlet ¾” G male Discharge pipe Ø 25mm. Exhaust discharge Gas supply pipe ½" G male Fumes reduction water inlet (on request) ¾” G male L. Fumes fast discharge 69 131 51 201 135 F 326 43 L D C H A F 823 D 9 WIRING DIAGRAM – 240~V S F N R J5 J6 1 2 3 4 5 6 7 JT1 JT2 1 1 1 V EV1 EV Z F G A A B A T 1 A 2 1 A Q D P H P 1 2 CONVEZ 1 VAP.SUPER L U 2 ~ P1 P 2 S1 S 2 M K ~ 10 B 1 C E 1 N 1 2 T2 WIRING DIAGRAM KEY WIRING DIAGRAM KEY A. Timer B. Power line warning light C. Internal lamp D. Electronic bell E. Door microswitch F. Fuses G. Super-steam thermostat H. Cooking program selector K. Water solenoid valve L. Steam amount selector M. Motor N. Steam amount warning light P. Cooking thermostat P1. Cooking thermostat warning light R. Flame control device S. Terminal board T. Contactor T2 Timing relay U. Autoreverse timer V. RESET button Z. Gas safety valve 11 REPLACEMENT OF GAS COMPONENTS Only qualified personnel should carry out this operation! ATTENTION : before performing any intervention, disconnect the equipment from the mains and interrupt the gas flow using the gate valve upstream of the equipment. Remove the right, left and back sides of the equipment using the fastening screws on the base. Main burner - Fig. 5 1. Remove the anti-reflection panels W under the burners. 2. Remove the gas feeding joint A and remove the gas pipe B. 3. Unscrew the 4 screws Q (2 fix bracket S to base - 2 fix two-hole collector X to base). 4. Remove the burner block from the oven, remove the air control plate P by removing the 4 fastening screws F 5. Replace the burners. Repeat the above-indicated operations. ATTENTION: the gas outlet slots of the burner must face the combustion chamber. Electrodes (Fig.5) Remove the flame ignition electrodes M and flame control electrodes N by removing the screws that fix them to the front panel of the main burner. Position the new electrodes in the proper seats M1 and N1 and fix with appropriate screws. Gas safety valve (Fig.6) Disconnect the electric wires of the gas feeding valve. Remove the gas inlet joint Pand outlet B. Remove the two bolts Q that fix the supporting plate of the gas valve to the base. Remove the 8 screws R that fix the two gas inlet and outlet joints. Replace the valve by positioning the joints on the new valve with the relating gaskets and screws. Repeat the operations indicated above. Attention!! (Fig.3) Verify that the internal outlet pressure controller is closed. Once the cap is removed (2), the screw (3) must remain completely screwed down (without forcing). 12 BURNER – FIG. 5 13 GAS SAFETY VALVE – FIG. 6 14 REPLACEMENT OF ELECTRIC COMPONENTS TO BE CARRIED OUT BY QUALIFIED PERSONNEL ONLY! WARNING: before performing any intervention, disconnect the equipment from the mains and cut off the gas flow by means of a gate valve placed at the source of the equipment. MOTOR Remove the oven’s internal deflector Unscrew the fan’s middle nut Ø 6 and the locking socket-head screw Ø 4. Slide out the fan. Remove the oven’s back panel by unscrewing the fastening screws Disconnect the motor’s power supply wires Unscrew the six bolts that fasten the motor to the plate. Replace the motor. CAPACITOR Remove the oven’s back panel by unscrewing the fastening screws The capacitor s placed close to the motor. Disconnect the power supply wires and the ones that connect the capacitor to the motor. Replace the capacitor. Warning: the capacitor must have the following features: 500 V 8 µ WATER INLET SOLENOID VALVE The solenoid valve is placed in the back side of the equipment Disconnect the power supply wires Loosen the clamp on the solenoid valve’s end Disconnect the water supply pipe Unscrew the screws that fasten the solenoid valve to the base and replace the valve Reconnect the power supply wires and make sure they are positioned as before TIMER, HUMIDIFIER PROGRAMMING, MASTER SWITCH Slide out the knob on the power switchboard Disconnect the power supply wires Unscrew the fastening screws of the power switchboard Replace the component THERMOSTAT Slide out the knob Disconnect the power supply wires Unscrew the fastening screws of the power switchboard Unscrew the fastening nuts of the oven’s internal deflector Unscrew the screws Ø 4, remove the thermostat probe and slide it out SAFETY THERMOSTAT Remove the right side by means of the fastening screws Unscrew the safety thermostat’s retaining screws (the safety thermostat is on the oven’s back side) Take out the safety thermostat Unscrew the fastening nuts of the oven’s internal deflector Unscrew the screws Ø 4, remove the thermostat probe and slide it out. 15 DIRECTIONS FOR USERS Fig. 8 7 6b 6a RESE 5 c 8 4 c SUPE R 3 2 AU T 1 1. Timer 2. Steam amount selector 3. Cooking program selector 4. Thermostat 5. Thermometer 6a. Fumes fast discharge button 6b. Fumes fast discharge 7. Cooking fumes pipe 8. RESET button to unlock the gas valve 16 WARNING Users are recommended to check that the equipment installation has been properly performed; the manufacturer cannot be held responsible for damages due to poor installation, bad maintenance, user unskilfulness. Before putting the oven in operation read carefully the directions for users. The manufacturer accepts no responsibility if the directions stated in this instruction manual are not strictly observed. All installation, maintenance or repair interventions are to be carried out by authorized personnel only. The equipment is to be checked out at least every six months; for such reason, the drawing up of a maintenance contract is recommended. The manufacturer accepts no responsibility in case of mistakes or inaccuracies in this manual due to clerical errors or misprints. Furthermore, the manufacturer reserves the right to make changes in the equipment that are deemed necessary or fitting, and that however don’t modify its basic features. MAINTENANCE ADVICE Do not perform any maintenance or cleaning intervention when the oven is connected to the power supply network: disconnect first the oven from the mains. To avoid hygiene and operation problems, clean out the oven at regular intervals. Never wash the equipment by means of direct flushes or pressure! Steel components are to be washed with water and detergents; do not use acid or aggressive substances or abrasive detergents. Do not use steel wool tools that might leave rust traces. Warning: the water of particular geographic areas may leave, on the cooking chamber’s walls, stains that look like rust (stainless steel is not eaten into). On request, COVEN can provide you with a specific cleaning product. 17 OPERATIONAL ADVICE The ovens manufactured by COVEN work through hot air circulation. Such system allows you to cook pastas, roasts, to grill, to bake pastries, to thaw frozen foods. During cooking, thanks to COVEN ovens, foods lose less weight and volume, and there is a 50% saving on seasonings. Hot air must be allowed to circulate both over and under the food that’s being cooked. Leave free air tracks with a thickness of at least 4 cm. Since the edges of pans are an obstacle to the circulation of air, do not use pans or baking tins with edges higher than necessary. Leave a little space between the products placed on the same baking rack, between a chicken and the other one etc. To grill, put meat directly on the oven’s rack. To cook food with pans or baking tins use directly the oven’s racks inserting them into the side slides. To cook pastries and pizzas, the use of baking sheets is recommended. To prevent the surface of baked pastas from getting too dry, cover it up with a kitchen foil riddled with holes to allow the evaporation of cooking fumes. In order to achieve excellent results it is essential to preheat the oven until it reaches the cooking temperature 18 COOKING ADVICE ROASTS, GAME, POULTRY The bigger the pieces to cook, the more moderate the temperature should be (about 180°C); with higher temperatures, roasts might be more cooked outside than inside. Chickens are better and faster cooked if carved in halves or into pieces. If you use pans or baking tins, grease always them with oil or butter; when you have to cook breaded foods, make a very soft breadcrumb coating, so that it does not come away during its cooking. Use the humidifier during the cooking. The weight loss of meats will be much lower and the food will cook more evenly. LASAGNE, BAKED PASTA ETC. Do not set too high temperatures (max 170°C). If you want the food to be golden brown, raise the temperature to 230°C just in the last minutes. GRILLED MEAT AND FISH Grease meat or fish before putting it on the grill. PIZZA Place pizzas straight on the baking sheet, if their bread base is precooked. To cook “Deep dish pizza” cover the pizza baking sheet with a kitchen foil riddled with holes to allow the evaporation of cooking fumes. PASTRIES With COVEN ovens the temperature to use for pastries is about 30 °C lower than with traditional ovens. You must leave a space of at least 8 cm between a baking sheet and the other. To thaw biscuits, cream and chocolate pies or cakes in general, do not heat the air. REGENERATION OF FROZEN FOODS Suggested temperature: between 120°C and 130°C. At such temperature bacteria are eliminated, food containers do not buckle and the food is heated up evenly. Aluminium containers: preheat at 190°C and thaw at 140°C Plastic containers: preheat at 130°C and thaw at 110°C 19 DIRECTIONS SWITCHING ON (Fig. 9) Turn on the gas. Turn timer 1 to the right. Turn cooking-program selector 3 to the left, on the position "convection". Set a cooking temperature by means of thermostat 4. Check the ignition and the blowing out of the burner’s flame when the set temperature is reached with the thermometer 5, by means of the attendant warning light. A flashing sound signal indicates that the set time is over. N.B. If at the first attempt the burner does not start, check that: gas is on ignition indicator is on ignition and flame detection electrodes are in the right position. At the first ignition the gas valve may have an arrest (warning light of button RESET). Wait 10 seconds, then push the button RESET. SWITCHING OFF (Fig. 9) When the cooking is finished, put temperature back to “0” Turn knob 1 to position “0” SWITCHING OFF IN CASE OF FAILURE In case of failure or operational problems, switch off the equipment as shown in the preceding section “SWITCHING OFF”. Turn off the gas tap at the source of the equipment. If safety thermostat unexpectedly causes the oven to cut out because of high temperature inside the oven, don’t switch the oven on again. Call the technical assistance service. 20 CONTROL PANEL – FIG. 9 7 RESET 6 5 c 4 SUPER 3 2 AUT 1 21 SUPER STEAM COOKING REFER TO FIG. 9 To cook fresh vegetables, boiled meat, frozen foods and to speed cooking time up. a. Switching on Turn timer 1 to the right to set a cooking time from 0÷120 min. Or turn it to the left (P) to set the permanent time. b. Select the cooking program Turn the knob 3 to the right on the position "super steam". c. You don’t need to set the temperature. The oven is already programmed to reach the temperature of 100°C. MIXED COOKING (CONVECTION + STEAM) REFER TO FIG. 9 To cook roasts, vegetable stews, fruit cakes. a. Switching on Turn timer 1 to the right to set a cooking time from 0÷120 min. Or turn it to the left (P) to set the permanent time. b. Select the cooking program Turn the knob 3 to the left, on the position "dry convection". c. Set the temperature Set the desired value turning the knob 4. d. During cooking, turn the knob 2 to the right. 22 DRY CONVECTION COOKING REFER TO FIG. 9 To cook lasagne, baked pasta, pizza, grilled meat and vegetables a. Switching on. Turn timer 1 to the right to set a cooking time from 0÷120 min. Or turn it to the left (P) to set the permanent time. b. Select the cooking program. Turn the knob 3 to the left, on the position "dry convection". c. Set the cooking temperature. Set the desired value turning the knob 4. d. By means of the knob 6, activate the “fumes fast discharge” in order to remove internal humidity of some particular foods. FAST COOLING REFER TO FIG. 9 To fast lower the temperature inside the cooking chamber a. Switching on. Turn timer 1 to the right to set a cooking time from 0÷120 min. Or turn it to the left (P) to set the permanent time. b. Select the fast cooling Turn upward the knob 3. 23 CORE PROBE (ON REQUEST) U P FIG. 4 Operating instructions Push button 1 “On/Off” to switch core probe on. Insert the probe into the food. Push P (button 2) for one second; sul display 5 apparirà la scritta “SP1” che lampeggerà alternatamente al valore di temperatura impostato. Per impostare un valore diverso di temperatura utilizzare i tasti 3 e 4, quindi premere nuovamente il tasto 2. Se i tasti 3 e 4 si mantengono premuti oltre un secondo si incrementa o decrementa in modo veloce il valore indicato sul display 5. Quando all’interno del cibo la temperatura sarà quella impostata, l’apparecchio emetterà un segnale sonoro. ATTENZIONE: tutte le funzioni impostate, quali temperatura generale, tempo ecc. vengono immediatamente arrestate dopo tale segnale sonoro. 24