1
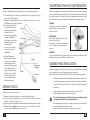
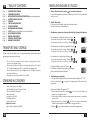
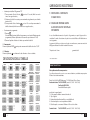
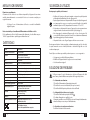
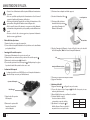
PROIETTORE AUTOMATICO
AUTO CHART PROJECTOR
Ref. 08245
MANUALE D’USO E MANUTENZIONE - GARANZIA
OPERATION AND MAINTENANCE MANUAL - WARRANTY
CENTROSTYLE S.p.A. - Via G.D. Martinengo, 7 - 21040 Vedano Olona - Varese - Italy
Servizio Clienti Italia:Tel. 0332.270270 - Fax 0332.270222 E-mail: [email protected]
Customer Service Export:Tel.+39.0332.270400 - Fax +39.0332.270405 E-mail:[email protected]
www.centrostyle.com
Ref. 08245
WARRANTY AND SERVICE
1 CHECK THE CONTENTS OF
ALL THE BOXES
2 NOTIFY CUSTOMER SERVICE
OF ANY PROBLEMS
WITHIN 8 DAYS
If any fault develops within the warranty period, do not open the cleaner but
contact Technical Assistance immediately. All parts recognised as having manufacturing
faults will be replaced under the terms of the warranty.
The warranty covers faults and breakages not caused by normal wear, provided the
cleaner has not been tampered with. Consumables are not covered by the warranty.
* Within one year of purchase
full warranty
* from the date of invoice.
IN CASE OF MALFUNCTIONING
Never return the cleaner or parts without prior notice!
Contact your nearest authorised Service Centre before returning the cleaner or any parts,
or to request repairs under the warranty.
Centro Style S.p.A.Via G.D. Martinengo, 21040 Vedano Olona,Varese.
Fax:
+ 39 0332 270 405
E-mail: [email protected]
Call to clarify the following points:
1 - Cleaner code and serial number
1 - Type of fault
3 - Quick over-the-phone troubleshooting and problem solving
4 - Quick over-the-phone troubleshooting with delivery of spare parts
5 - Always state the purchase date, the number of the invoice or delivery note and your
customer code.
10
GB
REMOVAL FROM SERVICE
Decommissioning and disposal.
At the end of its life cycle, or in the event of irreparable damage, dispose of the tester
immediately or render it unserviceable to prevent further use and unnecessary risk.
- Disconnect the mains power cable and cut the plug off to make the Auto Chart
Projector unusable.
Notes on the collection and recycling of different materials.
Dispose of and recycle the Auto Chart Projector in compliance with European refuse
disposal standard 160200 governing “waste equipment and equipment parts”.
TECHNICAL SPECIFICATIONS
I
Descrizione comandi
GB Description of controls
Custodia superiore
Upper case
Lente di proiezione
Projection Lens
Quadrante per rilevazione remota
Window for remote detection
Supporto da tavolo
Table stand
Manopola di messa a fuoco
Focusing Wheel
Indicatore luminoso
Pilot Lamp
Interruttore di accensione ON/OFF
Power Switch ON/OFF
Connettore RS-232C
RS-232C Connector
Vano fusibile
Fuse Holders
Presa per cavo di alimentazione
alla rete
Power Connector
Trasmettitore a raggi infrarossi
Infrared ray transmitter
Pulsanti per la tabella alfabetica
Alphabet chart buttons
Pulsanti per la tabella numerica
Number chart buttons
Chart
33 Selections
Chart selection speed
Average 0.3 sec.
Mask
1 open 5 horizontal lines
5 vertical lines 21 single letters
Pulsanti per la tabella con la
lettera E
Illiterate E chart buttons
Filter
Red / Green
Pulsanti di programmazione
Program buttons
Projection distance
2.7 m ~ 7.0 m (5 m is standard)
Lamp on/off button
Projection magnification
30X (at 5 m)
Pulsante di accensione/spegnimento
della luce
Projection size
252 mm and 330 mm (w) x 225 mm (h) (a 5 m)
Pulsante rosso/verde
Red/Green button
Tilt angle
Ball joint ( ± 10 degree)
Pulsanti per le tabelle per i bambini
Children chart buttons
Lamp
6V 30W (Halogen), 2,000 hrs lifetime
AC110,220~240V 50 / 60Hz
Pulsanti per la tabella con tecnica
Vectograph
Vectograph chart buttons
Power source
Power consumption
50VA
Pulsanti di direzione
Direction buttons
Auto-OFF function
after 5 minutes
Dimensions (mm) w x p x h
Main body: 230 x 360 x 265 mm
Remote controller: 64 x 195 x 20 mm
Pulsanti Maschera lettere verticali,
orizzontali, singole
Vertical, horizontal, single letter
Mask buttons
Segnalatore acustico
Buzzer
Net weight
Main body: 6.0 Kg
Remote controller: 180 g
Azzeramento
Reset
Interface
RS232
Ambient operating conditions
Temperature between 15° and 30° C.
Relative humidity <80%
The appliance complies with the following directives:
73/23 CEE Bassa Tensione
89/336 CEE Compatibilità Elettromagnetica
GB
9
3) Place the new Lamp at the hole of Lamp Holder.
4) Turn on the power switch
.
Projection lens
5) Place the wite paper in front
of the projection lens in
order to project the filament
image of lamp.
White paper
6) Adjust the filament image at the center of paper with the screw at the lamp plate.
(Note: Do not look into the lamp directly).
Screws
Adjusted filament image
7) Place the Lamp Cover and fasten the screw.
8) Turn the power switch off.
•
Replacement of Fuses
1) Turn off the power switch and disconnet the power cord.
2) Push and turn the fuse holder
a quarter counterclockwise with your finger and
remove it.
3) Pull out the fuse from the fuse holder and check the condition.
4) Replace the fuse with
the provided spare or
VOLTAGE
FUSE
equivalent as specified below.
2A 120V;T2AL
100V~120V
5) Simply return it with the fuse
2A 250V;T2AL
200V~240V
holter to the socket. Push and
turn it a quarter clockwise to lock.
8
GB
MAINTENANCE AND CLEANING
• Always disconnect the mains power cable before performing any maintenance
or cleaning.
• There are no cleaning requirements other than regular office housekeeping,
such as dusting.
• Periodically check the mains power cable and the plug for wear or damage.
Also check the external shell of the Auto Chart Projector.
• Clean the external surfaces of the Auto Chart Projector with a soft cloth, using
only small quantities of neutral detergents to prevent water infiltrating the
circuitry.
• Do not use solvents or other aggressive substances. Do not spray liquids on to
the Spectrotester. Do not use abrasive materials.
•
Cleaning the projection lens
1) Blow dusts with a blower brush.
2) If it is not clean enough, wipe with lens cleaning paper.
•
Disassembling the upper case
1) Turn off the power and pull out the power cord.
2) Unfasten the screw in counterclockwise at the back side of case .
3) Disassembling the Upper Case by lifting it.
4) In case of reassembling, place the upper case on the main body and adjust the
front position.Then, fasten the screw in clockwise.
•
Replacement of lamp
The lamp may be HOT! Do not touch the Lamp directly and allow the sufficient
amount of time to cool down the heat.
Lamp cover
INFORMAZIONI PRELIMINARI
IMPORTANT NOTICE
I
ATTENZIONE! Prima di utilizzare l’apparecchio, leggere attentamente il
presente manuale, esso è parte integrante dell’apparecchio e va conservato in un
posto noto ed accessibile fino alla dismissione dell’apparecchio stesso.
Centro Style S.p.A. si riserva tutti i diritti sul presente manuale, nessuna riproduzione
totale o parziale è consentita senza autorizzazione scritta.
GB
WARNING! Read this manual carefully before using the appliance.
Keep this manual safe for reference throughout the life of the appliance.
Copyright Centro Style S.p.A.. All rights reserved. Total or partial reproduction
of this manual is strictly forbidden without the prior written consent of
Centro Style S.p.A.
SIMBOLOGIE UTILIZZATE NEL MANUALE
SYMBOLS USED IN THIS MANUAL
I
Prestare attenzione, pericolo generico, rischio generico.
GB Warning! Generic danger or risk.
I
Limiti di utilizzo dell’apparecchiatura, azioni da evitare.
GB Restrictions on use of the machine. Actions to avoid.
Fixinf screw
I
1) Unfasten the screw at
the Lamp Cover.
2) Disassembling the
Lamp Cover by lifting it
and pull out the Lamp.
GB
7
Pericoli ed avvertenze riguardanti l’alimentazione elettrica dell’apparecchio
e generalmente le parti sotto tensione.
GB Instructions concerning the electrical power supply.
I
Note riguardanti la protezione dell’apparecchio da acqua e umidità.
GB Instructions for protecting the machine from water and humidity.
CLASSIFICAZIONI
SAFETY
CLASSIFICATION
Improper and prohibited uses and residual risks.
I
Classificazione secondo le prescrizioni della direttiva 93/42/CEE (Direttiva
Dispositivi Medici) Classe I
Il Proiettore Automatico è classificato nella classe I sistema.
Modalità di protezione da shock elettrico Classe I
Il Proiettore Automatico è classificato nella Classe I strumenti.
Nella Classe I strumenti la protezione dallo shock elettrico non si affida esclusivamente
all'isolamento di base, prevede anche una precauzione supplementare, che prevede
che lo dello strumento sia collegato al conduttore di terra di protezione in cablaggio
fisso dell'installazione, affinché nessuna parte conduttrice accessibile possa prendere
fuoco in caso di guasto dell'isolamento di base.
Livello di protezione contro l'ingresso di liquidi IPXO
Il Proiettore Automatico è uno strumento comune (strumento incluso senza protezione
contro l'ingresso di liquidi). Evitare che lo strumento entri in contatto con l'acqua.
Livello di protezione contro l'infiammabilità
Il Proiettore Automatico è classificato come un dispositivo il cui uso in presenza di
miscele anestetiche potenzialmente infiammabili con aria o con ossigeno o con ossido
di azoto è sconsigliato. Non utilizzare in prossimità di materiali infiammabili.
GB
• Make sure that the voltage of the main power supply corresponds to that
specified on the data label underneath the Auto Chart Projector.
• The Auto Chart Projector is not impermeable to water and other liquids.
Do not immerse it in water, or expose it to splashes or to ambient humidity in
excess of 85%. Operate the Auto Chart Projector only in temperatures between
15° and 30° C.
• Do not attempt to repair the Auto Chart Projector yourself. Refer all repairs to a
Centro Style service centre (see page 10).
• Do not damage the body of the Auto Chart Projector or its mains power cable.
Risk of electric shock, accidents, malfunctions and fire! Have any damaged parts
replaced immediately by an authorised service centre.
• The electrical power supply to which the Auto Chart Projector is connected
must conform to applicable standards.
The Auto Chart Projector is designed and made exclusively for the purposes described in
this manual as normal, specified or deducible uses. Any other use is considered improper.
Modalità di funzionamento Funzionamento continuo
Centro Style S.p.A. declines all responsibility for injury to persons or damage to property due to:
• Improper or prohibited uses of the Auto Chart Projector.
• Unauthorised modifications to the Auto Chart Projector or its accessories.
• Use of non original spare parts.
Classifications under the provision of 93/42/EEC (MDD) Class I
Auto Chart Projector is classified into Class I system
BASIC TROUBLE SHOOTING
Protection method against eletric shock Class I
Auto Chart Projector is classified into Class I instrument.
Class I instrument in which protection against electric shock does not rely basic
insulation only, but which includes an additional safety precaution with the provision
of the instrument to the protective earth conductor in fixed wiring of the installation in
such a way that any accessible conductive parts cannot become live in the event of a
fallure of the basic insulation.
Degree of protection agaist ingress of liquids IPXO
Auto Chart Projector is the ordinary instrument (enclosed instrument without protection
against ingress of liquids). Be careful not to splash water on the instrument.
Degree of protection against flammability
Auto Chart Projector is classified as an equipment not suitable to be used in a
Potentially flammable anesthetic mixture with air or with oxygen or nitrous oxide.
Do not use near flammable material.
Mode of operation Continuous operation
Always disconnect the power cord from the wall and the instrument prior to
performing any of the following procedures.
• If the instrument does not function at all:
1) Check the facility power source. (Circuit Breackers)
2) Check the electrical commections. (Power Cord)
3) Check the main fuse located on the rear of the unit.
• If the projector lamp does not light:
1) Check the mai ON/OFF Switch .
2) Replace the lamp with the spare lamp.
The lamp may be HOT! Do not touch the Lamp directly and allow the sufficient
amout of time to cool down the heat.
• If the projector turns on but does not function:
Check the batteries in the remote control.
6
GB
Dichiarazione di conformità CE / CE Declaration of Conformity
•
•
To install Programm “P2”
1) Keep pressing the left button of
for 2-3 seconds and release the button upon
hearing a beep sound;
2) Press the charts needed to store one by one, with a limit of at most 30 charts;
Centro Style S.p.A.
3) Keep pressing the right button of
for 2-3 seconds to store selected charts
and release the button upon hearing a beep sound;
Via G. D. Martinengo, 7 - I-21040 Vedano Olona -Varese - Italy
Programmed Operation
1) Press
The first chart in the program will be viewed and the programmed operation
started. (Press the button once again to switch over between P1 and P2)
2) Press the left of right button to change charts.
Dichiara che l’apparecchio seguente:
Hereby declares that the machine:
5. Reset
Press RESET button
6. Mute
Press the button
to re.position charts to “0.05E”.
PROIETTORE AUTOMATICO
AUTO CHART PROJECTOR
Matricola / Serial number
to switch over between mute and sound states.
Anno di produzione / Year of manufacture
CHART DESCRIPTION
Letters
Ref. 08245
Number
Illiterate
Children
Schober
0.05
0.05
0.1
0.15
0.1
0.1
0.15
0.1
0.15
0.2
0.3
0.4
0.2
0.4
0.6
0.8
1.0
0.2
0.3
0.4
0.2
0.3
0.4
0.5
0.6
0.7
0.5
0.6
0.7
0.5
0.6
0.7
0.8
0.9
1.0
0.8
0.9
1.0
0.8
0.9
1.0
1.2
1.5
2.0
Phoria
è conforme alle Direttive Europee / conforms to the following European directives
Binocular
balance
Phoria with
fixation
Duochrome
balance
Coincidence
vertical
Cross Cylinder
dots
Minute
stereo
Astigmatic
Clock Dial
Fixation
Bassa tensione / Low Voltage Directive
73/23 CEE - 93/68 CEE
Classe I (DDM) / Class I (DDM)
93/42 CEE
Compatibilità elettromagnetica / Elektromagnetische Verträglichkeit
EMC / EMV 89/336 CEE
Cross lines
Red/Green
Worth for dot
1.2
1.5
2.0
GB
5
1.2
1.5
2.0
Vedano Olona,
01 02 2008
Centro Style S.p.A.
I
Pagina 1
Pagina 1
Pagina 2
Pagina 2
Pagina 3
Pagina 4
Pagina 5
Pagina 6
Pagina 8
Pagina 8
Pagina 9
Pagina 9
Pagina 10
INDICE
START-UP AND OPERATION
TRASPORTO E MAGAZZINAGGIO.
ACCESSORI IN DOTAZIONE.
DESCRIZIONE APPARECCHIO, destinazione d’uso e campo d’impiego.
INSTALLAZIONE E MONTAGGIO.
MESSA A FUOCO.
MESSA IN FUNZIONE E UTILIZZO.
DESCRIZIONE DELLE TABELLE.
MANUTENZIONE E PULIZIA.
SICUREZZA DI UTILIZZO, uso improprio e proibito, rischi annessi.
SOLUZIONE DEI PROBLEMI.
MESSA FUORI SERVIZIO.
DATI TECNICI.
GARANZIA ED ASSISTENZA.
1. Turn the power switch of instrument on .
The projection lam light and the chart for 0.05 vision shall be viewed in 3 seconds.
TRASPORTO E MAGAZZINAGGIO
L’apparecchio e gli accessori in dotazione, durante il trasporto e il magazzinaggio devono
stare sempre nell’imballo originale.
• Non conservare lo strumento in luoghi soggetti a umidità o in cui sono
conservati anche gas o liquidi pericolosi.
• Non esporre l’apparecchio a: temperature inferiori a 10° C e superiori a 70° C,
umidità superiore a 85%, ambienti notevolmente polverosi.
• Non sovrapporre più di 10 confezioni o pesi superiori a 15 Kg. Evitare urti o
forti sollecitazioni meccaniche.
• Campo di variazione della pressione atmosferica compreso tra 500 e 1060hPa
ACCESSORI IN DOTAZIONE
Nr. 1 Proiettore automatico Ref. 08245.
Nr. 1 Schermo metallico polarizzato (400 mm x 350 mm)
Nr. 1 Cavo di alimentazione con spina tipo Schuko
Nr. 1 Telecomando
Nr. 2 Fusibili di riserva (2A, 250V)
Nr. 2 Batterie tipo AAA
Nr. 1 copia del manuale di istruzioni per l’uso
Accessori optional
Supporto a muro autobilanciato Ref. 08241
I
1
2. Changing the chart
Press the appropriate chart button the remote controller on.
The charts have 33 selections
3. Isolating the visual acuity chart
•
•
•
•
•
To use Vertical line masking: Press
- To move the position right or left: Press
- To move the position up or down: Press
or
or
To use Horizontal line masking: Press
- To move the position right or left: Press
- To move the position up or down: Press
or
or
To use Single letter masking: Press
- To move the position right or left: Press
- To move the position up or down: Press
or
or
0.2
0.3
0.4
0.2
0.3
0.4
0.2
0.3
0.4
To use Red/Green filter: Press
To release masking and filter:
Press any chart button
0.2
0.3
0.4
4. Programmed operation
There are two programs for selection, which are Program “P1” and “P2”. Be sure to
press
to turn off the lamp before program selecton.
•
To install Programm “P1”
1) Keep pressing the left button of
for 2-3 seconds and release the button
upon hearing a beep sound;
2) Press the charts needed to store one by one, with a limit of at most 30 charts;
3) Keep pressing the right button of
for 2-3 seconds to store selected charts
and release the button upon hearing a beep sound;
4) Press
to turn on the lamp and exit programmig.
4
GB
DESCRIZIONE APPARECCHIO
The Auto Chart Projector should be installed according to the following procedures:
1. If using a wall mount, it is best to locate a wall stud to support the weight of
instrument.
2. Determine the refracting distance (from the patient’s eye to the screen) and install
the projection screen.
3. Position the instrument at
the same distance form
Screen
the screen to the patient
within the range between
2 m and 7 m.
To obtein longer refracting
Patient’s eye
distances in small rooms,
a mirror or systems of
mirrors can be used in this
Mirror
case, a high quality front
surface mirror is required.
4. Check the three-dimensional
alignment of the system.
The instrument is optimized
when the projecton screen is
angled to direct light to the
patient’s head.
Place a mirror on the screen.
The light should project
where the patient’s head
would be.
Il Proiettore Automatico è impiegato per la misurazione del potere visivo, nell'ambito
della rifrazione soggettiva.
Si raccomanda di leggere attentamente le istruzioni e di comprenderne l'esatto
significato, oltre a seguire le fasi descritte dal presente manuale per garantire un utilizzo
sicuro, prestazioni ottimali ed una lunga durata del vostro nuovo strumento. Si prega di
conservare il presente manuale per usi futuri.
DESTINAZIONE D’USO:
professionale, deve essere utilizzato
da personale adeguatamente istruito.
CAMPO DI IMPIEGO:
laboratorio o negozio ottico.
Apparecchio di rilevazione non invasivo,
non è un dispositivo medicale diagnostico.
ATTENZIONE:
Non utilizzare lo strumento in prossimità di altre attrezzature o di lampadine a
incandescenza (per esempio, lampade alogene), poiché il suo corretto funzionamento
potrebbe essere compromesso dall'effetto delle onde elettroniche.
Patient
Spot of light
on wall
Screen
Projector
INSTALLAZIONE E MONTAGGIO
Aprire la confezione verificando l’integrità del contenuto e che la dotazione di serie
corrisponda a quanto descritto a pag. 1 (accessori in dotazione).
Se l’apparecchio è stato danneggiato durante il trasporto, rivolgersi all’assistenza.
• Installare lo strumento in un luogo stabile e piano, al riparo da vibrazioni e urti.
In tal caso si potrebbero verificare dei difetti di proiezione o di funzionamento.
FOCUSING
• Se si utilizza un supporto a parete, si raccomanda di fissare un ancoraggio a
muro per sostenere il peso dello strumento.
To obtain the correct focus:
• Condizioni ambientali d’esercizio: temperatura tra i 15 e i 30° C.
Umidità: < 85% evitare ambienti polverosi.
1. Measure the distance from the patient to the screen (refracting distance).
2. Turn the Auto Chart Projector on, and using the remote control, project the 0.05 “E”
onto the screen.
3. Adjust the position of the instrument forward or backward for sizing.
4. Adjust for sharpness and clarity by turning the focusing wheel
left or right as
needed.
GB
3
• L’impianto elettrico di rete a cui va allacciato l’apparecchio deve essere
conforme alle norme vigenti nel paese di destinazione.
• In caso di inutilizzo prolungato dello strumento, si consiglia di scollegare il cavo
di alimentazione elettrica dalla presa a muro, per evitare rischi di incendio.
Rimuovere le batterie dal vano batterie del telecomando.
2
I
DESCRIPTION OF THE AUTO CHART PROJECTOR
Procedere all'installazione del Proiettore Automatico come da istruzioni seguenti:
1. Se si utilizza un supporto a parete, si raccomanda di fissare un ancoraggio a muro per
sostenere il peso dello strumento.
2. Stabilire la distanza di rifrazione (tra l'occhio del paziente e lo schermo) e procedere
all'installazione dello schermo di proiezione.
3. Posizionare lo strumento alla
stessa distanza tra schermo e
Schermo
paziente entro valori massimi
e minimi di 2 m e 7 m.
Per ottenere maggiori distanze
di rifrazione in ambienti di
Occhio paziente
piccole dimensioni, è possibile
utilizzare uno specchio o un
sistema di specchi.
Specchio
In questo caso, è necessario
uno specchio anteriore di
ottima qualità.
4. Verificare l'allineamento
tridimensionale del sistema.
Lo strumento è in condizioni
ottimali quando lo schermo
di proiezione forma un angolo
rispetto alla luce diretta che
giunge alla testa del paziente.
Installare uno specchio sullo
schermo. La luce dovrebbe
essere proiettata in direzione
della testa del paziente.
In this area of subjective refraction, the Auto Chart Projector is best used for measuring
visual acuity. It is fully recommended that you carefully read, understand and follow the
steps in this manual order to ensure safe operation, optimum performance and a longer
service life from your new instrument. Please retain this manual for future reference.
PURPOSE:
The machine is a professional instrument
and must only be use by adequately
trained personnel.
APPLICATIONS:
The machine is designed for use in optical
labs and optical outlets.
The machine is a non-invasive test appliance
and is not suitable for medical diagnostic
purposes.
WARNING!
Do not use this machine near by other machines of electric bulb (ex.Halogen lamp), it
will improperly operate on the effect of electronic waves.
Paziente
Raggio di luce
sulla parete
Schermo
Proiettore
ASSEMBLY AND INSTALLATION
Open the packaging and check that the contents are not damaged. Also make sure that
all the contents listed on page 1 (Standard accessories) are present.
Contact technical assistance if the Auto Chart Projector has been damaged in transit.
• Install the instrument in a stable and level place where vibration or shock does not
occur.The instrument may not perform observation correctly or may malfuction.
MESSA A FUOCO
• If using a wall mount, it is best to locate a wall stud to support the weight of
instrument.
Per ottenere una corretta messa a fuoco:
• Ambient operating conditions:Temperature between 15 and 30° C.
Relative humidity: <85%. Avoid dusty environments.
1. Misurare la distanza tra il paziente e lo schermo (distanza di rifrazione).
2. Accendere il Proiettore Automatico e per mezzo del telecomando, proiettare la
tabella "E" con valore 0.05 sullo schermo.
3. Regolare la posizione dello strumento in avanti o indietro per impostare le misure corrette.
4. Girando la manopola
di messa a fuoco verso destra o verso sinistra, è possibile
regolare e ottenere un'immagine precisa e chiara.
I
3
• The electrical mains supply to which the tester is connected must conform
to applicable standards in the country of installation.
• If the instrument is not be used for a long time, disconnect the power cord from
the wall outlet. Otherwise, it may cause a fire.
Remove batteries from the battery case of the remote controller.
2
GB
GB
Page 1
Page 1
Page 2
Page 2
Page 3
Page 4
Page 5
Page 6
Page 8
Page 8
Page 9
Page 9
Page 10
TABLE OF CONTENTS
MESSA IN FUNZIONE E UTILIZZO
TRANSPORT AND STORAGE.
STANDARD ACCESSORIES.
DESCRIPTION OF THE AUTO CHART PROJECTOR,proper use and applications.
ASSEMBLY AND INSTALLATION.
FOCUSING.
START-UP AND OPERATION.
CHART DESCRIPTION.
MAINTENANCE AND CLEANING.
SAFETY, improper and prohibited uses and residual risks.
BASIC TROUBLE SHOOTING.
REMOVAL FROM SERVICE.
TECHNICAL SPECIFICATIONS.
WARRANTY AND SERVICE.
1. Premere l'interruttore di accensione
per accendere lo strumento.
La luce della lampadina di proiezione e la tabella per visione a 0.05 si accenderanno
entro 3 secondi.
TRANSPORT AND STORAGE
The Auto chart Projector and the accessories supplied with it must be left in their original
packaging during transport and storage.
• Do not store the instrument in a place where it may get wet or where
poisonous gas or liquid is stored.
• Do not expose the Auto chart Projector to temperatures below 10° C or above
70° C, relative humidity above 85%, or particularly dusty atmospheres.
• Do not stack more than 10 boxes or weights in excess of 15 Kg. Avoid impacts
and mechanical stresses.
• Atmospheric pressure range within 500 to 1060hPa
STANDARD ACCESSORIES
1 x Auto chart Projector, code 08245
1 x Polarized Metal Screen (400 mm x 350 mm)
1 x Power cable with Schuko plug
1 x Remote Control
2 x Spare fuses (2A, 250V)
2 x AAA type batteries
1 x Instruction manual
Optional accessories
Support arm for sight tester Ref. 08241
GB
1
2. Cambio della tabella
Premere il tasto della tabella corrispondente sul telecomando.
É possibile selezionare 33 tabelle diverse.
3. Visualizzazione di una parte selezionata della tabella per l'esame dell'acuità visiva
•
Per visualizzare una singola linea verticale: Premere
- Per spostarsi verso destra o sinistra: Premere
o
- Per spostarsi verso l'alto o verso il basso: Premere
0.2
0.3
0.4
o
•
Per visualizzare una singola linea orizzontale: Premere
- Per spostarsi verso destra o sinistra: Premere
o
- Per spostarsi verso l'alto o verso il basso: Premere
o
0.2
0.3
0.4
•
Per visualizzare una singola lettera: Premere
- Per spostarsi verso destra o sinistra: Premere
o
- Per spostarsi verso l'alto o verso il basso: Premere
0.2
0.3
0.4
•
•
o
Per applicare il Filtro verde/rosso: Premere
Per terminare le funzioni di mascheratura e di filtraggio:
Premere qualsiasi pulsante della tabella.
0.2
0.3
0.4
4. Funzionamento programmato
Sono disponibili due programmi di selezione, denominati Programma "P1" e "P2".
Assicurarsi di premere
per spegnere la lampada prima della selezione del
programma.
•
Istruzioni per installare il Programma "P1"
1) Tenere premuto il pulsante di sinistra
per circa 2-3 secondi , finché non
verrà emesso un segnale acustico;
2) Selezionare le tabelle necessarie per memorizzarle singolarmente, con un limite
massimo di 30;
3) Tenere premuto il tasto di destra
per circa 2-3 secondi per memorizzare
le tabelle selezionate, finché non verrà emesso un segnale acustico;
4) Premere
per accendere la lampada e uscire dalla programmazione.
4
I
GARANZIA ED ASSISTENZA
•
•
Istruzioni per installare il Programma "P2"
1) Tenere premuto il tasto di destra
per circa 2-3 secondi, finché non verrà
emesso un segnale acustico;
2) Selezionare le tabelle necessarie per memorizzarle singolarmente, con un limite
massimo di 30;
3) Tenere premuto il tasto di sinistra
per circa 2-3 secondi per memorizzare le
tabelle selezionate, finché non verrà emesso un segnale acustico;
Funzionamento programmato
1) Premere
Sarà visualizzata la prima tabella nel programma e verrà avviato il funzionamento
programmato. (Premere il pulsante ancora una volta per selezionare P1 e P2)
2) Premere il pulsante di destra o di sinistra per cambiare le tabelle.
5. Azzeramento
Premere il pulsante RESET
6. Silenzioso
Premere il pulsante
per impostare nuovamente le tabelle sul valore "0.05E".
Per analfabeti
0.05
Per bambini
Eteroforia
PRODOTTO DIFETTOSO
0.1
0.15
0.1
0.1
0.15
0.2
0.3
0.4
0.2
0.4
0.2
0.3
0.4
0.2
0.3
0.4
0.5
0.6
0.7
0.6
0.8
1.0
0.5
0.6
0.7
0.5
0.6
0.7
0.8
0.9
1.0
0.8
0.9
1.0
0.8
0.9
1.0
1.2
1.5
2.0
Eteroforia con
Bilanciamento
fissazione
refrattivo binoculare
Bilanciamento
a due colori
Coincidenza
verticale
Test cilindri
crociati
Minute
stereo
Quadrante per
astigmatismo
Fissazione
Reticolo
Rosso/Verde
Luci di Worth
I
5
garanzia totale
* vale la data della fattura
Schober
0.1
0.15
1.2
1.5
2.0
In caso di malfunzionamento nel periodo di garanzia, non aprire l’apparecchio e
contattare il servizio di assistenza. Le parti riconosciute difettose alla fabbricazione
sono in garanzia.
La garanzia è valida per rotture non dovute a normale usura, senza manomissioni
dell’apparecchiatura ed esclude i materiali di consumo.
per selezionare lo stato silenzioso o di suono attivato.
Numeri
0.05
2 SEGNALARE ENTRO 8 GIORNI
AL SERVIZIO CLIENTI EVENTUALI
DIFFORMITA’
* Acquisto entro 1 anno
DESCRIZIONE DELLE TABELLE
Lettere
1 VERIFICARE IL CONTENUTO
DI OGNI PACCO
1.2
1.5
2.0
Non spedire mai nulla senza preavviso:
Se volete rendere qualcosa, se vi occorre una sostituzione, contattate sempre prima
il Centro di assistenza autorizzato:
Centro Style S.p.A.Via G.D. Martinengo, 7 - 21040 Vedano Olona - Varese.
Assistenza tecnica: Tel. 0332 270450 (orario: 8.30/12.30 - 14.00/18.00)
Fax Verde: 800 221144
E-mail: [email protected]
per chiarire i seguenti punti:
1 - Codice apparecchiatura e numero di matricola
2 - Tipo di guasto
3 - Eventuale ripristino funzionalità con consigli telefonici
4 - Soluzione rapida con nostra spedizione ricambio
5 - Data di acquisto con numero di fattura o bolla e codice cliente
Servizio clienti:
Tel. 0332 270270 (orario: 8.30/12.30 - 14.00/18.00)
10
I
MESSA FUORI SERVIZIO
SICUREZZA DI UTILIZZO
Dismissione e smaltimento.
Al termine del ciclo di vita o in caso di danno irreparabile, se l’apparecchio non viene
smaltito immediatamente occorre metterlo fuori uso in maniera completa per
ragioni di sicurezza.
Uso improprio e proibito, rischi annessi.
- Scollegare il cavo di alimentazione dalla rete e renderlo inutilizzabile
tagliando la spina.
Note sui materiali per lo smaltimento. Differenziazione del rifiuto e riciclo.
Per lo smaltimento ed il riciclo dello strumento fare riferimento al codice rifiuto europeo
160200: “apparecchiature o parti di apparecchiature fuori uso”.
DATI TECNICI
Tabella
33 Selezioni
Velocità di selezione tabella
0.3 sec in media
Maschera
1 aperta 5 linee orizzontali
5 linee verticali 21 lettere singole
Filtro
Rosso/Verde
Distanza di proiezione
2.7 m ~ 7.0 m (distanza standard 5 m )
Ingrandimento
30X (a 5 m)
Dimensioni della proiezione
252 mm e 330 mm (larghezza) x 225 mm (altezza) (a 5 m)
Angolo d'inclinazione
Giunto sferico ( ± 10 gradi)
Lampada
6V 30W (alogena), durata 2,000 ore
Alimentazione
AC110,220~240V 50 / 60Hz
Consumi di energia
50VA
Funzione di autospegnimento
dopo 5 minuti
Dimensioni (mm) l x p x a
Unità principale: 230 x 360 x 265 mm
Telecomando: 64 x 195 x 20 mm
Peso netto
Unità principale: 6.0 Kg
Telecomando: 180 g
Interfaccia
RS232
Condizioni ambientali di esercizio
Temperatura compresa fra 15° e 30° C.
Umidità relativa < 85%
L’apparecchio è conforme alle direttive:
73/23 CEE Bassa Tensione
89/336 CEE Compatibilità Elettromagnetica
I
9
• Verificare che la tensione del proprio impianto corrisponda a quella riportata
nella targhetta identificativa posta sotto l’apparecchio.
• Questa apparecchiatura non è impermeabile all’acqua ed ai liquidi in generale:
non immergerla in acqua, non esporla a spruzzi di liquidi né ad umidità
ambientale superiore a 85%, temperatura di esercizio tra i 15° e i 30° C.
• Non tentare assolutamente di riparare l’apparecchio autonomamente ma
rivolgersi al sevizio di assistenza tecnica Centro Style (vedi pag. 10).
• Non danneggiare la struttura dell’apparecchio e il cavo di rete, pericoli di
scossa elettrica, infortunio, guasti ed incendio. Far sostituire immediatamente
le parti danneggiate da personale autorizzato.
• L’impianto elettrico a cui collegare l’apparecchio deve essere a norma.
Questa apparecchiatura è stata progettata e realizzata unicamente per l’uso descritto
su questo manuale come uso normale, dichiarato o deducibile. Ogni altro uso è da
considerarsi improprio.
Centro Style non si ritiene responsabile per danni a persone o cose conseguenti a:
• Uso improprio o proibito dell’apparecchiatura.
• Modifiche sull’apparecchiatura o sugli accessori non autorizzate.
• Uso di ricambi non originali.
SOLUZIONE DEI PROBLEMI
Scollegare sempre il cavo di alimentazione elettrica dell’apparecchio dalla
presa a muro prima di effettuare una qualsiasi delle seguenti procedure.
• Se lo strumento non funziona:
1) Controllare l'alimentazione (Interruttori automatici).
2) Controllare le connessioni elettriche. (Cavo per la corrente)
3) Controllare il fusibile principale situato sul retro dell'unità.
• Se la lampada del proiettore non si accende:
1) Controllare l'interruttore principale ON/OFF .
2) Sostituire la lampada con quella di scorta.
La lampada potrebbe essere CALDA! Non toccare la lampada direttamente e
attendere il tempo necessario per il raffreddamento.
• Se il proiettore si accende ma non funziona:
Controllare le batterie del telecomando.
6
I
MANUTENZIONE E PULIZIA
• Staccare il cavo di alimentazione dalla rete prima di effettuare la manutenzione
o la pulizia.
• Non sono specificati requisiti particolari di manutenzione oltre alle normali
operazioni di pulizia, quali la rimozione della polvere.
• Verificare periodicamente l'integrità del cavo elettrico di alimentazione e della
spina; verificare l'integrità della struttura esterna dell'apparecchio.
• Pulire le superfici esterne dello strumento con un panno morbido, utilizzando
esclusivamente detergenti neutri in piccola quantità per evitare infiltrazioni nei
circuiti.
• Non usare solventi o altre sostanze aggressive, né spruzzare direttamente
liquidi, non usare oggetti abrasivi.
•
•
•
3) Posizionare la nuova lampada nel relativo supporto.
4) Accendere l'interruttore di linea
.
Lente di ptoiezione
5) Posizionare della carta bianca
davanti alla lente di proiezione
per proiettare l'immagine del
filamento della lampada.
Carta bianca
Pulizia della lente di proiezione
1) Aspirare la polvere con un apposito apparecchio.
2) Se non si ritiene di aver pulito abbastanza a fondo, strofinare con la carta utilizzata
per la pulizia delle lenti.
6) Regolare l'immagine del filamento al centro del foglio di carta con la vite sulla
base della lampadina. (Nota: Non fissare la lampada direttamente)
Smontaggio della custodia superiore
1) Interrompere l'alimentazione di corrente e staccare il cavo.
2) Svitare la vite in senso antiorario sul lato posteriore della custodia superiore .
3) Rimuovere la custodia superiore sollevandola.
4) Per re-inserirla, posizionare la custodia superiore sull'unità principale e regolare
la posizione frontale. Infine, avvitare la vite in senso orario.
Viti
Immagine del filamento regolata
Sostituzione della lampada
La lampada potrebbe essere CALDA! Non toccare la lampada direttamente e
attendere il tempo necessario per il raffreddamento.
7) Posizionare la copertura della lampada e avvitare.
8) Spegnere l'interruttore.
Copertura della lampada
•
Vite di fissaggio
1) Svitare la vite sulla copertura
della lampada.
2) Rimuovere la copertura della
lampada sollevandola ed
estrarre la lampada.
I
7
Sostituzione dei fusibili
1) Spegnere l'interruttore e scollegare il cavo per la corrente.
2) Con un dito, tirare e ruotare il supporto del fusibile di un quarto, in senso
antiorario, quindi rimuoverlo.
3) Estrarre il fusibile dal suo vano e verificarne le condizioni.
4) Sostituire il fusibile con quello
di scorta in dotazione o fusibile
TENSIONE
FUSIBILE
corrispondente, come sotto indicato.
2A 120V;T2AL
100V~120V
5) Riposizionarlo con il supporto del
2A 250V;T2AL
200V~240V
fusibile sulla presa. Premere e ruotarlo di
un quarto in senso orario per bloccarlo.
8
I