1
1
2
3
4
5
6
7
8
9
10
FAUSTI STEFANO SRL
Via M. Dell’Indipendenza, 70
25060 Marcheno (BS)
+39 030 861475 - 8960220 - 217
Sovrapposti - Over and under
11
12
13
Manuale D’istruzione - Instruction Manual
Italia - Italy
Punzoni di prova ufficiali del Banco Nazionale di Prova di Gardone Val Trompia (Brescia)
Official Proof Stamps Gardone Val Trompia Prooff House (Brescia - Italy)
MANUALE D’USO
FUCILI SOVRAPPOSTI
Punzone distintivo del Banco di Prova di Gardone Val Trompia opposto su tutte le Armi
Gardone Val Trompia Proof House Stamp (to be stamped on all firearms)
per tutti i modelli da caccia, tiro e sporting
leggere attentamente le istruzioni prima di usare l’arma
OVER AND UNDER GUNS
OWNER’S MANUAL
Prova definitiva a polvere nera
Black powder proof stamp
PN
Prova definitiva a polvere senza fumo
Smokeless powder proff Stamp
PSF
Prova facoltativa a polvere senza fumo
Optional additional proof with smokeless powder
PSF
Punzone di “Conferma catalogo nazionale delle armi italiano”
“Italian national catalogue of firearms” stamp
Punzone di prova
Reproofing stamp
For all Hunting, Competition and Sporting model
Read carefully before using your firearm.
Punzone prova con pallini di acciaio
Steel-shot proof stamp
Grazie per aver scelto Fausti
Thank you for choosing Fausti
Marchio controllo delle munizioni
Ammunition control mark
R
FUCILI SOVRAPPOSTI
MANUALE D’ISTRUZIONE
•
Valido per tutti i modelli da caccia, tiro e competizione.
•
Leggere scrupolosamente tutte le istruzioni riportate prima di utilizzare l’arma.
NOTE PER LA SICUREZZA
•
Anche se pensate di essere esperti nell’utilizzo delle armi da fuoco non date mai
nulla per scontato e leggete attentamente il presente manuale destinato a tutti i neofiti e non.
•
L’utilizzo in maniera sicura delle armi da fuoco richiede addestramento, disciplina e
prudenza. Per la loro natura e la loro funzione, le armi da fuoco sono strumenti mortali e non devono essere maneggiate con trascuratezza od impropriamente in quanto l’uso incauto può determinare ferite gravi o mortali.
•
Le armi da fuoco raramente causano incidenti dovuti al loro malfunzionamento, statisticamente questi incidenti sono causati dalla mancata osservanza delle regole
fondamentali di sicurezza. Si è purtroppo riscontrato che tali regole vengono trasgredite sia da tiratori esperti che da dilettanti o tiratori alle prime esperienze. Per questo motivo è bene ricordare sempre le regole di base per un sicuro e corretto utilizzo dell’arma. E’ consigliabile leggere e rileggere più volte tali norme in modo da
memorizzarle e far divenire il loro utilizzo una buona abitudine da non scordare.
•
Rivolgetevi ad un istruttore nel caso in cui abbiate dei dubbi sulle vostre cognizioni
dell’arma o alle vostre abilità di utilizzo in totale sicurezza di questa o di qualsiasi
altro tipo di arma da fuoco. Ci sono negozi specializzati, Club, circoli sportivi che
organizzano corsi personalizzati: aproffittatene. Nel caso in cui risiediate in zone non
raggiunte da questi servizi potete sempre rivolgervi alla Associazione Nazionale
Armi da Fuoco che vi darà la sua assistenza.
•
Chi possiede un arma né è sempre responsabile (24 ore su 24). L’arma deve sempre essere conservata ed utilizzata in sicurezza e il proprietario deve sempre adottare tutte le cautele necessarie affinchè la situazione di sicurezza non cambi. Non
saranno ammesse imprecisioni, omissioni o dimenticanze. La responsabilità dell’ar1
•
ma ricade interamente e completamente sul proprietario che non potrà delegarla a
nessun altro.
Attenzione: non esiste arma da fuoco che possa essere costruita a prova di incidente. Essa non è nient’altro che una macchina senza facoltà di giudizio e risponde solo
ed esclusivamente alle azioni del proprietario senza distinzione fra le azioni assennate o stupide. L’unico dispositivo di sicurezza veramente efficace per un’arma è il
comportamento del suo proprietario il quale deve essere sempre prudente e non
deve mai dimenticare che una sua disattenzione può provocare una tragedia.
CONOSCERE LA VOSTRA ARMA
A prima vista molte armi di diversi modelli e marche possono sembrare equivalenti. Così
non è; infatti ogni arma si differenzia dalle altre sia per il funzionamento che per la disposizione e il compito dei vari comandi. Leggete e memorizzate attentamente questo
manuale. Imparate a conoscere tutte le caratteristiche tecniche e di funzionamento della
vostra arma prima di procedere all’imbracciatura e al brandeggio. Fate fare lo stesso ad
eventuali persone che imbracceranno la vostra arma.
Ogni arma dovrebbe avere il suo manuale di istruzioni; nel caso voi abbiate delle armi
sprovviste di tale manuale contattate il costruttore e fatevene inviare una copia.
Se per qualsiasi motivo non fosse possibile reperire il manuale potete recarvi presso una
qualsiasi biblioteca e consultare uno dei molti libri pubblicati che contengono informazioni inerenti le armi da fuoco fuori produzione od obsolete.
GLI INFORTUNI POSSONO ESSERE EVITATI GRAZIE ALLA VOSTRA CONOSCENZA DELL’ARMA
La nostra arma è stata studiata e costruita per fornire il massimo della sicurezza. Deve
però essere utilizzata correttamente.
Essa, come tutte le armi, non riconosce l’intelligenza o la stupidità di chi la utilizza e può
quindi diventare molto pericolosa se non vengono scrupolosamente seguite le seguenti
regole di base:
2
LEGGERE CON ATTENZIONE
1. non puntate mai in nessuno caso il fucile, sia esso carico o scarico, verso qualsiasi
cosa a cui non intendiate sparare.
2. maneggiate sempre l’arma come se fosse carica.
3. Prendete lezioni da un’istruttore qualificato prima di brandeggiare qualsiasi arma.
4. l’arma è dotata di un dispositivo meccanico di sicura, che non deve rimpiazzare in
nessun caso il buon senso del tiratore.
5. le dita vanno tenute lontane dal grilletto fino a quando non avete mirato e siete pronti per sparare al bersaglio.
6. controllate sempre che il fucile sia scarico prima di riporlo, pulirlo o cambiare gli
strozzatori; non posizionate mai un’arma carica in verticale contro un qualsiasi
appoggio, potrebbe cadere con forza bastante a causare una partenza di colpi accidentali.
7. scaricate sempre l’arma prima di riporla in macchina o di entrare in un edificio popolato.
8. non lasciate mai l’arma incustodita sia essa carica o scarica.
9. conservate secondo legge le armi e le munizioni. Non tenete mai armi e munizioni
nello stesso luogo, tenetele lontane dalla portata dei bambini e dalle persone inesperte in genere, mettetele in un luogo chiuso a chiave.
10. il buon funzionamento della sicura non va mai provato premendo il grilletto a meno
che voi siate del tutto sicuri che l’arma sia scarica e che non sia puntata verso delle
persone.
11. prima di sparare siate certi del bersaglio da colpire.
12. non utilizzate mai armi sotto l’effetto di alcool, droghe o medicinali che possono limitare la vostra capacità motoria o di giudizio.
13. non tirate mai verso di voi l’arma afferrandola dal vivo di volata; non effettuate movimenti pericolosi quali arrampicamenti su alberi, salto di fossi o scavalcamento di
ostacoli con l’arma carica.
14. caricate e scaricate il fucile sempre all’aperto e con la bocca del fucile direzionata
verso un punto sicuro.
3
15. se tirato il grilletto la vostra arma non dovesse sparare immediatamente, tenetela
puntata verso il bersaglio per almeno 30 secondi e inserite la sicura. A volte questi
ritardi nello sparo si possono verificare a causa di una lenta iniezione delle cartucce. Sempre con la sicura inserita, aprite il fucile ed estraete manualmente la cartuccia non sparata.
16. Non indirizzate mai lo sparo contro superfici dure e piane o nell’acqua; questi tipi di
bersagli facilitano il rimbalzo dei pallini o della pallottola.
17. controllate sempre che l’arma che ricevete sia scarica.
18. non puntate mai la bocca dell’arma verso una persona e non mettete mai ne mani
ne altre parti del corpo davanti ad essa. Osservando questa regola si eviteranno
rischi di ferimento nel caso di una eventuale scarica accidentale.
19. assicuratevi sempre che le cartucce che utilizzate siano del calibro giusto per il
vostro fucile e che non siano né danneggiate né malformate. Non dimenticatevi che
nel caso di utilizzo di una cartuccia calibro 20 con un arma di calibro 12 potrà succedere che la cartuccia attraversi la camera di scoppio fermandosi nella canna. Nel
caso in cui venga poi introdotta nella stessa arma una cartuccia calibro 12 e venga
fatto fuoco la canna potrebbe scoppiare e recare ferite gravi, anche mortali
20. togliete la sicura solo quando siete pronti allo sparo.
21. non sparate a vuoto in quanto questa operazione potrebbe deteriorare l’arma.
22. se avete il sospetto che qualcosa possa aver ostruito le canne del vostro fucile, scaricate subito l’arma e controllate all’interno le canne per tutta la loro lunghezza. Non
soffermatevi solo alla camera di scoppio.
23. la vostra arma è uno strumento di precisione e come tale dovete trattarla.
24. vi sconsigliamo assolutamente l’impiego di munizioni ricaricate o vecchie, possono
essere pericolose.
25. non tentate di modificare la forza di tiro del grilletto in quanto andrete a modificare
l’assetto dell’arresto del cane creando i presupposti per scariche accidentali.
Qualsiasi modifica apportata all’arma ne rende in ogni caso nulla la garanzia.
26. se intendete utilizzare munizioni Steel Shot accertatevi che il vostro fucile sia predisposto al loro impiego. Nel caso in cui il vostro fucile presenti sul manicotto delle
4
canne il “Giglio Francese” esso è abilitato all’uso di dette munizioni. ( Fig. 1).
CONTATTATECI PER QUALSIASI DUBBIO RIGUARDANTE IL FUNZIONAMENTO
DELL’ARMA O GLI ARGOMENTI RELATIVI ALLA SICUREZZA.
AVVERTENZA
Le nostre armi sono state costruite per funzionare regolarmente con i pezzi originali della
nostra casa. Il vostro fucile è razionalmente costituito da tanti componenti che si collegano in maniera perfetta tra di loro; qualsiasi modifica può compromettere l’esatto funzionamento dell’arma, così come il montaggio sbagliato della stessa, e causare danni gravi a
cose o persone. Per questo motivo qualsiasi eventuale intervento di riparazione deve
essere effettuato dal costruttore o da riparatori autorizzati. Qualsiasi intervento non
autorizzato annullerà la garanzia dell’arma.
PROTEZIONI: OCCHI E ORECCHIE (Fig. 2)
Quando utilizzate la vostra arma mettete sempre le cuffie per la protezione acustica e gli
occhiali adatti. Anche le persone accanto a voi devono indossare simili protezioni.
La protezione degli occhi è necessaria in quanto fuoriuscite di particelle di polvere, gas,
lubrificante, residui di carbonio, particelle metalliche o altri residui possono uscire da
un’arma da fuoco nel corso del suo normale utilizzo.
L’esposizione prolungata e continuata al rumore può, se non indossate regolarmente le
cuffie, causare perdita d’udito anche permanente.
MUNIZIONAMENTO
1. Utilizzate solo ed esclusivamente cartucce prodotte industrialmente secondo la normativa Cip ( o per altre nazioni da organismo equivalente), originali e di qualità. Non
utilizzate mai in nessun caso cartucce danneggiate, deformate, corrose, bagnate o
sporche.
Non utilizzate spray detergenti o lubrificanti direttamente sulle munizioni o in punti
dell’arma che andranno a stretto contatto con le cartucce in quanto il contatto con
5
2.
3.
4.
•
•
•
•
•
•
queste sostanze può rendere le munizioni malfunzionanti ed estremamente pericolose. Utilizzate solo cartucce del calibro compatibile con la camera di scoppio del
vostro fucile.
l’utilizzo di munizionamento non standard, ricaricato, caricato a mano, “rifabbricato” o ricaricato in maniera non adeguata renderà nulle tutte le garanzie
dell’arma. Le cartucce caricate in maniera non idonea sono molto pericolose e possono causare sia danni al tiratore che alle persone che lo circondano sia danni all’arma. Impiegare sempre munizionamento in linea con gli standard stabiliti dalle regole CIP o dall’equivalente organismo nelle rispettive nazioni.
un’eccessiva pressione all’interno della camera di scoppio o delle canne durante lo
sparo può causare danni gravi sia all’utilizzatore dell’arma sia ad eventuali terzi nonché danno all’arma stessa. Tale eccesso di pressione può essere determinato da
cartucce non caricate in modo adeguato, da un sovraccarico di polvere propellente
o da un’ostruzione delle canne. L’impiego di munizioni danneggiate, sporche o corrose può condurre all’esplosione della cartuccia con relativo danno a carico del fucile o delle persone a causa dell’improvvisa fuori uscita di gas propellente ad alta pressione dal fucile.
SMETTETE IMMEDIATAMENTE DI SPARARE
In caso di:
Difficoltà in fase di inserimento delle munizioni nella camera;
Percezione di una resistenza insolita nel caricamento;
Mancato sparo della cartuccia;
Mancata espulsione delle munizioni sparate;
Riscontrata presenza di grani di polvere da sparo non combusta nel meccanismo;
Sparo debole o anormale.
In questi casi potrebbe essersi verificata un’ostruzione nelle canne. Controllate immediatamente le canne internamente in tutta la loro lunghezza per accertarvi che non vi siano
ostruzioni che potrebbero compromettere il buon funzionamento dell’arma e quindi causare danni gravi a cose o persone. Non limitatevi a verificare solo la camera di scoppio.
6
Nel caso di sospetta occlusione delle canne scaricare immediatamente l’arma assicurandovi che sia direzionata verso un punto sicuro. Tale occlusione potrebbe essere causata
da qualsiasi cosa come ad esempio residui di sporco, neve, fango, borra, sabbia, acqua
ecc.
NON TENTATE MAI DI RIMUOVERE UN’EVENTUALE OSTRUZIONE UTILIZZANDO
UNA NUOVA CARTUCCIA O UNA CARTUCCIA CON LA CARICA NON RIMOSSA; SI
POTREBBE VERIFICARE UN’ECCESSIVA PRESSIONE ALL’INTERNO DELLA
CAMERA DI SCOPPIO CON CONSEGUENTE DANNEGGIAMENTO DELL’ARMA O,
COSA PIU’ GRAVE, ARRECAMENTO DI GRAVI LESIONI PERSONALI.
•
la presenza di qualsiasi corpo estraneo sulla cartuccia o la sua malformazione
potrebbero rendere difficoltoso il suo inserimento nella camera di scoppio; in questo
caso si potrebbe verificare, al momento dello sparo, l’esplosione della cartuccia stessa con conseguente possibilità di danno a cose o persone. Ciò vale anche in caso
di utilizzo di cartucce deformate o danneggiate.
•
Non utilizzate mai lubrificante sulle munizioni e verificate sempre che la camera di
scoppio sia ben pulita ed asciutta prima di sparare. In fase di sparo, infatti, l’olio
potrebbe creare dell’attrito e sprigionare una reazione simile a quella verificabile in
caso di eccesso di pressione.
•
Lubrificate le parti mobili della vostra arma ma fatelo sempre con parsimonia.
L’utilizzo eccessivo dei lubrificanti, specialmente se spray rischia di compromettere
l’integrità delle cartucce e, in fase di sparo, si possono verificare dei mancati inneschi o degli innesti parziali tali da causare l’arresto della borra all’interno delle canne.
Certi lubrificanti ad elevata penetrazione possono entrare in contatto con la carica
delle cartucce causandone lo sparo a vuoto.
AVVERTENZA
L’esposizione a piombo ed altri agenti presenti nelle munizioni possono causare difetti
congeniti, danni all’apparato riproduttore ed altri seri danni fisici. Provvedete quindi a
maneggiare munizioni, scaricare e pulire la vostra arma in luoghi sempre molto ben arieggiati. Lavatevi accuratamente le mani dopo aver effettuato queste operazioni.
7
LA SICURA: ISTRUZIONI PER L’USO - AVVERTENZA
Per capire e comprendere il funzionamento della sicura esercitatevi nel suo utilizzo prima
di sparare. Fatelo sempre a fucile scarico
Il pulsante della sicura è posizionato sulla coda della bascula, in prossimità della paletta
della chiave di apertura dell’arma. Ha una forma rettangolare ed ha un movimento scorrevole in avanti e in dietro.
Per azionare il dispositivo di sicura portate il pulsante nella posizione indietro in maniera
tale da scoprire la lettera S (Fig. 3). La visione di questa lettera assicura che il fucile non
sparerà se verrà premuto il grilletto.
Portando il pulsante in posizione avanti si disinserisce il meccanismo di sicura, la lettera
S viene coperta (Fig. 4) e l’arma NON E’ PIU’ IN POSIZIONE DI SICURA. Nel momento in cui verrà premuto il grilletto essa sparerà senza nessun impedimento.
ATTENZIONE
Sulla vostra arma il pulsante della sicura può anche essere di tipo non automatico. Se
così fosse nel fucile, al momento della sua apertura e chiusura, non interviene in automatico l’inserimento della sicura. Questa operazione deve essere eseguita MANUALMENTE. Per essere certi che il fucile sia in SICURA dovete assicurarvi che il pulsante sia
ben posizionato e non tentate mai di mettere il pulsante tra la posizione di Sicura e la
posizione libera.
Qualora siate obbligati a trasportare il fucile con le cartucce in canna ( cosa che non deve
essere fatta) assicuratevi che esso sia in posizione di SICURA.
Durante la fase di brandeggio e di sparo la sicura può essere facilmente selezionata per
lo sparo. Ricordatevi che l’unico momento in cui l’arma non deve essere in SICURA è
quando avete l’intenzione di sparare.
AVVERTENZA:
La sicura è un meccanismo progettato con la massima cura, correttamente tarato e testato. Non tentate mai in nessun caso si smontarlo. Ogni tipo di meccanismo potrebbe presentare malfunzionamenti quindi non giustificate mai il fatto di brandeggiare con disinvol8
tura la vostra arma solo per il fatto di aver impostato la posizione di SICURA. Non usate
mai un’arma se il sistema di sicura non funziona.
COME CARICARE IL VOSTRO FUCILE
AVVERTENZA
Non utilizzate mai munizioni diverse dal tipo indicato dal simbolo indicato all’interno della
bascula. Tale marchio è visibile solo a fucile aperto (Fig. 5).
AVVERTENZA
Assicuratevi che l’interno delle canne del vostro fucile siano sempre prive di ostruzioni e
di presenza di grasso e lubrificanti prima di procedere al suo caricamento. Verificate
sempre che sia inserita la sicura e che la camera di scoppio sia vuota.
•
Puntate l’arma in una direzione sicura prima di procedere con l’apertura della bascula. Con una mano spostate la chiave di apertura verso destra fino a raggiungere il
fine corsa (Fig. 6). Questa operazione non prevede l’utilizzo di una forza particolare
in quanto la chiave solitamente si muove senza difficoltà. Con l’altra mano tirate le
canne verso il basso fino a che la bascula non arriverà al suo punto massimo di apertura. A questo punto inserite le munizioni del giusto calibro all’interno delle camere
di scoppio.
•
Richiudete l’arma facendo molta attenzione a tenere le dita lontane dalla bascula e
dal grilletto. Anche questa operazione, come l’apertura, non richiede una grande
forza; il “click” di chiusura dovrebbe essere udito senza grossi problemi. Al momento
della chiusura del fucile la chiave di apertura tornerà alla sua posizione iniziale
(Fig. 7). Se così non fosse non cercate in nessun modo di sparare in quanto l’arma
non è del tutto chiusa e uno sparo potrebbe causare danni gravi sia a cose che a
persone.
•
I percussori per entrambe le canne si attivano automaticamente nel momento in cui
il fucile viene chiuso. A questo punto il fucile è armato e, nel caso in cui voi non intendiate sparare immediatamente dopo il caricamento del fucile, la SICURA deve essere tenuta in posizione S (cioè attivata).
9
COME EFFETTUARE LO SPARO
Scegliete il bersaglio, posizionate la sicura in posizione di sparo (tutta avanti), mirate e
premete il grilletto. Il primo colpo partirà dalla canna destra, dopo avere rilasciato il grilletto, ripremetelo ed effettuate quindi il secondo sparo che avverrà con la canna sinistra.
Questo nel caso che il Vostro fucile sia dotato di monogrillo non selettivo. Se il vostro fucile presenta il sistema bigrillo, premendo il grilletto anteriore (destro) sparerà la canna
destra, premendo il grilletto posteriore (sinistro) sparerà la canna sinistra. Nel caso in cui
non abbiate sparato con entrambe le canne riposizionate la sicura in posizione S e sbloccatela solo al momento in cui sarete pronti ad effettuare un nuovo tiro.
ARMI PROVVISTE DI MONOGRILLO SELETTIVO SULLA CODA: SEQUENZA DI SPARO
Al centro del dispositivo di sicura trovate un bottone zigrinato che può essere movimentato a destra o a sinistra. Tale meccanismo permette di selezionare la canna da cui partirà il colpo. Se il meccanismo viene posizionato a destra (Fig. 8) comparirà un puntino
rosso e l’arma esploderà il primo colpo con la canna inferiore e ripremendo il grilletto sarà
la canna superiore a sparare. Se invece verrà posizionato a sinistra (Fig. 9) verranno scoperti 2 puntini rossi ed in questo caso la sequenza di sparo coinvolgerà prima la canna
superiore e poi quella inferiore. Dopo aver esploso il primo colpo, rilasciate completamente il grilletto per preparare il fucile al colpo seguente. Risulterà dannoso ed inutile a questo punto manovrare il bottone selettore di testa in quanto l’arma è automaticamente
pronta all’esplosione del secondo colpo.
ARMI PROVVISTE DI MONOGRILLO SELETTIVO SUL GRILLETTO: SEQUENZA DI SPARO
Manovrando il bottone del selettore posto sul grilletto da destra, posizione contrassegnata dalla lettera O (O come over, superiore, fig. 10) a sinistra, posizione contrassegnata
dalla lettera U (U come under, inferiore, fig. 11) il fucile sparerà prima la cartuccia contenuta nella prima canna (inferiore) mentre azionando il bottone da sinistra verso destra, il
fucile sparerà prima la cartuccia contenuta nella seconda canna (superiore). Dopo aver
esploso il primo colpo rilasciate completamente il grilletto per preparare il fucile al colpo
10
seguente. Risulterà dannoso ed inutile a questo punto manovrare il selettore in quanto
l’arma è automaticamente pronta all’esplosione del secondo colpo.
ARMI PROVVISTE DI ESTRATTORI AUTOMATICI
Nel caso in cui il vostro fucile sia dotato di estrattori automatici (Fig. 12) essi provvederanno, al momento dell’apertura dell’arma, ad espellere le munizioni esplose. Gli estrattori faranno fuori uscire solamente le munizione esplose, quindi nel caso abbiate caricato l’arma con due cartucce ed esploso un sol colpo, verrà espulsa una sola cartuccia,
quella sparata.
AVVERTENZA
Quando effettuate l’operazione di apertura del fucile per espellere le munizioni fate molta
attenzione a non puntare la bascula ne verso di voi ne verso nessun altra persona a voi
vicina; anche se la forza di uscita delle cartucce non è molto elevata essa può comunque
essere sufficiente a causare danni agli occhi.
SCARICAMENTO DELL’ARMA
Assicuratevi che l’arma sia puntata verso un luogo sicuro, che la sicura sia inserita (posizione S) e quindi aprite la bascula per togliere manualmente sia le munizioni esplose che
quelle inesplose. Nel caso il vostro fucile sia provvisto di estrattori automatici essi provvederanno all’espulsione automatica dalle camere di scoppio solo delle munizioni esplose; quelle inesplose vanno estratte manualmente
AVVERTENZA
Prima di deporre l’arma o di caricarla in un veicolo assicuratevi sempre che sia scarica e
controllate che le camere di scoppio risultino vuote.
11
IL FUCILE NON SPARA? COSA FARE
1. in caso di sparo a vuoto (premendo il grilletto la cartuccia non esplode) rimanete
fermi in posizione di tiro per almeno 30 secondi poi inserite la sicura (posizione S) e
dopo aver aperto il fucile togliete la cartuccia che ha sparato a vuoto.
2. in caso di detonazione debole o di rumore insolito può essersi verificata la rara possibilità che la cartuccia abbia una carica insufficiente. Questo caso è molto raro nel
caso di munizioni nuove, integre e prodotte a norma CIP. Se si verificasse questa
situazione seguite queste semplici regole:
scaricate il fucile e verificate che la camera di scoppio e le canne non siano ostruite
dal residuo di borra della cartuccia. Effettuata questa operazione visionando l’arma
dalla parte della bascula e non dal vivo di volata delle canne. Qualora ci fossero dei
residui potranno essere facilmente rimossi mediante una bacchetta per pulizia.
Qualora non fosse possibile rimuovere il residuo mediante questa semplice operazione rivolgetevi ad un riparatore autorizzato.
PULIZIA DEL VOSTRO FUCILE
AVVERTENZE
•
Assicuratevi che il fucile sia completamente scarico ed effettuate l’apertura della
bascula prima di procedere con le operazioni di pulizia dell’arma.
•
Seguite attentamente le istruzioni riportate nel capitolo “scaricamento dell’arma”
prima di procedere alla pulizia del vostro fucile. Non tentate mai in nessun modo di
pulire un’arma carica.
•
Una precisa e regolare pulizia allungherà la vita ed il corretto funzionamento della
vostra arma; tale operazione deve essere effettuata accuratamente specialmente nel
caso in cui il fucile venga a contatto con elementi liquidi o se dei materiali esterni si
introducono nella bascula o nelle canne.
•
I materiali necessari per la pulizia dell’anima e delle camere da scoppio della vostra
arma sono: un solvente in polvere, alcune pezze, uno scovolino ed uno spazzolino
di bronzo appropriato al diametro delle camere di scoppio. Utilizzate un solvente in
grado di eliminare gli eventuali segni lasciati dall’involucro delle cartucce in fase di
12
•
•
•
sparo. Non utilizzate mai in nessun caso uno spazzolino d’acciaio in quanto potrebbe rovinare le anime delle canne.
Imbevete una pezzolina con il solvente, inseritela nella spazzolina e fatela scorrere
all’interno delle camere e per tutta la lunghezza delle canne; attendete alcuni minuti in maniera tale che il solvente possa agire. Ripassate con lo scovolino di bronzo e
poi con delle pezzoline pulite che dovranno essere cambiate fino a che non usciranno perfettamente pulite. Come ultima operazione passare una pezzolina imbevuta in
maniera molto leggera di olio per armi onde evitare la formazione di ruggine all’interno delle canne e delle camere di scoppio.
Per la pulizia delle parti esterne utilizzate un panno morbido; servirà a togliere
impronte digitali ed eventuali tracce di umidità. Se notate dello sporco in incavi o fessure difficili da raggiungere (per esempio le parti zigrinate della calciatura) può
esservi d’aiuto un vecchio spazzolino da denti. Le parti metalliche esterne e la
bascula vanno trattate con un lieve strato di olio per armi (non esagerate mai con le
quantità). Una buona manutenzione dell’arma richiede anche l’applicazione almeno
due volte l’anno di un modico strato di grasso per armi sui punti che contribuiscono
all’apertura dell’arma (bascula, perni e croce, chiusure). Questo renderà più agevole il movimento di apertura e chiusura dell’arma.
Se il legno del vostro calcio è finito ad olio, cospargetelo di un leggero strato di olio
di lino. Lo manterrete in buono stato e ne proteggerete la bellezza.
COME PROCEDERE ALLO SMONTAGGIO DELL’ARMA
Se conservate o trasportate l’arma dovrete procedere allo smontaggio. Seguite questi
semplici passi:
1. posizionate la sicura in posizione S.
2. controllate che il fucile non sia carico.
3. smontate l’astina tirando la leva di sblocco (auget) posizionato al suo centro (fig. 13).
Per effettuare questa semplice operazione tirate in avanti la levetta dell’auget ed in contemporanea allontanate dalle canne la parte superiore dell’astina. Nei modelli con selettore sul grilletto e con gli estrattori automatici l’astina deve essere allontanata dalle canne
13
sfilandola verso l’alto per evitare il contatto con la parte finale degli estrattori automatici.
4. dopo aver tolto l’astina procedete allo smontaggio della bascula dalle canne; per
effettuare questa operazione spostate la chiave di apertura verso destra per aprire l’arma. A questo punto le canne, essendo prive dell’astina, si potranno sfilare dalla bascula.
5. seguire queste indicazioni in maniera opposta per procedere al montaggio dell’arma.
In fase di rimontaggio dell’astina riaprite la leva dell’auget e con una lieve pressione dell’astina contro le canne, questa dovrebbe riagganciarsi senza nessun problema.
N.B.: L’unico smontaggio che è consigliabile effettuare senza la supervisione di un’armaiolo o della ditta costruttrice è quello sopra descritto.
Quando effettuate la manutenzione del vostro fucile usare solo una minima quantità di
olio leggero per armi in quanto, in caso di gelo, è possibile che esso possa rallentare il
funzionamento del vostro fucile.
Pulite sempre la vostra arma con un panno morbido qualora si presentino delle goccioline di condensa o nel caso in cui ci sia un’eccessiva umidità nel luogo in cui vi trovate; eviterete la formazione della ruggine. Utilizzate un panno leggermente imbevuto d’olio leggero per armi per pulire le parti metalliche esterne.
In caso di utilizzo ridotto dell’arma, prima di deporla in un luogo asciutto e possibilmente
arieggiato per parecchio tempo, passate sulla bascula e sulle canne uno straccio leggermente imbevuto con dell’olio leggero per armi. Non conservate mai il vostro fucile all’interno di una valigetta se non per il trasporto. Riponete l’arma sempre scarica.
UTILIZZO DI MUNIZIONAMENTO CON PALLINI D’ACCIAIO (STEEL SHOT)
Solo per fucili che presentano sul manicotto il simbolo del giglio francese (Fig. 1)
e che quindi sono stati testati per l’utilizzo di tali munizioni.
Le munizioni specifiche Steel Shot di buona qualità hanno i pallini d’acciaio ricoperti da
uno strato di plastica e quindi, anche se più duri dei normali pallini di piombo, non danneggiano l’interno delle canne. Tuttavia, se si utilizza una strozzatura troppo stretta (è
consigliabile non scendere mai al di sotto della Modified ***) è possibile che lo strozzato14
re interno o la canna possano essere danneggiati.
Nel caso in cui vengano utilizzate delle munizioni Steel Shot con strozzature non
idonee quali la Full * o la Improved Modified ** la ditta produttrice riterrà nulla la
garanzia.
L’ESCLUSIVO SISTEMA DI STROZZATORI INTERCAMBIABILI
Il set di strozzatori intercambiabili consente di modificare in maniera veloce e sicura le
strozzature del vostro fucile in modo tale da consentirvi un rapido adattamento alle condizioni di tiro che potrebbero modificarsi nel corso dell’utilizzo della vostra arma.
I kit di strozzatori intercambiabili di cui sono dotate le nostre armi nei calibri 12-16-20-28
variano da tre a cinque o più pezzi a scomparsa o esterni (in questo caso si avrà un’aumento della lunghezza della canna) a seconda del modello da voi acquistato. Nel Kit è
compresa anche la chiave per il montaggio e lo smontaggio degli strozzatori. Effettuate
sempre una leggera oliatura del filetto ogni qualvolta montate uno strozzatore all’interno
della canna.
INDIVIDUAZIONE DELLO STROZZATORE
Riconoscere la strozzatura associata a ciascun strozzatore è molto semplice: ogni strozzatore presenta delle tacche facilmente identificabili, anche in caso di scarsa luce, le quali
sono riconducibili alle strozzature presenti nella tabelle sotto elencata.
NUMERO DI TACCHE
PRESENTI SUL BORDO
SUPERIORE DELLO
STROZZATORE
STROZZATURA
STROZZATURA
STROZZATURA
I
*
Full
1/1
II
**
Improved Modified
3/4
III
***
Modified
1/2
IIII
****
Improved cylinder
1/4
IIIII
Skeet
Skeet
Skeet
Nessuna tacca
CL
Cylinder
0/0
15
AVVERTENZA:
Scaricate sempre l’arma ed aprite la bascula prima di effettuare il cambio degli strozzatori. Qualora la vostra arma sia dotata di strozzatori intercambiabili NON effettuate mai in
nessun caso uno sparo senza aver montato lo strozzatore; potreste rovinare sia le canne
che la filettatura presente al loro interno. Non utilizzate mai uno strozzatore danneggiato;
in caso di necessità potete acquistare presso i rivenditori autorizzati o dal costruttore gli
strozzatori di ricambio. Controllate sempre che lo strozzatore sia bene avvitato all’interno
della canna.
REGOLE FONDAMENTALI PER IL POSSESSORE DEI NOSTRI FUCILI SOVRAPPOSTI
Le regole fondamentali da seguire sono tre; la mancata osservazione di almeno una di
queste è spesso causa di incidenti:
1. puntate l’arma sempre in una direzione sicura.
2. maneggiate il vostro fucile come se fosse sempre carico.
3. deporre l’arma in un posto sicuro e a norma quando non viene utilizzata.
IMPORTANTISSIMO: NON GETTATE QUESTO MANUALE
Conservatelo sempre con cura assieme alla vostra arma e, in caso di vendita, consegnatelo al nuovo proprietario.
CERTIFICATO
Si certifica che quest’arma è stata sottoposta alla prova obbligatoria prevista dalla normativa C.I.P. (Commissione Internazionale Permanente) presso il Banco Nazionale Delle
Armi da fuoco portatili di Gardone Valtrompia (Brescia). Sulla bascula e sulla canna di
questo fucile trovate impressi tutti i marchi prescritti di prova, il diametro e la lunghezza
della camera di scoppio e, a 23 cm dalla culatta, il diametro delle canne.
16
•
•
•
•
•
•
•
*
OVER AND UNDER SHOTGUNS
OWNER’S MANUAL
This owner’s manual applies to all hunting, sporting and competition models.
Read and understand this owner’s manual fully, before using your firearm.
IMPORTANT SAFETY INFORMATION
Even if you are not a beginner and you think you know firearms very well, don’t take
anything for granted and follow the safety rules outlined in this manual very carefully.
In order to use a firearm safely, proper training, discipline and caution are needed.
Firearms are by their own nature deadly weapons, and if carelessly handled can
cause death or serious injury.
Accidents are hardly ever caused by malfunctioning of a firearm. Accidents occur
when either experienced shooters or beginners fail to obey basic safety rules.
Principles of gun safety need to be reiterated. Read and understand the instructions
in this owner’s manual over and over again until they become habits you will never
forget.
Teach other members of your family, especially children, safe gun handling.
Whenever possible attend a “Hunter safety” course or “Firearms safety” course at
your local dealer or gun club.
The owner of a firearm is ultimately responsible for it (24 hours a day). A firearm
needs to be stored and used safely and the owner needs to follow all the safety procedures outlined in this manual. Carelessness and ignorance cannot be tolerated
when handling a firearm. The owner will always be fully responsible for firearms
safety and will not be able to assign this responsability.
PLEASE NOTE: A firearm cannot assure an “accident-free” performance. It is simply
a tool which responds to its owner’s actions whether good or bad. A cautious owner
alone, who is always careful and never forgets that a moment of negligence can
result in a tragedy, is the ultimate safety mechanism.
17
GETTING TO KNOW YOUR FIREARM
Even if at first sight different firearm models might look the same, that is never the case.
As a matter of fact the design, function and operation is unique to every firearm model.
Study this manual very carefully. Before handling and mounting your firearm, learn how it
works and if other people want to use it, tell them to do the same. Every firearm should
be provided with an owner’s manual. If your firearm is not accompanied by one, please
contact the manufacturer and have them send one to you. If, for any reason, you can not
find an owner’s manual, please go to a library and read one of the books written about
old and discontinued firearms.
ACCIDENTS WILL NOT OCCUR, IF YOU KNOW YOUR FIREARM.
Even if our firearm has been designed and crafted to be as safe as possible, it needs to
be used properly. Like any other firearm, it can not tell the difference between a fool or a
wise user and it can become extremely dangerous if the following instructions are not followed:
READ CAREFULLY
1. Whether loaded or unloaded, always keep the firearm pointed in a safe direction.
2. Always treat every firearm as if it was loaded.
3. Go to a competent instructor to take shooting lessons before starting to use your
firearm.
4. No safety mechanism is a substitute for common sense and proper gun handling.
5. Always keep your fingers off the trigger until ready to shoot.
6. Always make sure your firearm is unloaded before cleaning it, storing it or replacing
the choke tubes. Never rest a loaded firearm against a wall, it could fall and fire accidentally.
7. Never transport a loaded firearm.
8. Never bring a loaded firearm into a building.
9. Never leave a firearm, either loaded or unloaded, unattented.
10. Always store firearms and ammunition in separate, locked containers so that they are
18
secure and not accessible to children or inexperienced people.
11. Never test the safety by pulling the trigger unless you are absolutely sure your
firearm is unloaded and pointed in a safe direction.
12. Always know your target and what is beyond it before shooting.
13. Never use alcohol or drugs before or during handling of a gun.
14. Never pull a firearm towards you by the muzzle. Always unload your gun before climbing a fence or crossing any obstacle.
15. Never load or unload firearms indoors.
16. When loading and unloading always point the muzzle of your firearm in a safe direction.
17. If you pull the trigger but your firearm does not fire, keep it pointed in a safe direction, wait 30 seconds and engage the safety device. Then open the action carefully
and remove the unfired shell manually.
18. Never shoot against hard, flat surfaces or water as the shot might ricochet.
19. When receiving a firearm always check to make sure it is unloaded.
20. Never point a gun at anyone, or position any part of your body over the end of the
barrels. If you follow this safety procedure, no harm will result from an accidental discharge.
21. Always use the correct ammunition of the right gauge and length.
22. Never place 20 gauge shells in 12 gauge chambers. These shells will disappear from
sight down the bore and create a dangerous barrel obstruction. If a 20ga shotgun
shell is in the bore, do not attempt to shoot it out by using another shotgun shell in
12ga. This will generate excessive pressure and cause serious personal injury or
death as well as destroying the firearm.
23. Always keep the safety ON until ready to shoot.
24. Never dry fire as that might damage your firearm.
25. If you suspect there might be some obstruction in the barrels, make sure that the
firearm is unloaded. After making sure the firearm is completely empty, look down the
whole length of the barrels and not only through the chambers.
26. Your firearm is a precision instrument and needs to be treated as such.
19
27. We only reccomend the use of new, clean and commercial factory loaded ammunition.
28. Do not try to change the trigger pull weight as you might change the hammer set up
and cause accidental discharge. Unauthorized adjustments or parts replacement will
void your service warranty.
29. If you want to use “Steel Shot” ammunition, please make sure the monoblock of your
firearm shows the “French Lily” symbol which means that your firearm was designed
to use this kind of ammunition (see figure 1), and never use steel shot through chokes tighter than 1/2 choke.
IF YOU HAVE ANY QUESTIONS CONCERNING THE PERFORMANCE OR SERVICING OF YOUR FIREARM, PLEASE CONTACT US.
WARNING
Although our firearms have been designed, precision manufactured and assembled to
perform faultlessly, there is always the possibility of damage or the need of servicing
and/or parts replacement. Remember that unauthorized adjustments or parts replacement will void your service warranty. As our guns are precision instrument and replacement parts require proper installation, return the gun to the manufacturer or to an authorized gunsmith if it needs servicing. Unauthorized servicing will void your warranty.
EYE AND EAR PROTECTIONS (see figure 2)
Always wear eye and ear protections when shooting and encourage people close to you
to do the same. If you do not wear eye protections, your eyes might be damaged by powder particles, gas, lubricant, carbon residues, metallic particles or similar debris that your
firearm can release during normal operation. Repeated exposure to shooting noise can
cause permanent hearing loss.
20
AMMUNITION
1. Use only clean, original, commercial factory loaded ammunition that comply with CIP
standards (or similar standards in other countries). Never use damaged, deformed, corroded, dirty or wet ammunition. Never spray detergent or lubricant oil on cartridges or
areas cartridges will get in touch with as that might cause potentially dangerous ammunition malfunctioning. Use only ammunition of the proper gauge and shell length.
2. We will not be responsible in any manner whatsoever for malfunctioning of the
firearm, phisical injury or property damage resulting from defective, improper, handloaded or re-loaded ammunition. Improperly re-loaded ammunition are very dangerous and can destroy your firearm and cause serious personal injury or death to the
shooter and people standing close to him/her. Always use ammunition that complies
with CIP standards or similar standards in other countries.
3. Excessive pressure inside the chambers and the barrels can damage the firearm
and cause serious personal injury to you and people standing close to you. This
excessive pressure can be generated by the use of improperly loaded ammunition or
too much powder. A barrel obstruction can also increase pressure and cause damage to your gun and injury to you and others. The use of a damaged, dirty or corroded cartridge can make the cartridge explode and the consequent release of high
pressure gas can cause damage to the gun and personal injury to you and others.
STOP USING YOUR FIREARM IMMEDIATELY.
4. If
you find it difficult to insert cartridges in the chambers
you encounter resistance in chembering a cartridge
you experience a light load
the gun does not fire
the gun does not eject fired shells
there is any evidence of unfired powder in the mechanism
For your safety and the safety of others and to avoid damage to the gun, beware of
barrel obstructions. An obstruction such as mud, snow, dirt or other foreign objects
21
•
•
•
can increase pressure, cause damage to your gun, property damage and injury to
you and to others. Before checking the barrel for an obstruction, make sure the gun
is empty and then look down the barrels (do not stop at the chambers). IF AN
OBSTRUCTION IS DETECTED IN THE BORE, NEVER TRY TO SHOOT IT OUR BY
USING A NEW CARTRIDGE. THIS CAN GENERATE EXCESSIVE PRESSURE IN
THE CHAMBERS, DAMAGE THE FIREARM AND CAUSE SERIOUS PERSONAL
INJURY.
The presence of any foreign objects on the cartridge can impede its complete chambering and cause it to burst upon firing. The same is true for damaged or deformed
cartridges which can damage the firearm and cause property damage and serious
personal injury.
Never lubricate ammunition and always check to make sure that the chambers are
clean and dry before shooting. Upon firing oil could cause some friction and a stress
similar to that caused by excessive pressure.
Lubricate your firearm parts lightly. Overlubricating, especially with spray, can damage your cartridges and cause misfires. Some very penetrative lubricant can get in
touch with the cartridge and deteriorate the powder which, on firing, might not ignite. If only the primer ignites, the wad might get stuck into the barrels.
WARNING
Discharging firearms in poorly ventilated areas, cleaning firearms or handling
ammunition may result in exposure to lead and other substances known to cause
birth defects, reproductive problems and other serious physical injury. Have adequante ventilation at all times. Wash hands thoroughly after exposure.
SAFETY OPERATION
WARNING
Prior to firing practice engaging the safety mechanism of your unloaded firearm in order
to fully understand how it functions. The safety mechanism is located on the action tang
in the back of the top lever. It is rectangular and it slides back and forth. To engage the
22
safety mechanism, move the safety rearward towards the butt. When it is in the correct
“safe” position you will see the letter “S” (see figure 3) fully exposed on the tang which
means that even if you pull the trigger, the firearm will not shoot.
To take the gun off safe, push the safety forward until it covers the letter “S” (see figure 4).
THE GUN IS NOW OFF SAFE and it is ready to fire as soon as the trigger is pulled.
WARNING
The safety on your firearm may not be automatic. In this case it does not engage automatically upon opening your firearm, but it needs to be engaged manually. Never position
the safety switch between the ON and the OFF positions. Move the safety all the way forward or all the way back, otherwise you will never know if the safety is On or OFF. If you
are forced to carry a loaded firearm (which should never be done), make sure it is ON
safety. When you are ready to fire, you can quickly disengage the safety. Remember to
take the gun off safe only when you are ready to fire.
WARNING
Never disassemble the safety mechanism on your firearm which has been perfectly fitted
and tested. Never completely trust any safety mechanism. While your firearm is equipped
with an effective, well designed safety mechanism, no safety mechanism is a substitute
for proper gun handling. Never use a firearm if the safety mechanism does not work.
LOADING WARNING
Never try to load your firearm with ammunition which does not meet the cartridge designation marked inside the action. This marking can be seen only when the firearm is
open.
WARNING
•
Before loading the firearm, always check to make sure that the barrels are free from
oil, grease or any other obstruction. Always make sure the chambers are empty and
the safety is ON.
23
•
•
•
When loading, point the firearm in a safe direction. Unlock the action by pushing the
top lever completely to the right (see figure 6) which should be possible exerting only
a very light pressure. Open the action by putting downward pressure on the barrels.
Insert one or two cartridges of the proper gauge in the chambers.
Keeping your finger off the trigger, close the action by lifting the stock up to the barrels, shile keeping the barrels pointing safely at the ground until the top lever snaps
back into the locked position. Once again this operation should not require excessive pressure and the top lever should easily snap into locked position (see figure 7).
If that does not happen, do not shoot as the firearm is not completely closed and
serious property damage and personal injury might result.
Closing the firearm automatically cocks the firing pins of both barrels. Keep the safety
in the rear “ON” (“S”) position until you are ready to fire.
HOW TO FIRE
Select your target, push the safety all the way forward in the "OFF" position, aim and pull
the trigger. If your firearm is provided with a non selective single trigger, the bottom barrel will fire first and the top barrel will fire after you pull trigger for the second time. If your
firearms is provided with a double trigger, the bottom barrel will fire by pulling the front
trigger (right) while the top barrel will fire by pulling the rear one (left). If you have not fired
both barrels, put the safety in the rear "ON" ("S") position until you are ready to fire again.
FIREARMS PROVIDED WITH SINGLE SELECTIVE TRIGGER AND BARREL SELECTOR ON THE SAFETY SLIDE: THE SEQUENCE OF BARREL FIRING
The safety mechanism on your firearm functions as both a safety and a barrel selector.
The barrel selector consists of a checkered button in the middle of the safety. Pushing the
button to the right (see figure 8), exposing one red dot, will cause the bottom barrel to
fire first. Pushing the button to the left (see figure 9), exposing two red dots, will cause
the top barrel to fire first. After firing the first time, release the trigger completely to prepare the firearm to fire again. Moving the barrel selector after fireing the first barel will
make no effect, and could cause danage; the shotgun will automaticaly select the second
24
barrel when the trigger is released after the first barrel has fired.
FIREARMS PROVIDED WITH SINGLE SELECTIVE TRIGGER AND BARREL SELECTOR ON THE TRIGGER: THE SEQUENCE OF BARREL FIRING
Pushing the selector positioned on the trigger from right (position marked by the letter O
like over in “over and under”, fig. 10) to left (position marked by the letter U like under in
“over and under” fig. 11) the shotgun will fire the bottom barrel first. Pushing the selector
from left to right, the shotgun will fire the top barrel first. After firing the first shot, completely release the trigger to get the shotgun ready to fire the second shot. Moving the selector at this point would damage the shotgun which gets automatically ready to fire the
second shot.
FIREARMS PROVIDED WITH EJECTORS
If your shotgun is provided with automatic ejectors (see figure 10), they will automatically
eject fired shells upon opening the gun. Ejectors eject only fired shells. Therefore if you
have chambered two shells but fired only one, only the fired shell will be ejected.
WARNING
When you open the firearm to eject fired shells, make sure not to point the rear of the
action towards you or any other person as the fired shells are ejected with enough strengh
to cause possible eye injury.
UNLOADING
To manually remove either fired or unfired shells, point the firearm in a safe direction, set
the safety switch to “ON” (“S”) and then open the action. If your firearm is provided with
automatic ejectors, fired shells only will be ejected automatically while unfired ones will
have to be removed manually.
WARNING
Never store or transport a loaded firearm.
25
WHAT TO DO IF THE FIREARM DOES NOT FIRE
1. If you pull the trigger but the gun does not fire, keep it pointed in a safe direction and
wait 30 seconds. Then set the safety switch to the “ON” (“S”) position and remove the
loaded shotshell.
2. If you experience a light or “squib” load, you might have used an underpowered cartridge. That is extremely unusual if the ammunition is new, fresh and factory-loaded
in compliance with CIP standards, but if that is the case proceed as follows:
•
As the wad might still be in the barrel, unload the firearm and look down both barrels
from the breech end (not from the muzzle end) to see if there is any obstruction. If
you can not remove the obstruction with a cleaning rod, please contact a trained gunsmith.
CLEANING WARNING
•
Be sure your gun is unloaded
•
Read the unloading instructions carefully before cleaning a firearm. Never try to
clean a loaded gun
•
If you want to extend your firearm life, you should disassemble, clean carefully and
re-lubricate it after each use especially when it gets wet or when foreign objects enter
barrels or action
•
After each use, run a bronze brush of the correct gauge through the barrels from the
breech end to remove any powder residue. If any evidence of powder, lead or plastic
remains, use a high quality bore cleaner with a bronze brush. Then remove the loosened fouling with gun bore patches. Finally apply a thin coat of high quality gun oil
preservative on the entire bore surface in order to prevent the bore and the chambers from rusting. Never use a steel brush as it might damage the bores.
•
Remove finger prints and moisture from external parts with a clean cloth. If you notice any accumulation of dirt or other debris in hard-to-reach areas (e.g. the stock
checkering), you might find a toothbrush of help. Apply a thin coat of gun oil on the
action and all metal surfaces. Wipe off any excess with a clean cloth (do not overlubricate any part of your gun). Twice a year place a thin film of gun grease around the
26
•
hinge pins, iron fore-end and the curved frame surfaces that mate with the forend in
order to help the opening and closing of the gun.
If your gun is provided with an oil-polished stock, coat it with a thin film of linseed oil
which will keep it in perfect conditions and preserve its beauty.
TO DISASSEMBLE
If you wish to disassemble the gun for storage or transport, please proceed as described
in details below:
•
Push the safety in the rear “ON” (S) position
•
Be sure that the shotgun is unloaded
•
Pull the fore-end release lever to unlock and remove the fore-end (fig. 13). In shotguns provided with barrel selector on the trigger and automatic ejectors, the fore-end
must be removed by moving it towards the barrels to prevent it from touching the end
of the automatic ejectors.
•
Unlock the action by pushing the top lever to the right and open it by putting downward pressure to the barrels
•
Reverse the procedure to re-assemble the gun. Push the fore-end lightly towards the
barrels. It should snap easily into place. Do not put excessive pressure.
NOTE: Any other disassembling operation should be carried out by a trained gunsmith or by the manufacturer.
When you service your firearm, use only very small quantities of light gun oil. When
temperatures go below 0º C it might freeze and affect the performance of the gun.
Always clean your firearm with a soft cloth if it shows any condensation to prevent
rusting.
Wipe the entire outer surface of your gun with a cloth lightly soaked in oil.
Before returning your gun to its dry and possibly ventilated storage place for long
periods of time, wipe action and barrels with a cloth lightly soaked in oil. Never
store your firearm in a case unless you need to transport it.
27
STEEL SHOT
This ammunition can be used only with shotguns that have been specifically tested and
show the “French Lily” symbol (see figure 1) on the monoblock.
Good quality Steel Shot ammunition consists of steel shots covered by plastic and, even
if they are sensibly harder than lead, they do not damage the barrel bores. However if the
gun comes with a very tight choke (it is suggested never to go below a Modified *** 1/2
choke constriction), the choke tube or the barrel might get damaged. The use of Steel
Shot ammunition with unsuitable chokes (like Full * or Improved Modified **) will void the
service warranty.
EXCLUSIVE SYSTEM OF INTERCHANGEABLE CHOKES
A set of interchangeable chokes make it possible to change the choke on your gun easily
and safely in order to adapt to different shooting conditions. Our 12ga/16ga/20ga and
28ga shotguns can be provided with sets of three or five interchangeable choke tubes,
either flush or extended (which make the barrel longer) depending on the model. The set
comes with a wrench to facilitate the insertion of the choke tubes. Whenever you insert a
different choke put a light coat of oil on its threads.
HOW TO IDENTIFY THE CHOKE TUBE
The choke constrictions can be easily identified even in poor light by the notches on their
exposed ends.
Number of notches on
the top edge of the choke
tube
Choke
Constriction
Choke
Constriction
Choke
Constriction
I
*
Full
1/1
II
**
Improved Modified
3/4
III
***
Modified
1/2
IIII
****
Improved cylinder
1/4
IIIII
Skeet
Skeet
Skeet
No notch
CL
Cylinder
0/0
28
WARNING
Before removing, inserting or changing choke tubes, always check to make sure that
the gun is unloaded and the action is open. If your gun comes with interchangeable
chokes, never fire without having the choke tubes completely installed. Doing so you
could damage the barrels and the internal threads. Never use a damaged choke tube.
If necessary buy spare choke tubes from authorized dealers or from the manufacturer. Always make sure that the choke is firmly screwed into the barrel.
BASIC RULES FOR THE OWNER OF OUR SIDE BY SIDE SHOTGUNS
There are three basic rules to follow. Failure to follow one of these rules cause most
firearm related accidents:
1. Always keep the gun pointed in a safe direction
2. Treat your gun as if it was always loaded
3. Always store your unloaded gun locked in a safe place when not in use
VERY IMPORTANT
Do not discard. Keep this manual with your firearm. Upon change of ownership,
tranfer this manual with the firearm.
CERTIFICATE
Hereby we certify that this shotgun has been tested at the National Proof House in
Gardone V.T in compliance with C.I.P (*Permanent International Committee) standards. The action and barrels of this shotgun show all proof marks required, chamber length and diameter and barrel diameter at 23 cm from the breech.
29
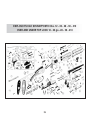
Esploso fucile sovrapposto con chiusura su ramponi inferiori
cal. 20-28-36-410
≥
Over and Under Bottom Lock Exploded View 20-28-36-410 ga
30
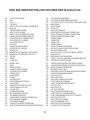
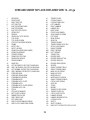
ESPLOSO FUCILE SOVRAPPOSTO CON CHIUSURA SU RAMPONI INFERIORI
CAL. 20-28-36-410
200
201
202
203
204
205
206
207
208
209
210
211
212
213
214
215
216
217N
217E
218
219
220
221
222
223
224
225
226
229
230
231
232
233
234
235
236
237
238
239
240
241
242
243
244
2 VITE CALCIOLO
CALCIOLO
CALCIO
CHIAVE O MANETTA
SICURA BIGRILLO
PERNO LEVE SCATTO
VITE UNIONE SOTTOGUARDIA BASCULA
MOLLA PER SICURA
VITE FERMO MOLLA SICURA
PIOLO GUIDAMOLLA RICHIAMO CANE
MOLLA PER CILINDRO FERMO CHIAVE
CILINDRO FERMO CHIAVE
PIOLO FERMO CHIAVE
BASCULA
2 VITE FERMO PERNO CERNIERA
VITE FERMO ESTRATTORE NORMALE
ESTRATTORE NORMALE
MANICOTTO NORMALE
MANICOTTO EJECTOR
BINDELLA SUPERIORE
TENONE
2 BINDELLA LATERALE
TUBO
MIRINO
PORTACINGHIA PER CANNA
4 VITINE PER PORTACINGHIA CANNA
2 VITE GANCIO CROCE
AUGET
CROCE
ASTINA
NASETTO D'ARMAMENTO
VITE FISSAGGIO CROCE
2 PERNI CERNIERA
SPINA FERMO CHIAVE-PERCUSSORE
SPINA ELASTICA PER SOTTOGUARDIA
TASSELLO PER CHIUSURA
2 MOLLA PERCUSSORE
PERCUSSORE SINISTRO
PERCUSSORE DESTRO
2 ASTA PER LEVA DI SCATTO BIRILLO
CANE SINISTRO
CANE DESTRO
2 LEVA DI SCATTO BIRILLO
MOLLA RICHIAMO LEVA DI SCATTO BIRILLO
245
246
247
248
249
250
251
252
253
254
255
256
257
258
259
260
261
262
263
264
265
266
267
268
269
270
271
277
278
279
280
281
282
283
284
285
286
287
288
289
290
291
292
293
31
MOLLA RICHIAMO CHIAVE
TUBETTO GUIDAMOLLA RICHIAMO CHIAVE
VITE FERMO TUBETTO GUIDAMOLLA RICHIAMO CHIAVE
MOLLA DEL CANE
PORTACINGHIE DEL CALCIO
TIRANTE DEL CALCIO
RONDELLA PER TIRANTE
GRILLETTO SINISTRO BIRILLO
GRILLETTO DESTRO BIRILLO
VITE FISSAGGIO GUARDIA
GUARDIA
PERNO GRILLETTO
PERNO GRILLETTO
SOTTOGUARDIA
GUIDAMOLLA ARMAMENTO NORMALE
MOLLA RICHIAMO LEVA ARMAMENTO NORMALE
LEVA ARMAMENTO NORMALE
SICURA SELETTIVA PER
BILANCERE
MOLLA RICHIAMO BILANCERE
2 SPINA PER MOLLA RICHIAMO BILANCERE E SICURA
GRILLETTO MONOGRILLO
MOLLA RECUPERO GRILLETTO MONOGRILLO
2 MOLLA RICHIAMO LEVA DI SCATTO MONOGRILLO
LEVA DI SCATTO MONOGRILLO
ASTA PER SICURA AUTOMATICA
SICURA FISSA PER MONOGRILLO NON SELETTIVO
2 VITE TENUTA CARTELLA
CARTELLA SINISTRA
CARTELLA DESTRA
VITE PASSANTE UNIONE CARTELLE
2 MOLLA RICHIAMO ESTRATTORE EJECTOR
2 GUIDAMOLLA RICHIAMO ESTRATTORE EJECTOR
ESTRATTORE EJECTOR SINISTRO
ESTRATTORE EJECTOR DESTRO
PIASTRINO FERMO ESTRATTORE EJECTOR SINISTRO
PIASTRINO AGGANCIO ESTRATTORE EJECTOR DESTRO
2 MOLLA PER CILINDRO FERMO PIASTRINO EJECTOR
2 CILINDRO FERMO PIASTRINO AGGANCIO EJECTOR
PIASTRINO FERMO ESTRATTORE EJECTOR DESTRO
2 VITE PIASTRINO FERMO ESTRATTORE EJECTOR
PIASTRINO AGGANCIO ESTRATTORE EJECTOR
LEVA ARMAMENTO EJECTOR DESTRA
LEVA ARMAMENTO EJECTOR SINISTRA
OVER AND UNDER BOTTOM LOCK EXPLODED VIEW 20-28-36-410 GA
200
201
202
203
204
205
206
207
208
209
210
211
212
213
214
215
216
217N
217E
218
219
220
221
222
223
224
225
226
229
230
231
232
233
234
235
236
237
238
239
240
241
242
243
244
2 STOCK PAD SCREWS
PAD
STOCK
TOP LEVER
SAFETY CATCH FOR DOUBLE TRIGGER GUN
SEAR PIN
TRIGGER GUARD SCREW
SAFETY CATCH SPRING
SAFETY CATCH SPRING STOP SCREW
HAMMER RETURN SPRING GUIDE PIN
TOP LEVER STOP CYLINDER SPRING
TOP LEVER STOP CYLINDER
TOP LEVER STOP PIN
RECEIVER
2 HINGE PIN STOP SCREWS
EXTRACTOR STOP SCREW
EXTRACTOR
MONOBLOC FOR GUNS WITH EXTRACTORS
MONOBLOC FOR GUNS WITH EJECTORS
TOP RIB
TENON
2 SIDE RIBS
BARREL TUBE
SIGHT
BARREL SWIVELS
4 BARREL SWIVEL SCREWS
2 FOREND CATCH SCREWS
FOREND CATCH
IRON FOREND
FOREND
COCKING HOOK
IRON FOREND WOOD SCREW
2 HINGE PINS
FIRING PIN-TOP LEVER STOP PIN
TRIGGER GUARD LOCK PIN
LOCKING BOLT
2 FIRING PIN SPRINGS
BOTTOM BARREL FIRING PIN
TOP BARREL FIRING PIN
2 SEAR BARS FOR DOUBLE TRIGGER GUN
BOTTOM BARREL HAMMER
TOP BARREL HAMMER
2 SEARS FOR DOUBLE TRIGGER GUN
SEAR RETURN SPRING FOR DOUBLE TRIGGER GUN
245
246
247
248
249
250
251
252
253
254
255
256
257
258
259
260
261
262
263
264
265
266
267
268
269
270
271
277
278
279
280
281
282
283
284
285
286
287
288
289
290
291
292
293
32
TOP LEVER RETURN SPRING
TOP LEVER RETURN SPRING GUIDE TUBE
STOP SCREW FOR TOP LEVER RETURN SPRING GUIDE TUBE
MAIN SPRING
STOCK SWIVEL
STOCK BOLT
STOCK BOLT WASHER
REAR TRIGGER FOR DOUBLE TRIGGER GUN
FRONT TRIGGER FOR DOUBLE TRIGGER GUN
TRIGGER GUARD RETAINING SCREW
TRIGGER GUARD
TRIGGER PIN
TRIGGER PIN
TRIGGER GUARD
ACTION COCKING SPRING GUIDE
ACTION COCKING LEVER RETURN SPRING
ACTION COCKING LEVER
SELECTIVE SAFETY CATCH FOR SINGLE TRIGGER
INERTIA BLOCK
INERTIA BLOCK RETURN SPRING
2 SAFETY CATCH AND INERTIA BLOCK RETURN SPRING PINS
TRIGGER FOR SINGLE TRIGGER
TRIGGER RETURN SPRING FOR SINGLE TRIGGER
2 SEAR RETURN SPRINGS FOR SINGLE TRIGGER GUN
SEAR FOR SINGLE TRIGGER GUN
AUTOMATIC SAFETY BAR
SOLID SAFETY CATCH FOR SINGLE NON-SELECTIVE TRIGGER
2 SIDE PLATE RETAINING SCREWS
LEFT SIDE PLATE
RIGHT SIDE PLATE
SIDE PLATE CONNECTING SCREW
2 EJECTOR RETURN SPRINGS
2 EJECTOR RETURN SPRING GUIDES
LEFT EJECTOR
RIGHT EJECTOR
LEFT EJECTOR STOP
RIGHT EJECTOR ENGAGING PLATE
2 EJECTOR STOP CYLINDER SPRINGS
2 EJECTOR ENGAGING PLATE STOP CYLINDERS
RIGHT EJECTOR STOP
2 EJECTOR STOP SCREWS
EJECTOR ENGAGING PLATE
RIGHT EJECTOR COCKING BAR
LEFT EJECTOR COCKING BAR
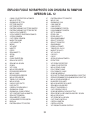
ESPLOSO FUCILE SOVRAPPOSTO CON CHIUSURA SU RAMPONI
INFERIORI CAL. 12
OVER AND UNDER BOTTOM LOCK EXPLODED VIEW 12 GA
33
ESPLOSO FUCILE SOVRAPPOSTO CON CHIUSURA SU RAMPONI
INFERIORI CAL. 12
1
2
3
4
5
6
7
8
9
10
11
12
13
14
15
16
17
18
19
21
24
25
26
27
28
29
30
31
32
33
34
35
36
37
38
39
40
41
42
43
44
45
46
CANNE CON ESTRATTORI AUTOMATICI
MOLLE EIETTORI
GUIDAMOLLE EIETTORI
EIETTORE SINISTRO
EIETTORE DESTRO
PIASTRINO AGGANCIO EIETTORE SINISTRO
PIASTRINO AGGANCIO EIETTORE DESTRO
2 MOLLA PIOLO ARRESTO
2 PIOLO ARRESTO PIASTRINO AGGANCIO
2 PERNI CERNIERA
2 VITE PERNI CERNIERA
MAGLIETTA CANNE
4 VITI MAGLIETTA
MIRINO
VITI AUGET
NASETTO
CROCE
SPINA NASETTO
ASTINA
AUGET
CHIAVE D'APERTURA
SPINA LEVE SCATTO
SPINA MOLLA SICURA
SICURA
VITE CODA
MOLLA PERCUSSORE
PERCUSSORE INFERIORE
MOLLA CHIAVE
PERCUSSORE SUPERIORE
MOLLA PERCUSSORE
TASSELLO DI CHIUSURA
MOLLA SICURA
2 MOLLE LEVE SCATTO
LEVE SCATTO
CARRELLO SICURA BIRILLO
GUIDAMOLLA CHIAVE
GUIDAMOLLA CHIAVE INTERNO
VITE CONTRASTO MOLLA MANETTA
SPINA SOTTOGUARDIA
SPINA ARRESTO CHIAVE
2 SPINA ARRESTO PERCUSSORI
BASCULA
PIASTRINA GRILLETTO DESTRO
47
48
49
50
51
52
53
54
55
56
57
58
59
60
61
63
64
65
66
67
68
69
70
71
72
73
74
75
76
78
79
80
81
82
83
84
85
86
87
88
89
90
91
92
34
PIASTRINA GRILLETTO SINISTRO
MOLLE CANI
GUIDAMOLLE CANI
CANE SINISTRO
CANE DESTRO
LEVA ARMAMENTO DESTRA
LEVA ARMAMENTO SINISTRA
SOTTO GUARDIA
PERNO CANI
PERNO GRILLETTI
SPINA GUARDIAMANO
GRILLETTO DESTRO
GRILLETTO SINISTRO
GUARDIAMANO
RONDELLA TIRANTE
TIRANTE DEL CALCIO
MAGLIETTA CALCIO
VITI CALCIOLO
CALCIOLO
CALCIO
ASTINA SICURA AUTOMATICA
ESTRATTORE
VITE FERMO ESTRATTORE
CANNE CON ESTRATTORI
MOLLA FERMO CHIAVE
PIOLO FERMO CHIAVE
PIOLO SGANCIO CHIAVE
SICURA MONOGRILLO
BLOCCHETTO FERMO SICURA MONOGRILLO SELETTIVO
SFERA POSIZIONAMENTO SICURA MONOGRILLO SELETTIVO
MOLLA SICURA MONOGRILLO
BILANCERE OSCILLANTE
MOLLA BILANCERE OSCILLANTE
SPINA MOLLA BILANCIERE
GRILLETTO MONOGRILLO
2 VITI FISSAGGIO CROCE
SICURA MONOGRILLO NON SELETTIVO
SPINA PER MOLLA RICHIAMO BILANCERE E SICURA
MOLLA PER SICURA
VITE FERMO MOLLA SICURA
2 VITI TENUTA CARTELLA
CARTELLA SINISTRA
CARTELLA DESTRA
VITE PASSANTE UNIONE CARTELLE
OVER AND UNDER BOTTOM LOCK EXPLODED VIEW 12 GA
1
2
3
4
5
6
7
8
9
10
11
12
13
14
15
16
17
18
19
21
24
25
26
27
28
29
30
31
32
33
34
35
36
37
38
39
40
41
42
43
44
45
46
BARRELS WITH EJECTORS
EJECTOR SPRINGS
EJECTOR SPRING GUIDES
LEFT EJECTOR
RIGHT EJECTOR
LEFT EJECTOR ENGAGING PLATE
RIGHT EJECTOR ENGAGING PLATE
2 STOP PIN SPRINGS
2 ENGAGING PLATE STOP PINS
2 HINGE PINS
2 HINGE PINS SCREWS
BARREL SWIVEL
4 SWIVEL SCREWS
SIGHT
FOREND CATCH SCREWS
COCKING HOOK
FOREND IRON
COCKING HOOK PIN
FOREND
FOREND CATCH
TOP LEVER
SEAR PIN
SAFETY CATCH SPRING PIN
SAFETY CATCH
TANG SCREW
FIRING PIN SPRING
BOTTOM BARREL FIRING PIN
TOP LEVER SPRING
TOP BARREL FIRING PIN
FIRING PIN SPRING
LOCKING BOLT
SAFETY CATCH SPRING
2 SEAR SPRINGS
SEARS
SAFETY SLIDE FOR DOUBLE TRIGGER GUN
EXTERNAL TOP LEVER SPRING GUIDE
INTERNAL TOP LEVER SPRING GUIDE
TOP LEVER SPRING CONTROL SCREW
TRIGGER GUARD PIN
TOP LEVER STOP PIN
2 FIRING PIN STOP PINS
RECEIVER
FRONT TRIGGER PLATE
47
48
49
50
51
52
53
54
55
56
57
58
59
60
61
63
64
65
66
67
68
69
70
71
72
73
74
75
76
78
79
80
81
82
83
84
85
86
87
88
89
90
91
92
35
REAR TRIGGER PLATE
MAIN SPRINGS
HAMMER SPRING GUIDES
BOTTOM BARREL HAMMER
TOP BARREL HAMMER
RIGHT COCKING LEVER
LEFT COCKING LEVER
TRIGGER GUARD
HAMMER PIN
TRIGGER PIN
TRIGGER GUARD PIN
FRONT TRIGGER
REAR TRIGGER
TRIGGER GUARD
STOCK BOLT WASHER
STOCK BOLT
STOCK SWIVEL
STOCK PAD SCREWS
PAD
STOCK
AUTOMATIC SAFETY BAR
EXTRACTOR
EXTRACTOR STOP SCREW
BARRELS WITH EXTRACTORS
TOP LEVER STOP SPRING
TOP LEVER STOP PIN
TOP LEVER RELEASE PIN
SAFETY CATCH FOR SINGLE TRIGGER GUN
SAFETY BLOCK FOR SINGLE SELECTIVE TRIGGER
SAFETY POSITIONING BALL FOR SINGLE SELECTIVE TRIGGER
SAFETY CATCH SPRING FOR SINGLE TRIGGER
INERTIA BLOCK
INERTIA BLOCK SPRING
INERTIA BLOCK SPRING PIN
TRIGGER FOR SINGLE TRIGGER GUN
2 IRON FOREND WOOD SCREWS
SAFETY CATCH FOR SINGLE NON-SELECTIVE TRIGGER
SAFETY CATCH AND INERTIA BLOCK RETURN SPRING PIN
SAFETY CATCH SPRING
SAFETY CATCH SPRING STOP SCREW
2 SIDE PLATE RETAINING SCREWS
LEFT SIDE PLATE
RIGHT SIDE PLATE
SIDE PLATE CONNECTING SCREW
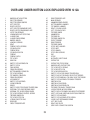
ESPLOSO FUCILE SOVRAPPOSTO CAL. 12 - 20 - 28 - 36 - 410
OVER AND UNDER TOP LOCK 12 - 20 ga - 28 - 36 - 410
36
ESPLOSO FUCILE SOVRAPPOSTO CON CHIUSURA SUPERIORE CAL. 12 - 20
1
2
5
6
7
8
13
14
15
16
17
18
19
20
22
24
25
26
28
29
30
31
32
34L
34R
35L
35R
36
37
38
39
40
41
42
43
44
47
49
50
56
57
58
60
BINDELLA SUPERIORE
MIRINO
ESTRATTORE DESTRO
ESTRATTTORE SINISTRO
PIOLO GUIDAMOLLA EJECTOR
MOLLA SCATTO EJECTOR
PIOLO FERMO ESTRATTORE
TASSELLO CHIUSURA
PERNO MOVIMENTO
PIOLO FERMO MOVIMENTO
CHIAVE
VITE PERNO MOVIMENTO
MOLLA PIOLO FERMO MOVIMENTO
BASCULA
COPPILIA SICURA
VITE SICURA
PERCUSSORE DESTRO / SINISTRO
MOLLE PERCUSSORI
MOLLE RECUPERO GRILLETTI
COPPIGLIE FERMO PERCUSSORI
PIOLO MOLLA MOVIMENTO
MOLLA MOVIMENTO
PERNO CERNIERA
LEVA ARMAMENTO SINISTRA
LEVA ARMAMENTO DESTRA
LEVA ARMAMENTO SINISTRA
LEVA ARMAMENTO DESTRA
CROCE
VITE CROCE
VITE ASTA AUGET
ASTA
AUGET
LEVA AUGET
MOLLA AUGET
COPPIGLIA AUGET
CALCIO
RONDELLA VITE TIRANTE
VITI CALCIOLO
CALCIOLO
CARTELLA DESTRA
CARTELLA SINISTRA
VITI CARTELLA CORTA
VITE CARTELLA PASSANTE
61
62
63
64
65
66
67
68
69
70
71
73
74
75
77
79
80A
80B
81
82
83
84
85
86
87
88
89
90
91
92
93
94
95
96
97
99
100
101
102
105
107
108
109
110
37
SOTTOGUARDIA
NOTTOLINI ARMAMENTO
COPPIGLIA NOTTOLINI
CANE SINISTRO
CANE DESTRO
COPPIGLIA CANE
STANGHETTA DESTRA
MAGLIETTA CANNA
VITE MAGLIETTA
STANGHETTA SINISTRA
MOLLA STANGHETTA
COPPIGLIA STANGHETTA
GUARDIAMANO
COPPIGLIA FERMO GUARDIAMANO
PORTACINGHIA CALCIO
GRILLETTO MONOGRILLO
GRILLETTO DESTRO
GRILLETTO SINISTRO
COPPIGLIA GRILLETTI
INVERTITORE MONOGRILLO
BOTTONE INVERTITORE
COPPIGLIA INVERTITORE
MOLLA INVERTITORE
SFERA
CARRELLO MONOGRILLO
MASSA MONOGRILLO
MOLLA MASSA
PERNO MASSA
BILANCERE MONOGRILLO
VITE TENUTA BILANCERE
MOLLA RECUPERO GRILLETTO
MOLLA FRENAGGIO SPINTONE
BINDELLA LATERALE
TENONE
CANNE
VITE TENUTA SOTTOGUARDIA
COPPIGLIA TENUTA SOTTOGUARDIA
PIOLO FRENAGGIO SPINTONE
MOLLA CANE
SPINTONE MOLLA CANE
NASELLO ARMAMENTO
SICURA
MOLLA SICURA
SPINTONE DESTRO / SINISTRO
OVER AND UNDER TOP LOCK EXPLODED VIEW 12 – 20 ga
1
2
5
6
7
8
13
14
15
16
17
18
19
20
22
24
25
26
28
29
30
31
32
34L
34R
35L
35R
36
37
38
39
40
41
42
43
44
47
49
50
56
57
58
60
UPPER RIB
FRONT SIGHT
RIGHT EJECTOR
LEFT EJECTOR
EJECTOR SPRING GUIDE
EJECTOR SPRING
EJECTOR STOP PISTON
CROSS BOLT
SPINDLE
CROSS BOLT STOP PISTON
TOP LEVER
TOP LEVER SCREW
STOP PISTON SPRING SPINDLE
FRAME
SAFETY PIN
SAFETY SCREW
FIRING PIN (UPPER AND LOWER)
FIRING PIN SPRINGS
TRIGGER SPRING
FIRING PIN STOP PINS
SPRING PIN SPINDLE
SPRING SPINDLE
HINGE PIN
LEFT AUTOMATIC EJECTOR COCKING BAR
RIGHT AUTOMATIC EJECTOR COCKING BAR
LEFT NORMAL EXTRACTOR COCKING BAR
RIGHT NORMAL EXTRACTOR COCKING BAR
FORE-END IRON
FORE-END IRON SCREW
FOREARM IRON SCREW
FOREARM WOOD
FOREARM CATCH PLATE
FOREARM CATCH
FOREARM CATCH PLATE SPRING
FOREARM CATCH PIN
STOCK
STOCK BOLT WASHER
BUTT PLATE SCREWS
RUBBER RECOIL PAD
RIGHT SIDE PLATE
LEFT SIDE PLATE
SIDE PLATE RETAINING SCREWS
SIDE PLATE CONNECTING SCREW
61
62
63
64
65
66
67
68
69
70
71
73
74
75
77
79
80A
80B
81
82
83
84
85
86
87
88
89
90
91
92
93
94
95
96
97
99
100
101
102
105
107
108
109
110
38
TRIGGER PLATE
COCKING PAWLS
COCKING PAWLS PIN
LEFT HAMMER
RIGHT HAMMER
HAMMER PIN
RIGHT SEAR
FRONT SLING SWIVEL
SLING SWIVEL SCREWS
LEFT SEAR
SEAR SPRING
SEAR PIN
TRIGGER GUARD
TRIGGER GUARD STOP PIN
STOCK SLING SWIVEL
SINGLE TRIGGER
RIGHT TRIGGER
LEFT TRIGGER
TRIGGER PIN
REVERS GEAR
REVERS GEAR-BOTTON
REVERS GEAR-PIN
REVERS GEAR-SPRING
SPHERE
SINGLE TRIGGER TRUCK
SINGLE TRIGGER MASS
MAIN BLOCK SPRING
MAIN BLOCK PIN
INERTIA BLOCK
INERTIA BLOCK SCREW
SINGLE TRIGGER SPRING
CATCH PLATE SPRING
SIDE RIB
TENON
BARREL
TRIGGER PLATE SCREW
TRIGGER PLATE PIN
CATCH PLATE PISTON
HAMMER SPRING
HAMMER SPRING PISTON
COCKING HOOK
SAFETY
SAFETY SPRING
RIGHT/LEFT EXTRACTOR CATCH PLATE
since 1948