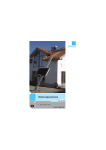
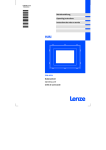
1
Lifting Systems
CVB
Owners Manual - Lifting Clamp for beams
Användarhandbok - Lyfthandske för balkar
Gebrauchsanleitung - Sicherheits Trägerklemme
Manual do Utilizador - A pinça de segurança de elevação de vigas
www.gunnebolifting.com
1
English
Please carefully read the safety instructions of this owner’s manual before using
the safety lifting clamp. In case of any doubts, please refer to your dealer!
Our manuals are intended to be a reference source throughout the lifetime
of your product.We appreciate any suggestions, and/or comments regarding this manual.
Due to continuing research and development activities, product specifications are subject
to change without notice.
Deutsch
Lesen Sie die Gebrauchsanleitung vor Benutzung des Produkts sorgfältig durch.
Bei Fragen wenden Sie sich bitte an Ihren Zulieferer. Die Gebrauchsanleitung dient
während der gesamten Lebensdauer des Produkts als ständige Informationsquelle.
Für Hinweise oder Anmerkungen zur Verbesserung des Inhalts dieser Gebrauchsanleitung
sind wir dankbar. Aufgrund kontinuierlicher Forschungs- und Entwicklungsprozesse
behalten wir uns technische Änderungen und/oder Änderungen äußerlicher
Português
Svenska
Läs anvisningarna i denna användarhandbok noggrant innan du använder lyfthandsken.
Vid frågor, rådgör med återförsäljaren. Våra handböcker är avsedda att vara en referenskälla
under produktens livslängd. Vi uppskattar förslag och/eller kommentarer angående
denna handbok. På grund av kontinuerligt undersöknings- och utvecklingsarbete, kan
produktspecifikationer ändras utan föregående meddelande.
Leia atentamente as instruções de segurança deste manual do utilizador antes de utilizar
a pinça de segurança de elevação. Em caso de dúvida, consulte o seu revendedor! Os
nossos manuais devem ser um ponto de referência ao longo da vida útil do seu produto.
Agradecemos quaisquer sugestões e/ou comentários relativos a este manual. Devido às
contínuas actividades de investigação e desenvolvimento, as especificações do produto
estão sujeitas a alterações sem aviso prévio.
2
Contents
1
3
3
3
3
5
5
6
6
6
7
7
27
28
English
1. General
2. Operating principle
3. Permitted applications
4. Safety instructions
5. Lifting
6. Maintenance
7. Disassembling/Assembling
8. Overhaul
9. Disposal
10. Troubleshooting checklist
11. Warranty
Appendix
- Exploded view of the safety beam lifting clamp
- How to correctly use the safety beam lifting clamp
General
Congratulations with the purchase of your new Gunnebo Lifting CVB safety beam lifting clamp.
The quality systems of management and services of Gunnebo Lifting fully comply
with ISO 9001 standards. The many years of vast experience are a guarantee of optimum
quality and safety. Gunnebo Lifting clamps are made of top quality alloyed steel and fully comply
with European standards as laid down in Machine Directive 2006/42/EG.
2
Operating Principle
The CVB safety beam lifting clamp has especially been developed for the lifting of steel beams.
A special lifting shackle is used to place the centre of gravity of the beam to be lifted directly
beneath the lifting shackle. This maintains the equilibrium of the beam, once it is lifted.
The CVB lifting clamp features a safety mechanism consisting of a locking device, a tension
spring and a lever. Once the lever is operated, the safety mechanism provides constant pretensioning
of the cam on the steel plate, thus ensuring that the clamp does not slip when
the lifting force is applied. When a load is being lifted, the clamping force on the cam is increased
by the weight of the load. It also ensures that the clamp will not work itself loose
from the plate when the lifting force is off the clamp.
3
Permitted Applications
The CVB lifting clamp may only be used for lifting and transporting steel beams (T, UNP, INP,
IPE, HE, etc.), here it is possible to position the clamp on a flat point of contact so that the
clamp completely fits on to the flange of the beam.
Permitted positions for using the clamp are the lifting and transporting of beams from:
- horizontal position and
- vertical position.
4
Safety Instructions
Safety first! Guarantee your personal safety by carefully reading the following safety
instructions first.
3
Ensure your own safety and continue to benefit from our product safety by having the clamp
inspected, tested and, if necessary, overhauled at least once a year by Gunnebo Lifting
or by a recognised mechanical repair and service centre.
See also Chapter 8 - Overhauling. Contact Gunnebo Lifting for further information.
Avoid Situations Danger to Life
Prevent dangerous situations by seriously taking care of the following precautions:
- Never work with an untested clamp.
- Keep your distance when lifting and never stand under the load.
- Do not use the clamp if damaged; have the clamp repaired by Gunnebo Lifting firstly or by a
recognised mechanical repair centre. If in doubt, please consult your supplier.
- Never lift more than one beam at a time.
- Never lift beams that are heavier than the working load limit (W.W.L.), as indicated on the clamp
and the test certificate.
- Do not lift beams with flanges thicker or thinner than the jaw opening, as indicated on the clamp
and the test certificate.
- When simultaneously operating a number of lifting clamps facing each other, use lifting slings or
chains which are of sufficient length to ensure that the angle between the slings or chains never
exceeds 60°.
- When simultaneously operating a number of lifting clamps side by side, use a lifting beam
(equaliser) and lifting slings or chains of a sufficient length to ensure that the lifting shackles on
the clamps are never subjected to lateral load.
- Do not place the clamp on tapered or conical sections of the beam to be lifted.
- Remove all grease, oil, dirt, corrosion and mill scale from the beam at the point where the clamp
is to be attached.
- The surface hardness of the beam must not exceed 37 HrC (345 Hb, 1,166 N/mm2).
- The clamp is only suitable for use in normal atmospheric conditions.
Safety Precautions
- Ensure that the lifting shackle can never be subjected to lateral load.
- A free fall or uncontrolled swaying at the crane hook resulting in objects being struck may cause
damage to the clamp. If this occurs, check whether the clamp is in good working order before
using it.
- Lifting clamps are not suitable for creating permanent joints.
- The clamp should be subjected to preventive maintenance on a monthly basis in accordance to
the guidelines described in Chapter 6 - Maintenance.
- Do not modify the clamp (by welding, grinding, etc.), as this can adversely affect its operation
and safety, thereby nullifying any forms of guarantee and product liability.
- For the very same reason, use only original Gunnebo Lifting components.
- Any improper use of the clamp and/or failure to observe any directions and warnings in these
operating instructions concerning the use of this product may endanger the health of the user
and/or bystanders.
4
English
5
Lifting
- Check whether the working load limit (W.L.L.) of the safety beam lifting clamp is sufficient
for the load created in the lifting situation.
- Attach the lifting clamp to the hoisting mechanism, either by means of a:
- Safety shackle directly to a crane hook,
- Coupling link or D-shackle,
- Sling or chain, if necessary in conjunction with a coupling link or D-shackle.
- Ensure that all attachments have been tested and are of the
correct tonnage. Make sure that coupling links and shackles
are of sufficient dimensions to allow the clamp to
move freely in the hook.
- Check whether the clamp shows any visible damage.
- Operate the lever to check whether the clamp opens and closes smoothly.
- Check whether the teeth of the cam are free from dirt and if necessary thoroughly clean with
a wire brush.
- Remove any grease, dirt and mill scale from the beam at the site of the lifting clamp.
- Use the lever to open the clamp.
- Place the jaws as far as they will go over the beam, making sure that the clamp is positioned
so as to balance the load when it is being lifted.
- Make sure that the lifting shackle is facing towards the centre of the beam or structure.
- Close the clamp by fully turning the lever back.
- Lift gently to allow the lifting force to be applied; check whether the clamp is slipping.
- If the load is slipping, read through this section on Lifting again.
- If the load continues to slip, read the following Chapter 6 - Maintenance.
- Make sure that the load is in a stable position, before taking the clamp off the plate
6
Maintenance
From a safety point of view, please check the general condition of the clamp at least once a
month, according to the guidelines of Chapter 7 - Disassembling/Assembling.
Stop using the beam lifting clamp if:
- The body is split or deformed, particularly in the corners of the jaws.
- The lifting shackle is visibly deformed.
- The cam and/or pivot teeth are no longer sharp.
5
- The spring has become stretched or broken.
- The lever locking mechanism has become inefficient or has ceased to work.
- The shackle pins have been visibly deformed.
- Any retaining pins are missing.
- The side of the lifting shackle is pressed in at the spacer pins.
Depending on the defects noted:
- Dismantle and clean the beam lifting clamp (see Chapter 7 – Disassembly/Assembly)
or have the clamp overhauled by Gunnebo Lifting or by a recognized mechanical repair
centre (see Chapter 8 - Overhauling).
7
Disassembling/Assembling
The safety beam lifting clamp can be easily disassembled for cleaning and inspection
purposes. Please make use of the following sequence:
- Open the clamp to its full extent.
- Remove the tension spring (13); in case of the type 1,5 CVB, first remove the retaining
pin (11) in the cam assembly (4).
- Remove the retaining pin and the cam pin (8).
- Remove the lifting shackle (3) and the cam assembly.
- Remove the shackle pin (2).
- Dismantle the lever (5) by removing the retaining pin and take the lock assembly (7) out
of the clamp.
- Remove the pivots (6) using a socket and ring spanner.
- Clean all parts with a standard degreasant.
- Grease all shackle pins with a bearing grease.
- Oil the spring if necessary.
- Assemble all the parts in reverse sequence.
- Always insert new and original retaining pins and do so with the aid of a hammer,
combination pliers and pin punch.
- Always fit new pivot bolts and nuts.
- When replacing parts always make sure to use original Gunnebo Lifting components.
- Remove any burr with a file.
8
Overhaul
At least once a year or in case of any damage to the CVB safety beam lifting clamp, the
clamp should be inspected, tested and if necessary overhauled by Gunnebo Lifting or by a
recognised mechanical repair centre.
9
Disposal
Once it has reached the end of its useful life the CVB safety beam lifting clamp can be
treated
as scrap iron, provided that the clamp is rendered unfit for further use.
6
10
Troubleshooters Checklist
Possible Cause
Action
Load slipping
Load dirty
Pivot and/or cam dirty
Pivot and/or cam blunt
Jaws bent open
Clean load
Clean clamp
Overhaul clamp
Reject clamp
Body bent
Clamp overloaded
Reject clamp
Lifting shackle oval shape
Clamp overloaded
Reject clamp
Spring defective
Spring worn out
Overhaul clamp
Shackle pins bent
Clamp overloaded
Reject clamp
Retaining pins missing
Incorrectly assembled
Fit new retaining pins
Clamp difficult to open/close
Key way slot dirty
Clamp worn out
Clamp contaminated
Clamp overloaded
Clean clamp
Reject clamp
Clean clamp
Reject clamp
11
English
Failure/malfunction
Warranty
Gunnebo Lifting Clamps provides a 5 year warranty on its lifting clamps. This warranty is
applicable to the original end user of the lifting clamps. Only if the clamp has been inspected,
checked and maintained by this instructions and by an official dealer. This warranty period
of 5 years is valid from the day of purchase, and is liable to all conditions and measurements
stated in this document.
11a
Conditions
This warranty only covers failures in the lifting tools which is the consequence of production
errors which occur during normal use. The warranty covers no wear to components such as
pivots, cam assemblies, lock springs etc. Should there be any kind of failure within this
guarantee period, the lifting tool will be replaced or repaired to insight of the producer
No warranty is given to clamps due to the following failures:
- Regular wear
- Overload.
- Wrong and/or carelessly use
- Damages
- Not following procedures and measures
- Hoisting differing material other then indicated on clamp or stated in the user-manual
- Adapting and/or modifying of the Gunnebo Lifting clamp.
- The injudicious use of the clamp, and not succeeding all indications which are stated in
the users manual.
- When maintenance and/or revision has not been carried out by an authorised Gunnebo Lifting
distributor.
The producer is not responsible for incidental damage or damage due to use of the lifting
tools as well as from violation of this manual.
7
11b
Procedure Safety Inspection
All inspections and repairings must be written down in the maintenance diagram. This counts
not only for
your own inspections but also for inspections which are carried out by your authorised Gunnebo
distributor.
When the clamp is handed in for maintenance and inspection you always must provide the
maintenance diagram.
Defective Lifting Clamps
When a form of wear or damage is indicated, you must take the following measures.
1.
Take the lifting clamp out of use. (Note the date of failure of the lifting clamp)
2.
Try to recover the cause of the failure, for example (complete list is available in
chapter 1):
- Overload
- Wrong and/or carelessly use
- etc
These claims stated in no.2 do not fall under the guarantee! To guarantee the security of you
and your colleagues you are obliged to follow up this procedure.
3.
Return your lifting clamp (with the maintenance history) to your authorised Gunnebo
Lifting distributor.
4.
If the lifting clamp has been revised / repaired by your distributor, you can safely use
your clamp again.
Please note this date in your maintenance chart (see page 31).
11c
Inspection Schedule
Months
Years
Safety inspections by
your own inspector
Maintenance by a
official Gunnebo Lifting
distributor
Revision by a official
Gunnebo Lifting
distributor
8
4
8
1
12
16
20
2
24
28
32
3
36
40
44
4
48
52
56
5
60
Innehåll
Allmänt
Arbetsprincip
Tillåtna applikationer
Säkerhetsanvisningar
Lyft
Underhåll
Demontering/Montering
Service
Kassation
Checklista för felsökning
Garanti
Bilaga - Sprängskiss på CVB-lyfthandske för balkar
- Korrekt användning av CVB-lyfthandske för balkar
1
9
9
9
9
11
12
12
12
12
13
13
Svenska
1.
2.
3.
4.
5.
6.
7.
8.
9.
10.
11.
27
28
Allmänt
Grattis till köpet av ny Gunnebo Lifting CVB-lyfthandske för balkar. Kvalitetssystemen för
hantering och tjänster från Gunnebo Lifting är helt i enlighet med ISO 9001-krav.
Många års omfattande erfarenhet är en garanti för optimal kvalitet och säkerhet.
Gunnebo Liftings lyfthandskar är tillverkade av legerat stål av bästa kvalitet och uppfyller
europeiska normer och krav som fastställs i Maskindirektivet 2006/42/EG.
2
Arbetsprincip
CVB-lyfthandske har särskilt utvecklats för att lyfta stålbalkar. En speciallyftbygel används
för att placera balkens gravitationscentrum direkt under lyftbygeln. Detta bibehåller balkens
jämnvikt när den lyfts. CVB-lyfthandske har en säkerhetsmekanism som består av en låsenhet,
en spännfjäder och en spak. När spaken slås till, tillhandahåller säkerhetsmekanismen konstant
förspänning på kammen mot stålplåten, vilket i sin tur garanterar att lyfthandsken inte
glider när lyftkraft tillämpas. När en last lyfts, ökar låskraften på kammen med lastens vikt.
Det garanterar även att lyfthandsken inte lossnar från plåten när lyfthandsken saknar lyftkraft.
3
Tillåtna Applikationer
CVB-lyfthandske får endast användas för att lyfta och transportera stålbalkar (T, UNP, INP,
IPE, HE, etc.).
Här är det möjligt att placera lyfthandsken på en plan kontaktyta så att lyfthandsken helt
passar på balkflänsen. Tillåtna positioner för att använda lyfthandsken är lyft och transport
av balkar från:
- horisontal position och
- vertikal position.
4
Säkerhetsanvisningar
Säkerheten främst! Garantera din personliga säkerhet genom att först läsa igenom
säkerhetsanvisningarna noggrant.
9
Garantera din egen säkerhet och fortsätt att dra nytta av vår produktsäkerhet genom att låta
inspektera, testa och, om nödvändigt, serva lyfthandsken minst en gång om året av Gunnebo
Lifting eller ett auktoriserat mekaniskt reparations- eller servicecenter.
Se även kapitel 8 - Service. Kontakta Gunnebo Lifting för mer information.
Undvik livshotande situationer
Förebygg farliga situationer genom att iakttaga följande försiktighetsåtgärder:
- Arbeta aldrig med en lyfthandske som inte är testad.
- Håll avståndet när du lyfter och stå aldrig under lasten.
- Använd inte lyfthandsken om den är skadad; låt Gunnebo Lifting eller annat auktoriserat
mekanisk reparationscenter serva lyfthandsken. Rådgör med leverantören om du är osäker.
- Lyft aldrig mer än en balk åt gången.
- Lyft aldrig balkar tyngre än den tillåtna arbetsbelastningen (W.L.L.), som anges på
lyfthandsken och i testcertifikatet.
- Lyft aldrig balkar som är tjockare eller tunnare än gripklons öppning, som anges på
lyfthandsken och i testcertifikatet.
- När du använder flera lyfthandskar på motstående sidor av varandra samtidigt, nyttja
lyftslingor eller -kättingar av tillräcklig längd för att garantera att vinkeln mellan slingorna
eller kättingarna inte överskrider 60 grader.
- Vid samtidig användning av flera lyfthandskar sida vid sida, använd en lyftbom (utjämnare)
och lyftslingor eller -kättingar som har en tillräcklig längd för att garantera att lyftschaklarna
på lyfthandskarna aldrig utsätts för sidobelastning.
- Placera inte lyfthandsken på avsmalnande eller koniska sektioner på balken som skall lyftas.
- Avlägsna fett, olja, smuts, korrosion och glödspån från balken där lyfthandsken skall fästas.
- Balkytans hårdhet får inte överskrida 37 HrC (345 Hb, 1,166 N/mm2).
- Lyfthandsken är endast lämplig för användning under normala atmosfäriska förhållanden.
Säkerhetsanvisningar
- Kontrollera att lyftbygeln aldrig kan utsättas för sidobelastning.
- Fritt fall eller okontrollerad svajning från lyftkroken som leder till att föremål fastnar, kan
leda till stötskador på lyfthandsken. Om detta händer, kontrollera om lyfthandsken
fortfarande är i användbart skick innan du använder den igen.
- Lyfthandskar är inte lämpliga för att skapa permanenta fogar.
- Förebyggande underhåll av lyfthandsken skall ske regelbundet varje månad i enlighet med
riktlinjerna som beskrivs i kapitel 6 - Underhåll.
- Ändra inte lyfthandsken (genom svetsning, slipning, etc.), detta kan påverka dess funktion
och säkerhet negativt, och därmed upphäva alla former av garanti och produktansvar.
- Av samma skäl får endast Gunnebo Lifting originalkomponenter användas.
- Felaktig användning av lyfthandsken och/eller underlåtenhet att iakttaga anvisningar och
varningar i denna användarhandbok som gäller användningen av denna produkt kan utsätta
användarens och/eller kringståendes hälsa för fara.
10
Svenska
5
Lyft
- Kontrollera att lyfthandskens tillåtna arbetsbelastning (W.L.L.) är tillräcklig för belastningen i
lyftsituationen.
- Montera lyfthandsken på lyftmekanismen, antingen med hjälp av:
- säkerhetsbygel direkt på lyftkroken,
- kopplingslänk eller D-bygel,
- sling eller kätting, om nödvändigt tillsammans med en
kopplingslänk eller en D-bygel.
- Se till att alla tillsatser har testats och har rätt lastförmåga. Kontrollera att kopplingslänkar och
byglar är tillräckligt stora så att lyfthandsken kan röra sig fritt i kroken.
- Kontrollera om lyfthandsken har synliga skador.
- Slå till spaken för att kontrollera att lyfthandsken öppnas och stängs utan problem.
- Kontrollera att kamtänderna är fria från smuts. Rengör om nödvändigt med en stålborste.
- Avlägsna fett, smuts och glödspån från balken där lyfthandsken sitter.
- Använd spaken för att öppna lyfthandsken.
- Placera gripklorna så långt de kommer över balken (flänsen måste vara helt infogad i lyfthandsken).
Kontrollera att lyfthandsken är placerad så att lasten balanseras när den lyfts.
- Se till att lyftbygeln är vänd mot balkens eller strukturens mitt.
- Stäng lyfthandsken genom att vrida spaken helt bakåt.
- Lyft försiktigt så att lyftkraften kan tillämpas. Kontrollera om lyfthandsken glider.
- Om lasten glider, se kapitel 5 - Lyft igen.
- Om lasten fortsätter att glida, se kapitel 6 - Underhåll.
- Kontrollera att lasten är stadig innan du lossar lyfthandsken från plåten.
11
6
Underhåll
Ur säkerhetssynpunkt, kontrollera lyfthandskens allmänna skick minst en gång i månaden, i enlighet
med riktlinjerna i kapitel 7 - Demontering/Montering.
Använd inte lyfthandsken om:
- Stommen är delad eller deformerad, särskilt vad gäller klohörnen.
- Lyftbygeln är visuellt deformerad.
- Kammen och/eller pivottänderna inte längre är vassa.
- Fjädern är utdragen eller trasig.
- Spakens låsmekanism har blivit ineffektiv eller slutat att fungera.
- Bygelbultarna har deformerats visuellt.
- Fästskruvar saknas.
- Lyftbygelns sida pressas in i distansbultarna.
Beroende på observerade defekter:
- Demontera och rengör lyfthandsken (se kapitel 7 - Demontering/Montering) eller låt lyfthandsken
servas av Gunnebo Lifting eller annat auktoriserat mekaniskt reparationscenter (se kapitel 8 - Service).
7
Demontering/Montering
Lyfthandsken för balkar kan enkelt demonteras för rengöring och inspektion.
Använd nedanstående procedur:
- Öppna lyfthandsken helt.
- Avlägsna spännfjädern (13); på 1,5 CVB, avlägsna först fästbulten (11) i kammen (4).
- Avlägsna fästbulten och kambulten (8).
- Avlägsna lyftbygeln (3) och kammen.
- Avlägsna bygelbulten (2).
- Demontera spaken (5) genom att avlägsna fästbulten och avlägsna låset (7) från lyfthandsken.
- Avlägsna pivoterna (6) med en muff- och polygonnyckel.
- Rengör alla delar med ett vanligt avfettningsmedel.
- Smörj alla bygelbultar med ett lagerfett.
- Smörj fjädern om nödvändigt.
- Sätt ihop alla delar i omvänd ordning.
- Sätt alltid i nya originalfästbultar med hjälp av en hammare, tillsammans med en tång och
dorn.
- Montera alltid nya pivotbultar och muttrar.
- Använd alltid Gunnebo Lifting originalkomponenter när du byter delar.
- Avlägsna eventuellt borrskägg med en fil.
8
Service
Minst en gång om året eller vid skador, skall CVB lyfthandsken inspekteras, testas och, om
nödvändigt, servas av Gunnebo Lifting eller ett auktoriserat mekaniskt reparationscenter.
9
Kassation
När CVB lyfthandsken når slutet av sin livslängd, kan den betraktas som järnskrot, under förutsättning
att lyfthandsken inte längre kan användas.
12
10
Checklista för felsökning
Möjlig orsak
Åtgärd
Last glider
Last smutsig
Smutsig pivot och/eller kam
Pivot och/eller kam slö
Gripklor har krökts upp
Rengör last
Rengör kam
Serva lyfthandske
Kassera lyfthandske
Stomme krökt
Lyfthandske överbelastad
Kassera lyfthandske
Lyftbygeln är ovalformad
Lyfthandske överbelastad
Kassera lyfthandske
Fjäder defekt
Fjäder utsliten
Serva lyfthandske
Bygelbultar böjda
Lyfthandske överbelastad
Kassera lyfthandske
Fästbultar saknas
Felaktig montering
Sätt i nya fästbultar
Lyfthandske svår att öppna/
stänga
Kilspår smutsigt
Lyfthandske utsliten
Lyfthandske förorenad
Lyfthandske överbelastad
Rengör kam
Kassera lyfthandske
Rengör kam
Kassera lyfthandske
11
Svenska
Fel/funktionsstörning
Garanti
Gunnebo Lifting tillhandahåller en 5 års garanti på sina lyfthandskar. Denna garanti
gäller den ursprungliga slutanvändaren av lyfthandskarna. Endast om lyfthandsken har
inspekterats, kontrollerats och underhållits enligt dessa anvisningar och av en officiell
återförsäljare. Garantiperioden på 5 år gäller från inköpsdagen och gäller alla villkor och
åtgärder som nämns detta dokument.
11a
Villkor
Denna garanti täcker endast fel på lyftutrustning till följd av produktionsfel som inträffar vid
normal användning. Garantin täcker inte slitage på komponenter som pivoter, kamdelar,
låsfjädrar, etc. Om fel uppstår inom garantiperioden, kommer lyftutrustningen att ersättas
eller repareras enligt tillverkarens anvisningar.
Ingen garanti ges till lyfthandskar på grund av följande fel:
- Regelbundet slitage.
- Överbelastning.
- Felaktig och/eller vårdslös användning.
- Skador.
- Handlingsplan och återgärder har ej följts.
- Lyft av andra material än de som anges på lyfthandsken eller i användarhandboken.
- Anpassning och/eller förändring av lyfthandsken.
- Omdömeslös användning av lyfthandsken och inte följa alla anvisningar som anges i
användarhandboken.
- När underhåll och/eller revidering inte har utförts av en auktoriserad Gunnebo Lifting
återförsäljare.
Tillverkaren ansvarar inte för oavsiktlig skada eller skada till följd av användning av
lyftutrustningen samt om anvisningarna i denna handbok försummas.
13
11b
Handlingsplan för skyddsinspektion
Alla inspektioner och reparationer skall skrivas ned i underhållstabellen.
Detta gäller inte bara dina egna inspektioner, utan även inspektioner som utförs av auktoriserade
Gunnebo Lifting återförsäljare. När lyfthandsken lämnas in för underhåll och inspektion, måste
du alltid tillhandahålla underhållstabellen.
Defekta lyfthandskar
När slitage eller skada uppkommer, skall följande åtgärder vidtagas:
1.
Ta lyfthandsken ur bruk. (Notera datumet när lyfthandsken uppvisade felet)
2.
Försök att ta reda på felets orsak, till exempel (fullständig lista finns i kapitel 1):
- Överbelastning
- Felaktig och/eller vårdslös användning
- etc.
Anspråken som anges under punkt 2 omfattas inte av garantin! För att garantera din och dina
kollegors säkerhet, skall denna handlingsplan följas upp.
3.
Lämna tillbaka lyfthandsken (med underhållsbakgrund) till auktoriserad Gunnebo
Lifting återförsäljare.
4.
Om lyfthandsken har reviderats/reparerats av återförsäljaren, kan lyfthandsken
användas igen utan fara.
Notera detta datum i underhållstabellen.
11c
Inspektionsschema
Månad
År
Skyddsinspektioner
av egen inspektör
Underhåll av
auktoriserad Gunnebo
Lifting återförsäljare
Revision av auktoriserad
Gunnebo Lifting
återförsäljare
14
4
8
1
12
16
20
2
24
28
32
3
36
40
44
4
48
52
56
5
60
Gebrauchsanleitung
1 Allgemeines
2 Funktionsbeschreibung
3 Bestimmungsgemäße Verwendung
4 Sicherheitshinweise
5 Heben
6 Wartung/Inspektion
7 Richtlinien zur Demontage/Montage
8 Überprüfung
9 Entsorgung
10 Checkliste zur Fehlersuche
11 5 Jahre Garantie
Appendix
- Konstruktionzeichnung der Trägerklemme
- Richtige Verwendung der Trägerklemme
1
15
15
15
16
17
17
18
18
18
19
19
27
27
Allgemeines
Lesen Sie die Gebrauchsanleitung vor Benutzung des Produkts sorgfältig durch.
Bei Fragen wenden Sie sich bitte an Ihren Zulieferer.
Herzlichen Glückwunsch zum Erwerb Ihrer neuen Gunnebo Liftig CVB-Trägerklemme. Gunnebo
Lifting verbürgt sich aufgrund jahrelanger Erfahrung für optimale Qualität und
Sicherheit. Gunnebo Lifting Lastaufnahmemittel werden aus hochwertigen Stahlsorten gefertigt und
entsprechen der EG-Maschinenrichtlinie 2006/42/EG.
2
Funktionsbeschreibung
3
Deutsch
Die CVB- Trägerklemme dient ausschließlich zum Heben/Transportieren von Stahlträgern.
Durch die Anwendung einer spezialen Kranöse liegt der Schwerpunkt des Trägers genau
unterhalb der Kranöse, wodurch der Träger im Gleichgewicht bleibt. Nach Betätigung des
Spannhebels sorgt der innovative Sicherheitsmechanismus für konstante Vorspannung des
Segments auf dem Flansch des Trägers.
Hierdurch wird ein Rutschen des Transportgutes bei der Krafteinleitung vermieden. Bei der
Krafteinleitung wird der Klemmdruck durch das Eigengewicht des Transportgutes auf die
Anpressbacken vergrößert. Beim Absetzen des Transportgutes wird ein unvorhergesehenes
Lösen des Stahlträgers mit Hilfe der Klemme verhindert.
Bestimmungsgemäße verwendung
Die CVB-Trägerklemme ist ein spezial entwickelter Lastaufnehmer, der ausschließlich zum
Heben und Transportieren von Stahlträgern (T, UNP, INP, IPE, HE u.ä.) mit gleichmäßig flachem
Befestigungspunkt dient und die volle Klemmlänge der Klemme am Flansch des Stahlträgers
wirken kann.
Unter bestimmungsgemäßer Verwendung der Klemme versteht man das Heben und Transportieren
von Trägern aus:
- waagerechter Position.
- senkrechter Position.
Technische Dokumentation ist beim Fabrikanten erhältlich.
15
4
Sicherhetishinweise
Denken Sie stets an Ihre eigene Sicherheit und die von Dritten!
Lesen Sie vor Benutzung des Produkts sorgfältig die Gebrauchsanleitung durch!
Zur Gewährleistung Ihrer eigenen Sicherheit und der unserer Produkte sollte die Klemme
minimal einmal (1x) pro Jahr durch Gunnebo Lifting oder einen anderen Fachbetrieb
überprüft, getestet und bei Bedarf überholt werden. Siehe auch Kapitel 8 - Überholung.
Für weitere Informationen wenden Sie sich bitte an Gunnebo Lifting
Vermeidung lebensgefährlicher siutationen
Zur Vermeidung lebensgefährlicher Situationen sind nachfolgende Richtlinien zu beachten.
- Verwenden Sie keine Klemmen, die nicht geprüft sind oder deren Prüfungstermin überschritten ist.
- Den Sicherheitsabstand unbedingt einhalten! Der Aufenthalt unter schwebenden Lasten
ist verboten.
- Lassen Sie Klemmen, die eine Beschädigung aufweisen, umgehend durch Gunnebo Lifting
oder einen anderen Fachbetrieb reparieren. Im Zweifelfall: Fragen Sie den Lieferanten.
- Nur einen Träger gleichzeitig transportieren.
- Transportieren Sie keine Träger, die den Sicherheitsbereich der Lastaufnahme (W.L.L.)
übersteigen (siehe Angaben auf Klemme, Zertifikat).
- Transportieren Sie keine Träger,wobei der Flansch dicker oder dünner ist als die Maulöffnung
(siehe Angaben auf der Klemme oder dem Zertifikat).
- Achten Sie bei gleichzeitiger Verwendung mehrerer gegenüber liegender Klemmen auf
ausreichende Länge der Gurte oder Ketten, so dass ein Neigungswinkel von 60º nicht
überschritten wird.
- Benutzen Sie bei gleichzeitiger Verwendung mehrerer nebeneinander liegender Greifklemmen
eine Traverse und ausreichend lange Gurte oder Ketten, so dass die Kranösen der Klemmen nicht
seitlich belastet werden.
- Der Befestigungspunkt ist so auszuwählen, dass die Klemme nicht auf einem konischen Teil
des Lastgutes greift.
- Befreien Sie den Träger und Befestigungspunkt von Verschmutzungen wie Schmiermittel,
Korrosion,Walzzunder u.ä..
- Die zulässige Lastoberflächenhärte darf 37 HrC (345 Hb, 1166 N/mm2) nicht überschreiten.
- Alle Klemmen sind ausschließlich zum Gebrauch unter normalen Umgebungstemperaturen
geeignet.
Warnung
- Eine seitliche Belastung der Kranöse ist zu vermeiden.
- Werden Gegenstände durch freien Fall oder unkontrolliertes Pendeln des Lasthakens getroffen,
kann dies zu Beschädigungen der Klemme führen. In diesem Fall ist die Klemme or weiterer
Benutzung auf eventuelle Beschädigung zu überprüfen.
- Greifklemmen sind nicht für dauerhafte Verbindungen geeignet.
- Die Klemme sollte 1x monatlich gewartet werden (siehe Kapitel 6 – Wartung/Inspektion).
- Durch Veränderungen der Klemme, z.B. durch Schweißen, Schleifen etc., kann die Funktion
und Sicherheit des Produkts beeinträchtigt werden. In diesem Fall verfällt die Garantie und wird
keinerlei Haftung übernommen.
- Ausschließlich Orginalersatzteile von Gunnebo Lifting verwenden.
- Eine unsachgemäße Verwendung der Klemme und/oder Nichtbeachtung der Bedienungsanleitung
und Sicherheitshinweise kann zur Gefährdung des Benutzers oder Dritter führen.
16
5
Heben
6
Wartung/Inspektion
Einmal pro Monat ist die Klemme zu überprüfen (siehe Kapitel 7 Demontage/Montage).
Die Klemme darf nicht mehr verwendet werden bei:
17
Deutsch
Bei Verwendung der Klemme ist darauf zu achten, dass die zulässige Tragfähigkeit (W.L.L.)
nicht überschritten wird.
- Befestigung der Greifklemme am Anschlagpunkt:
- direkt am Lasthaken mit Sicherheitsverschluss;
- in Verbindung mit Anker oder Kettenschäkel;
- in Verbindung mit Gurt oder Kette, eventuell in Kombination mit Anker oder Kettenschäkel.
- Achten Sie darauf, dass alle Lastaufnahmemittel geprüft und für die Last geeignet sind.
Bei der Größe der Befestigungsglieder und -verschlüsse ist zu darauf zu achten, dass sich
die Klemme im Haken frei bewegen kann.
- Überprüfen Sie die Klemme auf sichtbare Schäden.
- Kontrolle des Spannhebels auf einfaches Öffnen und Schließen.
- Kontrolieren Sie das Segment auf Verschmutzung. Bei Bedarf ist zur Reinigung eine
Drahtbürste zu verwenden.
- Befreien Sie den Befestigungspunkt von Verschmutzungen wie Schmiermittel,Walzzunder u.ä..
- Öffnen Sie die Klemme mit dem Spannhebel.
- Schieben Sie die Maulöffnung vollständig über den Flansch und kontrollieren Sie die Position
der Klemme um sicherzugehen, dass das Lastgut während des Transports ein stabiles
Gleichgewicht hat.
- Die Kranöse muß immer in Richtung Mittelpunkt des Trägers oder der Konstruktion zeigen.
- Schließen Sie die Klemme durch Zurückdrehen des Spannhebels.
- Beginnen Sie mit dem Heben langsam, so dass die Anpressbacken gut greifen können und
kontrollieren Sie die Klemme auf Rutschen.
- Beim Rutschen des Lastgutes, siehe Kapitel 5 - Heben.
- Rutscht das Lastgut nach wie vor, siehe Kapitel 6 - Wartung.
- Vor dem Lösen der Greifklemme ist das Lastgut auf seine sichere und stabile Position zu kontrollieren.
- Riss oder Vervormung des Gehäuses, insbesondere an den Ecken der Maulöffnung.
- Verformung der Kranöse.
- abgenutztem Zahnprofil der Anpressbacken.
- abgenutzter oder gebrochener Feder.
- eingeschränkter Funktion oder Ausfall des Spannhebelmechanismus.
- Verformung der Achsen.
- fehlenden Spannstiften.
- bei eingedrückten Seiten der Kranöse auf Höhe der Abstandsstifte.
Abhängig von konstatierten Mängeln:
- Demontage und Reinigung der Klemme (siehe Kapitel 7 Demontage/Montage) oder Überholung
der Klemme mit erneuter Prüfung durch Gunnebo Lifting oder einem anderen
Fachbetrieb (siehe Kapitel 8 – Überprüfung).
Deutsch
7
Richtlinien zur demontage/montage
Die CVB-Trägerklemme kann zur Reinigung und Wartung auf einfache Weise wie folgt demontiert
werden (siehe Konstruktionzeichnung auf Seite 21):
- Klemme vollständig öffnen.
- Spannfeder (13) entfernen. Bei der 1,5 CVB zunächst den Spannstift aus der Segmentachse (4)
entfernen.
- Spannstift (11) und Segmentstift (8) entfernen.
- Segment (4) nach unten und nach innen schieben, so dass die Achse der Kranöse (3) aus der
Kranöse (2) entfernt werden kann.
- Achse der Kranöse (2) und Segmentachse (4) entfernen.
- Demontage des Spannhebels (5): Spannstift (12) entfernen, Spannachse (7) aus der Klemme
entnehmen.
- Zahnsegment (6) mit Hilfe eines Imbus- und Ringschlüssels entfernen.
- Reinigung der Teile mit handelsüblichem Entfettungsmittel.
- Alle Achsen mit Lagerfett einschmieren.
- Bei Bedarf die Feder ölen.
- Eventuell entstandener Metallgrat mit einer Feile entfernen.
Zusammenbau der Klemme in umgekehrter Reihenfolge. Ausschließlich orginale Spannstifte,
Zahnsegmet-Muttern und Schrauben von Gunnebo Lifting verwenden.
8
Überprüfung
Mindestens einmal (1x) pro Jahr (gesetzlich vorgeschrieben) oder bei Beschädigung der
FBKTrägerklemme muss diese durch Gunnebo Lifting oder einen anderen Fachbetrieb
kontrolliert, gestestet und überprüft werden.
9
Entsorgung
De CVB-Trägerklemme kann, vorausgesetzt sie ist unbenutzbar, den örtlichen Vorschriften
entsprechend entsorgt werden.
18
10
Checkliste zur fehlersuche
Störung
Mögliche Ursache
Abhilfe
Lastgut rutscht
Lastgut verschmutzt
Zwinge u/o Segment verschmutzt
Zwinge u/o Segment stumpf
Maulöffnung verbogen
Reinigen
Reinigen
Austauschen
Austauschen
Gehäuse verbogen
Klemme überlastet
Ausmustern
Kranöse oval Ausmustern
Klemme überlastet
Ausmustern
Feder beschädigt
Verschleiß der Feder
Ausmustern
Achse verbogen
Klemme überlastet
Ausmustern
Spannstifte fehlen
Falsche Montage
Spannstifte montieren
Klemme öffnet/schließt
schwer
Keilnut verschmutzt
Klemme überlastet
Klemme verschmutzt
Verschleiß der Klemme
Reinigen
Ausmustern
Reinigen
Ausmustern
11
5 Jahre Garantie
Deutsch
Gunnebo Lifting gewährt Endbenutzern 5 Jahre Garantie auf ihre Hebeklemmen.
Diese Garantie gilt nur für den ursprünglichen Endbenutzer der Hebeklemme und unter
der Voraussetzung, dass das Hebemittel während der gesamten Garantiefrist den Anweisungen
des Herstellers und Verkäufers gemäß inspiziert, geprüft und gewartet wird.
Die Garantiefrist beträgt 5 Jahre ab Verkaufsdatum. Die Garantie unterliegt den hier genannten
Bestimmungen und Bedingungen.
11a Bedingungen und Bestimmungen
Nur Mängel als Folge von Herstellungsfehlern, die bei normalem Gebrauch auftreten, werden
von der Garantie abgedeckt. Von der Garantie ausgeschlossen ist Verschleiß an Teilen
wie z. B. Zahnkreisen, Zahnsegmenten, Spannfedern usw. Wenn innerhalb der Garantiefrist
ein Mangel festgestellt wird, wird die Hebeklemme nach Ermessen des Herstellers ersetzt
oder repariert.
Von der Garantie ausgeschlossen sind Klemmen mit Mängeln die auf Folgendes zurückzuführen
sind:
- Normaler Verschleiß
- Überlastung
- Unsachgemäßer oder nachlässiger Gebrauch
- Beschädigungen
- Nichteinhaltung der vorgeschriebenen Verfahren und Maßnahmen
- Heben von anderem Hebegut als auf der Klemme oder in der Bedienungsanleitung angegeben
- Modifikationen/Änderungen an der Gunnebo -Klemme
19
- Unsachkundiger Gebrauch der Klemme und Nichteinhaltung der Anweisungen in der
betreffenden Bedienungsanleitung
- Wartungs- und/oder Revisionsarbeiten, die nicht von einem anerkannten Gunnebo -Händler
durchgeführt wurden.
Der Hersteller haftet nicht für Nebenschäden oder Schäden, die sich aus dem Gebrauch der
Hebeklemme oder einem Verstoß gegen die Garantie ergeben.
11b
Sicherheitsinspektion
Alle Inspektionen und Reparaturen müssen in das Inspektionsschema eingetragen werden.
Dies gilt nicht nur für die eigenen Inspektionen, sondern auch für Inspektionen, die von
einem anerkannten Gunnebo Lifting-Händler vorgenommen werden. Wenn die Einheit zur
Inspektion oder Wartung gegeben wird, muss das Wartungsheft immer mitgeliefert werden.
Schäden an der Hebeklemme Werden Verschleiß oder Beschädigungen in irgendeiner Form
festgestellt, ist folgendermaßen orzugehen:
1 Die Klemme außer Betrieb nehmen (Datum der Außerbetriebnahme notieren).
2 Versuchen, die Ursache des Defekts zu ermitteln, z. B. (die vollständige Liste finden Sie in
Kap. 1):
- Überlastung
- Unsachgemäßer Gebrauch (die Klemme ist nicht zum Ziehen oder Schleppen von Objekten
geeignet)
- Unsachkundiger Gebrauch
- Grober oder nachlässiger Gebrauch
Derartige Beschädigungen sind von der Garantie ausgeschlossen! Um Ihre Sicherheit und die
Sicherheit Ihrer Kollegen/Mitarbeiter zu gewährleisten, muss dieses Verfahren dennoch eingehalten
werden.
3 Die Hebeklemme zusammen mit dem Wartungsheft bei einem anerkannten Gunnebo Lifting
-Reparaturfachmann abgeben.
4 Nach der Revision/Reparatur die Klemme wieder in Betrieb nehmen. Datum der Inbetriebnahme
im Wartungsheft notieren (auf Seite 31).
11c
Kontrollenzeitplan
Monate
Jahre
Vom eigenen Sicherheitsbeauftragten durchzuführende Inspektionen
Wartung durch einen
anerkannten Gunnebo
Lifting Reparaturfachmann
Revision durch einen
anerkannten Gunnebo
Lifting Reparaturfachmann
20
4
8
1
12
16
20
2
24
28
32
3
36
40
44
4
48
52
56
5
60
Sommario
1 In generale
2 Principio operativo
3 Applicazioni consentite
4 Istruzioni di sicurezza
5 Sollevamento
6 Manutenzione
7 Smontaggio/Montaggio
8 Revisione
9 Smaltimento
10 Elenco delle verifiche per la risoluzione dei problemi
11 Garanzia
21
21
21
22
23
24
24
24
25
25
25
Appendice
- Vista esplosa della clampa di sollevamento per putrelle di sicurezza CVB
27
- Come utilizzare correttamente la clampa di sollevamento per putrelle di sicurezza CVB 28
1
In Generale
Congratulazioni per l’acquisto della vostra nuova clampa di sollevamento per putrelle di sicurezza
Gunnebo Lifting CVB I sistemi di qualità della gestione e dei servizi della società Gunnebo Lifting
sono interamente conformi alle norme ISO 9001. I molti anni di ampia esperienza rappresentano una
garanzia di massima qualità e sicurezza. La clampe di sollevamento Gunnebo Lifting sono realizzate
di acciaio d’alta qualità con leghe e sono pienamente conformi alle norme e regolamentazioni
europee, quali indicate nella Direttiva dei macchinari 2006/42/EC.
2
Principio Operativo
La clampa di sollevamento a trave di sicurezza CVB è stata sviluppata in particolar modo per
il sollevamento di putrelle d’acciaio. Un maniglione di sollevamento speciale viene utilizzato
per sistemare il centro di gravità della putrella, in modo che quest’ultima possa essere
sollevata direttamente sotto il maniglione di sollevamento. Questo fatto mantiene l’equilibrio
della putrella, una volta sollevata. La clampa di sollevamento CVB è dotata di un meccanismo
di sicurezza consistente in un dispositivo di bloccaggio, una molla di tensione ed una leva.
Una volta azionata la leva, il meccanismo di sicurezza fornisce un pretensionamento costante
della camma sulla putrella d’acciaio, impedendo in tal modo che la clampa civoli quando viene
applicata la forza di sollevamento. Quando viene sollevato un carico, la forza di presa sulla camma
viene incrementata dal peso del carico stesso. In tal modo ci si assicura inoltre che la clampa non si
allenti dalla lama quando viene disattivata la forza di sollevamento a livello della clampa.
Português
3
Applicazioni Consentite
La clampa di sollevamento CVB può essere utilizzata soltanto per il sollevamento ed il trasporto
di putrelle d’acciaio (T, UNP, INP, IPE, HE, etc.), per cui è possibile posizionare la clampa
su un punto piatto di contatto, in modo che la clampa si disponga completamente sulla
flangia della putrella.
Le posizioni consentite per l’impiego della clampa sono il sollevamento ed il trasporto di
putrelle:
- dalla posizione orizzontale e
- dalla posizione verticale.
21
4
Istruzioni de Sicurezza
Prima di tutto, la sicurezza! Garantite la vostra sicurezza personale leggendo per prima
cosa le seguenti istruzioni di sicurezza.
Assicurare la propria sicurezza e continuare a trarre vantaggio dalla sicurezza del nostro
prodotto facendo ispezionare e collaudare la clampa e, se necessario, realizzarne la revisione
una volta all'anno da parte della Gunnebo Lifting o da un altro centro di assistenza
e di riparazioni meccaniche qualificato e noto. Vedere pure il Paragrafo 8 Revisione. Mettersi in contatto con la Gunnebo Lifting per ulteriori informazioni.
Evitare situazioni Pericolose per la Vita
Si possono prevenire situazioni pericolose prendendo seriamente le precauzioni seguenti:
- Non lavorare mai con una clampa non collaudata.
- Mantenere sempre una distanza di sicurezza durante l'operazione di sollevamento e non restare
mai sotto il carico.
- Non utilizzare una clampa danneggiata; ottenerne la riparazione presso la Gunnebo Lifting
o un altro centro di assistenza e riparazioni meccaniche qualificato e noto. In caso di dubbio,
consultare il proprio fornitore.
- Non sollevare mai più di una putrella alla volta.
- Non sollevare mai putrelle più pesanti del limite di carico di lavoro (WLL), come indicato sulla
clampa stessa e sul certificato di collaudo.
- Non sollevare putrelle con flange che siano più spesse o più sottili dell'apertura delle griffe,
come indicato sulla clampa e sul certificato di collaudo.
- Quando si utilizzano allo stesso tempo più clampe, opposte le une alle altre, fornire imbracature
di sollevamento o catene di una lunghezza sufficiente ad assicurare che l'angolo ra le imbracature
o le catene non superi i 60 gradi.
- Quando si opera contemporaneamente con un certo numero di clampe di sollevamento poste
una accanto all'altra, utilizzare una trave di sollevamento (equilibratrice) e delle imbracature o
catene di sollevamento aventi una lunghezza sufficiente per assicurarsi che i maniglioni di
sollevamento sulle clampe non subiscano mai un carico laterale.
- DNon sistemare la clampa su sezioni di forma tronco-conica o conica presenti nella putrella
da sollevare.
- RRimuovere tutto il grasso, l'olio, la sporcizia, la corrosione e scrostature da laminatoio, nel
punto in cui si deve attaccare la clampa.
- La durezza della superficie della putrella non deve eccedere il valore di 37 HrC (345 Hb,
1,166 N/mm2).
- La clampa è adatta soltanto ad un impiego in normali condizioni atmosferiche.
Precauzioni di Sicurezza
- Assicurarsi che il maniglione di sollevamento non sia mai oggetto di carichi laterali.
- Una caduta libera o un movimento incontrollato di pendolio del gancio della gru, che causino
urti contro degli oggetti, possono indurre danni alla clampa. Se questo dovesse succedere,
verificare che la clampa si trovi in buone condizioni operative prima di riutilizzarla.
- Le clampe di sollevamento non sono adatte alla creazione di giunti permanenti.
- La clampa deve essere oggetto di manutenzione preventiva con una frequenza mensile,
secondo le linee guida descritte nel Capitolo 6 - Manutenzione.
- Non modificare la clampa (mediante saldature, smerigliature, etc.), dato che ciò può influire
in modo negativo sulla sua operabilità e sicurezza, rendendo così nulla qualsiasi forma di garanzia
e responsabilità del prodotto.
- Per questo stesso motivo, utilizzare soltanto elementi originali Gunnebo Lifting come pezzi di
ricambio.
- Un qualsiasi utilizzo improprio della clampa e/o l’inosservanza di tutte le direttive e avvertenza
menzionate in queste istruzioni operative, a proposito dell’impiego di questo prodotto, può
provocare danni alla salute dell’utente stesso e/o di altre persone presenti
22
5
Sollevamento
Português
- Verificare che il limite di carico di lavoro (WLL) della clampa di sollevamento per putrelle
di sicurezza sia sufficiente per il carico determinato dalle condizioni di sollevamento.
- Attaccare la clampa di sollevamento al meccanismo di sollevamento, per mezzo di:
- maniglione di sicurezza connesso direttamente al gancio di una gru,
- collegamento di accoppiamento o maniglione a D,
- imbracatura o catena, se necessario abbinata ad un collegamento di accoppiamento o ad
un maniglione a D.
- Assicurarsi che tutti gli attacchi siano stati collaudati e siano previsti per i pesi corretti; Assicurarsi
che i collegamenti ad accoppiamento ed i maniglioni siano abbastanza larghi da consentire alla
clampa di muoversi liberamente nel gancio;
- Verificare l'eventuale presenza sulla clampa di un qualsiasi danno visibile.
- Operare la leva per verificare se la clampa si apra e si chiuda uniformemente.
- Verificare se i denti della camma siano esenti da sporcizia e, se necessario, pulirli mediante una
spazzola metallica.
- Rimuovere qualsiasi traccia di grasso, sporcizia e scrostamenti da laminatoio dalla putrella al
punto della clampa di sollevamento.
- Utilizzare la leva per aprire la clampa.
- Sistemare le griffe il più all'interno possibile della putrella (la flangia dev'essere completamente
inserita nell'estremità della clampa), assicurandosi che la clampa sia posizionata in modo da
equlibrare il carico quando viene sollevata.
- Assicurarsi che il maniglione di sollevamento punti verso il centro della putrella o della struttura.
- Richiudere la clampa ruotando la leva completamente all'indietro.
- Sollevare con delicatezza, per consentire alla forza di sollevamento di essere applicata
uniformemente; verificare che la clampa non scivoli.
- Se il carico dovesse scivolare, leggere il paragrafo Nuova operazione di sollevamento.
- Se il carico dovesse continuare a scivolare, leggere il Capitolo 6 - Manutenzione.
- Assicurarsi che il carico si trovi in una posizione stabile prima di allentare la clampa dalla flangia.
23
6
Manutenzione
Dal punto di vista della sicurezza, verificare le condizioni generali della clampa almeno una
volta al mese, secondo le linee guida del Capitolo 7 - Smontaggio/Montaggio.
Terminare l'impiego della clampa di sollevamento per putrelle nei seguenti casi:
- se il corpo è fessurato o deformato, in modo particolare a livello degli angoli delle griffe,
- se il maniglione di sollevamento è visibilmente deformato,
- se la camma e/o i denti del perno non sono più affilati,
- se la molla si è allungata o si è rotta,
- se il meccanismo di bloccaggio a leva non è più efficiente o ha cessato di funzionare,
- se i perni del maniglione sono visibilmente deformati,
- se mancano uno o più perni di ritenuta,
- se il lato del maniglione di sollevamento si mostra premuto all'interno al livello dei perni
distanziatori.
A seconda dei difetti rimarcati:
- smontare e pulire la clampa (vedere il Capitolo 7 - Smontaggio/Montaggio) o richiedere
la revisione da parte della Gunnebo Lifting o presso un altro centro di assistenza
e riparazioni meccaniche qualificato e noto (vedere il Capitolo 8 - Revisione).
7
Smontaggio/Montaggio
La clampa di sollevamento per putrelle di sicurezza può essere facilmente smontata a scopi
di pulizia ed ispezione.
Seguire la seguente indicazione:
- Aprire la clampa alla sua massima estensione.
- Rimuovere la molla di tensione (13); nel caso del tipo 1,5 CVB, rimuovere per prima cosa
il perno di ritenuta (11) nell’insieme della camma (4).
- Rimuovere il perno di ritenuta e quello della camma (8).
- Rimuovere il maniglione di sollevamento (3) e l’insieme della camma.
- Rimuovere il perno del maniglione (2).
- Smontare la leva (5) rimuovendo il perno di ritenuta ed estrarre dalla clampa l’insieme di
bloccaggio (7).
- Rimuovere i perni (6) utilizzando un manicotto ed una chiave a stella.
- Pulire tutte le parti mediante un normale sgrassante.
- Ingrassare tutti i perni dei maniglioni mediante grasso per cuscinetti.
- Oliare la molla se necessario.
- Rimontare tutte le parti in ordine inverso.
- Inserire sempre nuovi perni originali di ritenuta servendosi di un martello ed un abbinamento
di pinze e punzonatore.
- Disporre sempre nuovi bulloni e dadi per i perni.
- Per la sostituzione della varie parti, utilizzare sempre elementi originali Gunnebo Lifting.
- Rimuovere tutte le sbavature mediante una lima.
8
Revisione
Almeno una volta all’anno, o in occasione di danni alla clampa, la clampa di sollevamento
per putrelle di sicurezza CVB deve essere ispezionata, collaudata e, se necessario, revisionata
dalla Gunnebo Lifting o da un centro di assistenza e di riparazioni meccaniche qualificato e noto.
24
9
Smaltimento
Una volta che la clampa di sollevamento di sicurezza CVB ha raggiunto il termine della sua
durata utile, essa potrà essere trattata alla stregua di rottame ferroso, a condizione che
vanga resa inadatta all'impiego.
10
Elenco Delle Verifiche per la Risoluzione dei Problemi
Guasto/malfunzionamento
Causa possibile
Azion
Scivolamento del carico
Carico sporco
Perno e/o camma sporchi
Perno e/o camma spuntati
Griffe che restano in
posizione di apertura
perché piegate
Pulire il carico
Pulire la clampa
Revisione della clampa
Rigetto della clampa
Corpo piegato
Clampa sovraccarica
Rigetto della clampa
Maniglione di sollevamento
ovalizzato
Clampa sovraccarica
Rigetto della clampa
La molla è difettosa
Molla usurata
Revisione della clampa
Perni del maniglione piegati
Clampa sovraccarica
Rigetto della clampa
Perni di ritenuta mancanti
Montaggio non corretto
Montare nuovi perni di
ritenuta
Clampa difficile a [missing
text - manca testo]
apertura/chiusura
Solco della chiavetta sporco
Clampa usurata
Clampa sovraccarica
Clampa sovraccarica
Pulire la clampa
Rigetto della clampa
Pulire la clampa
Rigetto della clampa
11
Garanzia
La Gunnebo Lifting offre una garanzia di 5 anni sulle sue clampe di sollevamento.
Questa garanzia è applicabile all’utente finale d’origine delle clampe di sollevamento. E soltanto
nel caso che la clampa in questione sia stata ispezionata, verificata e assistita secondo le istruzioni
e da parte di un distributore ufficiale. Il periodo di garanzia di 5 anni decorre dal giorno
dell’acquisto ed è soggetto a tutte le condizioni e misurazioni menzionate in questo documento.
Português
11a
Condizioni
Questa garanzia copre soltanto le anomalie degli utensili di sollevamento che siano conseguenti
ad errori di produzione e che intervengano durante un impiego normale. La garanzia non copre le
usure di elementi quali perni di rotazione, montaggi delle camme, molle di bloccaggio, etc.
Se dovesse presentarsi un qualsiasi tipo di difetto durante questo periodo di garanzia, l’utensile di
sollevamento verrà sostituito o riparato, ad insindacabile giudizio del produttore.
Non si potrà usufruire della garanzia sulle clampe in seguito alle seguenti anomalie:
- usura regolare
- sovraccarico
25
- impiego errato e/o senza cura
- danni
- innosservanza di procedure e misurazioni
- sollevamento di materiali diversi da quelli indicati sulla clampa o specificati nel Manuale dell’utente
- adattamento e/o modifica della clampa Gunnebo Lifting.
- un impiego scriteriato della clampa e l’inosservanza delle indicazioni menzionate nel Manuale
dell’utente
- nel caso che la manutenzione e/o la revisione non sia stata condotta da un distributore ufficiale
Gunnebo Lifting.
Il produttore non si assume alcuna responsabilità per danni incidentali o derivanti dall’impiego
degli utensili di sollevamento, né per l’inosservanza delle istruzioni menzionate in
questo Manuale.
11b
Procedimento de Inspecção de Segurança
Todas as inspecções e reparações devem ser registadas no diagrama de manutenção.
Isto é válido não só para as suas próprias inspecções mas também para as inspecções efectuadas
pelo seu distribuidor autorizado da Gunnebo Lifting. Quando a pinça é entregue para manutenção
e inspecção, deve sempre apresentar o diagrama de manutenção.
Pinças de elevação com defeito.
Quando é indicado algum tipo de desgaste ou dano, deve tomar as seguintes medidas.
1 Inutilize a pinça de elevação. (Tome nota da data da falha da pinça de elevação)
2 Tente apurar a causa da falha, como por exemplo (lista completa disponível no capítulo 1):
- Sobrecarga
- Utilização errada e/ou descuidada
- etc.
As reclamações indicadas no N.º 2 não são abrangidas pela garantia! Para garantir a sua
segurança e a dos seus colegas, é obrigatório seguir estes procedimentos
4. Se a pinça de elevação tiver sido revista/reparada pelo seu distribuidor, pode utilizar a sua
pinça novamente em segurança. Tome nota desta data no seu diagrama de manutenção.
11c
Registo de Inspecção
Meses
Anos
Inspecções de segurança pelo
seu próprio inspector
Manutenção por um
distribuidor oficial da Gunnebo
Lifting
Revisão por um distribuidor
oficial da Gunnebo Lifting
26
4
8
1
12
16
20
2
24
28
32
3
36
40
44
4
48
52
56
5
60
DISASSEMBLING/ASSEMBLING
DEMONTERING/MONTERING
DEMONTAGE/MONTAGE
DESMONTAGEM/MONTAGEM
27
SAFELY LIFTING
KORREKT ANVÄNDING AV VERTIKALA LYFTHANDSKAR
GEFAHRLOS HEBEN
COMO UTILIZAR CORRECTAMENTE AS PINÇAS DE ELEVAÇÃO VERTICAL
28
Maintenance chart
Remarks
Date
Signature
Year 1
Year 1
Year 1
Year 2
Year 2
Year 2
Year 3
Year 3
Year 3
Year 4
Year 4
Year 4
Year 5
Year 5
Year 5
Safety inspections by your own inspector
Skyddsinspektioner av egen inspektör
Vom eigenen Sicherheitsbeauftragten durchzuführende Inspektionen
Inspecções de segurança pelo seu próprio inspector
Maintenance by a official Gunnebo Lifting distributor
Underhåll av auktoriserad Gunnebo Lifting -återförsäljare
Wartung durch einen anerkannten Gunnebo Lifting-Reparaturfachmann
Manutenção por um distribuidor oficial da Gunnebo Lifting
Revision by a official Gunnebo Lifting distributor
Revision av auktoriserad Gunnebo Lifting-återförsäljare
Revision durch einen anerkannten Gunnebo Lifting-Reparaturfachmann
Revisão por um distribuidor oficial da Gunnebo Lifting
29
Notes
30
Notes
31
Gunnebo Industrier AB,
Lifting Systems
P O Box 44
SE-730 60 Ramnäs, Sweden
www.gunnebolifting.com
32
User Instr. CVB - October 2011