1
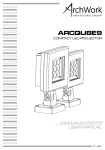
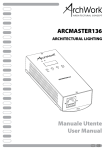
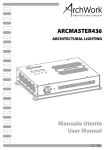
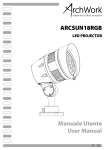
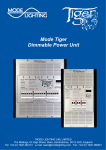
WALLDIM4
WALLMIX
LED CONTROLLER
Manuale Utente
User Manual
IT
EN
Music & Lights S.r.l. si riserva ogni diritto di elaborazione in qualsiasi forma delle presenti istruzioni per l’uso.
La riproduzione - anche parziale - per propri scopi commerciali è vietata.
Al fine di migliorare la qualità dei prodotti, la Music&Lights S.r.l. si riserva la facoltà di modificare, in
qualunque momento e senza preavviso, le specifiche menzionate nel presente manuale di istruzioni.
Tutte le revisioni e gli aggiornamenti sono disponibili nella sezione 'Manuali' sul sito www.musiclights.it
REV.001-08/12
WALLDIM4/WALLMIX
INDICE
Sicurezza
Avvertenze generali
Attenzioni e precauzioni per l’installazione
Informazioni generali
4
4
4
1 Descrizione
1. 1 Specifiche tecniche WALLDIM4 e WALLMIX
5
2 Installazione
2. 1 Montaggio
2. 2 Collegamento dei fili
6
6
3 Funzioni e impostazioni
3. 1 Funzionamento e impostazione base WALLDIM4
3. 2 Funzionamento e impostazione base WALLMIX
3. 3 Impostazione DIP-switch WALLMIX
7
8
9
Certificato di garanzia
Contenuto dell'imballo:
3
• WALLDIM4/WALLMIX
• Piastra di montaggio con 2 viti
• Manuale utente
WALLDIM4/WALLMIX
4
ATTENZIONE! Prima di effettuare qualsiasi operazione con l’unità, leggere con attenzione
questo manuale e conservarlo accuratamente per riferimenti futuri. Contiene informazioni
importanti riguardo l’installazione, l’uso e la manutenzione dell’unità.
SICUREZZA
Avvertenze generali
• I prodotti a cui questo manuale si riferisce sono conformi alle Direttive della Comunità Europea e pertanto recano la sigla .
• Il dispositivo funziona con tensione DC 12V.
• Le operazioni di collegamento alla rete di distribuzione dell’energia elettrica devono essere effettuate
da un installatore elettrico qualificato. Verificare che frequenza e tensione della rete corrispondono alla
frequenza ed alla tensione per cui l’unità è predisposta, indicate sulla targhetta dei dati elettrici.
• L’unità non per uso domestico, solo per uso professionale.
• Evitare di utilizzare l’unità:
- in luoghi soggetti ad eccessiva umidità;
- in luoghi soggetti a vibrazioni, o a possibili urti;
- in luoghi a temperatura superiore ai 50°C o inferiori a 0°C.
• Evitare che nell’unità penetrino liquidi infiammabili, acqua o oggetti metallici.
• Non smontare e non apportare modifiche all’unità.
• Tutti gli interventi devono essere sempre e solo effettuati da personale tecnico qualificato. Rivolgersi al
più vicino centro di assistenza tecnica autorizzato.
• Se si desidera eliminare il dispositivo definitivamente, consegnarlo
per lo smaltimento ad un’istituzione locale per il riciclaggio.
Attenzioni e precauzioni per l’installazione
• Se il dispositivo dovesse trovarsi ad operare in condizioni differenti da quelle descritte nel presente
manuale, potrebbero verificarsi dei danni; in tal caso la garanzia verrebbe a decadere. Inoltre, ogni altra
operazione potrebbe provocare cortocircuiti, incendi, scosse elettriche, rotture etc.
• Prima di iniziare qualsiasi operazione di manutenzione o pulizia sull’unità togliere la tensione dalla rete
di alimentazione.
• Per la pulizia usare solo un panno morbido, asciutto, non impiegare in nessun caso prodotti chimici o
acqua.
INFORMAZIONI GENERALI
Spedizioni e reclami
Le merci sono vendute “franco nostra sede” e viaggiano sempre a rischio e pericolo del distributore/cliente. Eventuali avarie e danni dovranno essere contestati al vettore. Ogni reclamo per imballi manomessi
dovrà essere inoltrato entro 8 giorni dal ricevimento della merce.
Garanzie e resi
Il prodotto è coperto da garanzia in base alle vigenti normative. Sul sito www.musiclights.it è possibile
consultare il testo integrale delle “Condizioni Generali di Garanzia”. Si prega, dopo l’acquisto, di procedere
alla registrazione del prodotto sul sito www.musiclights.it. In alternativa il prodotto può essere registrato
compilando e inviando il modulo riportato alla fine del manuale. A tutti gli effetti la validità della garanzia
è avallata unicamente dalla presentazione del certificato di garanzia. Music & Lights constata tramite verifica sui resi la difettosità dichiarata, correlata all’appropriato utilizzo, e l’effettiva validità della garanzia;
provvede quindi alla riparazione dei prodotti, declinando tuttavia ogni obbligo di risarcimento per danni
diretti o indiretti eventualmente derivanti dalla difettosità.
WALLDIM4/WALLMIX
5
- 1 - DESCRIZIONE E SPECIFICHE TECNICHE
La serie di controller WALL si compone di due interfacce per il montaggio a parete, ciascuna concepita
per gestire fino a un massimo di 4 canali DMX. WALLMIX è adatto per il controllo di proiettori RGB/RGBW
con macro colori e scene pre-impostate nell’unità. WALLDIM4 è invece ideato per gestire proiettori di
luce bianca (1ch), fino a un massimo di 4 indirizzi indipendenti. Le operazioni risultano essere semplici
ed intuitive, grazie all’interfaccia encoder retroilluminata LED, rendendo questi controller una soluzione
realmente alla portata di tutti.
Technical Data
WALLDIM4
Power Supply
DC12V
DMX channels
4
Control
Dimmer (each zone)
Editable programs
One current scene
Dimensions (mm)
98 x 98 x 52
Weight
0,5 kg
WALLMIX
Power Supply
DC12V
DMX channels
4
Control
Colour, Dimmer, Fade, Memory
Editable programs
One current scene
Dimensions (mm)
98 x 98 x 52
Weight
0,5 kg
52
16
Technical Data
98
Fig.1
98
WALLDIM4/WALLMIX
6
- 2 - INSTALLAZIONE
2.1 MONTAGGIO
Il controller WALLDIM4/WALLMIX può essere installato in una scatola elettrica standard (60 mm).
• Montare la piastra posteriore del controller con 2 o più viti.
• Chiudere l’unità con montaggio a pressione del pannello frontale sulla piastra posteriore.
Fig.2
2.2 COLLEGAMENTO DEI FILI
• DMX: collegare il cavo DMX dell’unità di illuminazione al controller WALLDIM4/WALLMIX.
• POWER: collegare l’alimentazione DC 12V al controller WALLDIM4/WALLMIX prestando attenzione a
non invertire le polarità.
Seguire lo schema di connessione come mostrato in figura.
BLOCCO CONNESSIONI
12V
0V
POWER
GND
Fig.3
DMXDMX
DMX+
XLR: 1 = Massa
2 = DMX3 = DMX +
WALLDIM4/WALLMIX
7
- 3 - FUNZIONI E IMPOSTAZIONI
3.1 FUNZIONAMENTO E IMPOSTAZIONE BASE - WALLDIM4
1
1. ENCODER ROTATIVO: per regolazione
luminosità dei dispositivi LED o per
attivazione funzione Blackout.
2. Tasto DIMMER (Dimmer1/Dimmer2/
Dimmer3/Dimmer4): per controllo
dispositivi LED in modo singolare o
sincronizzato.
2
Fig.4
• Premere il tasto DIMMER1/DIMMER2/DIMMER3/DIMMER4 per selezionare il dispositivo/gruppo che si
desidera controllare.
• Ruotare l’ ENCODER per regolare la luminosità.
• Ripetere le operazioni precedenti per settare tutti i dispositivi LED.
NOTA - Quando la rotazione dell’ encoder supera i valori estremi (0 o 255), il relativo indicatore LED lampeggia per segnalare che la luminosità è fuori intervallo e bisogna tornare indietro con l’encoder.
Multi controllo
1. Premere il tasto dimmer per selezionare il dispositivo/gruppo che si desidera controllare una volta sola.
2. Ruotare l’ ENCODER per regolare la luminosità.
Per esempio: premere il tasto DIMMER1 e poi premere il tasto DIMMER3 quindi ruotare l’ ENCODER. In
questo modo si potranno avere i due dispositivi/gruppi sotto controllo.
Controllo integrale
1. Non premere alcun tasto dimmer.
2. Ruotare l’ ENCODER per regolare la luminosità di tutti i dispositivi.
Funzione Blackout
Per attivare la funzione Blackout per tutti i dispositivi premere l’encoder. Premere nuovamente per disattivare.
ATTENZIONE - Questa funzione non equivale a spegnere il dispositivo; significa invece che nessun segnale
DMX è inviato (valore =0).
IMPORTANTE
Nel caso si verifichi una brusca interruzione di alimentazione tutte le operazioni incompiute verranno
automaticamente memorizzate dal controller.
WALLDIM4/WALLMIX
8
3.2 FUNZIONAMENTO E IMPOSTAZIONE BASE - WALLMIX
2
1
4
3
1.
2.
3.
4.
5.
ENCODER ROTATIVO
Tasto DIMMER/WHITE
Tasto COLOR
Tasto FADE
Tasto MEMORY
5
Fig.5
Dimmer/White
• Nella modalità canale RGB/RGB-D, premere il tasto Dimmer/White e ruotare l’ENCODER per regolare la
luminosità del dispositivo.
• Nella modalità canale RGBW/RGBW-D, premere il tasto Dimmer/White e ruotare l’ENCODER per regolare la luminosità del Rosso/Verde/Blu; premere il tasto Dimmer/White e ruotare l’ENCODER per regolare
la luminosità del Bianco
NOTA - Nella modalità canale RGBW/RGBW-D, quando si regola il bianco e il valore è 0 oppure 255, l’indicatore LED del tasto DIMMER/WHITE lampeggerà.
Colore
1. Premere il tasto COLORE per entrare nella modalità colore.
2. Ruotando l’ENCODER è possibile osservare il cambiamento di colore dei dispositivi.
3. Tenere premuto, per 5 secondi, il tasto MEMORY per memorizzare il colore corrente.
Fade
1. Premere il tasto FADE per entrare nella modalità dissolvenza.
2. Ruotare l’ENCODER per regolare la velocità della dissolvenza (0.1s-300s).
3. Tenere premuto, per 5 secondi, il tasto MEMORY per memorizzare l’effetto.
NOTA - Un solo colore o effetto dissolvenza può essere memorizzato.
Memory
• Memorizzare: premere il tasto MEMORY per 5 secondi, gli indicatori LED sotto l’ encoder lampeggeranno
tre volte, per segnalare che la scena corrente è stata memorizzata con successo.
• Uso memoria: premere il tasto MEMORY per mandare in esecuzione sui dispositivi la scena memorizzata.
Standby
Per attivare la funzione Blackout per tutti i dispositivi premere l’encoder. Premere nuovamente per disattivare.
NOTA - In caso di non funzionamento per più di 30 secondi, l’indicatore LED si spegnerà. Quando si ruoterà
nuovamente l’encoder l’unità entrerà nella modalità scelta in precedenza.
WALLDIM4/WALLMIX
9
3.3 IMPOSTAZIONE DIP-SWITCH WALLMIX
Il WALLMIX dispone di un modulo DIP-switch presente sul pannello posteriore che consente l’impostazione della modalità desiderata. Far riferimento allo schema seguente per l’impostazione dei DIP-switch
n°1-2.
MODE
DIP-SWITCH SETTING
1
Dip #1=OFF - Dip #2=OFF
ON
2
ON
3
ON
ON
ON
ON
ON
ON
ON
Control RGB
LED lighting groups
Dip #1=ON - Dip #2=OFF
Control RGB, D
LED lighting groups
Dip #1=OFF - Dip #2=ON
Control RGBW
LED lighting groups
ON
ON
ON
Dip #1=ON - Dip #2=ON
4
DESCRIPTION
ON
Control RGBW, D
LED lighting groups
Valido per le modalità 1, 2, 3 e 4
Color Mode: selezionare colore.
Fade Mode: esecuzione effetto dissolvenza.
Dimmer Mode: regolare la luminosità dei dispositivi
Memory Mode: memorizzare la scena corrente.
NOTA - Un solo colore o effetto dissolvenza può essere memorizzato.
Encoder
Selezionare il colore e regolare il tempo di dissolvenza (0.1-300s), o regolare la luminosità per i dispositivi
e la funzione standby. Ruotando la manopola si possono regolare: dimmer, color e fade. Quando il valore
è 0 o 255, l’indicatore LED lampeggerà.
All rights reserved by Music & Lights S.r.l. No part of this instruction manual may be
reproduced in any form or by any means for any commercial use.
In order to improve the quality of products, Music&Lights S.r.l. reserves the right to modify the
characteristics stated in this instruction manual at any time and without prior notice.
All revisions and updates are available in the ‘manuals’ section on site www.musiclights.it
WALLDIM4/WALLMIX
TABLE OF CONTENTS
Safety
General instructions
Warnings and installation precautions
General information
2
2
2
1 Description
1. 1 Technical specifications WALLDIM4 and WALLMIX
3
2 Installation
2. 1 Mounting
2. 2 Connections
4
4
3 Functions and settings
3. 1 Operation and setup WALLDIM4
3. 2 Operation and setup WALLMIX
3. 3 Dip switch - WALLMIX
5
6
7
Warranty
Packing content
1
• WALLDIM4/WALLMIX
• Plate with 2 screws
• User manual
WALLDIM4/WALLMIX
2
WARNING! Before carrying out any operations with the unit, carefully read this instruction
manual and keep it with cure for future reference. It contains important information about
the installation, usage and maintenance of the unit.
SAFETY
General instruction
• The products referred to in this manual conform to the European Community Directives and are therefore marked with .
• The unit is supplied with voltage DC 12V.
• The connection to the main network of electric distribution must be carried out by a qualified electrical
installer. Check that the main frequency and voltage correspond to those for which the unit is designed
as given on the electrical data label.
• This unit is not for home use, only professional applications.
• Never use the fixture under the following conditions:
- in places subject to excessive humidity;
- in places subject to vibrations or bumps;
- in places with a temperature of over 50°C or less than 0°C.
• Make certain that no inflammable liquids, water or metal objects enter the fixture.
• Do not dismantle or modify the fixture.
• All work must always be carried out by qualified technical personnel. Contact the nearest sales point for
an inspection or contact the manufacturer directly.
• If the unit is to be put out of operation definitively, take it to a local recycling
plant for a disposal which is not harmful to the environment.
Warnings and installation precautions
• If this device will be operated in any way different to the one described in this manual, it may suffer
damage and the guarantee becomes void. Furthermore, any other operation may lead to dangers like
short circuit, burns, electric shock, etc.
• Before starting any maintenance work or cleaning the projector, cut off power from the main supply.
• For cleaning only use a dry, soft cloth, by no means chemicals or water.
GENERAL INFORMATION
Shipments and claims
The goods are sold “ex works” and always travel at the risk and danger of the distributor. Eventual damage will have to be claimed to the freight forwarder. Any claim for broken packs will have to be forwarded
within 8 days from the reception of the goods.
Warranty and returns
The guarantee covers the fixture in compliance with existing regulations. You can find the full version of
the “General Guarantee Conditions” on our web site www.musiclights.it. Please remember to register the
piece of equipment soon after you purchase it, logging on www.musiclights.it. The product can be also
registered filling in and sending the form available on your guarantee certificate. For all purposes, the validity of the guarantee is endorsed solely on presentation of the guarantee certificate. Music & Lights will
verify the validity of the claim through examination of the defect in relation to proper use and the actual
validity of the guarantee. Music & Lights will eventually provide replacement or repair of the products declining, however, any obligation of compensation for direct or indirect damage resulting from faultiness.
WALLDIM4/WALLMIX
3
- 1 - DESCRIPTION AND TECHNICAL SPECIFICATIONS
WALL control series is a range of two wall-mounted interface conceived to contro a number of 4 DMX
channels WALLMIX is a plug-n-play solution for RGB and RGBW fixtures, containing macro and fade effect presets. WALLDIMMER4 instead is conceived to be used with white luminaires (1ch each), up to 4
indipendent zones. Operations are totally simple and user-friendly through the central round encoder
and coloured backlight which reports the choosen operations, making the WALL series an affordable tool
recommended for everyone.
Technical Data
WALLDIM4
Power Supply
DC12V
DMX channels
4
Control
Dimmer (each zone)
Editable programs
One current scene
Dimensions (mm)
98 x 98 x 52
Weight
0,5 kg
WALLMIX
Power Supply
DC12V
DMX channels
4
Control
Colour, Dimmer, Fade, Memory
Editable programs
One current scene
Dimensions (mm)
98 x 98 x 52
Weight
0,5 kg
52
16
Technical Data
98
Fig.1
98
WALLDIM4/WALLMIX
4
- 2 - INSTALLATION
2.1 MOUNTING
The WALLDIM4/WALLMIX controller can be installed in a standard (60mm) electrical backbox.
• Mount the back side of the interface on the wall with 2 or more screws.
• Close the unit by clipping the front panel onto the back plate.
Fig.2
2.2 CONNECTIONS
• DMX: connect the DMX cable to lighting fixtures.
• POWER: connect the power DC12V. Make sure to not invert the positive and the ground.
Follow the wiring diagram as shown in figure.
CONNECTOR BLOCK
12V
0V
POWER
GND
Fig.3
DMXDMX
DMX+
XLR: 1 = Ground
2 = DMX3 = DMX +
WALLDIM4/WALLMIX
5
- 3 - FUNCTIONS AND SETTINGS
3.1 OPERATION AND SETUP - WALLDIM4
1
1. ENCODER: Blackout the LED
lightings or adjust brightness
of the luminaries.
2. DIMMER (Dimmer1/Dimmer2/
Dimmer3/Dimmer4): control
LED fixtures individually or
synchronously
2
Fig.3
• Press button DIMMER 1/DIMMER 2/DIMMER 3/DIMMER 4 to select the fixture/groups you need to control.
• Spin ENCODER to adjust the brightness.
• Repeat the operation above to adjust your LED luminaries one by one.
NOTE - When the encoder turned to output value at 0 or 255, the corresponding LED indicator will flash,
which means the brightness is already out of range, you need turn back the encoder.
Multi control
1. Press DIMMER buttons, to select fixtures/groups you need to control at one time
2. Spin ENCODER to adjust the brightness
For example: press Dimmer 1 then press Dimmer 3, then spin the encoder, you will see, two fixtures/
groups are under control.
Integral control
1. Don’t press any DIMMER button.
2. Spin the ENCODER to adjust brightness for all luminaries.
Blackout function
Press encoder to blackout all luminaries, it doesn’t mean Power ON/OFF the luminaries, in this function, no
DMX signal send out, the value is 0.
Power failure memory
When interrupted by abrupt power off, all the unfinished operation will be memorized by the controller
automatically.
WALLDIM4/WALLMIX
6
3.2 OPERATION AND SETUP - WALLMIX
2
1
4
3
1.
2.
3.
4.
5.
ENCODER
DIMMER/WHITE button
COLOR button
FADE button
MEMORY button
5
Fig.3
Dimmer/White
• Under RGB/RGBD channel mode, press the Dimmer/White button, spin the ENCODER to adjust the
brightness of the luminaries
• Under RGBW/RGBWD channel mode, press the Dimmer/white button, spin the ENCODER to adjust
brightness of R/G/B, press the Dimmer/White button again, spin the ENCODER to adjust the brightness
of the white.
NOTE - Under RGBW/RGBWD channel mode, when you adjust the white, the value is on 0 or 255, the LED
indicator under Dimmer/White button will blink.
Color
1. Press COLOR button, entering COLOR mode.
2. Spin the encoder, you will see your luminaries change the color when spinning the encoder.
3. Hold and press the MEMORY button for 5 seconds to store the current color.
Fade
1. Press FADE button, entering FADE mode, then twisting the encoder to adjust the speed of the fade
(0.1s-300s).
2. Press MEMORY button for 5 seconds to store the fade effect.
NOTE - Notion: only one current color or fade can be memorized
Memory
• Memorize: Press and hold the MEMORY button for 5 seconds, the LED indicators under the encoder
flash three times, then one current scene memorized successfully.
• Use memory: Press the memory button, your LED luminaries will run the scene you’ve stored.
NOTE: You have to make sure, there’s one current scene stored successfully.
Stand by
Press the encoder to black out all the lights, press the encoder again, all lights light up.
If you do not operation the unit more then 30 seconds, the LED indicator on Wall-Dimmer will black out ,
when twisting the encoder again, it will enter the mode you have chosen before.
WALLDIM4/WALLMIX
7
3.3 DIP SWITCH - WALLMIX
To choose the mode you desired. Please refer to the following diagram to set the DIP Switch:
MODE
DIP-SWITCH SETTING
1
Dip #1=OFF - Dip #2=OFF
ON
2
ON
3
ON
ON
ON
ON
ON
ON
ON
ON
Control RGB
LED lighting groups
Dip #1=ON - Dip #2=OFF
Control RGB, D
LED lighting groups
Dip #1=OFF - Dip #2=ON
Control RGBW
LED lighting groups
ON
ON
ON
Dip #1=ON - Dip #2=ON
4
DESCRIPTION
Control RGBW, D
LED lighting groups
Mode1, 2, 3 and 4
Color Mode: Select color
Fade Mode: Run fade effect
Dimmer Mode: Adjust the brightness for luminaries
Memory Mode: Store one current scene. (Only one color or fade effect can be memorized)
Middle encoder
Select color and adjust the fade time (0.1-300s), or adjust the brightness for the luminaries, and stand by
functions. When twisting the knob adjust the dimmer, color, fade, the value is on the 0 or 255 ,the LED
indicate will blink.
"
• Si prega, dopo l’acquisto, di
procedere alla registrazione del
prodotto sul sito www.musiclights.it.
In alternativa il prodotto può essere
registrato compilando e inviando il
modulo riportato sul retro.
• Sono esclusi i guasti causati da
imperizia e da uso non appropriato
dell’apparecchio.
• La garanzia non ha più alcun effetto
qualora l’apparecchio sia stato
manomesso.
• La garanzia non prevede la
sostituzione dell’apparecchio.
• Sono escluse dalla garanzia le parti
esterne, le lampade, le manopole, gli
interruttori e le parti asportabili.
• Le spese di trasporto e i rischi
conseguenti sono a carico del
possessore dell’apparecchio.
• A tutti gli effetti la validità della
garanzia è avallata unicamente
dalla presentazione del certificato di
garanzia.
Estratto dalle
Condizioni Generali di Garanzia
Il prodotto è coperto da garanzia
in base alle vigenti normative.
Sul sito www.musiclights.it è
possibile consultare il testo
integrale delle “Condizioni
Generali di Garanzia”.
• Please remember to register the
piece of equipment soon after you
purchase it, logging on
www.musiclights.it. The product
can be also registered filling in and
sending the form available on your
guarantee certificate.
• Defects caused by inexperience
and incorrect handling of the
equipment are excluded.
• The guarantee will no longer be
effective if the equipment has
been tampered.
• The guarantee makes no provision
for the replacement of the
equipment.
• External parts, lamps, handles,
switches and removable parts are
not included in the guarantee.
• Transport costs and subsequent
risks are responsibility of the
owner of the equipment.
• For all purposes, the validity of
the guarantee is endorsed solely
on presentation of the guarantee
certificate.
Abstract
General Guarantee Conditions
The guarantee covers the unit
in compliance with existing
regulations. You can find the
full version of the “General
Guarantee Conditions” on our
web site www.musiclights.it.
CERTIFICATO DI GARANZIA
GUARANTEE CERTIFICATE
"
Place Stamp Here
Affrancare
Spett.le
Music&Lights S.r.l.
Via Appia Km 136.200
04020 Itri (LT) Italy
"
Purchased by / Acquistato da
SERIAL N° / SERIE N°
MODEL / MODELLO
SURNAME / COGNOME
Purchased by / Acquistato da
SERIAL N° / SERIE N°
MODEL / MODELLO
Dealer’s stamp
and signature
N.
PROV.
"
"
SURNAME / COGNOME
CITY / CITTà
ADDRESS / VIA
NAME / NOME
N.
NAME / NOME
ADDRESS / VIA
CITY / CITTA’
Dealer’s stamp
and signature
Timbro e firma
del Rivenditore
ZIP CODE / C.A.P.
Timbro e firma
del Rivenditore
Purchasing date
Data acquisto
PROV.
Purchasing date
Data acquisto
FORM TO BE FILLED IN AND KEPT / CEDOLA DA COMPILARE E CONSERVARE
ZIP CODE / C.A.P.
FORM TO BE FILLED IN AND MAILED / CEDOLA DA COMPILARE E SPEDIRE
ARCHWORK is a brand of Music & Lights S.r.l .company. ©2012 Music & Lights S.r.l.
entertainment technologies
Via Appia km 136,200 - 04020 Itri (LT) ITALY ISO 9001:2008
tel. +39 0771 72190 fax +39 0771 721955 Certified Company
www.musiclights.it
[email protected]
ARCHWORK è un brand di proprietà della Music & Lights S.r.l.
Music & Lights S.r.l.