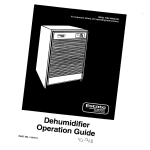
1
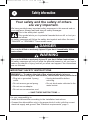
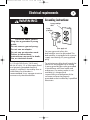
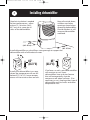
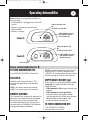
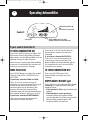
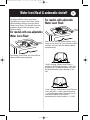
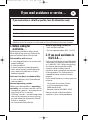
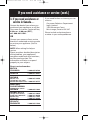
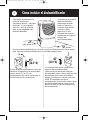
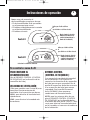
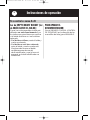
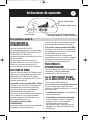
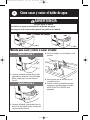
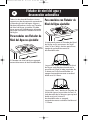
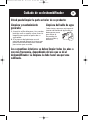
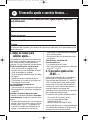
YA20320/1182768A
8/7/02
8:51 AM
Page 1
Dehumidifier
Use & Care Guide
Contents
Safety information . . . . . . . . . . . . . . . . . . . . . . . . . . . . . . . . . . .2
Electrical requirements . . . . . . . . . . . . . . . . . . . . . . . . . . . . . . . .3
Installing dehumidifier . . . . . . . . . . . . . . . . . . . . . . . . . . . . . . . .4
Operating dehumidifier . . . . . . . . . . . . . . . . . . . . . . . . . . . . . .5-6
Removing and emptying water bucket . . . . . . . . . . . . . . . . . . . .7-8
Water level float and automatic shutoff . . . . . . . . . . . . . . . . . . . .9
Caring for your dehumidifier . . . . . . . . . . . . . . . . . . . . . . . . . . .10
If you need assistance or service . . . . . . . . . . . . . . . . . . . . . .11-12
Warranty . . . . . . . . . . . . . . . . . . . . . . . . . . . . . . . . . . .Back Cover
Part No. 1182768 Rev. A
YA20320/1182768A
8/7/02
8:51 AM
Page 2
Safety information
2
Your safety and the safety of others
are very important.
We have provided many important safety messages in this manual and on
your appliance. Always read and obey all safety messages.
This is the safety alert symbol.
This symbol alerts you to potential hazards that can kill or hurt you
and others.
All safety messages will follow the safety alert symbol and either the word
“DANGER” or ‘“WARNING.” These words mean:
DANGER
You can be killed or seriously injured if you don’t immediately follow
instructions.
WARNING
You can be killed or seriously injured if you don’t follow instructions.
All safety messages will tell you what the potential hazard is, tell you how to
reduce the chance of injury, and tell you what can happen if the instructions
are not followed.
IMPORTANT SAFETY INSTRUCTIONS
WARNING — To reduce the risk of fire, electrical shock, injury or
sickness when using your dehumidifier, follow these basic precautions:
• Plug into a grounded 3 prong
outlet.
• Unplug dehumidifier before
servicing.
• Do not remove ground prong.
• Do not drink water collected in the
water bucket.
• Do not use an adapter.
• Do not use an extension cord.
— SAVE THESE INSTRUCTIONS —
It is your responsibility to:
• Install the dehumidifier according to the Installation Instructions.
• Connect the dehumidifier only to the proper kind of outlet, with the correct
electrical supply and ground. See “Electrical requirements,” page 3.
YA20320/1182768A
8/7/02
8:51 AM
Page 3
Electrical requirements
WARNING
3
Grounding instructions:
3-prong ground-type
outlet
3-prong
ground plug
Electrical Shock Hazard
Plug into a grounded 3 prong
outlet.
Do not remove ground prong.
Do not use an adapter.
Do not use an extension cord.
Failure to follow these
instructions can result in death,
fire, or electrical shock.
A 115-volt (103.5 min., 126.5 max.),
60-Hz, AC-only, 15- or 20-ampere fused
and properly grounded electrical
supply is required. A time-delay fuse or
time-delay circuit breaker is
recommended. Use a separate circuit to
connect only the dehumidifier.
ground
prong
power supply cord
For your personal safety, this
dehumidifier must be grounded. This
dehumidifier is equipped with a power
supply cord having a 3-prong ground
plug.
To minimize possible shock hazard, the
cord must be plugged into a mating
3-prong ground-type outlet, grounded
in accordance with local codes and
ordinances. If a mating outlet is not
available, it is the personal
responsibility and obligation of the
customer to have the properly
grounded outlet installed by a qualified
electrician.
YA20320/1182768A
8/7/02
8:51 AM
Page 4
Installing
Safety information
dehumidifier
4
Keep all outside doors,
windows and other
openings closed when
operating dehumidifier.
Humid outdoor air will
increase dehumidifier
workload.
Good air circulation is needed
for best performance—allow
at least 12-18 inches (30.5 45.7 cm) of air space on all
sides of the dehumidifier.
12-18"
(30.5 - 45.7 cm)
12-18"
(30.5 - 45.7 cm)
Install dehumidifier on a level floor strong enough to support the
dehumidifier with a full bucket of water.
❤❤
❤
65°
(18.3°C)
Install your dehumidifier in an area
where the temperature will not fall
below 65°F (18.3°C). Lower temperatures will cause ice to form on coils.
65°
(18.3°C)
If ice forms on coils, some dehumidifiers
will continue to run. Some
dehumidifiers have a de-icer feature
that will automatically shut the
compressor off when ice forms. (Fan
continues to run.) Unplug either type of
dehumidifier until ice melts and room
temperature rises.
YA20320/1182768A
8/7/02
8:51 AM
Page 5
Operating
Safety information
dehumidifier
Note: Before turning dehumidifier on,
be sure that:
• Dehumidifier is plugged into the wall
outlet
• Bucket is properly inserted into
dehumidifier
• Bucket is empty
indicates the bucket is full
OR
the bucket is not in position
NO R M A L
HIGH
EMPTY/ADJUST
BUCKET
DRYE ST
Control A
5
adjusts humidity removal set
point (amount of moisture
removed from room)
LOW
OFF
CONTINUOUS
DRYNESS CONTROL
FAN SPEED
indicates the bucket is full
OR
the bucket is not in position
NO R M A L
HIGH
DRYE ST
Control B
EMPTY/ADJUST
BUCKET
LOW
OFF
FAN SPEED
CONTINUOUS
adjusts humidity removal set
point (amount of moisture
removed from room)
DRYNESS CONTROL
selects fan speed
If your control looks like A or B:
TO TURN DEHUMIDIFIER ON:
Turn DRYNESS CONTROL clockwise.
FAN SPEED:
(Models with Control B only): This
controls fan operation. Use desired
setting.
HIGH - for faster moisture removal.
LOW - for slower moisture removal.
DRYNESS CONTROL:
This controls the amount of moisture in
the room.Turn control knob clockwise
for more drying.Turn control knob
counterclockwise for less drying.Turn
control knob to “NORMAL” to maintain
average humidity conditions.
NOTE: For the first few days of use, turn
the DRYNESS CONTROL clockwise to
“DRYEST” to remove extra moisture from
the furnishings as well as the room air.
EMPTY/ADJUST BUCKET light:
If this light is on, the dehumidifier is not
running. This light indicates that you
need to check:
• If the bucket is full, empty bucket and
replace.
• If the bucket is not in position,
remove bucket and replace. Make
sure the bucket fits all the way into the
dehumidifier and the light is off,
or dehumidifier will not run.
TO TURN DEHUMIDIFIER OFF:
Turn DRYNESS CONTROL
counterclockwise to OFF.
YA20320/1182768A
8/7/02
8:51 AM
Page 6
Operating dehumidifier
6
indicates the bucket is full
OR
the bucket is not in position
DRY
AUTO DRY
CONTINUOUS
HIGH
Control C
MOIST
LOW
ON / OFF
EMPTY /ADJUST
BUCKET
MODE
selects mode
If your control looks like C:
TO TURN DEHUMIDIFIER ON:
adjusts humidity removal set point
(amount of moisture removed from room)
Each time you unplug the dehumidifier
or power is interrupted, the control will
return to your previous settings.
Pressingorwill not increase or
decrease the amount of moisture
removed.
If you have selected AUTO DRY:
Pressorto set the amount of
moisture you want removed. The
dehumidifier will automatically adjust
fan speed and/or turn on and off to
maintain your setting.
MODE SELECTION
TO TURN DEHUMIDIFIER OFF:
Press MODE button to select fan speed.
Choose LOW, HIGH, CONTINUOUS or
AUTO DRY.
Press the ON/OFF button.The
dehumidifier will retain your last
settings.
If you have selected LOW or HIGH:
Pressorto set the amount of
moisture you want removed. Pressing
increases the amount of moisture
removed; pressingdecreases the
amount of moisture removed.The
indicator light will change according to
the number of times you pressor.
If you have selected CONTINUOUS:
You cannot change the amount of
moisture you want removed.
EMPTY/ADJUST BUCKET light:
Press the ON/OFF button. All lights will
flash once. If the Empty/Adjust Bucket
light comes on, the dehumidifier will not
operate. Empty or adjust bucket.
If this light is on, the dehumidifier is not
running. This light indicates that you
need to check:
• If the bucket is full, empty bucket and
replace.
• If the bucket is not in position,
remove bucket and replace. Make
sure the bucket fits all the way into the
dehumidifier and the light is off,
or dehumidifier will not run.
YA20320/1182768A
6
8/7/02
8:51 AM
Page 7
Removing & emptying water bucket
7
WARNING
Sickness Hazard
Do not drink water collected in water bucket.
Doing so can result in sickness.
Bucket styles:
style 1
style 2
Bucket method:
Bucket style 1
1. Use both side handles to lift bucket.
Pull bucket forward and remove.
Go to Step 2.
Bucket style 2
1. Lift bucket from bottom. Pull bucket
forward and remove. Go to Step 2.
2. Carry bucket to a large sink or tub.
3. Pour water through opening into a
sink or tub.
4. Replace bucket completely and
check that EMPTY/ADJUST BUCKET
light is off.
YA20320/1182768A
8
8/7/02
8:51 AM
Page 8
Removing & emptying water bucket
Drain hose connection method:
(to drain water from bucket continuously)
Bucket style 1
drain hose
connector cover
(not on all models)
Do Not
damage
outside or
connection
will leak.
center of drain hose connector
2. Drill out only the center of the drain
hose connector. Use a minimum 1/4"
drill bit.
1. If your dehumidifier does not have
a drain hose connector cover, go to
Step 2.
If your dehumidifier has a drain
hose connector cover, use a flatblade screwdriver to remove cover
from drain connector. Turn cover
counterclockwise. Discard cover. It
cannot be reused. Go to Step 2.
Bucket style 2
3. Attach a garden hose to drain hose
connector. The garden hose should
not be longer than 8 feet (2.4 m). Run
other end of garden hose into a floor
drain. Check that the hose lies flat
and in the drain.
To use the bucket without the garden hose:
For bucket style 1:
Use a garden hose cap to seal the drain
hose connector.
For bucket style 2:
Use a garden hose cap to seal the drain
hose connector.
Replace drain hose connector cover.
1. Slide off the drain hose connector
cover. Go to Step 2.
YA20320/1182768A
8
8/7/02
8:51 AM
Page 9
Water level float & automatic shutoff
All dehumidifiers have automatic
shutoff and a water level float. Some
dehumidifiers feature an adjustable
Water Level Float. The bucket must be
properly aligned for the Water Level
Float to work.
9
For models with adjustable
Water Level Float:
For models with non-adjustable
Water Level Float:
You can set the adjustable Water Level
Float at the “high” or “low” position. Both
settings will turn off the dehumidifier
automatically.
The Water Level Float will shut off the
dehumidifier automatically.
“High” setting: Water Level Float is
preset to the “high” position—left side
of opening. The dehumidifier will shut
off automatically when bucket is 3/4
full.
“Low” setting: Slide Water Level Float to
“low” position—right side of opening
— to make the bucket lighter to carry.
The dehumidifier will shut off
automatically when bucket is 1/2 full.
YA20320/1182768A
10
8/7/02
8:51 AM
Page 10
Caring for your dehumidifier
You may clean the exterior of your product:
General cleaning and
maintenance
1. Dust the front grille and side panels
with a soft brush or the dusting
attachment of your vacuum.
2. If cabinet paint chips, you can touch
up the paint with a good grade
enamel paint to prevent rust.
Water bucket cleaning
Every few weeks, rinse the inside
of the water bucket with
a mild detergent
to prevent growth
of mold, mildew
and bacteria.
D
MIL GENT
ER
T
E
D
Interior coils should be cleaned every year, or more often,
depending on dehumidifier usage. Cleaning should be done by a
qualified person.
YA20320/1182768A
8/7/02
8:51 AM
Page 11
If you need assistance or service…
11
If you need service or call with a question, have this information ready:
Model number
Serial number
Purchase date
Phone number
Store
Model and serial numbers are located on the wall behind the water bucket.
1. Before calling for
assistance…
Performance problems often result
from little things you can find and fix
yourself without tools of any kind.
Dehumidifier will not run:
• Is unit plugged into a live circuit with
proper voltage?
• Is unit turned on?
• Is water bucket installed properly?
• Does water bucket need emptying?
• Has a house fuse blown or circuit
breaker tripped?
Unit runs but does not dehumidify:
• Is unit in defrost cycle? (Provided on
some models.)
Normal operating sounds:
When your dehumidifier is operating
normally, you will hear sounds such as:
• Compressor sounds—the compressor
can be loud. This is normal.
• “Clicking” sounds—can be heard when
the unit or compressor turns off and
on, and when the Automatic Shutoff
Switch is working.
• Air movement from the fan.
Normal operating conditions:
• Unit will put out heat.
• Do not operate below 65°F (18.3°C).
2. If you need assistance in
the U.S.A.…
Call your local dealer or the Whirlpool
Consumer Assistance Center toll-free
at 1-800-253-1301. When requesting
assistance, please provide model
number, serial number, date of
purchase, and a complete description
of the problem. This information is
needed to better respond to your
request.
If you need further assistance, you can
write to:
Consumer Assistance Center
c/o Correspondence Dept.
2000 North M-63
Benton Harbor, MI 49022-2692
Please include a daytime phone
number in your correspondence.
YA20320/1182768A
12
8/7/02
8:51 AM
Page 12
If you needSafety
assistance
or service (cont.)
information
3. If you need assistance or
service in Canada…
Contact the dealer from whom you
purchased your appliance, or call the
Consumer Assistance Centre toll free,
8:30 a.m. - 6:00 p.m. (EST),
at 1-800-461-5681.
OR
Contact your nearest direct service
branch or authorized servicing outlet
to service your appliance. (See list
below.)
NOTE: When asking for help or
service:
Please provide a detailed description
of the problem, your appliance’s
complete model and serial numbers,
and the purchase date. This
information will help us respond
properly to your request.
Direct service branches:
BRITISH
COLUMBIA
1-800-665-6788
ALBERTA
1-800-661-6291
ONTARIO
Ottawa area
1-800-267-3456
(except 807 area code)
Outside the Ottawa area 1-800-807-6777
MANITOBA,
SASKATCHEWAN
and 807 area code in
ONTARIO
QUEBEC Montreal
1-800-665-1683
(except South Shore)
South Shore Montreal
Quebec City
Sherbrooke
1-800-361-3032
1-800-361-0950
1-800-361-1523
1-800-567-6966
ATLANTIC
PROVINCES
1-800-565-1598
11
If you need further assistance, you can
write to:
Consumer Relations Department
Inglis Limited
1901 Minnesota Court
Mississauga, Ontario L5N 3A7
Please include a daytime phone
number in your correspondence.
YA20320/1182768A
8/7/02
8:51 AM
Page 13
Safety information
Dehumidifier
Warranty
13
LENGTH OF WARRANTY
WE WILL PAY FOR
FULL NINETY-DAY WARRANTY
From Date of Purchase
Replacement parts and
repair labor to correct defects
in materials or workmanship.
WE WILL NOT PAY FOR
A. Service calls to:
1. Correct the installation of your dehumidifier.
2. Instruct you how to use your dehumidifier.
3. Replace house fuses or correct house wiring.
B. Pickup and delivery. This dehumidifier is designed to be repaired in
the home.
C. Damage to the dehumidifier caused by accident, misuse, fire,
flood, acts of God or use of products not mentioned in this
manual.
D. Repairs to parts or systems resulting from unauthorized modifications
made to the dehumidifier.
E. In Canada, travel or transportation expenses for customers who
reside in remote areas.
Service under the full warranties must be provided by an authorized service
company.
WHIRLPOOL CORPORATION SHALL NOT BE LIABLE FOR INCIDENTAL OR
CONSEQUENTIAL DAMAGES. Some states or provinces do not allow the exclusion
or limitation of incidental or consequential damages, so this limitation or exclusion
may not apply to you. This warranty gives you specific legal rights, and you may also
have other rights which vary from state to state or province to province.
Outside the United States and Canada, a different warranty may also apply. For
details, please contact your authorized dealer.
If you need service, first see the “If you need assistance or service” section of this
book. After checking “If you need assistance or service,” additional help can be
found by calling the Whirlpool Consumer Assistance Center telephone number,
1-800-253-1301, from anywhere in the U.S.A. For service in Canada, see “If you
need assistance or service in Canada” for the service branch in your area.
Part No. 1182768 Rev. A
©2002 Whirlpool Corporation
2/02
Printed in U.S.A.
YA20320/1182768A SP
8/7/02
8:52 AM
Page 1
Manual de uso y
cuidado del
deshumidificador
Contenido
Información de seguridad . . . . . . . . . . . . . . . . . . . . . . . . . . . . . 2
Requisitos eléctricos . . . . . . . . . . . . . . . . . . . . . . . . . . . . . . . . . 3
Cómo instalar el deshumidificador . . . . . . . . . . . . . . . . . . . . . . . 4
Instrucciones de operación . . . . . . . . . . . . . . . . . . . . . . . . . . 5-7
Cómo sacar y vaciar el balde de agua . . . . . . . . . . . . . . . . . . . 8-9
Flotador de nivel del agua y desconexión automática . . . . . . . . . 10
Cuidado de su deshumidificador . . . . . . . . . . . . . . . . . . . . . . . . 11
Si necesita ayuda o servicio técnico . . . . . . . . . . . . . . . . . . . . . 12
Garantía . . . . . . . . . . . . . . . . . . . . . . . . . . . . . . . . . . Contratapa
Parte No. 1182768 Rev. A
YA20320/1182768A SP
2
8/7/02
8:52 AM
Page 2
Información de seguridad
Su seguridad y la seguridad de los
demás es muy importante.
Hemos incluido muchos mensajes importantes de seguridad en este
manual y en su electrodoméstico. Lea y obedezca siempre todos los
mensajes de seguridad.
Este es el símbolo de advertencia de seguridad.
Este símbolo le llama la atención sobre peligros potenciales que
pueden ocasionar la muerte o una lesión a usted y a los demás.
Todos los mensajes de seguridad irán a continuación del símbolo de
advertencia de seguridad y de la palabra “PELIGRO” o “ADVERTENCIA”.
Estas palabras significan:
PELIGRO
Si no sigue las instrucciones de inmediato, usted puede morir o sufrir una
lesión grave.
ADVERTENCIA
Si no sigue las instrucciones, usted puede morir o sufrir una lesión grave.
Todos los mensajes de seguridad le dirán el peligro potencial, le dirán
cómo reducir las posibilidades de sufrir una lesión y lo que puede suceder
si no se siguen las instrucciones.
INSTRUCCIONES IMPORTANTES DE SEGURIDAD
ADVERTENCIA - Para reducir el riesgo de incendio, descarga
eléctrica, lesión o enfermedad al usar su deshumidificador, siga
estas precauciones básicas:
• Enchúfelo en un contacto de
• No use cable alargador.
pared de conexión a tierra con
• Desenchufe el deshumidificador
tres terminales.
antes de darle mantenimiento o
• No quite la terminal para conexión
a tierra.
servicio.
• No tome el agua acumulada en el
• No use adaptador.
balde.
— GUARDE ESTAS INSTRUCCIONES —
Es su responsabilidad:
• Instalar el deshumidificador de acuerdo con las instrucciones de instalación.
• Enchufar el deshumidificador únicamente en el tipo de contacto de pared
adecuado, con la alimentación eléctrica y la conexión a tierra correctas. Vea
“Requisitos eléctricos” en la página 3.
YA20320/1182768A SP
8/7/02
8:52 AM
Page 3
Requisitos eléctricos
ADVERTENCIA
3
Instrucciones de conexión
a tierra:
contacto de pared de conexión a tierra
con tres terminales
enchufe tripolar
con conexión
a tierra
Peligro de descarga eléctrica
Enchúfelo en un contacto de
pared de conexión a tierra con
tres terminales.
No quite la terminal para
conexión a tierra.
No use adaptador.
No use cable alargador.
No seguir estas instrucciones
puede ocasionar la muerte, un
incendio o descarga eléctrica.
Se requiere una alimentación eléctrica
de 115 volt. (103.5 mín, 126.5 máx), 60
HZ, sólo CA, o 20 amperes, con fusibles
y debidamente conectada a tierra. Se
recomienda emplear un a fusible de
retardo o interruptor de circuito
retardador. Use un circuito separado
sólo para el deshumidificador.
terminal
para
conexión a tierra
cable de alimentación
Para su seguridad personal, este
deshumidificador debe estar conectado
a tierra. Este deshumidificador está
equipado con un cable de alimentación
con un enchufe tripolar con conexión a
tierra.
Para reducir al mínimo el peligro de una
descarga eléctrica, el cable debe
enchufarse en un contacto de pared
con tres terminales, del mismo tipo,
conectado a tierra de acuerdo con
todos los reglamentos y normas locales.
Si no se dispone de un contacto de
pared del mismo tipo, es
responsabilidad personal y obligación
del cliente hacer que un electricista
calificado instale un contacto de pared
del mismo tipo, conectado a tierra
correctamente.
YA20320/1182768A SP
4
8/7/02
8:52 AM
Page 4
Cómo instalar el deshumidificador
Cuando esté usando el
deshumidificador,
mantenga cerradas
todas las puertas y
ventanas que dan al
exterior, y otras
aberturas. El aire
húmedo del exterior
aumentará la carga de
trabajo del
deshumidificador.
Para mejor rendimiento, se
necesita una buena
circulación de aire—deje por
lo menos 12-18 pulgadas
(30.5-45.7 cm) de espacio
para el aire alrededor del
deshumidificador.
12-18"
(30.5 - 45.7 cm)
12-18"
(30.5 - 45.7 cm)
Instale el deshumidificador en un piso a nivel lo suficientemente fuerte como
para soportar el deshumidificador con el balde de agua lleno.
❤❤
❤
65°
(18.3°C)
Instale el deshumidificador en un área
donde la temperatura no descienda a
menos de 65°F (18.3°C). Las
temperaturas más bajas harán que se
forme hielo en los serpentines.
65°
(18.3°C)
Si se forma hielo en los serpentines,
algunos deshumidificadores
continuarán funciónando. Algunos
deshumidificadores tienen una función
de deshielo que automáticamente
apaga el compresor cuando se forma
hielo. (El ventilador continúa
funcionando). Desenchufe ambos tipos
de deshumidificadores hasta que se
derrita el hielo y suba la temperatura
de la habitación.
YA20320/1182768A SP
8/7/02
8:52 AM
Page 5
Instrucciones de operación
Nota: antes de encender el
deshumidificador, asegúrese de que:
• El deshumidificador esté conectado
en el tomacorriente mural
• El balde esté debidamente insertado
en el deshumidificador
• El balde esté vacío.
Indica que el balde está lleno
O
que el balde no está bien colocado
NO R M A L
HIGH
EMPTY/ADJUST
BUCKET
DRYE ST
Control A
5
LOW
OFF
Regula el punto de ajuste de
eliminación de humedad (la
cantidad de humedad que se
elimina de la habitación)
CONTINUOUS
DRYNESS CONTROL
FAN SPEED
Indica que el balde está lleno
O
que el balde no está bien colocado
NO R M A L
HIGH
DRYE ST
Control B
EMPTY/ADJUST
BUCKET
LOW
OFF
FAN SPEED
CONTINUOUS
DRYNESS CONTROL
Regula el punto de ajuste de
eliminación de humedad (la
cantidad de humedad que se
elimina de la habitación)
Selecciona la velocidad de ventilación
Si su control es como A o B:
PARA ENCENDER EL
DESHUMIDIFICADOR:
Gire el DRYNESS CONTROL (CONTROL
DE SEQUEDAD) en la dirección de las
manecillas del reloj.
VELOCIDAD DE VENTILACIÓN:
(Sólo para modelos con Control B): esto
controla el funcionamiento del
ventilador. Use la posición que desee.
HIGH - para eliminar la humedad más
rápidamente.
LOW - para eliminar la humedad más
lentamente.
DRYNESS CONTROL
(CONTROL DE SEQUEDAD):
Esto controla la cantidad de humedad
en la habitación. Gire la perilla de
control en la dirección de las manecillas
del reloj para mayor sequedad. Gire la
perilla de control en dirección contraria
a las manecillas del reloj para menor
sequedad. Gire la perilla de control
hasta “NORMAL” para mantener
condiciones de humedad media.
NOTA: para los primeros días de uso,
gire el DRYNESS CONTROL (CONTROL
DE SEQUEDAD) en la dirección de las
manecillas del reloj hasta “DRYEST” (Más
seco) para eliminar humedad adicional
en los muebles así como en el ambiente
de la habitación.
YA20320/1182768A SP
6
8/7/02
8:52 AM
Page 6
Instrucciones de operación
Si su control es como A o B:
Luz de EMPTY/ADJUST BUCKET (luz PARA APAGAR EL
DESHUMIDIFICADOR:
de VACÍE/AJUSTE EL BALDE):
Si esta luz está encendida, el deshumidificador no está funcionando. Esta
luz indica que usted tiene que verificar
si el balde está lleno o si no está bien
colocado:
• Si el balde está lleno, vacíe el balde y
vuelva a colocarlo.
• Si el balde no está bien colocado,
quite el balde y vuelva a colocarlo.
Asegúrese de insertar el balde
completamente dentro del
deshumidificador y que la luz esté
apagada, o el deshumidificador no
funcionará.
Gire el DRYNESS CONTROL (CONTROL
DE SEQUEDAD) en la dirección de las
manecillas del reloj, para APAGARLO.
YA20320/1182768A SP
8/7/02
8:52 AM
Page 7
Instrucciones de operación
Indica que el balde está lleno
O
que el balde no está bien colocado
DRY
AUTO DRY
CONTINUOUS
HIGH
Control C
MOIST
LOW
ON / OFF
7
EMPTY /ADJUST
BUCKET
MODE
Selecciona el modo
Si su control es como C:
PARA ENCENDER EL
DESHUMIDIFICADOR:
Oprima el botón de ON/OFF
(Encendido/Apagado). Si se enciende la
luz de EMPTY/ADJUST BUCKET (luz de
VACÍE/AJUSTE EL BALDE), el
deshumidificador no funcionará. Vacíe o
ajuste el balde.
Siempre que usted desconecte el
deshumidificador o se interrumpa el
suministro de energía eléctrica, el
control volverá a su posición anterior.
SELECCIÓN DE MODO
Oprima el botón de MODE (Modo) para
seleccionar la velocidad de ventilación.
Seleccione LOW (Baja), HIGH (Alta),
CONTINUOUS (Continua) o AUTO DRY
(Secado automático).
Si usted ha seleccionado LOW o HIGH:
Oprimaopara fijar la cantidad de
humedad que usted desea eliminar.
Oprimiraumenta la cantidad de
humedad eliminada; oprimir
disminuye la cantidad de humedad que
se va a eliminar. La luz del indicador
cambiará según el número de veces
que usted oprimao.
Si usted ha seleccionado
CONTINUOUS:
Usted no puede cambiar la cantidad de
humedad que desea eliminar.
Regula el punto de ajuste de eliminación de humedad
(la cantidad de humedad que se elimina de la habitación)
Oprimirono aumentará ni bajará
la cantidad de humedad eliminada.
Si usted ha seleccionado AUTO DRY:
Oprimaopara fijar la cantidad de
humedad que usted desea eliminar. El
deshumidificador ajustará
automaticamente la velocidad de
ventilación y/o se encenderá y apagará
automáticamente para mantener la
posición que usted seleccionó.
PARA APAGAR EL
DESHUMIDIFICADOR:
Oprima el botón de ON/OFF (Encendido
/Apagado). El deshumidificador
mantendrá sus últimos ajustes.
Luz de EMPTY/ADJUST BUCKET
(luz de VACÍE/AJUSTE EL BALDE):
Si esta luz está encendida, el
deshumidificador no está funcionando.
Esta luz indica que usted tiene que
verificar si el balde está lleno o si no está
bien colocado:
• Si el balde está lleno, vacíe el balde y
vuelva a colocarlo.
• Si el balde no está bien colocado,
quite el balde y vuelva a colocarlo.
Asegúrese de insertar el balde
completamente dentro del
deshumidificador y que la luz esté
apagada, o el deshumidificador no
funcionará.
YA20320/1182768A SP
8
8/7/02
8:52 AM
Page 8
Cómo sacar y vaciar el balde de agua
ADVERTENCIA
Peligro para la salud
No beba el agua acumulada en el balde de agua.
No seguir esta instrucción puede perjudicar su salud.
Estilos de balde:
estilo 1
estilo 2
Método para sacar y volver a vaciar el balde:
Balde estilo 1
1. Levante el balde utilizando las dos
agarraderas laterales. Tire del balde
hacia usted, para sacarlo. Vaya al
Paso 2.
Balde estilo 2
1. Levante el balde sujetándolo por la
base. Tire del balde hacia usted, para
sacarlo. Vaya al Paso 2.
2. Lleve al balde a un sumidero o tina
grande.
3. Vierta agua por el orificio en un
sumidero o tina.
4. Vuelva a colocar el balde completamente y verifique que la luz de
VACÍE/AJUSTE EL BALDE esté
apagada.
YA20320/1182768A SP
8/7/02
8:52 AM
Page 9
Cómo sacar y vaciar el balde de agua
Método de conexión de la
manguera de desagüe:
(para sacar agua del balde continuamente.)
9
No dañe el
exterior para
que la conexión
no tenga fugas.
Balde estilo 1
Centro del conector de la manguera
de desagüe
tapa del conector
de la manguera de
desagüe (no en
todos los modelos)
1. Si su deshumidificador no tiene una
tapa del conector de la manguera
de desagüe, vaya al Paso 2.
Si su deshumidificador tiene una
tapa del conector de la manguera
de desagüe, use un destornillador de
hoja plana para quitar la tapa del
conector de desagüe. Gire la tapa en
el sentido contrario al de las
manecillas del reloj. Deseche la tapa.
No puede usarse de nuevo. Vaya al
Paso 2.
Balde estilo 2
2. Perfore únicamente el centro del
conector de la manguera de desagüe.
Use una broca de 1/4" como mínimo.
3. Coloque una manguera de patio en
el conector de la manguera de
desagüe. La manguera no debe tener
una longitud mayor de 8 pies (2.4 m).
Haga pasar el otro extremo de la
manguera de patio por un desagüe
de piso. Verifique que la manguera
esté plana y en el desagüe.
Para usar el balde sin la manguera de patio:
Para balde estilo 1:
Use un casquete de manguera de patio
para seller el conector de la manguera
de desagüe.
1. Deslice la tapa del conector de la
manguera de desagüe para sacarla.
Vaya al Paso 2.
Para balde estilo 2:
Use un casquete de manguera de patio
para sellar el conector de la manguera
de desagüe.
Vuelva a colocar la tapa del conector de
la manguera de desagüe.
YA20320/1182768A SP
10
8/7/02
8:52 AM
Page 10
Flotador de nivel del agua y
desconexión automática
Todos los deshumidificadores tienen
mecanismo de desconexión automática
y flotador de nivel del agua. Algunos
deshumidificadores tienen un Flotador
de Nivel del Agua ajustable. El balde
tiene que estar debidamente alineado
para que funcione el Flotador de Nivel
del Agua.
Para modelos con Flotador de
Nivel del Agua ajustable:
Para modelos con Flotador de
Nivel del Agua no ajustable:
Usted puede poner el Flotador de Nivel
del Agua en las posiciones de “high”
(alto) o “low” (bajo). Ambas posiciones
apagarán automáticamente el
deshumidificador.
El Flotador de Nivel del Agua apagará
automáticamente el deshumidificador.
La posición “High”: el Flotador de Nivel
del Agua está preseleccionado en la
posición de “high”, al lado izquierdo de
la abertura. El deshumidificador se
apagará automáticamente cuando el
balde esté 3/4 lleno.
La posición “Low”: deslice el Flotador de
Nivel del Agua a la posición de “low”, al
lado derecho de la abertura, para que el
balde esté más liviano. El
deshumidificador se apagará
automáticamente cuando el balde esté
1/2 lleno.
YA20320/1182768A SP
8/7/02
8:52 AM
Page 11
Cuidado de su deshumidificador
11
Usted puede limpiar la parte exterior de su producto:
Limpieza y mantenimiento
generales
1. Limpie la rejilla delantera y los paneles
laterales con un cepillo suave o con la
boquilla para quitar el polvo de su
aspiradora.
2. Si la pintura del gabinete se está
picando, puede retocar la pintura con
pintura esmaltada de buena calidad
para evitar que se oxide.
Limpieza del balde de agua
Cada ciertas semanas, enjuague el
interior del balde de agua con un
detergente suave
para evitar la
formación de
D
MIL GENT
ER
moho, mildiu y
DET
bacterias.
Los serpentines interiores se deben limpiar todos los años o
con más frecuencia, dependiendo del uso que se dé al
deshumidificador. La limpieza la debe hacer una persona
calificada.
YA20320/1182768A SP
12
8/7/02
8:52 AM
Page 12
Si necesita ayuda o servicio técnico…
Si necesita servicio técnico o llamar para hacer alguna pregunta, tenga lista
esta información:
Número del modelo
Número de serie
Fecha de compra
Número de teléfono
Tienda
El número del modelo y el número de serie están ubicados en la pared detrás del
balde de agua.
1. Antes de llamar para
solicitar ayuda…
Los problemas de funcionamiento con
frecuencia se deben a pequeñas cosas
que usted mismo puede localizar y
arreglar sin necesidad de herramientas.
El deshumidificador no funciona:
• ¿Está enchufada la unidad en un
circuito activo con el debido voltaje?
• ¿Está encendida la unidad?
• ¿Está instalado debidamente el balde
de agua?
• ¿Necesita vaciar el balde de agua?
• ¿Se quemó un fusible o se disparó el
interruptor de circuito?
La unidad funciona pero no
deshumidifica:
• ¿Se encuentra la unidad en el ciclo de
descongelación? (provisto en algunos
modelos).
Sonidos normales de operación:
Cuando su deshumidificador funciona
normalmente, usted oirá sonidos tales
como:
• Sonidos del compresor—el compresor
puede sonar muy alto. Esto es normal.
• Ruidos secos (“clic”)—se pueden oír
cuando la unidad o el compresor se
apaga y se enciende y cuando el
Interruptor Automático de Apagado
está funcionando.
• Movimiento de aire proveniente del
ventilador.
Condiciones normales de
funcionamiento:
• La unidad generará calor.
• No funciona a temperaturas inferiores
a los 65°F (18.3°C).
2. Si necesita ayuda en los
EE.UU..…
Llame al distribuidor de su localidad o
llame gratis al Centro de Ayuda al
Consumidor de Whirlpool al 1-800-2531301. Cuando llame para pedir ayuda,
tenga listos el número del modelo, el
número de serie, la fecha de compra y
una descripción completa del
problema. Esta información es necesaria
para poder atenderle mejor.
Si necesita más ayuda, puede escribir a:
Consumer Assistance Center
c/o Correspondence Dept.
2000 North M-63
Benton Harbor, MI 49022-2692
Incluya por favor en su correspondencia
un número de teléfono en el que se le
pueda encontrar durante el día.
YA20320/1182768A SP
8/7/02
8:52 AM
Page 13
Si necesita ayuda o servicio
técnico en Canadá
3. Si necesita ayuda o
servicio técnico en
Canadá…
Contacte al distribuidor que le vendió
su aparato, o llame gratis al Centro de
Ayuda al Consumidor,
de 8:30 a.m. a 6:00 p.m. (EST),
al 1-800-461-5681.
O
Contacte a la sucursal de servicio
directo o al centro de servicio
autorizado más cercano para reparar
o darle mantenimiento a su aparato.
(Vea la lista abajo).
NOTA: cuando solicite ayuda o
servicio: Dé por favor una descripción
detallada del problema, el número
del modelo y el número de serie
completos de su aparato y la fecha de
compra. Esta información nos
ayudará a atenderle mejor.
Sucursales de servicio directo:
´
COLUMBIA
BRITANICA
1-800-665-6788
ALBERTA
1-800-661-6291
ONTARIO
área de Ottawa
1-800-267-3456
(excepto código de área 807)
Fuera del área de Ottawa 1-800-807-6777
MANITOBA,
SASKATCHEWAN
y código de área 807 en
ONTARIO
QUEBEC Montreal
1-800-665-1683
(excepto South Shore)
South Shore Montreal
Quebec City
Sherbrooke
1-800-361-3032
1-800-361-0950
1-800-361-1523
1-800-567-6966
´
PROVINCIAS
ATLANTICAS
1-800-565-1598
13
Si necesita más ayuda, puede escribir a:
Consumer Relations Department
Inglis Limited
1901 Minnesota Court
Mississauga, Ontario L5N 3A7
Incluya por favor en su correspondencia
un número de teléfono en el que se le
pueda encontrar durante el día.
YA20320/1182768A SP
8/7/02
8:52 AM
Page 14
Garantía
Safety
del information
deshumidificador
TÉRMINO DE LA GARANTÍA
GARANTÍA TOTAL POR NOVENTA DÍAS
Desde la fecha de compra
PAGAREMOS POR
Piezas de reemplazo y
mano de obra de reparaciones
para corregir defectos en materiales
o mano de obra.
NO PAGAREMOS POR
A. Llamadas de servicio para:
1. Corregir la instalación del deshumidificador.
2. Enseñarle cómo usar el deshumidificador.
3. Reemplazar fusibles del hogar o para corregir las conexiones del
hogar.
B. Traslado y entrega de la unidad. Este producto está diseñado para ser
reparado en el hogar.
C. Daño al deshumidificador causado por accidente, uso incorrecto,
incendio, inundación, casos de fuerza mayor o darle al producto un uso
no mencionado en este manual.
D. Reparaciones a partes o sistemas ocasionadas por modificaciones no
autorizadas del deshumidificador.
E. En Canadá, gastos de viaje o transporte de clientes que residen en zonas
remotas.
El servicio técnico bajo las garantías totales debe ser hecho por una compañía de
servicio autorizada.
WHIRLPOOL CORPORATION NO SERÁ RESPONSABLE DE DAÑOS INCIDENTALES
O INDIRECTOS. Algunos estados o provincias no permiten la exclusión o la
limitación de los daños incidentales o indirectos, por lo que esta limitación o
exclusión podría no ser aplicable a usted. Esta garantía le da derechos legales
específicos, y usted podría tener otros derechos que varían de estado a estado o
de provincia a provincia.
Fuera de los Estados Unidos y Canadá, podría ser aplicable también una garantía
diferente. Para detalles, póngase en contacto con su distribuidor autorizado.
Si necesita servicio técnico, consulte primero la sección de “Si necesita ayuda o
servicio técnico” de este manual. Después de hacerlo, puede obtener ayuda
adicional llamando al Centro de Ayuda al Consumidor de Whirlpool al teléfono
1-800-253-1301, desde cualquier parte de los Estados Unidos. Para servicio en
Canadá, vea “Si necesita ayuda o servicio técnico en Canadá” para conocer la
sucursal de servicio en su área.
Parte No. 1182768 Rev. A
©2002 Whirlpool Corporation
2/02
Impreso en los EE.UU.