1
length position. This can also be remedied by lifting and
lowering the shade several times.
Standard Shade
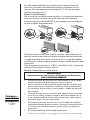
Always raise and lower the shade SLOWLY(!) to assure that the
pleated fabric stacks neatly. To lower the shade: grip the bottom rail
handle and slowly pull straight down. To raise the shade, grip the
bottom rail handle and push up slowly.
Always keep the bottom rail level.
Top-Down Bottom-Up & Day/Night Cordless Shades
To raise and lower the shade from the bottom, follow the directions
above. To lower and raise the shade from the top: grip the middle
rail handle and slowly pull straight down/up.
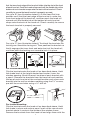
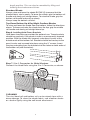
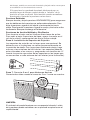
Step 6. Installing Hold-Down Brackets
Hold down brackets are provided for optional use. These brackets
should be used only if the shade is to be in a permanently lowered
position. With the shade fully lowered, make pencil marks at the
outside ends of the bottom rail. Brackets should be lined up to the
pencil marks and screwed into place using the 3/8” screws. Insert
the pins protruding from the brackets into the holes on both ends of
the bottom rail (see illustration).
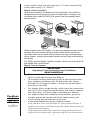
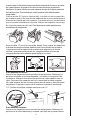
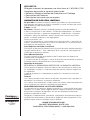
Step 7. 2-in-1 Connector for Wide Windows
Connect the Head Rails using the 2-in-1 Connector, as shown.
CLEANING
The vinyl head rail and bottom rail can be wiped clean with a
damp sponge. To clean the shade fabric, use a feather duster
or vacuum lightly using the soft brush attachment.
6