1
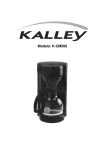
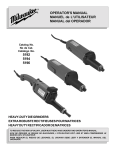
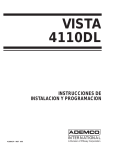
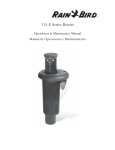
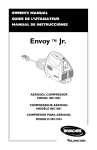
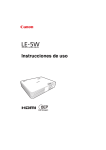
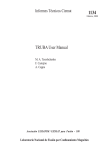
0.9 Cu. Ft. Countertop Microwave Model: OGM4901 GLZ100918 TABLE OF CONTENTS IMPORTANT SAFETY INSTRUCTIONS PRECAUTIONS TO AVOID POSSIBLE EXPOSURE TO EXCESSIVE MICROWAVE ENERGY INSTALLATION GUIDE GROUNDING INSTRUCTIONS PRODUCT DIAGRAM CONTROL PANEL INSTALLING THE TURNTABLE OPERATION INSTRUCTIONS COOKING UTENSILS GUIDE COOKING TECHNIQUES CLEANING AND CARE BEFORE CALLING FOR SERVICE SPECIFICATIONS 1 2 3 4 4 5 5 6 6 11 12 14 15 15 IMPORTANT SAFETY INSTRUCTIONS READ ALL SAFETY INSTRUCTIONS BEFORE USING THIS MICROWAVE WARNING - to reduce the risk of burns, electric shock, fire, injury to persons, or exposure to excessive microwave energy, basic safety precautions should be followed, including the following: 1. Read all instructions before using the microwave. 2. This microwave must be grounded. Connect only to properly grounded outlets. See page 4 for grounding instructions. 3. Install or place this microwave only in accordance with installation instructions. 4. Some produce such as whole eggs and sealed containers-for example, closed glass jars - are able to explode and should not be heated in this oven. 5. This microwave is intended for use only as described in this manual. Do not use corrosive chemicals or vapors in this microwave. This type of microwave is specifically designed to heat, cook, or dry foods. It is not designed for laboratory use. 6. As with any appliance, close supervision is necessary when used by children. 7. To reduce the risk of fire in the oven cavity,do not overcook food. Carefully attend to the microwave when paper, plastic, or other combustible materials are placed inside the microwave to facilitate cooking. 8. Remove wire twist-ties from paper or plastic bags before placing in microwave. 9. If materials inside the microwave should ignite, keep microwave door closed, turn it off, and disconnect the power cord or turn off the power fuse at the circuit breaker panel. Do not use the microwave cavity for storage purposes. 10. Do not leave paper products, cooking utensils, or food in the cavity when not in use. 11. Liquids, such as water, coffee, or tea may overheat beyond the boiling point without appearing to be boiling due to surface tension of the liquid. Visible bubbling or boiling when the container is removed from the microwave is not always present. THIS COULD RESULT IN VERY HOT LIQUIDS SUDDENLY BOILING OVER WHEN A SPOON OR OTHER UTENSIL IS INSERTED INTO THE LIQUID. To reduce the risk of injury: do not overheat the liquid; stir the liquid both before and halfway through heating; do not use straight-sided containers with narrow necks; after heating, allow the container to stand in the microwave a short time before removing; use extreme care when inserting a spoon or other utensil into the container. 12. Do not heat oil or fat for deep-frying in this microwave. It is difficult to control the temperature of oil in the microwave. 13. Pierce foods with heavy skins, such as potatoes, before cooking. 14. The contents of feeding bottles and baby jars should be stirred or shaken and the temperature should be checked before serving to avoid burns. 15. Cooking utensils may become hot from heat transferred from the heated food. Pot holders may be needed to handle these utensils. 16. Do not cover or block any openings on the microwave. 17. Do not store or use this microwave outdoors. Do not use this microwave near water, for example, near a kitchen sink, in a wet basement, near a swimming pool, or similar location. 18. Do not operate this microwave if it has a damaged cord or plug, if it is not working properly, or if it has been damaged or dropped. 19. Do not immerse the cord or plug in water. Keep cord away from heated surfaces. Do not let the cord hangover the edge of the table or counter. SAVE THESE INSTRUCTIONS 2 IMPORTANT SAFETY INSTRUCTIONS (continued) 20. 21. 22. 23. Use only thermometers specifically designed for microwaves. Do not operate any heating or cooking under this microwave. Be certain the glass tray and roller rings are in place when using the microwave. Read and follow the specific “Precautions to Avoid Possible Exposure to Excessive Microwave Energy” section found on page 3. 24. When cleaning microwave surface and door, use only mild, nonabrasive soaps or detergents applied with a sponge or soft cloth. PRECAUTIONS TO AVOID POSSIBLE EXPOSURE TO EXCESSIVE MICROWAVE ENERGY 1. Do not attempt to operate this microwave with the door open. Door open operation can result in harmful exposure to microwave energy. It is important not to defeat of tamper with the safety interlocks. 2. Do not place any objects between the microwave front face and the door, or allow soil or cleaner residue to accumulate on sealing surfaces. 3. Do not operate the microwave if damaged. It is particularly important that the microwave door be properly closed and there is no damage to the door (bent), hinges and latches (broken or loosened), or door seals and sealing surfaces. 4. The microwave should not be adjusted or repaired by anyone except properly qualified service personnel. SAVE THESE INSTRUCTIONS 3 INSTALLATION GUIDE 1. Make sure all packing materials are removed from inside the microwave door. 2. Check the microwave for damage, such as misaligned or bent door, damaged door seals and sealing surface, broken or loose door hinges and latches, and dents inside the cavity or on the door. 3. This microwave must be placed on a flat, stable surface to hold its weight and the heaviest food likely to be cooked inside. 4. Do not place the oven where heat, moisture, or high humidity is generated. Do not place microwave near combustible materials. 5. For correct operation, the oven must have sufficient air flow. Allow 8” of space above the microwave, 4” at the back, and 2” on each side of the unit. 6. Do not cover or block any openings on the microwave. Do not remove microwave feet. Do not operate the oven without the glass tray, roller support, and shaft in their proper positions. Make sure the power supply cord is undamaged and does not run under the microwave or over any hot or sharp surface. 7. The socket must be readily accessible so the microwave can be easily unplugged in an emergency. GROUNDING INSTRUCTIONS This microwave must be grounded. In the event of an electrical short circuit, grounding reduces risk of electric shock by providing an escape wire for the electric current. Consult a qualified electrician or serviceman if the grounding instructions are not completely understood, or if doubt exists as to whether the appliance is properly grounded. If it is necessary to use an extension cord, use only a 3-wire extension cord that has a 3-blade grounded plug, and 3-slot receptacle that will accept the plug on the appliance. The marked rating of the extension cord shall be equal to or greater than the electrical rating of the appliance. Do not use an extension cord. If the power supply cord is too short, have a qualified electrician or serviceman install an outlet near the appliance. WARNING: Improper use of the grounding plug can result in risk of electric shock. ELECTRICAL REQUIREMENTS The electrical requirements for this microwave are a 120V, 60Hz, AC only, 20 amp. It is recommended that a separate circuit serving only the microwave be provided. The microwave is equipped with a 3-prong grounding plug. It must be plugged into a wall outlet properly installed and grounded. 4 GROUNDING INSTRUCTIONS (continued) POWER CORD A short power supply cord is provided to reduce the risks resulting from becoming entangled in or tripping over a long cord. Longer cord sets or extension cords are available and may be used if care is taken in using them. If using a longer cord, the marked electrical rating of the cord set or extension cord should be at least as great as the electrical marking of the microwave itself and the extension cord must be a grounded-type 3-wire cord. The longer cord should be arranged so it will not drape over the counter or tabletop. RADIO OR TV INTERFERENCE Should there be any interference caused by the microwave oven to your radio or TV, check that the microwave oven is on a different circuit, relocated the radio or TV as far away from the oven as feasible or check position and signal of receiving antenna. PRODUCT DIAGRAM 1. Door Safety Lock System 2. Oven Window 3. Roller Ring 4. Shaft 5. Push Door 6. Control Panel 7. Wave Guide 8. Glass Tray 5 CONTROL PANEL DISPLAY Cooking time, power, indicators and present time are displayed. QUICK COOK BUTTONS Instant settings to cook popular foods POWER Use to set power levels other than high. TIMER Timer functions independently, even while a cooking program is in process. COOK Use for multi-stage cooking. Enables cooking at multiple power and time settings automatically. COOK BY WEIGHT Programmed cooking based on weight of foods cooked. DEFROST BY WEIGHT Programmed defrosting based on the weight of the foods to be defrosted. SPEED DEFROST Quick defrost function that alternates defrost and stand times to quickly and effectively defrost foods. NUMBER PADS (0-9) Touch to set time or amount. CLOCK Sets current time. RESET Clears all previous settings. START/STOP Touch to start or stop cooking. INSTALLING THE TURNTABLE Never place the glass tray upside down. The glass tray should never be restricted. Both the glass tray and turntable ring assembly must always be used during cooking. All food and containers of food should always be placed on the glass tray for cooking. If the glass tray or turntable ring assembly cracks or breaks, contact your nearest authorized service center. 6 OPERATION INSTRUCTIONS SETTING THE CLOCK Touch CLOCK pad. 2. Use the number pads to enter the correct time. 3. Touch CLOCK pad again. NOTE: ·This is a 12 hour clock. When the oven is first plugged in or when power resumes after a power interruption, the display will show ENTER CLOCK TIME. If you prefer to not have the clock displayed, touch RESET. 1. SETTING THE TIMER 1. Touch TIMER. 2. Enter the amount of time by touching the number pads. Touch START/STOP. NOTE: ·Time countdown can be seen in display before clock or cooking time is returned to display. ·Touch TIMER and then touch RESET to cancel TIMER during timing process. 3. SETTING A COOKING PROGRAM A. One-stage Cooking 1. Use the number pads to set a cooking time. You can set a cooking time from one second to 99 minutes and 99 seconds. 2. The default setting is 100% microwave power output. If you want to set a power level other than 100%, touch POWER, and then use the number pads to enter the power level. 3. Touch START/STOP to start cooking. Use single digits to set a cooking power level: Number pad Cooking power 1,0 100% 9 90% 8 80% 7 70% 6 60% 5 50% 4 40% 3 30% 2 20% 1 10% 0 0% B. Two-stage Cooking Some recipes require different stages of cooking at different temperatures. 7 OPERATION INSTRUCTIONS (continued) 1. SET STAGE 1: Follow steps 1 and 2 in “One-stage Cooking”. DO NOT TOUCH START/STOP 2. SET STAGE 2: Touch COOK then enter proper cooking time and (lower) power level. (Most 2-stage recipes use lower power for second stage.) 3. Touch START/STOP. NOTE: ·After stage 1 time has elapsed, one signal sounds, signaling the beginning of stage 2. ·After total time elapsed, the system will sound beeps with END in display. The beeps will continue to sound every two minutes automatically until the door is opened or any pad is touched. SPEED DEFROST Touch SPEED DEFROST. 2. Enter desired defrosting time by touching correct number pads. 3. Touch START/STOP. NOTE: ·After total time elapsed, the system will sound beeps with END in display. The beeps will continue to sound every two minutes automatically until the door is opened or any pad is touched. ·After setting SPEED DEFROST, oven can be programmed to automatically switch to one or two-stage cooking. ·For speed defrost and one stage cooking, follow steps above. Before touching START/STOP, touch COOK, enter time and power level and then touch START/STOP. ·For speed defrost and two stage cooking, follow steps above. Before touching START/STOP, enter two-stage cooking programs. 1. COOK BY WEIGHT 1. Touch COOK BY WEIGHT. 2. Enter the one digit code by touching the correct number pad(1~3). 3. Touch the number pad to enter weight. 4. Touch START/STOP. Cook By Weight Code Description MAX CODE TYPE 1 Beef 5 lbs. 16 oz. 2 Mutton 5 lbs. 16 oz. 3 Pork 5 lbs. 4 oz. WEIGHT Note: ·Meat must be defrosted and at refrigerated temperature. ·Weight must be in pounds and ounces. ·Ounce weights less than 10 must be preceded by a 0. If label gives weight in pounds only, change the fraction of a pound to ounces using the chart. 8 OPERATION INSTRUCTIONS (continued) Converting Fractions of a Pound to Ounces Fractions of a pound Less than .03 Ounces 0 .03 to .09 1 .10 to .15 2 .16 to .21 3 .22 to .27 4 .28 to .34 5 .35 to .40 6 .41 to .46 7 .47 to .53 8 .54 to 59 9 .60 to .65 10 .66 to .71 11 .72 to .78 12 .79 to .84 13 .85 to .90 14 .91 to .97 15 above .97 go to next even ·During cooking, the system will pause and sound beeps to remind user to turn food over. Press START/STOP to resume the defrosting. ·After total time elapsed, the system will sound beeps with END in display. The beeps will continue to sound every two minutes automatically until the door is opened or any pad is touched. ·Let meat stand few minutes before carving. DEFROST BY WEIGHT 1. Touch DEFROST BY WEIGHT pad. 2. Touch the number pad to enter weight. 3. Touch START/STOP pad. NOTE: ·Weight must be in pounds and ounces. Ounce weights less than 10 must be preceded by a 0. If label gives weight in pounds only, change the fraction of a pound to ounces using the chart given above. ·You may need to turn food over at the middle of cooking time to obtain uniform cooking. ·After total time elapsed, the system will sound beeps with END in display. The beeps will continue to sound every two minutes automatically until the door is opened or any pad is touched. 9 OPERATION INSTRUCTIONS (continued) SETTING CHILD LOCK The safety lock prevents unsupervised operation by children. To set, press and hold RESET for 3 seconds. LOCK is indicated on the display. To cancel, press and hold RESET for 3 seconds. LOCK indication disappears. POPCORN Touch POPCORN. ·POPCORN automatically sets the cooking time for a 3.5 oz. bag of microwave popcorn. 2. Touch START/STOP. NOTE: 1. ·To change the preset POPCORN time: Touch POPCORN twice. ENTER TIME appears in display. Touch number pads to enter minutes and seconds. Touch START/STOP. This new cooking time will remain whenever you use the POPCORN setting. BEVERAGE For cups (5 to 7 oz.): 1. Touch BEVERAGE once. 2. Enter number of cups by touching number pads from 1 to 4. 3. Touch START/STOP. For the larger coffee mugs (9 to 11 oz.): 1. Touch BEVERAGE twice. 2. Enter number of mugs by touching number pads from 1 to 4. 3. Touch START/STOP. REHEAT 1. Press the REHEAT button. 2. Press START/STOP to start. 10 OPERATION INSTRUCTIONS (continued) PIZZA Reheating a slice of pizza: 1. Touch PIZZA once. 2. Touch START/STOP. Heating a whole pizza: 1. Touch PIZZA twice. 2. Touch START/STOP. BAKED POTATO For potatoes (4 to 6 oz.): 1. Touch POTATO once. 2. Enter number of potatoes by touching number pads from 1 to 4. 3. Touch START/STOP. For the large potatoes (8 to 10 oz.): 1. Touch POTATO twice. 2. Enter number of potatoes by touching number pads from 1 to 4. 3. Touch START/STOP. FROZEN DINNER For one or two small (7-9 oz.) frozen dinners: 1. Touch FROZEN DINNER once. 2. For 1 entree or 2 entrees, touch the number pad “1” or “2”. 3. Touch START/STOP pad. Microwaving one large (10-12 oz.) frozen dinner: 1. Touch FROZEN DINNER twice. 2. For 1 entree or 2 entrees, touch the number pad “1” or “2”. 3. Touch START/STOP pad. 11 COOKING UTENSILS GUIDE This section lists which utensils can be used in this microwave, which have limited use for short periods, and which should not be used in this microwave. RECOMMENDED Microwave browning dish -- Use to brown the exterior of small items such as steaks, chops, or pancakes. Follow the directions provided with your browning dish. Microwaveable plastic wrap -- Use to retain steam. Leave a small opening for some steam to escape and avoid placing it directly on the food. Paper towels and napkins -- Use for short-term heating and covering; these absorb excess moisture and prevent splattering. Do not use recycled paper towels which may contain metal and could ignite. Glass and glass-ceramic bowls and dishes -- Use for heating and cooking. Paper plates and cups -- Use for short-term heating at low temperatures. Do not use recycled paper which may contain metal and could ignite. Wax paper -- Use as a cover to prevent splattering. Thermometers -- Use only those labeled “Microwave Safe” and follow all directions. Check the food in several places. Conventional thermometers may be used on microwaved food once the food has been removed from the microwave. LIMITED USE Aluminum foil -- Use narrow strips of foil to prevent overcooking exposed areas. Using too much foil can damage your microwave, so be careful. Keep 1” between foil and microwave cavity. Ceramic, porcelain, and stoneware -- Use these if they are labeled “Microwave Safe”. If they are not labeled, test them to make sure they can be used safely. Plastic -- Only use if labeled “Microwave Safe”. Other plastics may melt. COOKING UTENSILS GUIDE (continued) NOT RECOMMENDED Glass jars and bottles -- Regular glass is too thin to be used in a microwave. It can shatter and cause damage and injury. Paper bags -- These are a fire hazard, except for popcorn bags that are designed for microwave use. Styrofoam plates and cups -- These can melt and leave unhealthy residue on food. Plastic storage and food containers -- Containers such as margarine tubs can melt in the microwave. Metal utensils -- These can damage your microwave. Remove all metal before cooking. Note: Should you wish to check if a dish is safe for microwaving, place the empty dish in the microwave and microwave on high for 30 seconds. A dish that becomes very hot should not be used. 12 COOKING TECHNIQUES Your microwave makes cooking easier than conventional cooking, provided you keep these considerations in mind: STIRRING Stir foods such as casseroles and vegetables while cooking to distribute heat evenly. Food at the outside of the dish absorbs more energy and heats quicker, so stir from the outside to the center. The microwave will turn off when you open the door to stir your food. ARRANGEMENT Arrange evenly shaped foods, such as chicken pieces or chops, with the thicker, meatier parts towards the outside of the turntable where they receive more microwave energy. To prevent overcooking, place delicate areas, such as asparagus tips, towards the center of the turntable. SHIELDING Shield food with narrow strips of aluminum foil to prevent overcooking. Areas that need shielding include poultry wing tips, the ends of poultry legs, and corners of square baking dishes. Use only small amounts of aluminum foil, as larger amounts may damage your microwave. TURNING Turn foods over midway through cooking to expose all parts to microwave energy. This is especially important when cooking large foods such as roasts. STANDING Foods cooked in a microwave build up internal heat and continue to cook for a few minutes after heating stops. Let foods stand to complete cooking, especially for foods such as cakes and whole vegetables. Roasts need this time to complete cooking in the center without overcooking the outer areas. All liquids, such as soup or hot chocolate, should be shaken or stirred when cooking is complete. When heating baby food, stir well after removing from microwave and test temperature before serving. 13 COOKING TECHNIQUES (continued) ADDING MOISTURE Microwave energy is attracted to water molecules. Food that is uneven in moisture content should be covered or allowed to stand so that the heat disperses evenly. Add a small amount of water to dry food to help it cook. CLEANING AND CARE 1. Turn off the microwave and unplug the power cord from the wall when cleaning. 2. Keep the inside of the microwave clean. When food splatters or spilled liquids adhere to microwave walls, wipe with a damp cloth. Mild detergents may be used if the microwave gets very dirty. Avoid using spray or other harsh cleaners. They may stain, streak, or dull the door surface. 3. The outside of the microwave should be cleaned with a damp cloth. To prevent damage to the operating parts inside the microwave, water should not be allowed to seep into the ventilation openings. 4. Wipe the window on both sides with a damp cloth to remove any spills or splatters. 5. Do not allow the control panel to become wet. Clean with a soft, damp cloth. When cleaning the panel, leave the microwave door open to prevent it from accidentally turning on. 6. If steam accumulates inside or around the outside of the door, wipe with a soft cloth. This may occur when the microwave is operated under high humidity. This is normal. 7. It may be necessary to remove the glass tray for cleaning. Wash the tray in warm, soapy water or in a dishwasher. The roller ring and microwave floor should be cleaned regularly to avoid excessive noise. Wipe the bottom surface of the microwave with a mild detergent. 8. The roller ring may be washed in mild, soapy water or in a dishwasher. When removing the roller ring, be sure to replace it in the proper position. 9. Remove odors from your microwave by combining a cup of water with the juice and skin of one lemon in a microwaveable bowl. Microwave for 5 minutes. Wipe thoroughly and dry with a soft cloth. 10. The microwave should be cleaned regularly and any food deposits should be removed. Failure to maintain the microwave in a clean condition could lead to deterioration of surfaces that could adversely affect the life of the unit and could possibly result in a hazardous situation. 11. Please do not dispose of this appliance into a regular garbage receptacle. Please check to see where you can dispose such appliances. 14 BEFORE CALLING FOR SERVICE Before asking for service, please check each item below: Check to ensure the microwave is plugged in securely. If not, remove the plug from the outlet, wait 10 seconds, and plug it in again securely. Check for a blown circuit fuse or a tripped main circuit breaker. If these seem to be operating properly, test the outlet with another appliance. Check to ensure the control panel is programmed correctly and the timer is set. Check to ensure the door is securely closed, engaging the door safety lock system. If the door is not properly closed, the microwave energy will not flow inside. SPECIFICATIONS Power Consumption 120V~60Hz, 1350W Output 900W Operation Frequency 2450MHz Outside Dimensions (H×W×D) 11 1/16 × 19× 14 1/8 inches Oven Cavity Dimensions (H×W×D) 8 11/16 × 13 3/8 × 12 5/8 inches Oven Capacity 0.9 cu. ft. Cooking Uniformity Turntable System Net Weight Approx. 30 lbs. 15 ©2010 Sunbeam Products, Inc. doing business as Jarden Consumer Solutions. All rights reserved. Oster® logo is a registered trademark of Sunbeam Products, Inc. used under license. Distributed by Foshan Shunde Galanz Microwave Oven Electrical Appliance, Ltd. Shunde, Foshan, Guangdong, 528305, China For Service, support and warranty information, call 1-866-257-3336 16 WARRANTY FOR OSTER® COUNTERTOP MICROWAVE OGM4901 ONE-YEAR LIMITED WARRANTY For one year from the date of purchase, when this appliance is operated and maintained according to instructions attached to or furnished with the product, Foshan Shunde Galanz Microwave Oven Electrical Appliance Ltd. (“GALANZ”) will pay for replacement parts and repair labor costs to correct defects in materials or workmanship, replace the appliance with an equivalent unit or a new unit, or refund the purchase price, solely at our option. Service must be provided by a GALANZ designated service company. To Obtain Warranty Service and Troubleshooting Information: If you need service, first see the Before Calling for Service section of your User Manual. To obtain service, call our Consumer Care Center at: 1-866-257-3336 in the U.S.. GALANZ will not pay for: 1. Service calls to correct the installation of your appliance, to instruct you how to use your appliance, to replace house fuses or correct house wiring, or to replace light bulbs. 2. Repairs when your appliance is used in other than normal, single-family household use. 3. Pickup and delivery. 4. Damage resulting from accident, alteration, misuse, abuse, fire, flood, improper installation, acts of God, or use of products not approved by GALANZ. 5. Repairs to parts or systems resulting from unauthorized modifications made to the appliance. 6. Service or warranty support for units located and/or operated outside the United States. NO WARRANTIES, WHETHER EXPRESS OR IMPLIED, INCLUDING, BUT NOT LIMITED TO, ANY IMPLIED WARRANTIES OF MERCHANTABILITY OR FITNESS FOR A PARTICULAR PURPOSE, OTHER THAN THOSE EXPRESSLY DESCRIBED ABOVE SHALL APPLY. MANUFACTURER FURTHER DISCLAIMS ALL WARRANTIES AFTER THE EXPRESS WARRANTY PERIOD STATED ABOVE. NO OTHER EXPRESS WARRANTY OR GUARANTY GIVEN BY ANY PERSON, FIRM OR ENTITY WITH RESPECT TO THE PRODUCT SHALL BE BINDING ON GALANZ. REPAIR OR REPLACEMENT IS THE EXCLUSIVE REMEDY OF THE CONSUMER. GALANZ AND SUNBEAM PRODUCTS, INC. SHALL NOT BE LIABLE FOR ANY INCIDENTAL OR CONSEQUENTIAL DAMAGES CAUSED BY THE USE, MISUSE OR INABILITY TO USE THE PRODUCT. NOTWITHSTANDING THE FOREGOING, CONSUMER’S RECOVERY AGAINST GALANZ SHALL NOT EXCEED THE PURCHASE PRICE OF THE PRODUCT SOLD BY GALANZ. THIS WARRANTY SHALL NOT EXTEND TO ANYONE OTHER THAN THE ORIGINAL CONSUMER WHO PURCHASED THE PRODUCT AND IS NOT TRANSFERABLE. Some states or provinces do not allow the exclusion or limitation of incidental or consequential damages or allow limitations on warranties, so limitation or exclusions may not apply to you. This warranty gives you specific legal rights, and you may have other rights that vary from state to state or province to province. Outside the 50 United States, this warranty does not apply. Contact your authorized GALANZ dealer to determine if another warranty applies. Keep this Warranty and your sales slip together for future reference. You must provide proof of purchase for in-warranty service. Write down the following information about your appliance to better help you obtain assistance or service if you ever need it. You will need know your complete model number and serial number. You can find this information on the model and number label / plate. CUSTOMER’S RECORD Date of Purchase: Store / Dealer: Model No.: Serial No.: Horno de Microondas de 0.9 Pies Cúbicos Modelo: OGM4901 GLZ100830 ÍNDICE IMPORTANTES INSTRUCCIONES DE SEGURIDAD 2, 3 PRECAUCIONES PARA EVITAR POSIBLE EXPOSICIÓN A LA ENERGÍA DE MICROONDAS 3 GUÍA DE INSTALACIÓN 4 INSTRUCCIONES PARA LA CONEXIÓN 4, 5 DESCRIPCIÓN DE LA UNIDAD 5 PANEL DE CONTROL 6 INSTALANDO EL PLATO GIRATORIO 7 INSTRUCCIONES DE OPERACIÓN 7, 12 GUÍA DE UTENSILIOS DE COCINA 13 TÉCNICAS DE COCCIÓN 14, 15 CUIDADO Y LIMPIEZA 15 ANTES DE SOLICITAR SERVICIO 16 ESPECIFICACIONES 16 1 IMPORTANTES INSTRUCCIONES DE SEGURIDAD LEA TODAS LAS INSTRUCCIONES ANTES DE USAR ESTE HORNO DE MICROONDAS ADVERTENCIA - Para reducir el riesgo de quemaduras, descarga eléctrica, incendio, daños personales o exposición excesiva a la energía del microondas, siempre debe seguir básicas precauciones de seguridad incluyendo las siguientes: 1. Lea todas las instrucciones antes de usar el horno de microondas 2. Este aparato debe ser conectado a tierra. Conéctelo solamente a un tomacorriente apropiado. Vea las Instrucciones de Conexión a Tierra. 3. Instale este horno de microondas solamente de acuerdo a las instrucciones de instalación descritas en este manual. 4. Algunos productos tales como huevos y otros recipientes sellados — por ejemplo, jarras de vidrio cerradas — pueden explotar y no deben ser calentados en este aparato. 5. Este horno de microondas está diseñado solamente para usarlo tal y como se describe en este instructivo. No use químicos corrosivos o vapor en este aparato. calentar, o cocinar alimentos. Este horno de microondas está diseñado específicamente para NO está diseñado para uso industrial o en laboratorios. 6. Como en cualquier aparato eléctrico, es necesaria la supervisión cercana cuando este aparato es usado por niños. 7. Para reducir el riesgo de incendio dentro del horno de microondas, no sobrecocine los alimentos. Manténgase atento a este aparato si usa papel, plástico u otro material combustible dentro del horno cuando esté cocinando. 8. Quite el alambre de las bolsas de plástico o papel antes de ponerlas dentro del horno de microondas. 9. Si los materiales dentro del horno prenden fuego, MANTENGA EL HORNO CON LA PUERTA CERRADA, apáguelo y desconéctelo del tomacorriente de pared, o corte la corriente en el panel de circuitos y fusibles. No use el interior del horno de microondas para guardar utensilios de cocina u otros objetos. 10. No deje productos de papel, utensilios de cocina o alimentos, dentro del horno cuando no lo esté usando. 11. Los líquidos tales como agua, café o té pueden calentarse excesivamente más allá del punto de ebullición sin que parezcan estar en ebullición. Las burbujas visibles o ebullición no están siempre presentes cuando se saca el recipiente del horno de microondas; ESTO PUEDE TERMINAR EN LÍQUIDOS QUE ENTREN EN EBULLICIÓN REPENTINAMENTE CUANDO SE COLOCA UNA CUCHARA U OTRO UTENSILIO EN EL LÍQUIDO. Para reducir el riesgo de daños personales: no caliente excesivamente el líquido, agite el líquido antes y durante el proceso de calentamiento, no use recipientes con lados rectos o cuellos estrechos, use recipientes de boca ancha. 12. No caliente aceite o manteca para freir en este microondas. Es muy díficil controlar la temperatura del aciete en el microondas. 13. Perfore los alimentos con cascara muy gruesa como las papas, antes de cocinarlos. 14. Coloque la comida para bebé en un plato pequeño y caliéntela cuidadosamente, muévala frecuentemente; verifique la temperatura antes de servir. Coloque la mamila en el biberón antes de calentar y agítela fuertemente, pruébela en su muñeca antes de amamantar el bebé. 15. Los utensilios de cocina se pueden poner muy calientes mientras transifere los alimentos de un depósito a otro o cuando sirve los alimentos; siempre use guantes o toallas de cocina mientras este usando utensilios de cocina. 16. No cubra ni bloquee ninguna de las aberturas, ranuras u orificios del horno de microondas. GUARDE ESTAS INSTRUCCIONES 2 IMPORTANTES INSTRUCCIONES DE SEGURIDAD (continuación) 17. No guarde o use este aparato en exteriores. No use este aparato cerca del agua — por ejemplo, cerca del fregadero de la cocina, en un sótano mojado, cerca de una alberca, o de algo similar. 18. No opere este aparato si tiene dañado el enchufe o el cable de corriente, si no está funcionando apropiadamente, si se ha dejado caer o si se ha dañado de alguna manera. 19. Nunca sumerja el cordón o el enchufe en agua ni en ninguna otra clase de líquido, mantenga el cable lejos de superficies calientes, no deje que el cable cuelgue sobre el borde de la mesa o mostrador. 20. 21. 22. 23. Use solamente termómetros específicamente diseñados para microondas. No opere ningún aparato de cocción o calefacción debajo de este horno de microondas. Asegúrese que la charola de vidrio y el anillo giratorio estén en su lugar cuando esté usando el horno de microondas. Lea y siga la sección específica acerca de las “Precauciones para Evitar la Posible Exposición Excesiva a la Energía del Mircroondas”. 24. Cuando limpie la superficie y la puerta del microondas, use un paño suave ligeramente humedecido con agua y jabón. PRECAUCIONES PARA EVITAR LA EXPOSICIÓN EXCESIVA A LA ENERGÍA DEL MICROONDAS 1. No intente operar este horno con la puerta abierta – si lo hace, puede resultar perjudicial debido a la exposición de la energía del microondas. 2. Es importante acatar todas las instrucciones de seguridad. No coloque ningún objeto entre la puerta y el interior del horno, no deje acumular residuos en las superficies del sello. 3. No opere el horno si está dañado. Es particularmente importante que la puerta del horno esté cerrada apropiadamente y que no haya daños en la puerta (encorvada), bisagras y pestillos (quebrados o sueltos), en los sellos de la puerta y las superficies de sello. 4. El horno no debe ser reparado o ajustado por ninguna otra persona que no sea un técnico calificado. GUARDE ESTAS INSTRUCCIONES 3 GUÍA DE INSTALACIÓN 1. Asegúrese de remover todo el material de empaque dentro del interior del microondas. 2. Verifique que el microondas no esté dañado de ninguna manera, como puerta doblada o desnivelada, sellos de la puerta y superficies de sellamiento dañados, bisagras y pestillos quebrados o sueltos. Si hay alún daño parcial o total, no opere el microondas y contacte de inmediato el lugar donde lo adquirio. 3. El microondas debe ser colocado sobre una superficie plana y estable, capaz de soportar el peso del microondas. 4. No coloque ni instale el horno de microondas en un área donde se genere calor y vapor, por ejemplo cerca o arriba de una estufa eléctrica o de gas o de otro aparato eléctrico; el calor y el vapor pueden dañar las partes electrónicas o mecánicas del horno. 5. Instale el microondas en un lugar donde se le proporcione una ventilación apropiada, porque el horno de microondas debe tener suficiente flujo de aire a su alrededor; deje un espacio libre de 8” arriba, 4” atrás y 2” a cada lado del microondas. 6. No cubra ni bloquee ninguna de las aberturas/ranuras del horno de microondas, no remueva las patitas del microondas. lugares. Nunca opere el microondas sin la charola de vidrio, el anillo giratorio y el eje giratorio en sus respectivos Asegúrese que el cable de alimentación esté en perfectas condiciones y que no quede abajo del microondas ni de otra superficie caliente o punzante. 7. El enchufe en el que esté conectado el microondas debe estar inmediatamente accesible para poder desenchufarlo en el caso de una emergencia. INSTRUCCIONES DE CONEXIÓN A TIERRA Este horno de microondas debe ser conectado a tierra; en el caso de un corto circuito, esta conexión reduce el riesgo de descarga eléctrica, proporcionando una ruta de escape para la corriente eléctrica. equipado con un cable que tiene un enchufe de conexión a tierra; tomacorriente que este debidamente instalado. Este horno de microondas está el enchufe debe ser conectado dentro de un Si es necesario el uso de una extensión eléctrica, use solamente una que tenga un enchufe de conexión a tierra de 3 púas y un receptor de 3 ranuras; la potencia eléctrica marcada en la extensión debe ser igual o mayor que la potencia eléctrica del horno de microondas. Arregle el cable de la extensión de tal manera que no cuelgue sobre el borde de la mesa para que no lo puedan jalar o tropezarse en él accidentalmente. Consulte con un electricista o un técnico calificado si las instrucciones de conexión a tierra no están completamente claras, o si tiene dudas acerca de si la unidad está conectada apropiadamente. ADVERTENCIA – El uso inapropiado del enchufe de conexión a tierra puede resultar en un riesgo de descarga eléctrica. REQUERIMIENTOS ELÉCTRICOS Los requerimientos eléctricos para este horno de microondas son: 120V ca, 60 Hz, 20 Amp Se recomienda que use un circuito separado solamente para conectar el horno de microondas. El microondas está equipado con un enchufe de conexión a tierra de 3 púas; debe ser insertado en un tomacorriente instalado apropiadamente. 4 INSTRUCCIONES DE CONEXIÓN A TIERRA (continuación) CABLE DE ALIMENTACIÓN Se le ha provisto un cable de alimentación corto para reducir el riesgo de que alguien se tropiece o se enrrede en él. Extensiones eléctricas con cable más largo están disponibles y se puede usar siempre y cuando se tomen en cuenta todas las precauciones posibles. Si usa una extensión eléctrica, asegúrese que tenga un enchufe de conexión a tierra de 3 púas y un receptor de 3 ranuras y que la potencia eléctrica marcada en la extensión sea igual o mayor a la potencia eléctrica del microondas. Arregle el cable de la extensión de tal manera que no cuelgue sobre el borde de la mesa para que no lo puedan jalar o tropezarse en él accidentalmente. INTERFERENCIA DE RADIO O TV Si hay alguna interferencia causada por el horno de microondas a su radio o TV, colóquelos lo más lejos posible del horno de microondas. DESCRIPCIÓN DE LA UNIDAD 5 1. Pestillos de seguridad de la puerta 2. Ventana en la puerta del horno 3. Anillo giratorio 4. Eje giratorio 5. Presiónelo para abrir la puerta 6. Panel de control 7. Guía de onda 8. Charola de vidrio PANEL DE CONTROL PANTALLA — Aquíaparece el tiempo de cocción, poder de energía, indicadores y el tiempo actual. BOTONES DE COCCIÓN RÁPIDA — Ajustes instantáneos para cocinar alimentos populares. POWER (PODER) — Úsela para ajustar el nivel de energía deseado. Presiónela para ver el nivel de energía durante el proceso de cocción. TIMER (TEMPORIZADOR) — El temporizador funciona independientemente, aún cuando esté en proceso una cocción programada. COOK (COCCIÓN) — Úsela para cocinar en fases múltiples. Le permitirá cocinar automáticamente en múltiples ajustes de tiempo y energía. COOK BY WEIGHT (COCCIÓN POR PESO) — Úsela para programar la cocción basada en el peso de los alimentos que va a cocinar. DEFROST BY WEIGHT (DESCONGELAMIENTO POR PESO) — Úsela para programar el descongelamiento basado en el peso de los alimentos que va a descongelar. SPEED DEFROST (DESGONGELAMIENTO A VELOCIDAD) — Función de descongelamiento rápido que alterna los tiempos de descongelación y reposo para descongelar los alimentos rápida y efectivamente. TECLAS NUMÉRICAS (del 0 al 9) — Úselas para programar tiempos o pesos. CLOCK (RELOJ) — Úsela para ajustar el tiempo del día o para ver la hora actual. RESET (REAJUSTAR) — Presiónela para borrar todos los ajustes previos. START / STOP (INICIAR / PARAR) — Presiónela para iniciar o parar el proceso de cocción. 6 INSTALANDO EL PLATO GIRATORIO Nunca coloque la charola de vidrio al revés. La charola de vidrio nunca debe estar restringida. La charola de vidrio y el anillo giratorio siempre deben estar en su lugar durante la cocción en el microondas. Los depósitos con alimentos/comida siempre deben estar en la charola de vidrio para cocinarlos/calentarlos. Si la charola de vidrio o el anillo giratorio están rotos o agrietados, llame a su centro de servicio autorizado. INSTRUCCIONES DE OPERACIÓN AJUSTANDO EL RELOJ 1. Presione la tecla CLOCK. 2. Use las teclas numéricas para entrar el tiempo correcto. 3. Vuelva a presionar la tecla CLOCK. NOTA: Este reloj tiene el sistema horario de 12 horas. Cuando enchufe el microondas por primera vez o cuando se restaure la energía después de una interrupción en el suministro de corriente, en la pantalla aparecerá el mensaje ENTRE EL TIEMPO DEL RELOJ (ENTER CLOCK TIME). Si prefiere que no aparezca el reloj, presione la tecla RESET. AJUSTANDO EL TEMPORIZADOR 1. Presione la tecla TIMER. 2. Entre la cantidad de tiempo presionando las teclas numéricas. 3. Presione la tecla START / STOP. NOTAS: ·Podrá ver el conteo regresivo en la pantalla antes que el tiempo del reloj o cocción regrese a la pantalla. ·Presione TIMER y después la tecla RESET para cancelar la función de TIMER durante esté en proceso. 7 INSTRUCCIONES DE OPERACIÓN (continuación) AJUSTANDO UNA COCCIÓN PROGRAMADA A. Cocción en Una-Fase 1. Use las teclas numéricas para ajustar un tiempo de cocción. Podrá programarlo desde 1 segundo hasta 99 minutos y 99 segundos. 2. El ajuste de fábrica es al 100% de energía de microondas; si desea ajustar el microondas en otro nivel de energía diferente al 100%, presione la tecla POWER y después use los botones numéricos para entrar el nivel de energía deseado. 3. Presione la tecla START / STOP para iniciar la cocción. Use un sólo dígito para ajustar un nivel de energía para la cocción: Tecla numérica Nivel de energía 1,0 100% 9 90% 8 80% 7 70% 6 60% 5 50% 4 40% 3 30% 2 20% 1 10% 0 0% B. Cocción en Dos Fases Algunas recetas requieren diferentes fases de cocción a temperaturas diferentes. 1. FASE 1: Siga los pasos 1 y 2 de la sección “Cocinando en Una Fase”. 2. FASE 2: Presione la tecla COOK y después entre el tiempo de cocción apropiado y el nivel de energía (más bajo). No presione la tecla START / STOP. (La mayoría de las recetas de 2 Fases, usan niveles de energía más bajos para la segunda fase.) 3. Presione la tecla START / STOP. NOTA: Después que haya transcurrido el tiempo de la primera fase, sonará una señal indicando el principio de la segunda fase. Después que haya transcurrido el tiempo total, el microondas emitirá sonidos de beep con la indicación END en la pantalla. Los beep continuarán sonando automáticamente cada dos minutos hasta que abra la puerta o presione cualquier tecla. 8 INSTRUCCIONES DE OPERACIÓN (continuación) DESCONGELAMIENTO A VELOCIDAD 1. Presione la tecla SPEED DEFROST. 2. Entre el tiempo de descongelamiento deseado presionando las teclas numéricas. 3. Presione la tecla START / STOP. NOTAS: ·Después que haya transcurrido el tiempo total, el microondas emitirá sonidos de beep con la indicación END en la pantalla. Los beep continuarán sonando automáticamente cada dos minutos hasta que abra la puerta o presione cualquier tecla. ·Después que haya programado un DESCONGELAMIENTO A VELOCIDAD, podrá programar el microondas para que se cambie a la cocción en una fase o en dos fases. ·Para descongelamiento a velocidad y cocción en una fase, siga los pasos descritos anteriormente. Antes de presionar la tecla START / STOP, presione la tecla COOK, entre el tiempo, el nivel de energía deseado y después presione la tecla START / STOP. ·Para descongelamiento a velocidad y cocción en dos fases, siga los pasos descritos anteriormente. Antes de presionar la tecla START / STOP, entre el programa de cocción en dos fases. COCCIÓN POR PESO 1. Presione la tecla COOK BY WEIGHT. 2. Entre el código de un dígito usando la tecla numérica correcta (del 1 al 3). 3. Use las teclas numéricas para entrar el peso. 4. Presione la tecla START / STOP. Descripción del código de Cocción Por Peso CÓDIGO TIPO PESO MAXIMO 1 Res 5 lb. 16 oz. 2 Pollo 5 lb. 16 oz. 3 Puerco 5 lb. 4 oz. Notas: ·El peso debe estar en libras y onzas. ·Pesos menores a las 10 onzas deben estar precedidos por un 0. fracción de una libra a onzas usando el siguiente cuadro. 9 Si el peso establecido está solo en onzas, cambie la INSTRUCCIONES DE OPERACIÓN (continuación) Convirtiendo Fracciones de una Libra a Onzas Fracciones de una libra Onzas Menos de .03 0 de .03 a .09 1 de .10 a .15 2 de .16 a .21 3 de .22 a .27 4 de .28 a .34 5 de .35 a .40 6 de .41 a .46 7 de .47 a .53 8 de .54 a .59 9 de .60 a .65 10 de .66 a .71 11 de .72 a .78 12 de .79 a .84 13 de .85 a .90 14 de .91 a .97 15 Más de .97 Vaya al siguiente número par ·Durante la cocción, el microondas pausará automáticamente y emitirá un sonido para recordarle al usuario que voltee la carne, después presione la tecla START / STOP para reanudar la cocción. ·Después que haya transcurrido el tiempo total, el microondas emitirá sonidos beep y mostrará la indicación END en la pantalla. Los beep continuarán sonando automáticamente cada dos minutos hasta que abra la puerta o presione cualquier tecla. ·Deje reposar las carnes durante unos minutos antes de cortarla. DESCONGELAMIENTO POR PESO 1. Presione la tecla DEFROST BY WEIGHT. 2. Use las teclas numéricas para entrar el peso. 3. Presione la tecla START / STOP. NOTAS: · El peso debe estar en libras y onzas. Pesos menores a las 10 onzas deben estar precedidos por un 0. Si el peso establecido está solo en onzas, cambie la fracción de una libra a onzas usando la información del cuadro anterior. 10 INSTRUCCIONES DE OPERACIÓN (continuación) · Durante el descongelamiento, puede ser necesario voltear los alimentos para que se descongelen uniformemente. · Después que haya transcurrido el tiempo total, el microondas emitirá sonidos beep y mostrará la indicación END en la pantalla. Los beep continuarán sonando automáticamente cada dos minutos hasta que abra la puerta o presione cualquier tecla. ACTIVANDO EL SEGURO CONTRA NIÑOS Esta función previene la operación del microondas por niños sin supervisión. Para activarla, en el modo de espera, mantenga presionada la tecla RESET por 3 segundos; en la pantalla aparecerá la indicación LOCK. Para cancelarla, en el modo de espera, mantenga presionada la tecla RESET por 3 segundos. La indicación LOCK desaparecerá de la pantalla. Tecla POPCORN (PALOMITAS DE MAÍZ) 1. Presione la tecla POPCORN. • El tiempo de cocción se ajustará automáticamente para una bolsa de palomitas de maíz de 3.5 onzas. 2. Presione la tecla START / STOP. NOTE: Para cambiar el tiempo preajustado de POPCORN: presione dos veces la tecla POPCORN, en la pantalla aparecerá la indicación ENTER TIME (ENTRAR EL TIEMPO). segundos, presione la tecla START / STOP. Use las teclas numéricas para entrar los minutos y los Este nuevo tiempo de cocción se mantendrá en la memoria hasta que usted lo reajuste. Tecla BEVERAGE (BEBIDAS) Para tazas pequeñas (de 5 a 7 onzas): 1. Presione una vez la tecla BEVERAGE. 2. Entre el número de tazas presionando las teclas numéricas del 1 al 4. 3. Presione la tecla START / STOP. Para tazas más grandes (de 9 a 11 onzas): 1. Presione dos veces la tecla BEVERAGE. 2. Entre el número de tazas presionando las teclas numéricas del 1 al 4. 3. Presione la tecla START / STOP. 11 INSTRUCCIONES DE OPERACIÓN (continuación) Tecla REHEAT (RECALENTAR) 1. Presione la tecla REHEAT. 2. Presione la tecla START / STOP. Tecla PIZZA Recalentando una rebanada de pizza: 1. Presione una vez la tecla PIZZA. 2. Presione la tecla START / STOP. Calentando una pizza entera congelada: 1. Presione dos veces la tecla PIZZA. 2. Presione la tecla START / STOP. Tecla POTATO (PAPAS) Para papas pequeñas (de 4 a 6 onzas cada una): 1. Presione una vez la tecla POTATO. 2. Entre el número de papas presionando las teclas numéricas del 1 al 4. 3. Presione la tecla START / STOP. Para papas más grandes (de 8 a 10 onzas cada una): 1. Presione dos veces la tecla POTATO. 2. Entre el número de papas presionando las teclas numéricas del 1 al 4. 3. Presione la tecla START / STOP. Tecla FROZEN DINNER (COMIDAS CONGELADAS) Para comidas congeladas pequeñas (de 7 a 9 onzas cada una): 1. Presione una vez la tecla FROZEN DINNER. 2. Para un plato principal, presione la tecla numérica “1”; para dos platos principales, presione la tecla numérica “2”. 3. Presione la tecla START / STOP. Para comidas congeladas más grandes (de 10 a 12 onzas cada una): 1. Presione dos veces la tecla FROZEN DINNER. 2. Para un plato principal, presione la tecla numérica “1”; para dos platos principales, presione la tecla numérica “2”. 3. Presione la tecla START / STOP. 12 GUÍA DE UTENSILIOS DE COCINA Esta sección lista los utensilios que puede usar en este microondas, cuales se pueden usar por tiempo limitado y los que no se deven usar en este microondas. RECOMENDADOS Plato para dorar en microondas – Úselo para dorar el exterior de porciones pequeñas de bistec, chuletas o crepas. Siga las instrucciones provistas con su plato para dorar. Plástico para microondas – Úselo para retener el vapor. Haga una pequeña abertura para que salga un poco de vapor y evite colocarlo direcatmente en la comida. Toallas de papel y servilletas – Úselas para cubrir alimentos que se cocinen en corto tiempo; estas absorben el exceso de humedad y evitan que se salpiquen. No use toallas de papel reciclable porque pueden contener metal y podrían producir fuego. Vidrio, platos y tazones de vidrio-cerámica – Úselos para calentar y cocinar. Platos y vasos de papel – Úselos para calentar a bajas temperaturas por corto tiempo. No use papel reciclable porque podría contener metal y producir fuego. Papel de cera – Úselo para cubrir los alimentos y evitar las salpicaduras. Termómetros – Use solamente aquellos que estén etiquetados para “Uso en Microondas” (Microwave Safe). USO LÍMITADO Papel Aluminio -- Use pedacitos de aluminio para proteger las áreas expuestas contra la sobrecocción. papel aluminio puede dañar su horno de microondas, sea muy cuidadoso. El usar mucho Deje una pulgada de distancia entre el papel aluminio y las paredes internas del microondas. Cerámica, porcelana y cerámica de gres – Úselos solamente si están etiquetados para “Uso en Microondas” (Microwave Safe); si no lo están, hagales una prueba para saber si se pueden usar en el microondas. Plástico – Úselos solamente si están etiquetados para “Uso en Microondas”; de lo contrario, se pueden fundir. NO RECOMENDADOS Jarras de vidrio y botellas – El vidrio regular es muy delgado para usarlo en el microondas. Se puede quebrar y causar daños al microondas y daños personales. Bolsas de papel – Estas son un peligro de incendio, a excepción de las bolsas de las palomitas de maíz que están diseñadas para usarlas en el microondas. Platos y vasos de espuma de poliestireno – Estos se pueden fundir y dejar residuos dañinos en la comida. Depósitos plásticos – Depósitos como los de la margarina se pueden fundir en el microondas. Utensilios metálicos – Estos pueden dañar su microondas. Remueva cualquier pieza metálica antes de cocinar. Nota: Si desea comprobar si un plato es seguro para usarlo en el microondas, coloque el plato vacío en el microondas y haga funcionar el microondas durante 30 segundos; si el plato se pone muy caliente, no debe usarlo en el microondas. 13 TÉCNICAS DE COCCIÓN Su horno de microondas le hace más fácil el proceso de cocción que el cocinar en una estufa regular; por lo tanto, mantenga en consideración lo siguiente: REMOVER Remueva los alimentos como guisados y vegetales mientras los cocina para distribuir uniformemente el calor. Los alimentos que están en el borde exterior del plato absorben más energía y se calientan más rápido, por lo tanto, remuevalos del exterior hacia el centro. El microondas se apagará cuando abra la puerta para remover los alimentos. ARREGLAR Coloque los alimentos bien formados como las piezas de pollo o chuletas, con la parte más gruesa y carnosa hacia el exterior del plato donde recibirán más energía del microondas. Para evitar que los alimentos se sobrecocinen, coloque las áreas delicadas como la punta de un esparrago hacia el centro del plato. PROTECCIÓN Proteja los alimentos con pedacitos de papel aluminio para evitar que se sobrecocinen. Las áreas que necesitan protección incluyen las puntas de las alas de pollo, los extremos de las piernas de las aves de corral y las esquinas de los platillos horneados cuadrados. Use solamente pequeñas cantidades de papel aluminio, de lo contrario puede dañar su microondas. VOLTEANDO Voltee los alimentos a la mitad del proceso de cocción para exponer todas las partes a la energía del microondas. Esto es especialmente importante cuando cocine porciones grandes como asados. POSICIÓN Los alimentos cocinados en el microondas retienen el calor interno y continuan cocinándose por unos minutos después de parar el calor. Deje reposar los alimentos para que se terminen de cocinar, especialmente los pasteles y los vegetales enteros. Los asados necesitan este tiempo de reposo para completar su cocción interna sin sobrecocinar las áreas externas. Todos los líquidos como sopas o chocolate caliente, deben revolverse o menearse cuando ya esté cocinados. Cuando caliente comida para bebé, siempre pruebe la temperatura antes de servirla. 14 TÉCNICAS DE COCCIÓN (continuación) AGREGANDO HUMEDAD La energía de microondas es atraída por las moléculas de agua. Los alimentos que contienen poca humedad deben cubrirse o dejarlos reposar para que el calor se disperse uniformemente. Agregue un poquito de agua a los alimentos secos para que se cocinen mejor. CUIDADO Y LIMPIEZA 1. Apague el microondas y desenchúfelo del tomacorriente en la pared antes de limpiarlo. 2. Mantenga limpio el interior del microondas. microondas; Use un paño humedecido con agua para limpiar las paredes internas del si está muy sucio, humedezca el paño con agua jabonosa. Nunca use limpiadores químicos o abrasivos para limpiar su microondas. 3. El exterior del microondas lo puede limpiar con un paño ligeramente humedecido con agua; evite que entre agua o cualquier clase de líquido a través de las aberturas/ranuras del microondas. 4. Limpie ambos lados de la ventana/puerta del microondas con un paño ligeramente humedecido con agua. 5. No permita que el panel de control se moje. Cuando lo limpie use un paño suave ligeramente humedecido con agua y mantenga la puerta del microondas abierta para evitar que se active accidentalmente. 6. Si se acumula vapor en el interior del microondas o alrededor del exterior de la puerta, limpiélo con un paño suave. Esto es normal, puede ocurrir cuando está operando el microondas bajo una alta humedad. 7. Puede ser necesario remover la charola de vidrio para limpiarla/lavarla; lavéla con agua tibia y jabón o en la lavadora de platos. Debe limpiar regularmente el anillo giratorio y el piso del microondas para evitar el ruido excesivo. 8. El anillo giratorio lo puede lavar con agua tibia y jabón o en la lavadora de platos; asegúrese de volver a colocarlo correctamente en su lugar. 9. Remueva los olores del microondas colocando una taza/depósito con agua y jugo de limón (también la cáscara si está disponible) y haga trabajar el microondas por 5 minutos; seque completamente antes de volver a usar el microondas. 10. Debe limpiar el microondas regularmente y sacar cualquier depósito que esté en el interior. El mantener el microondas sucio, puede deteriorar las superficies del mismo y conllevar a una situación peligrosa. 11. Cuando llegue el momento de deshechar el microondas, no lo ponga con la basura regular; contacte las regulaciones locales para saber cómo y donde deshechar este tipo de aparatos. 15 ANTES DE SOLICITAR SERVICIO Antes de solicitar servicio, por favor revise la siguiente información: Verifique que el microondas esté seguramente enchufado. Si no lo está, desenchúfelo del tomacorriente, espere 10 segundos y vuelva a enchufarlo. Revise que no se haya quemado ningún fusible o se haya disparado el circuito principal; compruebe que el tomacorriente esté en perfectas condiciones, enchufando otro aparato eléctrico. Asegúrese que el panel de control esté programado correctamente y el temporizador esté ajustado. Asegúrese que la puerta esté completamente cerrada; de lo contrario, la energía del microondas no fluirá en el interior del mismo. ESPECIFICACIONES Consumo de energía 120 V~ 60 Hz, 1350 W Salida 900 W Frecuencia de operación 2450 MHz Dimensiones externas (H×W×D) 11 /16 × 19× 14 /8 pulgadas Dimensiones internas (H×W×D) 8 /16 × 13 /8 × 12 /8 pulgadas Capacidad del horno 0.9 pies cuúbicos Uniformidad de cocción Sistema de tornamesa Peso neto 30 lbs aproximadamente 1 11 16 1 3 5 ©2010 Sunbeam Products, Inc. doing business as Jarden Consumer Solutions. All rights reserved. Oster® logo is a registered trademark of Sunbeam Products, Inc. used under license. Distributed by Foshan Shunde Galanz Microwave Oven Electrical Appliance, Ltd. Shunde, Foshan, Guangdong, 528305, China For Service, support and warranty information, call 1-866-257-3336 17