1
5.6 TO CHANGE PRESSURE UNIT DISPLAY (Refer to Figure 9.0)
The default pressure unit display is “psi”. To change pressure unit display to
“bar” follow steps below:
1. Press and hold Set button (3) for two seconds to enter setup screen.
2. Press both (+) and (-) button simultaneously two times. The unit “psi” will
be flashing.
3. Press both Set button (3) and (+) button simultaneously to change unit
display to “bar”. Repeat this step to change unit display back to “psi”
4. Press and hold Set button (3) for two seconds to exit setup screen.
5.7 LOW PRESSURE SETTING (Refer to Figure 9.0)
The low-pressure setting is pre-set at the factory to 70 Psi (4.8 bar). When the
supplied pressure drops below 70 Psi (4.8 bar) the unit will not function. To
change the low pressure set point, follow steps below:
1. Set the dispense cycle in “TIMED MODE” mode.
2. Press and hold the Set button (3) for two seconds to enter the setup screen.
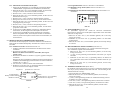
3. Press (+) and (-) button simultaneously, the low pressure set point will appear
on display as shown on figure 6.0.
4. Press the Set button (3) and (+) button simultaneously to increase the set point.
5. Press the Set button (3) and (-) button simultaneously to decrease the set point.
6. Press and hold the Set button (3) for two seconds to save the data.
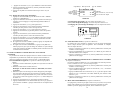
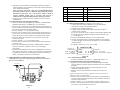
P1 TIMED MODE VALVE
DISP: 0.100 70 psi
Low pressure
set point
Figure 10.0
6. TROUBLESHOOTING
PROBLEM
LCD does not
light
System will not
actuate
POSSIBLE CAUSE
• No power input
• Supplied pressure
dropped below set
pressure
• Foot switch not plugged
in or improperly
plugged in
• Defective foot switch
• Broken wire or loose
connection inside unit
• Defective solenoid
• Defective PC board
11
CORRECTION
• Check power cord
connections
• Turn on power
• Increase supplied
pressure
• Check foot switch
connection
• Foot switch needs to be
repaired or replaced
• Unplug power cord and
disconnect air supply.
Remove cover and check
for broken wires or loose
connections
• Replace solenoid
• Replace PC board
System will not
pressurize
No Motor
Response
Inconsistent
dispensing
• Insufficient air pressure
• Air hoses not plugged
in
• Regulator defective
• Foot switch connection
is loose
• Motor cable connection
is loose
• Input Voltage is too
low
• Dispense time is too
low
• Air bubbles in adhesive
• Dispense time is too
low
• Dispense needle started
to clog
• Increase air supply
pressure
• Check connection
• Replace regulator
• Check Foot switch
connection
• Check Motor cable
connection
• Increase input voltage
• Increase dispense time
• De-air material
• Increase dispensing time
• Replace needle
7. MAINTENANCE
The dispenser is designed and built to be relatively maintenance free. To assure
trouble free operation, please follow below steps:
1. Make certain air supply is clean and dry.
2. Avoid connecting the unit to excessive moisture or solvent saturation.
3. Avoid connecting air supply exceeding 100 psi (6.9 bar).
4. Use only Amyl Alcohol to clean outside surface of the main housing.
5. Use only soft cloth to clean the LCD.
8. SPARE PARTS AND ACCESSORIES
For TS500R spare parts and accessories information, please visit the TS500R User
Guide webpage at http://www.okinternational.com
9. LIMITED WARRANTY
OK International warrants this product to the original purchaser for a period of two (2)
years from date of purchase to be free from material and workmanship defects but not
normal wear-and-tear, abuse and faulty installation. Defective product or subassembly
and components under warranty will be repaired or replaced (at OK
International's option) free of charge. Customer with defective product under warranty
must contact the nearest OK International office or distributor to secure a return
authorization prior to shipping the product to the assigned OK International authorized
service center. For nearest OK International office or distributor contact information,
please visit www.okinternational.com. OK International reserves the right to make
engineering product changes without notice.
10. I/O CONFIGURATION AND END OF CYCLE FEEDBACK
For TS500R I/O Configuration and End of Cycle Switch information, please visit the
TS500R User Guide webpage at http://www.okinternational.com
12