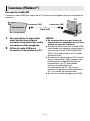
1
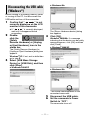
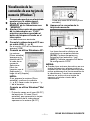
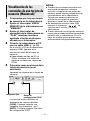
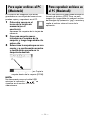
ENGLISH
SOFTWARE INSTALLATION AND
USB CONNECTION GUIDE
LYT1520-001A
EN
Contents
JVC SOFTWARE LICENSE AGREEMENT..
.................................................................. 3
Notice for Users ............................................ 5
System Requirements .................................. 6
Software Installation (Windows®).................. 7
Connecting (Windows®) ................................ 8
Viewing the Contents of a Memory Card
(Windows®) .............................................. 9
Copying Files to the PC (Windows®) ........... 10
Playing Back Files on the PC (Windows®)
................................................................. 10
Disconnecting the USB cable (Windows®)... 11
Connections (Macintosh)............................. 12
Viewing the Contents of a Memory Card
(Macintosh).............................................. 13
Copying Files to the PC (Macintosh) ........... 14
Playing Back Files on the PC (Macintosh)... 14
Disconnecting the USB cable (Macintosh) .. 15
User’s Guide/Help/Readme (Windows®) ..... 15
distribute, rent, lease or transfer the
Program to any third party or
otherwise let them use the Program.
JVC SOFTWARE LICENSE
AGREEMENT
4 LIMITED WARRANTY
IMPORTANT
TO CUSTOMERS: PLEASE MAKE
SURE TO READ THIS CAREFULLY
BEFORE INSTALLING OR USING THE
SOFTWARE PROGRAM NAMED
“DIGITAL PHOTO NAVIGATOR”
(“Program”) ON YOUR PC.
The right to use the Program is granted by
Victor Company of Japan, Limited (“JVC”)
to You only on the condition that You agree
to the following.
Should You not agree to the terms here of,
You may not install or use the Program.
HOWEVER, INSTALLING OR USING THE
PROGRAM INDICATES YOUR
ACCEPTANCE OF THESE TERMS AND
CONDITIONS.
1 COPYRIGHT; OWNERSHIP
You acknowledge that all copyrights and
other intellectual property rights in the
Program are owned by JVC and its
licensor, and remain vested in JVC and
such licensor. The Program is protected
under the copyright law of Japan and
other countries, and related
Conventions.
2 GRANT OF LICENSE
5
(1) Subject to the conditions of this
Agreement, JVC grants to You a nonexclusive right to use the Program.
You may install and use the Program
on a HDD or other storage devices
incorporated in Your PC.
(2) You may make one (1) copy of the
Program solely for your personal
backup or archival purposes.
3 RESTRICTION ON THE
PROGRAM
(1) You may not reverse engineer,
decompile, disassemble, revise or
modify the Program, except to the
extent that expressly permitted by
applicable law.
(2) You may not copy or use the
Program, in whole or in part, other
than as expressly specified in this
Agreement.
(3) You have no right to grant a license to
use the Program, and may not
—3—
JVC warrants that any media in which
the Program is embodied are free from
any defects in materials and
workmanship for a period of thirty (30)
days from the date of Your purchasing
any our products accompanying the
Program. JVC’s entire liability and your
exclusive remedy in connection with the
Program shall be replacement of such
defective media. EXCEPT FOR THE
EXPRESS WARRANTIES STATED
HERE IN AND TO THE EXTENT
PERMITTED BY APPLICABLE LAW,
JVC AND ITS LICENSORS DISCLAIM
ANY OTHER WARRANTIES, EITHER
EXPRESS OR IMPLIED, INCLUDING
BUT NOT LIMITED TO IMPLIED
WARRANTIES OF MERCHANTABILITY
AND FITNESS FOR A PARTICULAR
PURPOSE IN REGARD TO THE
PROGRAM AND THE
ACCOMPANYING PRINTED
MATERIALS. SHOULD THERE BE ANY
PROBLEM ARISING FROM OR
CAUSED BY THE PROGRAM, YOU
SHOULD SETTLE ALL SUCH
PROBLEM AT YOUR OWN COST AND
EXPENSE.
LIMITED LIABILITY
TO THE EXTENT PERMITTED BY
APPLICABLE LAW, IN NO EVENT
SHALL JVC AND ITS LICENSORS BE
LIABLE FOR ANY INDIRECT, SPECIAL,
INCIDENTAL OR CONSEQUENTIAL
DAMAGES WHATSOEVER,
REGARDLESS OF THE FORM OF
ACTION WHETHER IN CONTRACT,
TORT OR OTHERWISE ARISING OUT
OF OR IN CONNECTION WITH THE
USE OF OR INABILITY TO USE THE
PROGRAM, EVEN IF JVC HAS BEEN
ADVISED OF THE POSSIBILITY OF
SUCH DAMAGES. YOU WILL
INDEMNIFY AND HOLD HARMLESS
JVC FROM ANY LOSS, LIABILITY OR
COST ARISING OUT OF OR IN ANY
WAY CONNECTED TO CLAIMS FROM
ANY THIRD PARTY RELATING TO THE
USE OF THE PROGRAM.
CONTINUED ON NEXT PAGE
6 TERM
9 GENERAL
This Agreement will become effective on
the date when You install and use the
Program on Your machine, and continue
to be in effect until the termination under
the following provision.
Should You breach any provision of this
Agreement, JVC may terminate this
Agreement without giving any notice to
You. In this event, JVC may claim
against You for any damages caused by
Your breach. Should this Agreement be
terminated, You must immediately
destroy the Program stored in Your
machine (including the erasing from any
memory in Your PC), and no longer own
such Program.
(1) No modification, change, addition,
deletion or other alternation of or to
this Agreement will be valid unless
reduced to writing and signed by an
authorized representative of JVC.
(2) If any part of this Agreement is held
invalid by or in conflict with any law
having jurisdiction over this
Agreement, the remaining provisions
will remain in full force and effect.
(3) This Agreement shall be governed by
and interpreted under the laws of
Japan. The Tokyo District Court has
jurisdiction over all disputes which
may arise with respect to the
execution, interpretation and
performance of this Agreement.
7 EXPORT CONTROL
You agree that You will not ship, transfer
or export the Program or underlying
information and technology to any
countries to which Japan and other
relevant countries have initiated an
embargo on such goods.
8 U.S. GOVERNMENT USER
If You are an agency of the United
States of America (the “Government”),
You acknowledge JVC’s representation
that the Program is a “Commercial Item”
as defined in Federal Acquisition
Regulation (FAR) part 2.101 (g)
consisting unpublished “Commercial
Computer Software” as those items are
used at FAR part 12.212 and is only
licensed to You with the same use rights
JVC grants all commercial end users
pursuant to the terms of this Agreement.
Victor Company of Japan, Limited
NOTE:
If You acquired the Program in Germany,
the provisions of Sections 4 (Limited
Warranty) and 5 (Limited Liability) provided
above will be replaced with those of the
German version of this Agreement.
—4—
CAUTION:
● Operate this equipment according to
the operating procedures described in
this manual.
● Use only the provided CD-ROM. Never
use any other CD-ROM to run this
software.
● Do not attempt to modify this software.
● Changes or modifications not approved
by JVC could void user’s authority to
operate the equipment.
How to handle a CD-ROM
Notice for Users
Use of this software is authorized according
to the terms of the software license.
When contacting the nearest JVC office or
agency in your country about this software
(refer to the JVC Worldwide Service
Network at http://www.jvc-victor.co.jp/
english/worldmap/index-e.html), please fill
out the following and have the appropriate
information ready.
Product Name
● Take care not to soil or scratch the
mirror surface (opposite to the printed
surface). Do not write anything or put a
sticker on either the front or back
surface. If the CD-ROM gets dirty,
gently wipe it with a soft cloth outward
from the center hole.
● Do not use conventional disc cleaners
or cleaning spray.
● Do not bend the CD-ROM or touch its
mirror surface.
● Do not store your CD-ROM in a dusty,
hot or humid environment. Keep it away
from direct sunlight.
You can find the latest information (in
English) on the provided software
program at our world wide web server at
http://www.jvc-victor.co.jp/english/
index-e.html
Model
Problem
Error Message
Manufacturer
Model
PC
□ Desktop
□ Laptop
CPU
OS
Memory
MB
Available Hard
Disk Space
MB
Please note that it may take some time to
respond to your questions, depending on
their subject matter.
JVC cannot answer questions regarding
basic operation of your PC, or questions
regarding specifications or performance
of the OS, other applications or drivers.
—5—
System Requirements
䡲 Windows®
The following requirements must be
satisfied to connect a camcorder to a PC
and to use Digital Photo Navigator.
OS: Windows® Millennium Edition (Me)
(pre-installed), Windows® 2000 Professional
(2000) (pre-installed), Windows® XP Home
Edition (XP) (pre-installed), or
Windows® XP Professional (XP) (preinstalled)
CPU: Intel® MMXTM Pentium®, at least
200 MHz
RAM: At least 64 MB
Free hard disk space: At least 10 MB for
installation, at least 500 MB recommended
Connector: USB connector
Display: Must be capable of displaying
800 x 600 dots with 16-bit color
Miscellaneous: Internet Explorer 5.5 or
later
Corporation in the United States and/or
other countries.
● Macintosh is a registered trademark of
Apple Computer, Inc.
● Other product and company names
included in this instruction manual are
trademarks and/or registered trademarks
of their respective holders.
䡲 Macintosh
The following requirements must be
satisfied to connect a camcorder to a PC.
Hardware: iMac, iBook, Power Mac G4 or
G5, PowerBook G3 or G4, eMac, Mac Mini
equipped with a USB connector
OS: Mac OS X (10.1.5, 10.2.1 to 10.2.8,
10.3.1 to 10.3.9, 10.4.2, 10.4.3)
RAM: At least 128 MB
● The system requirements information
above is not a guarantee that the
provided software will work on all
personal computers meeting those
requirements.
● If your PC does not meet the system
requirements above, you can use the
optional USB reader/writer CU-VUSD70,
the PC card adapter CU-VPSD60 or the
floppy disk adapter CU-VFSD50 to load
the files in the memory card to the hard
disk on your PC.
(Refer to “JVC Accessories” on our world
web site at: http://www.jvc-victor.co.jp/
english/accessory/)
● Windows® are either registered
trademarks or trademarks of Microsoft
—6—
Software Installation
(Windows®)
Follow the procedure described below to
install the software. Quit any other software
you are using. (Check that there are no
other application icons on the status bar.)
Digital Photo Navigator 1.5
This application is used to organize still
images and convert them into a variety of
formats.
Click [Next].
[Setup Status] screen appears. Wait
for a moment until the installation is
finished.
1 Load the provided CD-ROM into
the PC.
2 Follow the on screen
instructions to complete the
installation.
Following steps are the example of
Digital Photo Navigator on
Windows® Me.
[License Agreement] screen appears.
When the installation is finished,
[Digital Photo Navigator Setup] screen
appears and asks you if you want to
create the icon on the desktop.
Click [Yes].
Then, [Choose Destination Location]
screen appears.
If you need it, click [Yes]. If not, click
[No].
NOTE:
If you perform installation of a software that
is already installed, uninstallation will start.
In this case, perform the installation again
after uninstallation is finished.
Click [Next].
Then, [Select Program Folder] screen
appears.
—7—
Connecting (Windows®)
Connecting the USB cable
Connect the USB cable to copy still image files in a memory card to the PC.
PC
To USB connector
To USB connector
Camcorder
USB cable
1 To assure safety, make sure all
2
units are turned off before
making any connections.
Use the USB cable to connect
the camcorder to the PC.
NOTES:
● It is recommended to use the AC
Adapter as the power supply instead
of the battery pack.
● When the USB cable is connected,
turning on or off the camcorder or
switching the VIDEO/MEMORY (DSC)
mode on the camcorder causes
malfunctions of the PC.
● If you connect the camcorder to the PC
through a USB hub, compatibility issues
between the hub and the PC may result in
instability in the operation of the PC. If this
happens, connect the camcorder directly
to the PC, not through the hub.
● Do not use an extension USB cable.
—8—
Viewing the Contents of a
Memory Card (Windows®)
1 Make sure that there is a
memory card in the camcorder.
2 Double-click the [Removable Disk]
icon.
2 Set the camcorder’s VIDEO/
3
MEMORY Switch to “MEMORY”.
Set the camcorder’s Power
Switch to “PLAY” while
pressing down the Lock Button
located on the switch.
6 The folders in the memory card
appear.
The camcorder turns on.
4 Connect the camcorder to the
PC with a USB cable. (墌 pg. 8)
On the camcorder’s LCD monitor
[USB] appears.
5 When using Windows® XP:
The [Removable
Disk] window
appears on the
PC’s screen
after a moment.
Select [Open
folders to view
files using
Windows
Explorer] and
click [OK].
NOTE:
If the [Removable Disk] window does
not appear, confirm the connection
(墌 pg. 8) or perform the steps 1 and
2 in the right.
When using Windows® Me/2000:
1 Double-click the [My Computer] icon
on the desktop. The [Removable
Disk] icon which represents the
memory card in the camcorder
appears in the [My Computer]
window.
Still images
DPOF setting data
Different file types are stored in
different folders.
[DCIM]: Contains folders with still
images (extension “.jpg”)
[MISC]: Contains folders with DPOF
setting data
NOTES:
● Saving the wrong kinds of files in a
memory card or deleting files or folders
from a memory card can cause problems
with the operation of the camcorder.
When it is necessary to delete a file from
a memory card, delete it through the
camcorder.
● Never disconnect the USB cable while
“
” is displayed on the
camcorder’s LCD monitor.
● If you are using a brand new memory
card, you need to initialize the memory
card with the camcorder first. You may not
be able to copy files from the memory
card to the PC without doing so.
● The file extension may not appear
depending on the [FOLDER] option
setting of Windows®.
—9—
NOTE:
Never disconnect the USB cable while
“
” is displayed on the camcorder’s
LCD monitor.
Copying Files to the PC
(Windows®)
Still image files that are stored in a memory
card can be copied to the PC and played
back on the PC.
Playing Back Files on the PC
(Windows®)
1 Perform the procedure in
“Viewing the Contents of a
Memory Card (Windows®)”
(墌 pg. 9).
Use an application that can handle the
JPEG file format. To view a still image,
double-click the still image file (extension
“.jpg”).
The folders in the memory card
appear.
2 Create a new folder, enter the
folder name, and then doubleclick it.
● For example, create a new folder in
the [My Pictures] folder.
3 Select the folder to be copied,
and then drag and drop that
folder in the destination folder.
● To copy still images: Copy the folder
within the [DCIM] folder.
“
” appears on the LCD
monitor of the camcorder, and the
folder is copied from the memory card
to the PC.
— 10 —
● Windows® Me
Disconnecting the USB cable
(Windows®)
Before loading or unloading memory cards
or turning off the PC, first disconnect the
USB cable and turn off the camcorder.
1 Confirm that “
” is not
currently displayed on the LCD
monitor of the camcorder.
● If “
” is currently displayed,
wait until it disappears before
proceeding.
2 Doubleclick the
[Safely
Remove Hardware] or [Unplug
or Eject Hardware] icon in the
status bar.
The [Stop a Hardware device] dialog
box appears.
4 Click [OK].
Windows® 2000/Me: If a message
indicating that the device can be safely
removed appears, click [OK] and then
click [Close].
● Windows® 2000/XP
The [Safely Remove Hardware] or
[Unplug or Eject Hardware] dialog box
appears.
Windows® XP: If not, wait a while then
go to step 5.
3 Select [USB Mass Storage
Device] or [USB Disk], and then
click [Stop].
● Windows® 2000/XP
● Windows® Me
*The model name depends on the
connected camcorder.
5 Disconnect the USB cable.
6 Set the camcorder’s Power
Switch to “OFF”.
The camcorder turns off.
— 11 —
Connections (Macintosh)
Connect the USB cable to copy still image files in a memory card to the PC.
PC
To USB
connector
Camcorder
To USB
connector
USB cable
1 To assure safety, make sure all
2
units are turned off before
making any connections.
Use the USB cable to connect
the camcorder to the PC.
NOTES:
● It is recommended to use the AC
Adapter as the power supply instead
of the battery pack.
● When the USB cable is connected,
turning on or off the camcorder or
switching the VIDEO/MEMORY (DSC)
mode on the camcorder causes
malfunctions of the PC.
● If you connect the camcorder to the PC
through a USB hub, compatibility issues
between the hub and the PC may result in
instability in the operation of the PC. If this
happens, connect the camcorder directly
to the PC, not through the hub.
● Do not use an extension USB cable.
— 12 —
Viewing the Contents of a
Memory Card (Macintosh)
1 Make sure that there is a
memory card in the camcorder.
2 Set the camcorder’s VIDEO/
MEMORY Switch to “MEMORY”.
3 Set the camcorder’s Power
4
Switch to “PLAY” while
pressing down the Lock Button
located on the switch.
Connect the camcorder to the
PC with a USB cable. (墌 pg. 12)
NOTES:
● Saving the wrong kinds of files in a
memory card or deleting files or folders
from a memory card can cause problems
with the operation of the camcorder.
When it is necessary to delete a file from
a memory card, delete it through the
camcorder.
● Never disconnect the USB cable while
“
” is displayed on the
camcorder’s LCD monitor.
● If you are using a brand new memory
card, you need to initialize the memory
card with the camcorder first. You may not
be able to copy files from the memory
card to the PC without doing so.
On the camcorder’s LCD monitor
[USB] appears. The memory card icon
appears on the desktop.
● Depending on the type of OS used,
iPhoto starts if the memory card
contains a DCIM folder.
5 Double-click the memory card
icon on the desktop.
The folders in the memory card
appear.
Still images
DPOF Setting data
Different file types are stored in
different folders.
[DCIM]: Contains folders with still
images (extension “.jpg”)
[MISC]: Contains folders with DPOF
setting data
— 13 —
Copying Files to the PC
(Macintosh)
Playing Back Files on the PC
(Macintosh)
Still image files that are stored in a memory
card can be copied to the PC and played
back on the PC.
1 Double-click the
memory card icon on
the desktop.
Use an application that can handle the
JPEG file format. To view a still image,
either double-click the still image file
(extension “.jpg”), or drag and drop the file
on the application icon.
The folders in the memory
card appear.
2 Create a new folder, enter the
3
folder name, and then doubleclick it.
Select the folder to be copied,
and then drag and drop that
folder in the destination folder.
● To copy still images: Copy the folder
within the [DCIM] folder.
NOTE:
Never disconnect the USB cable while
“
” is displayed on the camcorder’s
LCD monitor.
— 14 —
Disconnecting the USB cable
(Macintosh)
Before loading or unloading memory cards
or turning off the PC, first disconnect the
USB cable and turn off the camcorder.
1 Drop the memory card
User’s Guide/Help/Readme
(Windows®)
This manual only refers to software
installation and PC connection. For more
details of each software, refer to its user’s
guide/help/Readme.
䡲 Digital Photo Navigator
icon on the desktop
into the [Trash] icon.
● If the confirmation
message appears, click
[OK].
2 Confirm that
“
” is not
currently displayed on
the LCD monitor of the
camcorder.
● If “
” is currently displayed,
wait until it disappears before
proceeding.
● The instruction manual is included on the
CD-ROM in PDF format. Right-click the
CD-ROM icon in [My Computer], then
click [Open]. Double-click the [Docs]
folder. Open the “Start.pdf” file and click
the button of the desired language. Note
that Adobe® Acrobat® ReaderTM or
Adobe® Reader® must be installed to read
PDF files.
● Adobe® Reader® can be loaded from
Adobe’s web site: http://
www.adobe.com/
3 Disconnect the USB cable.
4 Set the camcorder’s Power
Switch to “OFF”.
The camcorder turns off.
— 15 —
EN
SOFTWARE INSTALLATION
AND USB CONNECTION
GUIDE
© 2005 Victor Company of Japan, Limited
M6D1
Printed in Malaysia
1205ASR-PR-VM
CASTELLANO/ESPAÑOL
GUÍA DE INSTALACIÓN DE
SOFTWARE Y CONEXIÓN USB
LYT1520-001A
SP
Contenido
CONVENIO DE LICENCIA DEL SOFTWARE
DE JVC..................................................... 3
Aviso a los usuarios...................................... 5
Requisitos del sistema.................................. 6
Instalación del software (Windows®)............. 7
Conexiones (Windows®) ............................... 8
Visualización de los contenidos de una tarjeta
de memoria (Windows®) .......................... 9
Para copiar archivos al PC (Windows®)....... 10
Para reproducir archivos en el PC
(Windows®) ............................................. 10
Desconexión del cable USB (Windows®)..... 11
Conexiones (Macintosh) .............................. 12
Visualización de los contenidos de una tarjeta
de memoria (Macintosh).......................... 13
Para copiar archivos al PC (Macintosh)....... 14
Para reproducir archivos en el PC (Macintosh)
................................................................. 14
Desconexión del cable USB (Macintosh) .... 15
Guía del usuario/Ayuda en línea/Léame
(Windows®) .............................................. 15
3 LIMITACIONES AL USO DEL
CONVENIO DE LICENCIA DEL
SOFTWARE DE JVC
PROGRAMA
IMPORTANTE
A NUESTROS CLIENTES: LE
ROGAMOS SE ASEGURE DE LEER
ESTE TEXTO CUIDADOSAMENTE
ANTES DE INSTALAR O DE USAR EL
PROGRAMA DE SOFTWARE
DENOMINADO “DIGITAL PHOTO
NAVIGATOR” (“Programa”) EN SU PC.
El derecho a utilizar el Programa le es
otorgado a Usted por Victor Company of
Japan, Limited (“JVC”) a condición de que
Usted acepte los siguientes términos.
En caso de que no acepte los términos del
presente documento, Usted no está
autorizado a instalar o utilizar el Programa.
NO OBSTANTE, LA INSTALACIÓN O EL
USO DEL PROGRAMA IMPLICA QUE
USTED ACEPTA ESTOS TÉRMINOS Y
CONDICIONES.
(1) Está prohibido someter el Programa a
ingeniería inversa, descompilarlo,
desensamblarlo, revisarlo o
modificarlo, salvo en la medida en que
tal limitación esté prohibida
expresamente por la legislación
aplicable.
(2) Está prohibido copiar o utilizar el
Programa, entero o en parte, de
manera distinta a la estipulada
específicamente en este Acuerdo.
(3) Usted no tiene el derecho de otorgar
una licencia para usar el Programa, y
no puede distribuir, alquilar, arrendar,
o transferir el Programa a terceros ni
dejarles usar el Programa de ninguna
otra manera.
4 GARANTIA LIMITADA
1 COPYRIGHT; PROPIEDAD
Usted reconoce que todos los copyrights
y demás derechos de propiedad
intelectual asociados al Programa
pertenecen a JVC y al proveedor, y
permanecen conferidos a JVC y dicho
proveedor. El Programa está protegido
por la ley de copyright de Japón y de otros
países, así como por Convenciones
relacionadas.
2 CONCESION DE LICENCIA
(1) En conformidad con las condiciones
de este Acuerdo, JVC le otorga a usted
el derecho no exclusivo a utilizar el
programa. Usted puede instalar y usar
el Programa en un disco duro (HDD) o
en otros dispositivos de
almacenamiento incorporados a su
PC.
(2) Usted puede realizar una (1) copia
del Programa exclusivamente como
copia de seguridad o para fines de
archivo.
—3—
JVC garantiza que el soporte en el que se
suministra el Programa está exento de
defectos materiales y de fabricación
durante un período de treinta (30) días a
partir de la fecha de adquisición por su
parte de cualquiera de los productos
asociados al Programa. La única
responsabilidad de JVC y el recurso
exclusivo de que Usted dispone en
relación con el Programa será la
sustitución de los soportes defectuosos
mencionados. SALVO POR LAS
GARANTÍAS EXPRESAS INDICADAS
EN ESTE ACUERDO Y EN LA MEDIDA
EN QUE ESTÉ PERMITIDO POR LA
LEGISLACIÓN APLICABLE, JVC Y SUS
PROVEEDORES AUTORIZADOS
RENUNCIAN A TODAS LAS DEMÁS
GARANTÍAS, YA SEAN TÁCITAS O
EXPRESAS, INCLUIDAS A TÍTULO
ENUNCIATIVO PERO NO LIMITATIVO
LAS GARANTÍAS TÁCITAS DE
COMERCIABILIDAD E IDONEIDAD
PARA UN FIN DETERMINADO EN
RELACIÓN CON EL PROGRAMA Y LOS
MATERIALES IMPRESOS QUE LO
ACOMPAÑAN. EN CASO DE QUE
SURJA CUALQUIER PROBLEMA
RELACIONADO CON EL PROGRAMA O
CAUSADO POR EL MISMO, USTED
DEBERÁ SOLUCIONARLO POR SUS
PROPIOS MEDIOS Y CORRER CON
LOS GASTOS INCURRIDOS.
SIGUE EN PÁGINA SIGUIENTE
5 RESPONSABILIDAD LIMITADA
8 USUARIO DEL GOBIERNO DE
EN LA MEDIDA EN QUE ESTÉ
PERMITIDO POR LA LEGISLACIÓN
APLICABLE, EN NINGÚN CASO SERÁN
RESPONSABLES JVC Y SUS
PROVEEDORES AUTORIZADOS POR
DAÑOS INDIRECTOS, ESPECIALES,
FORTUITOS O CONSECUENTES DE
NINGÚN TIPO,
INDEPENDIENTEMENTE DE SU
FORMA, YA SEA BAJO CONTRATO,
ACTO DELICTIVO, O RELACIONADA
CON EL USO O LA IMPOSIBILIDAD DE
UTILIZAR EL PROGRAMA, AUNQUE SE
HAYA NOTIFICADO A JVC LA
POSIBILIDAD DE QUE PUEDAN
PRODUCIRSE TALES DAÑOS. USTED
EXONERARÁ A JVC DE TODA
RESPONSABILIDAD QUE PUDIERA
DERIVARSE DE CUALQUIER PÉRDIDA,
RESPONSABILIDAD O COSTE
RELACIONADOS CON CUALQUIER
RECLAMACIÓN DE TERCEROS
RESPECTO AL USO DEL PROGRAMA.
6 RESCISIÓN
Este Acuerdo entrará en vigor en la fecha
que Usted instale y utilice el Programa en
su equipo, y seguirá en vigor hasta su
rescisión con arreglo a la siguiente
disposición.
En caso de que Usted infringiera
cualquiera de las disposiciones de este
Acuerdo, JVC puede rescindir dicho
Acuerdo sin necesidad de notificárselo a
Usted. En dicho caso, JVC puede
denunciarle por los daños causados por
su infracción. En caso de que este
Acuerdo sea rescindido, Usted debe
destruir de inmediato el Programa
guardado en su equipo (incluyendo su
eliminación de cualquier tipo de memoria
de su PC), y no poseer más dicho
Programa.
7 CONTROL DE EXPORTACIÓN
Usted acuerda no enviar, transferir, o
exportar el Programa o la información y
tecnología asociados al mismo a ninguno
de los países sometidos a embargo con
relación a tales productos por parte de
Japón y de otros países relevantes.
EEUU
Si Usted es una agencia de los Estados
Unidos de América (el “Gobierno”), Usted
acepta la categorización que JVC hace
del programa como un “Artículo
comercial”, según éste aparece definido
en la Federal Acquisition Regulation
(FAR, Normativa de Adquisición Federal),
parte 2.101 (g), que trata del “Software
informático comercial” inédito, según
tales artículos se utilizan en la FAR, parte
12.212, y sólo se le concede a Usted la
licencia del Programa con los mismos
derechos que JVC otorga a todos los
usuarios comerciales finales en
conformidad con los términos de este
Acuerdo.
9 GENERAL
(1) Ningún cambio, modificación, adición,
eliminación, o cualquier otra
alteración de este Acuerdo tendrá
validez a no ser que se efectúe por
escrito y se firme por un representante
autorizado de JVC.
(2) Si cualquier parte de este Acuerdo
quedara invalidada o entrara en
conflicto con cualquier ley que
reglamente este Acuerdo, las
disposiciones restantes
permanecerán en pleno vigor.
(3) Este Acuerdo se regirá y será
interpretado en conformidad con la
legislación de Japón. El Tribunal del
Distrito de Tokio tendrá jurisdicción
sobre todas las disputas que pudieran
surgir con respecto a la ejecución,
interpretación y ejercicio de este
Acuerdo.
Victor Company of Japan, Limited
NOTA:
Si Usted ha adquirido el Programa en
Alemania, las disposiciones de las
secciones 4 (Garantía limitada) y 5
(Responsabilidad limitada) establecidas
arriba serán sustituidas por las secciones
correspondientes que aparecen en la
versión alemana de este Acuerdo.
—4—
PRECAUCIÓN:
● Opere este equipo de acuerdo con los
procedimientos operativos descritos en
este manual.
● Emplee el CD-ROM suministrado
exclusivamente. Nunca emplee ningún
otro CD-ROM para ejecutar este
software.
● No intente modificar este software.
● Cambios o modificaciones no
autorizados por JVC podrían anular la
autorización otorgada al usuario para
operar el equipo.
Aviso a los usuarios
El uso de este software está autorizado de
acuerdo a los términos de la licencia del
software.
Antes de contactar con la oficina o agencia
de JVC más cercana en su país en relación
con este software (consulte la red de
servicio internacional de JVC en http://
www.jvc-victor.co.jp/english/worldmap/
index-e.html), le rogamos que rellene el
siguiente formulario para tener a mano la
información apropiada.
Manipulación del CD-ROM
Nombre del producto
● Tome precauciones para no ensuciar o
arañar la superficie reflejante (opuesta
a la superficie impresa). No escriba
nada ni coloque rótulos en ninguna de
las caras del disco. Si el CD-ROM se
ensucia, límpielo suavemente con un
paño suave desde el centro hacia la
periferia.
● No emplee limpiadores para discos
convencionales ni pulverizadores de
limpieza.
● No doble el CD-ROM ni toque la
superficie reflejante.
● No almacene su CD-ROM en un lugar
polvoriento, caliente o húmedo.
Manténgalo lejos de la luz solar directa.
Modelo
Usted puede encontrar la información
más reciente (en inglés) acerca del
programa de software suministrado en
nuestro servidor de Internet http://
www.jvc-victor.co.jp/english/index-e.html
Problema
Mensaje de error
Fabricante
Modelo
PC
□ Ordenador
de sobremesa
□ Portátil
CPU
Sistema
operativo
Memoria
MB
Espacio
disponible en el
disco duro
MB
Note que puede tomar cierto tiempo
responder a sus preguntas dependiendo
del tema.
JVC no puede responder preguntas en
relación a la operación básica de su PC
o preguntas en relación a las
especificaciones o prestaciones del SO,
otras aplicaciones o softwares básicos.
—5—
● Macintosh es una marca registrada de
Apple Computer, Inc.
● Otros nombres de productos y de
compañías incluidos en este manual de
instrucción son marcas y/o marcas
registradas de sus respectivos
propietarios.
Requisitos del sistema
䡲 Windows®
Para conectar una cámara de vídeo a un
PC y usar Digital Photo Navigator, deben
cumplirse los siguientes requisitos.
SO: Windows® Millennium Edition (Me)
(pre-instalado), Windows® 2000
Professional (2000) (pre-instalado),
Windows® XP Home Edition (XP) (preinstalado), o Windows® XP Professional
(XP) (pre-instalado)
CPU: Intel® MMXTM Pentium®, mínimo
200 MHz
RAM: Mínimo 64 MB
Espacio libre en el disco duro: Mínimo
10 MB para instalación, mínimo 500 MB
recomendado
Conector: Conector USB
Pantalla: Debe ser capaz de mostrar
800 x 600 puntos con color de 16 bits
Otros: Internet Explorer 5.5 o superior
䡲 Macintosh
Para conectar una videocámara a un PC,
deben cumplirse los siguientes requisitos.
Equipo: iMac, iBook, Power Mac G4 o G5,
PowerBook G3 o G4, eMac, Mac Mini
equipado con un conector USB
SO: Mac OS X (10.1.5, 10.2.1 a 10.2.8,
10.3.1 a 10.3.9, 10.4.2, 10.4.3)
RAM: Mínimo 128 MB
● La información de los requisitos del
sistema arriba mencionada no es una
garantía de que el software suministrado
funcionará en todas las computadoras
personales satisfaciendo todas las
necesidades.
● Si su PC no cumple los requisitos del
sistema arriba indicados, puede utilizar el
lector/escritor USB opcional, CU-VUSD70,
el adaptador de tarjeta de PC CU-VPSD60
o el adaptador de disquete CU-VFSD50
para cargar los archivos de la tarjeta de
memoria en el disco duro de su PC.
(Consulte “JVC Accessories” (Accesorios
de JVC) en nuestro sitio web internacional:
http://www.jvc-victor.co.jp/english/
accessory/)
● Windows® son marcas comerciales
registradas o marcas comerciales de
Microsoft Corporation en los Estados
Unidos y/o en otros países.
—6—
Instalación del software
(Windows®)
Siga el procedimiento descrito a
continuación para instalar el programa de
software. Salga de cualquier otro programa
que esté utilizando. (Compruebe que no
haya ningún otro icono de aplicación en la
barra de tareas.)
Digital Photo Navigator 1.5
Haga clic en [Next].
Aparece la pantalla [Setup Status].
Espere un momento hasta que la
instalación haya finalizado.
Esta aplicación sirve para organizar
imágenes fijas y convertirlas a una variedad
de formatos.
1 Cargue en el PC el CD-ROM
suministrado.
2 Siga las instrucciones en pantalla
para llevar a cabo la instalación.
Los siguientes pasos son un
ejemplo relacionado con Digital
Photo Navigator en Windows® Me.
Aparece la pantalla [License
Agreement].
Cuando la instalación haya finalizado,
aparecerá la pantalla [Digital Photo
Navigator Setup] y le preguntará si
desea crear el icono en el escritorio.
Haga clic en [Yes].
Luego aparece la pantalla [Choose
Destination Location].
Si lo necesita, pulse [Yes]. En caso
contrario, pulse [No].
NOTA:
Si ejecuta la instalación de un programa ya
instalado, se iniciará la desinstalación. En
este caso, vuelva a realizar la instalación
de una vez finalizada la desinstalación.
Haga clic en [Next].
Luego aparece la pantalla [Select
Program Folder]
—7—
Conexiones (Windows®)
Para conectar el cable USB
Conecte el cable USB para copiar en el PC archivos de imágenes fijas en una tarjeta de
memoria.
PC
A conector USB
A conector USB
Videocámara
Cable USB
1 Para garantizar la seguridad,
2
antes de efectuar ninguna
conexión compruebe que todos
los equipos están apagados.
Utilice el cable USB para
conectar la videocámara al PC.
NOTAS:
● Se recomienda usar como fuente de
alimentación el adaptador de corriente
alterna en lugar de la batería.
● Si mientras está conectado el cable USB,
se enciende o se apaga la videocámara o
se conmuta el modo VIDEO/MEMORY
(DSC) en la videocámara, el PC puede
presentar fallos.
● Si conecta la videocámara al PC a través
de un concentrador USB, pueden surgir
problemas de compatibilidad entre el
concentrador y el PC que pueden
provocar inestabilidad en el
funcionamiento del PC. En tal caso,
conecte la videocámara directamente al
PC, no a través del concentrador.
● No utilice un cable alargador para USB.
—8—
Visualización de los
contenidos de una tarjeta de
memoria (Windows®)
1
2
3
4
Compruebe que hay una tarjeta de
memoria en la videocámara.
Ajuste el interruptor VIDEO/
MEMORY de la videocámara en
“MEMORY”.
Ajuste el interruptor de encendido
de la videocámara en “PLAY”
mientras mantiene apretado el
botón de bloqueo situado en el
interruptor.
2 Pulse dos veces en el icono [Disco
extraíble].
6
Aparecen las carpetas de la
tarjeta de memoria.
La videocámara se enciende.
Conecte la videocámara al PC con
un cable USB. (墌 p. 8)
En el monitor LCD de la videocámara
aparece [USB].
5 Cuando se utilice Windows® XP:
La ventana
[Disco extraíble]
aparece en la
pantalla del PC
al cabo de un
momento.
Seleccione
[Abrir las
carpetas con el
Explorador] y
haga clic en [Aceptar].
NOTA:
Si no aparece la ventana [Disco
extraíble], confirme la conexión
(墌 p. 8) o lleve a cabo los pasos 1 y
2 de la derecha.
Imágenes fijas
Datos de
configuración DPOF
Los tipos de archivo distintos se
almacenan en carpetas distintas.
[DCIM]: Contiene carpetas con
imágenes fijas (extensión “.jpg”)
[MISC]: Contiene carpetas con datos
de configuración DPOF
NOTAS:
● Guardar tipos erróneos de archivos en una
tarjeta de memoria o eliminar archivos o
carpetas de una tarjeta de memoria puede
causar problemas en el funcionamiento de
la videocámara. Cuando sea necesario
eliminar un archivo de una tarjeta de
memoria, elimínela a través de la
videocámara.
Cuando se utilice Windows® Me/
2000:
1 Pulse dos veces en el icono [Mi PC]
del escritorio. El icono [Disco
extraíble], que representa la tarjeta
de memoria de la videocámara,
aparece en la ventana [Mi PC].
—9—
SIGUE EN PÁGINA SIGUIENTE
● No desconecte nunca el cable USB
mientras la indicación “
” se
visualice en el monitor LCD de la
videocámara.
● Si está utilizando una tarjeta de memoria
nueva, primero debe inicializar la tarjeta
de memoria con la videocámara. Si no lo
hace, es posible que no pueda copiar
archivos desde la tarjeta de memoria al
PC.
● Es posible que, en dependencia de la
configuración de la opción [FOLDER] de
Windows®, la extensión de archivo no
aparezca.
Para copiar archivos al PC
(Windows®)
Los archivos de imágenes fijas estén
guardados en una tarjeta de memoria se
pueden copiar y reproducir en el PC.
1 Ejecute el procedimiento en
● Para copiar imágenes fijas: Copie la
carpeta dentro de la carpeta [DCIM].
La indicación “
” aparece en
el monitor LCD de la videocámara, y la
carpeta se copia de la tarjeta de
memoria al PC.
NOTA:
No desconecte nunca el cable USB
mientras la indicación “
” se
visualice en el monitor LCD de la
videocámara.
“Visualización de los contenidos
de una tarjeta de memoria
(Windows®)” (墌 p. 9)
Para reproducir archivos en
el PC (Windows®)
.
Utilice una aplicación que pueda manejar el
formato de archivo JPEG. Para ver una
imagen fija, haga doble clic sobre el archivo
de la imagen fija (extensión “.jpg”).
2
Aparecen las carpetas de la tarjeta de
memoria.
Cree una carpeta nueva,
introduzca el nombre de la
carpeta, y luego haga doble clic
sobre ella.
● Por ejemplo, cree una nueva carpeta
en la carpeta [Mi imagen].
3 Seleccione la carpeta que se va a
copiar, y a continuación arrastre
y suelte dicha carpeta en la
carpeta de destino.
— 10 —
● Windows® Me
Desconexión del cable USB
(Windows®)
Antes de cargar o descargar tarjetas de
memoria o de apagar el PC, desconecte
primero el cable USB y apague la
videocámara.
1 Compruebe que la indicación
“
” no aparece en ese
momento en el monitor LCD de la
videocámara.
● Si la indicación “
” se
visualiza en ese momento, espere
hasta que desaparezca antes de
proceder.
Aparece el cuadro de diálogo [Detener
un dispositivo de hardware].
4 Haga clic en [Aceptar].
Windows® 2000/Me: Si aparece un
mensaje indicando que el dispositivo
se puede quitar sin peligro, haga clic
en [Aceptar] y luego en [Cerrar].
● Windows® 2000/XP
2 Pulse dos
veces en
el icono
[Desconectar hardware con
seguridad] o [Desconectar o
retirar hardware] en la barra de
tareas.
Aparece el cuadro de diálogo
[Desconectar hardware con seguridad]
o [Desconectar o retirar hardware].
Windows® XP: Si no aparece, espere
un momento y luego vaya al paso 5.
● Windows® Me
3 Seleccione [USB Mass Storage
Device] o [USB Disk] y a
continuación pulse [Detener].
● Windows® 2000/XP
* El nombre del modelo depende de la
videocámara conectada.
5 Desconecte el cable USB.
6 Ajuste el interruptor de
encendido de la videocámara en
“OFF”.
La videocámara se apaga.
— 11 —
Conexiones (Macintosh)
Conecte el cable USB para copiar en el PC archivos de imágenes fijas en una tarjeta de
memoria.
PC
A conector
USB
Videocámara
A conector
USB
Cable USB
1 Para garantizar la seguridad,
2
antes de efectuar ninguna
conexión compruebe que todos
los equipos están apagados.
Utilice el cable USB para
conectar la videocámara al PC.
NOTAS:
● Se recomienda usar como fuente de
alimentación el adaptador de corriente
alterna en lugar de la batería.
● Cuando el cable USB está conectado,
encender o apagar la videocámara, o
cambiar el modo VIDEO/MEMORY
(DSC) de la videocámara, provoca fallos
de funcionamiento del PC.
● Si conecta la videocámara al PC a través
de un concentrador USB, pueden surgir
problemas de compatibilidad entre el
concentrador y el PC que pueden
provocar inestabilidad en el
funcionamiento del PC. En tal caso,
conecte la videocámara directamente al
PC, no a través del concentrador.
● No utilice un cable alargador para USB.
— 12 —
Visualización de los
contenidos de una tarjeta de
memoria (Macintosh)
1 Compruebe que hay una tarjeta
de memoria en la videocámara.
2 Ajuste el interruptor VIDEO/
3
4
MEMORY de la videocámara en
“MEMORY”.
Ajuste el interruptor de
encendido de la videocámara en
“PLAY” mientras mantiene
apretado el botón de bloqueo
situado en el interruptor.
Conecte la videocámara al PC
con un cable USB. (墌 p. 12)
NOTAS:
● Guardar tipos erróneos de archivos en
una tarjeta de memoria o eliminar
archivos o carpetas de una tarjeta de
memoria puede causar problemas en el
funcionamiento de la videocámara.
Cuando sea necesario eliminar un
archivo de una tarjeta de memoria,
elimínela a través de la videocámara.
● No desconecte nunca el cable USB
mientras la indicación “
” se
visualice en el monitor LCD de la
videocámara.
● Si está utilizando una tarjeta de memoria
nueva, primero debe inicializar la tarjeta de
memoria con la videocámara. Si no lo
hace, es posible que no pueda copiar
archivos desde la tarjeta de memoria al PC.
En el monitor LCD de la videocámara
aparece [USB]. Aparece en el
escritorio el icono de la tarjeta de
memoria.
● Dependiendo del tipo de SO, el
iPhoto comienza si la tarjeta de
memoria contiene una carpeta de
DCIM.
5 Pulse dos veces en el icono de la
tarjeta de memoria (en el
escritorio).
Aparecen las carpetas de la tarjeta de
memoria.
Imágenes fijas
Datos de
configuración DPOF
Los tipos de archivo distintos se
almacenan en carpetas distintas.
[DCIM]: Contiene carpetas con
imágenes fijas (extensión “.jpg”)
[MISC]: Contiene carpetas con datos
de configuración DPOF
— 13 —
Para copiar archivos al PC
(Macintosh)
Para reproducir archivos en
el PC (Macintosh)
Los archivos de imágenes fijas estén
guardados en una tarjeta de memoria se
pueden copiar y reproducir en el PC.
1 Pulse dos veces en el
icono de la tarjeta de
memoria (en el
escritorio).
Utilice una aplicación que pueda manejar el
formato de archivo JPEG. Para ver una
imagen fija, haga doble clic sobre el archivo
de la imagen fija (extensión “.jpg”) o arrastre y
suelte el archivo sobre el icono de la
aplicación.
Aparecen las carpetas de la tarjeta de
memoria.
2 Cree una carpeta nueva,
3
introduzca el nombre de la
carpeta, y luego haga doble clic
sobre ella.
Seleccione la carpeta que se va a
copiar, y a continuación arrastre
y suelte dicha carpeta en la
carpeta de destino.
● Para copiar imágenes fijas: Copie la
carpeta dentro de la carpeta [DCIM].
NOTA:
No desconecte nunca el cable USB
mientras la indicación “
” se
visualice en el monitor LCD de la
videocámara.
— 14 —
Guía del usuario/Ayuda en
línea/Léame (Windows®)
Desconexión del cable USB
(Macintosh)
Antes de cargar o descargar tarjetas de
memoria o de apagar el PC, desconecte
primero el cable USB y apague la
videocámara.
Este manual sólo trata sobre la instalación
del software y la conexión al PC. Para más
detalles sobre cada programa, consulte su
guía del usuario/ayuda en línea/Léame.
1 Lleve el icono de la
䡲 Digital Photo Navigator
tarjeta de memoria
(situado en el escritorio)
hasta el icono
[Papelera].
● Si aparezca el mensaje de
confirmación, pulse
[Aceptar].
2 Compruebe que la
indicación “
”
no aparece en ese
momento en el monitor LCD de la
videocámara.
● Si la indicación “
” se
visualiza en ese momento, espere
hasta que desaparezca antes de
proceder.
● El manual de instrucciones está incluido
en el CD-ROM en formato PDF. Haga clic
derecho sobre el icono del CD-ROM en
[Mi PC], y a continuación haga clic en
[Abrir]. Haga doble clic en la carpeta
[Docs]. Abra el archivo “Start.pdf” y haga
clic en el botón del idioma deseado.
Tenga en cuenta que para leer archivos
PDF tiene que tener instalado Adobe®
Acrobat® ReaderTM o Adobe® Reader®.
● Adobe® Reader® se puede cargar desde
el sitio web de Adobe: http://
www.adobe.com/
3 Desconecte el cable USB.
4 Ajuste el interruptor de
encendido de la videocámara en
“OFF”.
La videocámara se apaga.
— 15 —
SP
GUÍA DE INSTALACIÓN DE
SOFTWARE Y CONEXIÓN
USB
© 2005 Victor Company of Japan, Limited
M6D1
Impreso en Malasia
1205ASR-PR-VM