1
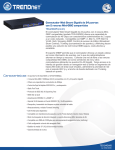
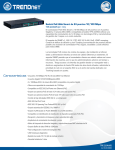
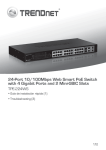
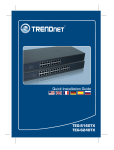
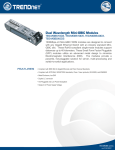
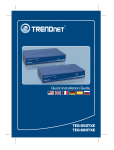
Quick Installation Guide
TEG-424WS
H/W: V1
Table ofofContents
Table
Contents
Español .....................................................................................................
1. Antes de iniciar ..................................................................................
2. Instalación del Hardware ...................................................................
3. Herramienta de gestión para conmutador Web Smart .......................
1
1
2
3
Troubleshooting ........................................................................................ 6
Version 09.03.2008
1. Antes de iniciar
Contenidos del paquete
?
TEG-424WS
?
Guía de instalación rápida
?
Herramienta y CD-ROM para la
guía del usuario
?
Cable de alimentación
?
Kit para montaje en estante
?
Protectores de goma
Requisitos del sistema
?
Navegador Web: Internet Explorer (5.0 ó superior)
?
PC con adaptador de red instalado
?
Cable de red RJ-45
Equipo Opcional
?
Rack estándar de EIA 19”
?
Módulo Mini-GBIC (Ej. TEG-MGBSX, TEG-MGBS10, TEG-MGBS40,
TEG-MGBS80, TEG-MGBS10D3_5, TEG-MGBS40D3_5) para ranuras
Mini-GBIC.
Aplicación
28-Port Gigabit Web Smart Switch
(TEG-424WS)
Servers with Copper Gigabit
PCI Adapters
(TEG-PCITXR)
Module SX multi mode GBIC
(TEG-MGBSX)
Module SX multi mode GBIC
(TEG-MGBSX)
Laptops with 10/100Mbps PC Card
(TE100-PCBUSR)
1000Mbps
24-Port Gigabit Web Smart Switch
with Mini-GBIC Slots
(TEG-240WS)
100Mbps
1
Español
2. Instalación del Hardware
Nota:
1. Tras completar la instalación del hardware, utilice la herramienta de gestión
para conmutador Web Smart para configurar el TEG-424WS. Abra su
navegador Web, después introduzca la dirección IP http://192.168.0.1 y la
contraseña por defecto “admin”. Compruebe que su PC y el TEG-424WS
están configurados en el mismo segmento de red.
2. Las ranuras Mini-GBIC están compartidas con los puertos Ethernet Gigabit
25 y 26. Cuando las ranuras Mini-GBIC se estén usando, los puertos
Ethernet Gigabit 25 y 26 estarán desactivados.
1. Conecte el Power Cord (Cable de
alimentación) en la parte trasera
del TEG-424WS y después a la
toma corriente.
2. Conecte un cable de red CAT-5e/6
RJ-45 del PC a un puerto Ethernet
disponible en el TEG-424WS.
2
Español
3. Herramienta de gestión para conmutador
Web Smart
Nota: Si desea encontrar con facilidad todos los conmutadores de gestión
Web en la red asigne una dirección IP, cambie la contraseña, actualice la
nueva versión del firmware, y después instale la herramienta de gestión Web.
Siga los siguientes pasos.
Para usuarios de Windows
1. Introduzca el Herramienta y
CD-ROM para la guía del
usuario en la unidad de CD-ROM
de su PC y luego haga clic en
Install Utility (Instalar
herramienta).
2. Siga las instrucciones del
Installation Wizard (Asistente de
instalación). Haga click OK.
3. Haga clic en Start (Inicio) >
All Programs (Todos los
programas) > TRENDnet >
Herramienta de gestión para
conmutador Web Smart y luego
en Herramienta de gestión para
conmutador Web Smart.
3
Español
4. Haga clic en Discovery
(Descubrir) y después haga doble
clic en el Switch (Enrutador) que
aparece en la “Discovery List”.
5. Haga clic en el Switch
(conmutador) que aparece en la
Monitor List y después haga clic
en Configure settings.
6. Establezca la configuración de la
IP Address (Dirección IP), Subnet
mask (Máscara de subred),
Gateway y Password
(Contraseña). Haga clic en Set
(Establecer).
7. Haga clic en OK.
4
Español
8. Haga clic en Acces Web (Web de
acceso)
9. Escriba su Password(Contraseña)
y luego haga clic en Login(Entrar)
Por defecto, la contraseña es
admin.
Nota: La contraseña por defecto
es caso sensible.
La instalación ha sido completada
Para más información sobre la configuración de la herramienta de gestión
para conmutador Web Smart y de las configuraciones avanzadas, consulte
por favor la Guía del Usuario que se incluye en el CD-ROM de la herramienta y
del controlador o en el sitio Web de TRENDnet en www.trendnet.com.
Registre su producto
Para asegurar los más altos niveles de servicio y apoyo al cliente, registre su producto
en línea en: www.TRENDnet.com/register
Gracias por elegir TRENDnet
5
Español
Troubleshooting
Q1: After connecting the TEG-424WS to a power outlet, the LEDs do not turn on.
A1: Check the connection of the power cord to the TEG-424WS and the power outlet. Also
check that the power outlet is receiving power.
Q2: After installing the Web Smart Switch Management Utility, I clicked Discovery and the
Utility is unable to discover the TEG-424WS. What should I do?
A2: First, make sure that the TEG-424WS is powered on and that all connections are secure.
Second, check that your computer's IP address is on the same network segment as the
TEG-424WS. The default IP address of the TEG-424WS is http://192.168.0.1 and the default
password is admin. Third, disable any software firewall programs such as ZoneAlarm or
Norton Internet Security. If you are using Windows XP, Server 2003 or Vista, disable the
built-in firewall.
Q3: When I access the TEG-424WS using a web browser, I get a screen that tells me “only
one user can login”. What should I do?
A3: Another computer is configuring the TEG-424WS. Please wait until the user logs off. If
the other user has already logged off and you still get the same screen, then disconnect the
power cord from the TEG-424WS, wait for 5 seconds, reconnect the power cord to the TEG424WS, allow 5 seconds for the switch to power on, and then attempt to access the web
configuration page again.
Q4: I forgot the administration password. How do I reset my TEG-424WS?
A4: Press on the reset button using a pen or paperclip for 10 seconds. The default
password is admin. Note: The default password is case sensitive.
Q5: When I connect a computer to the Switch's Gigabit Ethernet port, I am not getting
Gigabit speeds. What should I do?
A5: First, check the LEDs on the Switch. When the 1000Mbps LED is off, the computer's
connection speed is 10 or 100Mbps. Second, make sure that you have a Gigabit Ethernet
adapter installed. Third, make sure to use a Cat 5e or Cat 6 Ethernet cable. Some CAT-5
cables are not rated to run in Gigabit.
If you still encounter problems or have any questions regarding the TEG-424WS, please refer to
the User's Guide included on the Utility CD-ROM or contact Trendnet's Technical Support
Department.
6
Certifications
This equipment has been tested and found to comply with FCC and CE Rules.
Operation is subject to the following two conditions:
(1) This device may not cause harmful interference.
(2) This device must accept any interference received. Including interference that may
cause undesired operation.
Waste electrical and electronic products must not
be disposed of with household waste. Please
recycle where facilities exist. Check with you Local
Authority or Retailer for recycling advice.
NOTE: THE MANUFACTURER IS NOT RESPONSIBLE FOR ANY RADIO OR TV
INTERFERENCE CAUSED BY UNAUTHORIZED MODIFICATIONS TO THIS
EQUIPMENT. SUCH MODIFICATIONS COULD VOID THE USER’S AUTHORITY TO
OPERATE THE EQUIPMENT.
ADVERTENCIA
En todos nuestros equipos se mencionan claramente las caracteristicas del adaptador de alimentacón
necesario para su funcionamiento. El uso de un adaptador distinto al mencionado puede producir
daños fisicos y/o daños al equipo conectado. El adaptador de alimentación debe operar con voltaje y
frecuencia de la energia electrica domiciliaria existente en el pais o zona de instalación.
Product Warranty Registration
Please take a moment to register your product online.
Go to TRENDnet’s website at http://www.trendnet.com/register
20675 Manhattan Place
Torrance, CA 90501
USA
Copyright ©2008. All Rights Reserved. TRENDnet.