1
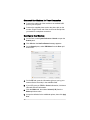
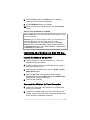
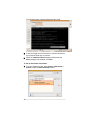
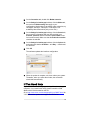
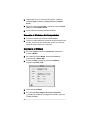
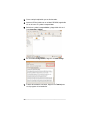
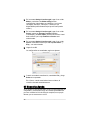
V.92 USB MODEM
Quick Start
English....................................................................... 3
Español.....................................................................20
V.92 USB MODEM
Quick Start
This Quick Start describes the V.92 USB modem
installation for Windows®, Macintosh® and Linux systems.
Before You Begin
Before you install your V.92 USB modem, make sure that you
have the following items that were supplied:
•
USB modem with built-in USB cable
•
Phone cord
•
CD
The CD contains the installation software, documentation,
and Customer Support information.
Important Safety Measures
• To reduce the risk of fire, use the supplied phone cord or an AWG 26 or
larger UL-listed or CSA-certified phone cord.
• Do not use this product near water — for example, in a wet basement or next
to a swimming pool.
• Avoid using a telephone (other than a cordless phone) during an electrical
storm.
• Do not use the telephone to report a gas leak while you are in the vicinity of
the leak.
Additional regulatory information is included in the V.92 USB Modem
User Guide, which is located on the product CD.
Getting Started
•
Windows Vista, XP, and 2000 users: Please go to Installing
the Modem on Windows Vista, XP, and 2000 on page 4.
•
Windows Me and 98SE users: Please go to Installing the
Modem on Windows Me and 98SE on page 7.
_________________________________________________________
3
•
Macintosh users: Please go to Installing the Modem on Mac
OS X 10.5 on page 9 or Installing the Modem on Mac OS X
10.0.x - 10.4.x on page 11 or Installing the Modem on Mac
OS 9.x on page 13.
•
Linux users: Please go to Installing the Modem on a Linux
PC on page 15.
Installing the Modem on Windows
Vista, XP, and 2000
Install the Software
1
Make sure that your computer is powered on. Close any
applications that are running.
2
Insert the modem's CD into your CD or DVD drive.
Windows Vista: If the AutoPlay dialog appears, click Run
Setup.exe. If the User Account Control dialog appears, select
Allow.
The CD should start automatically after a few seconds and
display an installation screen. If the CD does not start
automatically, select Computer or My Computer on your
desktop and double-click the CD (or DVD) drive icon.
3
When the introductory window opens, select your language.
4
On the Modem Installation menu, click Install Modem Drivers,
then USB Drivers.
5
The installation program begins.
Windows Vista: If a publisher verification message
appears, click Install this driver software anyway.
Windows XP: If a Windows logo test message appears,
click Continue Anyway.
Windows 2000: If a Digital Signature message appears,
you can safely ignore it and click Yes.
6
On the USB Modem Driver Installation...screen, click OK to
install the NetWaiting Modem on Hold application, which lets
you take a phone call while you are online. See page 7 for
more information.
_________________________________________________________
4
7
On the Netwaiting Setup screen, click Next and follow the
prompts.
8
On the NetWaiting Setup InstallShield... screen, leave the two
check boxes unselected and click Finish.
9
On the Modem Installation screen, click Main Menu, then Exit.
10 Remove the installation CD and shut down your computer.
Connect the Modem and Confirm the
Installation
1
Make sure that your computer is powered off.
2
Make a note of the modem's serial number, which is located
on the bottom of the modem case, just under the barcode.
3
Connect the cable end of the modem to any USB port on
your computer.
4
Turn on your computer.
5
A popup notification message states that the new hardware
installed successfully.
Windows Vista: If a Windows driver installation message
appears, select Locate and install. If the User Account Control
message appears, click Continue.
Windows XP: If the Found New Hardware... window opens,
select Install the software automatically, click Next, and follow
the prompts. If a Windows logo test failure message
_________________________________________________________
5
appears, click Continue Anyway. If the Completing the Found
New Hardware Wizard screen appears, click Finish
Windows 2000: If a Digital Signature message appears,
you can safely ignore it and click Yes.
6
Connect the supplied phone cord to the phone jack on the
modem. Plug the other end of the cord into the wall jack just
as you would for a telephone connection.
7
Windows Vista: Select Start > Control Panel > Printers and Other
Hardware > Phone and Modem Options.
Windows XP and 2000: Select Start >Settings > Control Panel >
Phone and Modem Options.
8
Enter your Location information, then click the Modems tab.
9
On the Modems page, select the installed USB modem, then
click the Properties button.
10 On the USB Modem Properties page, verify that the Maximum
Port Speed is set to 115,200, then click the Diagnostics tab.
11 On the Diagnostics page, click Query Modem. You will see a list
of AT commands and responses, indicating that your modem
is properly connected.
12 Click OK to close the Diagnostics page.
13 On the Phone and Modem Options page, click OK to exit.
Note: The DATA light on the modem indicates that the modem is ready
to communicate data.
Important! If your PC already had a modem installed, you must redirect
your application software so that it recognizes your new modem.
• America Online 9.0 users: On the AOL Sign on screen, click the
Connect Options button. On the Connect Options screen, select
Advanced Settings. On the Advanced Settings screen, click the Modems
tab, select the new USB modem from the list, and click Close to exit.
• Windows Vista users: Select Start > Control Panel > Network and Sharing
Center > Manage Network Connections >Dial-up Connection. Select the
connection and right-click on Properties. Select the new USB modem
in the Connect using... box.
• Windows XP and 2000 users: Select Start > Settings > Control Panel >
Network Connections > Dial-up Connection. Select the connection and
right-click on Properties. Select the new USB modem in the Connect
using... box.
_________________________________________________________
6
Taking a phone call while you're online
Windows Vista, XP and 2000 users: Your modem includes the
NetWaiting™ Modem-on-Hold™ program, which notifies you when
you have an incoming telephone call and lets you put your
Internet connection on hold while you take the call. Netwaiting is
installed automatically as part of your modem installation.
Note: If you want to use Modem-on-Hold, your Internet Service Provider
(ISP) must support the V.92 dial-up modem standard. Contact your ISP
if you are unsure about this support. Also, you must have Call
Waiting/Caller ID service from your telephone company to use the
modem’s Call Waiting/Caller ID feature.
If someone calls while you are online, the NetWaiting dialog
opens, offering three choices.
•
Click the green OK icon to place your Internet connection on
hold and accept the call.
•
Click the yellow Disconnect icon to disconnect from the
Internet and accept the call.
•
Click the red X icon to reject the call and remain connected
to the Internet.
For more details about NetWaiting, refer to that program's help.
Installing the Modem on Windows Me
and 98SE
Install the Software
1
Make sure that your computer is powered on. Close any
applications that are running.
2
Insert the modem's CD into your CD or DVD drive.
The CD should start automatically after a few seconds and
display an installation screen. If the CD does not start
automatically, on your desktop select My Computer and
double-click the CD (or DVD) drive icon.
3
When the introductory window opens, select your language.
4
On the Modem Installation menu, click Install Modem Drivers,
then USB Drivers.
_________________________________________________________
7
5
The installation program begins. Click Next and follow the onscreen instructions.
Windows Me: If a Digital Signature message appears,
you can safely ignore it and click Yes.
6
When the installation is complete:
a Click Finish.
b
On the Modem Installation menu, click Main Menu, then
Exit. (If the menu is minimized, click the USB modem
button on the taskbar to display the menu.)
c
Remove the installation CD and shut down your
computer.
Connect the Modem and Confirm the
Installation
1
Make sure that your computer is powered off.
2
Connect the cable end of the modem to any USB port on
your computer.
3
Power on your computer.
4
Popup notification messages tell you that Windows is
installing the USB modem hardware and associated
software on your system.
5
Connect the supplied phone cord to the phone jack on the
modem. Plug the other end of the cord into the wall jack just
as you would for a telephone connection.
6
Click Start > Settings > Control Panel > Modems.
7
When prompted, enter your Location information and click
Close.
8
On the Modems Properties page, select the new USB modem,
click Properties to verify that the Maximum Port Speed is set to
115,200, then click OK.
9
On the Modems Properties page, click the Diagnostics tab,
select the new USB modem, then click More info. You will see
a list of AT commands and responses, indicating that your
modem is properly connected.
10 Click OK, then Close to exit.
_________________________________________________________
8
Note: The DATA light on the modem indicates that the modem is ready
to communicate data.
Important! If your PC already had a modem, you must redirect the
application software so that it recognizes your new modem.
America Online 9.0 users: On the AOL Sign on screen, click the Connect
Options button. On the Connect Options screen, select Advanced Settings.
On the Advanced Settings screen, click the Modems tab, select the new
USB modem from the list, then click Close to exit.
Dial-up Networking users: From your computer’s desktop, double-click
My Computer then Dial-up Networking. Double-click the Make New Connection
icon, select the new modem from the list, and follow the prompts. You
will be entering the dial-up information that you received from your ISP.
Installing the Modem on Mac OS X
10.5
Connect the Modem to Your Computer
1
Connect the cable end of the modem to an available USB
port on your computer. Do not connect the modem to a USB
port on a keyboard.
2
Connect the supplied phone cord to the phone jack on the
modem. Plug the other end of the cord into the wall jack as
you would for a telephone connection.
Configure the Modem
1
On the Dock, select System Preferences > Network to open the
Network pane.
2
On the Network Connections Services dialog, select USB
Modem from the Interface menu, then enter a name for the
modem in the Service Name field, and click Create.
_________________________________________________________
9
If the USB Modem does not appear in the list:
a
b
c
d
Click the + button on the lower left of the Network
pane.
Select USB Modem from the Interface pull-down menu.
Enter a name in the Service Name field.
Click Create.
The newly created modem appears in the Network pane's list.
3
On the Network pane, click the Advanced button.
4
On the USB Modem pane, click the Modem tab and select the
new modem in the Vendor field and Universal (115k) in the
Model field.
5
If your ISP has given you DNS or Proxies information, open
those tabs and enter the information.
6
Click OK to return to the Network pane.
7
On the Network pane, enter the telephone number and
account information that your ISP gave you, then click Apply.
_________________________________________________________
10
8
Click Connect to open the Internet connection.
9
Click Disconnect when you finish the Internet session.
Note: The DATA light on the modem indicates that the modem is ready
to communicate data.
Installing the Modem on Mac OS X
10.0.x through X 10.4.x
Install the Modem Script File
1
Make sure that your computer is powered on. Close any
applications that are running.
2
Open the Mac's hard drive icon, then open the System >
Library > Modem Scripts folders.
3
Insert the modem's CD into the CD-ROM drive and open it
by double-clicking its icon.
4
Open the Mac folder on the modem's CD and drag the
Universal (115k) file from the Mac folder into the Modem Scripts
folder on your computer's hard drive.
5
Close all open windows.
_________________________________________________________
11
Connect the Modem to Your Computer
1
Connect the cable end of the modem to an available USB
port on your computer.
2
Connect the supplied phone cord to the phone jack on the
modem. Plug the other end of the cord into the wall jack as
you would for a telephone connection.
Configure the Modem
1
On the Dock, select System Preferences > Network to open the
Network pane.
2
Click OK when the New Port Detected message appears.
3
On the Network pane, select USB Modem from the Show: pulldown menu.
4
On the PPP tab, enter the information (given to you by your
Internet Service Provider) in the available fields.
5
If your ISP gave you TCP/IP or Proxies information, click those
tabs and enter the information.
6
Click the Modem tab, then select Universal (115k) from the
Modem pull-down menu.
7
Accept the defaults for the additional options, then click Apply
Now.
_________________________________________________________
12
8
Click the PPP tab, then click Dial Now from the dialog to
launch the Internet Connect application.
9
On the USB Modem dialog, click Connect.
10 When you finish your Internet session, click the Disconnect
button.
That's it! Your installation is complete.
Note: The DATA light on the modem indicates that the modem is ready
to communicate data.
Important! If you use America Online for OS X, you must redirect your
application software so that it recognizes your new modem.
On the AOL Welcome screen, click the Setup button. On the America
Online Setup dialog, select Add or change a modem or other connection. On
the New Modem Results dialog, select Universal (115K) as the Modem option,
and USB Modem as the Port option.
Installing the Modem on Mac OS 9.x
Install the Modem Script File
1
Make sure that your computer is powered on. Close any
applications that are running.
2
Insert the modem's CD into the CD-ROM drive and open it
by double-clicking its icon.
3
Open the Mac's hard drive, then open the System > Library >
Modem Scripts folders.
4
Open the Mac folder on the modem's CD and drag the
Universal (115k) file from the Mac folder into the Modem Scripts
folder on your computer's hard drive.
Close all open windows.
5
Connect the Modem to Your Computer
1
Connect the cable end of the modem to an available USB
port on your computer.
2
Connect the supplied phone cord to the phone jack on the
modem. Plug the other end of the cord into the wall jack just
as you would for a telephone connection.
_________________________________________________________
13
Configure the Modem
1
From the Apple menu, select Control Panels > Modem.
2
On the Modem dialog, select USB Modem from the Connect via
pull-down menu.
3
In the Setup area, select Universal (115K) from the Modem:
drop-down menu.
4
Close the Modem dialog.
5
When the Save changes to the current configuration? message
appears, click Save.
Configure TCP/IP
1
From the Apple menu, select Control Panels > TCP/IP.
2
On the TCP/IP dialog, select PPP from the Connect via pulldown menu.
3
In the Setup area, verify that Using PPP Server (the default
setting) appears in the Configure: field.
4
Close the TCP/IP dialog.
5
When the Save changes to the current configuration? message
appears, click Save.
Configure Remote Access
1
From the Apple menu select Control Panels > Remote Access.
2
On the Remote Access dialog, enter the User Name, Password
and dial-up access Number (supplied by your ISP), then click
Connect.
Note: The DATA light on the modem indicates that the modem is ready
to communicate data.
Important! If you are an America Online 5.0 user, you must redirect
your application software so that it recognizes your new modem.
On the AOL Welcome screen, click the Setup button. On the America
Online Setup dialog, select Configure a new modem. On the New Modem
Results dialog, accept Unknown - Error Correcting as the default Modem
option, and USB Modem as the Port option.
_________________________________________________________
14
Installing the Modem on a Linux PC
1
Plug the modem into any USB port on your computer.
2
Connect one end of the supplied telephone cable to the
phone jack on the modem, and the other end of the cable to
a wall telephone jack.
3
Insert the modem CD into your CD-ROM drive, double-click
the CD icon, and open the Linux folder.
You will see four folders containing Linux drivers: rpm, debian,
tar, and Distribution-specific binary packages (easiest to install).
4
Select the appropriate folder for your version of Linux, and
copy the folder to your computer.
5
From the command prompt, access the folder containing the
driver.
•
To install the driver in .rpm or .debian format:
a
Type su (for .rpm) or sudo (for debian) and press
Enter.
b
At the prompt, enter the superuser password.
c
For .rpm, enter
rpm -i dgcmodem.i386.rpm
For .debian, enter
dpkg -i dgcmodem_i386.deb
•
d
At the enter the Linux source build directory that
matches your running kernel.
e
If necessary, run dgcconfig to complete the
installation.
To install the driver in .tar format:
a
Extract the driver with
tar -xzf dgcmodem-1.01.tar.gz
b
Change to the driver directory with
cd dgcmodem-1.01
c
Enter
su make install
_________________________________________________________
15
or
sudo make install
d
At the prompt, enter your superuser password.
e
Enter
dgcconfig
f
6
At the prompt, enter the Linux source build directory
that matches your running kernel, and wait while the
driver is installed.
Configure your PPP client program to use the USB modem.
That's it! Your installation is complete.
Note: The DATA light on the modem indicates that the modem is ready
to communicate data.
Sample Installation and Configuration of
the Modem on Ubuntu Linux
This example describes modem installation and setup on Ubuntu
Linux, which uses the debian format driver.
To install the driver:
1
Plug the modem into any USB port on your computer.
2
Connect one end of the supplied telephone cable to the
phone jack on the modem, and the other end of the cable to
a wall telephone jack.
3
Stop all running programs on your computer.
4
Insert the modem CD into your CD-ROM drive, double-click
the CD icon, and open the Linux folder.
5
Select and open the debian folder, then double-click
dgcmodem_1386.deb (the package installer).
_________________________________________________________
16
6
In the Installer window, click install Package.
7
When the installation begins, click Terminal to view the
installation as it progresses.
_________________________________________________________
17
The software opens a shell and describes the install.
8
In the lower right corner of the screen, click the vertical box,
then press the Enter key to continue.
9
When the Installation finished message confirms that the
debian package was installed, click Close.
To set up the modem connection:
1
From the desktop tool bar, select System > Administration >
Network to open the Network Settings window.
_________________________________________________________
18
2
On the Connections tab, double-click Modem connection.
3
On the Settings for interface ppp0 window, click the Modem tab,
then select the Modem settings that apply to your
configuration.(/dev/modem is the default value; otherwise, try
/dev/ttyS0, /dev/ttyS1, /dev/ttyS2, or /dev/ttyS3. Port
availability determines which port you can use.)
4
On the Settings for interface ppp0 window, click the General tab,
then enter the information that your ISP provided (your
Username, password, and the Provider's Phone number to use
for Internet access). Make sure that the Enable this connection
checkbox is selected.
5
On the Settings for interface ppp0 window, click the Options tab,
and make sure that the Set modem ... and Retry ... checkboxes
are selected.
6
Click OK.
The software updates the interface configuration.
7
When the update is complete, exit, then reboot your system.
Thereafter, when you select the modem, the connection
should dial automatically.
If You Need Help
If your modem is not working, try powering off and restarting your
computer. If you need further help, please consult the USB
Modem User Guide located on the CD.
Go to http://www.zoom.com/techsupport/dial_up/3095F.shtml for
V.92 USB modem update and support file information.
_________________________________________________________
19
V.92 MÓDEM USB
Guía Rápida
Esta Guía Rápida describe la instalación del V.92 módem USB
para los sistemas Windows®, Macintosh® y Linux.
Antes de Comenzar
Antes de instalar su módem V.92, cerciórese de que usted tenga
los artículos siguientes que fueron suministrados:
•
Módem USB con cable USB incorporado
•
Cordón telefónico
•
CD
El CD contiene el software de instalación, la documentación,
y la información de soporte al cliente.
Precauciones Importantes de Seguridad
• Par reducir el riesgo de incendio, use el cordón telefónico suministrado o un
AWG 26 o uno más grande listado en UL o el cordón telefónico certificado
CSA.
• No use este producto cerca del agua — por ejemplo, en un sótáno húmedo o
cerca a una piscina o bañera.
• Evite usar un teléfono (que no sea un teléfono inalámbrico) durante una
tormenta eléctrica.
•
No usar el teléfono para informar sobre un escape de gas mientras se
encuentre cerca del escape.
La información reguladora adicional se incluye en la V.92 USB Módem
Guia del Usuario, que está situada en el CD del producto.
Para Comenzar
•
Usuarios de Windows Vista, XP, y 2000: Por favor ver Como
Instalar el Módem en Windows Vista, XP, 2000 en la página
21.
•
Usuarios de Windows Me y 98: Por favor ver Como Instalar
el Módem en Windows Me y 98SE en la página 25.
_________________________________________________________
20
•
Usuarios de Macintosh: Por favor ver Como Instalar el
Módem en un Macintosh OS X 10.5 en la página 27 o Como
Instalar el Módem en un Mac OS X 10.0.x - 10.4.x en la
página 29 o Como Instalar el Módem en un Mac OS 9.x en
la página 31.
•
Usuarios de Linux: Por favor ver Como Instalar el Módem en
un PC Linux en la página 34.
Como Instalar el Módem en Windows
Vista, XP, 2000
Instale el Software
1
Su computador debe estar encendido. Cierre cualquier
aplicación que este funcionando.
2
Inserte el CD que recibió con su módem en su unidad de CD
o DVD.
Windows Vista: Si aparece la caja de dialogo AutoPlay,
haga clic en Run Setup.exe. Si aparece la caja de dialogo
Cuenta Control Usuario, seleccione Permitir.
El CD deberá iniciarse automáticamente después de unos
pocos segundos y desplegar una pantalla de instalación. Si
el CD no se inicia automáticamente, seleccione en su
escritorio Computador o Mi Computador y haga doble clic en el
icono de su unidad de CD (o DVD).
3
Cuando aparezca la pantalla introductoria, seleccione su
idioma.
4
En el menú Módem Installation, haga clic en Instalar los Drivers
Módem y luego en Drivers USB.
5
El programa de instalación se iniciará.
Windows Vista: Si aparece un mensaje de la verificación
del editor, haga clic en De cualquier modo instale este
software.
Windows XP: Si aparece un mensaje de prueba de logo
de Windows, haga clic en Continuar de todos modos.
Windows 2000: Si aparece un mensaje de la Firma Digital,
usted puede ignorar este mensaje y hacer clic en Si.
_________________________________________________________
21
6
En la pantalla USB Modem Driver Installation, haga clic en OK
(Aceptar) para instalar el Módem NetWaiting en la Aplicación
Hold, que le permitirá tomar una llamada telefónica mientras
se encuentra en línea. Vea la página 24 para más
información.
7
En la pantalla Netwaiting Setup, haga clic en Next (Siguiente) y
siga las indicaciones.
8
En la pantalla NetWaiting Setup InstallShield..., deje sin
seleccionar las dos cajas de verificación y haga clic en Finish
9
En la pantalla Modem Installation, haga clic en Main Menu
(Menú principal), y luego en Exit (Salir).
10 Retire el CD de instalación y apague su computador.
Conecte el Módem y Confirme la
Instalación
1
Su computador deberá estar apagado.
2
Tome nota del número serial del módem que esta ubicado
en la parte inferior de la caja del módem, justo debajo del
código de barras.
3
Conecte el extremo del cable del módem a cualquier puerto
USB de su computador.
4
Encienda su computador.
_________________________________________________________
22
5
Un mensaje de notificación emergente le dirá que su nuevo
hardware ha sido instalado exitosamente.
Windows Vista: Si la caja de mensaje del Windows driver se
abre, seleccione Ubicar e instalar. Si la caja de mensaje
Control de Cuenta de Usuario, haga clic en Continuar.
Windows XP: Si la pantella Se encontró Administrador del Nuevo
Hardware se abre, seleccione Instalar automáticamente el
software, haga clic en Siguiente, y siga las indicaciones.
Puede que vea un mensaje sobre la prueba del logo de
Windows. Con toda seguridad usted puede ignorar el
mensaje y hacer clic en Continuar de todos modos. Si la caja
de dialogo Completando el Administrador del Nuevo Hardware
Encontrado se abre, haga clic en Terminar.
Windows 2000: Puede que vea una caja de dialogo
indicando que no se encontró la Firma Digital. Con toda
seguridad usted puede ignorar este mensaje y hacer clic en
Si.
6
Conecte el cordón telefónico enviado, en el enchufe
telefónico del módem. Conecte el otro extremo del cordón
en una toma de pared igual que como lo haría para un
teléfono.
7
Windows Vista: Haga clic en Inicio > Panel de Control >
Impresoras y el Otro Hardware > Opciones de Teléfono y Módem.
Windows XP y 2000: Haga clic en Inicio > Configuraciones >
Panel de Control > Opciones de Teléfono y Módem.
8
Ingrese su Información de ubicación y luego en la página
Opciones de Teléfono y Módem, haga clic en el tab Módems.
9
En la página Módems, donde vea que el módem USB esta
instalado, haga clic en el botón Propiedades.
10 En la página Propriedades del Módem USB, verifique que el
Puerto de Máxima Velocidad este fijo en 115.200 y luego haga
clic en el tab Diagnóstico.
11 En la página Diagnóstico, haga clic en Query Modem. Usted
verá una lista de comandos y respuestas AT, indicando que
su módem esta conectado adecuadamente.
12 Haga clic en OK para cerrar la página Diagnóstico.
13 En la página Opciones de Teléfono y Módem, haga clic en OK
para terminar.
_________________________________________________________
23
Eso es todo! Su instalación es completa.
Nota: La señal de DATA en el módem indica que el módem está listo
para comunicar datos.
Importante
Si su PC ya tenía un Módem debe redireccionar su software de
aplicación de manera que reconozca su nuevo módem.
• Usuarios de America Online 9.0: En la pantalla AOL Inscribase, haga
clic en el botón Conectar opciones. En la caja de dialogo Conectar
Opciones seleccione Configuraciones avanzadas. En la caja de dialogo
Configuraciones Avanzadas, haga clic en Módems tab y luego
seleccione en la lista de módems su nuevo Módem USB. Haga clic
en Cerrar para salir.
• Usuarios Windows Vista: Seleccione Inicio > Panel de Control > Red y
Centro para Compartir > Administrar Conexiones de Red > Conexión de
Marcación. Seleccione el nuevo modem y haga clic en Propiedades. En
la caja Conectar usando asegúrese de seleccionar su nuevo módem
USB.
• Usuarios Windows XP y 2000: Seleccione Inicio > Configuraciones >
Panel de Control > Conexiones de Red > Conexión de Marcación.
Seleccione el nuevo modem y haga clic en Propiedades. En la caja
Conectar usando asegúrese de seleccionar su nuevo módem USB.
Como tomar una llamada telefónica mientras
esta en-línea
Usuarios Windows Vista, XP y 2000: Su módem incluye el
programa NetWaiting™ Modem-on-Hold™, que le notifica cuando
esta entrando una llamada telefónica y le permite poner su
conexión Internet en espera mientras que usted contesta la
llamada. Netwaiting ha sido instalado automáticamente como
parte de la instalación del módem del software.
Nota: Si desea usar Modem-on-Hold (Módem-en-Espera), su
Proveedor de Servicio de Internet (ISP) debe soportar el módem
estándar de marcación V.92. Usted puede contactar su ISP si no esta
seguro sobre este soporte. También, deberá tener el servicio de
Llamada en espera/Identificador de llamadas de su compañía de teléfonos
para poder usar la función Llamada en espera/Identificador de llamadas de
su módem.
De ahora en adelante, si alguien llama mientras usted esta en
línea, aparecerá la caja NetWaiting en la pantalla de su
computador ofreciendo las tres opciones.
_________________________________________________________
24
•
Haga clic en el icono verde OK (Aceptar) para colocar su
conexión Internet en espera y aceptar la llamada.
•
Haga clic en el icono amarillo Disconnect (Desconectar) para
desconectarse del Internet y aceptar la llamada.
•
Haga clic en el icono rojo X para rechazar la llamada y
permanecer conectado al Internet.
Para más detalles sobre NetWaiting, por favor referirse a la ayuda
incorporada en el programa.
Como Instalar el Módem en
Windows Me y 98SE
Instale el Software
1
Su computador deberá estar encendido. Cierre cualquier
aplicación que este usando.
2
Inserte el CD que recibió con su módem en su unidad de
CD. El CD deberá iniciarse automáticamente después de
unos pocos segundos y desplegar una pantalla de
instalación. Si el CD no se inicia automáticamente, vaya al
escritorio y seleccione Mi Computador y haga doble clic en el
icono unidad de CD.
3
Cuando aparezca la pantalla introductoria, seleccione su
idioma.
4
En el menú Modem Instalación, haga clic en Instalar los Drivers
Módem y luego en Drivers USB.
5
Se iniciará el programa de instalación. Haga clic en Siguiente
o en Aceptar y siga las instrucciones que aparezcan en la
pantalla.
_________________________________________________________
25
6
Windows Me: Puede que vea una caja de dialogo
indicando que no se encontró la Firma Digital. Con toda
seguridad usted puede ignorar este mensaje y hacer clic
en Si.
Cuando la instalación este completa, siga estos pasos:
•
Haga clic en Terminar.
•
En el menú Modem Instalacion, haga clic en Main Menu
(Menú Principal) y luego en Exit (Salir). (Si el menú esta
minimizado, haga clic en el botón de la barra de tareas
para desplegar el menú.)
•
Retire el CD de instalación y apague su computador.
Conecte el Módem y Confirme la
Instalación
1
Su computador deberá estar apagado.
2
Conecte el extremo del cable del módem a cualquier puerto
USB de su computador.
3
Encienda el computador.
4
Windows instalará el hardware en su sistema.
Windows 98SE: Aparecerá un mensaje indicando que
Windows esta instalando el software para el módem
USB V.92.
5
Conecte el cordón telefónico suministrado, al enchufe
telefónico en el módem. Conecte el otro extremo en la toma
de pared tal como lo haría con un teléfono.
6
Haga clic en Inicio > Configuraciones > Panel de Control >
Módems.
7
Si así se lo indica, ingrese su Información de Ubicación y luego
haga clic en Close.
8
En la pagina Propiedades de los Módems, haga clic en la
entrada para su módem. Haga clic en Propiedades y verifique
que la Puerto de Máxima Velocidad esté fijo en a 115.200. Haga
clic en OK.
9
En la pagina Propiedades de los Módems, haga clic en el tab
Diagnóstico. Haga clic en la entrada para su módem y en Más
_________________________________________________________
26
Info. Verá una lista de comandos y respuestas AT indicando
que su módem esta correctamente conectado
10 Haga clic en OK, y luego en Close para salir.
Nota: La señal de DATA en el módem indica que el módem está listo
para comunicar datos.
Importante!
Si su PC ya tiene un módem, deberá redireccionar su software de
aplicación de manera que reconozca su nuevo módem.
America Online 9.0: En la pantalla Regístrese, haga clic en Opciones de
Conexión. En la ventana de dialogo Opciones de Conexión, seleccione
Configuraciones Avanzadas, haga clic en tab Módems y luego en la lista
de módems seleccione su nuevo Módem USB. Haga clic en Cerrar
para salir.
Dial-up Networking: Desde el escritorio de su computador, haga doble
clic en Mi Computador y luego en Red de Marcación. Haga doble clic en el
icono Hacer una Nueva Conexión, seleccione su nuevo módem de la lista
desplegable y siga las indicaciones.
Como Instalar el Módem en un Mac
OS X 10.5
Conecte el Módem a Su Computador
1
Conecte el extremo del cable del módem en cualquier
puerto USB de su computador.
2
Conecte el enchufe telefónico del módem en el cordón
telefónico suministrado y conecte el otro extremo del cordón
en la toma telefónica de pared.
Configure el Módem
1
En el puerto, seleccione System Preferences (Preferencias del
Sistema) > Network (Red) para desplegar la caja de dialogo
Network (Red).
2
En la caja de dialogo Network (Red), abra la lista Interface y
seleccione USB Módem, ingrese un nombre para el nuevo
módem USB en la caja Service Name, y haga clic en Create.
_________________________________________________________
27
Si el USB módem no aparece en la lista:
a
Haga clic en + en el segmento izquierdo más bajo
de la caja de dialogo Network.
b
Seleccione el USB Módem del menú pull-down
Interface.
c
Ingrese un nombre en la caja Service Name.
Haga clic en Create.
d
El nuevo módem aparece en la lista Network.
3
En la caja de dialogo Network (Red), haga clic en Advanced.
4
En la caja de dialogo USB Modem, haga clic en el tab Modem y
seleccione el nuevo modem en la caja Vendor y Universal
(115k) en la caja Model.
5
Si su Proveedor de Servicio Internet le ha dado la
información DNS o Proxies, abra esos tabs e ingrese la
información.
6
Haga clic en OK.
7
En la caja de dialogo Network (Red), ingrese el número de
teléfono y su información de cuenta y haga clic en Apply.
_________________________________________________________
28
8
Haga clic en Connect para abrir la conexión a Internet.
9
Cuando termine su sesión de Internet haga clic en Disconnect
(Desconectar).
Eso es todo! Su instalación es completa.
Nota: La señal de DATA en el módem indica que el módem está listo
para comunicar datos.
Como Instalar el Módem en un Mac
OS X 10.0.x - 10.4.x
Instale el Modem Script File
1
Su computador deberá estar encendido. Cierre cualquier
aplicación que este usando.
2
Haga doble clic en el icono de su disco duro, y abra las
carpetas Library (Biblioteca) > Modem Scripts.
3
Inserte el CD del módem en su unidad CD-ROM y ábralo
haciendo doble clic en este icono.
4
Abra la carpeta Mac y arrastre el archivo Universal (115k)
hasta la carpeta Modem Scripts en su disco duro.
5
Cierre todas las ventanas que estén abiertas.
_________________________________________________________
29
Conecte el Módem a Su Computador
1
Conecte el extremo del cable del módem en cualquier
puerto USB de su computador.
2
Conecte el enchufe telefónico del módem en el cordón
telefónico suministrado y conecte el otro extremo del cordón
en la toma telefónica de pared.
Configure el Módem
1
En el puerto, seleccione System Preferences (Preferencias del
Sistema) > Network (Red) para desplegar la caja de dialogo
Network (Red).
2
En la caja de mensaje New Port Detected (Nuevo Puerto
Detectado) haga clic en OK (Aceptar).
3
En la caja de dialogo Network (Red), abra la lista Show
(Mostrar) y seleccione USB Módem.
4
En el tab PPP, ingrese la información que su Proveedor de
Servicio Internet le ha dado.
5
Si su Proveedor le ha dado la información TCP/IP o Proxies,
abra esos tabs e ingrese la información.
_________________________________________________________
30
6
Haga clic en el tab Módem, y seleccione Universal (115k) del
menú pull-down Módem.
7
Acepte por defecto las opciones adicionales y haga clic en
Apply Now (Aplicar ahora).
8
Haga clic en el tab PPP, haga clic en Dial Now (Marque ahora)
para iniciar la aplicación Internet Connect (Conectar a
Internet).
9
En la caja de dialogo Módem USB, haga clic en Connect
(Conectar).
10 Cuando termine su sesión de Internet haga clic en el botón
Disconnect (Desconectar).
Eso es todo! Su instalación es completa.
Nota: La señal de DATA en el módem indica que el módem está listo
para comunicar datos.
Importante!
Si usa America Online para OS X, usted debe redireccionar su
aplicación de software de manera que reconozca su nuevo módem.
En la pantalla AOL Welcome (Bienvenido), haga clic en el botón Setup
(Configurar). En la caja de dialogo America Online Setup (Configuración
América En-línea), seleccione Add or change a modem or other connection
(Agregar o cambiar un módem u otra conexión). En la caja de dialogo
New Modem Results (Resultados del Nuevo Módem) en Modem Option
(Opción Módem), seleccione Universal (115K) y en la opción Port (Puerto)
seleccione Módem USB.
Como Instalar el Módem en un Mac
OS 9.x
Instale el Modem Script File
1
Su computador debe estar encendido. Cierre cualquier
aplicación que este funcionando.
2
Inserte el CD que le llego con su módem en la unidad CDROM y ábrala haciendo doble clic en su icono.
_________________________________________________________
31
3
Haga doble clic en el icono de su disco duro, y abra las
carpetas System (Sistema) > Library (Biblioteca) > Modem
Scripts.
4
En su CD, abra la carpeta Mac y arrastre el archivo Universal
(115k) a la carpeta Modem Scripts.
5
Cierre todas las ventanas que estén abiertas.
Conecte el Módem a Su Computador
1
Conecte el módem en un puerto USB disponible.
2
Conecte el cable telefónico enviado al enchufe telefónico del
módem. Conecte el otro extremo del cordón en la toma de
pared tal como lo haría con un teléfono.
Configure el Módem
1
En el menú Apple, seleccione Control Panels (Paneles de
Control) > Módem.
2
En el panel de control Módem, seleccione Connect via
(Conectar vía) > Módem USB.
3
De bajo de Setup (Configurar), abra la lista Módem y
seleccione Universal (115K).
4
Cierre el diálogo Módem.
5
En el mensaje Save changes to the current configuration?
(¿Guarda los cambios a la configuración actual?), haga clic
en Save (Guardar).
_________________________________________________________
32
Configure TCP/IP
1
En el menú Apple, seleccione Control Panels (Paneles de
Control) > TCP/IP.
2
En la caja de dialogo TCP/IP, en Connect via (Conectar vía),
seleccione PPP.
3
Debajo de Setup (Configurar), acepte Using PPP Server
(Usando el Servidor PPP) por defecto en la caja Configure.
4
Cierre el diálogo TCP/IP.
5
En la caja de consulta Save changes to current configuration?
(¿Guarda los cambios a la configuración actual?) haga clic
en Save (Guardar).
Configure el Acceso Remoto
1
En el menú Apple seleccione Control Panels (Paneles de
Control) > Acceso Remoto.
2
En la caja de dialogo Remote Access (Acceso Remoto)
ingrese su Name, Password (Nombre, Contraseña) de usuario
y marque el Number (número) de acceso y haga clic en
Connect (Conectar).
Eso es todo! Su instalación es completa.
Nota: La señal de DATA en el módem indica que el módem está listo
para comunicar datos
Importante!
Si es un usuario de America Online 5.0, usted debe redireccionar su
software de aplicación de manera que reconozca su nuevo módem.
En la pantalla AOL Welcome (Bienvenido), haga clic en el botón Setup
(Configurar). En la caja de dialogo America Online Setup (Configurar
América En-línea), seleccione Configure a new modem (Configurar un
nuevo módem). En la caja de dialogo New Modem Results (Resultados del
nuevo módem), en Modem Option (Opción Módem), acepte por omisión
(Unknown - Error Correcting) (Desconocido – Corrigiendo Error) y en la
opción Port (Puerto), seleccione USB Módem.
_________________________________________________________
33
Como Instalar el Módem en un PC
Linux
1
Conecte el módem en cualquier puerto USB de su
computador.
2
Conecte un extremo del cable telefónico recibido en el
enchufe telefónico del módem y el otro extremo del cable en
un enchufe telefónico de pared.
3
Inserte el CD del módem en su unidad CD-ROM, haga doble
clic en el icono CD y abra la carpeta Linux.
Usted verá cuatro carpetas conteniendo los drivers Linux:
rpm, debían, tar, y Distribution-specific binary packages (easiest to
install).
4
Seleccione la carpeta adecuada para su versión de Linux, y
copie la carpeta en su computador.
5
Desde el mensaje de comando, acceda a la carpeta que
contiene el driver.
•
Para instalar el driver en formato .rpm o .deb:
a
Digite su (para .rpm) o sudo (para debian) y presione
Enter (Entrar).
b
A la indicación, ingrese su súper contraseña de
usuario.
c
Luego, para .rpm, ingrese
rpm -i dgcmodem.i386.rpm
Para .deb, ingrese
dpkg -i dgcmodem_i386.deb
•
d
A la indicación, ingrese el Linux source build
directory (directorio fuente Linux) que hace pareja
con su running kernel.
e
Si es necesario, corra dgcconfig para completar la
instalación.
Para instalar el driver en formato .tar:
a
Extractar el driver con
tar -xzf dgcmodem-1.01.tar.gz
_________________________________________________________
34
b
Cambiar al directorio del driver con
cd dgcmodem-1.01
c
Ingrese
su make install
o
sudo make install
d
A la indicación, ingrese su súper contraseña de
usuario.
e
Luego, ingrese
dgcconfig
f
6
A la indicación, ingrese el Linux source build
directory (directorio de fuente Linux) que hace
pareja con su ‘running kernel’ y espere mientras se
instala el driver.
Configure su programa cliente PPP para usar con el módem
USB.
Eso es todo! Su instalación es completa.
Nota: La señal de DATA en el módem indica que el módem está listo
para comunicar datos
Un Ejemplo de la Instalación y de la
Configuración del Módem USB en Ubuntu
Linux
Este ejemplo describe cómo instalar y configurar el módem en
una computadora del Ubuntu Linux, que utiliza el driver del
debian-formato.
Para instalar el driver:
1
Conecte el módem en cualquier puerto USB de su
computador.
2
Conecte un extremo del cable telefónico recibido en el
enchufe telefónico del módem y el otro extremo del cable en
un enchufe telefónico de pared.
_________________________________________________________
35
3
Cierre cualquier aplicación que es funcionando.
4
Inserte el CD del módem en su unidad CD-ROM, haga doble
clic en el icono CD y abra la carpeta Linux.
5
Seleccione y abra la carpeta debian, y haga doble-clic en el
icono dgcmodem_1386.deb.
6
En la ventana Package Installer, haga clic en install Package.
7
Cuando la instalación comienza, haga clic en Terminal para
ver el progreso de la instalación.
_________________________________________________________
36
El software abre una ventana y describe la instalación.
8
En la esquina correcta más baja de la ventana, haga clic en
la caja vertical, y después pulse la tecla Enter para continuar.
9
Cuando el mensaje Installation finished confirma que el driver
debian fue instalado, haga clic en Close.
Para configurar la conexión del módem:
1
Seleccione System > Administration > Network para abrir la
ventana Network Settings.
2
En el tab Connections, haga doble-clic en Modem connection.
_________________________________________________________
37
3
En la ventana Settings for interface ppp0, haga clic en el tab
Modem, y seleccione los Modem settings para su
configuración.(/dev/modem es el defecto; si no, intento
/dev/ttyS0, /dev/ttyS1, /dev/ttyS2, o /dev/ttyS3. (La
disponibilidad puerto determina qué puerto usted puede
utilizar.)
4
En la ventana Settings for interface ppp0, haga clic en el tab
General. Ingrese su Username, Password (Nombre,
Contraseña) y el Phone number (número) del acceso. Usted
debe verificar que la caja Enable this connection esté
seleccionada.
5
En la ventana Settings for interface ppp0, haga clic en el tab
Options. Usted debe verificar que las cajas Set modem ... y
Retry ... son seleccionada.
6
Haga clic en OK.
La configuración es actualizada, según sus ajustes.
7
Cuando se acaba la actualización, usted debe Exit, y luego
Reboot su computador.
En el futuro, cuando usted selecciona su módem, la
conexión marcará automáticamente.
Si Necesita Ayuda
Si su módem no esta funcionando, primero pruebe apagando su
computador y reiniciándolo luego. Si necesita ayuda adicional
por favor consulte la Guía de Usuario completa, en su propio
idioma, que se encuentra en su CD.
_________________________________________________________
38
Vaya a http://www.zoom.com/techsupport/dial_up/3095F.shtml
para conseguir más información sobre las actualizaciones y los
archivos del V.92 USB módem.
Declaration of Conformity/
Declaración de Conformidad
Conformiteitsverklaring van de EU
Konformitätserklärung
Dichiarazione di conformità
Declaração de Conformidade
Konformitetsdeklaration
Cam kết về sự tuân thủ ở Châu Âu
Manufacturer/Producent/Fabrikant/Constructeur/
Hersteller/Κατασκευαστής/Fabbricante/
Fabricante/Tillverkare/Üretici/Nhà sản xuất
Brand/Varemærke/Merk/Marque/Marke/Μάρκα/
Marchio/Marka/Marca/Märke/Thương hiệu
Type/Typ/Μάρκα/Tipo/Türü/Kiểu mẫu
Déclaration de conformité
Δήλωση Συμμόρφωσης
Deklaracja zgodności
Declaración de conformidad
Uyum Beyanatı
Overensstemmelseserklæring
Zoom Technologies, Inc.
207 South Street
Boston, MA 02111 USA
617-423-1072
www.zoom.com
Zoom/Hayes V.92/V.90 USB
Modem
Series 1063, Model 3095, 0815356
Brand/Varemærke/Merk/Marque/Marke/Μάρκα/
Marchio/Marka/Marca/Märke/Thương hiệu
56K USB Modem
Type/Typ/Μάρκα/Tipo/Türü/Kiểu mẫu
Series 1068, Hayes Model
15360, 1171
Brand/Varemærke/Merk/Marque/Marke/Μάρκα/
Marchio/Marka/Marca/Märke/Thương hiệu
Conexant USB Modem
Type/Typ/Μάρκα/Tipo/Türü/Kiểu mẫu
Model RD02-D400
The manufacturer declares under sole responsibility that this equipment is compliant to
Directive 1999/5/EC via the following. This product is CE marked.
Producenten erklærer under eneansvar, at dette udstyr er i overensstemmelse med direktivet 1999/5/EC via
følgende. Dette produkt er CE-mærket.
De fabrikant verklaart geheel onder eigen verantwoordelijkheid dat deze apparatuur voldoet aan Richtlijn
1999/5/ EC op grond van het onderstaande. Dit product is voorzien van de CE-markering.
Le constructeur déclare sous son entière responsabilité que ce matériel est conforme à la Directive
1999/5/EC via les documents ci-dessous. Ce produit a reçu le marquage CE.
Hiermit erklärt Zoom die Übereinstimmung des Gerätes modem mit den grundlegenden Anforderungen und
den anderen relevanten Festlegungen der Richtlinie 1999/5/EC. Dieses Produkt ist das gekennzeichnete CE.
Ο κατασκευαστής δηλώνει με αποκλειστική του ευθύνη ότι αυτό το προϊόν συμμορφώνεται με την Οδηγία
1999/5/ΕC μέσω των παρακάτω. Αυτό το προϊόν φέρει τη Σήμανση CE.
Il fornitore dichiara sotto la sola responsabilità che questa apparecchiatura è compliant a 1999/5/EC direttivo
via quanto segue. Questo prodotto è CE contrassegnato.
Producent stwierdza ze to urzadzenie zostalo wyprodukowane zgodnie z Dyrektywa 1999/5/EC. Jest to
potwierdzone poprzez umieszczenie znaku CE na urzadzeniu.
O fabricante declara sob sua exclusiva responsabilidade que este equipamento está em conformidade com a
Directiva 1999/5/EC através do seguinte. Este produto possui Marcação CE.
El fabricante declara bajo su exclusiva responsabilidad que este equipo satisface la Directiva 1999/5/EC por
medio de lo siguiente. Este producto tiene marca CE.
Bu ürünün imalatçısı tüm sorumluluk kendisinde olmak kaydıyla bu cihazın aşağıdaki tabloda gösterilen
biçimde 1999/5/EC (R&TTE Yönetmeliği) no.lu Yönetmeliğe uygun olduğunu beyan etmektedir. Bu ürün CE
İşareti taşımaktadır.
Nhà sản xuất cam kết với trách nhiệm của mình là thiết bị này tuân theo Hướng dẫn 1999/5/EC thông qua
các mục sau. Sản phẩm này được đánh dấu là CE.
_________________________________________________________
39
I
2006/95/EC - LVD
2004/108/EC
Andy Pollock
28 October 2008
1063/TF, Boston, MA, USA
1068/TF, Boston, MA, USA
EN60950-1:2001/A11:2004
EN55022:1998/A1:2000/A2:2003
EN55024:1998/A1:200 1/A2:2003
Director, Hardware Engineering/Direktør, Hardware
Engineering/Director, Sustaining Engineering/Directeur,
ingénierie de soutien/Direktør, Sustaining Engineering/
Διευθυντής, Μηχανικής Διατήρησης/Direttore, Hardware
Engineering/Dyrektor, Inżynieria ciągła/Director,
Engenharia de Manutençã/Director, Ingeniería de
apoyo/Donanım Mühendisliği, Müdür/Giám Đốc Kỹ thuật
Phần cứng
_________________________________________________________
3128-A
27593-2
©2008